


Vue-cli Mobile学习
注:使用工具Vscode
什么是Vue-cli
vue-cli是有Vue提供的一个官方cli,专门为单页面应用快速搭建繁杂的脚手架。它是用于自动生成vue.js+webpack的项目模板,是为现代前端工作流提供了 batteries-included 的构建设置。只需要几分钟的时间就可以运行起来并带有热重载,保存时 lint 校验,以及生产环境可用的构建版本。
Vue-cli的使用
1.安装vue-cli
打开终端窗口即打开cmd,使用命令安装
npm install -g @vue.cli
2.创建项目(使用命令)
vue create my-app(my-app 自己项目名称)
项目格式化配置
1.使用插件
- 式化js代码插件:ESLint。
- 格式化html、标准css、标准js、vue文件:Vetur。
- 区分html,js,css模块不同属性使用颜色区分,方便查看插件:Beautify。
2.添加配置文件
配置文件setting.json:文件—>首选项—>设置
直接把下面的内容粘贴到setting.json文件中。
{
    "editor.fontSize": 18,
    "eslint.autoFixOnSave": true,
    "fileheader.LastModifiedBy": "xudanfeng",
    "fileheader.Author": "xudanfeng",
    "git.autofetch": true,
    "[html]": {
        "editor.defaultFormatter": "HookyQR.beautify"
    },
    "editor.detectIndentation": false,
    "editor.formatOnSave": true,
    "editor.formatOnPaste": true,
    // 添加 vue 支持
    "eslint.validate": [
        "javascript",
        "javascriptreact",
        {
            "language": "vue",
            "autoFix": true
        }
    ],
    //"prettier.eslintIntegration": true,
    //  #去掉代码结尾的分号
   // "prettier.semi": false,
    //  #使用带引号替代双引号
   // "prettier.singleQuote": true,
    //  #让函数(名)和后面的括号之间加个空格
    "javascript.format.insertSpaceBeforeFunctionParenthesis": true,
    // #这个按用户自身习惯选择
    "vetur.format.defaultFormatter.html": "js-beautify-html",
    // #让vue中的js按编辑器自带的ts格式进行格式化
    "vetur.format.defaultFormatter.js": "vscode-typescript",
    "vetur.format.defaultFormatterOptions": {
        "prettier": {
            "semi": false
        },
        "js-beautify-html": {
            "wrap_attributes": "auto"
            // #vue组件中html代码格式化样式
            // - auto: 仅在超出行长度时才对属性进行换行。
            // - force: 对除第一个属性外的其他每个属性进行换行。
            // - force-aligned: 对除第一个属性外的其他每个属性进行换行,并保持对齐。
            // - force-expand-multiline: 对每个属性进行换行。
            // - aligned-multiple: 当超出折行长度时,将属性进行垂直对齐。
        }
    },
    // 格式化stylus, 需安装Manta's Stylus Supremacy插件
    // "stylusSupremacy.insertColons": false, // 是否插入冒号
    // "stylusSupremacy.insertSemicolons": false, // 是否插入分好
    // "stylusSupremacy.insertBraces": false, // 是否插入大括号
    // "stylusSupremacy.insertNewLineAroundImports": false, // import之后是否换行
    // "stylusSupremacy.insertNewLineAroundBlocks": false,
    "typescript.format.insertSpaceAfterSemicolonInForStatements": false // 两个选择器中是否换行
}
-----------------------配置end--------------------------------
Vue使用iconFont
1.首先去iconfont挑选自己需要的加入购物车
2.点击右上角的购物车图标,选择下载代码

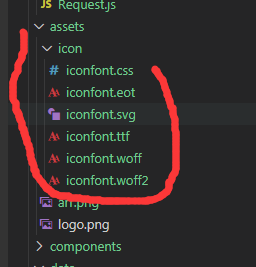
3.解压下载的压缩包把图片标记的内容拷贝到assets 文件夹下,可以在assets下新建一个icon 的文件夹,把圈住的文件拷贝进去

3.设置全局使用
在main.js全局变量中引入iconfont.css。
import "./assets/icon/iconfont.css";
注:如果在main.js引入报错,必须: npm install css-loader -s 否则报错
npm install css-loader -s
4.代码中使用
<span class="iconfont"></span>
5查看图标代码,打开下载代码中的.html 结尾的文件便可预览并查看图标所对应的代码


实践创建一个项目
- 使用命令行创建自己的项目demo
vue create demo
项目需要用到的库:
网络请求使用:Axios
路由使用的是:Vue-router
状态管理:Vuex
ui 组件库:vant
总结常见问题
一:调用系统文件选择
- 调用手机相册文件使用input
注:accept定义文件类型
<input class="select" type="file" name="photo" accept=".jpg,.png" @change="imagePath" multiple />
- 样式调成,默认样式比较丑可以隐藏掉
注:设置 display: none;
<div @click="chooseImg" class="choose">
        <img class="img" src="../assets/logo.png"></div>
      <input ref="filElem" type="file" id="photo" accept=".jpg,.png" @change="imagePath" multiple />
    </div>
.choose {
    background: #999999;
    height: 104px;
    width: 104px;
    display: table-cell;
    vertical-align: middle;
  }

  .img {
    width: 30px;
    height: 30px;
  }
  #photo {
    display: none;
  }
- 触发文件选择
 chooseImg () {
      this.$refs.filElem.dispatchEvent(new MouseEvent('click'))
    },
- 通过@change="imagePath "方法来获取文件
 imagePath (e) {
      let file = e.target.files[0]
      console.log(file)
    }
- 获取选择文件的路径并显示
<img ref="showImg" style="width:60px;height:60px" :src="path" />
在onChange回调方法中:
<input ref="filElem" type="file" id="photo" accept=".jpg,.png" @change="imagePath($event)" multiple />
 imagePath (event) {
      //var name = event.target.files[0].name;//获取上传的文件名
      var files = event.target.files;
      for (let i = 0; i < files.length; i++) {
        if (window.FileReader) {
          var file = files[i];
          var reader = new FileReader();
          var that = this;
          var url = '';
          reader.readAsDataURL(file);
          //监听文件读取结束后事件
          reader.onloadend = function (e) {
            console.log(this.result)
            url = this.result.substring(this.result.indexOf(',') + 1);
            that.path = 'data:image/png;base64,' + url;

          };
        }
      }
    },
二:div 标签下的子view居中

方式一:
 <div class="mdiv">
      <span>居中</span>
    </div>
.mdiv {
    display: table-cell;
    height: 100px;
    width: 100px;
    vertical-align: middle;
    text-align: center;
    background: chartreuse;
  }
}
方式二:
<div class="tocenter">
      <img class="img" src="../assets/logo.png"></div>
    </div>
 .tocenter {
    display: flex;
    display: -webkit-flex;
    align-items: center;
    justify-content: center;
     width: 100px;
    height: 100px;
    background: orangered;
  }
方式三:
<div class="tocenter">
      <img class="img" src="../assets/logo.png"></div>
    </div>
.tocenter {
    position: relative;
    height: 100px;
    width: 100px;
    background: crimson;
  }
  .tocenter img {
    position: absolute;
    top: 50%;
    left: 50%;
    transform: translate(-50%, -50%);
  }


 5万+
5万+


 被折叠的 条评论
为什么被折叠?
被折叠的 条评论
为什么被折叠?
 到【灌水乐园】发言


