


概述
数据库服务器:mysql
工具:IntelliJ IDEA 2021
数据库建表
CREATE SCHEMA test DEFAULT CHARACTER SET utf8 ;
CREATE TABLE django2_t1 (
id int NOT NULL AUTO_INCREMENT,
name varchar(45) DEFAULT NULL,
PRIMARY KEY (id)
) ENGINE=InnoDB AUTO_INCREMENT=3 DEFAULT CHARSET=utf8;
CREATE TABLE t1 (
id int NOT NULL AUTO_INCREMENT,
name varchar(45) DEFAULT NULL,
PRIMARY KEY (id)
) ENGINE=InnoDB AUTO_INCREMENT=3 DEFAULT CHARSET=utf8;
创建项目
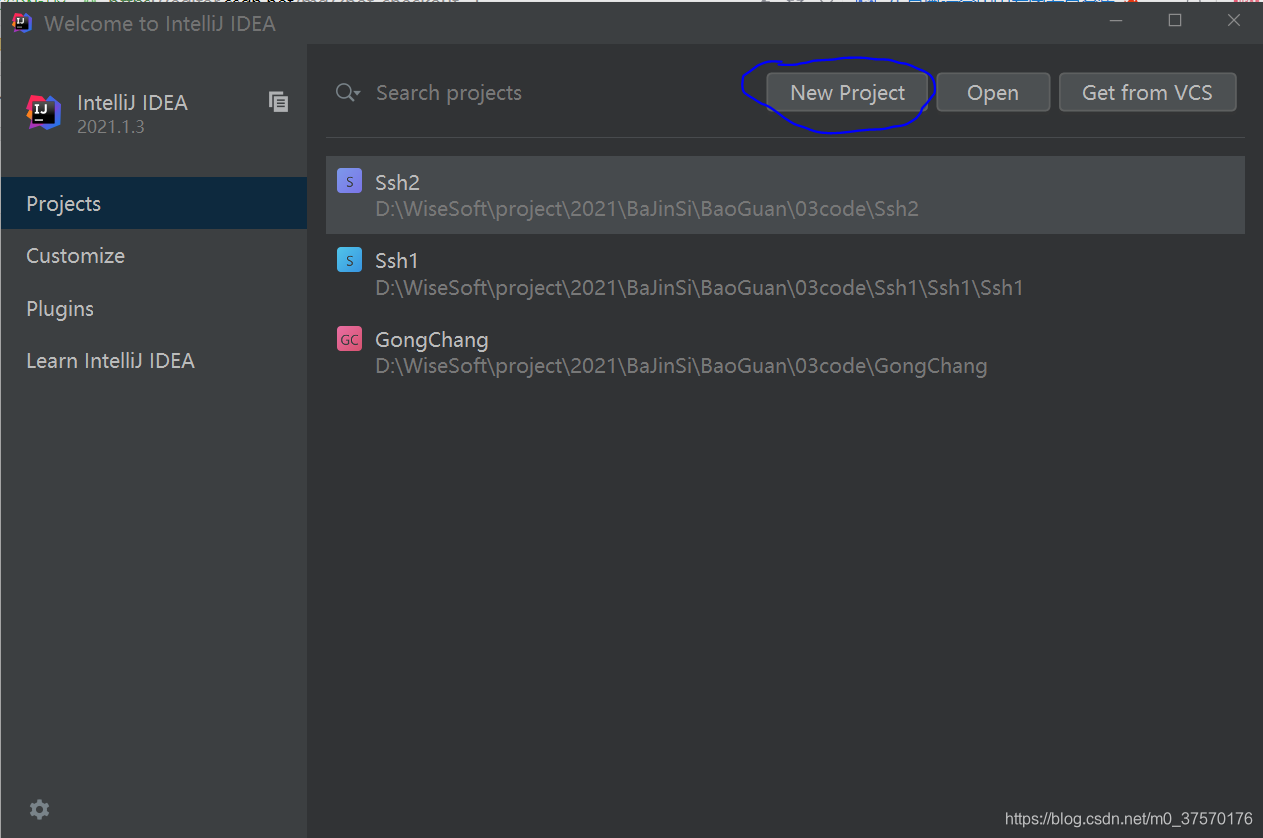
打开idea2021,点击“New Project”

按“Next”
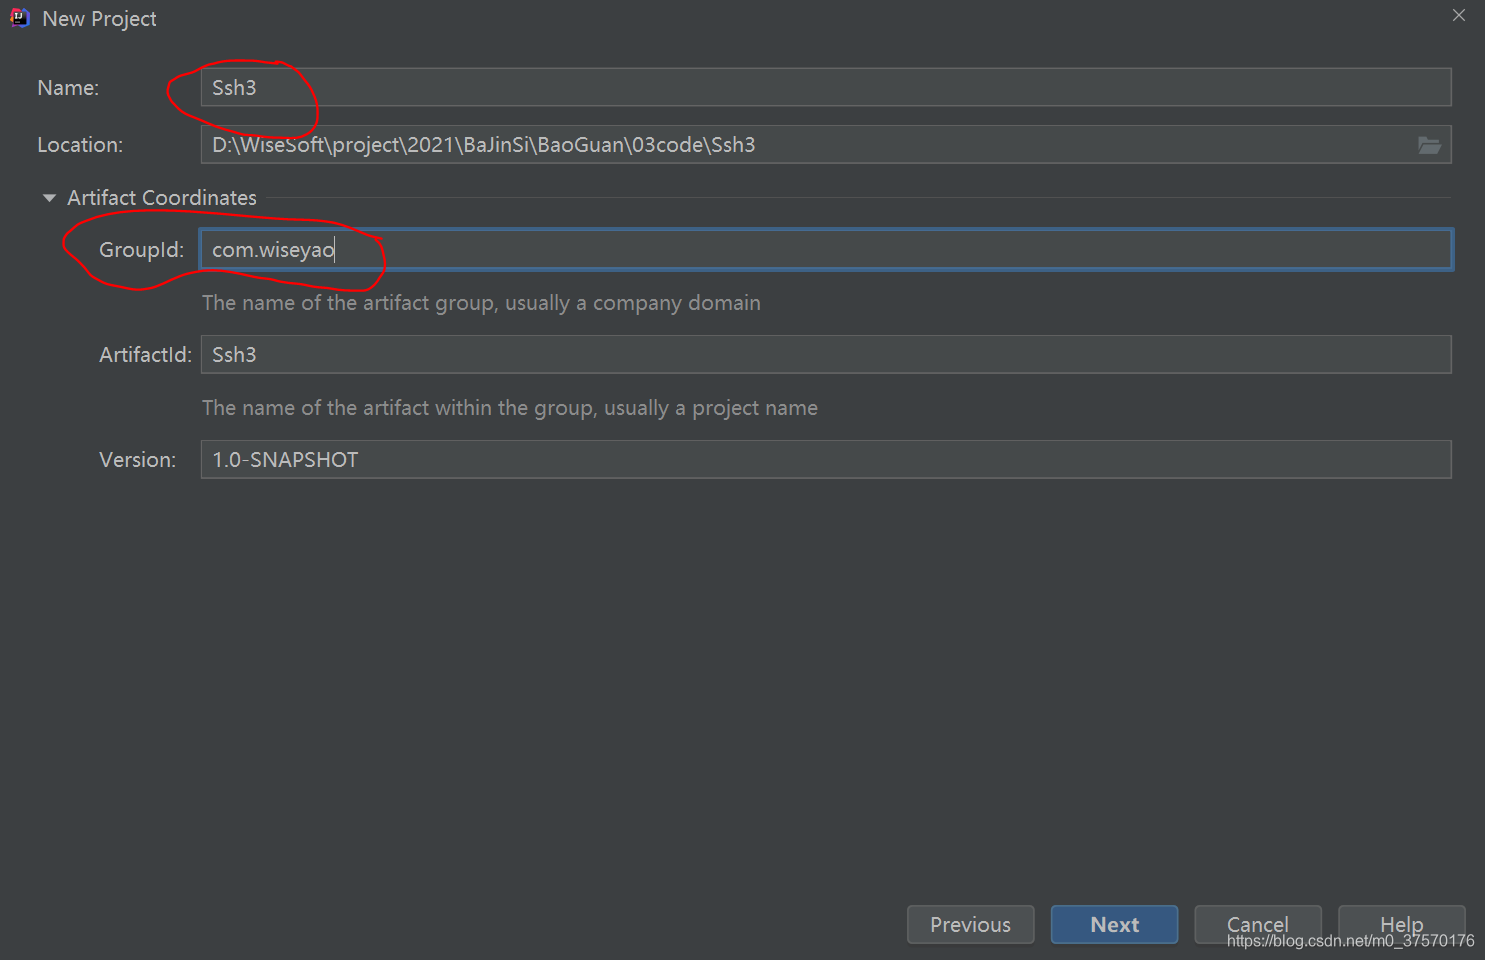
圈起来的地方改成自己的,按“Next”
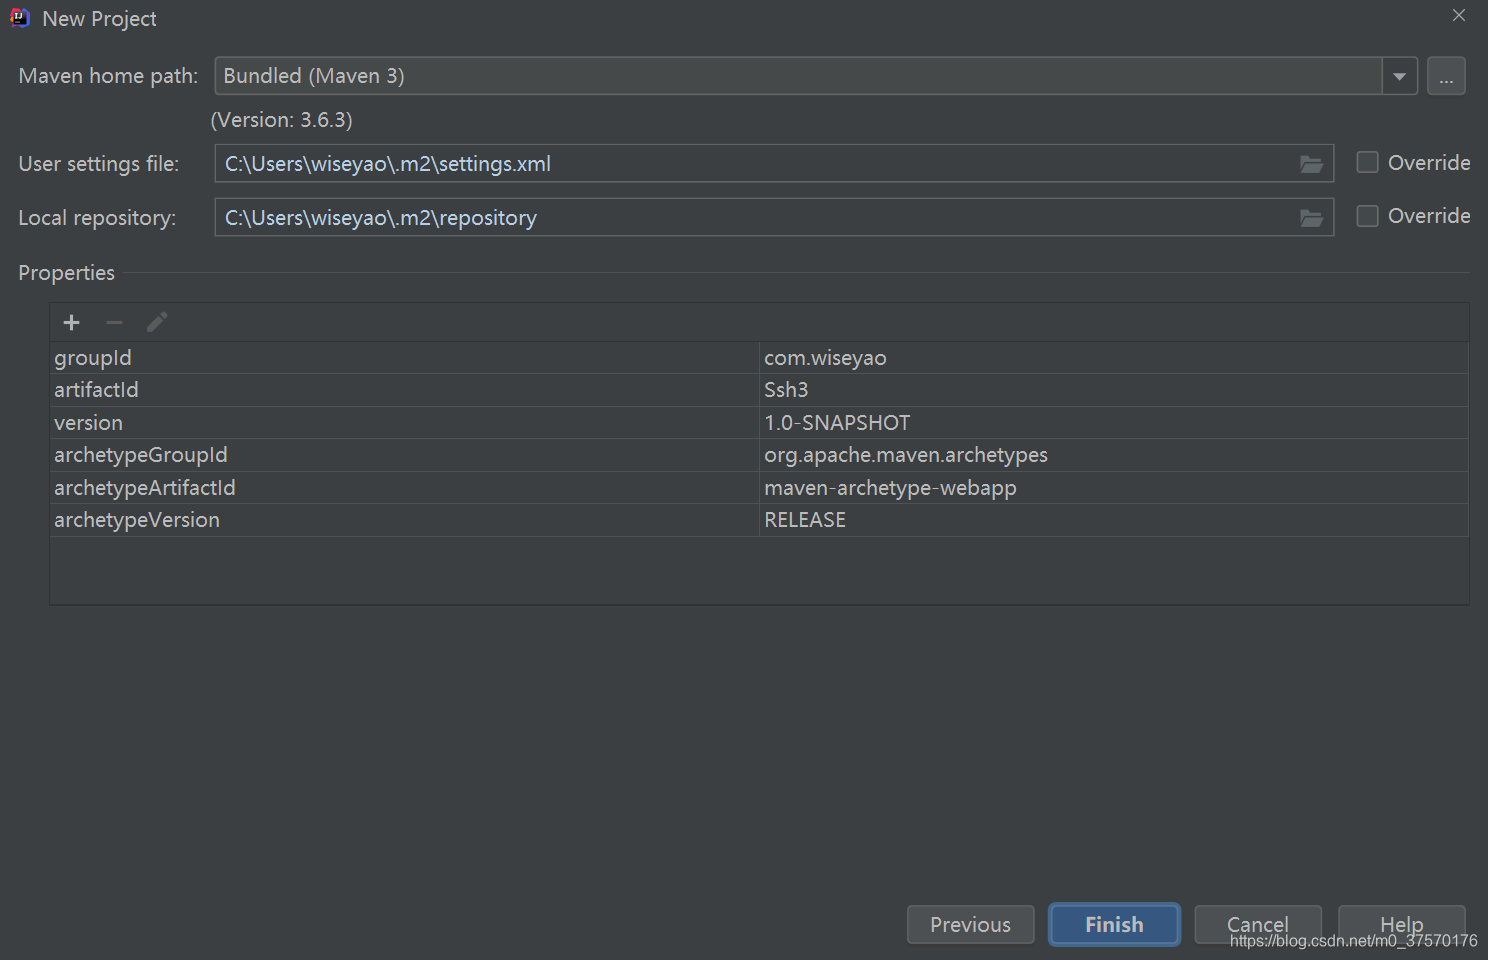
直接完成
修改pom.xml
在项目文件的根目录找到pom.xml,在标签里加入如下代码:
<dependency>
  <groupId>org.apache.struts</groupId>
  <artifactId>struts2-spring-plugin</artifactId>
  <version>2.5.26</version>
</dependency>

<!-- https://mvnrepository.com/artifact/org.apache.struts/struts2-convention-plugin -->
<dependency>
  <groupId>org.apache.struts</groupId>
  <artifactId>struts2-convention-plugin</artifactId>
  <version>2.5.26</version>
</dependency>

<!-- https://mvnrepository.com/artifact/org.apache.struts/struts2-json-plugin -->
<dependency>
  <groupId>org.apache.struts</groupId>
  <artifactId>struts2-json-plugin</artifactId>
  <version>2.5.26</version>
</dependency>

<!-- https://mvnrepository.com/artifact/org.hibernate/hibernate-core -->
<dependency>
  <groupId>org.hibernate</groupId>
  <artifactId>hibernate-core</artifactId>
  <version>4.2.5.Final</version>
</dependency>

<!-- https://mvnrepository.com/artifact/com.mchange/c3p0 -->
<dependency>
  <groupId>com.mchange</groupId>
  <artifactId>c3p0</artifactId>
  <version>0.9.5.5</version>
</dependency>

<!-- https://mvnrepository.com/artifact/com.mchange/mchange-commons-java -->
<dependency>
  <groupId>com.mchange</groupId>
  <artifactId>mchange-commons-java</artifactId>
  <version>0.2.20</version>
</dependency>

<!-- https://mvnrepository.com/artifact/mysql/mysql-connector-java -->
<dependency>
  <groupId>mysql</groupId>
  <artifactId>mysql-connector-java</artifactId>
  <version>5.1.49</version>
</dependency>

<!-- https://mvnrepository.com/artifact/org.springframework/spring-tx -->
<dependency>
  <groupId>org.springframework</groupId>
  <artifactId>spring-tx</artifactId>
  <version>4.3.26.RELEASE</version>
</dependency>

<!-- https://mvnrepository.com/artifact/org.springframework/spring-orm -->
<dependency>
  <groupId>org.springframework</groupId>
  <artifactId>spring-orm</artifactId>
  <version>4.3.26.RELEASE</version>
</dependency>

<!-- https://mvnrepository.com/artifact/org.aspectj/aspectjweaver -->
<dependency>
  <groupId>org.aspectj</groupId>
  <artifactId>aspectjweaver</artifactId>
  <version>1.9.7</version>
  <scope>runtime</scope>
</dependency>
修改web.xml
web.xml路径为:src/main/webapp/WEB-INF/web.xml,打开,在<web-app>节加入如下内容:
<!-- 默认打开的文件 -->
<welcome-file-list>
<welcome-file>index.jsp</welcome-file>
</welcome-file-list>
<!-- struts2过滤器 -->
<filter>
<filter-name>struts2</filter-name>
<filter-class>
org.apache.struts2.dispatcher.filter.StrutsPrepareAndExecuteFilter
</filter-class>
</filter>
<filter-mapping>
<filter-name>struts2</filter-name>
<url-pattern>/*</url-pattern>
</filter-mapping>
<!-- spring上下文监听器 -->
<context-param>
<param-name>contextConfigLocation</param-name>
<param-value>classpath:applicationContext.xml</param-value>
</context-param>
<listener>
<listener-class>org.springframework.web.context.ContextLoaderListener</listener-class>
</listener>
建立类根文件夹java,resources
在src/main里右键单击

在对话框中分别选中:java,resources建立文件夹
数据源配置文件db.properties
在src/main/resources/下建立db.properties,内容如下:
jdbc.user=root
jdbc.password=123456
jdbc.driverClass=com.mysql.jdbc.Driver
jdbc.jdbcUrl=jdbc:mysql://localhost:3306/test
jdbc.initPoolSize=5
jdbc.maxPoolSize=10
spring配置文件
在src/main/resources/下建立applicationContext.xml,内容如下:
<?xml version=“1.0” encoding=“UTF-8”?>
<beans xmlns=“http://www.springframework.org/schema/beans”
xmlns:xsi=“http://www.w3.org/2001/XMLSchema-instance”
xmlns:context=“http://www.springframework.org/schema/context”
xmlns:tx=“http://www.springframework.org/schema/tx”
xmlns:aop=“http://www.springframework.org/schema/aop”
xsi:schemaLocation=“http://www.springframework.org/schema/aop http://www.springframework.org/schema/aop/spring-aop-4.1.xsd
http://www.springframework.org/schema/beans http://www.springframework.org/schema/beans/spring-beans.xsd
http://www.springframework.org/schema/tx http://www.springframework.org/schema/tx/spring-tx-4.1.xsd
http://www.springframework.org/schema/context http://www.springframework.org/schema/context/spring-context-4.1.xsd”>
<!-- 配置注解自动扫描的包 ,改为自己的包名–>
<context:component-scan base-package=“com.wiseyao”></context:component-scan>
<!-- 配置数据源 -->
<!-- 导入资源文件 -->
<context:property-placeholder location=“classpath:db.properties”/>
<bean id=“dataSource” class=“com.mchange.v2.c3p0.ComboPooledDataSource”>
<property name=“user” value="KaTeX parse error: Expected 'EOF', got '&' at position 14: {jdbc.user}">&̲lt;/property> …{jdbc.password}"></property>
<property name=“driverClass” value="KaTeX parse error: Expected 'EOF', got '&' at position 21: ….driverClass}">&̲lt;/property> …{jdbc.jdbcUrl}"></property>
<property name=“initialPoolSize” value="KaTeX parse error: Expected 'EOF', got '&' at position 22: …initPoolSize}">&̲lt;/property> …{jdbc.maxPoolSize}"></property>
</bean>
<!-- 配置Hibernate的SessionFactory,通过spring提供的 LocalSessionFactoryBean配置–>
<bean id=“sessionFactory” class=“org.springframework.orm.hibernate4.LocalSessionFactoryBean”>
<!-- 配置依赖的数据源属性 -->
<property name=“dataSource” ref=“dataSource”></property>
<!-- hibernate 配置文件的路径 -->
<property name=“configLocation” value=“classpath:hibernate.cfg.xml”></property>
<!-- 配置hibernate映射文件的路径,可以使用通配符 -->
<property name=“mappingLocations” value=“classpath:.hbm.xml"></property>
</bean>
<!-- 配置 Spring 的声明式事物 -->
<bean id=“transactionManager” class=“org.springframework.orm.hibernate4.HibernateTransactionManager”>
<property name=“sessionFactory” ref=“sessionFactory”></property>
</bean>
<!-- 配置事物属性 ,需要事物管理器–>
<tx:advice id=“txAdvice” transaction-manager=“transactionManager”>
<tx:attributes>
<tx:method name="get” read-only=“true”/>
<tx:method name=“purchase” propagation=“REQUIRES_NEW”/>
<tx:method name=""/>
</tx:attributes>
</tx:advice>
<!-- 配置事物切点,并把事物属性和切点关联起来,要注意改为自己的包名 -->
<aop:config>
<aop:pointcut expression="execution( com.wiseyao.action..(…))" id=“txPointcut”/>
<aop:advisor advice-ref=“txAdvice” pointcut-ref=“txPointcut”/>
</aop:config>
</beans>
struts配置文件
路径:src/main/resources/struts.xml,内容:
<?xml version=“1.0” encoding=“UTF-8”?>
<!DOCTYPE struts PUBLIC
“-//Apache Software Foundation//DTD Struts Configuration 2.0//EN”
“http://struts.apache.org/dtds/struts-2.0.dtd”>
<struts>
<constant name=“struts.devMode” value=“true” />
<constant name=“struts.objectFactory.spring.autoWire.alwaysRespect” value=“true” />
<!-- <package name=“helloworld” extends=“struts-default”>
<-- 定义action -->
<action name=“hello”
class=“cn.w3cschool.struts2.HelloWorldAction”
method=“execute”>
<result name=“success”>/HelloWorld.jsp</result>
</action>
</package>–>
</struts>
Hibernate配置文件
路径:src/main/resources/hibernate.cfg.xml,内容:
<?xml version=‘1.0’ encoding=‘utf-8’?>
<!DOCTYPE hibernate-configuration PUBLIC
“-//Hibernate/Hibernate Configuration DTD//EN”
“http://www.hibernate.org/dtd/hibernate-configuration-3.0.dtd”>
<hibernate-configuration>
<session-factory>
<!-- <property name=“connection.url”>jdbc:mysql://localhost:3306/test</property>–>
<!-- <property name=“connection.driver_class”>com.mysql.jdbc.Driver</property>–>
<!-- <property name=“connection.username”/> -->
<!-- <property name=“connection.password”/> -->
<!-- 配置hibernate基本信息 -->
<!-- 1.数据源配置在IOC容器中,此处不需要额外配置 -->
<!-- 2.关联的.hbm.xml文件也在IOC容器配置SessionFactory时配置 -->
<!-- 3.此处配置hibernate的基本信息:数据库方言、SQL显示及格式化,及生成数据表的策略,二级缓存等 -->
<property name=“hibernate.dialect”>org.hibernate.dialect.MySQL5InnoDBDialect</property>
<property name=“hibernate.show_sql”>true</property>
<property name=“hibernate.format_sql”>true</property>
<property name=“connection.url”>jdbc:mysql://localhost:3306/test</property>
<property name=“connection.driver_class”>com.mysql.jdbc.Driver</property>
<!-- DB schema will be updated if needed -->
<!-- <property name=“hibernate.hbm2ddl.auto”>update</property> -->
<!-- 映射数据库表,使用java5注解,不生成映射文件 -->
<mapping class=“com.wiseyao.entity.Django2T1”/>
<mapping class=“com.wiseyao.entity.T1”/>
</session-factory>
</hibernate-configuration>
映射数据表
参考:https://www.cnblogs.com/developer_chan/p/8577351.html
实体类保存路径:com.wiseyao.entity
测试
路径:src/main/java/com/wiseyao/action/TestAction.java,内容:
package com.wiseyao.action;
import com.opensymphony.xwork2.ActionContext;
import com.opensymphony.xwork2.ActionSupport;
import com.wiseyao.entity.T1;
import org.apache.struts2.convention.annotation.Action;
import org.apache.struts2.convention.annotation.Namespace;
import org.apache.struts2.convention.annotation.ParentPackage;
import org.apache.struts2.convention.annotation.Result;
import org.hibernate.SessionFactory;
import org.springframework.beans.factory.annotation.Autowired;
import java.util.ArrayList;
import java.util.List;
@ParentPackage(“json-default”)
@Namespace("/test")
public class TestAction{
@Autowired
private SessionFactory sessionFactory;
@Action(value = “execute”,results = {
@Result(name = “success”,type=“json”)
})
public String execute(){
List list=new ArrayList<>();
list.add(“a”);
list.add(“b”);
ActionContext.getContext().getValueStack().push(list);
&bnsp;
return “success”;
}
@Action(value = “test1”,results = {
@Result(name = “success”,type=“json”)
})
public String test1(){
List list=new ArrayList<>();
list.add(“a”);
list.add(“b”);
ActionContext.getContext().getValueStack().push(list);
return “success”;
}
@Action(value=“testDao”,results = {
@Result(name=“success”,type=“json”)
})
public String testDao(){
List list=sessionFactory.getCurrentSession().createQuery(“from T1”).list();
ActionContext.getContext().getValueStack().push(list);
return “success”;
}
}


 401
401


 被折叠的 条评论
为什么被折叠?
被折叠的 条评论
为什么被折叠?
 到【灌水乐园】发言


