


IP地址管理系统phpipam部署
更多技术博客,请关注微信公众号:运维之美
一、IPAM管理系统简介
phpipam是一个开源Web IP地址管理应用程序(IPAM)。其目标是提供轻便,且有用的IP地址管理系统。它是基于PHP的应用程序,具有MySQL数据库后端,使用jQuery库,ajax和HTML5 / CSS3功能。
官网参考地址:https://phpipam.net/news/phpipam-installation-on-centos-7/
二、IPAM安装部署教程
2.1 环境准备
(1)安装依赖模块 Web server、Database 组件
[root@localhost ~]# yum install httpd mariadb-server php php-cli php-gd php-common php-ldap php-pdo php-pear php-snmp php-xml php-mysql php-mbstring git -y
(2)设置时区
[root@localhost  ~]# vim /etc/php.ini
[Date]
; Defines the default timezone used by the date functions
; http://php.net/date.timezone
date.timezone =Asia/Shanghai
(3)启动 Apache Web Server 并设置开机启动
[root@10-27-0-224 ~]# systemctl enable httpd  &&systemctl start httpd
Created symlink from /etc/systemd/system/multi-user.target.wants/httpd.service to /usr/lib/systemd/system/httpd.service.
(4)启动 MySQL (MariaDB) database server
[root@localhost ~]# systemctl enable mariadb && systemctl start mariadb
[root@localhost ~]# systemctl enable mariadb
Created symlink from /etc/systemd/system/multi-user.target.wants/mariadb.service to /usr/lib/systemd/system/mariadb.service.
(5)配置 Apache Web Server
[root@10-27-0-224 ~]# vim /etc/httpd/conf/httpd.conf
<Directory "/var/www/html">
	AllowOverride all
	Order allow,deny
	Allow from all
</Directory>
(6)初始化数据库设置
[root@localhost ~]# mysql_secure_installation
NOTE: RUNNING ALL PARTS OF THIS SCRIPT IS RECOMMENDED FOR ALL MariaDB
      SERVERS IN PRODUCTION USE!  PLEASE READ EACH STEP CAREFULLY!

In order to log into MariaDB to secure it, we'll need the current
password for the root user.  If you've just installed MariaDB, and
you haven't set the root password yet, the password will be blank,
so you should just press enter here.

Enter current password for root (enter for none):
OK, successfully used password, moving on...

Setting the root password ensures that nobody can log into the MariaDB
root user without the proper authorisation.

Set root password? [Y/n] y
New password:
Re-enter new password:
Password updated successfully!
Reloading privilege tables..
 ... Success!

By default, a MariaDB installation has an anonymous user, allowing anyone
to log into MariaDB without having to have a user account created for
them.  This is intended only for testing, and to make the installation
go a bit smoother.  You should remove them before moving into a
production environment.

Remove anonymous users? [Y/n] y
 ... Success!

Normally, root should only be allowed to connect from 'localhost'.  This
ensures that someone cannot guess at the root password from the network.

Disallow root login remotely? [Y/n] n
 ... skipping.

By default, MariaDB comes with a database named 'test' that anyone can
access.  This is also intended only for testing, and should be removed
before moving into a production environment.

Remove test database and access to it? [Y/n] y
 - Dropping test database...
 ... Success!
 - Removing privileges on test database...
 ... Success!

Reloading the privilege tables will ensure that all changes made so far
will take effect immediately.

Reload privilege tables now? [Y/n] y
 ... Success!

Cleaning up...

All done!  If you've completed all of the above steps, your MariaDB
installation should now be secure.

Thanks for using MariaDB!
2.2 安装phpIPAM
(1)从 git 下载 phpIPAM 文件
[root@localhost ~]# cd /var/www/html/
[root@localhost html]# git clone https://github.com/phpipam/phpipam.git phpipam
Cloning into 'phpipam'...
remote: Enumerating objects: 27455, done.
remote: Counting objects: 100% (627/627), done.
remote: Compressing objects: 100% (301/301), done.
remote: Total 27455 (delta 346), reused 570 (delta 317), pack-reused 26828
Receiving objects: 100% (27455/27455), 19.96 MiB | 17.48 MiB/s, done.
Resolving deltas: 100% (20027/20027), done.

[root@10-27-0-224 phpipam]# git checkout 1.4
Branch 1.4 set up to track remote branch 1.4 from origin.
Switched to a new branch '1.4'
(2)让 apache 用户有权限访问 phpipam
[root@localhost phpipam]# chown apache:apache -R /var/www/html/
[root@localhost phpipam]# cd /var/www/html/
[root@localhost html]# find . -type f -exec chmod 0644 {} \;
[root@localhost html]# find . -type d -exec chmod 0755 {} \;
(3)配置数据库链接
[root@localhost  ~]# cp /var/www/html/phpipam/config.dist.php /var/www/html/phpipam/config.php
[root@localhost  ~]# vim /var/www//html/phpipam/config.php
/**
 *  SSL options for MySQL
 *
 See http://phbase connection details
 ******************************/
$db['host'] = 'localhost';
$db['user'] = 'phpipam_user';
$db['pass'] = 'phpipam_Pass';
$db['name'] = 'phpipam_db';
$db['port'] = 3306;
##/**

if(!defined('BASE'))
define('BASE', "/phpipam/");
此处的配置我说明下
define(‘BASE’, “/”); #代表通过http://myserver/来访问,也就是根目录直接跳转
define(‘BASE’, “/phpipam”); #代表通过http://myserver/phpipam/ 来访问,根据自己需要来配置就好了
(4)重启 http 服务
[root@10-27-0-224 ~]# systemctl restart httpd
三、phpIPAM web配置
3.1 初始化
方式一:界面配置方方法
http://10.27.0.224/phpipam/index.php?page=install

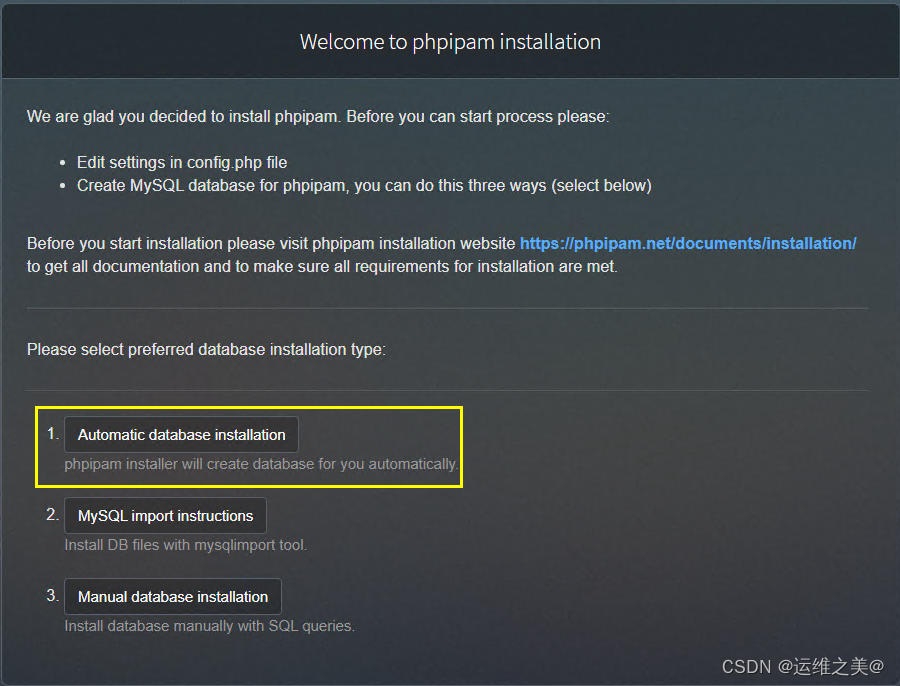
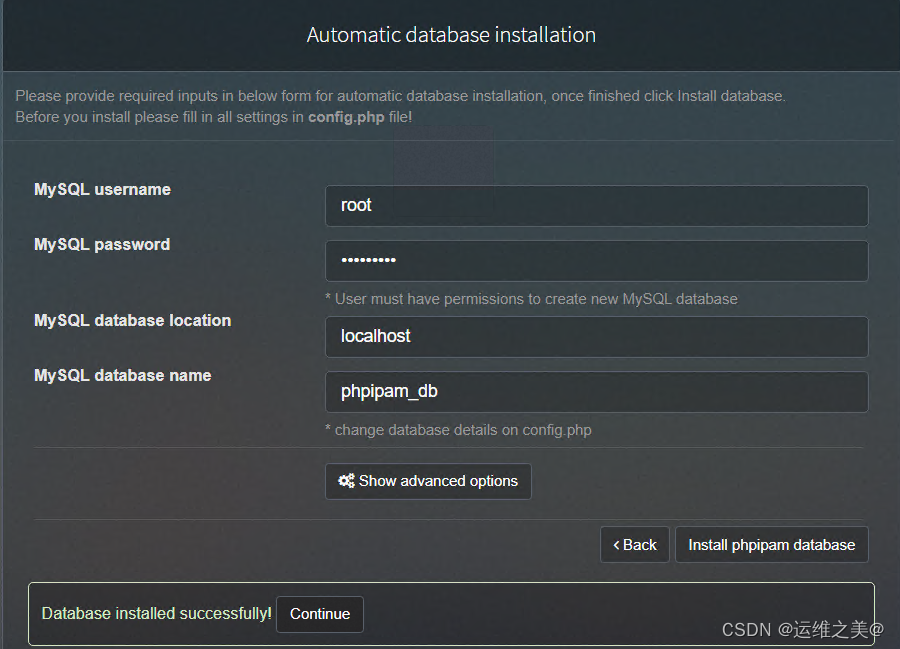
此处填写root的用户和密码,会按照config.php配置中定义的用户和密码进行创建
方式二:后台初始化
通过root账号创建phpipam用户,此处创建的用户密码和config.php文件中配置的密码
[root@ipam ~]# mysql -u root -p
Enter password:
mysql> create database phpipam;
Query OK, 1 row affected (0.00 sec)
mysql> GRANT ALL on phpipam.* to phpipam@localhost identified by ‘phpipamadmin’;
Query OK, 0 rows affected (0.00 sec)
mysql> exit
Bye
导入初始化数据SCHEMA.sql
mysql -u root -p phpipam < db/SCHEMA.sql
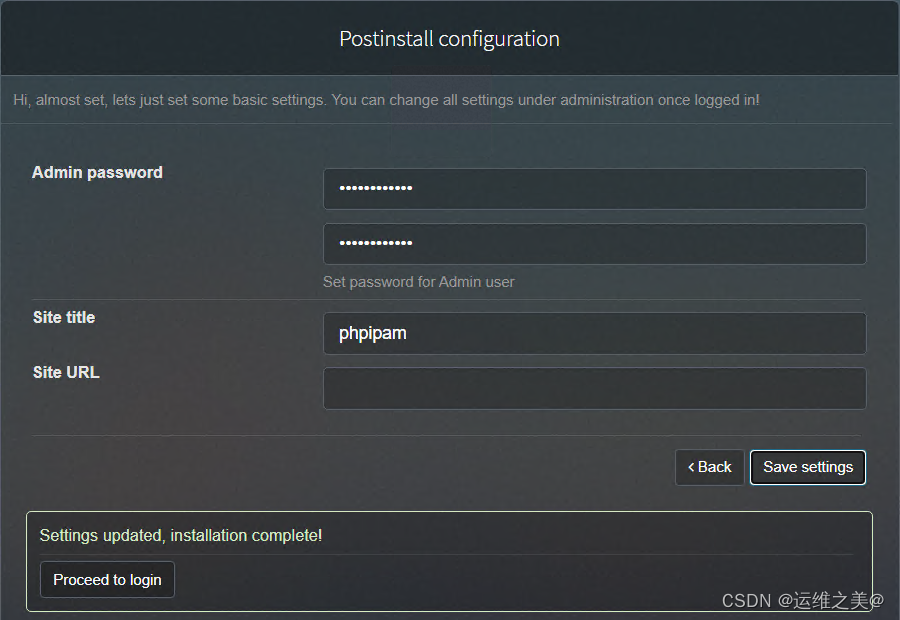
最后一步,设置phpIPAM登录的密码
cd /var/www/html/functions/scripts
[root@localhost scripts]# php reset-admin-password.php
Enter new admin password:
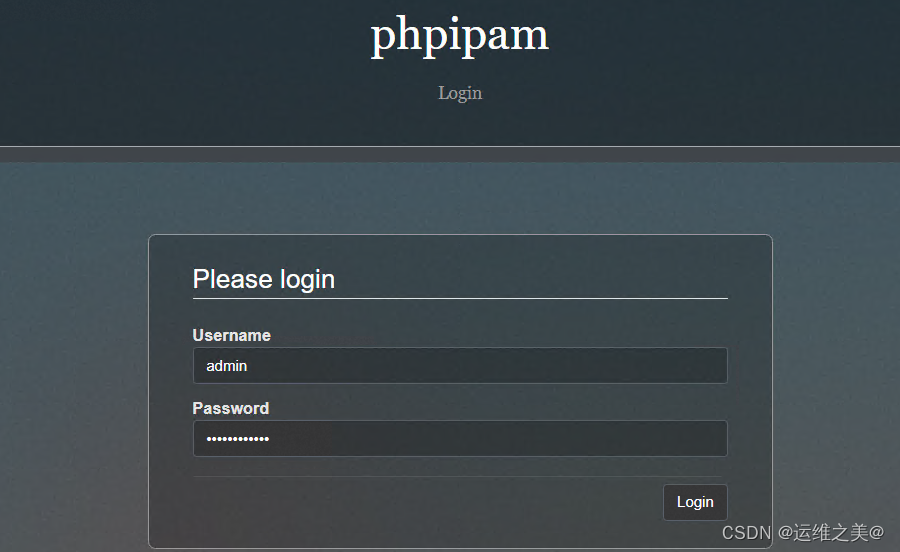
最后使用Admin和此处设置的账号密码登录即可
3.2 WEB配置使用
(1)简单功能介绍
| PHPIPAM Settings | # 设置PHPIPAM系统本身的一些配置,站点名称、语言、配色方案、一些功能模块的开关。 |
| Users | # 设置本地用户,添加、删除,编辑。Groups:设置本地用户组。 |
| Authentication methods | 设置认证方式,支持本地认证、常用的AD、LDAP、Radius,NetIQ和SAML2笔者也没听过 |
| Mail settings | 设置SMTP服务器,即当IPAM需要发邮件的时候使用哪个SMTP server。 API:懂编程的同学可以研究一下了。 |
| Scan agens | 使用什么agent来扫描网中的IP。 |
| Section | 即我们可以根据业务或其他属性将IP地址分section来进行管理,例如数据网,语音网,或者数据中心网,办公网等。 |
| Subnets | 已经可以在这里面创建网段了,然后大网段下再划分明细网段。 |
| Device Management | 可以做为一个小的资源管理系统来用,即你的设置在哪个楼哪个机房哪个RACK的哪个U上。 |
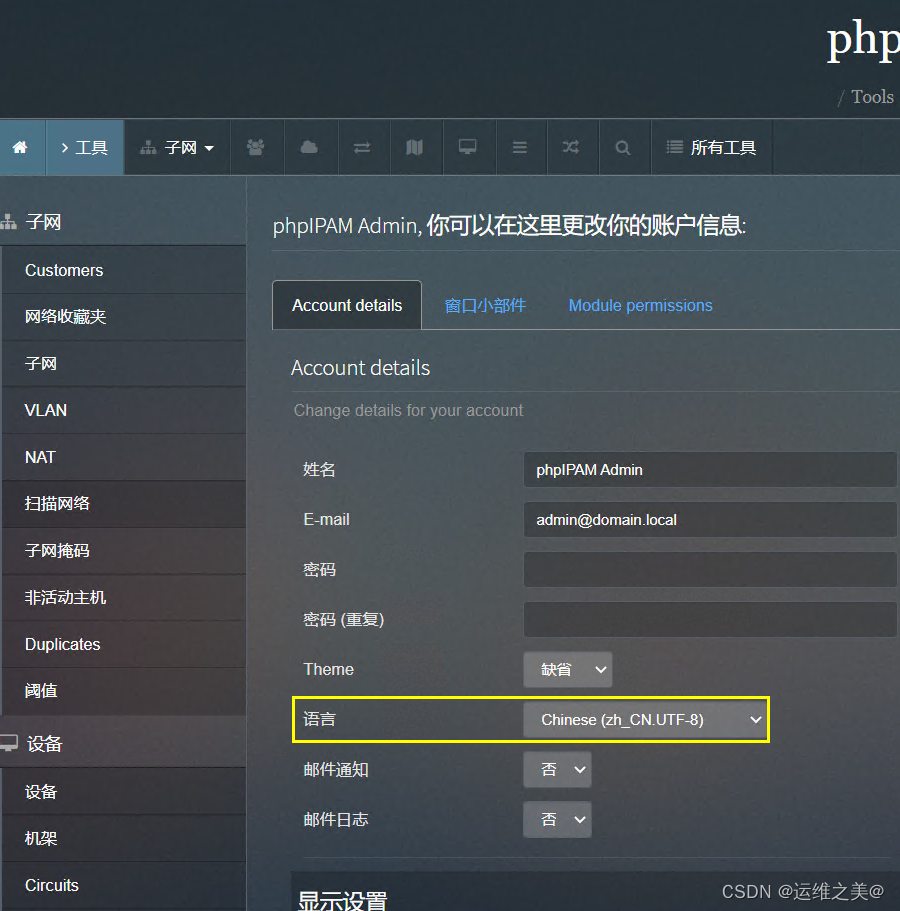
(2)中文配置
四、IPAM管理和使用
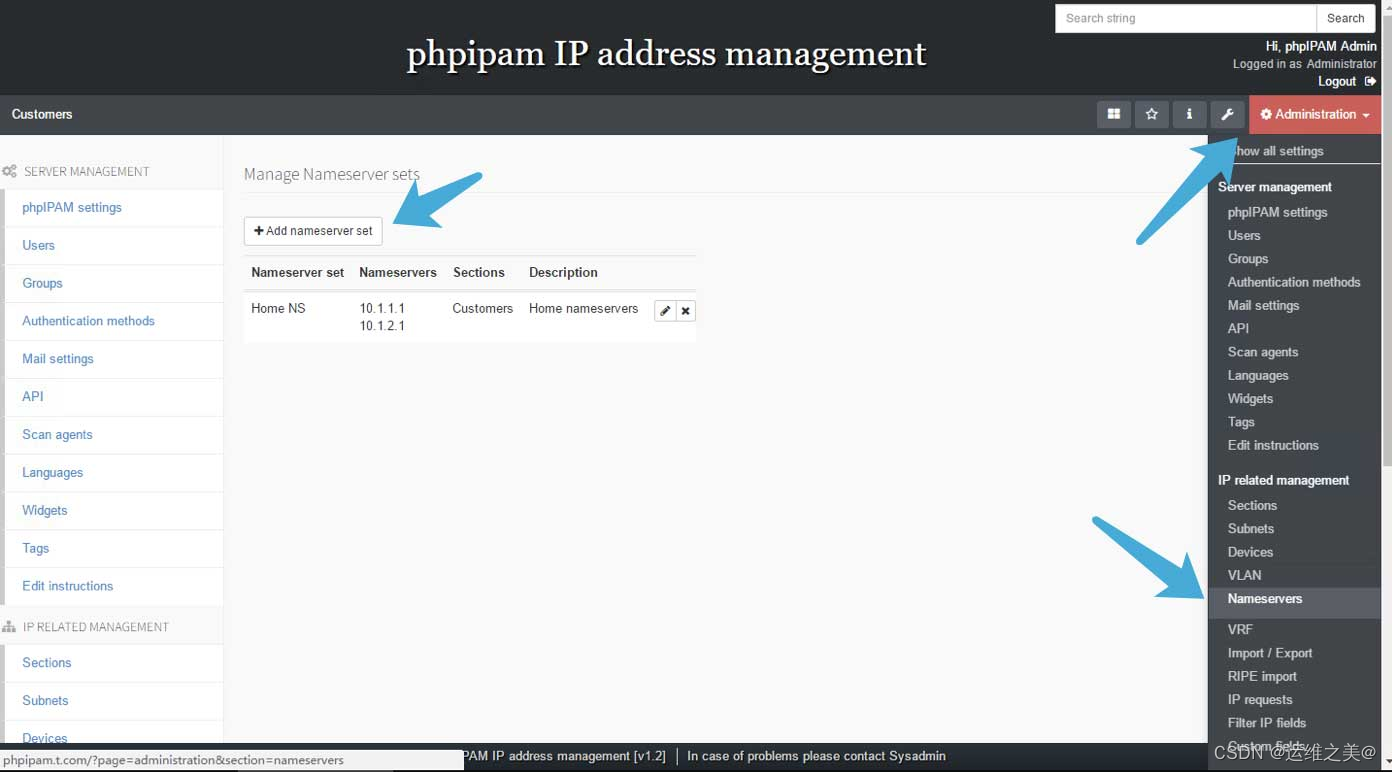
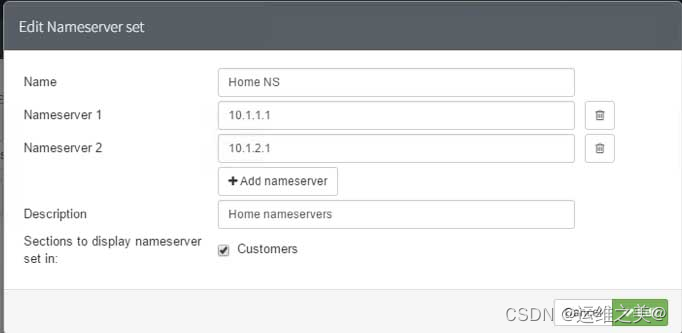
4.1配置dns
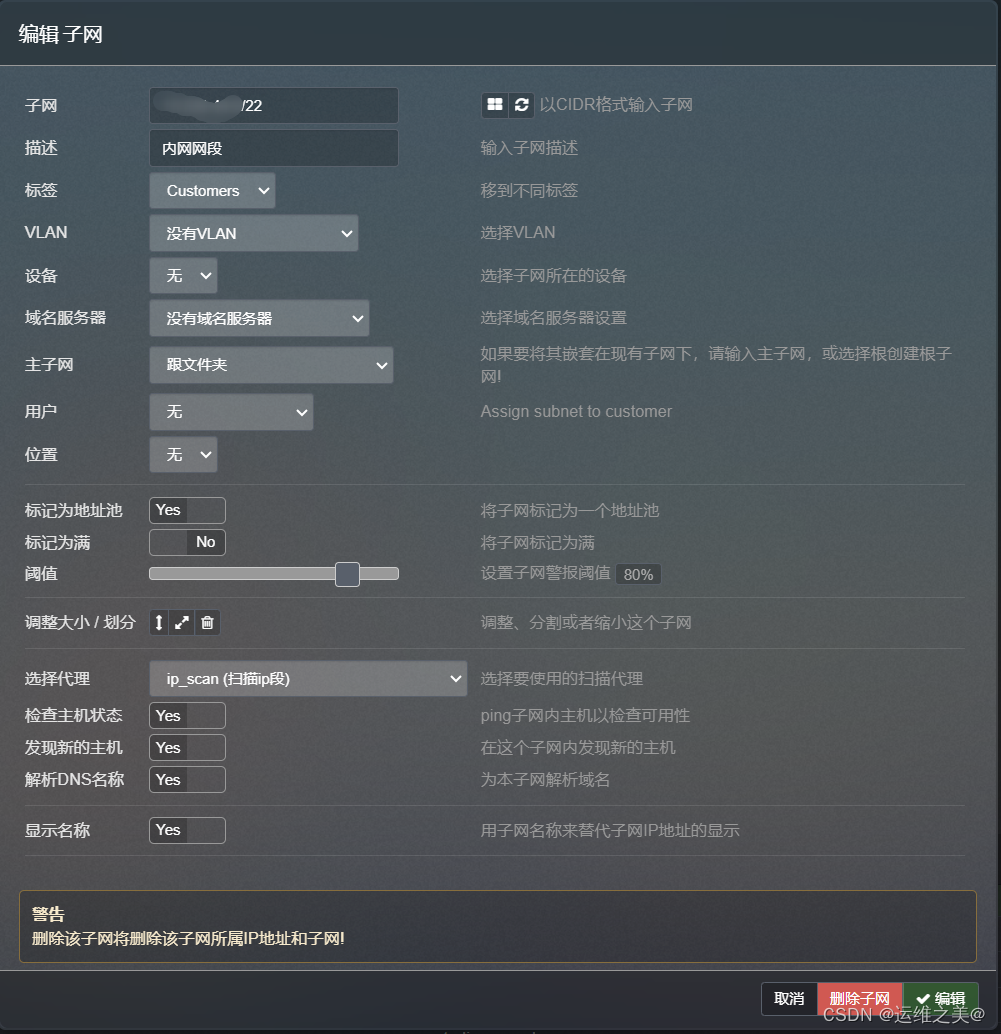
4.2 配置ip网段

4.3 配置ip地址自动扫描
我们想实现全自动化功能,可以自动发现在线用户并定时自动复检。为此我们还需要配置一个agent来完成这样的工作。
#进入文件夹
[root@web ~]# cd /usr/local/services_data/html/phpipam.t.com/

#克隆文件
[root@web phpipam.t.com]# git clone https://github.com/phpipam/phpipam-agent.git

#复制并重命名配置文件
[root@web phpipam.t.com]# cp phpipam-agent/config.dist.php phpipam-agent/config.php
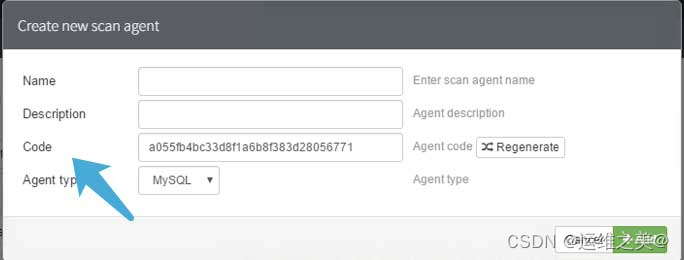
添加agent
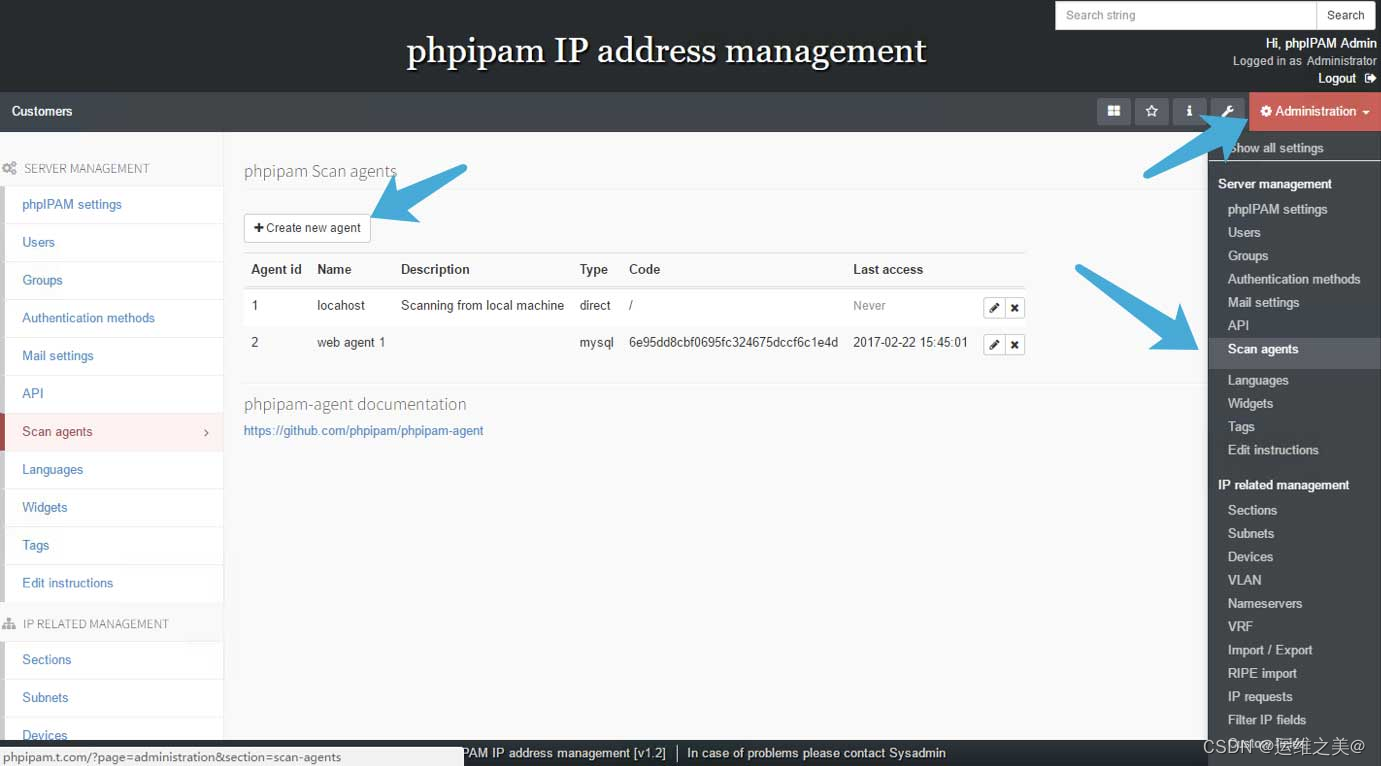
请填写agent的名称于描述并记下agent code:
修改config.php配置
#打开配置文件
[root@web phpipam.t.com]# vim phpipam-agent/config.php

#将以下值替换为刚才复制的code
$config['key'] = "替换为code";

#修正以下路径
$config['pingpath'] = "/usr/sbin/fping";

#修正数据库配置信息
$config['db']['host'] = "sql.t.com";
$config['db']['user'] = "phpipam";
$config['db']['pass'] = "phpipam";
$config['db']['name'] = "phpipam";
$config['db']['port'] = 3306;

#如果你的数据库不使用证书加密连接,请注释以下内容
#$config['db']['ssl']        = false;                           // true/false, enable or disable SSL as a whole
#$config['db']['ssl_key']    = '/path/to/cert.key';             // path to an SSL key file. Only makes sense combined with ssl_cert
#$config['db']['ssl_cert']   = '/path/to/cert.crt';             // path to an SSL certificate file. Only makes sense combined with ssl_key
#$config['db']['ssl_ca']     = '/path/to/ca.crt';               // path to a file containing SSL CA certs
#$config['db']['ssl_capath'] = '/path/to/ca_certs';             // path to a directory containing CA certs
#$config['db']['ssl_cipher'] = '/DHE-RSA-AES256-SHA:AES128-SHA'; // one or more SSL Ciphers
ipmi主机上安装fping命令用于测试可用ip
yum install fping -y
手动更新ip
#发现在线IP
[root@web ~]#php /var/www/html/phpipam-agent/index.php discover

#复检已添加的IP
[root@web ~]# php /var/www/html/phpipam-agent/index.php update
设置成定时任务区检测
#填入任务,每5分钟运行一次
*/5 * * * *  php /var/www/html/phpipam-agent/index.php update
*/5 * * * * php /var/www/html/phpipam-agent/index.php discover
设置数据库备份
# Backup IP address table, remove backups older than 10 days
@daily /usr/bin/mysqldump -u ipv6 -pipv6admin phpipam > /var/www/html/db/bkp/phpipam_bkp_$(date +"\%y\%m\%d").db
@daily /usr/bin/find /var/www/html/db/bkp/ -ctime +10 -exec rm {} \;

公众号:运维之美 不定期更新领取IT学习资料 关注一波!
最近,我们建立了一个技术交流微信群。有兴趣的同学可以加入和我们一起交流技术,在 「运维之美」 公众号直接回复 「加群」 邀请你入群。


 1203
1203

 被折叠的 条评论
为什么被折叠?
被折叠的 条评论
为什么被折叠?
 到【灌水乐园】发言


