


前言:逆境中,力挽狂澜使强者更强,随波逐流使弱者更弱,努力向前走一步,就离梦想就更近一步!加油
一、概述
虽然Android API提供了众多的控件View来使用,但是仍有很多时候系统提供的控件并不能满足我们业务发展的需要和日渐庞大复杂的需求,我们需要针对具体的业务来定制我们想要的View。并且自定义View也是安卓开发者必须掌握的技能。自定义View主要有四个步骤:
1.在attrs文件中自定义View的属性和属性类型
2.在View的构造方法中获取自定义的属性
3.重写onMeasure()方法 [此方法看需求是否需要重写,大部分还是需要重写的]
4.重写onDraw(Canvas canvas)方法
二、自定义View
1、在attrs文件中自定义View的属性和属性类型
自定义view的属性,在res/values/文件下建立一个attrs.xml文件,在里面定义我们自定义view的属性、属性的类型和声明的样式。
<?xml version="1.0" encoding="utf-8"?>
<resources>

     <!--自动义属性集合,name表示声明的"属性集合"名,可以随便取名,但是建议与自定义控件的名称一致,
    在该集合下设置不同的自定义属性-->
    <declare-styleable name="MySelfView">
        <!--name表示属性名称,format表示属性的类型-->
        <attr name="titleText" format="string"/>
        <attr name="titleColor" format="color"/>
        <attr name="titleSize" format="dimension"/>
        </declare-styleable>
</resources>这里定义了属性的控件名称name="MySelfView",在里面添加你需要的具体属性即可,这里只定义了字体,字体颜色,字体大小三个属性,format是属性的类型,dimension(字体大小)string(字符串)color(颜色)boolean(布尔类型)float(浮点型)integer(整型)enmu(枚举)fraction(百分比)等。(下面会列出各个属性的使用)
2.在View的构造方法中获取自定义的属性
首先创建自定义的view,实现其中的构造方法,无论我们继承系统等控件还是View,都需要对构造函数进行重写,构造函数有多个,至少需要重写一个才行,一般需要实现其中三个构造方法(为了方便开发,我们一般会在第一第二个构造函数中使用this关键字调用下个构造方法,具体逻辑最终在第三个构造函数中都会执行)
   /**
     * 在java代码里new的时候会用到
     * @param context 上下文
     */
    public MySelfView(Context context) {
//        super(context);
        this(context, null);
    }

    /**
     * 在xml布局文件中使用时自动调用
     * @param context 上下文
     * @param attrs   属性集合
     */
    public MySelfView(Context context, AttributeSet attrs) {
//        super(context, attrs);
        this(context, attrs, 0);
    }

    /**
     * 不会自动调用,如果有默认style时,在第二个构造函数中调用
     * @param context 上下文
     * @param attrs 属性集合
     * @param defStyleAttr
     */
    public MySelfView(Context context, AttributeSet attrs, int defStyleAttr) {
        super(context, attrs, defStyleAttr);
    }

    /**
     * 只有在版本Api>21时才会用到
     * 不会自动调用,如果有默认style时,在第二个构造函数中调用
     *
     * @param context 上下文
     * @param attrs   属性集合
     * @param defStyleAttr
     * @param defStyleRes
     */
    public MySelfView(Context context,  AttributeSet attrs, int defStyleAttr, int defStyleRes) {
        super(context, attrs, defStyleAttr, defStyleRes);
    }
然后在布局文件上用上我们的自定义属性:
<?xml version="1.0" encoding="utf-8"?>
<LinearLayout
    xmlns:android="http://schemas.android.com/apk/res/android"
    xmlns:app="http://schemas.android.com/apk/res-auto"
    android:layout_width="match_parent"
    android:layout_height="match_parent"
    android:gravity="center">

    <com.example.myselfview.MySelfView
        android:layout_width="wrap_content"
        android:layout_height="wrap_content"
        android:padding="10dp"
        app:titleColor="#000000"
        app:titleSize="32sp"
        app:titleText="自定义View"/>

</LinearLayout>这里一定要引入控件的命名空间:xmlns:app="http://schemas.android.com/apk/res-auto",否则无法使用自定义的属性(命名空间的用法下面会讲到),接着在自定义view的构造函数里面把自定义属性取出来,
  public MySelfView(Context context, AttributeSet attrs, int defStyleAttr) {
        super(context, attrs, defStyleAttr);
        //加载自定义属性集合
        // 第二个参数为res/values文件夹下attrs.xml文件中的<declare-styleable>标签
        TypedArray typedArray = getContext().obtainStyledAttributes(attrs, R.styleable.MySelfView);

        //根据属性名称获取实际的属性值
        //第一个参数为属性集合的属性,命名规则:R.styleable.+属性集合名称+下划线+属性名称
        mText = typedArray.getString(R.styleable.MySelfView_titleText);
        // 默认颜色设置为红色
        mColor = typedArray.getColor(R.styleable.MySelfView_titleColor, Color.RED);
        // 默认设置为16sp,TypeValue也可以把sp转化为px
        mTextSize = typedArray.getDimensionPixelSize(R.styleable.MySelfView_titleSize, (int) TypedValue.applyDimension(
                TypedValue.COMPLEX_UNIT_SP, 16, getResources().getDisplayMetrics()));
        //对象回收
        typedArray.recycle();

        init();
}我们利用context通过obtainStyledAttributes()获取自定义的属性集合,通过属性名称分别取出其中的值,TypedArray使用完后需要调用recycle()方法将其回收。
3.重写onMeasure()方法
  @Override
    protected void onMeasure(int widthMeasureSpec, int heightMeasureSpec) {
        super.onMeasure(widthMeasureSpec, heightMeasureSpec);
    }
对用 onMeasure()方法看具体需求是否需要重写,大部分情况下还是需要重写的,这里暂时不做任何操作,下面详细讲解
4.重写onDraw(Canvas canvas)方法
在自定义控制中,如果需要绘制那么必须要重写onDraw()方法了,几乎所有的绘制操作都是在onDraw()中完成,我们可以通过画笔和画布来实现自己需要的图形图型。
 @Override
    protected void onDraw(Canvas canvas) {
        super.onDraw(canvas);
        //创建画笔
        mPaint = new Paint();
        //设置字体大小
        mPaint.setTextSize(mTextSize);
        //创建矩形
        mRect = new Rect();
        //将字体放入到矩形中
        mPaint.getTextBounds(mText, 0, mText.length(), mRect);

        //设置画笔颜色
        mPaint.setColor(Color.RED);
        //在画布上绘制矩形
        canvas.drawRect(0, 0, getMeasuredWidth(), getMeasuredHeight(), mPaint);
        mPaint.setColor(mColor);
        //在画布上绘制文字
        canvas.drawText(mText, (float) getWidth() / 2 - (float) mRect.width() / 2, (float) getHeight() / 2 + (float) mRect.height() / 2, mPaint);
}在onDraw()方法中我将文字放入一个红色矩形中,然后将文字设置在里面,看看下面的效果图:
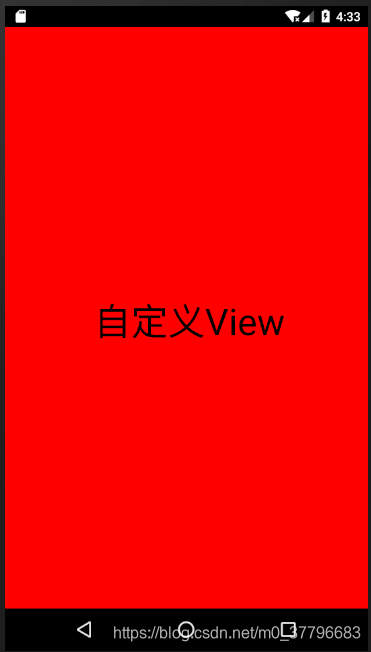
但是我们发现这明显不是我们想要的效果,为什么会这样呢?因为控件设置的宽高为具体值时,系统测量的结果就是我们设置的结果,如果我们设置wrap_content或者match_parent,系统帮我们测量的结果就是match_parent值。
5、为什么需要重写onMearsure()?
正是这个原因我们得自己去处理和设置尺寸,系统只是给了onMearsure()的默认处理,当不能满足需求的时候我们就需要重写onMearsure(int widthMeasureSpec, int heightMeasureSpec)方法了,这个里面包含宽高的信息,包括宽高和宽高的模式。我们在设置宽高时有三个选择wrap_content、match_parent、指定固定的尺寸,同样测量模式也有三种:MeasureSpec.UNSPECIFIED、MeasureSpec.AT_MOST、MeasureSpec.EXACTLY,这三种测量模式是什么意思呢?
| 测量模式 | 表示的意义 | 示例 |
| UNSPECIFIED | 父视图对子视图没有任何限制,可以取任何尺寸 | 表示子视图想要多大就多大,很少使用 |
| EXACTLY | 父视图希望子视图是specSize中指定的大小,当前尺寸就是当前View应该取的尺寸 | 一般指设置了明确的固定值或者是match_parent |
| AT_MOST | 子视图中的大小最多是specSize中的大小,当前尺寸是当前View能取的最大尺寸 | 表示子布局限制在一个指定范围内,一般指wrap_content |
怎么理解测量模式和wrap_content、match_parent、固定尺寸之间的关系呢?
match_parent ——>EXACTLY:match_parent 就是利用父view给我们提供的所剩余的空间,而父view的剩余空间是确定的,也就是这个测量模式里面存放的尺寸
warp_content——>AT_MOST:我们想要将大小这是为包裹我们的view内容,那么尺寸的大小就是父控件给我们作为参考的尺寸,只要不超出这个尺寸范围就可以啦,具体尺寸根据我们的实际需求去设定
固定尺寸——>EXACTLY:用户自定了尺寸的大小,我们不用干涉,就以指定的大小为主
我们点击方法super.onMeasure(widthMeasureSpec, heightMeasureSpec)进入源码看看:
  protected void onMeasure(int widthMeasureSpec, int heightMeasureSpec) {
        setMeasuredDimension(getDefaultSize(getSuggestedMinimumWidth(), widthMeasureSpec),
                getDefaultSize(getSuggestedMinimumHeight(), heightMeasureSpec));
    }
         ·······
 public static int getDefaultSize(int size, int measureSpec) {
        int result = size;
        int specMode = MeasureSpec.getMode(measureSpec);
        int specSize = MeasureSpec.getSize(measureSpec);

        switch (specMode) {
        case MeasureSpec.UNSPECIFIED:
            result = size;
            break;
        case MeasureSpec.AT_MOST:
        case MeasureSpec.EXACTLY:
            result = specSize;
            break;
        }
        return result;
    }
在getDefaultSize(int size, int measureSpec)中有两个参数,size表示view的默认的大小,通过getSuggestedMinimumWidth()获取最小值;measureSpec表示是上面分析的MeasureSpec,里面存放了view的测量值和测量模式,从上面的源码中可以看出,UNSPECIFIED则取默认值的大小,EXACTLY和AT_MOST则都是取测量值specSize的大小,也就是子视图的大小是specSize中指定的大小,两个模式的处理完全是一样的,所以在自定义view时我们需要对这两种模式做出处理。我们重写onMeasure()方法
  @Override
    protected void onMeasure(int widthMeasureSpec, int heightMeasureSpec) {
        super.onMeasure(widthMeasureSpec, heightMeasureSpec);
        //获取宽高的测量模式
        int widthMode = MeasureSpec.getMode(widthMeasureSpec);
        int heightMode = MeasureSpec.getMode(heightMeasureSpec);

        //获取宽高的值
        int widthSize = MeasureSpec.getSize(widthMeasureSpec);
        int heightSize = MeasureSpec.getSize(heightMeasureSpec);

        int width;
        int height;

        //设置宽度
        //如果布局里面设置的是固定值或者是match_parent则取测量模式里面的尺寸
        if (widthMode == MeasureSpec.EXACTLY) {
            width = widthSize;
        } else {//如果是其他(warp_content或者无限制)则重新计算
            mPaint.setTextSize(mTextSize);
            mPaint.getTextBounds(mText, 0, mText.length(), mRect);
            int textWidth = mRect.width();
            width = getPaddingLeft() + getPaddingRight() + textWidth;
        }

        //设置高度
        //如果布局里面设置的是固定值或者是match_parent则取测量模式里面的尺寸
        if (heightMode == MeasureSpec.EXACTLY) {
            height = heightSize;
        } else {//如果是其他(warp_content或者无限制)则重新计算
            mPaint.setTextSize(mTextSize);
            mPaint.getTextBounds(mText, 0, mText.length(), mRect);
            int textHeight = mRect.height();
            height = getPaddingTop() + getPaddingBottom() + textHeight;
        }

        //调用父类方法,将view的大小告诉父布局
        setMeasuredDimension(width, height);
    }
我们在上面的代码中对 MeasureSpec.EXACTLY模式,即固定尺寸或者match_parent的时候取测量值specSize,对于其他模式MeasureSpec.UNSPECIFIED、MeasureSpec.AT_MOST我们则重新计算了控件的宽高值,然后设置到父视图尺寸中。看一下效果图:
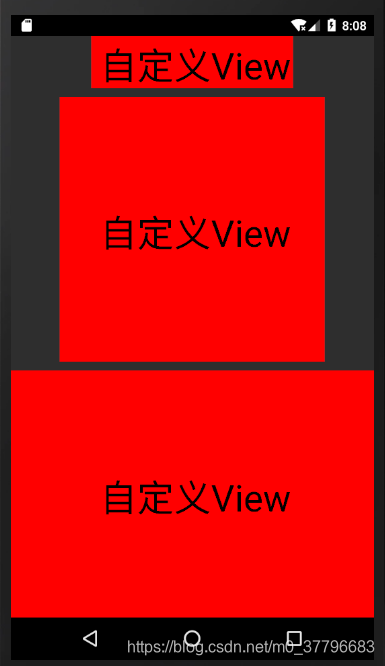
上面分别是设置了warp_content、固定值300dp、match_parent的效果图。
6.命名空间的理解
xml命名空间提供了避免元素命名冲突的问题,命名空间里面存放的是特定的属性集合,在xml文件中的根元素中插入,常见的有android、tool、app(自定义)命名空间:
    xmlns:android="http://schemas.android.com/apk/res/android"
    xmlns:app="http://schemas.android.com/apk/res-auto"
xmlns:tools="http://schemas.android.com/tools"1.xmlns:android="http://schemas.android.com/apk/res/android"
在android布局文件中必须在跟元素上面定义一个这个命名空间,我们来解读一下这个命名空间:
xmlns: 即xml namespace,声明我们即将要开始定义一个命名空间了
android 称作namespace-prefix,它就是命名空间的名字
http://schemas.android.com/apk/res/android 这实际是URI(统一资源标识符),它的值是固定不变得,相当于一个常量
2.xmlns:tools="http://schemas.android.com/tools"
我们可以把他理解为一个工具(tools)的命名空间,它的只作用于开发阶段,当app被打包时,所有关于tools属性将都会被摒弃掉!
3.xmlns:app="http://schemas.android.com/apk/res-auto"
自定义命名空间,实际上也可以这样写:xmlns:app="http://schemas.android.com/apk/完整包名",例如:xmlns:my="http://schemas.android.com/apk/com.example.myselfview.MySelfView",那么在xml文件中这样使用:
<?xml version="1.0" encoding="utf-8"?>
<LinearLayout
    xmlns:android="http://schemas.android.com/apk/res/android"
    xmlns:my="http://schemas.android.com/apk/com.example.myselfview.MySelfView"
    android:layout_width="match_parent"
    android:layout_height="match_parent"
    android:gravity="center"
    android:orientation="vertical">

    <com.example.myselfview.MySelfView
        android:layout_width="wrap_content"
        android:layout_height="wrap_content"
        android:padding="10dp"
        my:titleColor="#000000"
        my:titleSize="42sp"
        my:titleText="自定义View"/>

</LinearLayout>
但是在android studio2.0以后不建议这样写,在使用自定义控件时,在xml根元素中插入xmlns:app="http://schemas.android.com/apk/res-auto" 即可,1和2命名空间里的属性是系统封装好的,第3种命名空间里的属性是用户自定义的
7.其他属性的含义以及使用
attrs.xml
<?xml version="1.0" encoding="utf-8"?>
<resources>

    <!--自动义属性集合,name表示声明的"属性集合"名,可以随便取名,但是建议与自定义控件的名称一致,
    在该集合下设置不同的自定义属性-->
    <declare-styleable name="MySelfView">
        <!--name表示属性名称,format表示属性的类型-->
        <!--1. string:字符串-->
        <attr name="titleText" format="string"/>
        <!--2. color:颜色值 -->
        <attr name="titleColor" format="color"/>
        <!--3. dimension:尺寸值-->
        <attr name="titleSize" format="dimension"/>


        <!--4.reference 使用某一资源id-->
        <attr name="background1" format="reference"/>
       <!-- // 使用格式
        <ImageView
            android:layout_width="42dip"
            android:layout_height="42dip"
            android:background1="@drawable/图片ID" />-->

        <!--5. boolean:布尔值-->
        <attr name="focusable" format="boolean"/>
       <!-- // 格式使用
        <Button
            android:layout_width="42dip"
            android:layout_height="42dip"
            android:focusable="true" />-->

        <!--6.float:浮点值-->
        <attr name="fromAlpha" format="float"/>
        <attr name="toAlpha" format="float"/>
    <!--    // 格式使用
        <alpha
            android:fromAlpha="1.0"
            android:toAlpha="0.7" />-->

        <!--7.integer:整型值 -->
        <attr name="frameDuration" format="integer"/>
        <attr name="framesCount" format="integer"/>
       <!-- // 格式使用
        <animated-rotate
            android:frameDuration="100"
            android:framesCount="12"/>-->

        <!--8.fraction:百分数-->
        <attr name="pivotX" format="fraction"/>
        <attr name="pivotY" format="fraction"/>
       <!-- // 格式使用
        <rotate
            android:pivotX="200%"
            android:pivotY="300%"
            />-->

        <!--9.enum:枚举值-->
        <attr name="horizontal" format="enum"/>
        <attr name="vertical" format="enum"/>
       <!-- // 格式使用
        <LinearLayout
            android:layout_width="match_parent"
            android:layout_height="match_parent"
            android:orientation="vertical"/>-->

        <!--10.特别注意:属性定义时可以指定多种类型值-->
        <attr name="background2" format="reference|color"/>
       <!-- // 使用
        <ImageView
            android:layout_width="42dip"
            android:layout_height="42dip"
            android:background2="@drawable/图片ID|#00FF00" />-->

    </declare-styleable>
</resources>
activity_main.xml
<?xml version="1.0" encoding="utf-8"?>
<LinearLayout
    xmlns:android="http://schemas.android.com/apk/res/android"
    xmlns:app="http://schemas.android.com/apk/res-auto"
    android:layout_width="match_parent"
    android:layout_height="match_parent"
    android:gravity="center"
    android:orientation="vertical">

    <com.example.myselfview.MySelfView
        android:layout_width="wrap_content"
        android:layout_height="wrap_content"
        android:padding="10dp"
        app:titleColor="#000000"
        app:titleSize="42sp"
        app:titleText="自定义View"/>

    <com.example.myselfview.MySelfView
        android:layout_width="300dp"
        android:layout_height="300dp"
        android:layout_marginTop="10dp"
        android:padding="10dp"
        app:titleColor="#000000"
        app:titleSize="42sp"
        app:titleText="自定义View"/>

    <com.example.myselfview.MySelfView
        android:layout_width="match_parent"
        android:layout_height="match_parent"
        android:layout_marginTop="10dp"
        android:padding="10dp"
        app:titleColor="#000000"
        app:titleSize="42sp"
        app:titleText="自定义View"/>

</LinearLayout>
MySelfView.java
public class MySelfView extends View {
    private int mColor;
    private int mTextSize;
    private String mText;
    private Paint mPaint;
    private Rect mRect;

    /**
     * 在java代码里new的时候会用到
     *
     * @param context 上下文
     */
    public MySelfView(Context context) {
//        super(context);
        this(context, null);
    }

    /**
     * 在xml布局文件中使用时自动调用
     *
     * @param context 上下文
     * @param attrs   属性集合
     */
    public MySelfView(Context context, AttributeSet attrs) {
//        super(context, attrs);
        this(context, attrs, 0);
    }

    /**
     * 不会自动调用,如果有默认style时,在第二个构造函数中调用
     *
     * @param context      上下文
     * @param attrs        属性集合
     * @param defStyleAttr
     */
    public MySelfView(Context context, AttributeSet attrs, int defStyleAttr) {
        super(context, attrs, defStyleAttr);
        //加载自定义属性集合
        // 第二个参数为res/values文件夹下attrs.xml文件中的<declare-styleable>标签
        TypedArray typedArray = getContext().obtainStyledAttributes(attrs, R.styleable.MySelfView);

        //根据属性名称获取实际的属性值
        //第一个参数为属性集合的属性,命名规则:R.styleable.+属性集合名称+下划线+属性名称
        mText = typedArray.getString(R.styleable.MySelfView_titleText);
        // 默认颜色设置为红色
        mColor = typedArray.getColor(R.styleable.MySelfView_titleColor, Color.RED);
        // 默认设置为16sp,TypeValue也可以把sp转化为px
        mTextSize = typedArray.getDimensionPixelSize(R.styleable.MySelfView_titleSize, (int) TypedValue.applyDimension(
                TypedValue.COMPLEX_UNIT_SP, 16, getResources().getDisplayMetrics()));
        //对象回收
        typedArray.recycle();

        init();
    }

    private void init() {
        //创建画笔
        mPaint = new Paint();
        //设置字体大小
        mPaint.setTextSize(mTextSize);
        //创建矩形
        mRect = new Rect();
        //将字体放入到矩形中
        mPaint.getTextBounds(mText, 0, mText.length(), mRect);

        this.setOnClickListener(new OnClickListener() {
            @Override
            public void onClick(View v) {
                mText = ranDomText();
                postInvalidate();
            }
        });
    }

    private String ranDomText() {
        Random random = new Random();
        StringBuffer sb = new StringBuffer();
        for (int i = 0; i < 4; i++) {
            int anInt = random.nextInt(10);
            sb.append(anInt);
        }
        return sb.toString();
    }

    @Override
    protected void onMeasure(int widthMeasureSpec, int heightMeasureSpec) {
        super.onMeasure(widthMeasureSpec, heightMeasureSpec);
        //获取宽高的测量模式
        int widthMode = MeasureSpec.getMode(widthMeasureSpec);
        int heightMode = MeasureSpec.getMode(heightMeasureSpec);

        //获取宽高的值
        int widthSize = MeasureSpec.getSize(widthMeasureSpec);
        int heightSize = MeasureSpec.getSize(heightMeasureSpec);

        int width;
        int height;

        //设置宽度
        //如果布局里面设置的是固定值或者是match_parent则取测量模式里面的尺寸
        if (widthMode == MeasureSpec.EXACTLY) {
            width = widthSize;
        } else {//如果是其他(warp_content或者无限制)则重新计算
            mPaint.setTextSize(mTextSize);
            mPaint.getTextBounds(mText, 0, mText.length(), mRect);
            int textWidth = mRect.width();
            width = getPaddingLeft() + getPaddingRight() + textWidth;
        }

        //设置高度
        //如果布局里面设置的是固定值或者是match_parent则取测量模式里面的尺寸
        if (heightMode == MeasureSpec.EXACTLY) {
            height = heightSize;
        } else {//如果是其他(warp_content或者无限制)则重新计算
            mPaint.setTextSize(mTextSize);
            mPaint.getTextBounds(mText, 0, mText.length(), mRect);
            int textHeight = mRect.height();
            height = getPaddingTop() + getPaddingBottom() + textHeight;
        }

        //调用父类方法,将view的大小告诉父布局
        setMeasuredDimension(width, height);
    }

    @Override
    protected void onDraw(Canvas canvas) {
        super.onDraw(canvas);
        //设置画笔颜色
        mPaint.setColor(Color.RED);
        //在画布上绘制矩形
        canvas.drawRect(0, 0, getMeasuredWidth(), getMeasuredHeight(), mPaint);
        mPaint.setColor(mColor);
        //在画布上绘制文字
        canvas.drawText(mText, (float) getWidth() / 2 - (float) mRect.width() / 2, (float) getHeight() / 2 + (float) mRect.height() / 2, mPaint);
    }
}
8、注意事项
1.多线程应直接使用post方式
View的内部本身提供了post系列的方法,完全可以替代Handler的作用,使用起来更加方便、直接。
2. 避免内存泄露
主要针对View中含有线程或动画的情况:当View退出或不可见时,记得及时停止该View包含的线程和动画,否则会造成内存泄露问题。
启动线程/ 动画:使用view.onAttachedToWindow(),因为该方法调用的时机是当包含View的Activity启动的时刻
停止线程/ 动画:使用view.onDetachedFromWindow(),因为该方法调用的时机是当包含View的Activity退出或当前View被remove的时刻
上面已经贴出所有用到的代码,至此,本文结束!
源码地址:https://github.com/FollowExcellence/MySelfView
请尊重原创者版权,转载请标明出处:https://blog.csdn.net/m0_37796683/article/details/97810538谢谢!


 959
959

 被折叠的 条评论
为什么被折叠?
被折叠的 条评论
为什么被折叠?
 到【灌水乐园】发言


