


一、redis-shake简介
redis-shake是阿里云开源的用于Redis数据迁移和过滤的工具。
1.1、迁移工具对比
redis-migrate-tool
redis-migrate-tool是唯品会开源的一款Redis异构集群之间的数据实时迁移工具,不过已经有两年没有更新了,我个人觉得这是一款比较完善的工具,特别是数据校验。
redis-shake
RedisShake是阿里云基于豌豆荚开源的redis-port进行二次开发的一个支持Redis异构集群实时同步的工具,它和redis-migrate-tool相比较,我觉得它的优点在于支持前缀key的同步,支持多DB同步,而redis-migrate-tool 只能全量同步,并且如果源做了分库,同步到目标Redis的时候都同步到了db0一个库里面了,这对于做了分库场景的业务是不可行的。
redis-port
redis-port是豌豆荚当年为了让大家方便从redis迁移到Codis开源的一个Redis数据迁移工具,现在也已经很久没更新了。
1.2、redis-shake版本对比
| 迁移工具 | 版本类型 | 版本说明 | 支持redis版本 | 支持模式 |
|---|---|---|---|---|
| redis-shake | redis-shake 3.x | 新版 | Redis 5.0, Redis 6.0 and Redis 7.0 | Supports Standalone, Cluster and some proxies type like Codis, twemproxy, Aliyun Cluster Proxy, Tencent Cloud Proxy |
| redis-shake | redis-shake 2.x | 旧版 | Redis version from 2.x to 6.x | standalone sentinel cluster proxy |
二、单机redis数据迁移
《Linux运维总结:Centos7.6源码安装单实例redis6.2.8》
2.1、环境信息如下
迁移环境信息如下:
| 主机IP | 操作系统 | Redis版本 | CPU架构 | 端口 | 角色 |
|---|---|---|---|---|---|
| 192.168.1.191 | Centos7.6 | 6.2.8 | x86_64 | 7001 | 源主机 |
| 192.168.1.192 | Centos7.6 | 6.2.8 | x86_64 | 7001 | 目标主机 |
2.2、安装redis-shake
1、源端创建测试数据
[root@localhost ~]# for line in {1..10000};do /opt/redis6/bin/redis-cli -h 192.168.1.191 -p 7001 -c -a 1UEJjjGfYZU7dCWy set ops_${line} ${line}; done
2、下载解压redis-shake文件
[root@localhost ~]# mkdir redis-shake && cd redis-shake
[root@localhost redis-shake]# wget https://github.com/alibaba/RedisShake/releases/download/v3.1.7/redis-shake-linux-amd64.tar.gz
[root@localhost redis-shake]# tar axf redis-shake-linux-amd64.tar.gz
3、修改配置文件
[root@localhost redis-shake]# vim sync.toml
type = "sync"

[source]
version = 6.2 # redis version, such as 2.8, 4.0, 5.0, 6.0, 6.2, 7.0, ...
address = "192.168.1.191:7001"
username = "" # keep empty if not using ACL
password = "1UEJjjGfYZU7dCWy" # keep empty if no authentication is required
tls = false
elasticache_psync = "" # using when source is ElastiCache. ref: https://github.com/alibaba/RedisShake/issues/373

[target]
type = "standalone" # "standalone" or "cluster"
version = 6.2 # redis version, such as 2.8, 4.0, 5.0, 6.0, 6.2, 7.0, ...
# When the target is a cluster, write the address of one of the nodes.
# redis-shake will obtain other nodes through the `cluster nodes` command.
address = "192.168.1.192:7001"
username = "" # keep empty if not using ACL
password = "1UEJjjGfYZU7dCWy" # keep empty if no authentication is required
tls = false
2.3、redis-shake执行数据迁移
1、执行下述命令启动redis-shake,redis-shake将开始执行数据迁移
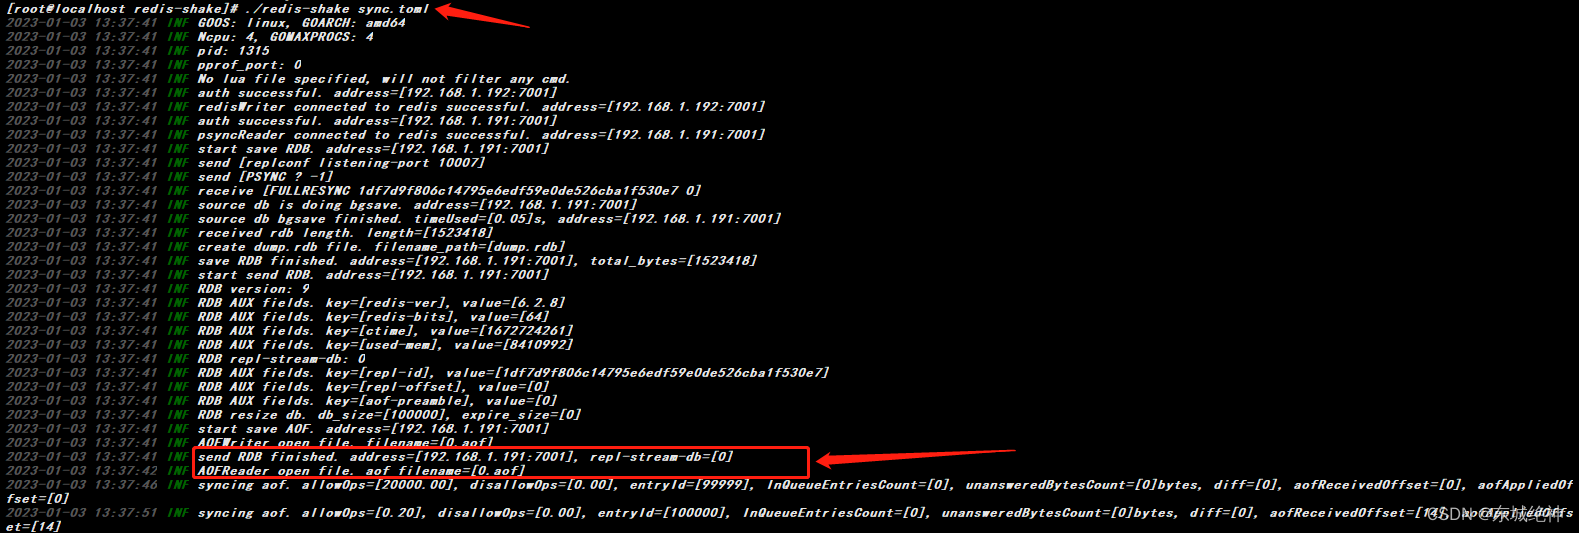
[root@localhost redis-shake]# ./redis-shake sync.toml
说明:当打印的日志出现send RDB finished,表示完成全量数据迁移,接下来进入增量数据迁移阶段,如下图所示:
2、暂停向源库写入数据,等待返回日志中allowOps对应值连续多次为0时,使用Ctrl+C组合键停止运行redis-shake,此时目标库的数据与源库完全一致,您可以将业务的数据库服务由自建Redis数据库切换至Tair或Redis实例。
2.4、校验迁移后的数据
说明:redis-full-check is used to compare whether two redis have the same data. redis-full-check用于比较2个redis数据是否一致,支持单节点、主从、集群版、以及多种proxy,支持同构以及异构对比,redis的版本支持2.x-5.x。当前redis版本为6.x,也是可以使用,因为测试的不是很全面,也有可能会在某些场景下存在问题。
[root@localhost ~]# wget https://github.com/alibaba/RedisFullCheck/releases/download/release-v1.4.8-20200212/redis-full-check-1.4.8.tar.gz
[root@localhost ~]# tar axf redis-full-check-1.4.8.tar.gz && cd redis-full-check-1.4.8
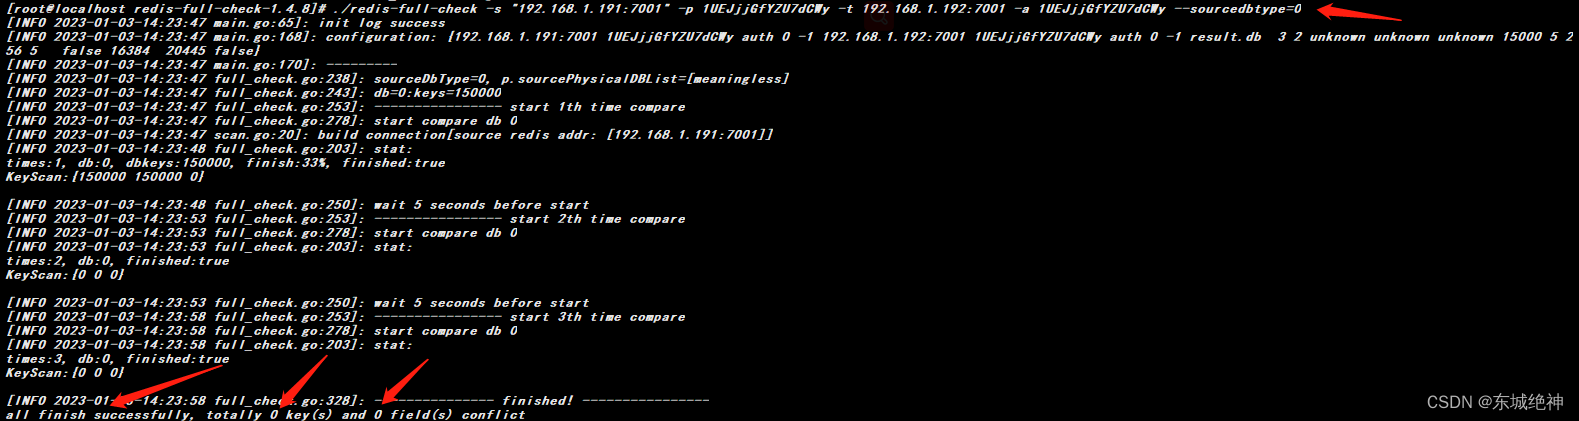
[root@localhost redis-full-check-1.4.8]# ./redis-full-check -s "192.168.1.191:7001" -p 1UEJjjGfYZU7dCWy -t 192.168.1.192:7001 -a 1UEJjjGfYZU7dCWy --sourcedbtype=0 --targetdbtype=0
说明:执行完成后命令行输出校对结,如果此处为0,则两端数据一致
三、redis哨兵集群数据迁移
《Linux运维总结:Centos7.6部署redis6.2.8哨兵集群》
3.1、环境信息如下
源端环境信息如下:
| 主机IP | 操作系统 | Redis版本 | CPU架构 | 端口 | 角色 |
|---|---|---|---|---|---|
| 192.168.1.191 | Centos7.6 | 6.2.8 | x86_64 | 7001 | master |
| 192.168.1.191 | Centos7.6 | 6.2.8 | x86_64 | 7002 | slave |
| 192.168.1.191 | Centos7.6 | 6.2.8 | x86_64 | 7003 | slave |
| 192.168.1.191 | Centos7.6 | 6.2.8 | x86_64 | 7004 | sentinel |
| 192.168.1.191 | Centos7.6 | 6.2.8 | x86_64 | 7005 | sentinel |
| 192.168.1.191 | Centos7.6 | 6.2.8 | x86_64 | 7006 | sentinel |
目标端环境信息如下:
| 主机IP | 操作系统 | Redis版本 | CPU架构 | 端口 | 角色 |
|---|---|---|---|---|---|
| 192.168.1.192 | Centos7.6 | 6.2.8 | x86_64 | 7001 | master |
| 192.168.1.192 | Centos7.6 | 6.2.8 | x86_64 | 7002 | slave |
| 192.168.1.192 | Centos7.6 | 6.2.8 | x86_64 | 7003 | slave |
| 192.168.1.192 | Centos7.6 | 6.2.8 | x86_64 | 7004 | sentinel |
| 192.168.1.192 | Centos7.6 | 6.2.8 | x86_64 | 7005 | sentinel |
| 192.168.1.192 | Centos7.6 | 6.2.8 | x86_64 | 7006 | sentinel |
3.2、安装redis-shake
1、源端创建测试数据
[root@localhost ~]# for line in {1..10};do /data/pkgs/redis/master/bin/redis-cli -h 192.168.1.191 -p 7001 -c -a 1UEJjjGfYZU7dCWy set ops_${line} ${line}; done
2、下载解压redis-shake文件
[root@localhost ~]# mkdir redis-shake && cd redis-shake
[root@localhost redis-shake]# wget https://github.com/alibaba/RedisShake/releases/download/v3.1.7/redis-shake-linux-amd64.tar.gz
[root@localhost redis-shake]# tar axf redis-shake-linux-amd64.tar.gz
3、修改配置文件
说明:standalone:标准(主从)架构、集群架构代理模式(Proxy)、读写分离架构。
[root@localhost redis-shake]# vim sync.toml
type = "sync"

[source]
version = 6.2 # redis version, such as 2.8, 4.0, 5.0, 6.0, 6.2, 7.0, ...
address = "192.168.1.191:7001"
username = "" # keep empty if not using ACL
password = "1UEJjjGfYZU7dCWy" # keep empty if no authentication is required
tls = false
elasticache_psync = "" # using when source is ElastiCache. ref: https://github.com/alibaba/RedisShake/issues/373

[target]
type = "standalone" # "standalone" or "cluster"
version = 6.2 # redis version, such as 2.8, 4.0, 5.0, 6.0, 6.2, 7.0, ...
# When the target is a cluster, write the address of one of the nodes.
# redis-shake will obtain other nodes through the `cluster nodes` command.
address = "192.168.1.192:7001"
username = "" # keep empty if not using ACL
password = "1UEJjjGfYZU7dCWy" # keep empty if no authentication is required
tls = false
3.3、redis-shake执行数据迁移
1、在主节点上,执行下述命令启动redis-shake,redis-shake将开始执行数据迁移
[root@localhost redis-shake]# ./redis-shake sync.toml
2、暂停向源库写入数据,等待返回日志中allowOps对应值连续多次为0时,使用Ctrl+C组合键停止运行redis-shake,此时目标库的数据与源库完全一致,您可以将业务的数据库服务由自建Redis数据库切换至Tair或Redis实例。
3.4、校验迁移后的数据
参考官网:校验迁移后的数据
说明:redis-full-check is used to compare whether two redis have the same data. redis-full-check用于比较2个redis数据是否一致,支持单节点、主从、集群版、以及多种proxy,支持同构以及异构对比,redis的版本支持2.x-5.x。当前redis版本为6.x,也是可以使用,因为测试的不是很全面,也有可能会在某些场景下存在问题。
[root@localhost ~]# wget https://github.com/alibaba/RedisFullCheck/releases/download/release-v1.4.8-20200212/redis-full-check-1.4.8.tar.gz
[root@localhost ~]# tar axf redis-full-check-1.4.8.tar.gz && cd redis-full-check-1.4.8
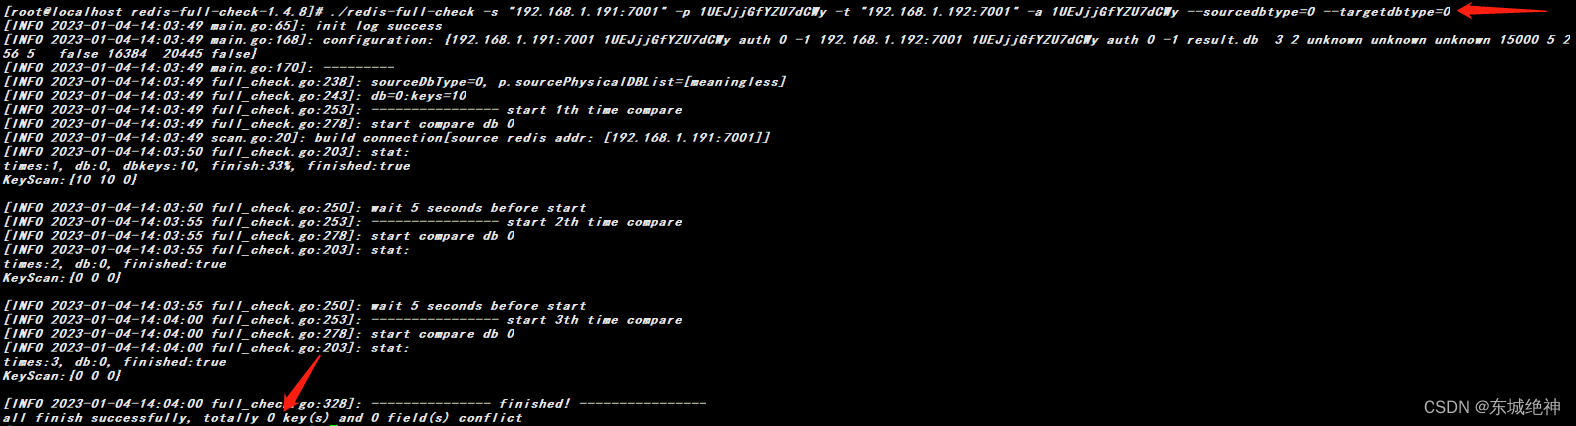
[root@localhost redis-full-check-1.4.8]# ./redis-full-check -s "192.168.1.191:7001" -p 1UEJjjGfYZU7dCWy -t "192.168.1.192:7001" -a 1UEJjjGfYZU7dCWy --sourcedbtype=0 --targetdbtype=0
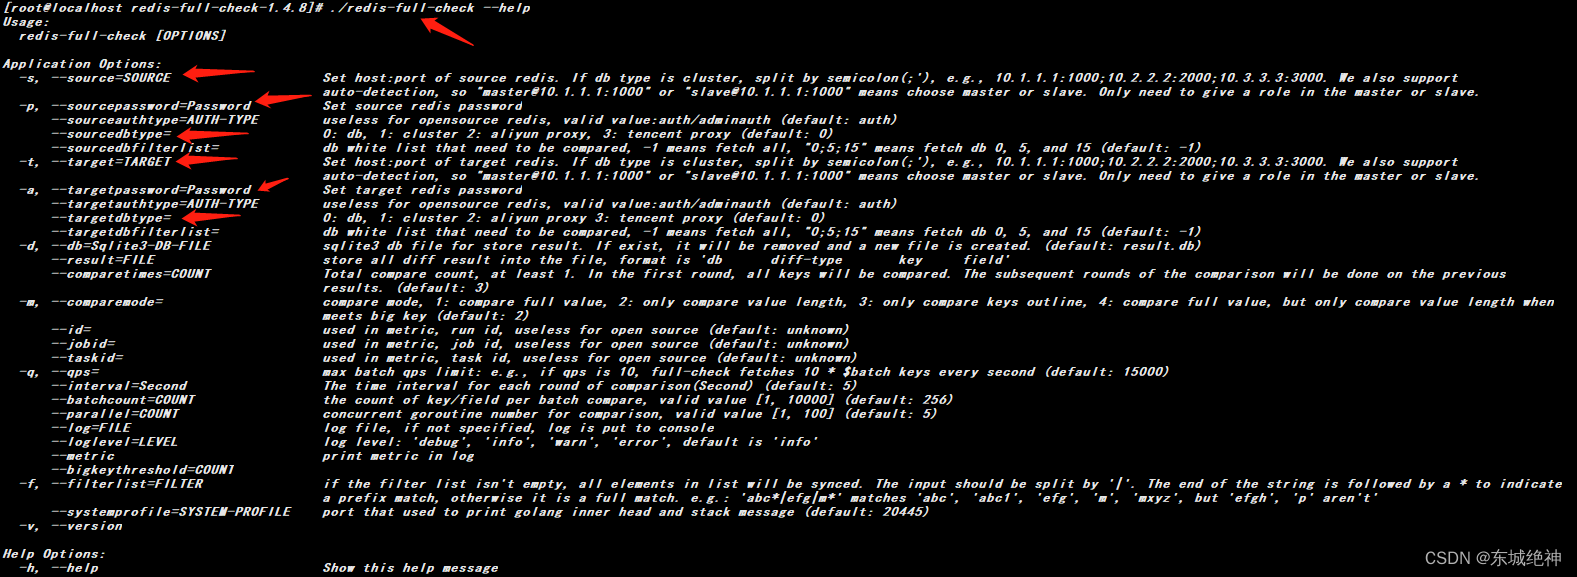
说明:redis-full-check参数如下所示:
说明:执行完成后命令行输出校对结,如果此处为0,则两端数据一致
四、redis cluster集群数据迁移
《Linux运维总结:Centos7.6部署redis6.2.8 cluster集群》
4.1、环境信息如下
源端环境信息如下:
| 主机IP | 操作系统 | Redis版本 | CPU架构 | 端口 | 角色 |
|---|---|---|---|---|---|
| 192.168.1.191 | Centos7.6 | 6.2.8 | x86_64 | 7001 | master |
| 192.168.1.191 | Centos7.6 | 6.2.8 | x86_64 | 7002 | master |
| 192.168.1.191 | Centos7.6 | 6.2.8 | x86_64 | 7003 | master |
| 192.168.1.191 | Centos7.6 | 6.2.8 | x86_64 | 7004 | slave |
| 192.168.1.191 | Centos7.6 | 6.2.8 | x86_64 | 7005 | slave |
| 192.168.1.191 | Centos7.6 | 6.2.8 | x86_64 | 7006 | slave |
目标端环境信息如下:
| 主机IP | 操作系统 | Redis版本 | CPU架构 | 端口 | 角色 |
|---|---|---|---|---|---|
| 192.168.1.192 | Centos7.6 | 6.2.8 | x86_64 | 7001 | master |
| 192.168.1.192 | Centos7.6 | 6.2.8 | x86_64 | 7002 | master |
| 192.168.1.192 | Centos7.6 | 6.2.8 | x86_64 | 7003 | master |
| 192.168.1.192 | Centos7.6 | 6.2.8 | x86_64 | 7004 | slave |
| 192.168.1.192 | Centos7.6 | 6.2.8 | x86_64 | 7005 | slave |
| 192.168.1.192 | Centos7.6 | 6.2.8 | x86_64 | 7006 | slave |
4.2、安装redis-shake
1、源端创建测试数据
[root@localhost ~]# for line in {1..1000};do /data/pkgs/redis/7001/bin/redis-cli -h 192.168.1.191 -p 7001 -c -a 1UEJjjGfYZU7dCWy set ops_${line} ${line}; done
2、分别在三个主节点上下载解压redis-shake文件
[root@localhost ~]# mkdir redis-shake1 && cd redis-shake1
[root@localhost redis-shake1]# wget https://github.com/alibaba/RedisShake/releases/download/v3.1.7/redis-shake-linux-amd64.tar.gz
[root@localhost redis-shake1]# tar axf redis-shake-linux-amd64.tar.gz

[root@localhost ~]# mkdir redis-shake2 && cd redis-shake2
[root@localhost redis-shake2]# wget https://github.com/alibaba/RedisShake/releases/download/v3.1.7/redis-shake-linux-amd64.tar.gz
[root@localhost redis-shake2]# tar axf redis-shake-linux-amd64.tar.gz

[root@localhost ~]# mkdir redis-shake1 && cd redis-shake3
[root@localhost redis-shake3]# wget https://github.com/alibaba/RedisShake/releases/download/v3.1.7/redis-shake-linux-amd64.tar.gz
[root@localhost redis-shake3]# tar axf redis-shake-linux-amd64.tar.gz
3、修改配置文件
说明:如果源库为集群架构,需要为N个节点启动N个redis-shake工具,源端分别为各节点的连接地址,目标端为相同目标实例地址。源库集群架构为三主三从,所以分别在三个主节点上分别启动redis-shake工具即可,目标端为三个主节点地址即可。
主节点一(192.168.1.191:7001)
[root@localhost redis-shake1]# vim sync.toml
type = "sync"

[source]
version = 6.2 # redis version, such as 2.8, 4.0, 5.0, 6.0, 6.2, 7.0, ...
address = "192.168.1.191:7001"
username = "" # keep empty if not using ACL
password = "1UEJjjGfYZU7dCWy" # keep empty if no authentication is required
tls = false
elasticache_psync = "" # using when source is ElastiCache. ref: https://github.com/alibaba/RedisShake/issues/373

[target]
type = "cluster" # "standalone" or "cluster"
version = 6.2 # redis version, such as 2.8, 4.0, 5.0, 6.0, 6.2, 7.0, ...
# When the target is a cluster, write the address of one of the nodes.
# redis-shake will obtain other nodes through the `cluster nodes` command.
address = "192.168.1.192:7001"
username = "" # keep empty if not using ACL
password = "1UEJjjGfYZU7dCWy" # keep empty if no authentication is required
tls = false
主节点二(192.168.1.191:7002)
[root@localhost redis-shake2]# vim sync.toml
type = "sync"

[source]
version = 6.2 # redis version, such as 2.8, 4.0, 5.0, 6.0, 6.2, 7.0, ...
address = "192.168.1.191:7002"
username = "" # keep empty if not using ACL
password = "1UEJjjGfYZU7dCWy" # keep empty if no authentication is required
tls = false
elasticache_psync = "" # using when source is ElastiCache. ref: https://github.com/alibaba/RedisShake/issues/373

[target]
type = "cluster" # "standalone" or "cluster"
version = 6.2 # redis version, such as 2.8, 4.0, 5.0, 6.0, 6.2, 7.0, ...
# When the target is a cluster, write the address of one of the nodes.
# redis-shake will obtain other nodes through the `cluster nodes` command.
address = "192.168.1.192:7002"
username = "" # keep empty if not using ACL
password = "1UEJjjGfYZU7dCWy" # keep empty if no authentication is required
tls = false
主节点三(192.168.1.191:7003)
[root@localhost redis-shake3]# vim sync.toml
type = "sync"

[source]
version = 6.2 # redis version, such as 2.8, 4.0, 5.0, 6.0, 6.2, 7.0, ...
address = "192.168.1.191:7003"
username = "" # keep empty if not using ACL
password = "1UEJjjGfYZU7dCWy" # keep empty if no authentication is required
tls = false
elasticache_psync = "" # using when source is ElastiCache. ref: https://github.com/alibaba/RedisShake/issues/373

[target]
type = "cluster" # "standalone" or "cluster"
version = 6.2 # redis version, such as 2.8, 4.0, 5.0, 6.0, 6.2, 7.0, ...
# When the target is a cluster, write the address of one of the nodes.
# redis-shake will obtain other nodes through the `cluster nodes` command.
address = "192.168.1.192:7003"
username = "" # keep empty if not using ACL
password = "1UEJjjGfYZU7dCWy" # keep empty if no authentication is required
tls = false
4.3、redis-shake执行数据迁移
1、分别在三个主节点上,执行下述命令启动redis-shake,redis-shake将开始执行数据迁移
[root@localhost redis-shake1]# ./redis-shake sync.toml
[root@localhost redis-shake2]# ./redis-shake sync.toml
[root@localhost redis-shake3]# ./redis-shake sync.toml
2、暂停向源库写入数据,等待返回日志中allowOps对应值连续多次为0时,使用Ctrl+C组合键停止运行redis-shake,此时目标库的数据与源库完全一致,您可以将业务的数据库服务由自建Redis数据库切换至Tair或Redis实例。
4.4、校验迁移后的数据
参考官网:校验迁移后的数据
说明:redis-full-check is used to compare whether two redis have the same data. redis-full-check用于比较2个redis数据是否一致,支持单节点、主从、集群版、以及多种proxy,支持同构以及异构对比,redis的版本支持2.x-5.x。当前redis版本为6.x,也是可以使用,因为测试的不是很全面,也有可能会在某些场景下存在问题。
[root@localhost ~]# wget https://github.com/alibaba/RedisFullCheck/releases/download/release-v1.4.8-20200212/redis-full-check-1.4.8.tar.gz
[root@localhost ~]# tar axf redis-full-check-1.4.8.tar.gz && cd redis-full-check-1.4.8
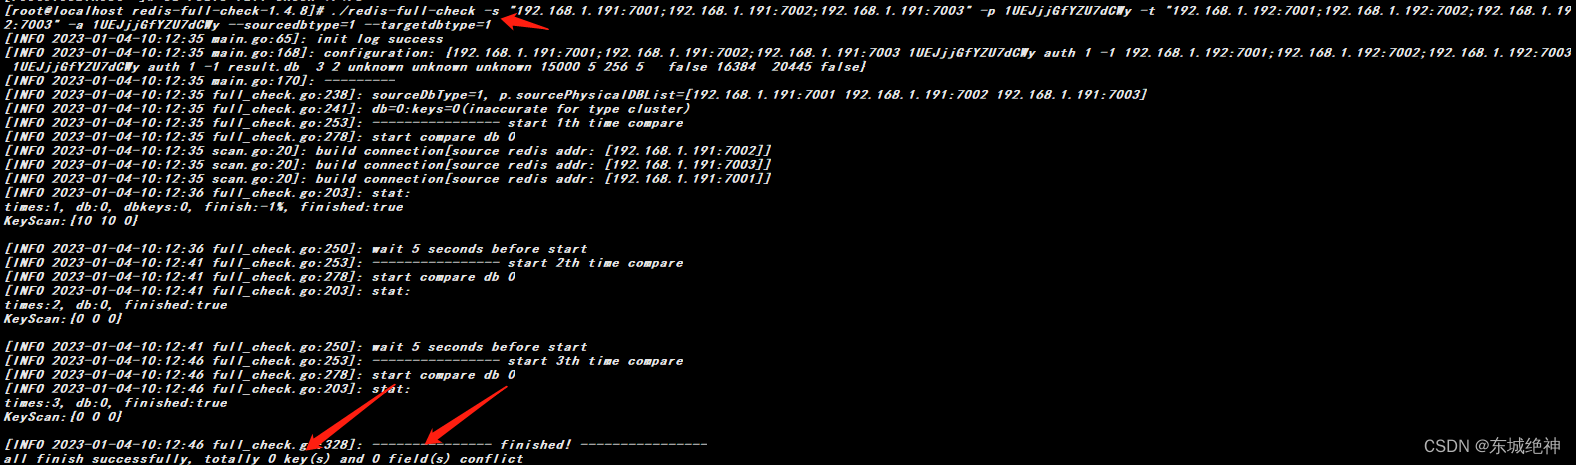
[root@localhost redis-full-check-1.4.8]# ./redis-full-check -s "192.168.1.191:7001;192.168.1.191:7002;192.168.1.191:7003" -p 1UEJjjGfYZU7dCWy \
-t "192.168.1.192:7001;192.168.1.192:7002;192.168.1.192:7003" -a 1UEJjjGfYZU7dCWy \
--sourcedbtype=1 --targetdbtype=1
说明:-s表示源端Redis的连接地址和端口,如果源Redis为集群版,集群中每个地址间需要以半角分号(;)分割不同的连接地址,-s后必须接三个主节点地址或者三个从节点地址,不能把三个主节点和三个从节点全部写上。-t表示目的端Redis的连接地址和端口,如果目的Redis为集群版,集群中每个地址间需要以半角分号(;)分割不同的连接地址,-t后必须接三个主节点地址或者三个从节点地址,不能把三个主节点和三个从节点全部写上。
说明:redis-full-check参数如下所示:
说明:执行完成后命令行输出校对结,如果此处为0,则两端数据一致
总结:整理不易,如果对你有帮助,可否点赞关注一下?
更多详细内容请参考:《Linux运维篇:Linux系统运维指南》


 1万+
1万+


 被折叠的 条评论
为什么被折叠?
被折叠的 条评论
为什么被折叠?
 到【灌水乐园】发言


