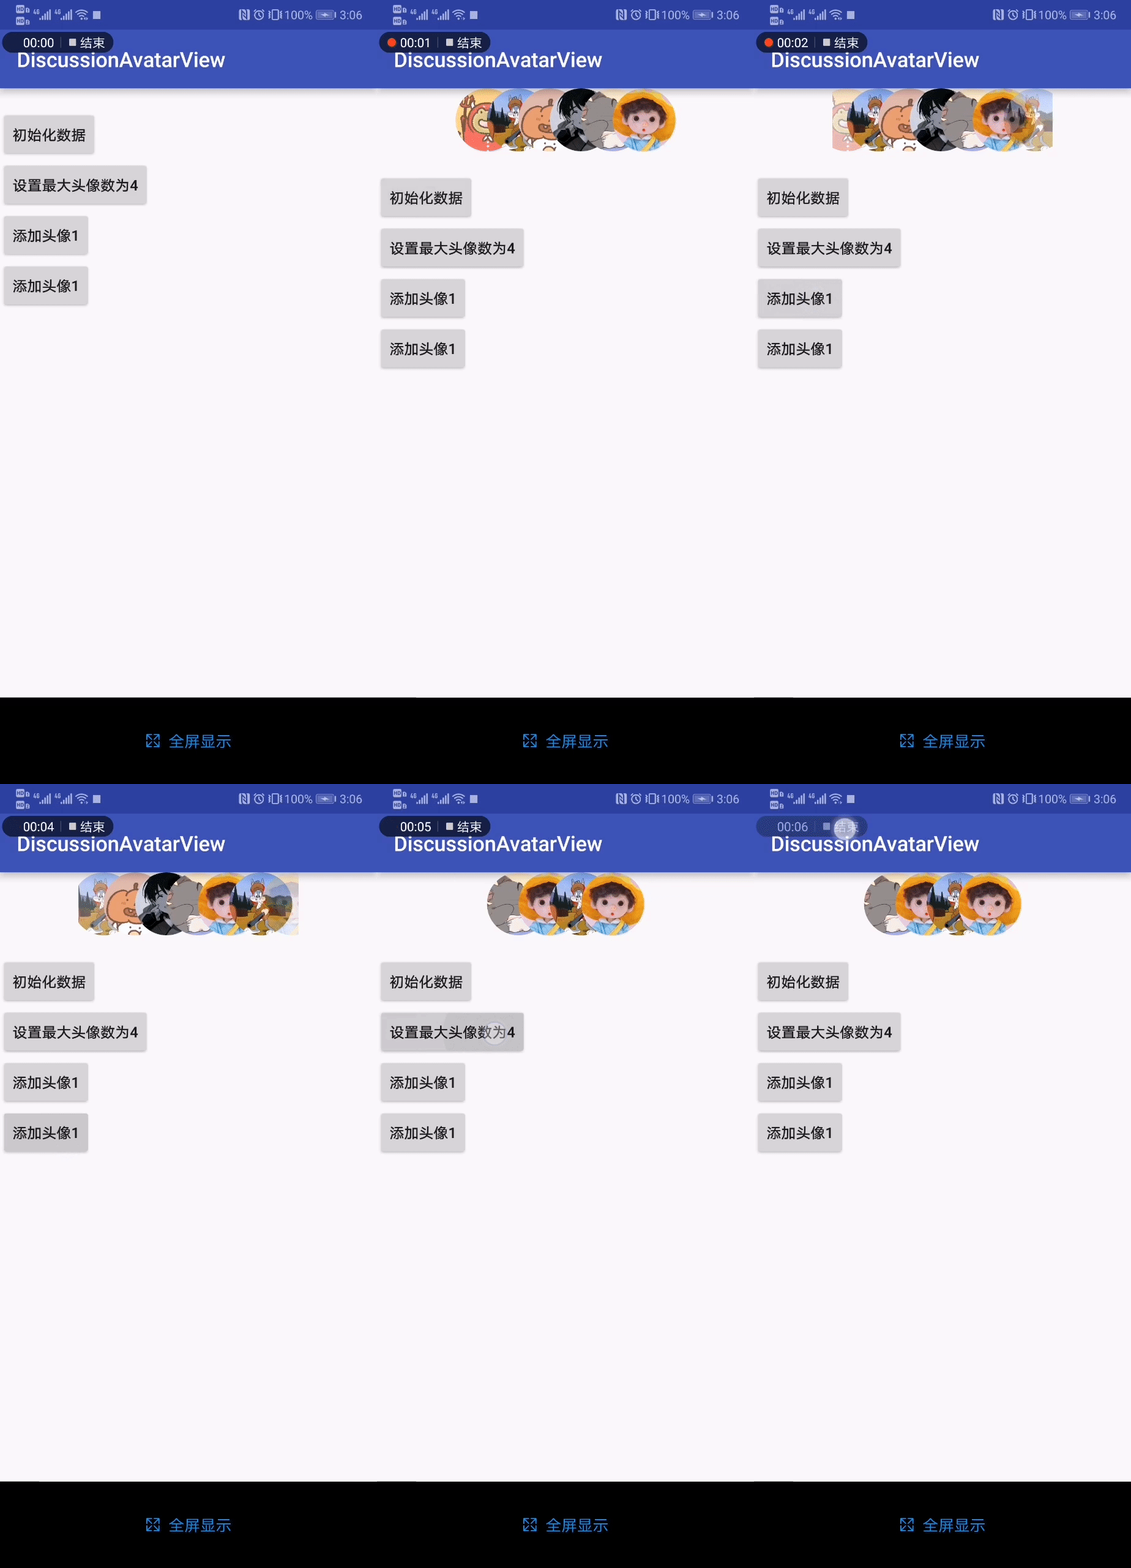
转载请标明出处:https://blog.csdn.net/m0_38074457/article/details/86589825
一、效果图

二、实现步骤

三、代码实现
1、attrs.xml中添加自定义控件的属性
  <declare-styleable name="DiscussionAvatarView">
        <!--头像的半径,dp为单位-->
        <attr name="radius" format="reference|integer" />
        <!--头像间的距离,为头像直径的长度的百分比,dp为单位-->
        <attr name="space" format="reference|float" />
        <!--最多显示多少个头像-->
        <attr name="maxCount" format="reference|integer" />
        <!--是否最后一个显示完全,默认是true-->
        <attr name="isLastComplete" format="reference|boolean" />
        <!--是否显示动画效果-->
        <attr name="isShowAnimation" format="reference|boolean" />
    </declare-styleable>
2、控件代码
1、构造方法中初始化
   private void initView(Context context, AttributeSet attrs) {
        this.mContext = context;
        this.mInflater = LayoutInflater.from(mContext);
        TypedArray array = context.obtainStyledAttributes(attrs, R.styleable.DiscussionAvatarView);
        if (array != null) {
            int radius = array.getInteger(R.styleable.DiscussionAvatarView_radius, 13);
            mSpace = array.getFloat(R.styleable.DiscussionAvatarView_space, (float) 0.5);
            mMaxCount = array.getInteger(R.styleable.DiscussionAvatarView_maxCount, 6);
            isLastComplete = array.getBoolean(R.styleable.DiscussionAvatarView_isLastComplete, true);
            isShowAnimation = array.getBoolean(R.styleable.DiscussionAvatarView_isShowAnimation, true);

            mRadius = DensityUtil.dip2px(context, radius);

            array.recycle();
        }
    }
2、onMeasure中设置控件的宽高
 @Override
    protected void onMeasure(int widthMeasureSpec, int heightMeasureSpec) {
        super.onMeasure(widthMeasureSpec, heightMeasureSpec);
        int heiMeasure = MeasureSpec.getSize(heightMeasureSpec);
        int heiMode = MeasureSpec.getMode(heightMeasureSpec);
        int widMode = MeasureSpec.getMode(widthMeasureSpec);
        int widMeasure = MeasureSpec.getSize(heightMeasureSpec);

        int wid = 0;
        int hei = 0;
        int count = getChildCount();
        for (int i = 0; i < count; i++) {
            View child = getChildAt(i);
            ViewGroup.LayoutParams lp = child.getLayoutParams();
            lp.width = 2 * mRadius;
            lp.height = lp.width;
            child.setLayoutParams(lp);
            // 测量子View的宽和高,系统提供的measureChild
            measureChild(child, widthMeasureSpec, heightMeasureSpec);
            // 子View占据的宽度
            int childWidth = child.getMeasuredWidth();
            // 子View占据的高度
            int childHeight = child.getMeasuredHeight();

            if (i < mMaxCount) {
                if (i == 0) {
                    wid = wid + childWidth;
                } else {
                    wid = (int) (wid + childWidth * mSpace);
                }
            }
            hei = Math.max(hei, childHeight);
        }
        //如果是exactly使用测量宽和高,否则使用自己设置的宽和高
        setMeasuredDimension((widMode == MeasureSpec.EXACTLY) ? widMeasure : wid,
                (heiMode == MeasureSpec.EXACTLY) ? heiMeasure : hei);
    }
3、onLayout对头像排版
@Override
    protected void onLayout(boolean changed, int l, int t, int r, int b) {
        int count = getChildCount();

        int left = -mCurrentOffset;
        int top = 0;
        int right = -mCurrentOffset;
        for (int i = 0; i < count; i++) {
            View child;
            if (isLastComplete) {
                child = getChildAt(i);
            } else {
                child = getChildAt(count - i - 1);
            }
            int childWidth = child.getMeasuredWidth();
            int childHeight = child.getMeasuredHeight();

            if (i == 0) {
                right = right + childWidth;
            } else {
                right = (int) (right + childWidth * mSpace);
            }
            child.layout(left, top, right, childHeight);
            left = (int) (left + childWidth * mSpace);
        }
    }
三、项目中如何引用
步骤1.将JitPack存储库添加到构建文件中
项目的根build.gradle中添加以下代码:
allprojects {
	repositories {
		...
		maven { url 'https://jitpack.io' }
	}
}
步骤2.build.gradle添加依赖项
dependencies {
    implementation 'com.github.hnsycsxhzcsh:DiscussionAvatarView:v1.3'
}
步骤3. 布局中引用控件
    <com.discussionavatarview.DiscussionAvatarView
        android:id="@+id/daview"
        android:layout_width="wrap_content"
        android:layout_height="wrap_content"
        android:layout_gravity="center_horizontal"
        app:isLastComplete="true"
        app:isShowAnimation="true"
        app:maxCount="6"
        app:radius="30"
        app:space="0.5">
    </com.discussionavatarview.DiscussionAvatarView>
步骤4. initDatas初始化数据(也可以直接addData),新增头像使用addData方法,DiscussionAvatarListener(可以不加)为动画效果的监听
备注:
可以在github上下载我的项目:https://github.com/hnsycsxhzcsh/DiscussionAvatarView,如果我的博客对你有帮助的话,欢迎博客点赞支持,并在github右上角star支持!


 819
819


 被折叠的 条评论
为什么被折叠?


