


这里以QQ邮箱为例:
1.打开QQ邮箱,点击“设置”

2.打开“账户”

3.打开服务,并生成授权码
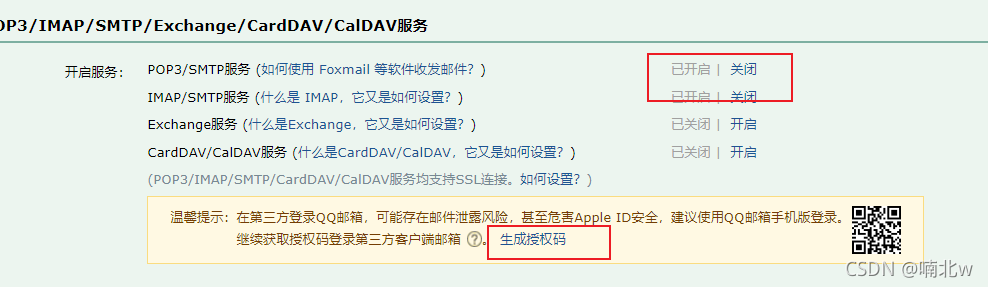
注意授权码记下来!!!
springboot引入依赖
<!--邮件依赖-->
        <dependency>
            <groupId>org.springframework.boot</groupId>
            <artifactId>spring-boot-starter-mail</artifactId>
        </dependency>
编写配置文件yml
spring:
  mail:
    host: smtp.qq.com
    username: your email accout
    password: auth code
    default-encoding: utf-8
    protocol: smtp
    port: 587
接下来定义接口
import cn.hutool.extra.mail.MailException;

public interface MailService {
    /**
     * 发送邮箱
     * @param to 收件人
     * @param subject 主题
     * @param content 正文
     * @throws MailException
     */
    void sendSimpleMail(String to, String subject, String content) throws MailException;
}

}
实现接口
import cn.hutool.extra.mail.MailException;
import com.ihep.astro.service.MailService;
import org.springframework.beans.factory.annotation.Autowired;
import org.springframework.beans.factory.annotation.Value;
import org.springframework.mail.SimpleMailMessage;
import org.springframework.mail.javamail.JavaMailSender;
import org.springframework.stereotype.Service;


@Service
public class MailServiceImpl implements MailService {
    @Autowired
    private JavaMailSender mailSender;

    @Value("${spring.mail.username}")
    private String from;

    @Override
    public void sendSimpleMail(String to, String subject, String content) throws MailException {
        SimpleMailMessage message = new SimpleMailMessage();
        message.setFrom(from); // 邮件发送者
        message.setTo(to); // 邮件接受者
        message.setSubject(subject); // 主题
        message.setText(content); // 内容
        mailSender.send(message);
    }
}
编写测试类
import com.service.MailService;
import org.junit.Test;
import org.junit.runner.RunWith;
import org.springframework.beans.factory.annotation.Autowired;
import org.springframework.boot.test.context.SpringBootTest;
import org.springframework.test.context.junit4.SpringRunner;


@RunWith(SpringRunner.class)
@SpringBootTest
public class ServiceTest {
    @Autowired
    private MailService mailService;

    @Test
    public void sendSimpleMail() {
        mailService.sendSimpleMail("123333@qq.com", "发送邮件测试", "大家好,这是我用springboot进行发送邮件测试");
    }
}
提醒自己注意:
编写配置文件yml的时候,没有写协议和端口两行,不能成功发送邮件。
spring:
  mail:
    host: smtp.qq.com
    username: wh19976552@qq.com
    password: ubvywpnzaqpbebgf
    default-encoding: utf-8
    protocol: smtp
    port: 587


 2809
2809


 被折叠的 条评论
为什么被折叠?
被折叠的 条评论
为什么被折叠?
 到【灌水乐园】发言


