


参考资料:课程链接
目录
1.BOM
- BOM (Browser Object Model): 浏览器对象模型
- 其实就是操作浏览器的一些能力
- 获取一些浏览器的相关信息,比如窗口大小
- 操作浏览器进行页面跳转
- 获取当前浏览器的地址栏信息
- 操作浏览器滚动条
- 浏览器的信息(浏览器版本)
- 让浏览器出现一个弹出框(alert、confirm、prompt)
- …
- BOM的核心就是Windows对象
- window是浏览器内置的一个对象,里面包含着操作浏览器的方法
1.1.获取浏览器窗口尺寸
innerHeight & innerWeight
获取的窗口的高、宽,window可以省略(BOM中,很多处的window都可以省略)
- innerHeight innerWeight
- window.innerHeight window.innerWeight
console.log(innerHeight, innerWidth)
console.log(window.innerHeight,window.innerWidth)
// 上下两部分输出相同
1.2.浏览器的弹出层
- alert() 弹出框
- confirm() 确定框
- prompt() 输入框
他们仨都会阻塞后面JS代码的执行,所以都不建议使用
<button id="btn1">点我</button>
<button id="btn2">点我</button>
<button id="btn3">点我</button>
<script>
    btn1.onclick = function() {
        alert("用户名密码不匹配")
    }

    btn2.onclick = function() {
        var res = confirm("确定删除吗?")
        console.log(res) //true / flase
    }

    btn3.onclick = function() {
        var res = prompt("请输入用户名")
        console.log(res)
    }
</script>
1.3.浏览器的地址信息
<button id="btn">点我跳转到另一个界面</button>
<button id="btn2">刷新</button>
<script>
    console.log(window.location)
    console.log(location)
    console.log(location.href) //浏览器会自动把地址栏信息中的中文字符解析为浏览器可以识别的地址

    btn.onclick = function() {
        // location.href 控制当前页面跳转到指定地址
        location.href = "https://www.bilibili.com"
    }
        //reload 刷新
    btn2.onclick = function() {
        location.reload()
    }
</script>
1.4.浏览器的常见事件
- window.onload()
window.onload = function() {
    //页面所有的资源(图片、视频、dom)都加载完后才会执行
    console.log("加载完成")
}
- window.onresize()
window.onresize = function() {
    console.log("resize")
    // 可以用于监测竖屏横屏的切换
}
- window.onscroll()
window.onscroll = function() {
    console.log("scoll")
    //用于监测页面的滚动,以及滚动距离达到指定距离与否
}
1.5.浏览器的滚动距离
- <!DOCTYPE html> 这是htlm5的标志,有些低版本浏览器不支持html5,在获取浏览器滚动距离时,我们要使用如下写法
console.log(document.body.scrollTop)
- 这是html5的写法
console.log(document.documentElement.scrollTop)
- 所以,我们一般这样写 【保证兼容性】
console.log(document.documentElement.scrollTop || document.body.scrollTop)

console.log(document.documentElement.scrollLeft || document.body.scrollLeft)
1.5.1.案例-跳转到页面顶部
window.scrollTo()有两种写法
-
两个数字 x y
window.scrollTo(0, 0) -
传对象
window.scrollTo({left: 0,right: 0})
<div style="width:100px; height:500px"></div>
<button id="btn">回到顶部</button>
<script>
    console.log(document.documentElement.scrollTop)
    //被卷上去的距离
    window.onscroll = function() {
        console.log(document.documentElement.scrollTop || document.body.scrollTop)
        console.log(document.documentElement.scrollLeft || document.body.scrollLeft)

        if ((document.documentElement.scrollTop || document.body.scrollTop) > 100) {
            console.log("显示回到顶部按钮")//后续替换相应方法
        } else {
            console.log("不显示回到顶部按钮")//后续替换相应方法
        }

    }
    // 点击按钮,跳转到页面顶部
    btn.onclick = function() {
    	//window.scrollTo()有两种写法

        //1.两个数字 x y
        // window.scrollTo(0, 0)

        //2.传对象
        window.scrollTo({
            left: 0,
            right: 0
        })

    }
</script>
1.6.浏览器打开&关闭标签页
// 区别于 location.href在当前页面打开页面
// window.open 在空白页面中打开页面
btn.onclick = function() {
    window.open("https://www.bilibili.com")
}
//window.close 关闭当前页面
btn2.onclick = function() {
    window.close()
}
1.7.浏览器的历史记录
window中有一个对象叫做history,专门用于存储历史记录信息
- window.history.back() 后退一个页面(要有历史记录才会生效)
<!-- 7.html -->
<button id="btn1">前进8.html</button>
<script>
    btn1.onclick = function() {
        location.href = "8.html"
    }
</script>
<!-- 8.html -->
<button id="btn2">后退7.html</button>
<script>
    btn2.onclick = function() {
        window.history.back()
    }
</script>
- window.history.forward() 前进一个界面(要有历史记录才会生效)
<button id="btn1">前进8.html</button>
<script>
    btn1.onclick = function() {
        // location.href = "8.html"

        // 有历史记录的情况下,才能用history.forward()
        history.forward()
    }
</script>
- window.history.go() 跳转(要有历史记录才会生效)
-
前进1个页面 n --> 前进n个页面
- history.go(1)
-
后退1个页面 -n --> 后退n个页面
- history.go(-1)
-
<!-- 7.html -->
<button id="btn1">前进8.html</button>
<script>
    btn1.onclick = function() {
        // 前进1个页面  n --> 前进n个页面
        history.go(1)
    }
</script>
<!-- 8.html -->
<button id="btn2">后退7.html</button>
<script>
    btn2.onclick = function() {
        // 后退1个页面  -n --> 后退n个页面
        history.go(-1)
    }
</script>
1.8.浏览器的本地存储
localStorage VS sessionStorage
localStorage是永久存储,关闭页面及电脑都不会丢失,除非卸载浏览器,删除了相关信息
sessionStorage是临时存储,关闭页面就消失
- localStorage
- 在浏览器本地存储
- 其他页面取不到本页面存储的东西
- 存也只能存字符串,不能存对象
- 存obj的方法
localStorage.setItem(“obj”, JSON.stringify({
name: “brisa”,
“age”: 100
})) - 取obj的方法
console.log(JSON.parse(localStorage.getItem(“obj”)))
- 存obj的方法
// 增
localStorage.setItem("name","brisa")
// 取
localStorage.getItem("name")
// 删
localStorage.removeItem("name")
// 清空
localStorage.clear()
<button id="btn">存</button>
<button id="btn2">取</button>
<button id="btn3">删</button>
<button id="btn4">清空</button>
<script>
    btn.onclick = function() {
        localStorage.setItem("name", "brisa")
        localStorage.setItem("age", "100")
        // 改的话,直接重新存一遍就好了

        // 存obj的方法
        localStorage.setItem("obj", JSON.stringify({
            name: "brisa",
            "age": 100
        }))
    }
    btn2.onclick = function() {
        // 取
        console.log(localStorage.getItem("name"))
        console.log(localStorage.getItem("age"))

        // 取obj的方法
        console.log(JSON.parse(localStorage.getItem("obj")))
    }
    btn3.onclick = function() {
        // 删
        localStorage.removeItem("name")
    }
    btn4.onclick = function() {
        // 清空
        localStorage.clear()
    }
</script>

- sessionStorage
// 增
sessionStorage.setItem("name","brisa")
// 取
sessionStorage.getItem("name")
// 删
sessionStorage.removeItem("name")
// 清空
sessionStorage.clear()
<button id="btn">存</button>
<button id="btn2">取</button>
<button id="btn3">删</button>
<button id="btn4">清空</button>
<script>
    btn.onclick = function() {
        sessionStorage.setItem("name", "brisa")
        sessionStorage.setItem("age", "100")
            // 改的话,直接重新存一遍就好了

        // 存obj的方法
        sessionStorage.setItem("obj", JSON.stringify({
            name: "brisa",
            "age": 100
        }))
    }
    btn2.onclick = function() {
        // 取
        console.log(sessionStorage.getItem("name"))
        console.log(sessionStorage.getItem("age"))

        // 取obj的方法
        console.log(JSON.parse(sessionStorage.getItem("obj")))
    }
    btn3.onclick = function() {
        // 删
        sessionStorage.removeItem("name")
    }
    btn4.onclick = function() {
        // 清空
        sessionStorage.clear()
    }
</script>

1.9.案例-记住用户名
<div>
    用户名:
    <input type="text" id="username">
</div>
<div>
    密码:
    <input type="password" id="password">
</div>
<div>
    <button id="login">登录</button>
</div>

<script>
    // 从本地存储先获取用户名、密码信息
    var uservalue = localStorage.getItem("username")
    var passvalue = localStorage.getItem("password")

    username.value = uservalue
    password.value = passvalue

    //点击登录时进行存储
    login.onclick = function() {
        // 获取里面的内容 还可以赋值
        // console.log(username.value)
        // console.log(password.value)
        localStorage.setItem("username", username.value)
        localStorage.setItem("password", password.value)
    }
</script>
2.DOM
- DOM(Document Object Model):文档对象模型
- 是操作html标签的一些能力
- 获取/移除/创建一个元素
- 向页面里添加一个元素
- 给元素绑定一些事件
- 获取元素的属性
- 给元素添加一些css样式
- …
- DOM的核心对象就是document对象
- document对象是浏览器内置的一个对象,里面存储着专门用来操作元素的各种方法
- DOM:页面中的标签,我们通过JS获取到后,就把这个对象叫做****DOM对象**
2.1.获取一个元素
通过JS获取标签,来对其操作
- html,head,body非常规
console.log(document.documentElement) //rem
console.log(document.head) //head
console.log(document.body) //body
- 常规 => id,class,tag,…
- getElementById
<div id="box"></div>
<script>
    // 1.id可以直接获取
    // console.log(box)
    // box.innerHTML = '111'

    // getElementById
    var box = document.getElementById('box')
    box.innerHTML = '22222'
    console.log(box)
</script>
- getElementsByClassName
获取到的是一个伪数组,不过可以用下标索引的方式去操作它
<ul>
    <li class="news">1111</li>
    <li class="news">1111</li>
    <li class="news">1111</li>
    <li class="news">1111</li>
    <li class="news">1111</li>
</ul>
<script>
    // getElementsByClassName
    var items = document.getElementsByClassName('news')
    console.log(items) //伪数组
    // console.log(items.filter) //显示undefined,说明这不是一个真的数组

    // items[0].innerHTML = "news-111111"
    for (var i = 0; i < items.length; i++) {
        items[i].innerHTML = 'news' + i
    }

    // set -> Array.from 转数组
    var newitems = Array.from(items)
    console.log(newitems.filter) //转成数组后,可以使用这个方法了
</script>
- getElementsByTagName
获取到的是一个伪数组
<ul>
    <li class="news">1111</li>
    <li class="news">1111</li>
    <li class="news">1111</li>
    <li class="news">1111</li>
    <li class="news">1111</li>
</ul>
<script>
    // getElementsByTagName
    var items1 = document.getElementsByTagName('li')
    console.log(items1) //仍然是伪数组
</script>
- getElementsByName
获取到的是一个伪数组
<input type="text" name='username'>
<input type="password" name="password" id="">
<script>
    // getElementsByName
    var username = document.getElementsByName('username')
    username[0].value = 'brisa' //也是伪数组,不过写html时要尽量避免同名
    console.log(username[0].value)

    var password = document.getElementsByName('password')
</script>
- querySelector
新版浏览器才支持,和css获取对象的方式差不多,只能返回一个对象
<div id="box"></div>
<ul>
    <li class="news">1111</li>
    <li class="news">1111</li>
    <li class="news">1111</li>
    <li class="news">1111</li>
    <li class="news">1111</li>
</ul>
<script>
    //querySelector
    var item2 = document.querySelector('#box')
    console.log(item2)
    var item3 = document.querySelector('ul li')
    console.log(item3)
</script>
- querySelectorAll
一次可以获取多个对象
<ul>
    <li class="news">1111</li>
    <li class="news">1111</li>
    <li class="news">1111</li>
    <li class="news">1111</li>
    <li class="news">1111</li>
</ul>
<script>
    // querySelectorAll 返回所有对象
    var items4 = document.querySelectorAll('ul li.news')
    console.log(items4)
</script>
2.2.操作元素属性
首先要区分元素自带(原生)属性 和 自定义属性
<div id='box' brisa='hello'></div>
<!-- id是原生的 brisa是自定义的 -->
2.2.1.操作原生属性
直接.xx属性进行获取和更改
<div id="box"></div>
<input type="text" value="hello" id="username" />
<input type="checkbox" checked id="remember" />
<img src="" alt="" id="photo">
<script>
    // 操作原生属性
    box.innerHTML = "hhhhh";
    // console.log(username.type) // text
    username.type = "password"; //把该input的type改为password类型
    remember.checked = false
    photo.src = 'https://tse3-mm.cn.bing.net/th/id/OIP-C.GyetURhYMDMpQ1aDOh8VnQHaHa?w=174&h=180&c=7&r=0&o=5&dpr=1.31&pid=1.7'
</script>
2.2.2.操作自定义属性
- 方式一
<div id="box"></div>
<ul>
    <li>1</li>
    <li>2</li>
    <li>3</li>
    <li>4</li>
    <li>5</li>
</ul>
<script>
    //操作自定义属性
    // 创建自定义属性(也可以直接在html标签内手动添加) setAttribute
    box.setAttribute('brisa', '111111')

    // 获取自定义属性 getAttribute
    console.log(box.getAttribute('brisa'))

    // 移除自定义属性 removeAttribute
    box.removeAttribute('brisa')
    // console.log(box.getAttribute('brisa'))//null

    // eg.1.给li加上自定义属性
    var litems = document.getElementsByTagName('li')
    for (var i = 0; i < litems.length; i++) {
        litems[i].setAttribute('liIndex', i + 1)
    }
</script>
- 方式二
这是h5出的新约定,目前更建议使用方式二这种方法
<ul>
    <li>1</li>
    <li>2</li>
    <li>3</li>
    <li>4</li>
    <li>5</li>
</ul>

<div id="box2" data-brisa="hello" data-tiechui="hello2"></div>
<script>
    // h5 ---> 约定: data-**** 自定义属性
    // 获取
    console.log(box2.dataset)
    console.log(box2.dataset.brisa)
    // 添加
    box2.dataset.xiaoming = 'hello3'
    // 删除
    delete box2.dataset.xiaoming
    delete box2.dataset.brisa
    delete box2.dataset.tiechui

    // eg.2.给li加上自定义属性
    var litems = document.getElementsByTagName('li')
    for (var i = 0; i < litems.length; i++) {
        litems[i].dataset.index = i + 1
    }
</script>
2.2.3.案例-密码可视
<input type="password" id="pwd">
<button id="eyeBtn">eye</button>

<script>
    var passInput = document.getElementById('pwd')
    var eyeBtn = document.querySelector('#eyeBtn')

    eyeBtn.onclick = function() {
        console.log(passInput.type)
        if (passInput.type === 'password') {
            passInput.type = 'text'
        } else {
            passInput.type = 'password'
        }
    }
</script>
2.2.4.案例-购物车全选框
<input type="checkbox" id="all" />全选/全不选
<hr />
<ul class="shop">
    <li><input type="checkbox" />商品1</li>
    <li><input type="checkbox" />商品2</li>
    <li><input type="checkbox" />商品3</li>
    <li><input type="checkbox" />商品4</li>
</ul>
<script>
    var oAll = document.querySelector("#all");
    var oitems = document.querySelectorAll(".shop input");
    oAll.onclick = function () {
    // console.log(oAll.checked)
    for (var i = 0; i < oitems.length; i++) {
        oitems[i].checked = oAll.checked;
    }
    };
    for (var i = 0; i < oitems.length; i++) {
    oitems[i].onclick = function () {
        var count = 0;
        //for 判断每一项,如果checked count++
        for (var i = 0; i < oitems.length; i++) {
        if (oitems[i].checked) {
            count++;
        }
        if (count === oitems.length) {
            oAll.checked = true;
        } else {
            oAll.checked = false;
        }
        }
    };
    }
</script>
2.3.操作元素文本内容
2.3.1.innerHTML
- 获取时,会获取到所有内容,包括标签
- 赋值时,会解析标签内容
console.log(box.innerHTML); //所有信息,包括标签
box.innerHTML = "<h1>say hi</h1>"; // 页面显示一级标题say hi
2.3.2.innerText
- 获取时,只获取到 text 文本内容
- 赋值时,不会解析标签,直接全部显示
console.log(box.innerText); // 只获取文本
box.innerText = "<h1>say hi</h1>"; //页面显示<h1>say hi</h1>
2.3.3.value
<input type="text" id="uname" value="hello" />
<script>
  //3.value
  console.log(uname.value);
  uname.value = "2222";
</script>
2.3.4.案例-页面渲染
<ul>
  <!-- <li>
        <img src="https://static.maizuo.com/pc/v5/usr/movie/f31367bb1a275f032ea3793a0571d9e0.jpg?x-oss-process=image/quality,Q_70" alt="">
        <h3>万里归途</h3>
        <p>观众评分7.3</p>
    </li> -->
</ul>
<script>
  var filmList = [
    {
      url: "https://static.maizuo.com/pc/v5/usr/movie/f31367bb1a275f032ea3793a0571d9e0.jpg?x-oss-process=image/quality,Q_70",
      title: "万里归途",
      grade: 7.3,
    },
    {
      url: "https://pic.maizuo.com/usr/movie/48a4189005bb14638db1f38263dffbc1.jpg?x-oss-process=image/quality,Q_70",
      title: "平凡英雄",
      grade: 7.2,
    },
    {
      url: "https://pic.maizuo.com/usr/movie/f85b53cad68c6c0c2cba934107f2199e.jpg?x-oss-process=image/quality,Q_70",
      title: "哥,你好",
      grade: 7.9,
    },
    {
      url: "https://pic.maizuo.com/usr/movie/abda2a3b3a3d6734e22ad7430b5e2854.jpg?x-oss-process=image/quality,Q_70",
      title: "还是觉得你最好",
      grade: 7.7,
    },
    {
      url: "https://pic.maizuo.com/usr/movie/1ce4633160a172867…5b85e4a1cab3.jpg?x-oss-process=image/quality,Q_70",
      title: "新神榜:杨戬",
      grade: 7.9,
    },
    {
      url: "https://pic.maizuo.com/usr/movie/338032d3924a20777…4d817251e188.jpg?x-oss-process=image/quality,Q_70",
      title: "搜救",
      grade: 7,
    },
  ];
  var FilmItems = filmList.map(function (item) {
    return `<li><img src="${item.url}" alt="">
        <h3>${item.title}</h3>
        <p>观众评分${item.grade}</p><li>`;
  });
  console.log(FilmItems.join(""));
  var oul = document.querySelector("ul");
  oul.innerHTML = FilmItems.join("");
</script>
2.4.操作元素样式
2.4.1.style
没有-符号的样式,直接通过 style.样式名获取
有 - 符号的样式,可以用 style[‘样式名’]获取,也可以通过 style.驼峰样式名 获取
// 1.行内样式 style
// 获取方法
console.log(box.style.width);
console.log(box.style["background-color"]);
console.log(box.style.backgroundColor); //驼峰
// 更改
box.style.width = "200px";
box.style.backgroundColor = "blue";
2.4.2.getComputedStyle
只能获取
内部样式,外部样式,行内样式都能获取到
ie 浏览器低版本会有兼容问题,换一种方法获取【obox.currentStyle.width】
//2.内部样式,外部样式,行内样式
// 只能获取 getComputedStyle 标准方法
var obox = document.getElementById("box");
var res1 = getComputedStyle(obox).width;
var res2 = getComputedStyle(obox).backgroundColor;
var res3 = getComputedStyle(obox)["background-color"];
console.log(res1, res2, res3);
2.5.操作元素类名
2.5.1.className
console.log(box.className); // 获取

box.className = "item item2 item3"; // 更改
box.className += " item4"; //要有空格
2.5.2.classList
// .classList 属性
console.log(box.classList); //获取
box.classList.add("item5"); //增加
box.classList.remove("item3"); //删除
box.classList.toggle("item"); //切换 (有就删除、没有就增加)

console.log(box.classList);
btn.onclick = function () {
  box.classList.toggle("item"); //切换 (有就删除、没有就增加)
};
2.5.3.案例-简易选项卡
<!-- head -->
<style>
  * {
    margin: 0;
    padding: 0;
  }

  ul {
    display: flex;
    list-style: none;
  }

  li {
    height: 50px;
    line-height: 50px;
    text-align: center;
    flex: 1;
  }

  .active {
    color: red;
    border-bottom: 1px solid #f00;
  }
</style>

<!-- body -->
<ul>
  <li id="item1" class="active">正在热映</li>
  <li id="item2">即将上映</li>
</ul>
<script>
  item1.onclick = function () {
    item1.classList.add("active");
    item2.classList.remove("active");
  };
  item2.onclick = function () {
    item1.classList.remove("active");
    item2.classList.add("active");
  };
</script>
2.5.4.案例-选项卡
尤其要注意切换部分的代码
<!-- ... -->
<head>
    <!-- ... -->
    <style>
        * {
            margin: 0;
            padding: 0;
        }
        ul {
            list-style: none;
        }
        .header {
            display: flex;
            width: 500px;
        }
        .header li {
            flex: 1;
            height: 50px;
            line-height: 50px;
            text-align: center;
            border: 1px solid #000;
        }
        .box {
            position: relative;
        }
        .box li {
            position: absolute;
            left: 0;
            top: 0;
            width: 500px;
            height: 200px;
            background-color: yellow;
            display: none;
        }
        .header .active {
            background-color: #f00;
        }
        .box .active {
            display: block;
        }
    </style>
</head>

<body>
    <ul class="header">
        <li class="active">1</li>
        <li>2</li>
        <li>3</li>
        <li>4</li>
    </ul>
    <ul class="box">
        <li class="active">111</li>
        <li>222</li>
        <li>333</li>
        <li>444</li>
    </ul>

    <script>
        var oHeaderItems = document.querySelectorAll('.header li')
        var oBoxItems = document.querySelectorAll('.box li')

        /*下面这个方法有坑,可能人为点击来不及响应就已经for循环完了,因此每次点击输出的都是4
        for (var i = 0; i < oHeaderItems.length; i++) {
            oHeaderItems[i].onclick = function() {
                console.log(i)
            }
        } */

        for (var i = 0; i < oHeaderItems.length; i++) {
            // 1.自定义属性
            oHeaderItems[i].dataset.index = i
            oHeaderItems[i].onclick = handler
        }

        function handler(){
            // 2.获取自身上的属性(使用this,获取当前对象)
            var index = this.dataset.index

            //2.1所有的都移除active
            for (var j = 0; j < oHeaderItems.length; j++) {
                oHeaderItems[j].classList.remove('active')
                oBoxItems[j].classList.remove('active')

            }
            oHeaderItems[index].classList.add('active')
            oBoxItems[index].classList.add('active')
        }
    </script>
</body>

</html>
2.6.DOM节点
2.6.1.DOM节点
DOM节点一般分为3类:元素节点,文本节点,属性节点(还可能会有注释节点)
元素节点:也即标签结点
通过getElementBy…获取到的都是元素节点
文本节点:标签里的文字
通过innerText获取到的是元素的文本节点
属性节点:每一个标签上的属性
通过getAttribute获取到的是元素的属性节点
注释节点:不会显示在页面
<div id='box'>
    111
    <p>22222</p>
    <!-- 我是一段注释哦 -->
</div>
<script>
    // Q: div里有几个亲儿子节点?
    //     A:5个。分别是:
    //         (1)文本节点
    //             \n
    //             111
    //             \n
    //         (2)标签节点
    //         <p>22222</p>
    //         (3)文本节点
    //         \n
    //         (4)comment结点(注释节点)
    //         <!-- 我是一段注释哦 -->
    //         (5)文本节点
    //         \n
</script>
2.6.2.获取节点的方式
- childNodes VS children
console.log(box.childNodes) //获取所有节点
console.log(box.children)  //只获取元素节点
- firstChild VS firstElementChild
console.log(box.firstChild)  //第一个节点
console.log(box.firstElementChild) //第一个元素节点
- lastChild VS lastElementChild
console.log(box.lastChild)  //最后一个节点
console.log(box.lastElementChild) //最后一个元素节点
- previousSibling VS previousElementSibling
console.log(box.previousSibling) //前一个兄弟节点
console.log(box.previousElementSibling) //前一个兄弟元素节点
- nextSibling VS nextElementSibling
console.log(box.nextSibling) //下一个兄弟节点
console.log(box.nextElementSibling) //下一个兄弟元素节点
- parentNode VS ParentElement
console.log(box.parentNode) //父亲节点
console.log(box.ParentElement) //父亲元素节点
- attributes
console.log(box.attributes) //找到属性节点
console.log(box.attributes[0],box.attributes[1]) //找到第一个属性节点,第二个属性节点...
2.6.3.操作DOM节点
- 创建一个节点
- createElement() 创建元素节点
- createTextNode() 创建文本节点
- 插入
- appendChild()
- insertBefore()
- 删除
- removeChild()
- remove()
- 替换
- replaceChild(新的节点,老的节点)
- 克隆
- cloneNode(true) false不克隆后代,true克隆后代
<body>
    <div id="box">
        <div id="child">11111</div>
    </div>
    <script>
        // 1.创建节点
        var odiv = document.createElement('div')
        odiv.className = 'aaa'
        odiv.id = 'aaa'
        odiv.style.background = 'yellow'
        odiv.innerHTML = '我是新创建的节点'
        console.log(odiv)

        // 2.1.插入节点
        // box.appendChild(odiv)

        // 2.2.insertBefore(要插入的节点,被插队的节点)
        box.insertBefore(odiv, child) /*要插入的节点,被插队的节点*/


        // 3.1.删除孩子节点(节点对象)
        // box.removeChild(child)

        // 3.2.删除自己及后代节点
        // box.remove() //删除自己及后代节点

        // 4.替换节点 replaceChild(新的节点,老的节点)
        var odiv2 = document.createElement('div')
        odiv2.innerHTML = '222'
        box.replaceChild(odiv2, child)

        // 5.克隆节点() false不克隆后代,true克隆后代
        var oCloneBox = box.cloneNode(true)
        console.log(oCloneBox)
        oCloneBox.id = 'box2'
        document.body.appendChild(oCloneBox)
    </script>
</body>
2.6.4.案例-动态删除
<body>
    <ul id="list">

    </ul>
    <script>
        var arr = ['111', '222', '333']
        for (var i = 0; i < arr.length; i++) {
            var oli = document.createElement('li')
            oli.innerHTML = arr[i]

            var obutton = document.createElement('button')
            obutton.innerHTML = 'delete'
            obutton.onclick = handler //没有括号
            oli.appendChild(obutton)

            list.appendChild(oli)
        }

        function handler() {
            // console.log(this)
            this.parentNode.remove()
        }
    </script>

</body>
2.6.5.节点属性
- nodeType 节点类型
- nodeName 节点名字
- nodeValue 节点值
[外链图片转存失败,源站可能有防盗链机制,建议将图片保存下来直接上传(img-v9L3XsAE-1672900805781)(images/ec4d2813a178429f961d9ab75184db803aec4a27aac10895fc0045a159c5e2cb.png)]
2.7.获取元素尺寸
获取元素的‘占地面积’
-
offsetWidth 和 offsetHeight
- offsetwidth :获取的是元素内容+ padding + border的宽度
- offsetHeight :获取的是元素内容+ padding + border的高度
-
clientWidth 和 clientHeight
- clientwidth :获取的是元素内容+ padding的宽度
- clientHeight :获取的是元素 内容+ padding的高度
注意:
- 获取的尺寸是没有单位的数字
- 当元素在页面不占位置时,获取到的是0
- 0 display:none; display:none;取不到offset* ,client*
- box-sizing的设置对上述计算方式没有影响
<!DOCTYPE html>
<html lang="en">

<head>
    <meta charset="UTF-8">
    <meta http-equiv="X-UA-Compatible" content="IE=edge">
    <meta name="viewport" content="width=device-width, initial-scale=1.0">
    <title>Document</title>
    <style>
        div {
            width: 100px;
            height: 100px;
            padding: 100px;
            border: 5px solid red;
            background-color: pink;
            box-sizing: border-box;
            display: none;
        }
    </style>
</head>

<body>
    <div id="box">

    </div>
    <script>
        console.log(getComputedStyle(box).width) //只能拿到内容的宽度
        console.log(box.style.width) //只能拿到行内内容的宽度


        // offset* == border+padding+content
        console.log(box.offsetWidth, box.offsetHeight)
            /*注意:
            1.单位 数字
            2.box-sizing的设置对上述计算方式没有影响
            3.display:none;取不到offset*
            */

        //client* == padding+content
        console.log(box.clientWidth, box.clientHeight)
            /*注意:
            1.单位 数字
            2.box-sizing的设置对上述计算方式没有影响
            3.display:none;取不到client*
            */
    </script>

</body>

</html>
2.8.获取元素偏移量
- offsetLeft,offsetTop的参考点是定位父级(第一个遇到的有定位的父节点)
- 如果父级元素都没有定位,偏移量相对于body
- clientLeft,clientTop border的宽度
<!DOCTYPE html>
<html lang="en">

<head>
    <meta charset="UTF-8">
    <meta http-equiv="X-UA-Compatible" content="IE=edge">
    <meta name="viewport" content="width=device-width, initial-scale=1.0">
    <title>Document</title>
    <style>
        * {
            margin: 0;
            padding: 0;
        }

        #box {
            width: 500px;
            height: 500px;
            background: yellow;
            overflow: hidden;
        }

        #myparent {
            width: 300px;
            height: 300px;
            background: blue;
            overflow: hidden;
            /* position: relative; */
        }

        #child {
            width: 100px;
            height: 100px;
            background: pink;
            overflow: hidden;
        }

        div {
            margin: 50px;
        }

        ul {
            width: 200px;
            height: 200px;
            padding: 20px;
            border: 10px solid black;
            background: red;
            margin: 50px;
            border-left-width: 50px;
            border-top-width: 35px;
        }
    </style>
</head>

<body>
    <div id="box">
        <div id="myparent">
            <div id="child"></div>
        </div>
    </div>

    <ul id="list"></ul>
    <script>
        // offsetLeft,offsetTop的参考点是定位父级(第一个遇到的有定位<position>的父节点)
        // 如果父级元素都没有定位,偏移量相对于body
        console.log(child.offsetLeft, child.offsetTop)
        console.log(myparent.offsetLeft, myparent.offsetTop)
        console.log(box.offsetLeft, box.offsetTop)


        // clientLeft,clientTop  border的宽度
        console.log(list.clientLeft, list.clientTop)
    </script>

</body>

</html>
2.9.获取可视窗口的尺寸
  <style>
        * {
            padding: 0;
            margin: 0;
        }
        html,
        body {
            /* width: 2000px; */
            height: 2000px;
        }
    </style>
</head>

<body>
    <script>
        //算滚动条
        console.log(innerHeight, innerWidth)
        console.log(window.innerHeight, window.innerWidth)

        //不算滚动条
        console.log(document.documentElement.clientHeight, document.documentElement.clientWidth)
    </script>
</body>
2.10.案例-懒加载
<!DOCTYPE html>
<html lang="en">

<head>
    <meta charset="UTF-8">
    <meta http-equiv="X-UA-Compatible" content="IE=edge">
    <meta name="viewport" content="width=device-width, initial-scale=1.0">
    <title>Document</title>
    <style>
        * {
            margin: 0;
            padding: 0;
        }

        html,
        body {
            height: 100%;
        }

        ul li {
            overflow: hidden;
            height: 150px;
        }

        ul li img {
            float: left;
            width: 80px;
        }
    </style>
</head>

<body>
    <h1>标题</h1>
    <ul id="list">
        <li>
            <img src="https://pic.maizuo.com/usr/movie/e6ee44927d2e3370dcf251c2627ef6d4.jpg?X-oss-process=image/quality,Q_70" alt="">
            <h3>海底小纵队:洞穴大冒险</h3>
        </li>
    </ul>
    <script>
        var arr1 = [{
            name: '我们要在一起',
            url: 'https://pic.maizuo.com/usr/movie/e6ee44927d2e3370dcf251c2627ef6d4.jpg?X-oss-process=image/quality,Q_70'
        }, {
            name: '海底小纵队:洞穴大冒险',
            url: 'https://pic.maizuo.com/usr/movie/e6ee44927d2e3370dcf251c2627ef6d4.jpg?X-oss-process=image/quality,Q_70'
        }, {
            name: '我们要在一起',
            url: 'https://pic.maizuo.com/usr/movie/e6ee44927d2e3370dcf251c2627ef6d4.jpg?X-oss-process=image/quality,Q_70'
        }]
        var arr2 = [{
            name: '哈哈哈哈哈',
            url: 'https://pic.maizuo.com/usr/movie/e6ee44927d2e3370dcf251c2627ef6d4.jpg?X-oss-process=image/quality,Q_70'
        }, {
            name: '海底小纵队:洞穴大冒险',
            url: 'https://pic.maizuo.com/usr/movie/e6ee44927d2e3370dcf251c2627ef6d4.jpg?X-oss-process=image/quality,Q_70'
        }, {
            name: '我们要在一起',
            url: 'https://pic.maizuo.com/usr/movie/e6ee44927d2e3370dcf251c2627ef6d4.jpg?X-oss-process=image/quality,Q_70'
        }, {
            name: '海底小纵队:洞穴大冒险',
            url: 'https://pic.maizuo.com/usr/movie/e6ee44927d2e3370dcf251c2627ef6d4.jpg?X-oss-process=image/quality,Q_70'
        }, {
            name: '我们要在一起',
            url: 'https://pic.maizuo.com/usr/movie/e6ee44927d2e3370dcf251c2627ef6d4.jpg?X-oss-process=image/quality,Q_70'
        }]

        renderHTML(arr1)
            //数据加载,将内容返回到页面
        function renderHTML(arr) {
            //方法一,这种方法,因为是追加,相当于重新赋值,会导致追加时屏幕一闪一闪的
            // += 避免覆盖
            // list.innerHTML += arr.map(function(item) {
            //     return `<li>
            //             <img src="${item.url}" alt="">
            //             <h3>${item.name}</h3>
            //         </li>`
            // }).join("")

            //方法二
            for (var i = 0; i < arr.length; i++) {
                var oli = document.createElement('li')
                oli.innerHTML = `<li>
                        <img src="${arr[i].url}" alt="">
                        <h3>${arr[i].name}</h3>
                    </li>`
                list.appendChild(oli) //append不会导致屏幕一闪一闪的
            }
        }

        isLoading = false
            //窗口滚动时进行判断
        window.onscroll = function() {
            // console . log( "1111")
            var listHeight = list.offsetHeight
            var listTop = list.offsetTop
                // console.log(listHeight + listTop)
            var scrollTop = document.documentElement.scrollTop ||
                document.body.scrollTop
            var windowHeight = document.documentElement.clientHeight
                // console.log(Math.round(windowHeight + scrollTop))
            if (isLoading) return
            if ((listHeight + listTop) - (Math.round(windowHeight + scrollTop)) < 100) {
                console.log('到底')
                isLoading = true

                //渲染下一页数据
                setTimeout(function() {
                        renderHTML(arr2)
                        isLoading = false //下一次到底事件可以继续触发
                    }, 1000) //1s后追加
            }
        }
    </script>

</body>

</html>
3.事件
3.1.初识事件
事件的组成:事件源、事件类型、事件处理函数
- 触发谁的事件:事件源
- 触发什么事件:事件类型
- 触发以后做什么:事件处理函数
绑定方式:
- dom0
- box.οnclick=function(){}
- 有一点问题(重复绑定时,后面写的会覆盖前面的)
- 但也可以直接在第一个里面调用函数实现相关功能
- dom2
- box2.addEventListener(“click”, function() {})
- 绑定多个事件处理函数,按顺序执行
- dom2有兼容性问题,主要是低版本浏览器,可以使用 box2.attach(‘onclick’,function(){}),但主要还是用add…比较好
<body>
    <div id="box">aaaaa</div>
    <div id="box2">bbbbb</div>
    <script>
        // dom0类型的绑定方式
        //有一点问题(重复绑定时,后面写的会覆盖前面的)但也可以直接在第一个里面调用函数实现相关功能
        box.onclick = function() {
                console.log(111)
                    // aaa()
            }
            /*box.onclick = function() {
                    console.log(222)
                }*/
            // box.onclick()

        //dom2 绑定多个事件处理函数,按顺序执行
        // dom2有兼容性问题,主要是低版本浏览器,可以使用 box2.attach('onclick',function(){}),但主要还是用add...比较好
        box2.addEventListener("click", function() {
            console.log('dom2绑定1')
        })
        box2.addEventListener("click", function() {
            console.log('dom2绑定2')
        })
    </script>
</body>
3.2.事件解绑
// 事件解绑-dom0 dom结点.οnclick=null
btn.onclick = function() {
    console.log('谢谢惠顾')

    //解绑操作
    this.onclick = null
}
// 事件解绑-dom2 函数要单独写出去
function handler() {
    console.log('谢谢惠顾')
    this.removeEventListener('click', handler)
}
btn.addEventListener('click', handler)

function handler() {
    console.log('谢谢惠顾')
    this.detachEvent('onclick', handler)
}
btn.attachEvent('onclick', handler)
3.3.事件类型
大致分为:浏览器事件、鼠标事件、键盘事件、表单事件、触摸事件
-
浏览器事件
- load:页面全部资源加载完毕
- scroll:浏览器滚动时触发
- …
-
鼠标事件
- click:点击事件
- dblclick:双击事件
- contextmenu:右键点击事件
- mousedown:鼠标左键按下事件
- mouseup:鼠标左键抬起事件
- mousemove:鼠标移动
- mouseover:鼠标移入事件
- mouseout:鼠标移出事件
- mouseenter:鼠标移入事件
- mouseleave:鼠标移出事件
- …
 // click 单击  dblclick 双击
btn.onclick = function() {
    console.log('单击执行')
}
btn.ondblclick = function() {
    console.log('双击执行')
}
 //contextmenu 右键单击
btn.oncontextmenu = function() {
    console.log('右键单击.自定义右键菜单')
}
//页面任意处右键时
document.oncontextmenu = function() {
    console.log('右键单击.自定义右键菜单')
}
// mousedown mousemove mouseup
box.onmousedown = function() {
    console.log('鼠标按下') //不可以代替click
}
box.onmousemove = function() {
    console.log('鼠标移动')
}
box.onmouseup = function() {
    console.log('鼠标抬起')
}
//移入移出 mouseover mouseout   在自身和孩子上都会触发
box.onmouseover = function() {
    console.log('移入')
}
box.onmouseout = function() {
    console.log('移出')
}

//移入移出 mouseenter mouseleave  在自身触发
box.onmouseenter = function() {
    console.log('移入')
}
box.onmouseleave = function() {
    console.log('移出')
}
- 键盘事件
- keyup:键盘抬起事件
- keydown:键盘按下事件
- keypress:键盘按下再抬起事件
- …
// window,document 输入框 input
username.onkeydown = function() {
    console.log('按下键盘', '判断是不是回车键')
}
username.onkeyup = function() {
    console.log('抬起键盘')
}
username.onkeypress = function() {
    console.log('键盘按下再抬起')
}
- 表单事件
- focus:获取焦点
- blur:失去焦点
- change:表单内容改变事件
- input:表单内容输入事件
- submit:表单提交事件
- …
// focus blur
username.onfocus = function() {
    console.log('获取焦点')
}
username.onblur = function() {
    console.log('失去焦点')
}
// change 获取焦点和失去焦点时,对比内容不一样才会触发
username.onchange = function() {
    console.log('change')
}
// input 只要内容不一样就会触发(输入一个就会触发一下)
username.oninput = function() {
    console.log('input')
}
// submit、reset 给form绑定
myform.onsubmit = function() {
    console.log('submit', '校验表单内容')
    return false //阻止默认提交行为
}
myform.onreset = function() {
    console.log('reset ')
}
- 触摸事件(仅针对移动端)
- touchstart:触摸开始事件
- touchend:触摸结束事件
- touchmove:触摸移动事件
- …
// 开始触摸
box.ontouchstart = function() {
    console.log('touchstart')
}

// 触摸着移动
box.ontouchmove = function() {
    console.log('touchmove')
}

// 触摸结束
box.ontouchend = function() {
    console.log('touchend')
}

// 打断触摸
box.ontouchcancel = function() {
    console.log('touchcancel')
}
3.4.事件对象
**什么是事件对象?**就是当你触发了一个事件以后,对该事件的一些描述信息,例如:
(1)你触发一个点击事件的时候,你点在哪个位置了,坐标是多少
(2)你触发一个键盘事件的时候,你按的是哪个按钮
每一个事件都会有一个对应的对象来描述这些信息,我们就把这个对象叫做事件对象
浏览器给了我们一个黑盒子,叫做window.event,就是对事件信息的所有描述。比如点击事件:你点在了0,0位置,那么你得到的这个事件对象里面对应的就会有这个点位的属性;你点在了10,10位置,那么你得到的这个事件对象里面对应的就会有这个点位的属性
 username.onkeyup = function(event) { //evt
    console.log(event)
    console.log(event.keyCode) //keyCode可后续用于判断执行相应操作
}
box.onclick = function(evt) {
    console.log(evt)
}

//兼容性 IE678不能使用evt,使用window.event
box.onclick = function(evt) {
    evt = evt || window.event
    console.log(window.event)
}
3.4.1.事件对象-鼠标事件
 box.onclick = function(evt) {
    console.log(evt)

    //clientX clientY 距离浏览器可视窗口的左上角的坐标值
    console.log(evt.clientX, evt.clientY)

    //pageX pageY 距离文档流(页面)的左上角的坐标值(一般不会变动的)
    console.log(evt.pageX, evt.pageY)

    //offsetX offsetY 距离触发元素的左上角的坐标值
    console.log(evt.offsetX, evt.offsetY)
}
3.4.2.案例-鼠标跟随
<!DOCTYPE html>
<html lang="en">

<head>
    <meta charset="UTF-8">
    <meta http-equiv="X-UA-Compatible" content="IE=edge">
    <meta name="viewport" content="width=device-width, initial-scale=1.0">
    <title>Document</title>
    <style>
        * {
            margin: 0;
            padding: 0;
        }

        div {
            width: 200px;
            height: 50px;
            background: pink;
            position: relative;
            margin: 100px;
        }

        #box p {
            width: 300px;
            height: 150px;
            background: skyblue;
            position: absolute;
            left: 100px;
            top: 100px;
            display: none;
            /* 方法二:穿透 */
            /* 会有层级问题,可以加z-index解决 */
            pointer-events: none;
            z-index: 100;
        }
    </style>
</head>

<body>
    <div id="box">
        我的头像
        <p>我的介绍</p>
    </div>
    <div>111111</div>
    <script>
        box.onmouseover = function(evt) {
            this.firstElementChild.style.display = 'block'
        }
        box.onmouseout = function(evt) {
            this.firstElementChild.style.display = 'none'
        }
        box.onmousemove = function(evt) {
            // console.log(evt.offsetX, evt.offsetY)
            this.firstElementChild.style.left = evt.offsetX + 'px'
            this.firstElementChild.style.top = evt.offsetY + 'px'

            //会一直抖动
            // 两个方法
            // (1)离远一点,不大好
            // this.firstElementChild.style.left = evt.offsetX + 50 + 'px'
            // this.firstElementChild.style.top = evt.offsetY + 50 + 'px'

            //(2)css里面设置pointer-events
        }
    </script>

</body>

</html>
3.4.3.案例-鼠标拖拽
<!DOCTYPE html>
<html lang="en">

<head>
    <meta charset="UTF-8">
    <meta http-equiv="X-UA-Compatible" content="IE=edge">
    <meta name="viewport" content="width=device-width, initial-scale=1.0">
    <title>Document</title>
    <style>
        * {
            margin: 0;
            padding: 0;
        }

        div {
            width: 100px;
            height: 100px;
            background: pink;
            position: absolute;
        }
    </style>
</head>

<body>
    <div id="box">

    </div>
    <script>
        box.onmousedown = function() {
            console.log('down')
            document.onmousemove = function(evt) {
                // console.log('move')
                //让鼠标处于box中心点
                var x = evt.clientX - box.offsetWidth / 2
                var y = evt.clientY - box.offsetHeight / 2

                // 设置边界
                if (y <= 0) y = 0
                if (x <= 0) x = 0
                if (x >= document.documentElement.clientHeight - box.offsetHeight) x = document.documentElement.clientHeight - box.offsetHeight
                if (x >= document.documentElement.clientWidth - box.offsetWidth) x = document.documentElement.clientWidth - box.offsetWidth

                //移动
                box.style.left = x + 'px'
                box.style.top = y + 'px'
            }
        }
        box.onmouseup = function() {
            console.log('up')
            document.onmousemove = null //解绑
        }
    </script>

</body>

</html>
<!DOCTYPE html>
<html lang="en">

<head>
    <meta charset="UTF-8">
    <meta http-equiv="X-UA-Compatible" content="IE=edge">
    <meta name="viewport" content="width=device-width, initial-scale=1.0">
    <title>Document</title>
    <style>
        * {
            margin: 0;
            padding: 0;
        }

        div {
            width: 100px;
            height: 100px;
            background: pink;
            position: absolute;
        }
    </style>
</head>

<body>
    <div id="box">

    </div>
    <script>
        // 设置一个标志位
        var isDown = false
        box.onmousedown = function() {
            console.log('down')
            isDown = true
        }
        box.onmouseup = function() {
            console.log('up')
            isDown = false
                // document.onmousemove = null //解绑
        }

        document.onmousemove = function(evt) {
            if (!isDown) return


            // console.log('move')
            //让鼠标处于box中心点
            var x = evt.clientX - box.offsetWidth / 2
            var y = evt.clientY - box.offsetHeight / 2

            // 设置边界
            if (y <= 0) y = 0
            if (x <= 0) x = 0
            if (x >= document.documentElement.clientHeight - box.offsetHeight) x = document.documentElement.clientHeight - box.offsetHeight
            if (x >= document.documentElement.clientWidth - box.offsetWidth) x = document.documentElement.clientWidth - box.offsetWidth

            //移动
            box.style.left = x + 'px'
            box.style.top = y + 'px'

        }
    </script>

</body>

</html>
3.5.DOM事件流
事件的传播:当元素触发一个事件的时候,其父元素也会触发相同的事件,父元素的父元素也会触发相同的事件
inner-center-outer-body-html-document-window
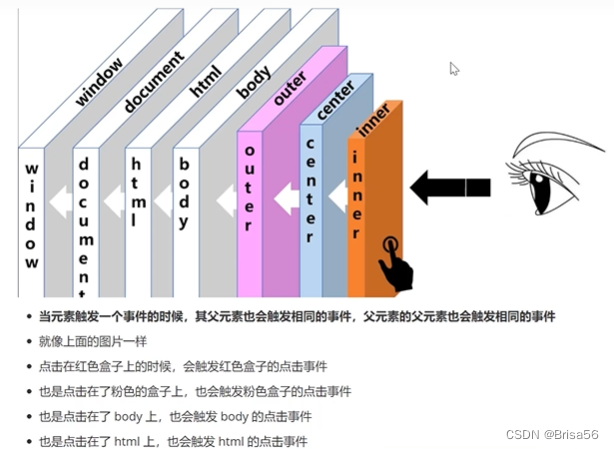
标准的DOM事件流:
捕获:window -> document -> body -> outer
目标:inner
冒泡:outer -> body -> document -> window
默认情况下,只在冒泡阶段触发
按照dom2事件绑定,并进行配置,才能看到【捕获】的回调函数触发
IE678只支持冒泡
这种事件流的触发传递现象是根据dom文件流来的,跟样式无关(无所谓是否盒子不在父盒子里)
// 点击(某事件)子代时,父代也会触发点击事件(某事件)
// 前提:父代有写相应触发事件函数
inner.onclick = function() {
    console.log('inner触发')
}
center.onclick = function() {
    console.log('center触发')
}
outer.onclick = function() {
    console.log('outer触发')
}
document.body.onclick = function() {
    console.log('document.body触发')
}
document.documentElement.onclick = function() {
    console.log('document.documentElement触发')
}
document.body.onclick = function() {
    console.log('document触发')
}
window.onclick = function() {
    console.log('window触发')
}
dom2捕获(加个true)演示:
 // console.log('---默认情况---')
inner.addEventListener('click', function() {
    console.log('inner')
})
center.addEventListener('click', function() {
    console.log('center')
})
outer.addEventListener('click', function() {
    console.log('outer')
})
document.body.addEventListener('click', function() {
    console.log('body')
})
document.documentElement.addEventListener('click', function() {
    console.log('documentElement')
})
document.addEventListener('click', function() {
    console.log('document')
})
window.addEventListener('click', function() {
    console.log('window')
})


// console.log('---捕获---')
inner.addEventListener('click', function() {
    console.log('inner-捕获')
}, true)
center.addEventListener('click', function() {
    console.log('center-捕获')
}, true)
outer.addEventListener('click', function() {
    console.log('outer-捕获')
}, true)
document.body.addEventListener('click', function() {
    console.log('body-捕获')
}, true)
document.documentElement.addEventListener('click', function() {
    console.log('documentElement-捕获')
}, true)
document.addEventListener('click', function() {
    console.log('document-捕获')
}, true)
window.addEventListener('click', function() {
    console.log('window-捕获')
}, true)
3.6.阻止事件传播
//阻止事件传播
evt.stopPropagation()

//IE
evt.cancelBubble() = true
3.7.阻止默认行为
// dom0 return false 阻止默认行为(d都适用)
document.oncontextmenu = function() {
    console.log('右键单击,自定义菜单')
    return false
}
//dom2 evt.preventDefault()
//     ie  evt.returnValue = false
document.addEventListener('contextmenu', function(evt) {
    console.log('右键单击,自定义菜单')
    // return false //没有用
    evt.preventDefault()
})
3.8.案例-自定义右键菜单
<!DOCTYPE html>
<html lang="en">

<head>
    <meta charset="UTF-8">
    <meta http-equiv="X-UA-Compatible" content="IE=edge">
    <meta name="viewport" content="width=device-width, initial-scale=1.0">
    <title>Document</title>
    <style>
        * {
            margin: 0;
            padding: 0;
        }

        ul {
            list-style: none;
            width: 200px;
            padding: 10px;
            border: 1px solid #000;
            display: none;
            position: absolute;
        }

        ul li:hover {
            background: skyblue;
        }
    </style>
</head>

<body>
    <ul id="list">
        <li class='aaa'>1</li>
        <li class='bbb'>2</li>
        <li class='ccc'>3</li>
    </ul>
    <script>
        //菜单
        document.addEventListener('contextmenu', function(evt) {
            evt.preventDefault()
            list.style.display = 'block'
            var x = evt.clientX
            var y = evt.clientY
            if (x >= document.documentElement.clientWidth - list.offsetWidth) x = document.documentElement.clientWidth - list.offsetWidth
            if (y >= document.documentElement.clientHeight - list.offsetHeight) y = document.documentElement.clientHeight - list.offsetHeight

            list.style.left = x + 'px'
            list.style.top = y + 'px'
        })

        //单击页面,菜单消失
        document.addEventListener('click', function() {
            list.style.display = 'none'
        })

        //利用冒泡来处理相应菜单点击事件
        list.onclick = function(evt) {
            console.log('list', evt.target)
            if (evt.target.className == 'aaa') {
                console.log('1')
            }
            if (evt.target.className == 'bbb') {
                console.log('2')
            }
            if (evt.target.className == 'ccc') {
                console.log('3')
            }

        }
    </script>
</body>

</html>
3.9.事件委托
- 就是把我要做的事情委托给别人来做
- 因为我们的冒泡机制,点击子元素的时候,也会同步触发父元素的相同事件
- 所以我们就可以把子元素的事件委托给父元素来做
事件触发
- 点击子元素的时候,不管子元素有没有点击事件,只要父元素有点击事件,那么就可以触发父元素的点击事件
target
- target 这个属性是事件对象里面的属性,表示你点击的目标
- 当你触发点击事件的时候,你点击在哪个元素上,target 就是哪个元素
- 这个target也不兼容,在IE下要使用srcElement
<!DOCTYPE html>
<html lang="en">

<head>
    <meta charset="UTF-8">
    <meta http-equiv="X-UA-Compatible" content="IE=edge">
    <meta name="viewport" content="width=device-width, initial-scale=1.0">
    <title>Document</title>
</head>

<body>
    <ul id="list">
        <li>111
            <button>add</button></li>
    </ul>
    <script>
        // 好处1:减少多个函数绑定的性能损耗
        list.onclick = function(evt) {
            // ie兼容性 evt.srcElement
            console.log(evt.target || evt.srcElement)
        }
    </script>

</body>

</html>
<!DOCTYPE html>
<html lang="en">

<head>
    <meta charset="UTF-8">
    <meta http-equiv="X-UA-Compatible" content="IE=edge">
    <meta name="viewport" content="width=device-width, initial-scale=1.0">
    <title>Document</title>
</head>

<body>
    <ul id="list">

    </ul>
    <script>
        // 好处2:动态添加li, 也会有事件处理
        var arr = ['111', '222', '333']
        for (var i = 0; i < arr.length; i++) {
            var oli = document.createElement('li')
            oli.innerHTML = arr[i]

            var obutton = document.createElement('button')
            obutton.innerHTML = 'delete'

            oli.appendChild(obutton)


            list.appendChild(oli)
        }

        list.onclick = function(evt) {
            console.log(evt.target.nodeName)
            if (evt.target.nodeName == 'BUTTON') {
                evt.target.parentNode.remove()
            }
        }
    </script>

</body>

</html>
4.正则表达式
4.1.初识正则表达式
两种写法: 1.字面量 //;2.内置构造函数
//正则表达式

// js复杂数据类型
// 1.字面量 //
var reg = /abc/ //是否包含abc

// 2.内置构造函数
var reg2 = new RegExp('abc')
console.log(reg, reg2) //效果相同

//测试一下
mytext.onblur = function() {
    console.log(mytext.value)
    console.log(reg.test(mytext.value))

}
4.2.元字符
4.2.1.基本元字符
-
- \d 一位数字 0-9
- \D 一位非数字
-
- \s 一位空白(空格 缩进 换行)
- \S 一位非空白
-
- \w 一位字母,数字,下换线
- \W 一位非字母,数字,下换线
-
- . 一位任意内容(不包含换行)
- \ 转义字符 (比如 /\d.\d/ 就代表 数字.数字)
4.2.2.边界符
-
- ^ 以…开头 /^\d/
- $ 以…结尾 /\d$/
4.2.3.限定符
-
- * 0~多次 /\d*/
- + 1~多次 /\d+/
- ? 0-1次 /\d?/
- {n} 指定次数 /\d{5}/
- {n,} 大于等于指定次数 /\d{5,}/
- {n,m} 大于等于n次,小于等于m次 /\d{3,5}/
4.2.4.特殊符号
-
- () 一个整体
- | 或 考虑的是左右两边作为一个整体的或
- [] 代表1个,有1个就算
- [^] 取反
[a-w]
[a-zA-Z0-9_] \w
[0-9]  \d
[^abc] 取反,表示不是这里面的,只要有不在这里面的一个就是对的
4.3.exec捕获
标识符: g:全局;i:忽略大小写
用法:/…/g;/…/i
// test()
// exec() 捕获片段
// var reg = /\d{3}/
// console.log(reg.exec('ab123ab'))

var datastr = 'time is 2029-01-01 12:20:20 to 2029-11-01 12:20:20'
      //2029/01/01
var reg = /\d{4}-\d{1,2}-\d{1,2}/  //懒解析
var newDataStr = reg.exec(datastr) //只能解析到第一个满足条件的字符串
console.log(newDataStr[0].split('-').join('/'))
var datastr = 'time is 2029-01-01 12:20:20 to 2029-11-01 12:20:20'
// var reg = /\d{4}-\d{1,2}-\d{1,2}/g
// 加上一个g,就可以解析全局,每次解析都是顺着上次解析完的地方往下继续解析,解析到没有时就为空(解决上面的懒惰问题)

// 标识符 g 全局 i 忽略大小写
var reg = /(\d{4})-(\d{1,2})-(\d{1,2})/g// 加上小括号后,就会变成单独捕获,捕获结果是一个数组,包括完整捕获结果,和括号内各自的内容

var newDataStr1 = reg.exec(datastr)
console.log(newDataStr1)
var newDataStr2 = reg.exec(datastr)
console.log(newDataStr2)


console.log(newDataStr1[0].split('-').join('/'))
console.log(newDataStr1[0], newDataStr1[1], newDataStr1[2], newDataStr1[4])
console.log(newDataStr2[0].split('-').join('/'))
// 标识符 g 全局 i 忽略大小写
var reg2 = /[a-z]/i
console.log(reg2.test('AA'))
4.4.正则表达式两大特性
// 1.懒惰 解决办法:全局标识符g

//2.贪婪(越多匹配越好) 加一个?
var reg = /\d{1,4}/
console.log(reg.exec('aa1234bb'))

// 3.非贪婪模式
var reg = /\d{1,4}?/
console.log(reg.exec('aa1234bb'))

/*
    *?
    +?
    ??
    {n,}?
    {n,m}?
*/
var str = '<p class="active"><span>brisa</span></p>'
var myreg = /<p.*?>/ //非贪婪模式
console.log(myreg.exec(str))
4.5.正则与字符串方法
// 正则.test(字符串)
// 正则.exec(字符串)

//字符串.replace search match

// replace
var str = 'adearga'

// var newStr = str.replace('a', '*') //只替换第一个
// var newStr = str.replace(/a/, '*') //只替换第一个
var newStr = str.replace(/a/g, '*') //替换所有满足正则的(替换所有的a)
console.log(newStr)

// search
console.log(str.search('a')) //只能找到第一个位置
console.log(str.search(/a/)) //只能找到第一个位置
console.log(str.search(/ax/)) //找不到就返回-1


// match 捕获内容
var datastr = 'time is 2029-01-01 12:20:20 to 2029-11-01 12:20:20'
console.log(datastr.match(/(\d{4})-(\d{1,2})-(\d{1,2})/g)) //找到所有满足条件的字符串
4.6.案例-密码强度验证
<!DOCTYPE html>
<html lang="en">

<head>
    <meta charset="UTF-8">
    <meta http-equiv="X-UA-Compatible" content="IE=edge">
    <meta name="viewport" content="width=device-width, initial-scale=1.0">
    <title>Document</title>
    <style>
        form {
            margin: 100px auto;
            border: 2px solid #000;
            width: 500px;
            text-align: center;
            overflow: hidden;
        }
        /* form>label {
            width: 400px;
            margin: 20px auto;
            overflow: hidden;
        } */

        form>label>input {
            width: 450px;
            height: 30px;
            line-height: 30px;
            font-size: 25px;
            margin: 10px auto;
        }

        form>p>span {
            display: inline-block;
            border: 1px solid #ccc;
            background: #ccc;
            color: #fff;
            width: 150px;
            height: 30px;
            font-size: 20px;
            line-height: 30px;
            text-align: center;
        }

        form>p>span:nth-child(1).active {
            background-color: red;
        }

        form>p>span:nth-child(2).active {
            background-color: orange;
        }

        form>p>span:nth-child(3).active {
            background-color: green;
        }
    </style>
</head>

<body>
    <form action="">
        <label for="">
            <input type="text" name="" id="">
        </label>
        <p>
            <span>弱</span>
            <span>中</span>
            <span>强</span>
        </p>
    </form>
    <script>
        var oinput = document.querySelector('input')
        var reg1 = /\d/
        var reg2 = /[a-z]/
        var reg3 = /[!@#$%^&\*]/

        var ospan = document.querySelectorAll('span')
        oinput.oninput = function(evt) {
            //一样的效果
            // console.log(evt.target.value)
            // console.log(this.value)
            var level = 0
            if (reg1.test(this.value)) {
                level++
            }

            if (reg2.test(this.value)) {
                level++
            }

            if (reg3.test(this.value)) {
                level++
            }

            for (var i = 0; i < ospan.length; i++) {
                ospan[i].classList.remove('active')
                if (i < level) {
                    ospan[i].classList.add('active')
                }
            }
            console.log(level)
        }
    </script>

</body>

</html>
5.this
5.1.this指向
<div id="box">click here- <span>11111</span></div>
<script>
    // this 关键字,
    // this 谁调用我, this就指向谁(es6 箭头函数)

    // that = this (赋值,that不是关键字)
    console.log(this) //window
    function test() {
        console.log(this)
    }
    test() //window.test() 所以输出的也是window

    // 对象
    var obj = {
        name: 'brisa',
        test1: function() {
            console.log(this)
            console.log(this.name)
        },
    }
    obj.test1() // 输出的是obj

    setTimeout(function() {
        console.log(this) //window  window.setTimeout
    }, 1000)

    // setInterval(function() {
    //     console.log(this) //window  window.setTimeout
    // }, 1000)

    // 事件绑定中的this
    box.onclick = function() {
        console.log(this) // box
    }
    box.addEventListener('click', function(evt) {
        // evt和this是有区别的,evt指向的仅仅是鼠标对应的target,而this指向的是触发当前对象的东西
        console.log(evt) //点击span与点击click here是不同的
        console.log(this) // box
    })
</script>
5.2.改变this指向
var name = '自定义的名字'
    // call apply bind
var obj1 = {
    name: 'boj1',
    getName: function(a, b, c) {
        console.log('getName1', this.name)
        console.log('参数', a, b, c)
    },
}
var obj2 = {
    name: 'boj2',
    getName: function() {
        console.log('getName2', this.name)
    },
}

obj1.getName()
call 执行函数, 并改变this执行为函数的第一个参数
支持多个参数
obj1.getName.call(obj2, 1, 2, 3) //call可以传n个参数
// obj1.getName.call(window)
apply 执行函数, 并改变this执行为函数的第一个参数
两个参数,第二个参数是一个数组
obj1.getName.apply(obj2, [1, 2, 3]) //apply只能传2个参数,若要传很多参数,第二个只能用数组的方式传递
bind 不执行函数,改变this指向为函数的第一个参数,需要手动执行
支持多个参数
尤其适用于不想立即触发函数的场景(手动触发,需要改变this指向)
var fun1 = obj1.getName.bind(obj2, 1, 2, 3)
// console.log(fun1)//输出obj1.getName的function
fun1() //手动执行


 235
235


 被折叠的 条评论
为什么被折叠?
被折叠的 条评论
为什么被折叠?
 到【灌水乐园】发言


