


常用API
math相关:
 //public static int abs(int a) 获取参数绝对值
//        int num = Math.abs(12);
        int num = Math.abs(-12);
        System.out.println(num);

        //public static double ceil(double a) 向上取整
        System.out.println(Math.ceil(4.0));
        System.out.println(Math.ceil(4.00000001));

        //public static double floor(double a) 向下取整
        System.out.println(Math.floor(4.999999));

        //public static int round(float a) 四舍五入
        System.out.println(Math.round(3.45678));
        System.out.println(Math.round(3.54678));

        //public static int max(int a,int b) 获取两个int值中的较大值
        System.out.println(Math.max(5, 8));

        //public static double pow(double a,double b) 返回a的b次幂的值
        System.out.println(Math.pow(2, 3)); // 2*2*2

        //public static double random() 返回值为double的随机值,范围[0.0,1.0)
        System.out.println(Math.random());

        //需求:一个宿舍住4个人,共9个人,需要几个宿舍?
        int a = 4; //能容纳的人数
        int b = 9; //总人数
        int count = (int) Math.ceil(b * 1.0 / a);
        System.out.println(count);
System相关:
        //public static void exit(int status) 终止当前运行的Java虚拟机。
        //该参数用作状态代码:非零代表异常终止
         //System.exit(0); //几乎不用。

        //public static long currentTimeMillis() 返回当前系统的时间毫秒值形式
        //返回的是long类型的时间毫秒值(1秒=1000毫秒):指的是从1970-01-01 00:00:00 到此刻的总毫秒数。
        long time1 = System.currentTimeMillis();
       System.out.println(time1);

        for (int i = 0; i < 1000000; i++) {
            System.out.println("当前i是:" + i);
        }

        long time2 = System.currentTimeMillis();

        System.out.println("循环执行的时间是:" + (time2 - time1) + "毫秒");
    }
RunTime相关:
        //public static Runtime getRuntime() 返回与当前Java应用程序关联的运行时对象
        Runtime runtime = Runtime.getRuntime();

        //public void exit (int status) 终止当前运行的虚拟机。该参数用作状态代码:非零代表异常终止
//        runtime.exit(0);

        //public int availableProcessors() 返回Java虚拟机可用的处理器数。
        System.out.println(runtime.availableProcessors());

        //public long totalMemory() 返回Java虚拟机中的内存总量(单位:字节)
        System.out.println(runtime.totalMemory() / 1024 / 1024 + "mb");

        System.out.println(runtime.maxMemory() * 1.0 / 1024 / 1024 / 1024 + "gb");

        //public long freeMemory() 返回Java虚拟机中的可用内存
        System.out.println(runtime.freeMemory() / 1024 / 1024 + "mb");

        //public Process exec(String command) 启动某个程序,并返回代表该程序的对象
//        Process p = runtime.exec("D:\\Program Files (x86)\\Tencent\\WeChat\\WeChat"); //执行启动某个程序
//        Thread.sleep(5000); //休眠5秒
//        p.destroy(); // 结束程序

//        runtime.exec("shutdown -s -t 30"); //作业
BigDecimal相关:
以下代码是一个工具类,别的类可调用相关代码,需要注意的是BigDecimal类型的数据可以直接打印,结果即所求结果。
除法如果遇到除不尽的情况下需要指定divide方法的后俩个参数确定保留几位小数以及怎样确定小数的情况。
ublic class BigDecimalUtil {

    //加
    public static BigDecimal add(double v1, double v2) {// v1 + v2
        BigDecimal b1 = new BigDecimal(Double.toString(v1));
        BigDecimal b2 = new BigDecimal(Double.toString(v2));
        return b1.add(b2);
    }

    //减
    public static BigDecimal sub(double v1, double v2) {
        BigDecimal b1 = new BigDecimal(Double.toString(v1));
        BigDecimal b2 = new BigDecimal(Double.toString(v2));
        return b1.subtract(b2);
    }

    //乘
    public static BigDecimal mul(double v1, double v2) {
        BigDecimal b1 = new BigDecimal(Double.toString(v1));
        BigDecimal b2 = new BigDecimal(Double.toString(v2));
        return b1.multiply(b2);
    }

    //除
    public static BigDecimal div(double v1, double v2) {
        BigDecimal b1 = new BigDecimal(Double.toString(v1));
        BigDecimal b2 = new BigDecimal(Double.toString(v2));
        // 2 = 保留小数点后两位   ROUND_HALF_UP = 四舍五入
        return b1.divide(b2, 2, RoundingMode.HALF_UP);// 应对除不尽的情况
    }
具体调用实现的代码如下:
注意第一条,一般情况下需要将double类型数据转化为tostring类型再去使用,或者直接使用静态方法BigDecimal2 valueOf(double val),将double类型的数据传入进行计算,直接使用double类型传入会损失精度。
 // 目标:掌握BigDecimal进行精确运算的方案。
        double a = 0.01;
        double b = 0.09;

        //System.out.println(0.01 + 0.09); //0.09999999999999999

        // 1、把浮点型数据封装成BigDecimal对象,再来参与运算。
        // a、public BigDecimal2(double val) 得到的BigDecimal对象是无法精确计算浮点型数据的。 注意:不推荐使用这个,
        // b、public BigDecimal2(String val)  得到的BigDecimal对象是可以精确计算浮点型数据的。 可以使用。
        // c、public static BigDecimal2 valueOf(double val): 通过这个静态方法得到的BigDecimal对象是可以精确运算的。是最好的方案。
//        BigDecimal2 b1 = new BigDecimal2(a);
//        BigDecimal2 b2 = new BigDecimal2(b);

    BigDecimal b1 = new BigDecimal(Double.toString(a));
    BigDecimal b2 = new BigDecimal(Double.toString(b));

       // BigDecimal2 b1 = BigDecimal2.valueOf(a);
       // BigDecimal2 b2 = BigDecimal2.valueOf(b);

        // 2、public BigDecimal2 add(BigDecimal2 augend): 加法
        BigDecimal sum = b1.add(b2);
        System.out.println(sum);

        // 3、public BigDecimal2 subtract(BigDecimal2 augend): 减法
        BigDecimal sub = b2.subtract(b1);
        System.out.println(sub); // 0.08

        // 4、public BigDecimal2 multiply(BigDecimal2 augend): 乘法
        System.out.println(b1.multiply(b2)); //0.0009

        // 5、public BigDecimal2 divide(BigDecimal2 b): 除法
        double a1 = 10.0;
        double a2 = 3.0;
        BigDecimal b3 = BigDecimal.valueOf(a1);
        BigDecimal b4 = BigDecimal.valueOf(a2);


        System.out.println(b3.divide(b4));


       /* Math.floor(4.9);
        Math.ceil(4.01);
        // 6、public BigDecimal2 divide(另一个BigDecimal对象,精确几位,舍入模式) : 除法,可以设置精确几位。
        System.out.println(b3.divide(b4,2 ,RoundingMode.CEILING)); // 3.333333


        // 7、public double doubleValue() : 把BigDecimal对象又转换成double类型的数据。
        BigDecimal bb = b3.divide(b4, 2, RoundingMode.HALF_UP);
        double d = bb.doubleValue();
        System.out.println(d);


        BigDecimal add = BigDecimalUtil.add(0.01, 0.09);
        System.out.println(add);*/
Date类型相关:
 // 1、创建一个Date的对象:代表系统当前时间信息的。
        Date date = new Date();
        System.out.println(date);

        // 2、拿到时间毫秒值。
        long time = date.getTime();
        System.out.println(time); // 1679294269446

        // 3、把时间毫秒值转换成日期对象: 2s之后的时间是多少。
        time +=  2 * 1000;
        Date date1 = new Date(1679294269446l);
        System.out.println(date1);

        // 4、直接把日期对象的时间通过setTime方法进行修改
        Date date2 = new Date();
        date2.setTime(time+2000);
        System.out.println(date2);
SimpleDateFormat相关:
 // 目标:掌握SimpleDateFormat的使用。
        // 1、准备一些时间
        Date d = new Date();
        System.out.println(d); //Mon Mar 20 15:01:13 CST 2023

        long time = d.getTime();
        System.out.println(time); //1679295673978

        // 2、格式化日期对象,和时间 毫秒值。
        SimpleDateFormat sdf = new SimpleDateFormat("yyyy-MM-dd hh:mm:ss EEE a");
        //把date类型转换为指定格式的字符串
        String format = sdf.format(d);
        System.out.println(format);

        SimpleDateFormat sdf1 = new SimpleDateFormat("yyyy年MM月dd日 hh时mm分ss秒 EEE a");
        String format1 = sdf1.format(time);
        System.out.println(format1);


        System.out.println("-------------------------------------------------------------------");

        // 目标:掌握SimpleDateFormat解析字符串时间 成为日期对象。
        String dateStr = "2023-03-21 10:12:11";
        // 1、创建简单日期格式化对象 , 指定的时间格式必须与被解析的时间格式一模一样,否则程序会出bug.
        SimpleDateFormat sdf2 = new SimpleDateFormat("yyyy-MM-dd hh:mm:ss");
        Date parseDate = sdf2.parse(dateStr);
        System.out.println(parseDate);
Calendar相关:
这里注意创建Calendar对象不是使用new的形式,而是Calendar calendar = Calendar.getInstance(); 这样的形式。
        // 1、得到系统此刻时间对应的日历对象。
        Calendar calendar = Calendar.getInstance();

        System.out.println(calendar);
        //java.util.GregorianCalendar[time=1679302521201,areFieldsSet=true,areAllFieldsSet=true,lenient=true,
        // zone=sun.util.calendar.ZoneInfo[id="Asia/Shanghai",offset=28800000,dstSavings=0,useDaylight=false,transitions=31,
        // lastRule=null],firstDayOfWeek=1,minimalDaysInFirstWeek=1,ERA=1,YEAR=2023,MONTH=2,WEEK_OF_YEAR=12,WEEK_OF_MONTH=4,
        // DAY_OF_MONTH=20,DAY_OF_YEAR=79,DAY_OF_WEEK=2,DAY_OF_WEEK_IN_MONTH=3,AM_PM=1,HOUR=4,HOUR_OF_DAY=16,MINUTE=55,SECOND=21,
        // MILLISECOND=201,ZONE_OFFSET=28800000,DST_OFFSET=0]

        // 2、获取日历中的某个信息
        int year = calendar.get(Calendar.YEAR);
        int month = calendar.get(Calendar.MONTH) + 1;
        int day = calendar.get(Calendar.DAY_OF_MONTH);

        System.out.println(year + "年" + month + "月" + day + "日");

        // 3、拿到日历中记录的日期Date对象。
        Date date = calendar.getTime();
        System.out.println(date);

        // 4、拿到时间毫秒值
        Date time = calendar.getTime();


        // 5、修改日历中的某个信息
        // 修改月份成为4月份。
//        calendar.set(Calendar.MONTH, 3);
        // 修改成一年中的第125天。
//         calendar.set(Calendar.DAY_OF_YEAR,125);

//        System.out.println(calendar.get(Calendar.MONTH)+1 );
//        System.out.println(calendar.get(Calendar.DAY_OF_YEAR));

        // 6、为某个信息增加或者减少多少
        calendar.add(Calendar.MONTH, 10);
        calendar.add(Calendar.DATE,-10);
        System.out.println(calendar.get(Calendar.YEAR) + "年" + (calendar.get(Calendar.MONTH) + 1) + "月" + calendar.get(Calendar.DAY_OF_MONTH) + "日");
Arrays相关:
下面代码是一些基本的API:
需要注意的是setAll这个函数的形式,他是一个函数式接口,下面会讲到,其中方法applyAsDouble里面的参数value是指数组下标,可以在方法中对原本数组进行操作。每次返回value自动加一。
下面写到lamada表达式的时候可以简化这个方法书写。
blic static void main(String[] args) {
        // 1、public static String toString(类型[] arr): 返回数组的内容
        int[] arr = {10, 20, 30, 40, 50, 60};
        System.out.println(Arrays.toString(arr)); //[10, 20, 30, 40, 50, 60]

        // 2、public static 类型[] copyOfRange(类型[] arr, 起始索引, 结束索引) :拷贝数组(指定范围,包前不包后)
        int[] arr1 = Arrays.copyOfRange(arr, 2, 4);
        System.out.println(Arrays.toString(arr1)); //[30,40]

        // 3、public static 类型[] copyOf(类型[] arr, int newLength):拷贝数组,可以指定新数组的长度。
        int[] arr3 = Arrays.copyOf(arr, 10);
        System.out.println(Arrays.toString(arr3));

        // 4、public static void setAll(double[] array, IntToDoubleFunction generator):把数组中的原数据改为新数据又存进去。
        double[] prices = {99.8, 128, 100};
        System.out.println(Arrays.toString(prices));

        // 把所有的价格都打八折,然后又存进去。
        Arrays.setAll(prices, new IntToDoubleFunction() {
            @Override //参数是数组的索引(下标) 0  1  2
            public double applyAsDouble(int value) {
                return prices[value] * 0.8;
            }
        });
        System.out.println(Arrays.toString(prices));

        // 5、public static void sort(类型[] arr):对数组进行排序(默认是升序排序)
        Arrays.sort(prices);
        System.out.println(Arrays.toString(prices));
对于sort方法,如果比较的内容是对象,则需要指明,到底是按照哪个属性进行排序:
下面给出实例,一共有俩种方法:
第一种是:
对应的对象类需要实现Comparable接口,且实现里面的方法compareTo,这个方法就是指定到底根据什么进行排序:
public class Student implements Comparable{
    private String name;
    private double height;
    private int age;

    public Student() {
    }

    public Student(String name, double height, int age) {
        this.name = name;
        this.height = height;
        this.age = age;
    }

    public String getName() {
        return name;
    }

    public void setName(String name) {
        this.name = name;
    }

    public double getHeight() {
        return height;
    }

    public void setHeight(double height) {
        this.height = height;
    }

    public int getAge() {
        return age;
    }

    public void setAge(int age) {
        this.age = age;
    }


    @Override
    //当前对象this和o进行比较操作
    public int compareTo(Object o) {
        Student s = (Student) o;
        //如果认为左边对象 大于 右边对象  应该返回正整数
        //如果认为左边对象 小于 右边对象  应该返回负整数
        //如果认为左边对象 等于 右边对象  应该返回0整数
      /*  if(this.age<s.age){
            return 1;
        }else if(this.age>s.age){
            return -1;
        }
        return 0 ;*/
        return s.age - this.age;
    }

    @Override
    public String toString() {
        return "Student{" +
                "name='" + name + '\'' +
                ", height=" + height +
                ", age=" + age +
                '}';
    }
这时候在test调用sort时,就可进行按照对应的形式进行排序:
// 目标:掌握如何对数组中的对象进行排序。
        Student[] students = new Student[4];
        students[0] = new Student("蜘蛛精", 169.5, 23);
        students[1] = new Student("紫霞", 163.8, 26);
        students[2] = new Student("紫霞", 163.8, 26);
        students[3] = new Student("至尊宝", 167.5, 24);

        // 1、public static void sort(类型[] arr):对数组进行排序。
        Arrays.sort(students);
        System.out.println(Arrays.toString(students));
第二种是:
在对应的对象类中,不需要实现Comparable接口,也就不需要重写compareTo方法,只需要直接在对应的测试类中进行规定到底使用哪个属性值进行排序:
   // 目标:掌握如何对数组中的对象进行排序。
        Student1[] students1 = new Student1[4];
        students1[0] = new Student1("蜘蛛精", 169.5, 23);
        students1[1] = new Student1("紫霞", 163.8, 26);
        students1[2] = new Student1("紫霞", 163.8, 26);
        students1[3] = new Student1("至尊宝", 167.5, 24);

        // 2、public static <T> void sort(T[] arr, Comparator<? super T> c)
        // 参数一:需要排序的数组
        // 参数二:Comparator比较器对象(用来制定对象的比较规则)

        Arrays.sort(students1, new Comparator<Student1>() {
            @Override
            public int compare(Student1 o1, Student1 o2) {
                return o1.getAge()-o2.getAge();
            }
        } );
        System.out.println(Arrays.toString(students1));
Lambda表达式
当出现函数式接口的时候,可以用lambda表达式进行简化书写
函数式接口函数的定义:有且仅有一个抽象方法的接口。
注意:将来我们见到的大部分函数式接口,上面都可能会有一个@FunctionalInterface的注解,有该注解的接口就必定是函数式接口。
简化规则:参数类型可以省略不写。 如果只有一个参数,参数类型可以省略,同时()也可以省略。 如果Lambda表达式中的方法体代码只有一行代码,可以省略大括号不写,同时要省略分号!此时,如果这行代码是return语句,也必须去掉return不写。
下面我们将上面的俩个函数式接口用Lambda表达式进行简化
//当我们面向一个接口,而且这个接口中有,且只有一个抽象方法时,可以使用Lambda表达式代替

        int[] arr = {100, 200, 300};
        //匿名内部类的方式
//        Arrays.setAll(arr, new IntUnaryOperator() {
//            @Override
//            public int applyAsInt(int operand) {
//                return (int)(arr[operand] * 0.8);
//            }
//        });

//        Arrays.setAll(arr, operand -> (int) (arr[operand] * 0.8));
        Arrays.setAll(arr, operand -> (int) (arr[operand] * 0.8));
        System.out.println(Arrays.toString(arr));


        //Lambda语法含义(理解就好,不用记):直接传方法,重写接口中的方法


        System.out.println("=========================================");

        Student[] stuArray = new Student[3];
        stuArray[0] = new Student("张三", 1.85, 22);
        stuArray[1] = new Student("李四", 1.75, 28);
        stuArray[2] = new Student("王五", 1.80, 21);

        //使用匿名内部类
//        Arrays.sort(stuArray, new Comparator<Student>() {
//            @Override
//            public int compare(Student o1, Student o2) {
//                return o1.getAge() - o2.getAge();
//            }
//        });

        Arrays.sort(stuArray, (o1, o2) -> o1.getAge() - o2.getAge());
        System.out.println(Arrays.toString(stuArray));
方法引用
静态方法以及实例方法的引用使用:
方法类:
public class CompareUtil {
    //静态方法
    public static int compareByAgeAsc(Student o1,Student o2){
        return o1.getAge()  - o2.getAge();
    }
    //实例方法
    public int compareByAgeDesc(Student o1 ,Student o2){
        return o2.getAge()  - o1.getAge();
    }
}
引用类:
//当我们面向一个接口,而且这个接口中有,且只有一个抽象方法时,可以使用Lambda表达式代替

        int[] arr = {100, 200, 300};

        Student[] stuArray = new Student[3];
        stuArray[0] = new Student("张三", 1.85, 22);
        stuArray[1] = new Student("李四", 1.75, 28);
        stuArray[2] = new Student("王五", 1.80, 21);

        //静态方法的引用
        Arrays.sort(stuArray,CompareUtil::compareByAgeAsc);
        System.out.println(Arrays.toString(stuArray));


        //实例方法的引用
        CompareUtil compareUtil = new CompareUtil();
        Arrays.sort(stuArray,compareUtil::compareByAgeDesc);
指定类型的方法引用:
     String[] names = {"boby", "angela", "Andy" ,"dlei", "caocao", "Babo", "jack", "Cici"};

        // 进行排序(默认是按照字符串的首字符编号进行升序排序的)
        Arrays.sort(names);
        System.out.println(Arrays.toString(names));

        // 要求忽略首字符大小写进行排序。
        // Arrays.sort(names, new Comparator<String>() {
        //     @Override
        //     public int compare(String o1, String o2) {
        //         return o1.compareToIgnoreCase(o2);
        //     }
        // });
        // System.out.println(Arrays.toString(names));


        //      要求忽略首字符大小写进行倒序排序。
        Arrays.sort(names, new Comparator<String>() {
            @Override
            public int compare(String o1, String o2) {

                return o2.compareToIgnoreCase(o1);
            }
        });
        System.out.println(Arrays.toString(names));


        // 特定类型的方法引用!
        Arrays.sort(names, String::compareToIgnoreCase);

        System.out.println(Arrays.toString(names));
    }
}
需要注意的是,如果使用特定类型的方法引用的话,只能进行升序排序。
正则表达式
常用的正则表达式如下所示:
        // 1、字符类别(只能匹配单个字符)
        //[abc]	   : 只能是a, b, 或c
        //[^abc]	   : 除了a, b, c之外的任何字符
        //[a-zA-Z] 	   : a到z A到Z,包括(范围)
        //[a-d[m-p]]    : a到d,或m到p
        //[a-z&&[def]]  : d, e, 或f(交集)
        //[a-z&&[^bc]]  : a到z,除了b和c(等同于[ad-z])
        //[a-z&&[^m-p]] :  a到z,除了m到p(等同于[a-lq-z])

        // 2、预定义字符(只能匹配单个字符)  .  \d  \D   \s  \S  \w  \W
        // .	任何字符
        // \d	一个数字: [0-9]
        // \D	非数字: [^0-9]
        // \s	一个空白字符:
        // \S	非空白字符: [^\s]
        // \w	[a-zA-Z_0-9]
        // \W	 [^\w]

        // 3、数量词: ?   *   +   {n}   {n, }  {n, m}
        // X?	X , 一次或0次
        // X*	X,零次或多次
        // X+	X , 一次或多次
        // X {n}	X,正好n次
        // X {n, }	X,至少n次
        // X {n,m}	X,至少n但不超过m次

        // 4、其他几个常用的符号:  或:|    分组:()
下面举例说明某些需求:注意/有特殊含义,需要在加一个/进行转义,告知后面的/是普通的/
        // 需求1:要求要么是3个小写字母,要么是3个数字。
        String str1 = "ghj" ;
        System.out.println(str1.matches("(\\d|\\p{Lower}){3}"));

        // 需求2:必须是”我爱“开头,中间可以是至少一个”编程“,最后至少是1个”666“
        String str2  = "我爱sjdifidsf编程编程djslfi66666";
        System.out.println(str2.matches("(我爱).*(编程){1,}.*(666){1,}"));
这俩个返回结果均为true
Collection
collection常用API
  //创建一个Collection集合对象
        Collection<String> collection = new ArrayList<>();

        // 1.public boolean add(E e):添加元素, 添加成功返回true。
        collection.add("西施");
        collection.add("貂蝉");
        collection.add("杨玉环");
        collection.add("王昭君");

        System.out.println(collection);

        // 2.public void clear():清空集合的元素。
        collection.clear();
        System.out.println(collection);

        // 3.public boolean isEmpty():判断集合是否为空 是空返回true,反之。 不是判断集合是否为null
        boolean empty = collection.isEmpty();
        System.out.println(empty);

        // 4.public int size():获取集合的大小。
        System.out.println(collection.size());

        // 5.public boolean contains(Object obj):判断集合中是否包含某个元素。
        System.out.println(collection.contains("貂蝉"));
        System.out.println(collection.contains("如花"));

        // 6.public boolean remove(E e):删除某个元素:如果有多个重复元素默认删除前面的第一个!
        collection.remove("貂蝉");
        System.out.println(collection);

        // 7.public Object[] toArray():把集合转换成数组
        Object[] objects = collection.toArray();
        System.out.println(Arrays.toString(objects));
        for (int i = 0; i < objects.length; i++) {
            String s = (String) objects[i];
            System.out.println(s);
        }
collection的遍历
方式一(迭代器):
    //创建集合对象,并添加数据
        Collection<String> collection = new ArrayList<>();
        collection.add("赵敏");
        collection.add("小昭");
        collection.add("素素");

        // 使用迭代器遍历集合
        // 1、从集合对象中获取迭代器对象。
        Iterator<String> ite = collection.iterator();

        System.out.println(ite.next());
        System.out.println(ite.next());
        System.out.println(ite.next());
        /*if(ite.hasNext()){ //判断当前指针指向的位置是否有元素,有 true  没有 false
            System.out.println(ite.next()); //获取当前元素,并把指针向下移动一个
        }
        if(ite.hasNext()){
            System.out.println(ite.next());
        }
        if(ite.hasNext()){
            System.out.println(ite.next());
        }
        if(ite.hasNext()){
            System.out.println(ite.next());
        }*/

        while (ite.hasNext()){
            System.out.println(ite.next());  //获取当前元素,并把指针向下移动一个
        }
方式二(增强for):
此处应该注意到增强for同样适用于数组
        Collection<String> c = new ArrayList<>();
        c.add("赵敏");
        c.add("小昭");
        c.add("素素");
        c.add("灭绝");
//        System.out.println(c);

        //使用增强for遍历集合或者数组。
        Iterator<String> it = c.iterator();
        while (it.hasNext()) {
            System.out.println(it.next());
        }

        for (String s : c) {
            System.out.println(s);
        }

        System.out.println("---------------------------------------");
        String[] names = {"迪丽热巴", "古力娜扎", "稀奇哈哈"};
        for(String s : names){
            System.out.println(s);
        }
    }
方式三(foreach):
        Collection<String> c = new ArrayList<>();
        c.add("赵敏");
        c.add("小昭");
        c.add("殷素素");
        c.add("周芷若");
//        System.out.println(c);

        // default void forEach(Consumer<? super T> action):  结合Lambda表达式遍历集合:
//        c.forEach(new Consumer<String>() {
//            @Override
//            public void accept(String s) {
//                System.out.println(s);
//            }
//        });

        c.forEach(s -> System.out.println(s));


        c.forEach(System.out::println);
collection除了可以添加基本数据以外还可以添加对象类型:
        创建一个集合容器负责存储多部电影对象。
        Collection<Movie> collection = new ArrayList<>();
        collection.add(new Movie("《肖生克的救赎》", 9.7, "罗宾斯"));
        collection.add(new Movie("《霸王别姬》" , 9.6 ,  "张国荣、张丰毅"));
        collection.add(new Movie("《阿甘正传》" , 9.5 ,  "汤姆.汉克斯"));

        for (Movie movie : collection) {
            System.out.println(movie);
List的常用API
 // 1.创建一个ArrayList集合对象(有序、可重复、有索引)
        List<String> list = new ArrayList<>();
        list.add("蜘蛛精");
        list.add("至尊宝");
        list.add("至尊宝");
        list.add("牛夫人");

        System.out.println(list);

        // 2.public void add(int index, E element): 在某个索引位置插入元素。
        list.add(2, "紫霞仙子");

        System.out.println(list); //[蜘蛛精, 至尊宝, 紫霞仙子, 至尊宝, 牛夫人]

        // 3.public E remove(int index): 根据索引删除元素,返回被删除元素
        list.remove(2);

        System.out.println(list);

        // 4.public E get(int index): 返回集合中指定位置的元素。
        String s = list.get(3);
        System.out.println(s);

//        String s1 = list.get(4);
//        System.out.println(s1);

        // 5.public E set(int index, E element): 修改索引位置处的元素,修改成功后,会返回原来的数据
        list.set(2, "如花");
        System.out.println(list); //[蜘蛛精, 至尊宝, 如花, 牛夫人]
List的遍历方式
其中for循环是独有的,因为List有索引
        List<String> list = new ArrayList<>();
        list.add("糖宝宝");
        list.add("蜘蛛精");
        list.add("至尊宝");

        //(1)for循环
        for (int i = 0; i < list.size(); i++) {
            String s = list.get(i);
            System.out.println(s);
        }

        System.out.println("-----------------------------");
        //(2)迭代器。
        Iterator<String> it = list.iterator();
        while (it.hasNext()){
            System.out.println(it.next());
        }

        System.out.println("-----------------------------");
        //(3)增强for循环(foreach遍历)
        for (String s : list) {
            System.out.println(s);
        }


        System.out.println("--------------Lambda---------------");
        //(4)JDK 1.8开始之后的Lambda表达式
        list.forEach(new Consumer<String>() {
            @Override
            public void accept(String s) {
                System.out.println(s);
            }
        });

        list.forEach(s-> System.out.println(s));

        list.forEach(System.out::println);
LinkedList集合
// 1、创建一个队列。
        LinkedList<String> queue = new LinkedList<>();
        // 入队
        queue.addLast("第1号人");
        queue.addLast("第2号人");
        queue.addLast("第3号人");
        queue.addLast("第4号人");
        System.out.println(queue);
        // 出队
        System.out.println(queue.removeFirst());
        System.out.println(queue.removeFirst());
        System.out.println(queue.removeFirst());
        System.out.println(queue);
        System.out.println("--------------------------------------------------");
        // 2、创建一个栈对象。
        LinkedList<String> stack = new LinkedList<>();
        // 压栈(push)
        stack.push("第1颗子弹");
        stack.push("第2颗子弹");
        stack.push("第3颗子弹");
        stack.push("第4颗子弹");
        System.out.println(stack);
        // 出栈(pop)
        System.out.println(stack.pop());
        System.out.println(stack.pop());
        System.out.println(stack);
collections的API
        //创建一个list集合
        List<String> list = new ArrayList<>();
        list.add("aa");
        // 1、public static <T> boolean addAll(Collection<? super T> c, T...elements):为集合批量添加数据
        Collections.addAll(list, "bb", "cc", "mm");
        Collections.addAll(list, new String[]{"gg","kk"});

        System.out.println(list);

        // 2、public static void shuffle(List<?> list):打乱List集合中的元素顺序。
        Collections.shuffle(list);
        System.out.println(list);

        // 3、 public static <T> void sort(List<T> list):对List集合中的元素进行升序排序。
        Collections.sort(list);
        System.out.println(list);

//        Collections.sort(list, new Comparator<String>() {
//            @Override
//            public int compare(String o1, String o2) {
//                return o2.compareToIgnoreCase(o1);
//            }
//        });

        Collections.sort(list,(o1,o2)-> o2.compareToIgnoreCase(o1));

//        Collections.sort(list,String::compareToIgnoreCase);

        System.out.println(list);


        //对象数据排序
        List<Student> students = new ArrayList<>();
        students.add(new Student("蜘蛛精",23, 169.7));
        students.add(new Student("紫霞",22, 169.8));
        students.add(new Student("紫霞",22, 169.8));
        students.add(new Student("至尊宝",26, 165.5));

        //Collections.sort(students);

//        Collections.sort(students, new Comparator<Student>() {
//            @Override
//            public int compare(Student o1, Student o2) {
//               /* if(o1.getHeight() > o2.getHeight())
//                    return 1;
//                if(o1.getHeight() < o2.getHeight())
//                    return -1;
//                return 0;*/
//                return Double.compare(o2.getHeight(), o1.getHeight());
//            }
//        });

        Collections.sort(students,(o1,o2)->Double.compare(o2.getHeight(), o1.getHeight()));

        System.out.println(students);
这里注意对字符串和double类型的参数进行排序时候,需要使用的俩个比较方式:
字符串类型排序:o2.compareToIgnoreCase(o1)
double类型排序:Double.compare(o2.getHeight(), o1.getHeight())
set集合
      Set<Integer> set = new HashSet<>(); //无序 无重复 无索引
      Set<Integer> set = new LinkedHashSet<>(); //有序 无重复 无索引
如何理解哈希值:
*      Java中的所有对象,都可以调用Obejct类提供的hashCode方法,返回该对象自己的哈希值。
*      public int hashCode(): 返回对象的哈希值。
*       同一个对象多次调用hashCode()方法返回的哈希值是相同的。
*      不同的对象,它们的哈希值一般不相同,但也有可能会相同(哈希碰撞)
Student stu1 = new Student( "蜘蛛精",25, 169.5); Student stu2 = new Student( "紫霞",22, 166.5); Student stu3 = new Student( "紫霞",22, 166.5); System.out.println(stu2.hashCode()); //2072149404 System.out.println(stu3.hashCode()); //2072149404 Set<Student> set = new HashSet<>(); set.add(stu1); set.add(stu2); set.add(stu3); System.out.println(set); System.out.println("重地".hashCode()); //1179395 System.out.println("通话".hashCode()); //1179395 String str = new String("abc"); System.out.println(str.hashCode()); //96354set方法和collection方法几乎是等同的。
在实体类是否重写hashcode和equal的区别:
Set<Student> stu = new HashSet<>();

        Collections.addAll(stu,new Student("zhangsan",18.2,19),new Student("zhangsan",18.2,19),new Student("lisi",19.2,16));

        System.out.println(stu);//不重写hashcode和equals就把相同的元素打印出来了 [Student{name='zhangsan', money=18.2, age=19}, Student{name='zhangsan', money=18.2, age=19}, Student{name='lisi', money=19.2, age=16}]

        System.out.println(stu);//重写以后:[Student{name='zhangsan', money=18.2, age=19}, Student{name='lisi', money=19.2, age=16}]
Map集合
map集合的常用API
       // 1.添加元素: 无序,不重复,无索引。
        Map<String, Integer> map = new HashMap<>();
        map.put("手表", 100);
        map.put("手表", 220);
        map.put("手机", 2);
        map.put("Java", 2);
        map.put(null, null);
        System.out.println(map);  // map = {null=null, 手表=220, Java=2, 手机=2}


        // 2.public int size():获取集合的大小
          System.out.println(map.size()); //4

        // 3、public void clear():清空集合
          map.clear();
          System.out.println(map); // {}

         //4.public boolean isEmpty(): 判断集合是否为空,为空返回true ,反之!
          System.out.println(map.isEmpty()); //判断集合中是否有元素。

        // 5.public V get(Object key):根据键获取对应值
          Integer num = map.get("手表");  //如果key不存在,则value返回null
          System.out.println(num);

        // 6. public V remove(Object key):根据键删除整个元素(删除键会返回键的值)
          Integer a = map.remove("Java");
          System.out.println(a);

          System.out.println(map);

        // 7.public  boolean containsKey(Object key): 判断是否包含某个键 ,包含返回true ,反之
          System.out.println(map.containsKey("手机"));

        // 8.public boolean containsValue(Object value): 判断是否包含某个值。
          System.out.println(map.containsValue(220));

        // 9.public Set<K> keySet(): 获取Map集合的全部键。
          Set<String> set = map.keySet();
          System.out.println(set);

        // 10.public Collection<V> values(); 获取Map集合的全部值。
          Collection<Integer> c = map.values();
          System.out.println(c);
map集合的遍历
第一种:
Map.entrySet()方法返回的是一个Set<Map.Entry<K,V>>类型的值,首先该返回值是一个集合Set,集合中的元素是Map.Entry<K,V>类型的,每个Map.Entry可以看作是一个键值对对象,可以通过getKey()和getValue()方法分别获取其键和值。
// 准备一个Map集合。
        Map<String, Double> map = new HashMap<>();
        map.put("蜘蛛精", 169.8);
        map.put("紫霞", 165.8);
        map.put("至尊宝", 169.5);
        map.put("牛魔王", 183.6);

//        Set<Map.Entry<String, Double>> entrySet = map.entrySet();
//        Iterator<Map.Entry<String, Double>> it = entrySet.iterator();
//        while (it.hasNext()){
//            Map.Entry<String, Double> entry = it.next();
//            System.out.println(entry.getKey()+"==="+entry.getValue());
//        }

//        Set<Map.Entry<String, Double>> set = map.entrySet();
//        for (Map.Entry<String, Double> entry : set) {
//            System.out.println(entry.getKey());
//            System.out.println(entry.getValue());
//        }

        for (Map.Entry<String, Double> entry : map.entrySet()) {
            System.out.println(entry.getKey());
        }
第二种:
        Set<String> keys = map.keySet();
        Iterator<String> it = keys.iterator();
        while (it.hasNext()) {
            String key = it.next(); //获取set集合中的数据
            Double value = map.get(key); //根据key获取map中对应的value
            System.out.println(key + "===" + value);
        }
第三种:map.forEach这个函数式接口进行遍历
        map.forEach(new BiConsumer<String, Double>() {
            @Override
            public void accept(String key, Double value) {
                System.out.println(key + "===" + value);
            }
        });

        map.forEach((key, value) -> System.out.println(key + "===" + value));
try-catch三种情况
第一种:
        //第一种情况:没有异常的情况
        try {
            System.out.println("代码1");
            int num = 10 / 2;
            System.out.println("代码2");

        } catch (Exception e) {
            System.out.println("代码3");

        }
        System.out.println("代码4");
    }
结果为:代码1 代码2 代码4
第二种:
 //第二种情况:有异常的情况
        try {
            System.out.println("代码1");
            int num = 10 / 0;
            System.out.println("代码2");

        } catch (Exception e) {
            System.out.println("代码3");
            //e.printStackTrace();  //打印了堆栈中跟踪到的异常消息
            System.out.println("发生了运算错误,除数不能为0");
            System.out.println(e.getMessage());

        }
        System.out.println("代码4");
输出结果为:
代码1
代码3
发生了运算错误,除数不能为0
/ by zero
代码4第三种:
 //第三种情况:有异常的情况,但处理的类型不匹配,程序依然非正常结束
        try {
            System.out.println("代码1");
            int num = 10 / 0;
            System.out.println("代码2");

        } catch (ArrayIndexOutOfBoundsException e) {
            System.out.println("代码3");

        }
        System.out.println("代码4");
    }
输出结果为:
代码1
Exception in thread "main" java.lang.ArithmeticException: / by zero
at com.itheima.d2_try_catch的3种情况.Test3.main(Test3.java:8)try-catch-finally三种情况
第一种
        try {
            System.out.println("代码1");
            int num = 10 / 0;
            System.out.println("代码2");

        } catch (Exception e) {
            System.out.println("代码3");

        }finally {
            System.out.println("代码4");

        }
        System.out.println("代码5");
    }
输出结果为:
代码1
代码3
代码4
代码5第二种
   try {
            System.out.println("代码1");
            int num = 10 / 2;
            System.out.println("代码2");
        } finally {
            System.out.println("代码3");
        }
        System.out.println("代码4");
输出结果为:
代码1
代码2
代码3
代码4第三种
        try {
           //  int num = 10 / 0;
//            int[] arr = {11, 22, 33};
//            System.out.println(arr[5]);
            int a = Integer.parseInt("123a");
        } catch (ArithmeticException e) {
            System.out.println("程序出错啦!除数为0了");
        } catch (ArrayIndexOutOfBoundsException e) {
            System.out.println("程序出错啦!索引越界了");
        } catch (Exception e) {
            System.out.println("程序出错啦!"+ e.getMessage());
        }

        System.out.println("aaaaaaaaaaaa");
输出结果为:
程序出错啦!For input string: "123a"
aaaaaaaaaaaa异常
常见的异常
        //ArithmeticException  算术运算异常
          int num = 10 / 0;

        //ArrayIndexOutOfBoundsException  数组下标越界异常
          int[] arr = {11, 22, 33};
          System.out.println(arr[3]);

        //NullPointerException  空指向异常
          Student stu = null;
          System.out.println(stu.getName());

        //NumberFormatException  数字格式异常
          String str = "18a";
          int age = Integer.parseInt(str);

        //IllegalArgumentException  非法参数异常
          Random r = new Random();
          int i = r.nextInt(-100);
          System.out.println(i);

        //ClassCastException  类型转换异常
          Animal a = new Dog();
          Cat c = (Cat) a;
自定义异常类:
public class AgeIllegalException extends Exception {
    //编写构造方法,目的是调用父类的构造方法,给变量赋值
    public AgeIllegalException(String message) {
        super(message);
    }
}
测试类:只需要在需要提示的地方进行对异常的抛出即可 throw new AgeIllegalException("age is illegal"); 引号内容为出现异常时候出现的异常信息提示
 //保存用户年龄
        try {
            saveAge(180);
        } catch (AgeIllegalException e) {
            e.printStackTrace();
        }
    }

    public static void saveAge(int age) throws AgeIllegalException {
        if (age > 0 && age < 150) {
            System.out.println("年龄已保存!");
        }else{
            //告知调用者年龄的错误。 手动创建一个异常
            //throw new Exception("您输入年龄不正确~"); 利用系统异常,只是自己定义了一个消息而已。
            throw new AgeIllegalException("age is illegal");
        }

        System.out.println("aaaaa");
File
文件的常用API
掌握File创建对象,代表具体文件的方案。// 1、创建一个File对象,指代某个具体的文件。 // 路径分隔符 //表示创建了一个文件 // File file = new File("D:\\aaa.txt"); // file.createNewFile(); //创建目录(文件夹) // File file = new File("D:\\source"); // file.mkdir(); //make directory // 注意:File对象可以指代一个不存在的文件路径 // File file = new File("d:\\abc\\aa"); // System.out.println(file.exists()); //判断文件或目录是否存在 // File file = new File("D:\\source","aaa.txt"); // File file = new File("D:\\source"+File.separator,"aaa.txt"); // System.out.println(file); //D:\source\aaa.txt // System.out.println(file.exists()); //true // 我现在要定位的文件是在模块中,应该怎么定位呢? // 绝对路径:带盘符的 File file1 = new File("D:\\code\\javase\\day08-file-io\\src\\com\\itheima\\aa.txt"); System.out.println(file1.exists()); // 相对路径(重点):不带盘符,默认是直接去工程下寻找文件的。 File file2 = new File("day08-file-io\\src\\com\\itheima\\aa.txt"); System.out.println(file2.exists());掌握File提供的判断文件类型、获取文件信息功能// 1.创建文件对象,指代某个文件 File f1 = new File("D:/resource/ab.txt"); // File f1 = new File("D:/resource/"); // f1.createNewFile(); //创建文件 // 2、public boolean exists():判断当前文件对象,对应的文件路径是否存在,存在返回true. // System.out.println(f1.exists()); // 3、public boolean isFile() : 判断当前文件对象指代的是否是文件,是文件返回true,反之。 // System.out.println(f1.isFile()); // 4、public boolean isDirectory() : 判断当前文件对象指代的是否是文件夹,是文件夹返回true,反之。 // System.out.println(f1.isDirectory()); // 5.public String getName():获取文件的名称(包含后缀) // System.out.println(f1.getName()); // 6.public long length():获取文件的大小,返回字节个数 // System.out.println(f1.length()); //25字节 // 7.public long lastModified():获取文件的最后修改时间。 // long l = f1.lastModified(); // Date date = new Date(l); // SimpleDateFormat sdf = new SimpleDateFormat("yyyy-MM-dd hh:mm:ss"); // String format = sdf.format(date); // System.out.println(format); //2023-03-26 05:07:52 // 8.public String getPath():获取创建文件对象时,使用的路径 File f2 = new File("D:\\resource\\ab.txt"); File f3 = new File("file-io-app\\src\\itheima.txt"); System.out.println(f2.getPath()); // D:\resource\ab.txt System.out.println(f3.getPath()); //file-io-app\src\itheima.txt // 9.public String getAbsolutePath():获取绝对路径 System.out.println(f2.getAbsolutePath()); //D:\resource\ab.txt System.out.println(f3.getAbsolutePath()); //d:\code\javase\file-io-app\src\itheima.txt掌握File创建和删除文件相关的方法。// 1、public boolean createNewFile():创建一个新文件(文件内容为空),创建成功返回true,反之。 // File f1 = new File("D:/resource/itheima2.txt"); // boolean newFile = f1.createNewFile(); // System.out.println(newFile); // 2、public boolean mkdir():用于创建文件夹,注意:只能创建一级文件夹 // File f2 = new File("d:/aa/bb"); // boolean mkdir = f2.mkdir(); // System.out.println(mkdir); // 3、public boolean mkdirs():用于创建文件夹,注意:可以创建多级文件夹 // File f3 = new File("d:/aaa/bbb"); // boolean mkdirs = f3.mkdirs(); // System.out.println(mkdirs); // 3、public boolean delete():删除文件,或者空文件,注意:不能删除非空文件夹。 // File f4 = new File("d:/aa/bb"); //表示删除此路径下的bb目录 // File f4 = new File("D:/resource"); //表示删除此路径下的resource目录 // boolean delete = f4.delete(); // System.out.println(delete); //true // System.out.println(delete); //false /* File f4 = new File("D:/resource/ab.txt"); boolean delete = f4.delete(); System.out.println(delete); //true*/
掌握File提供的遍历文件夹的方法。// 1、public String[] list():获取当前目录下所有的"一级文件名称"到一个字符串数组中去返回。 // File f1 = new File("D:\\software"); // String[] arr = f1.list(); // for (int i = 0; i < arr.length; i++) { // System.out.println(arr[i]); // } // 2、public File[] listFiles():(重点)获取当前目录下所有的"一级文件对象"到一个文件对象数组中去返回(重点) File f2 = new File("D:\\software"); File[] files = f2.listFiles(); // System.out.println(files); for (int i = 0; i < files.length; i++) { File f = files[i]; System.out.println(f.getName()); //查询文件名 }
文件的搜索
掌握文件搜索的实现。public static void main(String[] args) { try { searchFile("d:\\", "steam1.exe"); } catch (Exception e) { e.printStackTrace(); } } private static void searchFile(String path, String fileName) throws Exception { if (path == null) { System.out.println("目录不能为空"); } File dir = new File(path); if (!dir.exists() || dir.isFile()) { throw new Exception("目录不正确~");//throw等同于return,代码不会向下执行 } //遍历文件 File[] files = dir.listFiles(); if (files != null)//如果当前目录有文件时 { for (File file : files) { if (file.isFile()) { if (file.getName().contains(fileName)) { System.out.println("找到了"); System.out.println(file.getAbsolutePath()); } } else { searchFile(file.getAbsolutePath(), fileName); } } } }泛型<T>
泛型类
已知俩种普通的实体类,分别是Car和Cat,如下所示:
public class Car {
    private String brand;
    private double price;

    public Car(String brand, double price) {
        this.brand = brand;
        this.price = price;
    }

    @Override
    public String toString() {
        return brand + "汽车,价格:" + price;
    }
}
public class Cat { private String name; private String food; public Cat(String name, String food) { this.name = name; this.food = food; } @Override public String toString() { return name + "爱吃" + food; } }再定义一个泛型类Student如下所示:
public class Student<T> {

    private String name;
    private T t;  //定义一个猫对象类型的变量   T 代表type的意思,名字可以随便起。表示范型

    public String getName() {
        return name;
    }

    public void setName(String name) {
        this.name = name;
    }

    public T getT() {
        return t;
    }

    public void setT(T t) {
        this.t = t;
    }
}
在测试类调用student时候,<T>所标注的类型可以是任意类型,调用方法如下所示:
 public static void main(String[] args) {
//        Student stu1 = new Student();
//        stu1.setName("蔡钰");
//        stu1.setO("BMW");
//
//        System.out.println(stu1.getName());
//        Object o = stu1.getO();
//        System.out.println(o);

        Student<Cat> stu2 = new Student();
        stu2.setName("蔡钰");
        stu2.setT(new Cat("波斯猫","鱼"));

        System.out.println(stu2.getName());
        Cat cat = stu2.getT();
        System.out.println(cat);


        Student<Car> stu3 = new Student<>();
        stu3.setName("蔡钰");
        stu3.setT(new Car("宝马",50));

        System.out.println(stu3.getName());
        Car car = stu3.getT();
        System.out.println(car);

    }
泛型方法
定义和使用含有泛型的方法(重点)
可以把泛型定义在方法的修饰符和返回值类型之间
定义格式:
    修饰符 <泛型> 返回值类型(使用泛型) 方法名(参数列表==>使用泛型){
        方法体
    }
什么时候确定泛型的数据类型:
    调用方法传递的数据是什么类型,泛型就是什么类型
定义泛型方法的类如下所示:
public class GenericsMethod {

    public <T> void method(T t){
        System.out.println(t);
    }

    public <E>  E method2(E e){
        return e;
    }
}
测试类如下所示:
        GenericsMethod gm1 = new GenericsMethod();
        //使用了范型方法:方法的参数类型通用了。
        gm1.method("哈哈");
        gm1.method(123);
        gm1.method(true);

        //使用了范型方法:方法的返回值不用强转了。
        String s = gm1.method2("aaa");
        Integer i = gm1.method2(123);
        Boolean b = gm1.method2(true);
泛型接口
调用泛型接口的方法可以再对应实现的类里具体化,也可以在最后的测试类中进行具体化
泛型接内容为:
public interface GenericInterface<T> {

    double PI = 3.14; //PI     public static final double PI = 3.14;

    //变成了范型方法
    void show(T t);  //  public abstract void show(T t);

}
对应的实现俩个类为:
public class GenericInterfaceImpl implements GenericInterface<String>{

    @Override
    public void show(String s) {
    }
}
public class GenericInterfaceImpl2<T> implements GenericInterface<T>{ @Override public void show(T t) { } }对应的测试类为:
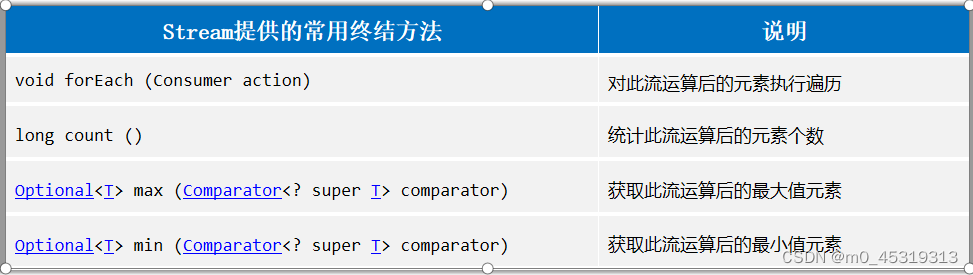
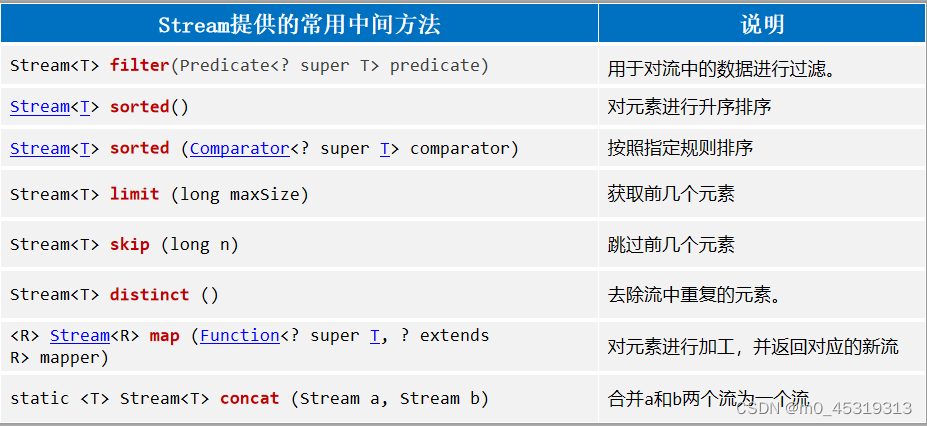
 GenericInterfaceImpl gii = new GenericInterfaceImpl();
        gii.show("abc");
//        gii.show(123);

        GenericInterfaceImpl2<Integer> gii2 = new GenericInterfaceImpl2();
//        gii2.show("aaa");
//        gii2.show(123);
Stream
获取stream的方式:
各种集合和数组获取stream流
  //1、如何获取list集合的Stream流?
        List<String> names = new ArrayList<>();
        Collections.addAll(names, "张三丰", "张无忌", "周芷若", "赵敏", "张强");
        Stream<String> stream1 = names.stream();

        System.out.println("-----------------------------");

        //2、如何获取set集合的Stream流?
        Set<String> set = new HashSet<>();
        Collections.addAll(set, "刘德华", "张曼玉", "蜘蛛精", "马德", "德玛西亚");
        //输出全部信息
        Stream<String> stream2 = set.stream();
        System.out.println("-----------------------------");

        //3、如何获取map集合的Stream流?
        Map<String, Double> map = new HashMap<>();
        map.put("古力娜扎", 172.3);
        map.put("迪丽热巴", 168.3);
        map.put("马尔扎哈", 166.3);
        map.put("卡尔扎巴", 168.3);

//        Set<String> keySet = map.keySet();
//        Stream<String> stream3 = keySet.stream();
        Stream<String> stream3 = map.keySet().stream();
        Stream<Double> stream4 = map.values().stream();

        //4、如何获取数组的Stream流?
        String[] names2 = {"张翠山","东方不败","唐大山","独孤求败"};
        Stream<String> arrStream = Arrays.stream(names2);
        Stream<String> arrStream2 = Stream.of(names2);
stream流常见API
        List<Student> stus = new ArrayList<>();
        Collections.addAll(stus,new Student("蜘蛛精", 26, 172.5),  new Student("蜘蛛精", 27, 172.5),
                new Student("紫霞", 23, 167.6), new Student("白晶晶", 25, 169.0), new
                        Student("牛魔王", 35, 183.3), new Student("牛夫人", 34, 168.5));

        //需求2:找出年龄大于等于23,且年龄小于等于30的学生,并按照年龄降序输出
        stus.stream().filter(stu -> stu.getAge() <= 30).filter(student -> student.getAge() >= 23).sorted(((o1, o2) -> o2.getAge() - o1.getAge())).forEach(System.out::println);
        //需求3: 取出身高最高的前3名学生,并输出
        stus.stream().sorted(((o1, o2) -> Double.compare(o2.getHeight(), o1.getHeight()))).limit(3).forEach(System.out::println);
        //需求4: 取出身高最低的前2名学生,并输出
        stus.stream().sorted(((o1, o2) -> Double.compare(o1.getHeight(), o2.getHeight()))).limit(2).forEach(System.out::println);
        System.out.println("_______");
        //需求5:找出身份超过168的学生叫什么名字,要求去掉重复的名字,再输出。
        stus.stream().filter(student -> student.getHeight() > 168.0).map(student -> student.getName()).distinct().forEach(System.out::println);

        //需求1:请计算出身高超过168的学生有几个
        System.out.println(stus.stream().filter(student -> student.getHeight() > 168).count());

        //需求2:请找出身高最高的学生对象,并输出,最后需要用get()取得对象
        System.out.println(stus.stream().max(((o1, o2) -> Double.compare(o1.getHeight(), o2.getHeight()))).get());
        //需求3:请找出身高最低的学生对象,并输出
        System.out.println(stus.stream().max(((o1, o2) -> Double.compare(o2.getHeight(), o1.getHeight()))).get());

        //需求4:请找出身高超过170的学生,并放到一个新的集合中去。(list,set)
        List<Student> collectlist = stus.stream().filter(student -> student.getHeight() > 170).collect(Collectors.toList());
        System.out.println(collectlist);
        Set<Student> collectset = stus.stream().filter(student -> student.getHeight() > 170).collect(Collectors.toSet());
        System.out.println(collectset);

        //需求5: 请找出身高超过170的学生对象,并把学生对象的名字和身高存入到一个Map集合中
     Map<String, Double> collectmap =
        stus.stream().filter(student -> student.getHeight() > 170).distinct().collect(Collectors.toMap(student -> student.getName(),student -> student.getHeight()));

/*        //需求6: 请找出身高超过170的学生对象,并把学生对象的名字和身高存入到一个数组中
        Object[] objects = stus.stream().filter(student -> student.getHeight() > 170).toArray();
        for (int i = 0; i < objects.length; i++) {
            Student student = (Student)objects[i];
            System.out.println(student);
        }

        Student[] studentsarr = stus.stream().filter(student -> student.getHeight() > 170).toArray(value -> new Student[value]);
        System.out.println(Arrays.toString(studentsarr));
    }*/
将流转化为list的方法:collect(Collectors.toList())
将流转化为set的方法:collect(Collectors.toSet())
将流转化为map的方法:collect(Collectors.toMap(student -> student.getName(),student -> student.getHeight())) 其中前一个参数为键,后一个参数为键值
将流转化为数组的方法:.toArray()使用该方法返回一个object的对象,后面需要进行强转
另外一种方法是toArray(value -> new Student[value]) 后面是什么对象就写对应的对象即可转化为对应的对象数组
IO流
家族图
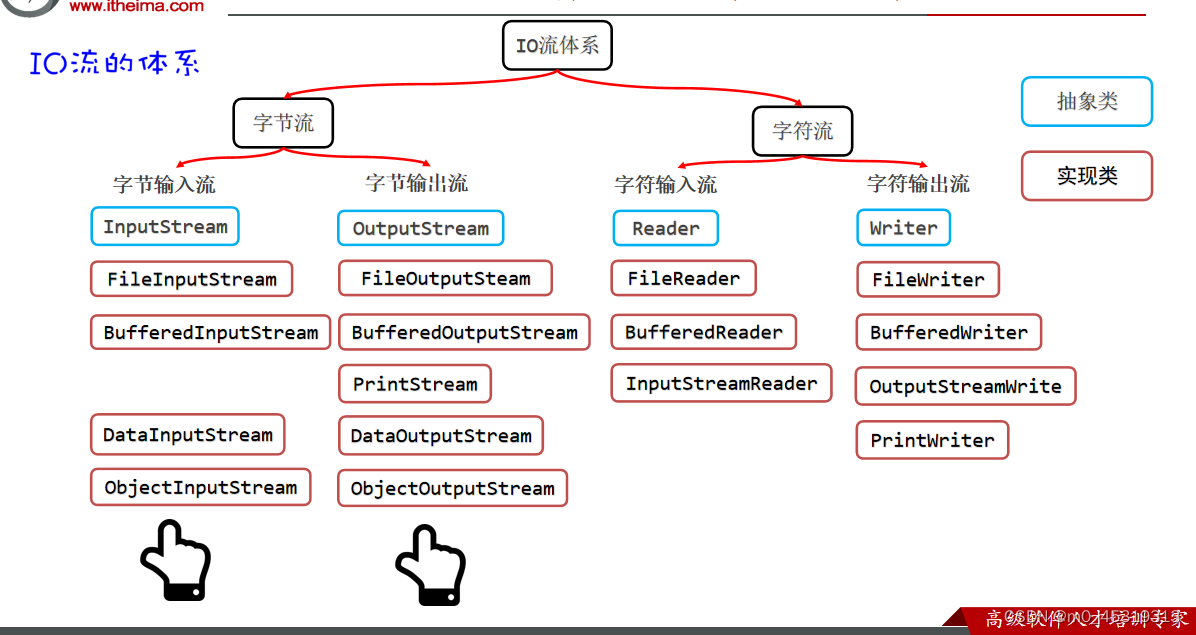
InputStream and OutputStream(字节输入输出流)
        try (InputStream is = new FileInputStream("C:\\code\\javase\\pratice\\src\\A.TXT");)
        {
            //遍历的几种方法:
            int len;
            while((len=is.read())!=-1)//每次读一个字节 返回的是文档字节本身数据 当read()结果为-1时,表示没有读到数据了
            {
                System.out.println((char)is.read());
            }
            System.out.println("++++++++++");

            int len1;
            byte[] bytes = new byte[1024];
            while((len1=is.read(bytes))!=-1)//每次读取多个字节到字节数组中去,返回读取的字节数量,读取完毕会返回-1.
            {
                System.out.println(new String(bytes,0,len1));
            }

            System.out.println("------------");
            File file  = new File("C:\\code\\javase\\pratice\\src\\A.TXT");
            int len2;
            byte[] bytes1 = new byte[(int)file.length()];
            while((len2=is.read(bytes1))!=-1){  //每次读取多个字节到字节数组中去,返回读取的字节数量,读取完毕会返回-1.
                System.out.println(new String(bytes1,0,len2));
            }

            System.out.println("");

            byte[] bytes2 = is.readAllBytes();//直接读取所有的字节的方法
            System.out.println(new String(bytes2));


        } catch (Exception e) {
            e.printStackTrace();
        }


        try (OutputStream os = new FileOutputStream("C:\\code\\javase\\pratice\\src\\A.TXT");)
        {
            os.write(97);

            byte[] bytearr = new byte[]{97,98,99,100,101};//批量输入
            os.write (bytearr);

            os.write(bytearr,0,2);//丛指定位置开始,向后读取指定位数
            os.write("我爱中国".getBytes());//不能直接读取字符串,需要将其转化为字节
        } catch (Exception e) {
            e.printStackTrace();
        }
Reader and Writer(字符输入输出;流)
        //创建时候需要用字节创建,但是创建出来的方法是字符类型的方法,是char
        try(Reader fr = new FileReader("C:\\code\\javase\\pratice\\src\\A.TXT");)
        {
            int len1;
            char[] chars = new char[1024];
            while((len1=fr.read(chars))!=-1){
                System.out.println(new String(chars,0,len1));
            }
        } catch (Exception e) {
            e.printStackTrace();
        }

        try(Writer fw = new FileWriter("C:\\code\\javase\\pratice\\src\\A.TXT",true);)
        {
            fw.write('a');//public void write(int c):写一个字符出去
            fw.write(98);
            fw.write("我爱你");// 2、public void write(String c)写一个字符串出去
            fw.write("我爱你",0,1);//3、public void write(String c ,int pos ,int len):写字符串的一部分出去

            char[] chars = new char[]{'1','2','3','4'};// 4、public void write(char[] buffer):写一个字符数组出去
            fw.write(chars);

            fw.write(chars,0,2);


        } catch (IOException e) {
            e.printStackTrace();
        }
Buffer(缓冲流)
   try (InputStream is = new FileInputStream("C:\\code\\javase\\pratice\\src\\A.TXT");
             OutputStream os = new FileOutputStream("C:\\code\\javase\\pratice\\src\\A.TXT");
             BufferedInputStream bis = new BufferedInputStream(is);
             BufferedOutputStream bos = new BufferedOutputStream(os);)
        {
            //buffer中字节输入流和字节输出流和InputStream和OutStream相同,只是变量不同

        } catch (Exception e) {
            e.printStackTrace();
        }


        try (  Reader r = new FileReader("C:\\code\\javase\\pratice\\src\\A.TXT");
               Writer w = new FileWriter("C:\\code\\javase\\pratice\\src\\A.TXT");
               BufferedReader br = new BufferedReader(r);
               BufferedWriter bw = new BufferedWriter(w);
        )
        {
            //buffer中字节输入流和字节输出流和Read和Write相同,只有俩个不同:
            String str;
            while((str=br.readLine())!=null)//成行读
            {
                System.out.println(str);
            }

            bw.write("15156165156151");
            bw.newLine();//换行
            bw.write('s');


        } catch (Exception e) {
            e.printStackTrace();
        }
PrintStream and PrintWriter(打印流)
  try (  PrintStream ps = new PrintStream("C:\\code\\javase\\pratice\\src\\A.TXT");)
        {
            ps.println("我爱你");
            ps.println('a');
            ps.println(8596);
            ps.println(96.36);
            ps.println(true);

        } catch (Exception e) {
            e.printStackTrace();
        }

        try ( PrintWriter pw = new PrintWriter("C:\\code\\javase\\pratice\\src\\A.TXT");)
        {
            pw.println("我爱你");
            pw.println('a');
            pw.println(8596);
            pw.println(96.36);
            pw.println(true);
            pw.println(true);

        } catch (Exception e) {
            e.printStackTrace();
        }
InputStreamReade and OutputStreamWriterr(字符输出输入转化流)
        try (InputStream r  = new FileInputStream("C:\\code\\javase\\pratice\\src\\A.TXT");
             InputStreamReader ism = new InputStreamReader(r,"UTF-8");)
        {
            int len;
            char[] chars = new char[1024];
            while((len= ism.read(chars))!=-1)
            {
                System.out.println(new String(chars,0,len));
            }
        } catch (Exception e) {
            e.printStackTrace();
        }

        try(OutputStream o = new FileOutputStream("C:\\code\\javase\\pratice\\src\\A.TXT");
            OutputStreamWriter osw = new OutputStreamWriter(o,"UTF-8");)
        {
            osw.write("jdnakdkas");
            osw.write('d');
            osw.write("蒂萨较大基督教爱接地极爱点击阿瓦i");

        } catch (Exception e) {
            e.printStackTrace();
        }
DataInputStream and DataOnputStream(数据输入输出流)
        try (DataOutputStream dos = new DataOutputStream(new FileOutputStream("C:\\code\\javase\\pratice\\src\\A.TXT")))
        {
            dos.writeUTF("我爱你");
            dos.writeInt(1);
            dos.writeBoolean(true);
            dos.writeDouble(159.3);

        } catch (Exception e) {
            e.printStackTrace();
        }
        try (DataInputStream dis = new DataInputStream(new FileInputStream("C:\\code\\javase\\pratice\\src\\A.TXT"));){

            System.out.println(dis.readUTF());
            System.out.println(dis.readInt());
            System.out.println(dis.readBoolean());
            System.out.println(dis.readDouble());

        } catch (Exception e) {
            e.printStackTrace();
        }
ObjectInputStream and ObjectOnputStream(对象字节输入输出流)
使用该流可以实现对象的反序列化
其中文件的后缀名不一定是一致的或者是刻度的,只要前后保持一致就可以读到。
 try ( ObjectOutputStream oos = new ObjectOutputStream(new FileOutputStream("C:\\code\\javase\\pratice\\src\\A.TXT"));)//这个地址随便写都可以
        {
            User user = new User("zhnagsan","123456",19);
            oos.writeObject(user);

        } catch (Exception e) {
            e.printStackTrace();
        }

        try (ObjectInputStream ois = new ObjectInputStream(new FileInputStream("C:\\code\\javase\\pratice\\src\\A.TXT"));){

            User U = (User)ois.readObject();
            System.out.println(U.getAge());
            System.out.println(U.getDamin());
            System.out.println(U.getPassword());

        } catch (Exception e) {
            e.printStackTrace();
        }
properties
获取Properties的信息
   // 1、创建一个Properties的对象出来(键值对集合,空容器)
        Properties p = new Properties();
        System.out.println(p);

        // 2、开始加载属性文件中的键值对数据到properties对象中去
     //   p.load(new FileReader("C:\\code\\javase\\day11\\src\\uers.properties"));
        p.load(new FileInputStream("C:\\code\\javase\\day11\\src\\uers.properties"));
        System.out.println(p);

        // 3、根据键取值
        System.out.println(p.getProperty("张无忌"));

        // 4、遍历全部的键和值。
        Set<String> set = p.stringPropertyNames();
        for (String s : set) {
            System.out.println(s+"="+p.getProperty(s));
        }

        System.out.println("__________________");
        p.forEach((k,v)-> System.out.println(k+"="+v));
输出结果是:{}
{dsadas=dawdadaw, tom=123, dawda=dawdadawdf, ndknks=45515, afa=dsadsa}
null
dsadas=dawdadaw
tom=123
dawda=dawdadawdf
ndknks=45515
afa=dsadsa
__________________
dsadas=dawdadaw
tom=123
dawda=dawdadawdf
ndknks=45515
afa=dsadsa往Properties存入信息
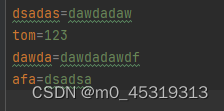
  // 1、创建Properties对象出来,先用它存储一些键值对数据
        Properties properties = new Properties();
        properties.setProperty("tom","123");
        properties.setProperty("afa","dsadsa");
        properties.setProperty("dsadas","dawdadaw");
        properties.setProperty("dawda","dawdadawdf");
        // 2、把properties对象中的键值对数据存入到属性文件中去
        properties.store(new FileWriter("C:\\code\\javase\\day11\\src\\uers.properties"),"i saved many users1");
其中store函数的第二个属性是备注信息,不会影响传入properties文件信息
输入结果为:
Xml
使用Dom4j框架解析XML文件
xml文件如下:
<?xml version="1.0" encoding="utf-8" ?> <!-- 这就是xml文档的注释 --> <!-- ctrl + shift + / 可以生成注释 --> <users> <user id="1" desc="第一个用户"> <name>张无忌</name> <aaa> <bbb>ccc</bbb> </aaa> <password>minmin</password> <address>光明顶</address> <sex>男</sex> <data>3 < 2 && 5 > 3 </data> <data1> <![CDATA[ 3 <2 && 6>3 ]]> </data1> </user> <person>好多人</person> <user id="2"> <name>赵敏</name> <password>wuji</password> <address>光明顶</address> <sex>女</sex> </user> </users>解析类如下所示:
        // 1、创建一个Dom4J框架提供的解析器对象
        SAXReader saxReader = new SAXReader();

        // 2、使用saxReader对象把需要解析的XML文件读成一个Document对象。
        Document doc = saxReader.read("C:\\code\\javase\\day11\\src\\hellow_world.xml");

        // 3、获得文档根元素。(从而可以获得文档中全部的数据了)
        Element rootElement = doc.getRootElement();
        System.out.println("根元素标签是"+rootElement.getName());

        // 4、获取根元素下的全部一级子元素。
        List<Element> user1 = rootElement.elements("user");
        for (Element element : user1) {
            System.out.println(element.getName());
        }
        System.out.println("__________________");

        List<Element> elements = rootElement.elements();
        System.out.println(elements.size());
        for (Element element : elements) {
            //输出每个子元素的表标签
            System.out.println(element.getName());
        }
        System.out.println("____________________");

        // 5、获取当前元素下的某个子元素。(如:people的子元素)
        Element userelement = rootElement.element("user");//有相同的默认取第一个
        System.out.println(userelement.element("name").getText());

        // 6、获取某个元素下,指定元素的文本内容。 (如:获取user下name中的文本”张无忌“)


        // 7、获取元素的属性信息(根据属性名获得属性对象)
        Attribute id = userelement.attribute("id");
        System.out.println(id.getName());//id
        System.out.println(id.getValue());//1
        System.out.println("_________________");

        //获得多个属性对象
        List<Attribute> attributes = userelement.attributes();
        for (Attribute attribute : attributes) {
            System.out.println(attribute.getName() + "=" + attribute.getValue());
        }
        System.out.println("____________________");

        // 8、获取当前元素(user)下的所有子元素文本值
        List<Element> elements1 = userelement.elements();
        for (Element element : elements1) {
            System.out.println(element.getText());
        }
输出结果为:
根元素标签是users
user
user
__________________
3
user
person
user
____________________
张无忌
id
1
_________________
id=1
desc=第一个用户
____________________
张无忌
minmin
光明顶
男
3 < 2 && 5 > 3
3 <2 && 6>3
向xml文件写入信息//使用StringBuilder对象添加数据 StringBuilder sb = new StringBuilder(); sb.append("<?xml version=\"1.0\" encoding=\"UTF-8\" ?>\r\n"); sb.append("<book>\r\n"); sb.append("\t <name>从入门到跑路</name>\r\n"); sb.append("\t<author>高斯林</author>\r\n"); sb.append("\t<price>999.9</price>\r\n"); sb.append(" </book>\r\n"); //使用字符写入文件 try(BufferedWriter bw = new BufferedWriter( new FileWriter("C:\\code\\javase\\day11\\src\\hellow_world.xml"));) { bw.write(sb.toString()); } catch (IOException e) { e.printStackTrace(); }
线程
创建线程的三种方式
第一种:
定义一个类,继承Thread线程类,重写run()任务方法
public class MyThread extends Thread {
    @Override
    public void run() {
        for (int i = 1; i <= 5; i++) {
            System.out.println("======= 子线程输出:" + i);
        }
    }
}
在测试类中引用这个任务执行
注意创建子线程对象的时候采用了多态的性质直接生成了线程
public class ThreadTest1 {
    // main方法是由一个默认的主线程对象负责调用执行。
    public static void main(String[] args) {

        //2、创建子线程对象
        Thread t = new MyThread();
        //3、启动线程
        t.start();

        for (int i = 1; i <= 5; i++) {
            System.out.println("主线程main输出:" + i);
        }
    }
}
第二种:
定义一个线程任务类,实现Runnable任务接口,重写run()任务方法public class MyRunnable implements Runnable { @Override public void run() { for (int i = 1; i <= 5; i++) { System.out.println("======== 子线程输出:" + i); } } }在测试类中,这个类相当于一个任务,需要把任务new出来,然后定义线程把这个任务分配给一个线程
public class ThreadTest2 {
    public static void main(String[] args) {
        Runnable r = new MyRunnable();
        //2、创建子线程对象
        Thread t = new Thread(r);
        //3、启动线程
        t.start();
        for (int i = 1; i <= 5; i++) {
            System.out.println("主线程main输出 ===》" + i);
        }
    }
}
也有简化的方式:
直接new一个线程在里面分配任务
public class ThreadTest2_2 {
    public static void main(String[] args) {

//        //2、创建子线程对象,并分配任务
//        Thread t = new Thread(new MyRunnable());
//        //3、启动线程
//        t.start();

        //简化方式1:
//        new Thread(new MyRunnable()).start();

        //简化方式2:
//        new Thread(new Runnable() {
//            @Override
//            public void run() {
//                for (int i = 1; i <= 5; i++) {
//                    System.out.println("子线程输出:" + i);
//                }
//            }
//        }).start();

        //简化方式3:
        new Thread(()->{
            for (int i = 1; i <= 5; i++) {
                System.out.println("子线程输出:" + i);
            }
        }).start();

        for (int i = 1; i <= 5; i++) {
            System.out.println("主线程main输出:" + i);
        }
    }
}
第三种,是带有返回参数的
//1、定义一个类实现Callable接口,重写call任务方法public class MyCallable implements Callable<String> { private int n; //默认值是0 public MyCallable(int n) { this.n = n; } @Override //任务方法 public String call() throws Exception { // if ("线程2".equals(Thread.currentThread().getName())){ // return null; // } int sum = 0; for (int i = 1; i <= n; i++) { sum += i; } return Thread.currentThread().getName()+"线程求出了1~" + n + "的和是:" + sum; } }
  public static void main(String[] args) throws Exception {
        //创建一个任务对象
        Callable<String> callable = new MyCallable(1000);
        //把Callable对象封装到FutureTask未来任务对象中
        //1)是一个任务对象,间接的实现了Runnable接口
        //2)可以在线程执行结束后,通过调未来对象的get()方法返回线程执行的结果
        FutureTask<String> f1 = new FutureTask<>(callable);

        //2、创建子线程对象,并分配任务
        Thread t = new Thread(f1);
        t.setName("线程1");
        //3、启动线程
        t.start();


        //又创建一个线程对象
        Callable<String> callable2 = new MyCallable(200);
        FutureTask<String> f2 = new FutureTask<>(callable2);
        Thread t2 = new Thread(f2);
        t2.setName("线程2");
        t2.start();

        Callable<String> callable3 = new MyCallable(200);
        FutureTask<String> f3 = new FutureTask<>(callable3);
        Thread t3 = new Thread(f3);
        t3.setName("线程3");
        t3.start();

//        String s1 = f1.get();
//        System.out.println(s1);
//
//        String s3 = f3.get();
//        System.out.println(s3);
//
//
//        String s2 = f2.get();
//        System.out.println(s2);


        //输出
//        线程1线程求出了1~1000的和是:500500
//        线程3线程求出了1~200的和是:20100
//        线程2线程求出了1~200的和是:20100

        String s2 = f2.get();
        System.out.println(s2);

        String s1 = f1.get();
        System.out.println(s1);

        String s3 = f3.get();
        System.out.println(s3);

        //输出
//        线程2线程求出了1~200的和是:20100
//        线程1线程求出了1~1000的和是:500500
//        线程3线程求出了1~200的和是:20100


        /*for (int i = 1; i <= 5; i++) {
            System.out.println("主线程的任务方法输出:" + i);
        }*/

    }
注意在该子线程并没有定义任何的输出,在测试类里面要拿到返回结果需要使用get方法
另外需要注意的是,在子线程可以使用Thread.currentThread().getName()这个api获得当前线程的名字,谁调用它名字就叫什么,在测试类中可以使用t3.setName("线程3")
线程常用API:
子线程类为:
public class MyThread extends Thread {

    public MyThread(String name) {
        super(name); //调用父类的有参构造
    }

    @Override
    public void run() {
        for (int i = 1; i <= 3; i++) {
            //哪个线程运行它,它就得到哪个线程对象
            String name = Thread.currentThread().getName();
//            System.out.println( this.getName()+"子线程输出:" + i);
            System.out.println(name + "子线程输出:" + i);
        }
    }
}
public class ThreadTest1 { public static void main(String[] args) { Thread t1 = new MyThread("1号线程"); // t1.setName("线程1"); t1.start(); System.out.println(t1.getName()); Thread t2 = new MyThread("2号线程"); // t2.setName("线程2"); t2.start(); System.out.println(t2.getName()); //哪个线程运行它,它就得到哪个线程对象 Thread m = Thread.currentThread(); // m.setName("main111"); System.out.println(m.getName()); for (int i = 1; i <= 5; i++) { System.out.println(m.getName()+"主线程输出:" + i); } } }public class ThreadTest2 { public static void main(String[] args) throws Exception { //如果i==3时,让程序休眠5秒 // for (int i = 1; i <= 5; i++) { // if(i==3){ // //如果用户交了会员费,就注释此代码 // Thread.sleep(5000); //以毫秒为单位,让当前线程睡眠。 // } // System.out.println(i); // } // join方法作用:让当前调用这个方法的线程先执行完。 Thread t1 = new MyThread("1号线程"); t1.start(); t1.join(); Thread t2 = new MyThread("2号线程"); t2.start(); t2.join(); Thread t3 = new MyThread("3号线程"); t3.start(); t3.join(); } }三种上锁方式
下面模拟转账的功能
第一种方式是同步代码块
package com.itheima.d6_同步代码块;

public class DrawThread extends Thread{
    private Account acc;
    public DrawThread(Account acc, String name){
        super(name);
        this.acc = acc;
    }
    @Override
    public void run() {
        // 取钱(小明,小红)
        acc.drawMoney(100000);
    }
}
package com.itheima.d6_同步代码块; /** * 目标:模拟线程安全问题。 */ public class ThreadTest { public static void main(String[] args) { Account acc = new Account("ICBC-110", 100000); new DrawThread(acc, "小明").start(); // 小明 new DrawThread(acc, "小红").start(); // 小红 /* Account acc1 = new Account("ICBC-112", 100000); new DrawThread(acc1, "小黑").start(); // 小黑 new DrawThread(acc1, "小白").start(); // 小白*/ } }package com.itheima.d6_同步代码块; public class Account { private String cardId; // 卡号 private double money; // 余额。 public Account() { } public Account(String cardId, double money) { this.cardId = cardId; this.money = money; } public static void test() { synchronized (Account.class) { } } // 小明 小红线程同时过来的 public void drawMoney(double money) { // 先搞清楚是谁来取钱? String name = Thread.currentThread().getName(); // 1、判断余额是否足够 synchronized (this){ if (this.money >= money) { System.out.println(name + "来取钱" + money + "成功!"); this.money -= money; System.out.println(name + "来取钱后,余额剩余:" + this.money); } else { System.out.println(name + "来取钱:余额不足~"); } } } public String getCardId() { return cardId; } public void setCardId(String cardId) { this.cardId = cardId; } public double getMoney() { return money; } public void setMoney(double money) { this.money = money; } }同步代码块是怎么样实现线程安全带?
对出现问题的核心代码使用synchronized进行加锁 每次只能一个线程占锁进入访问
同步代码块的同步锁对象有什么要求?
对于实例方法建议使用this作为锁对象。
第二种:同步方法 只有在Accound类中不同
package com.itheima.d7_同步方法;

public class Account {
    private String cardId; // 卡号
    private double money; // 余额。

    public Account() {
    }

    public Account(String cardId, double money) {
        this.cardId = cardId;
        this.money = money;
    }

    public static void test() {
        synchronized (Account.class) {

        }
    }

    // 小明 小红线程同时过来的
    // 同步方法 (方法锁就是对象锁)
    public synchronized void drawMoney(double money) {
        // 先搞清楚是谁来取钱?
        String name = Thread.currentThread().getName();

        // 1、判断余额是否足够
           if (this.money >= money) {
               System.out.println(name + "来取钱" + money + "成功!");
               try {
                   Thread.sleep(5000);
               } catch (InterruptedException e) {
                   e.printStackTrace();
               }
               this.money -= money;
               System.out.println(name + "来取钱后,余额剩余:" + this.money);
           } else {
               System.out.println(name + "来取钱:余额不足~");
           }

    }

    public String getCardId() {
        return cardId;
    }

    public void setCardId(String cardId) {
        this.cardId = cardId;
    }

    public double getMoney() {
        return money;
    }

    public void setMoney(double money) {
        this.money = money;
    }


}
第三种方法lock锁
需要再类中定义一个final类型的锁,在同步的代码进行之前加锁,在同步的代码结束之后进行解锁。
package com.itheima.d8_lock锁;

import java.util.concurrent.locks.Lock;
import java.util.concurrent.locks.ReentrantLock;

public class Account {
    private String cardId; // 卡号
    private double money; // 余额。
    //创建一个锁对象
    private final Lock lk = new ReentrantLock();

    public Account() {
    }

    public Account(String cardId, double money) {
        this.cardId = cardId;
        this.money = money;
    }

    // 小明 小红线程同时过来的
    public void drawMoney(double money) {
        // 先搞清楚是谁来取钱?
        String name = Thread.currentThread().getName();
        // 1、判断余额是否足够
        try {
            lk.lock();//加锁
            if (this.money >= money) {
                System.out.println(name + "来取钱" + money + "成功!");
                this.money -= money;
                System.out.println(name + "来取钱后,余额剩余:" + this.money);
                int i = 10/0;
            } else {
                System.out.println(name + "来取钱:余额不足~");
            }
        } catch (Exception e) {
            e.printStackTrace();
        } finally {
            lk.unlock();//释放锁
        }

    }

    public String getCardId() {
        return cardId;
    }

    public void setCardId(String cardId) {
        this.cardId = cardId;
    }

    public double getMoney() {
        return money;
    }

    public void setMoney(double money) {
        this.money = money;
    }


}
net
IP
掌握InetAddress类的使用public class InetAddressTest { public static void main(String[] args) throws Exception { // 1、获取本机IP地址对象的 InetAddress ip = InetAddress.getLocalHost(); System.out.println(ip.getHostName()); //获得本机的主机名称 System.out.println(ip.getHostAddress()); //获得本机的ip地址 // 2、获取指定IP或者域名的IP地址对象。 InetAddress ip2 = InetAddress.getByName("192.168.153.52"); System.out.println(ip2.getHostName());//192.168.153.52 System.out.println(ip2.getHostAddress());//192.168.153.52 InetAddress ip3 = InetAddress.getByName("www.baidu.com"); System.out.println(ip3.getHostName()); //www.baidu.com System.out.println(ip3.getHostAddress()); //220.181.38.150 // 3、判断指定网址是否联通. ping www.baidu.com System.out.println(ip2.isReachable(3000));//false } }
UDP
案例一:一发一收
客户端:
public class Client {
    public static void main(String[] args) throws Exception {

        //1、创建DatagramSocket对象(客户端对象)   扔韭菜的人
        DatagramSocket client = new DatagramSocket();
        //2、创建DatagramPacket对象封装需要发送的数据(数据包对象) 韭菜盘子
        //参数1:是要发送的数据
        //参数2:是数据的长度
        //参数3:对方服务器的ip地址
        //参数4:对方服务器程序的端口
        byte[] b = "你好,我是客户端".getBytes(); //64kb
        DatagramPacket packet = new DatagramPacket(b,b.length,InetAddress.getByName("127.0.0.1"),8888);

        //3、使用DatagramSocket对象的send方法,传入DatagramPacket对象  开始抛出韭菜
        client.send(packet);

        //4、释放资源
        client.close();

    }
}
服务端:
public class Server {
    public static void main(String[] args) throws Exception {
        System.out.println("----服务端启动----");
        //1、创建DatagramSocket对象并指定端口(服务端对象)   接韭菜的人
        DatagramSocket server = new DatagramSocket(8888);
        //2、创建DatagramPacket对象接收数据(数据包对象)     韭菜盘子
        byte[] b = new byte[1024*64];
        DatagramPacket packet = new DatagramPacket(b,b.length); //b.length 问题?
        //3、使用DatagramSocket对象的receive方法,传入DatagramPacket对象  开始接收韭菜
        server.receive(packet);

        int length = packet.getLength(); //实际接收数据的长度

        //输出数据
        String s = new String(b, 0, length); //b.length 问题?
        System.out.println(s);
        //4、释放资源
        server.close();
    }
}
案例二:多发多收其实就是在上面的济擦湖上添加一个while循环。
客户端:
public class Client {
    public static void main(String[] args) throws Exception {

        //1、创建DatagramSocket对象(客户端对象)   扔韭菜的人
        DatagramSocket client = new DatagramSocket();
        //2、创建DatagramPacket对象封装需要发送的数据(数据包对象) 韭菜盘子
        //参数1:是要发送的数据
        //参数2:是数据的长度
        //参数3:对方服务器的ip地址
        //参数4:对方服务器程序的端口
        Scanner sc = new Scanner(System.in);
        while (true) {
            System.out.println("请说(按n退出):");
            String msg = sc.next();
            if("n".equals(msg)){
                System.out.println("谢谢使用,欢迎下次再来~");
                client.close();
                break;
            }
            byte[] b = msg.getBytes(); //64kb
            DatagramPacket packet = new DatagramPacket(b,b.length,InetAddress.getByName("127.0.0.1"),8888);
            //3、使用DatagramSocket对象的send方法,传入DatagramPacket对象  开始抛出韭菜
            client.send(packet);
        }
        //4、释放资源
//        client.close();
    }
}
服务端:
public class Server {
    public static void main(String[] args) throws Exception {
        System.out.println("----服务端启动----");
        //1、创建DatagramSocket对象并指定端口(服务端对象)   接韭菜的人
        DatagramSocket server = new DatagramSocket(8888);
        //2、创建DatagramPacket对象接收数据(数据包对象)     韭菜盘子
        byte[] b = new byte[1024*64];
        DatagramPacket packet = new DatagramPacket(b,b.length);

        while (true) {
            //3、使用DatagramSocket对象的receive方法,传入DatagramPacket对象  开始接收韭菜
            server.receive(packet);

            int length = packet.getLength(); //实际接收数据的长度
            //输出数据
            String s = new String(b, 0, length); //b.length 问题?
            System.out.println(s);

            //获取客户机ip
            InetAddress ip = packet.getAddress();
            System.out.println(ip.getHostName());
            System.out.println(ip.getHostAddress());
        }
        //4、释放资源
//        server.close();
    }
}
TCP
案例一:一发一收
客户端:
public class Client {
    public static void main(String[] args) throws Exception {

        //1、创建客户端的Socket对象,请求与服务端的连接。
        Socket socket = new Socket("127.0.0.1",8888);

        //2、使用socket对象调用getOutputStream()方法得到字节输出流。
        OutputStream os = socket.getOutputStream();

        //3、使用字节输出流完成数据的发送。
        DataOutputStream dos = new DataOutputStream(os);
        dos.writeUTF("hello,我是客户端~");
        //4、释放资源:关闭socket管道。 先打开的,后关闭
        dos.close();
        os.close();
        socket.close();
    }
}
服务端:
public class Server {
    public static void main(String[] args) throws Exception {
        System.out.println("-----服务端启动成功-------");
        //创建ServerSocket对象,注册服务端端口。
        ServerSocket server = new ServerSocket(8888);

        //调用ServerSocket对象的accept()方法,等待客户端的连接,并得到Socket管道对象。
        Socket socket = server.accept();

        //通过Socket对象调用getInputStream()方法得到字节输入流、完成数据的接收。
        InputStream is = socket.getInputStream();
        DataInputStream dis = new DataInputStream(is);

        String s = dis.readUTF();
        System.out.println(s);

        SocketAddress a = socket.getRemoteSocketAddress();
        System.out.println(a);

        //释放资源:关闭socket管道
        dis.close();
        is.close();
        server.close();
    }
}
案例二:多发多收 就是在一发一收基础上添加while循环
客户端:
public class Client {
    public static void main(String[] args) throws Exception {

        //1、创建客户端的Socket对象,请求与服务端的连接。
        Socket socket = new Socket("127.0.0.1",8888);
        //2、使用socket对象调用getOutputStream()方法得到字节输出流。
        OutputStream os = socket.getOutputStream();
        //3、使用字节输出流完成数据的发送
        DataOutputStream  dos = new DataOutputStream(os);

        Scanner sc = new Scanner(System.in);
        while (true) {
            System.out.println("请说(按n结束):");
            String msg = sc.next();
            if("n".equals(msg)){
                System.out.println("谢谢使用,下次再来~");
                dos.close();
                os.close();
                socket.close();
                break;
            }
            dos.writeUTF(msg); //写出数据
            dos.flush(); //清缓存
        }


//        //4、释放资源:关闭socket管道。 先打开的,后关闭
//        dos.close();
//        os.close();
//        socket.close();

    }
}
public class Server { public static void main(String[] args) throws Exception { System.out.println("-----服务端启动成功-------"); //创建ServerSocket对象,注册服务端端口。 ServerSocket server = new ServerSocket(8888); //调用ServerSocket对象的accept()方法,等待客户端的连接,并得到Socket管道对象。 Socket socket = server.accept(); while (true) { //通过Socket对象调用getInputStream()方法得到字节输入流、完成数据的接收。 InputStream is = socket.getInputStream(); DataInputStream dis = new DataInputStream(is); try { String s = dis.readUTF(); System.out.println(s); } catch (IOException e) { System.out.println(socket.getRemoteSocketAddress() + "已下线"); dis.close(); is.close(); server.close(); break; } SocketAddress a = socket.getRemoteSocketAddress(); System.out.println(a); } //释放资源:关闭socket管道 // dis.close(); // is.close(); // server.close(); } }案例三:多客户端
将每次的客户端启动认定为一个任务,然后在服务端使用线程来执行各自的任务,就可以做到多客户端且一个服务端的效果。
线程类其实就是将上一个多发多收的服务端的一部分代码抽取掉作为一个线程的任务,然后在服务端,每次生成一个客户端,就会生成一个对应的任务。
客户端为:
public class Client {
    public static void main(String[] args) throws Exception {

        //1、创建客户端的Socket对象,请求与服务端的连接。
        Socket socket = new Socket("127.0.0.1",8888);
        //2、使用socket对象调用getOutputStream()方法得到字节输出流。
        OutputStream os = socket.getOutputStream();
        //3、使用字节输出流完成数据的发送
        DataOutputStream  dos = new DataOutputStream(os);

        Scanner sc = new Scanner(System.in);
        while (true) {
            System.out.println("请说(按n结束):");
            String msg = sc.next();
            if("n".equals(msg)){
                System.out.println("谢谢使用,下次再来~");
                dos.close();
                os.close();
                socket.close();
                break;
            }
            dos.writeUTF(msg); //写出数据
            dos.flush(); //清缓存
        }
//        //4、释放资源:关闭socket管道。 先打开的,后关闭
//        dos.close();
//        os.close();
//        socket.close();
    }
}
服务端:
public class Server {
    public static void main(String[] args) throws Exception {
        System.out.println("-----服务端启动成功-------");

        //创建ServerSocket对象,注册服务端端口。
        ServerSocket server = new ServerSocket(8888);

        while (true) {
            //调用ServerSocket对象的accept()方法,等待客户端的连接,并得到Socket管道对象。
            Socket socket = server.accept();
            System.out.println("有人上线了:"+socket.getRemoteSocketAddress());
            new ServerSocketThread(socket).start();
        }

        //释放资源:关闭socket管道
//        dis.close();
//        is.close();
//        server.close();
    }
}
客户端被抽取出来单独作为线程的类为:
public class ServerSocketThread extends Thread{
    private Socket socket;
    public ServerSocketThread(Socket socket) {
        this.socket = socket;
    }
    @Override
    public void run() {
        while (true) {
            try {
                //通过Socket对象调用getInputStream()方法得到字节输入流、完成数据的接收。
                InputStream is = socket.getInputStream();
                DataInputStream dis = new DataInputStream(is);
                try {
                    String s = dis.readUTF();
                    System.out.println(s);
                } catch (IOException e) {
                    System.out.println(socket.getRemoteSocketAddress() + "已下线");
                    dis.close();
                    is.close();
                    break;
                }
            } catch (IOException e) {
                e.printStackTrace();
            }
        }
    }
}
案例四:群发
服务端思想:将每个前端发送过来的socket存在一个list集合里面,利用这个socket对所有人进行群发消息,每个线程代表一个信道,每个线程都要遍历已有的信道集合对所有现有的存在新的信道进行转发数据。
服务端:
public class Server {
    //保存所有上线的用户信道
    public static List<Socket> socketList = new ArrayList<>();

    public static void main(String[] args) throws Exception {
        System.out.println("-----服务端启动成功-------");

        //创建ServerSocket对象,注册服务端端口。
        ServerSocket server = new ServerSocket(8888);

        while (true) {
            //调用ServerSocket对象的accept()方法,等待客户端的连接,并得到Socket管道对象。
            Socket socket = server.accept();
            socketList.add(socket); //保存信道到集合中
            System.out.println("有人上线了:" + socket.getRemoteSocketAddress());
            new ServerSocketThread(socket).start();
        }

        //释放资源:关闭socket管道
//        dis.close();
//        is.close();
//        server.close();
    }
}
服务端对应的线程任务类是:
public class ServerSocketThread extends Thread{
    private Socket socket;
    public ServerSocketThread(Socket socket) {
        this.socket = socket;
    }
    @Override
    public void run() {
        while (true) {
            try {
                //通过Socket对象调用getInputStream()方法得到字节输入流、完成数据的接收。
                InputStream is = socket.getInputStream();
                DataInputStream dis = new DataInputStream(is);
                try {
                    String s = dis.readUTF();
//                    System.out.println(s);
                    sendMsgToAll(s); //群发
                } catch (Exception e) {
                    System.out.println(socket.getRemoteSocketAddress() + "已下线");
                    Server.socketList.remove(socket); //从集合中移除当前信道对象
                    dis.close();
                    is.close();
                    break;
                }
            } catch (IOException e) {
                e.printStackTrace();
            }
        }
    }

    private void sendMsgToAll(String s) throws IOException {
        //循环每个信道
        for (Socket socket : Server.socketList) {
            OutputStream os = socket.getOutputStream();
            DataOutputStream dos = new DataOutputStream(os);
            dos.writeUTF(s);
            dos.flush();
        }
    }
}
客户端同样也需要一个线程,这个线程需要把自己服务端的数据记录下来。


 7万+
7万+


 被折叠的 条评论
为什么被折叠?
被折叠的 条评论
为什么被折叠?
 到【灌水乐园】发言


