


文章目录
一 、文件权限介绍
1. 什么是权限
权限是用来约束用户能对系统所做的操作。
或者说,权限是指某个特定的用户具有特定的系统资源使用权力。
2.为什么需要权限
Linux是一个多用户系统,对于每一个用户来说,个人隐私的保护十分重要,所以需要进行权限划分
- 安全性:降低误删除风险、减少人为造成故障以及数据泄露等风险。
- 数据隔离:不同的权限能看到、以及操作不同的数据(比如员工薪资表)。
- 职责明确:电商场景客服只能查看投诉、无法查阅店铺收益,运营则能看到投诉以及店铺收益。
3.权限与用户的关系
在 Linux 系统中,权限是用来定义用户能做什么,不能做什么。
- 针对文件定义了三种身份,分别是属主owner、属组group、其他人others
- 每种身份又对应三种权限,分别是读read、写write、执行execute
把一个用户加入了一个组,该用户就拥有了该组的权限,当一个用户要操作某个文件时,系统会依次检索该用户是否是该文件的拥有者,其次是组成员,最后是其他人,如果扫描到是拥有者,则具备拥有者的权限,不必往后扫描,以此类推
- 当一个用户访问文件流程如下
- 判断用户是否为文件属主,如果是则按属主权限进行访问
- 判断用户是否为文件属组,如果是则按属组权限进行访问
- 如果不是文件属主、也不是该文件属组,则按其他人权限进行访问
4.基本权限类型
linux 中权限是由,rwxr-xr-x 这9位字符来表示;主要控制文件的属主User、属组Group、其他用户 Other
r: 可读 4
w: 可写 2
x: 可执行 1

权限的归属
属主:u
属组:g
其他人 o

[root@localhost ~]# ls -l file.txt
-rw-r--r--. 1 root root 24 Jun 30 11:27 file.txt
[root@localhost ~]#
1.第一列文件类型:
-:文本文档
d:目录
b:设备block 硬盘挂载等
c:字符设备 中端
s:套接字文件
l:软链接
2.权限
3. .表示 selinux =enforced 时候创建的文件
4. 硬链接个数
5.属主
6.属组
7.文件所占用的空间(以字节为单位)
8.文件(目录)最近访问(修改)时间
9.文件名
二、修改文件权限
修改文件权限的意义:
简单来说就是赋于某个用户或组 --> 能够以何种方式(读写执行) --> 访问文件
修改权限使用 chmod(change mode) 命令来实现
对于 root 用户而言,可以修改任何人的文件权限;
对于普通用户仅仅只能变更属于自己的文件权限;
1.ugo 赋值方式
赋值法 好处是不管以前的权限,直接覆盖
[root@localhost tmp]# chmod 000 a.txt  # 权限清零
[root@localhost tmp]# ll
total 0
----------. 1 root root 0 Jul  2 22:12 a.txt
[root@localhost tmp]# chmod u=rwx,g=wx,o=r a.txt  # 赋值法 好处是不管以前的权限,直接覆盖
[root@localhost tmp]# ll
total 0
-rwx-wxr--. 1 root root 0 Jul  2 22:12 a.txt

[root@localhost tmp]# chmod u=-,g=-,o=- a.txt  # 这种写法也表示清空权限(也可以这样写chmod a=- a.txt 或ugo=-)
[root@localhost tmp]# ll
total 0
----------. 1 root root 0 Jul  3 11:06 a.txt
[root@localhost tmp]#
-
- 给文件所有人添加读写执行权限
[root@localhost ~]# chmod a=rwx filename
# a=all 所有(user+group+other)
- 取消文件的所有权限
[root@localhost ~]# chmod a=-rwx filename
- 属主读写执行,属组读写,其他人无权限
[root@localhost ~]# chmod u=rwx,g=rw,o=- filename
- 属主属组读写执行,其他人读权限
[root@localhost ~]# chmod ug=rwx,o=r filename
2. 数字方式
- 设定文件权限 644,rw-r–r-
[root@localhost ~]# chmod 644 filename[root@web ~]# chmod -R 755 dir
- 设定文件权限 600,rw-------
[root@localhost ~]# chmod 600 file
- 设定目录权限为755,递归授权 rwxr-xr-x
[root@localhost ~]# chmod -R 755 dir
3. 加减法(在原来的基础上加减)
1.增加权限用加法
[root@localhost tmp]# touch a.txt  # 创建文件
[root@localhost tmp]# ll
total 0
-rw-r--r--. 1 root root 0 Jul  2 22:12 a.txt

修改a.txt权限,让属主 rwx 属组rx 其他人w

[root@localhost tmp]# chmod u+x,g+x,o+w a.txt  # 需要在以前的基础上增减(可以连写u+rwx)
[root@localhost tmp]# ll
total 0
-rwxr-xrw-. 1 root root 0 Jul  2 22:12 a.txt
[root@localhost tmp]#
2.取消权限用减法
[root@localhost tmp]# chmod u-x,g-r a.txt
[root@localhost tmp]# ll
total 0
-rw---xrw-. 1 root root 0 Jul  2 22:12 a.txt
[root@localhost tmp]#

[root@localhost ~]# chmod a+x a.txt  # 对属主属组其他人同时增加x权限
[root@localhost ~]# ll a.txt
-rwxr-xr-x. 1 root root 0 Jul  4 00:25 a.txt
[root@localhost ~]#
4. 参数 -R 表示递归修改
[root@localhost tmp]# mkdir -p a/b/c   # 递归创建文件夹
[root@localhost tmp]# touch a/b/c/d.txt # 创建文件

[root@localhost tmp]#  ll -d a           # 查看a文件夹权限
drwxr-xr-x. 3 root root 15 Jul  2 23:36 a  # 755

[root@localhost tmp]#  ll -d a/b   #查看b文件夹权限
drwxr-xr-x. 3 root root 15 Jul  2 23:36 a/b #755
[root@localhost tmp]#  ll -d a/b/c       #查看c文件夹权限
drwxr-xr-x. 2 root root 19 Jul  2 23:36 a/b/c #755
[root@localhost tmp]# ll a/b/c/d.txt
-rw-r--r--. 1 root root 0 Jul  2 23:36 a/b/c/d.txt #644
[root@localhost tmp]#

[root@localhost tmp]# chmod -R 777 a #递归修改父文件夹权限,下面都跟着改
[root@localhost tmp]# ll -d a
drwxrwxrwx. 3 root root 15 Jul  2 23:36 a
[root@localhost tmp]# ll -d a/b
drwxrwxrwx. 3 root root 15 Jul  2 23:36 a/b
[root@localhost tmp]# ll -d a/b/c
drwxrwxrwx. 2 root root 19 Jul  2 23:36 a/b/c
[root@localhost tmp]# ll /a/b/c/d.txt
ls: cannot access /a/b/c/d.txt: No such file or directory
[root@localhost tmp]# ll a/b/c/d.txt
-rwxrwxrwx. 1 root root 0 Jul  2 23:36 a/b/c/d.txt
[root@localhost tmp]#
5. 修改文件的属主和属组
chown 属主.属组 文件路径
1.
[root@localhost home]# useradd libai  # 创建李白用户
[root@localhost home]# groupadd daye # 创建打野组
[root@localhost home]# cd /tmp

[root@localhost tmp]# rm -rf ./* #清空/tmp文件夹
[root@localhost tmp]# ll
total 0
[root@localhost tmp]# touch a.txt # 创建文件 a.txt
[root@localhost tmp]# ll
total 0
-rw-r--r--. 1 root root 0 Jul  3 11:06 a.txt
root@localhost tmp]# chown libai.daye a.txt  # 将文件属主和属组改为李白用户,打野组
[root@localhost tmp]# ll
total 0
-rw-r--r--. 1 libai daye 0 Jul  3 11:06 a.txt
[root@localhost tmp]#
2.
[root@localhost tmp]# useradd zhenji  # 创建用户甄姬
[root@localhost tmp]# chown zhenji. a.txt  # 如果不加属组,默认创建甄姬组,该文件属甄姬组
[root@localhost tmp]# ll
total 0
-rw-r--r--. 1 zhenji zhenji 0 Jul  3 11:06 a.txt
3.
[root@localhost tmp]# groupadd fashi  # 创建法师组
[root@localhost tmp]# chown .fashi a.txt  # 如果不加属主而修改法师组,默认还是原来的属主
[root@localhost tmp]# ll
total 0
-rw-r--r--. 1 zhenji fashi 0 Jul  3 11:06 a.txt
[root@localhost tmp]#
4. 递归的改 -R
总结:
   1.同时修改文件的属主和属组 , 用 chwon 属主.属组 文件路径
   2.若 属主.   则默认加属主一样名字的属组
   3. 若 .属组,则只改文件的属组
练习1.
例1:将a.txt设置为属主可读可写,其他人没有任何权限
[root@localhost ~]# chmod  600 a.txt

例2:将a.txt设置为属主可读可写可执行,其他人可读
[root@localhost ~]# chmod 744 a.txt

例3:将/tmp目录下所有的普通文件权限设置成600,文件夹设置成700
[root@localhost ~]# find /tmp/ -type d -exec chmod 700 {} \;
[root@localhost ~]# find /tmp/ -type f -exec chmod 600 {} \;

权限对文件及目录的意义
    要想执行文件,文件本身必须有可执行权限。
    要想查看文件,路径中所有的文件夹至少有可执行权限,文件本身至少有可查看权限。
    要想写文件,路径中所有的目录至少有可执行权限,文件本身至少有可写权限。

文件权限的归属
	[root@localhost tmp]# chmod o+r 1.txt
练习2.
场景1:针对 hr 部门的访问目录 /data/hr 设置权限,要求如下:
1.超级管理员 root 用户和 hr 组的员工可以读、写、执行。
2.其他用户或者组没有任何权限。
[root@localhost ~]# mkdir -p /data/hr
[root@localhost ~]# groupadd hr
[root@localhost ~]# useradd jack01 -G hr
[root@localhost ~]# useradd jack02 -G hr
[root@localhost ~]# cd /data
[root@localhost data]# ll
total 0
drwxr-xr-x. 2 root root 6 Jul 21 21:59 hr
[root@localhost data]# chgrp hr /data/hr/  # 也可以用chown .hr /data/hr
[root@localhost data]# ll
total 0
drwxr-xr-x. 2 root hr 6 Jul 21 21:59 hr
[root@localhost data]# chmod 770 /data/hr
[root@localhost data]# ll
total 0
drwxrwx---. 2 root hr 6 Jul 21 21:59 hr
三、权限对文件和文件夹的影响
- 针对文件
r:读取文件内容
w:修改文件内容
x:运行文件
- 针对文件夹
r:可以浏览该目录下的子子目录及文件名字
w:创建、删除、移动文件
x:可以进入该目录(只要我们要操作目录下的内容,至少对该目录具有执行权限)
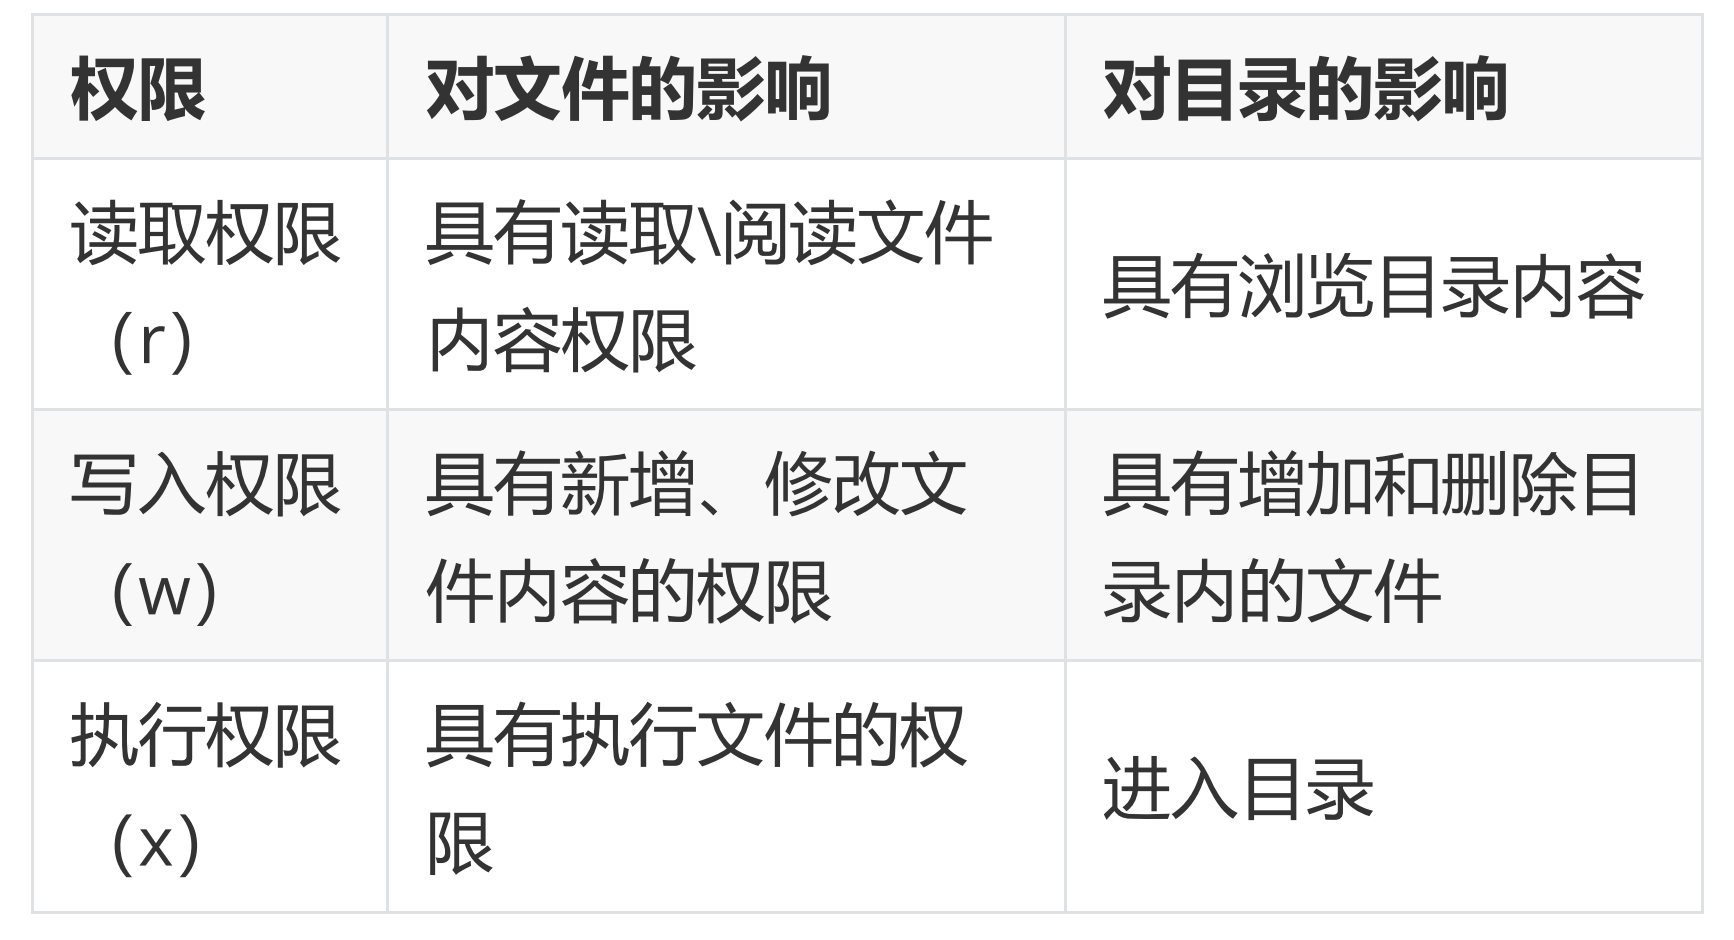
1.读取权限 r :具有读取、阅读文件内容权限
	  -只能使用查看类命令 cat、head、tail、less、more

2.写入权限 w :具有新增、修改文件内容的权限
	- 使用 vim 会提示权限拒绝,但可强制保存,会覆盖文件的所有内容
	- 使用 echo 命令重定向的方式可以往文件内写入数据,>> 可以追加内容
	- 使用 rm 无法删除文件,因为删除文件需要看上级目录是否有 w 的权限

3.执行权限 x:具有执行文件的权限
	- 执行权限什么用都没有
	- 如果普通用户需要执行文件,需要配合 r 权限
- 验证r权限
使用root用户,新建目录,修订权限为774
[root@localhost /]# mkdir /test
[root@localhost /]# ll -d /test/
drwxr-xr-x. 2 root root 6 7月  22 23:32 /test/
[root@localhost /]# chmod 774 /test/  # 修改目录其他人只读
[root@localhost /]# ll -d /test
drwxrwxr--. 2 root root 6 7月  22 23:32 /test
[root@localhost /]# touch /test/a.txt
[root@localhost /]# echo 123 >> /test/a.txt
[root@localhost /]#
用tom普通用户测试
[tom@localhost ~]$ cd /test
# 测试查看进入目录
-bash: cd: /test: Permission denied
# 测试创建文件
[tom@localhost ~]$ touch /test/a.txt
touch: cannot touch ‘/test/a.txt’: Permission denied
# 测试读取下面的文件内容
[tom@localhost ~]$ cat /test/a.txt
cat: /test/a.txt: Permission denied

# 测试查看目录里面内容
[tom@localhost ~]$ ls /test
ls: cannot access /test/a.txt: Permission denied
a.txt
[tom@localhost ~]$
2.验证w权限
使用root用户,修改权限为772
- 测试是否能够查看目录内容
- 测试是否能够删除文件
[root@localhost test]# chmod 772 /test/
[root@localhost test]# ll -d /test
drwxrwx-w-. 2 root root 19 Jul 22 23:34 /test
[root@localhost test]#


# 测试是否能够进入目录
[tom@localhost ~]$ cd /test
-bash: cd: /test: Permission denied
# 测试是否能够读取文件
[tom@localhost ~]$ cat /test/a.txt
cat: /test/a.txt: Permission denied
# 测试是否能够查看目录下内容
[tom@localhost ~]$ ls /test
ls: cannot open directory /test: Permission denied
# 测试是否能够删除目录下内容
[tom@localhost ~]$ rm -f /test/a.txt
rm: cannot remove ‘/test/a.txt’: Permission denied
3.验证x权限对目录的影响
root用户修改/test/ 为771
[root@localhost test]# chmod 771 /test/
[root@localhost test]# ll -d /test
drwxrwx--x. 2 root root 19 Jul 22 23:34 /test

# tom用户测试查看目录下内容
[tom@localhost ~]$ ls /test
ls: cannot open directory /test: Permission denied
# 测试进入目录
[tom@localhost ~]$ cd /test
[tom@localhost test]$ ls
目录权限总结:
- 1.读取权限r具有浏览目录及子目录内容的权限
使用 ls 命令浏览目录及子目录, 但同时也会提示权限拒绝
使用 ls -l 命令浏览目录及子目录,文件属性会带问号,并且只能看到文件名
[tom@localhost test]$ ls /test
ls: cannot access /test/a.txt: Permission denied
a.txt
[tom@localhost test]$ ls -l /test
ls: cannot access /test/a.txt: Permission denied
total 0
-????????? ? ? ? ?            ? a.txt
[tom@localhost test]$
- 2.写入权限 w :具有增加、删除或修改目录内文件名权限,需要 x权限配合
可以在目录内创建文件, 删除文件(跟文件本身权限无关)
不能进入目录、不能复制目录、不能删除目录、不能移动目录 - 3.执行权限 x:具有执行文件的权限
只能进入目录
不能浏览、复制、移动、删除
四、修改文件所属关系
假设tom用户有很多房产,希望过户给jim用户,只需要以root用户的身份改变房产属主关系,将属主tom变为jim,修改完成后该房产属主为jim而不再是tom
方式:
chown : 可以改变属主和属组
chgrp:仅能改变文件的属组
- chown 用法
创建文件或目录
创建/test/目录并查看属性
[root@localhost ~]# mkdir /test
[root@localhost ~]# ll -d /test
drwxr-xr-x. 2 root root 6 Jul 23 18:56 /test
·hown xxx 文件或目录名 形式 只改变属主
[root@localhost ~]# chown jim /test
[root@localhost ~]# ll -d /test
drwxr-xr-x. 2 jim root 6 Jul 23 18:56 /test
chwon xxx.文件或目录名 形式会把属主属组都替换为xxx
[root@localhost ~]# useradd jack
[root@localhost ~]# chown jack. /test
[root@localhost ~]# ll -d /test
drwxr-xr-x. 2 jack jack 6 Jul 23 18:56 /test
own .xxx 文件或目录名形仅仅只会更改属组
[root@localhost ~]# useradd jack1
[root@localhost ~]# chown .jack1 /test
[root@localhost ~]# ll -d /test
drwxr-xr-x. 2 jack jack1 6 Jul 23 18:56 /test
[root@localhost ~]#
递归修改用 chown -R xxx.yyy 目录名 会将目录及目录下所有的目录或文件属组属组都会修改
- chgrp 用法(同样有-R参数)
chgrp xxx 文件或目录名仅修改属组
[root@localhost ~]# chgrp jack2 /test
[root@localhost ~]# ll -d /test
drwxr-xr-x. 2 jack jack2 6 Jul 23 18:56 /test
[root@localhost ~]#
场景分析
一个进程能够以一种什么样的方式去访问一个文件,取决于这个进程所运行的身份对这个文件或者目录有什么样的权限;
基于httpd场景实践:
1.安装httpd
[root@localhost /]# setenforce 0
[root@localhost /]# systemctl stop firewalld
[root@localhost /]# yum install httpd -y &>/dev/null
[root@localhost /]# systemctl start httpd
[root@localhost /]#
2.在浏览器中测试我们自己写的网页

3.试着修改权限在访问
[root@localhost html]# chmod 600 index.html
[root@localhost html]# ll
total 4
-rw-------. 1 root root 12 Jul 23 19:21 index.html
[root@localhost html]#

提示被禁止。
有两种解决思路,1.再次修改文件权限,但是其他人可能也会对文件有相同的权限,我们只想让启动httpd 进程身份的人对其具有读写权限。那我只能看这个进程是哪个身份启动的
[root@localhost html]# ps -ef | grep [h]ttpd
root       2944      1  0 19:17 ?        00:00:00 /usr/sbin/httpd -DFOREGROUND
apache     2945   2944  0 19:17 ?        00:00:00 /usr/sbin/httpd -DFOREGROUND
apache     2946   2944  0 19:17 ?        00:00:00 /usr/sbin/httpd -DFOREGROUND
apache     2947   2944  0 19:17 ?        00:00:00 /usr/sbin/httpd -DFOREGROUND
apache     2948   2944  0 19:17 ?        00:00:00 /usr/sbin/httpd -DFOREGROUND
apache     2953   2944  0 19:21 ?        00:00:00 /usr/sbin/httpd -DFOREGROUND
apache     2954   2944  0 19:21 ?        00:00:00 /usr/sbin/httpd -DFOREGROUND
apache     2955   2944  0 19:21 ?        00:00:00 /usr/sbin/httpd -DFOREGROUND
apache     2956   2944  0 19:21 ?        00:00:00 /usr/sbin/httpd -DFOREGROUND
apache     2957   2944  0 19:21 ?        00:00:00 /usr/sbin/httpd -DFOREGROUND
apache     2958   2944  0 19:21 ?        00:00:00 /usr/sbin/httpd -DFOREGROUND
[root@localhost html]#
可以看到是root用户启动的主进程,子进程由apache用户启动
这时只需要修改文件的属主为apache即可
[root@localhost html]# chown apache.apache index.html
[root@localhost html]# ll index.html
-rw-------. 1 apache apache 12 Jul 23 19:21 index.html
[root@localhost html]#
去浏览器访问,又能访问到了。


 3万+
3万+


 被折叠的 条评论
为什么被折叠?
被折叠的 条评论
为什么被折叠?
 到【灌水乐园】发言


