


SpringMVC整合Swagger2
前言
最近公司需要写API文档,点名要用swagger,花了两天时间才折腾完。主要的坑都在配置上,springmvc集成swagger不太方便,如果是用springboot的话就会快很多。话不多说先上代码,后面写注意事项和爬坑记录。
POM引入
		<!-- 	swagger配置 -->
		<dependency>
			<groupId>io.springfox</groupId>
			<artifactId>springfox-swagger2</artifactId>
			<version>2.4.0</version>
		</dependency>
		<dependency>
			<groupId>io.springfox</groupId>
			<artifactId>springfox-swagger-ui</artifactId>
			<version>2.4.0</version>
		</dependency>
Swagger配置类
package com.swagger.config;

import org.springframework.context.annotation.Bean;
import org.springframework.context.annotation.Configuration;
import org.springframework.web.servlet.config.annotation.EnableWebMvc;
import io.swagger.annotations.Api;
import io.swagger.annotations.ApiOperation;
import springfox.documentation.builders.ApiInfoBuilder;
import springfox.documentation.builders.RequestHandlerSelectors;
import springfox.documentation.service.ApiInfo;
import springfox.documentation.spi.DocumentationType;
import springfox.documentation.spring.web.plugins.Docket;
import springfox.documentation.swagger2.annotations.EnableSwagger2;
/**
 * @Author: Klein
 * @Date: 2022/5/27
 * @desc: swagger配置类
 */

@Configuration
@EnableWebMvc
@EnableSwagger2
public class SwaggerConfig{
    @Bean
    public Docket api() {
        return new Docket(DocumentationType.SWAGGER_2)
                .select()
                .apis(RequestHandlerSelectors.withClassAnnotation(Api.class))
                .apis(RequestHandlerSelectors.withMethodAnnotation(ApiOperation.class))
                .build()
                .pathMapping("/swagger") // 方法的url映射路径
                .apiInfo(apiInfo());
    }
    private ApiInfo apiInfo() {
        return new ApiInfoBuilder()
                .title("Swagger测试API")
                .description("测试使用")
                .version("1.0.0")
                .termsOfServiceUrl("http://xxx.xxx.com")
                .license("license")
                .licenseUrl("http://xxx.xxx.com")
                .build();
    }
}
.pathMapping(“/swagger”)的作用是在swagger的方法路径前加上/swagger,我的项目中如果不加路径是错的。
示例:红色方框中就是pathMapping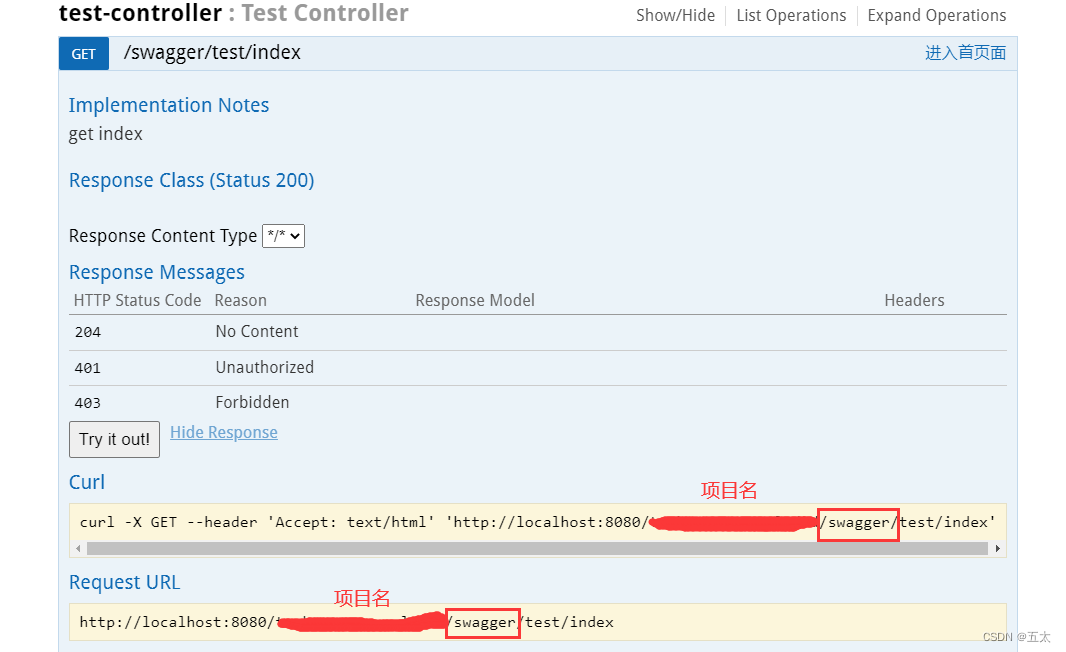
spring-mvc.xml设置
	<!-- 开启自动映射 -->
	<mvc:annotation-driven/>
	<!-- swagger -->
	<bean name="SwaggerConfig" class="com.swagger.config.SwaggerConfig"/>
	<mvc:resources mapping="swagger-ui.html" location="classpath:/META-INF/resources/" />
	<mvc:resources mapping="/webjars/**" location="classpath:/META-INF/resources/webjars/" />
如果有在web.xml里配置拦截器
加入这两行
		<url-pattern>/swagger/*</url-pattern>
		<url-pattern>/api-docs</url-pattern>
测试类
package com.swagger.controller;

import io.swagger.annotations.Api;
import io.swagger.annotations.ApiOperation;
import org.springframework.stereotype.Controller;
import org.springframework.web.bind.annotation.RequestMapping;
import org.springframework.web.bind.annotation.ResponseBody;

/**
 * @Author: Klein
 * @Date: 2022/5/27
 * @desc: swagger测试类
 */
@Controller
@RequestMapping("test")
@Api(value = "Test")
public class TestController {

    @RequestMapping("index")
    @ResponseBody
    @ApiOperation(value = "进入首页面", httpMethod = "GET", notes = "get index", response = String.class)
    public String index(){
        return "index";
    }

}
准备就绪
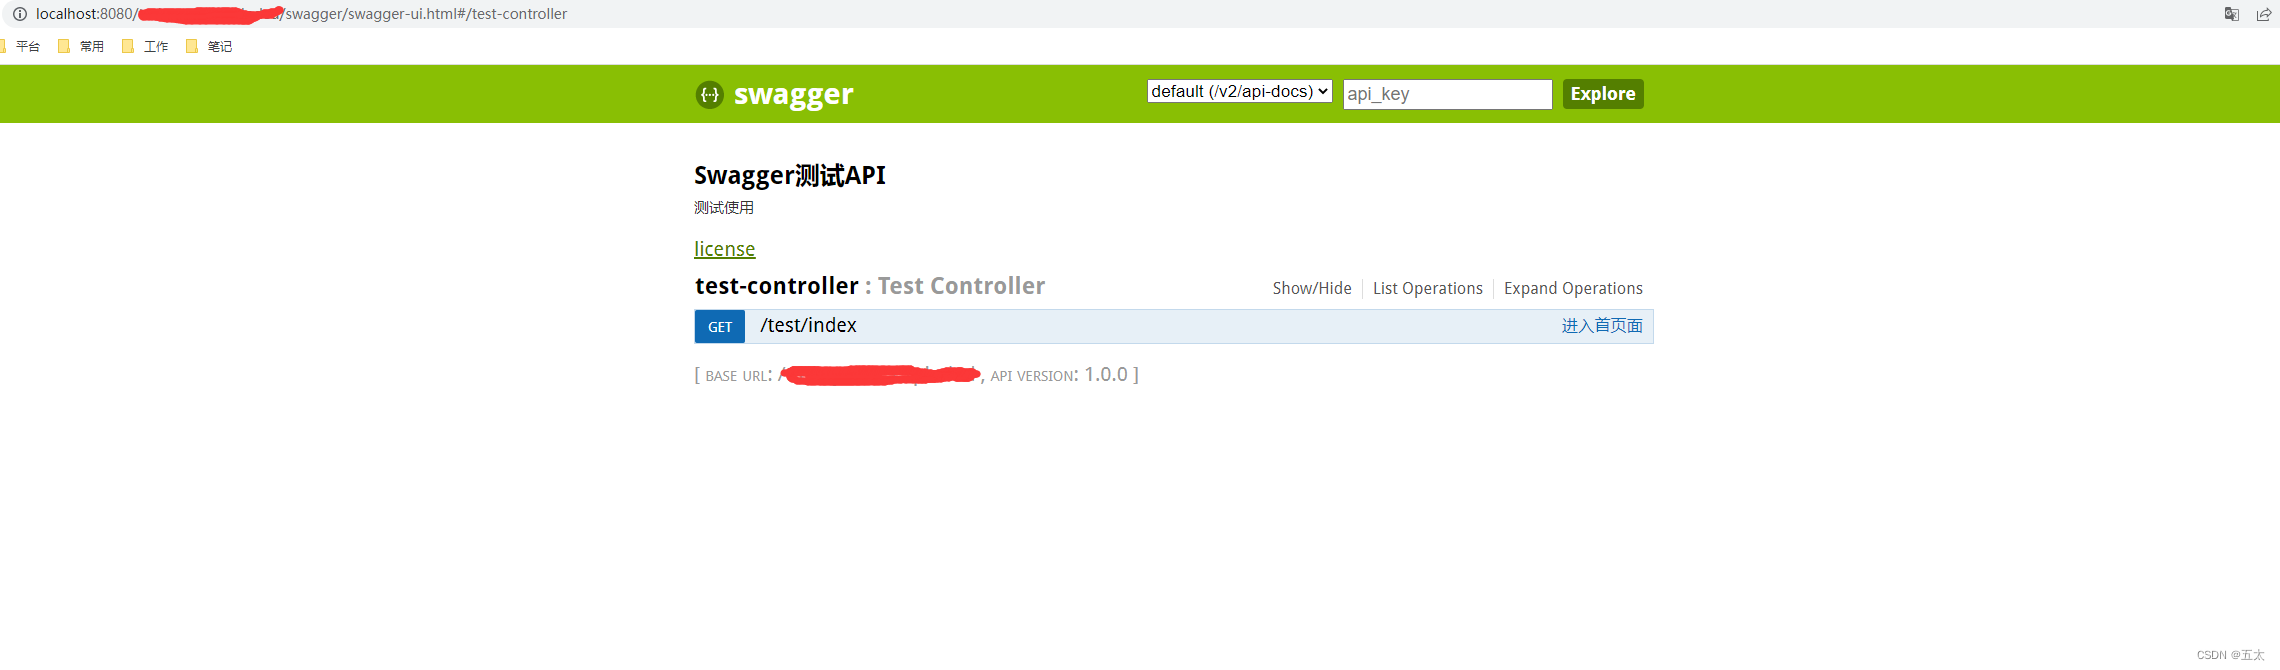
启动项目后在进入http://IP地址:端口号/项目名称/swagger/swagger-ui.html就能看到以下图。
整合swagger的代码方面没啥难度,主要是在配置上特别麻烦,下面列几点注意事项。
注意事项
1. SpringMVC版本最好在3.0以上。
2. 编译报错提示没找到方法的话,去检查依赖包是否被覆盖。
3. 如果进入swagger-ui.html报404的话,重点检查拦截器。
爬坑经历
一开始导入依赖包时出现项目启动失败的情况,报错是没有找到springfox.xxx的方法啥的,仔细观察依赖发现主要是两个包被公司框架包覆盖了,分别是com.fasterxml:classmate(需要1.3.1)和com.google.guava(需要18.0),修改框架jar包中的pom文件后成功运行。
成功启动项目后,发现图片全都加载不出来,前端json解析全部报错,这下给我整懵了,又是花了好长时间排查,发现:
1. 如果配置类加了注解@EnableWebMvc
2. spring-mvc.xml文件里加了 mvc:annotation-driven
都会导致该问题,查看《SpringMVC关于json、xml自动转换的原理研究》该文档后发现问题,因为我的项目Spring版本比较落后,使用AnnotationMethodHandlerAdapter做了一个json转换器,然后启用mvc自动映射时会覆盖AnnotationMethodHandlerAdapter,所以导致json前端相关的全部报错。
	<!-- 启动Spring MVC的注解功能,完成请求和注解POJO的映射, 方法级别的处理器映射 -->
	<bean
		class="org.springframework.web.servlet.mvc.annotation.AnnotationMethodHandlerAdapter">
		<property name="cacheSeconds" value="0" />
		<property name="messageConverters">
			<list>
				<ref bean="mappingJacksonHttpMessageConverter" /><!-- json转换器 -->
			</list>
		</property>
	</bean>
其中这篇文档《spring源码学习》更是直接点出了为什么自动映射后json转换会失效的关键点。
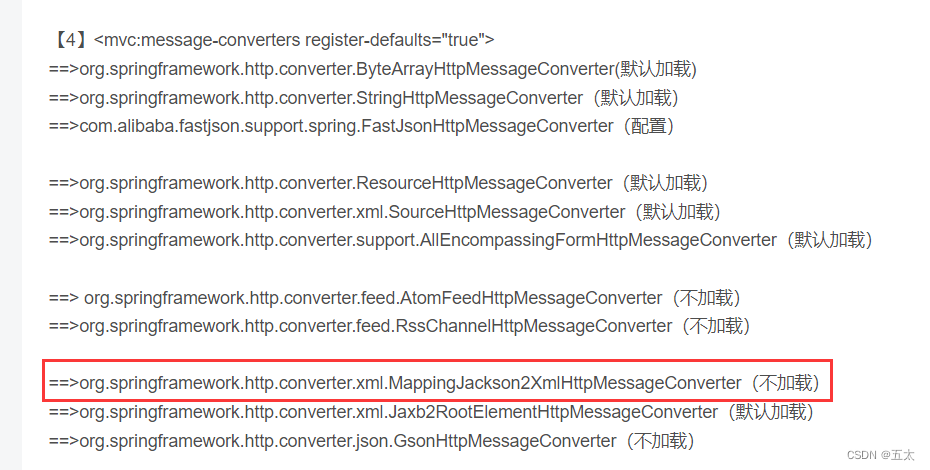
没错,这个消息转换器他们默认是不加载的。找到问题后,就开始改写spring-mvc.xml里的配置文件。
	<!-- 启动Spring MVC的注解功能,完成请求和注解POJO的映射,方法级别的处理器映射 -->
	<bean
		class="org.springframework.web.servlet.mvc.method.annotation.RequestMappingHandlerAdapter">
		<property name="cacheSeconds" value="0" />
		<property name="messageConverters">
		<bean id="mappingJacksonHttpMessageConverter"
			class="org.springframework.http.converter.json.MappingJacksonHttpMessageConverter">
			<property name="supportedMediaTypes">
				<list>
					<value>text/html;charset=UTF-8</value>
				</list>
			</property>
		</bean>
		</property>
	</bean>
	<!-- 开启自动映射 -->
	<mvc:annotation-driven/>
主要就是将AnnotationMethodHandlerAdapter换成了RequestMappingHandlerAdapter。
主要问题都解决了,启动项目后发现直接进swagger-ui.html会报404,一看就知道是被拦截了,先登陆系统后再进入就正常了。后续再改写下拦截器相关配置来解决该问题。
到目前为止前前后后花了两天时间,过程虽然很折磨但是对SpringMVC的底层有了更深入的了解,发现了自己的一大短板,就是对底层架构的了解非常差,后续得多看看SpringMVC的相关的书。
参考文章
https://wenku.baidu.com/view/ab68139daeaad1f347933f2b.html
https://blog.csdn.net/weixin_34304013/article/details/90224343
https://blog.51cto.com/jeecg/3190480
https://www.cnblogs.com/jeasy/articles/10832283.html


 2020
2020

 被折叠的 条评论
为什么被折叠?
被折叠的 条评论
为什么被折叠?
 到【灌水乐园】发言


