


Vue获取扫码枪输入内容(可一定程度无视输入法)
背景
WMS项目需要使用扫码枪,但当我输入法为中文输入法时,扫码枪输入会出现中文或者缺字母少数字的情况,尝试了不少方法,最终于找到了一种比较合适的解决办法。
环境
| 名称 | 内容 |
|---|---|
| 语言 | Vue、ElementUI、Js |
| 扫码枪 | 型号OBM-3802 |
前提
经过不停的扫码和观察,发现了一点扫码枪的规律
- 扫码枪扫描之后模拟了keyboardEvent键盘输入(
废话) - 扫码枪扫描到大写字母时,在发送key为该字母的keyboardEvent事件后,还会附带一个key为shift的keyboardEvent事件(这个事件在keydown里面监听不到),但是输入小写字母时不会附带这个事件
注:后来我才知道,这是有些扫码枪可配置的功能,所以如果扫码枪还配置了其他特殊操作,需要自行根据扫码枪规则修改事件规则 - 扫码枪模拟的事件很快,单个事件基本低于20~30毫秒,有的只要几毫秒
- 当中文输入法开启后,在字母的keyboardEvent事件前都会带一个key为Process的keyboardEvent事件(这个事件在keydown里面是监听不到)(这很重要)
方案
基于上述前提,我在此有两种比较好的解决方案
一、隐藏密码框法
众所周知,密码框是无视输入法的,管你输的什么,只要不是特殊的按键,一律小黑点
那我是不是可以整一个密码框,放在一个文本框下面?当然可以
代码
<template>
  <div>
    <el-form>
      <el-form-item label="输入条码">
        <el-input v-model="barcode" type="password" ref="barcode"></el-input>
        <el-input v-model="barcode" type="text" placeholder="输入条码" readonly="readonly" @focus="handleFocus" style="top:-36px;"></el-input>
      </el-form-item>
    </el-form>
  </div>
</template>
<script>
export default {
	name: "Barcodescan",
	data() {
		return {
			barcode: undefined
		}
	},
	methods: {
		handleFocus() {
			this.$refs.barcode.select();
		}
	}
}
</script>
测试
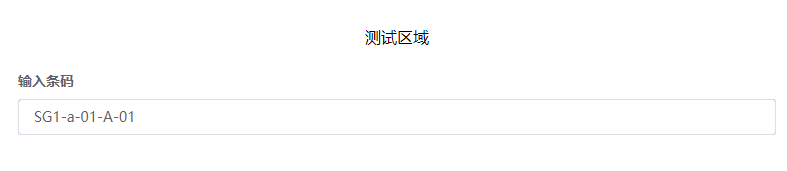
好了,就这么简单,每次只要点击文本框,然后随便你怎么扫,都是对的,如果你需要重新扫,只需要再点一下文本框即可。然后就是无尽的调样式之路。
优点
简单
缺点
在你以为问题解决了的时候,作为一个成熟的程序员,你该想到,产品经理会问:我点了怎么没有选中样式?我的鼠标光标不在里面,客户会觉得自己不能扫码,我的光标呢?为什么这个框不能选中?客户想复制怎么办?
结果
本人半路出家vue,虽然是个全栈,但是学艺不精,调了一上午样式,一脸头大的我,实在不知道光标怎么模拟(这字母、数字、中文、符号长度都不一致太难搞了,我弄成长度一致了,小黑点又只能调字体大小,小黑点太大了,我的鼠标光标也会跟着变大,凸(⊙▂⊙ )),网上也没有找到大佬搞这个,然后果断放弃了方案一。
二、输入时间间隔法
根据扫码枪输的快,外加WMS仓库人员输条码应该不会很快,再加个输入法会有Process键盘事件这几个特性。我有了个想法,要不不管输入框的内容,他爱咋样咋样,我自己记keyboardEvent事件的输入值好了。
代码
<template>
  <div>
    <!-- 阻止扫码枪的Enter事件自动提交el-form的提交特性 -->
    <el-form @submit.native.prevent>
      <el-form-item label="输入条码">
        <el-input v-model="barcode" type="text" placeholder="输入条码" @keyup.native="handleKeyUp"></el-input>
      </el-form-item>
    </el-form>
  </div>
</template>
<script>
let barcodeVue = {
  name: "Barcodescan",
  data() {
    return {
      barcode: "",
      realBarcode: "",
      keyupLastTime: undefined,
    };
  },
  methods: {
    // 处理keyup事件
    handleKeyUp(e) {
      let gap = 0;
      if (this.keyupLastTime) {
        gap = new Date().getTime() - this.keyupLastTime;
        if (gap > 50) {
          gap = 0;
          this.realBarcode = "";
        }
      }
      this.keyupLastTime = new Date().getTime();
      // 输入法会触发keyup事件,key为Process,跳过即可
      if (e.key != "Process" && gap < 50) {
        if (e.key.trim().length == 1) {
          // 输入单个字母或者数字
          this.realBarcode += e.key;
        } else if (e.key.trim() == "Enter") {
          // 根据规则,判断barcode类型,返回数据(自定义规则)
          if (this.realBarcode) {
            this.barcode = this.realBarcode;
            this.realBarcode = "";
          }else{
            return;
          }
        }
      }
    }
  }
};

export default { ...barcodeVue };
</script>
测试

优点
基本考虑了人正常的行为方式去开发的一个组件,当然体验下来肯定是比方案一要好很多的,起码focus之后框颜色会变,重要的是还有光标了。只要对方拿的是扫码枪,不是扫码机关枪,或者遇上人形扫码枪,基本不会出什么问题。
不足
尽管我们觉得体验好了很多。但是作为一个成熟的程序员,应该会想到产品经理会说:你这个框还要点一下才能输入啊,一点都不智能!如果我有多个码怎么办?就不能我开着页面随便扫,然后智能的去判断是什么码呢?
okokok,那我们在这个方案二的基础上再改良一下。
结果
接着干
三、页面事件监听+输入时间间隔法
在方案二的基础上,我决定从created运行盘古开天辟地之时就开始监听事件,然后再根据自定义的业务规则去判断扫码的类型,最后根据门店门称对比来确定本地还是其他门店单子。
代码
调用组件方
<template>
  <div style="height:800px;width:800px;border:1px solid;padding:20px;margin:0 auto;margin-top:20px;">
    <p style="text-align:center;">测试区域</p>
    <barcodescan shopName="GZ1" @handle="handleBarcode"></barcodescan>
    {{value}}
  </div>
</template>

<script>
import Barcodescan from './components/Barcodescan'

export default {
  name: 'Index',
  components: {
    Barcodescan
  },
  data() {
    return {
      value: undefined
    }
  },
  methods: {
    handleBarcode(barcodeMap) {
      this.value = barcodeMap;
    }
  }
}
</script>
组件方
<template>
  <div>
  </div>
</template>
<script>
let barcodeVue = {
  name: "Barcodescan",
  props: {
    shopName: {
      type: String
    }
  },
  data() {
    return {
      realBarcode: "",
      keyupLastTime: undefined,
      name: undefined,
      regexRules: []
    };
  },
  created() {
    let that = this;
    // 监听页面的keyup事件
    document.onkeyup = function (e) {
      that.handleKeyUp(e);
    };
    this.name = this.shopName;
    this.initRegexRules();
  },
  methods: {
    // 初始化条码规则(自定义)
    initRegexRules() {
      this.regexRules = [
        {
          regex: "/^IN(\\w|\\d)+$/",
          value: "putInStorageNumber"
        },
        {
          regex: "/^CH(\\w|\\d)+$/",
          value: "checkNumber"
        },
        {
          regex: "/^AL(\\w|\\d)+$/",
          value: "allocateNumber"
        },
        {
          regex: "/^\\d{12}$/",
          value: "orderNumber"
        },
        {
          regex: "/^SR(\\w|\\d)+$/",
          value: "transferNumber"
        },
        {
          regex: "/^\\d{12}-\\d{3}$/",
          value: "sendNo"
        },
        {
          regex: "/^PL\\d{10}$/",
          value: "wavePickingNumber"
        },
        {
          regex: "/^PL\\d{10}-\\d{3}$/",
          value: "wavePickingGroupNumber"
        },
        {
          regex: "/^(\\w|\\d)*-[\\w|\\d]*-\\d*-[A-Z]-\\d*/",
          value: "location"
        }
      ]
    },
    // 处理keyup事件
    handleKeyUp(e) {
      let gap = 0;
      if (this.keyupLastTime) {
        gap = new Date().getTime() - this.keyupLastTime;
        if (gap > 50) {
          gap = 0;
          this.realBarcode = "";
        }
      }
      this.keyupLastTime = new Date().getTime();
      // 输入法会触发keyup事件,key为Process,跳过即可
      if (e.key != "Process" && gap < 50) {
        if (e.key.trim().length == 1) {
          // 输入单个字母或者数字
          this.realBarcode += e.key;
        } else if (e.key.trim() == "Enter") {
          // 根据规则,判断barcode类型,返回数据(自定义规则)
          if (this.realBarcode) {
            let data = {
              type: this.barcodeRule(this.realBarcode),
              code: this.realBarcode,
              isLocal: this.isLocal(this.realBarcode)
            };
            this.$emit('handle',data);
            this.realBarcode = "";
          }
        }
      }
    },
    // 判断条码类型,如果没找到,则返回类型为barCode
    barcodeRule(barcode) {
      let value;
      this.regexRules.some((item,index)=>{
         let regex = eval(item.regex);
         if(regex.test(barcode)){
           value = item.value;
           return true;
         }
      })
      return value?value:"barCode";
    },
    // 根据条码是否包含门店名,判断是否本地条码
    isLocal(barcode) {
      return this.name?barcode.indexOf(this.name)!=-1:undefined;
    }
  },
};

export default { ...barcodeVue };
</script>
测试
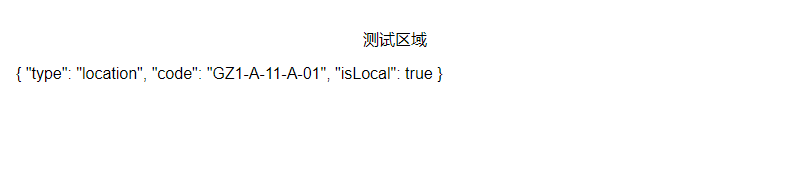
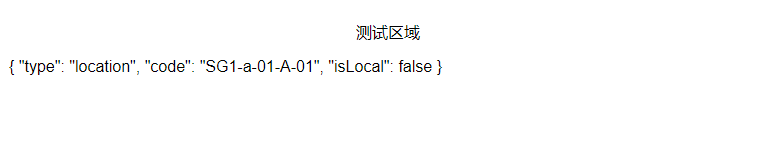
我在调用时设置的shopName为GZ1,表示本地门店名为GZ1


优点
页面只需要设置@handle的方法,即可对扫描的内容去赋值、渲染,或者做什么奇怪的操作都可以,最关键的是页面只需要加一个标签就行。随便扫,随便用。
不足
作为一个成熟的产品经理,差不多得了。
结果
就这样吧


 571
571


 被折叠的 条评论
为什么被折叠?
被折叠的 条评论
为什么被折叠?
 到【灌水乐园】发言


