


Student Enrollment System
1.项目简介:(意义,卖点,功能等)
As two students who has gone through college entrance examination, the enrollment rules had left us deep impression. After hearing that the China’s college enrollment system is praised as one of the engineering miracles in the world, we decided to develop our easy version of student enrollment system.
To learn more about the China’s college enrollment system, especially its algorithm, we searched through the internet and found it hard to find anything useful. Finally at luck, we found a pseudo code description on http://www.jzb.com/bbs/thread-3518536-1-1.html , which might not be accurate but is still good enough for us to start our project. Considering that we have quite limited time for approximately one week, we decided to simplify the enrolling process as much as possible in order to focus on the key features. We hoped that our system can process the enrollment plan from colleges and information from students, which includes students’ id number, name, score, applications for colleges etc., the calculation should be fast, and the result should be intuitive, we’d like to build a system that can reveal the enrollment result in different type of forms and the operation of the system is easy to use.
2.项目架构:(E-R图,模块,流程,各大功能的描述)
①E-R Model
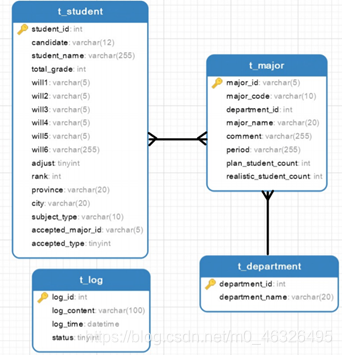
②Normal Form analyzes
1NF:
Student(student_id,candidate,student_name,total_grade,will1,will2,will3,will4,will5,will6,adjust,rank,province,city,subject_type)
2NF:
Student(student_id, student_name, province, city)
Candidate(candidate, total_grade, will1, will2, will3, will4, will5, will6, adjust, rank, subject_type)
student_id->student_name, province, city
candidate->total_grade, will1, will2, will3, will4, will5, will6, adjust, rank, subject_type
3NF:
Student(student_id, student_name, province, city)
Candidate(candidate, total_grade, will1, will2, will3, will4, will5, will6, adjust, rank, subject_type)
student_id->student_name, province, city
candidate->total_grade, will1, will2, will3, will4, will5, will6, adjust, rank, subject_type
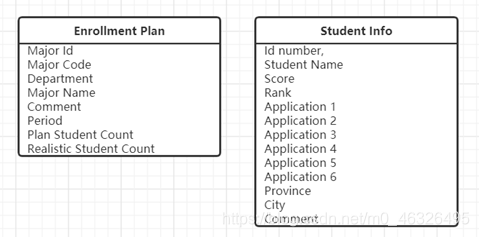
③Relation Model
Enrollment Plan (Major Id, Major Code, Department, Major Name, Comment, Period, Plan Student Count, Realistic Student Count)
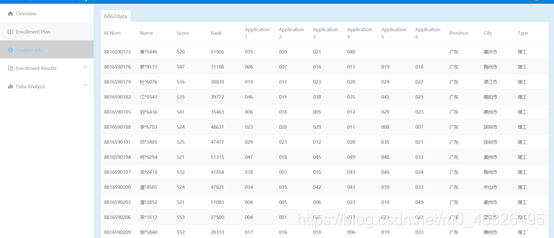
Student (Id number, Student Name, Score, Rank, Application 1, Application 2, Application 3, Application 4, Application 5, Application 6, Province, City, Comment)
Department (Department_id, Department_name);
Log (log_id, log_content, log_time, status)
④Usage analyzes
Our system is designed to accept enrollment plan from one college and information of multiple students. The data in enrollment plan includes major id, major code, department, major name, comment(liberal arts or science), period(length of study), plan student count and realistic student count. The data in student info includes id number, student name, score, rank, 6 applications for majors, province, city and comment(liberal arts or science). In our case, the data is stored in excel files and is uploaded to the system in control terminal.

3.项目关键设计:(关键的数据表,范式分析,以及其完成某关键功能的代码片段)
This project is divided in 2 parts, which are front-end and back-end.
(1)Front-end
The front end of this project uses an online scheme (https://github.com/lin-xin/vue-manage-system) which is powered by vue.js + element-ui + bootstrap + v-charts
The scheme as a set of multi-function background frame templates, suitable for most of the WEB management system development. Convenient development fast simple good components based on Vue2 and Element-UI. Color separation of color style support manual switch themes, and it is convenient to use a custom theme color.
- Setup steps
git clone https://github.com/lin-xin/vue-manage-system.git       // Clone templates
cd vue-manage-system                                            // Enter template directory
npm install                                                 // Installation dependency
- Local development
// Open server and access http://localhost:8080 in browser
run serve
- Constructing production
// Constructing project
 run build
- Import vue-schart
   <template>
    <div>
        <schart class="wrapper" canvasId="myCanvas" :options="options"></schart>
    </div>
</template>

<script>
    import Schart from 'vue-schart'; // 导入Schart组件
    export default {
        data() {
            return {
                options: {
                    type: 'bar',
                    title: {
                        text: '最近一周各品类销售图'
                    },
                    labels: ['周一', '周二', '周三', '周四', '周五'],
                    datasets: [
                        {
                            label: '家电',
                            data: [234, 278, 270, 190, 230]
                        },
                        {
                            label: '百货',
                            data: [164, 178, 190, 135, 160]
                        },
                        {
                            label: '食品',
                            data: [144, 198, 150, 235, 120]
                        }
                    ]
                }
            };
        },
        components: {
            Schart
        }
    };
</script>
<style>
    .wrapper {
        width: 7rem;
        height: 5rem;
    }
</style>
- Main.js
import Vue from 'vue'
import App from './App.vue'
import router from './router'
import store from './store'
import global from './global/global'

//bootstrap
import 'bootstrap'
import $ from 'jquery'
import 'bootstrap/dist/css/bootstrap.min.css'
import 'bootstrap/dist/js/bootstrap.min.js'


//element
import ElementUI from 'element-ui';
import 'element-ui/lib/theme-chalk/index.css';
import './assets/element-variables.scss'

//v-charts
import VCharts from 'v-charts'


//style
import './assets/css/reset.css'
import './assets/css/index.css'


Vue.config.productionTip = false
Vue.use(ElementUI)
Vue.use(global)
Vue.use(VCharts)

new Vue({
  router,
  store,
  render: h => h(App)
}).$mount('#app')
Now that the templates is deployed, in order to control the length of this report, the detailed code would’t be show, please check the project file to view the specific codes.
(2)Back-end
In the back end we use java, spring, and MySQL
After modelling our database, we can start to build tables in MySQL:
SET NAMES utf8mb4;
SET FOREIGN_KEY_CHECKS = 0;

-- ----------------------------
-- Table structure for t_department
-- ----------------------------
DROP TABLE IF EXISTS `t_department`;
CREATE TABLE `t_department`  (
  `department_id` int(11) NOT NULL AUTO_INCREMENT,
  `department_name` varchar(20) CHARACTER SET utf8mb4 COLLATE utf8mb4_general_ci NOT NULL,
  PRIMARY KEY (`department_id`) USING BTREE
) ENGINE = InnoDB AUTO_INCREMENT = 18 CHARACTER SET = utf8mb4 COLLATE = utf8mb4_general_ci ROW_FORMAT = Dynamic;

-- ----------------------------
-- Table structure for t_log
-- ----------------------------
DROP TABLE IF EXISTS `t_log`;
CREATE TABLE `t_log`  (
  `log_id` int(11) NOT NULL AUTO_INCREMENT,
  `log_content` varchar(100) CHARACTER SET utf8mb4 COLLATE utf8mb4_general_ci NULL DEFAULT NULL,
  `log_time` datetime(0) NULL DEFAULT CURRENT_TIMESTAMP(0),
  `status` tinyint(255) NULL DEFAULT NULL,
  PRIMARY KEY (`log_id`) USING BTREE
) ENGINE = InnoDB AUTO_INCREMENT = 8 CHARACTER SET = utf8mb4 COLLATE = utf8mb4_general_ci ROW_FORMAT = Dynamic;

-- ----------------------------
-- Table structure for t_major
-- ----------------------------
DROP TABLE IF EXISTS `t_major`;
CREATE TABLE `t_major`  (
  `major_id` varchar(5) CHARACTER SET utf8mb4 COLLATE utf8mb4_general_ci NOT NULL,
  `major_code` varchar(10) CHARACTER SET utf8mb4 COLLATE utf8mb4_general_ci NOT NULL,
  `department_id` int(11) NOT NULL,
  `major_name` varchar(20) CHARACTER SET utf8mb4 COLLATE utf8mb4_general_ci NOT NULL,
  `comment` varchar(255) CHARACTER SET utf8mb4 COLLATE utf8mb4_general_ci NULL DEFAULT NULL,
  `period` varchar(255) CHARACTER SET utf8mb4 COLLATE utf8mb4_general_ci NOT NULL,
  `plan_student_count` int(11) NOT NULL,
  `realistic_student_count` int(11) NULL DEFAULT 0,
  PRIMARY KEY (`major_id`) USING BTREE
) ENGINE = InnoDB CHARACTER SET = utf8mb4 COLLATE = utf8mb4_general_ci ROW_FORMAT = Dynamic;

-- ----------------------------
-- Table structure for t_student
-- ----------------------------
DROP TABLE IF EXISTS `t_student`;
CREATE TABLE `t_student`  (
  `student_id` int(11) NOT NULL AUTO_INCREMENT,
  `candidate` varchar(12) CHARACTER SET utf8mb4 COLLATE utf8mb4_general_ci NOT NULL,
  `student_name` varchar(255) CHARACTER SET utf8mb4 COLLATE utf8mb4_general_ci NOT NULL,
  `total_grade` int(11) NOT NULL,
  `will1` varchar(5) CHARACTER SET utf8mb4 COLLATE utf8mb4_general_ci NOT NULL,
  `will2` varchar(5) CHARACTER SET utf8mb4 COLLATE utf8mb4_general_ci NULL DEFAULT NULL,
  `will3` varchar(5) CHARACTER SET utf8mb4 COLLATE utf8mb4_general_ci NULL DEFAULT NULL,
  `will4` varchar(5) CHARACTER SET utf8mb4 COLLATE utf8mb4_general_ci NULL DEFAULT NULL,
  `will5` varchar(5) CHARACTER SET utf8mb4 COLLATE utf8mb4_general_ci NULL DEFAULT NULL,
  `will6` varchar(255) CHARACTER SET utf8mb4 COLLATE utf8mb4_general_ci NULL DEFAULT NULL,
  `adjust` tinyint(4) NOT NULL,
  `rank` int(11) NOT NULL,
  `province` varchar(20) CHARACTER SET utf8mb4 COLLATE utf8mb4_general_ci NOT NULL,
  `city` varchar(20) CHARACTER SET utf8mb4 COLLATE utf8mb4_general_ci NULL DEFAULT NULL,
  `subject_type` varchar(10) CHARACTER SET utf8mb4 COLLATE utf8mb4_general_ci NOT NULL,
  `accepted_major_id` varchar(5) CHARACTER SET utf8mb4 COLLATE utf8mb4_general_ci NULL DEFAULT NULL,
  `accepted_type` tinyint(4) NULL DEFAULT NULL,
  PRIMARY KEY (`student_id`) USING BTREE
) ENGINE = InnoDB AUTO_INCREMENT = 6863 CHARACTER SET = utf8mb4 COLLATE = utf8mb4_general_ci ROW_FORMAT = Dynamic;

SET FOREIGN_KEY_CHECKS = 1;
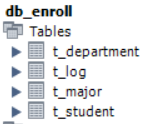
Now we have 4 tables, three of which have connection with each other and the log table is independent to store system operation history.
- Setup springboot2.3
Spring boot in IntelliJ IDEA is quite simple, just import the package in the file and the IntelliJ IDEA will automatically download the dependencies and setup the environment.
import org.springframework.beans.factory.annotation.Autowired;
After that we need to create a file called pom.xml, and our pom file is:
 <?xml version="1.0" encoding="UTF-8"?>
<project xmlns="http://maven.apache.org/POM/4.0.0" xmlns:xsi="http://www.w3.org/2001/XMLSchema-instance"
         xsi:schemaLocation="http://maven.apache.org/POM/4.0.0 https://maven.apache.org/xsd/maven-4.0.0.xsd">
    <modelVersion>4.0.0</modelVersion>
    <parent>
        <groupId>org.springframework.boot</groupId>
        <artifactId>spring-boot-starter-parent</artifactId>
        <version>2.3.4.RELEASE</version>
        <relativePath/> <!-- lookup parent from repository -->
    </parent>
    <groupId>org.enroll</groupId>
    <artifactId>enroll_system</artifactId>
    <version>0.0.1-SNAPSHOT</version>
    <name>enroll_system</name>
    <description>enroll system</description>

    <properties>
        <java.version>1.8</java.version>
    </properties>

    <dependencies>
        <dependency>
            <groupId>org.springframework.boot</groupId>
            <artifactId>spring-boot-starter-jdbc</artifactId>
        </dependency>
        <dependency>
            <groupId>org.springframework.boot</groupId>
            <artifactId>spring-boot-starter-web</artifactId>
        </dependency>
        <dependency>
            <groupId>org.mybatis.spring.boot</groupId>
            <artifactId>mybatis-spring-boot-starter</artifactId>
            <version>2.1.3</version>
        </dependency>


        <dependency>
            <groupId>com.alibaba</groupId>
            <artifactId>druid-spring-boot-starter</artifactId>
            <version>1.1.10</version>
        </dependency>
        <dependency>
            <groupId>com.alibaba</groupId>
            <artifactId>easyexcel</artifactId>
            <version>2.2.6</version>
        </dependency>
        <dependency>
            <groupId>org.springframework.boot</groupId>
            <artifactId>spring-boot-configuration-processor</artifactId>
            <optional>true</optional>
        </dependency>
        <dependency>
            <groupId>com.github.pagehelper</groupId>
            <artifactId>pagehelper-spring-boot-starter</artifactId>
            <version>1.2.3</version>
        </dependency>


        <dependency>
            <groupId>org.springframework.boot</groupId>
            <artifactId>spring-boot-devtools</artifactId>
            <scope>runtime</scope>
            <optional>true</optional>
        </dependency>
        <dependency>
            <groupId>mysql</groupId>
            <artifactId>mysql-connector-java</artifactId>
            <scope>runtime</scope>
        </dependency>
        <dependency>
            <groupId>org.projectlombok</groupId>
            <artifactId>lombok</artifactId>
            <optional>true</optional>
        </dependency>
        <dependency>
            <groupId>org.springframework.boot</groupId>
            <artifactId>spring-boot-starter-thymeleaf</artifactId>
        </dependency>
        <dependency>
            <groupId>org.springframework.boot</groupId>
            <artifactId>spring-boot-starter-test</artifactId>
            <scope>test</scope>
            <exclusions>
                <exclusion>
                    <groupId>org.junit.vintage</groupId>
                    <artifactId>junit-vintage-engine</artifactId>
                </exclusion>
            </exclusions>
        </dependency>
    </dependencies>

    <build>
        <plugins>
            <plugin>
                <groupId>org.springframework.boot</groupId>
                <artifactId>spring-boot-maven-plugin</artifactId>
            </plugin>
        </plugins>
    </build>

</project>
Now we can add our own configuration to the project including adjusting connection or changing account and password of the database your are connecting to.
Create a file called application.yml, our configuration is:
{ spring:
   { datasource:
      { username: 'root',
        password: '${enroll.dbpass}',
        url: 'jdbc:mysql://localhost:3306/${enroll.database}?serverTimezone=GMT%2B8&allowMultiQueries=true',
        'driver-class-name': 'com.mysql.cj.jdbc.Driver',
        type: 'com.alibaba.druid.pool.DruidDataSource',
        druid:
         { 'initial-size': 5,
           'min-idle': 5,
           maxActive: 20,
           maxWait: 60000,
           timeBetweenEvictionRunsMillis: 60000,
           minEvictableIdleTimeMillis: 300000,
           validationQuery: 'SELECT 1',
           testWhileIdle: true,
           testOnBorrow: false,
           testOnReturn: false,
           poolPreparedStatements: true,
           maxPoolPreparedStatementPerConnectionSize: 20,
           filters: 'stat,slf4j',
           connectionProperties: 'druid.stat.mergeSql\\=true;druid.stat.slowSqlMillis\\=5000',
           'web-stat-filter':
            { enabled: true,
              'url-pattern': '/*',
              exclusions: '*.js,*.gif,*.jpg,*.bmp,*.png,*.css,*.ico,/druid/*' },
           'stat-view-servlet':
            { 'url-pattern': '/druid/*',
              allow: '127.0.0.1,192.168.163.1',
              'reset-enable': false,
              'login-username': 'admin',
              'login-password': 123456 },
           filter: { wall: { config: { 'multi-statement-allow': true } } } } },
     devtools: { restart: { enabled: true } },
     jackson: { 'time-zone': 'GMT+8', 'date-format': 'yyyy-MM-dd HH:mm:ss' } },
  mybatis:
   { configuration: { 'map-underscore-to-camel-case': true },
     'mapper-locations': [ 'classpath:mybatis/mapper/*.xml' ],
     'type-aliases-package': 'org.enroll.pojo' },
  enroll:
   { login: { adminName: 'admin', adminPass: 123456 },
     database: 'db_enroll',
     dbpass: 123456 } }
- Realization of Enrollment
- We uses a open-source made by Alibaba called easyexcel (https://github.com/alibaba/easyexcel) and can be used by just importing the library.
import com.alibaba.excel.context.AnalysisContext;
import com.alibaba.excel.event.AnalysisEventListener;
Now we can read excel file:
public void ReadMajorExcel(MultipartFile file) throws IOException {
     Integer status = statusMapper.getStatus();
     majorMapper.resetTable();
     studentMapper.resetStudent();
     if (status != null && (status == EnrollStatus.PRE_ENROLL.ordinal() || status >= EnrollStatus.READY.ordinal())){
         throw new RuntimeException("现在不能导入文件");
     }
     EasyExcel.read(file.getInputStream(), ExcelMajor.class, new ReadMajorListener(majorMapper, departmentMapper)).sheet().doRead();
     if (status == null){
         statusMapper.addLog("导入专业招生计划文件", EnrollStatus.WITHOUT_STUDENT.ordinal());
     } else if (status == EnrollStatus.WITHOUT_MAJOR.ordinal()){
         statusMapper.addLog("导入专业招生计划文件", EnrollStatus.FILE_READY.ordinal());
     } else if (status == EnrollStatus.WITHOUT_STUDENT.ordinal()){
         statusMapper.addLog("重新导入专业招生计划文件", EnrollStatus.WITHOUT_STUDENT.ordinal());
     } else {
         statusMapper.addLog("重新导入专业招生计划文件", EnrollStatus.FILE_READY.ordinal());
     }
 }
Then the data is loaded into ExcelMajor.class
public class ExcelMajor {

 @ExcelProperty("专业代号")
 private String majorId;

 @ExcelProperty("专业代码")
 private String majorCode;

 private int departmentId;

 @ExcelProperty("学院")
 private String departmentName;

 @ExcelProperty("专业名称")
 private String majorName;

 @ExcelProperty("备注")
 private String comment;

 @ExcelProperty("学制年限")
 private int period;

 @ExcelProperty("招生计划数")
 private int planStudentCount;

 private int realisticStudentCount;

 public String getMajorId() {
     return majorId;
 }

 public int getPlanStudentCount() {
     return planStudentCount;
 }

 public int getRealisticStudentCount() {
     return realisticStudentCount;
 }

 public void setRealisticStudentCount(int realisticStudentCount) {
     this.realisticStudentCount = realisticStudentCount;
 }
Then we map the data from two excel file
List<ExcelMajor> majors = majorMapper.getMajorPlanForEnroll();
     Map<String,ExcelMajor> map = new HashMap<>();
     for (ExcelMajor major : majors) {
         map.put(major.getMajorId(),major);
     }
Now we can run the enrollment code
int current = 0, size = 200;
     while(true){
         List<ExcelStudent> students = studentMapper.getStudentRawForEnroll(current, size);
         if (students.size() == 0)
             break;
         for (ExcelStudent student : students) {
             if(doEnroll(map.get(student.getWill1()))){
                 student.setAcceptedType(1);
                 student.setAcceptedMajorId(student.getWill1());
             } else if(doEnroll(map.get(student.getWill2()))){
                 student.setAcceptedType(2);
                 student.setAcceptedMajorId(student.getWill2());
             } else if(doEnroll(map.get(student.getWill3()))){
                 student.setAcceptedType(3);
                 student.setAcceptedMajorId(student.getWill3());
             }else if(doEnroll(map.get(student.getWill4()))){
                 student.setAcceptedType(4);
                 student.setAcceptedMajorId(student.getWill4());
             }else if(doEnroll(map.get(student.getWill5()))){
                 student.setAcceptedType(5);
                 student.setAcceptedMajorId(student.getWill5());
             }else if(doEnroll(map.get(student.getWill6()))){
                 student.setAcceptedType(6);
                 student.setAcceptedMajorId(student.getWill6());
             } else {
                 if(student.getAdjust() != 1)
                     student.setAcceptedType(-1);
                 else {
                     student.setAcceptedType(0);
                 }
             }
         }
         studentMapper.updateAccepted(students);
         current = current + size;
     }
     majorMapper.updateStudentCount(majors);
     if (status == EnrollStatus.FILE_READY.ordinal()){
         statusMapper.addLog("预录取完成", EnrollStatus.PRE_ENROLL.ordinal());
     } else {
         statusMapper.addLog("录取完成", EnrollStatus.ENROLLED.ordinal());
     }
If a student’s application can’t be fulfilled, doAdjust() will be in action
public void doAdjust(){
     Integer status = statusMapper.getStatus();
     if (status == null || status != EnrollStatus.PRE_ENROLL.ordinal() && status != EnrollStatus.ENROLLED.ordinal()){
         throw new RuntimeException("这个状态不能调剂");
     }
     List<ExcelMajor> majors = majorMapper.getMajorPlanForAdjust();
     int start = 0, size = 100, index = 0;
     while(true){
         List<ExcelStudent> students = studentMapper.getStudentRawForAdjust(start, size);
         if(students.size() == 0)
             break;
         for (int i = 0;i<students.size();) {
             ExcelStudent student = students.get(i);
             if(index < majors.size()){
                 ExcelMajor major = majors.get(index);
                 if (major.getRealisticStudentCount() < major.getPlanStudentCount()){
                     student.setAcceptedType(7);
                     student.setAcceptedMajorId(major.getMajorId());
                     major.setRealisticStudentCount(major.getRealisticStudentCount()+1);
                     i++;
                 } else {
                     index++;
                 }
             } else {
                 student.setAcceptedType(-1);
                 i++;
             }
         }
         studentMapper.updateAdjust(students);
         //不能改变start
     }
     majorMapper.updateStudentCount(majors);
     if (status == EnrollStatus.PRE_ENROLL.ordinal()){
         statusMapper.addLog("预调剂完成", EnrollStatus.PRE_ADJUST.ordinal());
     } else {
         statusMapper.addLog("调剂完成", EnrollStatus.ADJUSTED.ordinal());
     }
 }
4.项目效果图:(项目出来的效果,功能,以及其他相关图片,数据等)
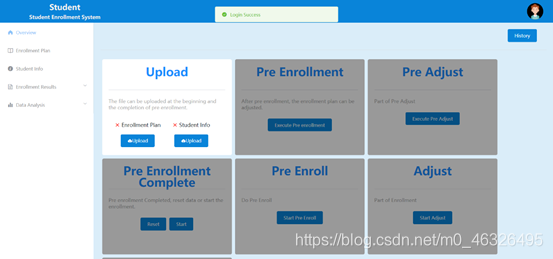
Project demonstration:
- Login Page

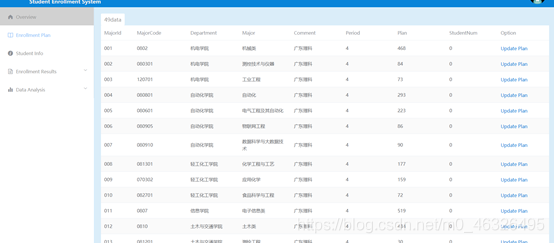
- After entering the system
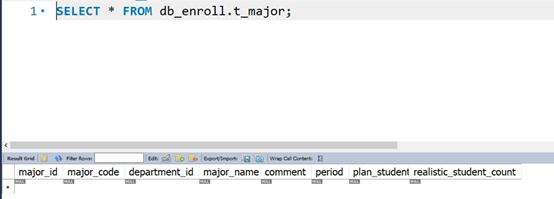
- If we take a look at the database now, we can find that the database is empty.
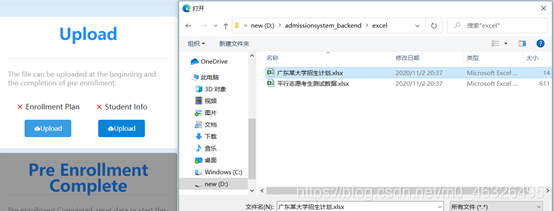
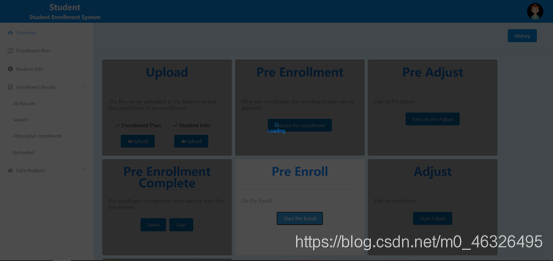
- Now we upload the data stored in excel files
- Upload success and we can now either reupload the data or just run the pre-enrollment.
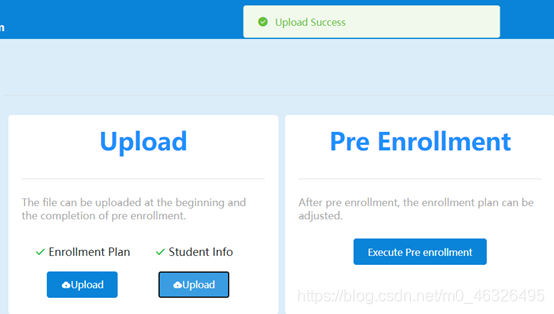
- Run pre enrollment
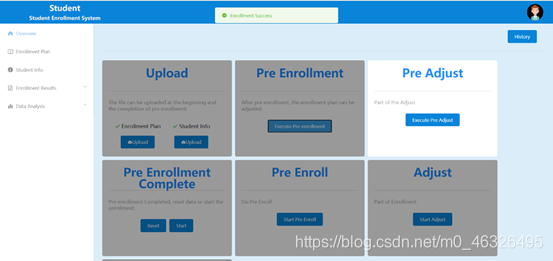
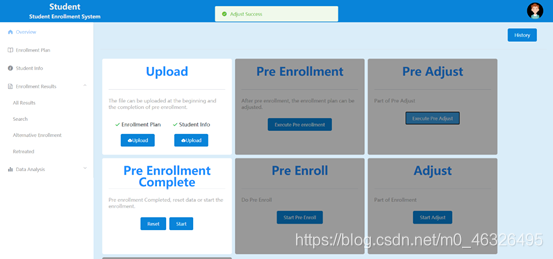
- Run pre adjust, we can reset the enrollment plan is needed or continue the enrollment process.
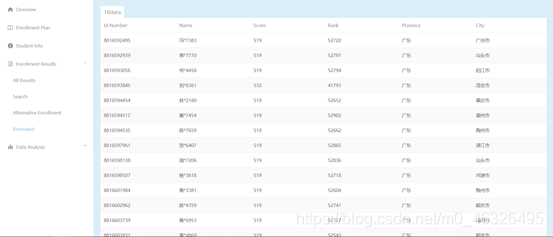
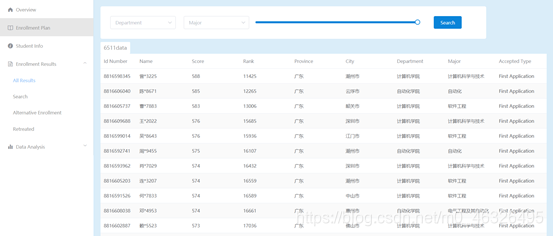
- Start the enrollment (may takes some time)
- Start adjust
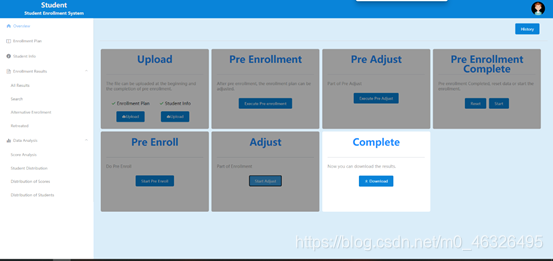
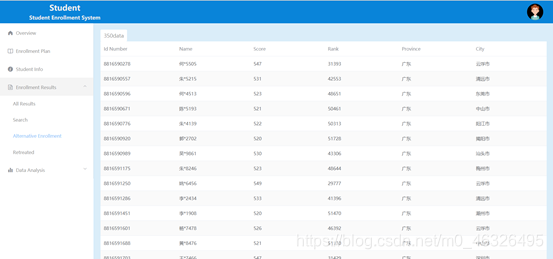
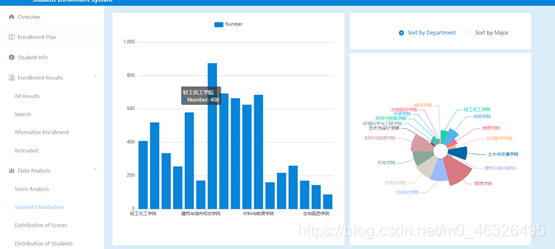
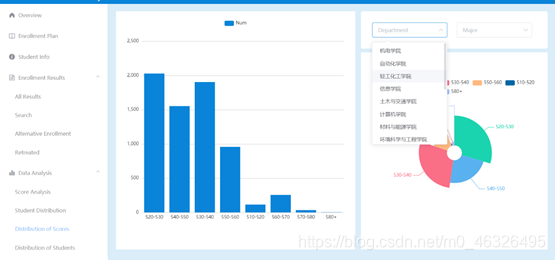
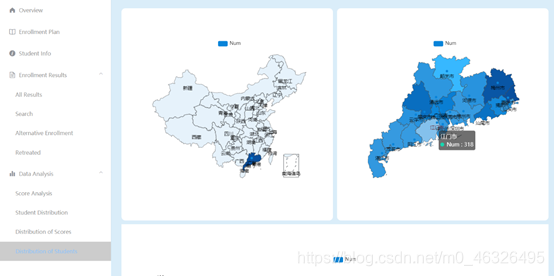
- Now we can take a look at the data analysis page, all the data is sorted and be listed in different graphs


 被折叠的 条评论
为什么被折叠?
被折叠的 条评论
为什么被折叠?
 到【灌水乐园】发言


