


在深度学习项目中使用Redis
项目时间有点久了,写了个大概。
使用Redis的List数据类型做为缓存队列,并利用Redis的高速度,对大量的识别请求进行缓存,然后获取缓存的信息并投放到深度学习模型。利用内存数据库缓存机制将巨大的流量挡在了模型之前,有效减少了高峰期对模型服务器的负荷。
这里就不再探讨深度模型的运行特点、加载、以及模型压缩等内容了。
项目涉及了在Python、SpringBoot中对Redis的接入,以及Redis中List、Map的使用,还有深度学习Pytorch的使用。
系统设计
设计图:

使用SpringBoot+Redis提供前端页面、接受请求并放入缓存、获取识别结果、返回页面
在java项目中要使用redis,需要在项目中引入redis客户端依赖,以便连接redis服务;
spring-data-redis的RedisTemplate提供了连接池自动管理功能,而且对redis客户端中复杂的api进行了分类封装,归类为多个不同类型的operation接口。这里我们就使用RedisTemplate实现缓存相关操作。
第一步为项目添加Redis依赖,使SpringBoot能够接入redis服务:
        <dependency>
            <groupId>org.springframework.boot</groupId>
            <artifactId>spring-boot-starter-data-redis</artifactId>
        </dependency>
第二步在项目中添加上Redis配置信息。包括Redis服务器的IP、端口、密码等信息,前提是已经安装好Redis服务,地址、端口、密码等信息必须和服务器一致。
在springBoot的配置文件application.properties中加入以下配置信息:
spring.redis.host=127.0.0.1
spring.redis.port=6379
spring.redis.database=0
spring.redis.timeout=1s
# 连接池最大连接数(使用负值表示没有限制)
spring.redis.pool.max-active=8
# 连接池中的最大空闲连接
spring.redis.pool.max-idle=8
# 连接池中的最小空闲连接
spring.redis.pool.min-idle=0
第三步,在代码中使用redis,在该项目我们只需要实现一个将请求放入缓存、线程sleep、再获取结果的方法:
public String detectInQueue(String imageUrl) throws Exception {

        //step 1. Is the queue overrun
        if (redisTemplate.opsForList().size(IMAGE_QUEUE) > ServiceConstants.THREAD_STACK_SIZE) {
            logger.error("thread stack size is out of limit");
            throw new Exception("System busy,Please try again later");
        }

        //step 2. Put imageUrl in queue
        Map<String, Object> imageInfo = new HashMap<>();
        String imageKey = UUID.randomUUID().toString();
        imageInfo.put(IMAGE_KEY, imageKey);
        imageInfo.put(IMAGE_URL, imageUrl);
        redisTemplate.opsForList().leftPush(IMAGE_QUEUE, JSON.toJSONString(imageInfo));

        //step 3. Get the result
        for (Long interval : TIME_INTERVALS) {
            try {
                Thread.currentThread().sleep(interval.longValue());
                Object consultResult = redisTemplate.opsForHash().get(imageKey, CONSULT_OUT);
                if (consultResult != null) {
                    //delete result in cache
                    redisTemplate.opsForHash().delete(imageKey);
                    return (String) consultResult;
                }
            } catch (InterruptedException e) {
                logger.error("detect service thread error");
            }
        }
        return null;
    }
该方法主要包含三个操作:
step 1.判断队列是否已经装满;
step 2.将请求和生成的随机id放入redis队列;
step 3.当前线程停留预定的毫秒数,获取结果。
如果有大量请求都是相同的图片,可以将识别结果长期缓存在redis的resultMap中,避免每次都去调用模型。
python服务获取redis请求队列,调用pytorch模型识别,将识别结果放入redis缓存
第一步、创建detect_process.py文件,引入redis等库,在全局变量中定义redis,请求队列相关参数:
# redis cache client
RedisCache = redis.StrictRedis(host="localhost", port=6379, db=0)
# the queue of expect to detect
IMAGE_QUEUE = "imageQueue"
# slice size every foreach
BATCH_SIZE = 32
# server sleep when queue>0
SERVER_SLEEP = 0.1
# server sleep when queue=0
SERVER_SLEEP_IDLE = 0.5
第二步、使用redis缓存,我们实现一个从redis中获取识别队列,再依次识别队列中的图片,最后将结果放入redis中的一个map中。
def detect_process():
    while True:
        # 从redis中获取预测图像队列
        queue = RedisCache.lrange(IMAGE_QUEUE, 0, BATCH_SIZE - 1)
        print("classify_process is running")
        if len(queue) < 1:
            time.sleep(SERVER_SLEEP)
            continue

        # 遍历队列
        for item in queue:
            # step 1. 获取队列中的图像信息
            item = json.loads(item);
            image_key = item.get("imageKey")
            image_link = item.get("imageUrl")
            response = req.get(image_link)
            image = Image.open(BytesIO(response.content))

            # step 2. detect image 识别图片
            image_array = service.detect(image)

            # step 3. convert image_array to byte_array
            img = Image.fromarray(image_array, 'RGB')
            img_byte_array = io.BytesIO()
            img.save(img_byte_array, format='JPEG')

            # step 4. set result_info in redis
            image_info = base64.b64encode(img_byte_array.getvalue()).decode('ascii')
            RedisCache.hset(name=image_key, key="consultOut", value=image_info)

        # 删除队列中已识别的图片信息
        RedisCache.ltrim(IMAGE_QUEUE, BATCH_SIZE, -1)

        time.sleep(SERVER_SLEEP)
工程仓库
将代码放入了以下仓库中:
SpringBoot+redis工程:https://github.com/anylots/detection
主要逻辑在ImageConsultService
python工程模型后端:https://github.com/anylots/DetectNet,
主要逻辑为detect_process.py;based on Yet-Another-EfficientDet-Pytorch
python工程包含了对模型调用的封装重构,Java项目直接使用应用广泛、最新和较精简的
SpringBoot框架;可以加个星,后面还会陆续更新,以及放上一些比较酷的GAN模型。
运行项目
首先启动redis,redis安装使用见https://redis.io/download,windows版redis是微软维护的,redis官方没有提供,链接:https://github.com/microsoftarchive/redis/releases,下载3.2.100就可以了。
然后分别启动SpringBoot工程的DetectionApplication.java和python工程detect_process.py;
最后使用浏览器访问http://localhost:8080/detectConsult,键入图片url,提交

识别结果:
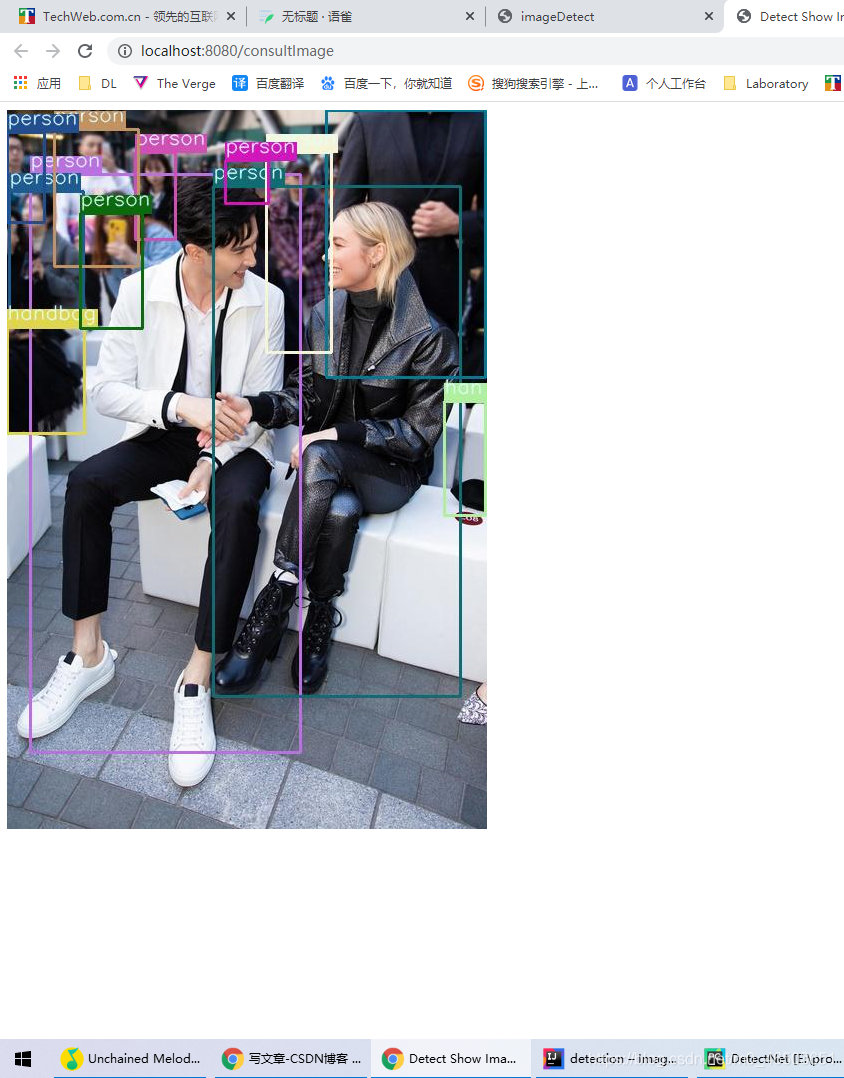
深度学习backend为pytorch,模型为EfficientDet,可随意替换为yolo等模型。
模型权重:链接: https://pan.baidu.com/s/1SyIa7hRQxeNGUsAXTuIlvQ 提取码: 3pif
说明:本文记录细节和逻辑还有很多未完善的地方,对图片识别服务搭建、部署还将继续研究,然后继续更新


 469
469


 被折叠的 条评论
为什么被折叠?
被折叠的 条评论
为什么被折叠?
 到【灌水乐园】发言


