


1 Java事件处理机制
在Java事件处理体系结构中,主要涉及的对象
● 事件(Event)
● 事件源(Event Source)
● 事件监听器(Event Listener)
基于监听器的事件处理机制是一种委派式的事件处理方式,实现步骤:
①委托: 组件将事件处理委托给特定的事件处理对象
②通知:触发指定的事件时,就通知所委托的事件处理对象
③处理:事件处理对象调用相应的事件处理方法来处理该事件

2 事件类
●事件用于封装事件处理所必须的基本信息
●所有AWT的事件类都是AWTEvent类的子类
●AWTEvent是所有AWT事件的根事件类
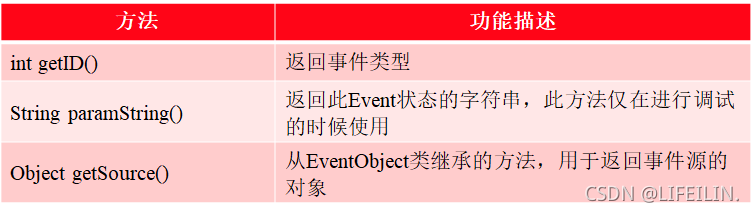
AWTEvent常用方法如下:
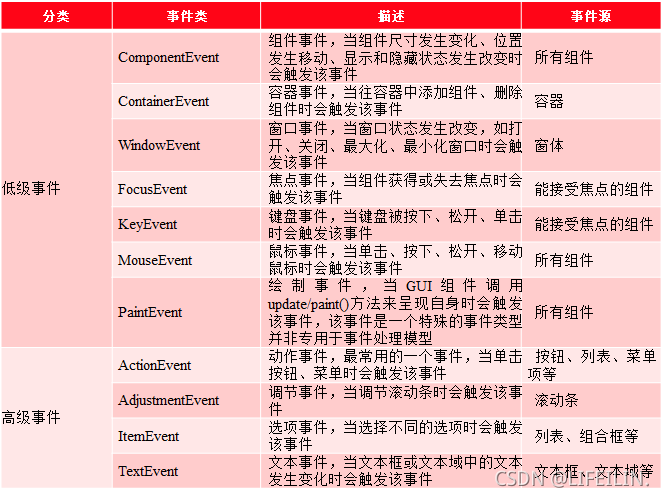
AWT事件可分为低级事件和高级事件
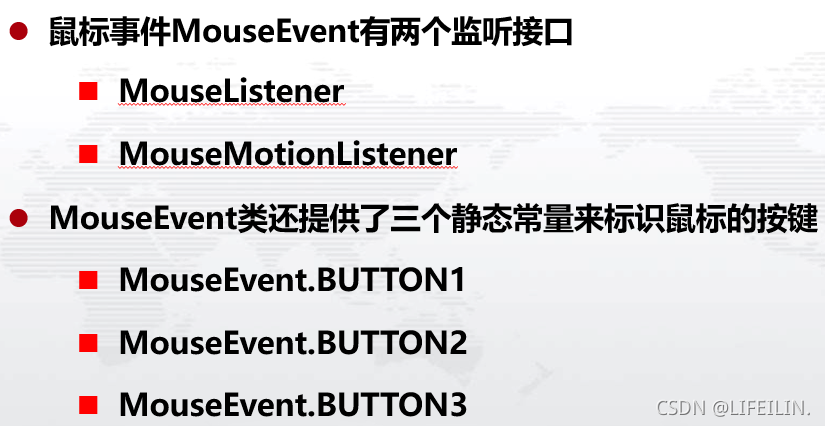
3 监听接口
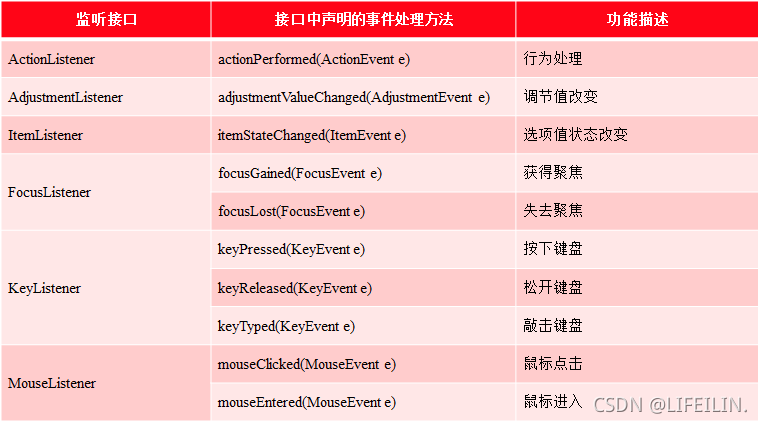
监听接口中定义了抽象的事件处理方法,常用的监听接口如下

4 事件处理步骤
1、创建监听类
    // 1. 创建扩展ActionListener的监听类
    class ButtonListener implements ActionListener {
    }
2、创建监听对象
    class ButtonListener implements ActionListener {
        //重写ctionListener接口中的事件处理方法actionPerformed()
        public void actionPerformed(ActionEvent e) {

        }
    }
3、注册监听对象
//2  创建一个监听对象
ButtonListener btnListener = new ButtonListener();
//3 注册监听
btnRed.addActionListener(btnListener);
btnGreen.addActionListener(btnListener);
btnYellow.addActionListener(btnListener);
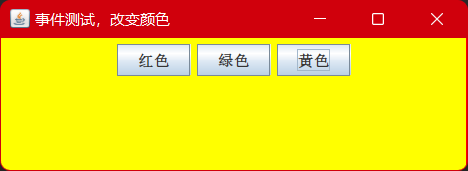
事件处理案例
import javax.swing.*;
import java.awt.*;
import java.awt.event.ActionEvent;
import java.awt.event.ActionListener;

public class ChangeColor extends JFrame {
    JPanel p;
    JButton btnRed, btnGreen, btnYellow;

    public ChangeColor() {
        super("事件测试,改变颜色");
        //创建组件
        p = new JPanel();
        btnRed = new JButton("红色");
        btnGreen = new JButton("绿色");
        btnYellow = new JButton("黄色");

        //2  创建一个监听对象
        ButtonListener btnListener = new ButtonListener();
        //3 注册监听
        btnRed.addActionListener(btnListener);
        btnGreen.addActionListener(btnListener);
        btnYellow.addActionListener(btnListener);

        //将按钮添加到面板
        p.add(btnRed);
        p.add(btnGreen);
        p.add(btnYellow);
        //将面板添加到窗体
        this.add(p);
        //设置窗口大小
        this.setSize(300, 300);
        //设置窗口左上角坐标
        this.setLocation(200, 100);
        //设置窗口关闭方式
        this.setDefaultCloseOperation(JFrame.EXIT_ON_CLOSE);
        //设置窗口可见
        this.setVisible(true);
    }

    // 1. 创建扩展ActionListener的监听类
    class ButtonListener implements ActionListener {
        //重写ctionListener接口中的事件处理方法actionPerformed()
        public void actionPerformed(ActionEvent e) {
            //获取事件源
            Object source = e.getSource();
            //判断事件源,进行相应的处理
            if (source == btnRed) {
                //设置背景面板的颜色为红色
                p.setBackground(Color.red);
            } else if (source == btnGreen) {
                //设置背景面板的颜色为绿色
                p.setBackground(Color.green);
            } else {
                //设置背景面板的颜色为黄色
                p.setBackground(Color.yellow);
            }
        }
    }

    public static void main(String[] args) {
        new ChangeColor();
    }
}
事件处理案例代码优化:通过匿名监听类的方式注册监听
import javax.swing.*;
import java.awt.*;
import java.awt.event.ActionEvent;
import java.awt.event.ActionListener;

public class ChangeColorAnonymous extends JFrame {
    JPanel p;
    JButton btnRed, btnGreen, btnYellow;

    public ChangeColorAnonymous() {
        super("事件测试,改变颜色");
        //创建组件3
        p = new JPanel();
        btnRed = new JButton("红色");
        btnGreen = new JButton("绿色");
        btnYellow = new JButton("黄色");

        //通过匿名监听类的方式注册监听
        btnGreen.addActionListener(new ActionListener() {
            //重写ActionListener接口中的事件处理方法actionPerformed()
            @Override
            public void actionPerformed(ActionEvent e) {
                //设置面板颜色为绿色
                p.setBackground(Color.green);
            }
        });
        btnRed.addActionListener(new ActionListener() {
            //重写ActionListener接口中的事件处理方法actionPerformed()
            @Override
            public void actionPerformed(ActionEvent e) {
                //设置面板颜色为红色
                p.setBackground(Color.red);
            }
        });
        btnYellow.addActionListener(new ActionListener() {
            //重写ActionListener接口中的事件处理方法actionPerformed()
            @Override
            public void actionPerformed(ActionEvent e) {
                //设置面板颜色为黄色
                p.setBackground(Color.yellow);
            }
        });

        //将按钮添加到面板
        p.add(btnRed);
        p.add(btnGreen);
        p.add(btnYellow);
        //将面板添加到窗体
        this.add(p);
        //设置窗口大小
        this.setSize(300, 300);
        //设置窗口左上角坐标
        this.setLocation(200, 100);
        //设置窗口关闭方式
        this.setDefaultCloseOperation(JFrame.EXIT_ON_CLOSE);
        //设置窗口可见
        this.setVisible(true);
    }

    public static void main(String[] args) {
        new ChangeColorAnonymous();
    }
}
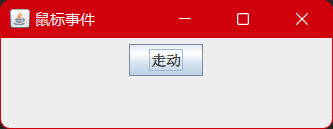
5 键盘事件
KeyEvent类是键盘事件类,该类对每个键盘按键都定义了一个整型常量与之对应
KeyEvent.VK UP代表“↑”键
KeyEvent.VK_ DOWN代表"↓"键
KeyEvent.VK_ RIGHT代表方向键"→"键
KeyEvent.VK_ LEFT代表"←”键
KeyEvent类还提供 了以下两个常用的方法:
int getKeyCode():获取键盘按键的码值
char getKeyChar():获取键盘按键上的字符值
键盘事件案例
import javax.swing.*;
import java.awt.event.ActionEvent;
import java.awt.event.ActionListener;
import java.awt.event.KeyEvent;
import java.awt.event.KeyListener;

public class KeyEventDemo extends JFrame {
    private JPanel p;
    private JButton btnMove;

    public KeyEventDemo() {
        super("鼠标事件");
        //创建组件
        p = new JPanel();
        btnMove = new JButton("走动");

        //通过匿名监听类的方式注册监听
        btnMove.addKeyListener(new KeyListener() {
            //敲击键盘事件的处理方法
            @Override
            public void keyTyped(KeyEvent e) {
            }

            //按下键盘事件的处理方法
            @Override
            public void keyPressed(KeyEvent e) {
                //获取按下键盘的码值
                int key = e.getKeyCode();
                //获取按钮当前x,y的坐标
                int x = btnMove.getX();
                int y = btnMove.getY();
                if (key == KeyEvent.VK_RIGHT) {
                    //向右,x坐标增加
                    btnMove.setLocation(x + 5, y);
                } else if (key == KeyEvent.VK_LEFT) {
                    //向左,x坐标减少
                    btnMove.setLocation(x - 5, y);
                } else if (key == KeyEvent.VK_UP) {
                    //向上,y坐标增加
                    btnMove.setLocation(x, y + 5);
                } else if (key == KeyEvent.VK_DOWN) {
                    //向下,y坐标减少
                    btnMove.setLocation(x, y - 5);
                }
            }

            //松开键盘事件的处理方法
            @Override
            public void keyReleased(KeyEvent e) {
            }
        });

        //将组件添加至面板
        p.add(btnMove);
        //将面板添加到窗体
        this.add(p);
        //设置窗口大小
        this.setSize(300, 300);
        //设置窗口左上角坐标
        this.setLocation(200, 100);
        //设置窗口关闭方式
        this.setDefaultCloseOperation(JFrame.EXIT_ON_CLOSE);
        //设置窗口可见
        this.setVisible(true);
    }

    public static void main(String[] args) {
        new KeyEventDemo();
    }
}
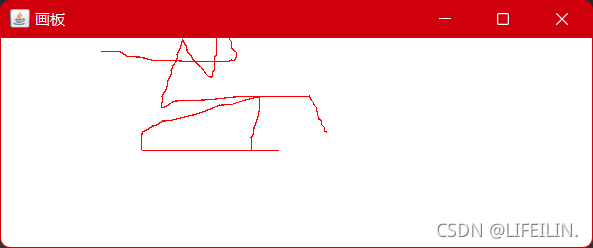
6 鼠标事件
鼠标事件案例
import java.awt.Color;
import java.awt.Graphics;
import java.awt.event.MouseEvent;
import java.awt.event.MouseListener;
import java.awt.event.MouseMotionListener;
import javax.swing.JFrame;
import javax.swing.JPanel;

public class MouseEventDemo extends JFrame {
    private JPanel p;
    // 鼠标上一次的坐标
    int pre_x = -1, pre_y = -1;
    // 鼠标当前坐标
    int x, y;

    public MouseEventDemo() {
        super("画板");
        p = new JPanel();
        // 注册鼠标监听
        p.addMouseMotionListener(new PaintListener());
        p.addMouseListener(new ResetListenter());

        // 将面板添加到窗体中
        this.add(p);
        // 设定窗口大小
        this.setSize(400, 300);
        // 设定窗口左上角坐标
        this.setLocation(200, 100);
        // 设定窗口默认关闭方式为退出应用程序
        this.setDefaultCloseOperation(JFrame.EXIT_ON_CLOSE);
        // 设置窗口可视(显示)
        this.setVisible(true);
    }

    // 重写JFrame的paint()方法,此方法用于在窗体中画图
    public void paint(Graphics g) {
        // 设置画笔的颜色
        g.setColor(Color.red);
        // 历史坐标>0
        if (pre_x > 0 && pre_y > 0) {
            // 绘制一条线段,从上一次鼠标拖动事件点到本次鼠标拖动事件点
            g.drawLine(pre_x, pre_y, x, y);
        }
        // 保存当前鼠标坐标,称为上一次的历史坐标
        pre_x = x;
        pre_y = y;
    }

    // 定义鼠标拖动监听类
    class PaintListener implements MouseMotionListener {
        // 鼠标移动的处理方法
        public void mouseMoved(MouseEvent e) {
        }

        // 鼠标拖动的处理方法,负责画画工作
        public void mouseDragged(MouseEvent e) {
            // 获取鼠标当前的坐标
            x = e.getX();
            y = e.getY();
            // 重画,repaint()触发paint()
            MouseEventDemo.this.repaint();
        }
    }

    // 定义鼠标监听类
    class ResetListenter implements MouseListener {

        // 鼠标点击事件处理
        public void mouseClicked(MouseEvent e) {
        }

        // 鼠标按下事件处理
        public void mousePressed(MouseEvent e) {
            // 获取鼠标按键,判断是否是右键
            if (e.getButton() == MouseEvent.BUTTON3) {
                // 重画面板(擦除原来的轨迹)
                MouseEventDemo.this.p.repaint();
            }
        }

        // 鼠标松开事件处理,重置历史坐标
        public void mouseReleased(MouseEvent e) {
            // 鼠标松开时,将历史坐标重设为-1(重置)
            pre_x = -1;
            pre_y = -1;
        }

        // 鼠标进入事件处理
        public void mouseEntered(MouseEvent e) {

        }

        // 鼠标退出事件处理
        public void mouseExited(MouseEvent e) {

        }
    }

    public static void main(String[] args) {
        new MouseEventDemo();
    }
}
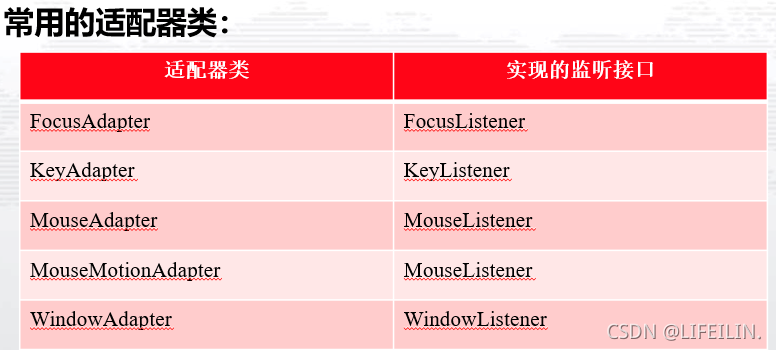
7 适配器
适配器类用于简化事件处理的代码
适配器案例
使用适配器简化鼠标事件案例中画图功能的MouseEventDemo程序
import java.awt.Color;
import java.awt.Graphics;
import java.awt.event.MouseAdapter;
import java.awt.event.MouseEvent;
import java.awt.event.MouseMotionAdapter;

import javax.swing.JFrame;
import javax.swing.JPanel;

public class MouseEventAdapterDemo extends JFrame {
	private JPanel p;
	// 鼠标上一次的坐标
	int pre_x = -1, pre_y = -1;
	// 鼠标当前坐标
	int x, y;

	public MouseEventAdapterDemo() {
		super("画板");
		p = new JPanel();
		// 注册鼠标监听
		p.addMouseMotionListener(new PaintListener());
		p.addMouseListener(new ResetListenter());

		// 将面板添加到窗体中
		this.add(p);

		// 设定窗口大小
		this.setSize(400, 300);
		// 设定窗口左上角坐标
		this.setLocation(200, 100);
		// 设定窗口默认关闭方式为退出应用程序
		this.setDefaultCloseOperation(JFrame.EXIT_ON_CLOSE);
		// 设置窗口可视(显示)
		this.setVisible(true);
	}

	// 重写JFrame的paint()方法,此方法用于在窗体中画图
	public void paint(Graphics g) {
		// 设置画笔的颜色
		g.setColor(Color.red);
		// 历史坐标>0
		if (pre_x > 0 && pre_y > 0) {
			// 绘制一条线段,从上一次鼠标拖动事件点到本次鼠标拖动事件点
			g.drawLine(pre_x, pre_y, x, y);
		}
		// 保存当前鼠标坐标,称为上一次的历史坐标
		pre_x = x;
		pre_y = y;
	}

	// 定义鼠标拖动监听类
	class PaintListener extends MouseMotionAdapter{
		// 鼠标拖动的处理方法,负责画画工作
		public void mouseDragged(MouseEvent e) {
			// 获取鼠标当前的坐标
			x = e.getX();
			y = e.getY();
			// 重画,repaint()触发paint()
			MouseEventAdapterDemo.this.repaint();
		}
	}

	// 定义鼠标监听类
	class ResetListenter extends MouseAdapter {
		// 鼠标按下事件处理
		public void mousePressed(MouseEvent e) {
			// 获取鼠标按键,判断是否是右键
			if (e.getButton() == MouseEvent.BUTTON3) {
				// 重画面板(擦除原来的轨迹)
				MouseEventAdapterDemo.this.p.repaint();
			}
		}

		// 鼠标松开事件处理,重置历史坐标
		public void mouseReleased(MouseEvent e) {
			// 鼠标松开时,将历史坐标重设为-1(重置)
			pre_x = -1;
			pre_y = -1;
		}
	}

	public static void main(String[] args) {
		new MouseEventAdapterDemo();
	}
}


 2万+
2万+

 被折叠的 条评论
为什么被折叠?
被折叠的 条评论
为什么被折叠?
 到【灌水乐园】发言


