为什么使用mysql
都已经用上了asp.net core 为什么不适用ms sql server. 我也是很苦恼,但是事实就是如此,微软的数据库引擎无法在某些情况下使用。
比如: windows11 附加 三星1T固态。
据查询的资料所知,可能是因为某些固态的最小分区和微软数据库引擎的要求不一样,所以无法使用。因为这个事情,我都已经重装了好几次电脑了。
我还以为是因为我把windows10 升级成windows11 导致的某些东西产生了不兼容,导致的无法使用呢。
总之,目前无法愉快地在windows11上使用微软数据库,所以就转向了使用MYSQL。
并没有很简单
在最开始接触ef工具和
Microsoft.EntityFrameworkCore
的时候,我就知道,这个东西支持各种数据库,我以为只要更改个连接字符串就可以工作了。
但是事实上并非如此,并且还有一些其他的问题。
网络上的文档太少了,即使是编写mysql驱动的
https://github.com/PomeloFoundation/Pomelo.EntityFrameworkCore.MySql
的文档也是很简单(对于我来说)。
使用它的文档,不是很容易完成这一工作。
那么该怎么做
首先做好准备工作
你需要准备好你的mysql数据库
创建一个 asp.net core 程序,创建一些模型用于验证ef工作。
然后你需要准备安装驱动和编写一些代码。
那么,从这里开始吧!
1. 安装包
编辑你的项目文件,然后保存。(或者使用nugut搜索包安装)
    <PackageReference Include="Microsoft.EntityFrameworkCore" Version="8.0.0" />
    <PackageReference Include="Microsoft.EntityFrameworkCore.Design" Version="8.0.0">
      <PrivateAssets>all</PrivateAssets>
      <IncludeAssets>runtime; build; native; contentfiles; analyzers; buildtransitive</IncludeAssets>
    </PackageReference>
    <PackageReference Include="Pomelo.EntityFrameworkCore.MySql" Version="8.0.0-beta.2" />
当你保存的时候,rider或者visual studio 就会开始进行包的安装。
2. 安装ef工具
打开powershell或者cmd
dotnet tool install --global dotnet-ef安装成功之后,注意使用
dotnet ef --version
将会输出ef工具的版本。
注意Pomelo.EntityFrameworkCore.MySql 需要和ef工具包的版本保持一致?(你可以查看如何安装特定版本的ef工具,使得两者保持一致。一般大版本一致即可)
3. 在appsetting.json 中填写数据库连接字符串
需要在mysql中创建数据库。具体是不是必要的我也记不太清,可以先尝试不创建,如果不行再创建。
使用create database ministore。
"ConnectionStrings": {
    "DefaultConnection": "server=localhost;port=3306;database=ministore;user=root;password=suzumiya;"
  }
4. 编写模型类
在Models文件夹中添加
public class Student
{
    [DatabaseGenerated(DatabaseGeneratedOption.Identity)]
    public int Id { get; set; }
    [Required]
    public string? Name { get; set; }
    [Required]
    public int Age
    {
        get;set;
    }
    [Required]
    [ForeignKey("School")]
    public int SchoolId { get; set; }
}
public class School
{
[DatabaseGenerated(DatabaseGeneratedOption.Identity)]
public int Id { get; set; }
[Required]
public string? Name { get; set; }
public string? Description { get; set; }
}5. 开始使用脚手架
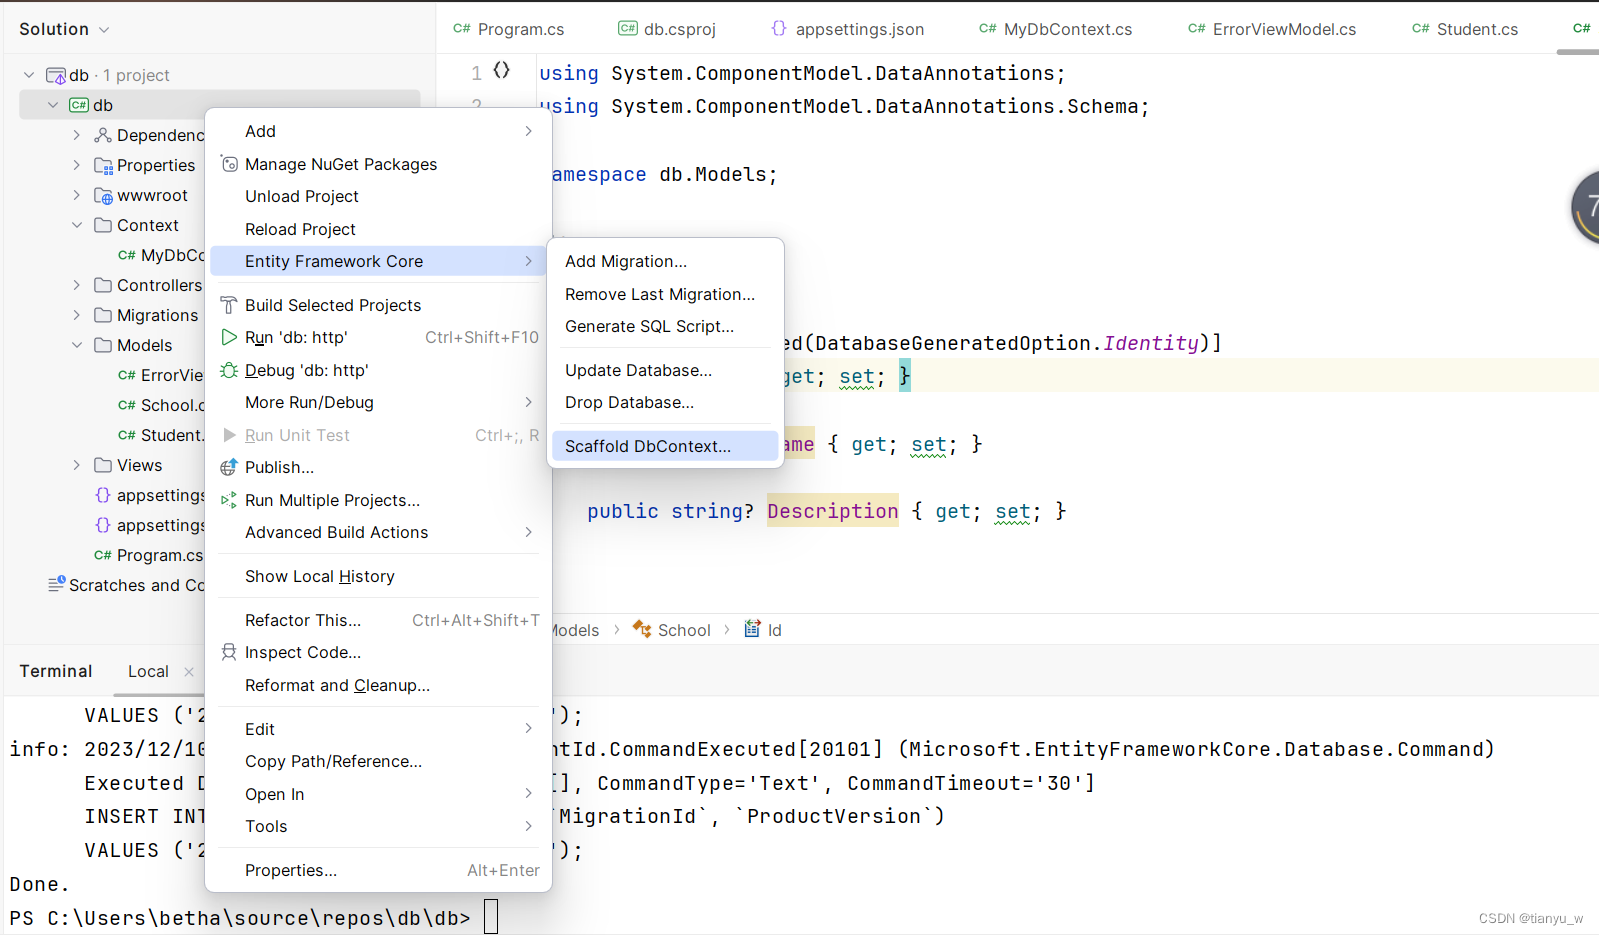
右键项目,选择 Scaffold DbContext

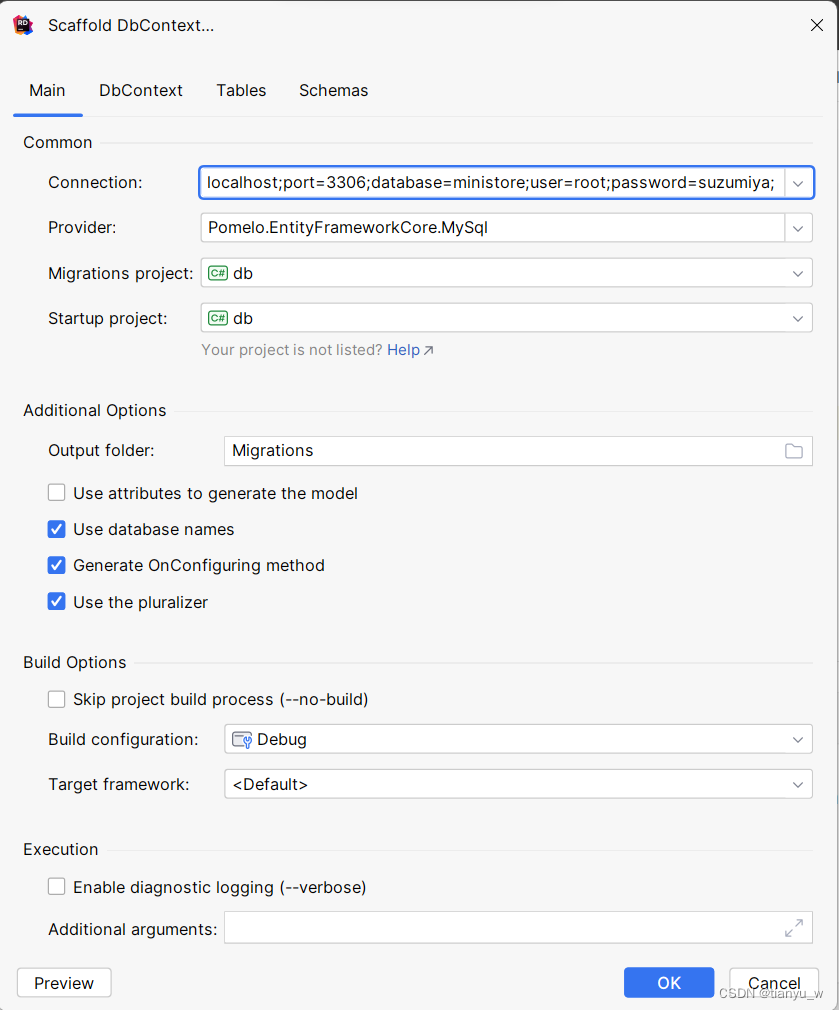
选择provider和connection

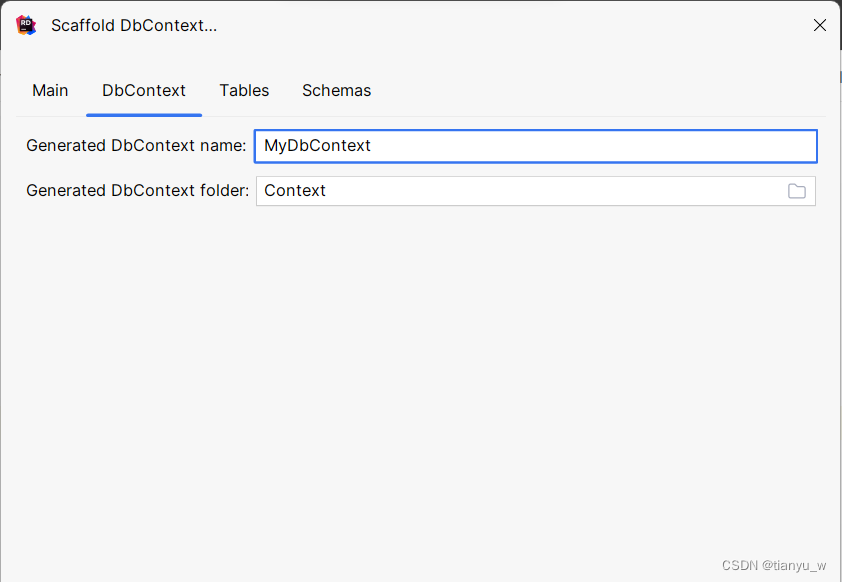
然后注意DbContext 选项卡

这其实和之前使用Microsoft SQL时手动创建的上下文是一样的。
点击确定之后就会为我们创建这个数据库上下文。
我们向其中添加我们需要使用的数据库表的实体模型。
public DbSet<Student>? Students { get; set; }
public DbSet<School>? Schools { get; set; }
最终MyDbContext的代码如此
public partial class MyDbContext : DbContext
{
    public MyDbContext()
    {
    }

    public MyDbContext(DbContextOptions<MyDbContext> options)
        : base(options)
    {
    }

    protected override void OnConfiguring(DbContextOptionsBuilder optionsBuilder)
#warning To protect potentially sensitive information in your connection string, you should move it out of source code. You can avoid scaffolding the connection string by using the Name= syntax to read it from configuration - see https://go.microsoft.com/fwlink/?linkid=2131148. For more guidance on storing connection strings, see https://go.microsoft.com/fwlink/?LinkId=723263.
        => optionsBuilder.UseMySql("server=localhost;port=3306;database=ministore;user=root;password=suzumiya", Microsoft.EntityFrameworkCore.ServerVersion.Parse("8.0.35-mysql"));

    protected override void OnModelCreating(ModelBuilder modelBuilder)
    {
        modelBuilder
            .UseCollation("utf8mb4_0900_ai_ci")
            .HasCharSet("utf8mb4");

        OnModelCreatingPartial(modelBuilder);
    }
    public DbSet<Student>? Students { get; set; }
    public DbSet<School>? Schools { get; set; }

    partial void OnModelCreatingPartial(ModelBuilder modelBuilder);
}
6. 在program中添加连接语句
using db.Context;
using Microsoft.EntityFrameworkCore;

var builder = WebApplication.CreateBuilder(args);

// Add services to the container.
builder.Services.AddControllersWithViews();
var serverVersion = new MySqlServerVersion(new Version(8, 0, 34));

// Replace 'YourDbContext' with the name of your own DbContext derived class.
builder.Services.AddDbContext<MyDbContext>(
    dbContextOptions =>
    {
        dbContextOptions
        .UseMySql(builder.Configuration.GetConnectionString("DefaultConnection"), serverVersion)
        // The following three options help with debugging, but should
        // be changed or removed for production.
        .LogTo(Console.WriteLine, LogLevel.Information)
        .EnableSensitiveDataLogging()
        .EnableDetailedErrors();
    }
);

var app = builder.Build();

// Configure the HTTP request pipeline.
if (!app.Environment.IsDevelopment())
{
    app.UseExceptionHandler("/Home/Error");
}
app.UseStaticFiles();

app.UseRouting();

app.UseAuthorization();

app.MapControllerRoute(
    name: "default",
    pattern: "{controller=Home}/{action=Index}/{id?}");

app.Run();
到了这里,接下来的步骤就和之前的使用ef工具的方式相同了。
7. 创建迁移和应用迁移
创建迁移
(在项目,而非解决方案下的 控制台输入执行)
dotnet ef migrations add Initial --context MyDbContext
一般如果只有一个DbContext 就不需要指定上下文了。当然加上也没有什么坏处
应用迁移
dotnet ef database update
更高级的,条件限制?
并不是总是能够使用rider,这时候该怎们办?
super方式,直接预览rider的参数
工作区是
C:\Users\betha\source\repos\db
指令(command)是
"C:\Program Files\dotnet\dotnet.exe" ef dbcontext scaffold --project db\db.csproj --startup-project db\db.csproj --configuration Debug server=localhost;port=3306;database=ministore;user=root;password=suzumiya; Pomelo.EntityFrameworkCore.MySql --context MyDbContext --context-dir Context --force --output-dir Migrations --use-database-names"C:\Program Files\dotnet\dotnet.exe" ef dbcontext scaffold --project db\db.csproj --startup-project db\db.csproj --configuration Debug server=localhost;port=3306;database=ministore;user=root;password=suzumiya; Pomelo.EntityFrameworkCore.MySql --context MyDbContext --context-dir Context --force --output-dir Migrations --use-database-names
很明显,工作区是解决方案的目录
command的各个部分分别是
"C:\Program Files\dotnet\dotnet.exe" 是ef 的上方程序dotnet
--project db\db.csproj 指定的是项目
--startup-project db\db.csproj 指定的也是项目
server=localhost;port=3306;database=ministore;user=root;password=suzumiya; 指定的是数据库连接字符串
Pomelo.EntityFrameworkCore.MySql 指定的是驱动(连接包)
--context MyDbContext 是脚手架要生成的数据库上下文的类名
--context-dir Context 指定的是上面的类放置的文件。


 836
836


 被折叠的 条评论
为什么被折叠?


