


简介
完整项目资源链接:https://download.csdn.net/download/m0_46573428/87796553
项目详细信息请看:毕业设计:Vue3+FastApi+Python+Neo4j实现主题知识图谱网页应用——前言_人工智能技术小白修炼手册的博客-CSDN博客
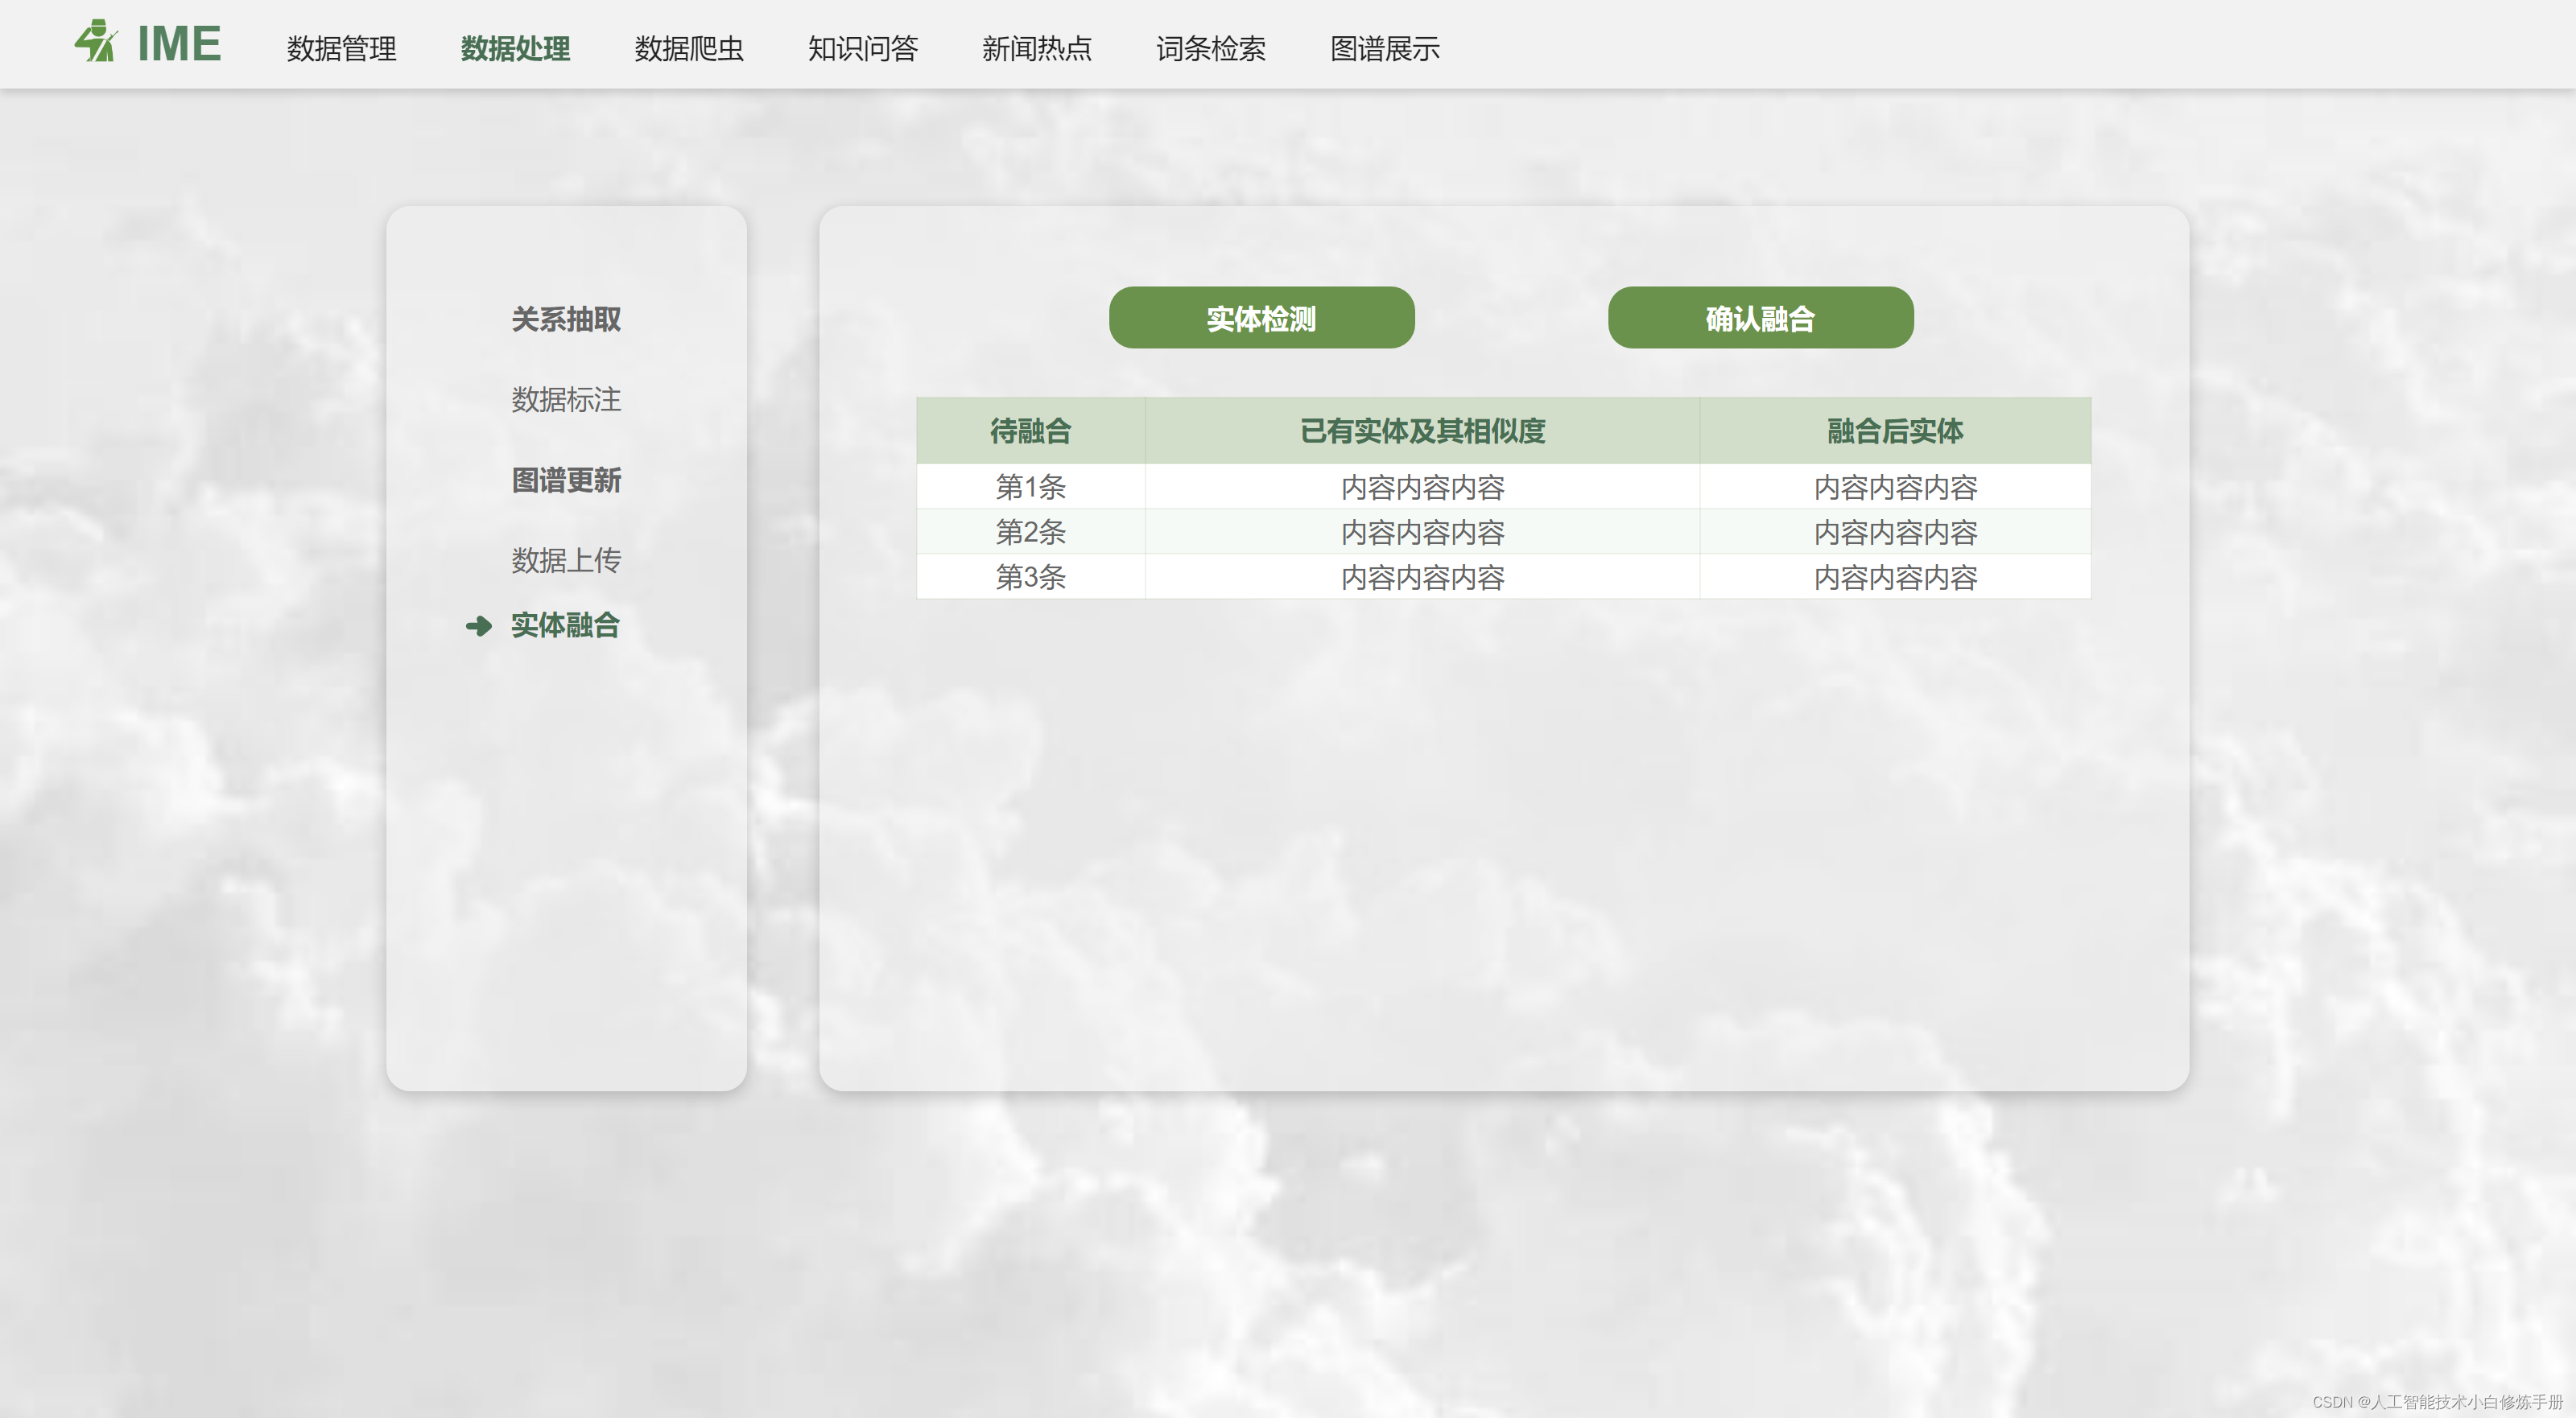
本文介绍的是数据处理模块的实体融合功能。
主要代码
前端
Html
这是一个Vue.js的组件模板,包括以下内容:
-
点击"实体检测"按钮会触发
loadFusion()函数; -
点击"确认融合"按钮会触发
confirm_fusion()函数; -
有一个class为
BiaoGe的div元素包含一个表格; -
表格中有一个头部和主体:头部包括三个列名(待融合、已有实体及其相似度、融合后实体);主体包含若干行数据;
-
每行数据有三列,分别与表头对应,并且可以编辑:第一列是要融合的实体,第二列是已有实体及其相似度,第三列是融合后的实体。在未确认融合前,第三列可以编辑。
-
当行数据被点击时,会触发
discardFusion(index)函数。
v-for用于遍历数据数组并渲染到页面上,:key则是用来指定每个被遍历的元素的唯一标识符,方便Vue.js跟踪每个元素的状态变化。类名_dis用于控制样式,表示此行数据是否选用。
<template>
  <div>
    <div id="main">
      <button @click="loadFusion()">实体检测</button>
      <button @click="confirm_fusion()">确认融合</button>
      <div class="BiaoGe">
        <table class="xwtable">
          <thead>
            <tr>
              <td>待融合</td>
              <td>已有实体及其相似度</td>
              <td>融合后实体</td>
            </tr>
          </thead>

          <tbody>
            <tr
              v-for="(item, index) in newFusionList"
              :key="index"

              @click="discardFusion(index)"
            >
              <td :class="{ _dis: !newFusionList[index][3] }">{{ item[0] }}</td>
              <td :class="{ _dis: !newFusionList[index][3] }">{{ item[1] }}</td>
              <td :class="{ _dis: !newFusionList[index][3] }" contenteditable="true">{{ item[2] }}</td>
            </tr>
          </tbody>
        </table>
      </div>
    </div>
  </div>
</template>
Script
这段JavaScript代码是一个Vue组件,它定义了一个名为"Fusion"的组件。下面对代码进行解释:
-
data():这个函数用于定义组件的数据。它返回一个对象,包含了组件中的各种数据。在这段代码中,定义了以下几个数据项:-
newFusionList:一个数组,包含了一些初始的数据项。 -
id:一个数值,初始值为1。
-
-
methods:这个对象包含了组件的方法。在这段代码中,定义了以下几个方法:-
discardFusion:这个方法用于处理丢弃融合的操作。它接收一个索引作为参数,将对应索引的数据项中的第四个元素取反,并打印出该数据项。 -
loadFusion:这个方法用于加载可融合的节点数据。它通过向后端发送HTTP POST请求,请求路径为"http://localhost:8000/FindSimilarNode"。请求成功后,将返回的数据赋值给`newFusionList`数组,并根据条件进行处理。最后,将结果打印到控制台。 -
confirm_fusion:这个方法用于确认数据融合。它首先弹出一个提示框显示"融合成功",然后创建一个空数组dataInput_fusion。通过遍历newFusionList数组,判断第四个元素是否为true,如果是,则将相关数据项的第二个元素和一个文本输入框的值作为一个数组添加到dataInput_fusion中。接下来,通过向后端发送HTTP POST请求,请求路径为"http://localhost:8000/Fusion2Graph",请求参数为`dataInput_fusion`和`new_nodes`。请求成功后,将返回的数据弹出一个提示框显示,并打印到控制台。
-
-
mounted():这个生命周期钩子函数会在组件挂载到DOM后执行。在这段代码中,将this.id的值设置为this.$route.params.id,即从路由参数中获取id值。
<script>
export default {
  name: "Fusion",
  props: {},
  data() {
    return {
      newFusionList: [
        ["第1条", "内容内容内容", "内容内容内容", true],
        ["第2条", "内容内容内容", "内容内容内容", true],
        ["第3条", "内容内容内容", "内容内容内容", true],
      ],
      id: 1,
    };
  },
  methods: {
    discardFusion: function (index) {
      this.newFusionList[index][3] = !this.newFusionList[index][3];
      console.log(this.newFusionList[index]);
    },
    // 数据融合:加载可融合的node
    loadFusion: function () {
      this.axios
        .post("http://localhost:8000/FindSimilarNode")
        .then((res) => {
          this.newFusionList = [
            ["“山猫”系列步兵战车", "“山猫”系列战车", "", true],
            ["“山猫”KF-41步兵战车", "“山猫”系列战车", "", true],
          ];
          if (res.data.length == 0) {
            alert("并未匹配到实体");
          } else {
            for (var i = 0; i < res.data.length; i++) {
              for (let key in res.data[i][0]) {
                this.newFusionList.push([res.data[i][1], key, '', true]);
              }
            }
          }
          console.log(this.newFusionList);
        })
        .catch((error) => {
          alert("实体检测失败");
          console.log(error);
        });
    },
    // 数据融合:确认融合fusion
    confirm_fusion: function () {
      alert('融合成功');
      var that = this;
      var dataInput_fusion = [];

      for (var item in that.newFusionList) {
        if (that.newFusionList[item][3] == true) {
          dataInput_fusion.push([
            that.newFusionList[item][1],
            this.$refs.box3_text_ref[0].value,
          ]);
        }
      }
      console.log(dataInput_fusion);
      this.axios
        .post(
          "http://localhost:8000/Fusion2Graph",
          {
            dataInput_fusion: dataInput_fusion,
            nodes: that.new_nodes,
          }
        )
        .then((res) => {
          alert(res.data.msg);
        })
        .catch((error) => {
          alert("Fusion2Graph failed!");
          console.log(error);
        });
    },
  },
  mounted() {
    this.id = this.$route.params.id;
  },
};
</script>
Css
<style scoped>
#main {
  padding-top: 50px;
  text-align: center;
  margin-left: 60px;
}
._dis {
  background: #bbb;
}
button {
  float: left;
  border: none;
  background: rgb(107, 146, 77);
  color: white;
  padding: 8px 10px;
  font-weight: bold;
  border-radius: 15px;
  margin-left: 120px;
  width: 190px;
  cursor: pointer;
}
.BiaoGe {
  height: 380px;
  width: 93%;
  /* border: #ccc solid 1px; */
  float: left;
  margin-top: 30px;
  overflow: scroll;
}
.xwtable {
  width: 100%;
  border-collapse: collapse;
  border: 1px solid rgba(107, 147, 77, 0.1);
}

.xwtable thead td {
  color: #486e53;
  text-align: center;
  border: 1px solid rgba(107, 147, 77, 0.1);
  font-weight: bold;
  padding: 10px;
  background: rgba(107, 147, 77, 0.3);
}

.xwtable-tbody {
  overflow: scroll;
  height: 100px;
}

.xwtable tbody tr {
  background: #fff;

  color: #666666;
}
.xwtable tbody tr td {
  text-align: center;
  color: #666666;
}
.xwtable tbody tr.alt-row {
  background: #f2f7fc;
}
.xwtable td {
  line-height: 20px;
  text-align: left;
  padding: 4px 10px 3px 10px;
  height: 18px;
  border: 1px solid rgba(107, 147, 77, 0.1);
}

table tr:nth-child(odd) {
  background: #fff;
}
table tr:nth-child(even) {
  background: #f5faf6;
}
</style>
后端
FindSimilarNode()
该函数用于在两个数据集(一个位于本地文件系统上,另一个来自OpenKG平台)之间查找相似的实体名称。该函数的主要步骤如下:
-
首先打开本地存储的JSON文件,并从中获取节点信息以及节点的属性值。
-
读取新数据集的每个实体,提取其具有代表性的属性值,并将每个实体名称都添加到列表
all_subject中。 -
打开来自OpenKG平台的JSON文件,提取每个实体的名称和其标签信息(类型、大类、labels等),并将这些数据存储到列表
graph_data中。 -
遍历列表
all_subject中的每个实体,计算它们与列表graph_data中的实体名称的相似度。如果相似度高于0.77,则将它们加入到列表similar_verb中。在进行相似度比较后,列表ans会收集每个实体的相似实体。 -
最后,对于每个实体,当存在多个相似的实体时,将它们按照相似度从高到低排序。然后按照指定的格式将它们添加到列表
ans中。
def FindSimilarNode():
    f = open(root+'/data/tmpData.json', 'r', encoding='utf-8')
    for i in f:

        json_data = eval(i)
        print(json_data)
        print(type(json_data))

    # 新的实体
    all_subject = []
    ans = []
    # 从这里输入字典,读取新数据的每个名称
    for _, node in json_data['nodes'].items():
        if '名称' in node['properties']:
            subject = node['properties']['名称']
            all_subject.append(subject)
        else:
            subject = node['properties']['name']
            all_subject.append(subject)

    graph_data = []
    f = open(openkgdata_root, 'r', encoding='utf-8')
    for data in f:
        data = json.loads(data)
        label = []
        if '类型' in data:
            label.append(data['类型'])
        if '大类' in data:
            label.append(data['大类'])
        if 'label' in data:
            label.append(data['label'])
        if 'labels' in data:
            label.append(data['labels'])
        graph_data.append([data['名称'], label])
        # graph_data.append(data['名称'])

    for sub in all_subject:
        similar_verb = {}
        for verb in graph_data:
            similar_ratio = string_similar(sub, verb[0])
            if similar_ratio >= 0.77:
                similar_verb[verb[0]] = [str(round(similar_ratio * 100, 2)) + "%", sub, verb[1]]
        if len(similar_verb) > 1:
            # 进行相似度排序
            d_order = sorted(similar_verb.items(), key=lambda x: x[1], reverse=True)
            for i in d_order:
                ans.append([{i[0]: i[1]}, i[1][1]])
    return ans
Fusion2Graph(node, nodes)
这段代码的实现逻辑如下:
-
定义一个空列表
pairs用于存储匹配的节点和相关信息。 -
使用两层循环遍历
node列表中的每个元素,以及nodes列表中的每个元素。对于每个node元素,它提取出原实体、新标签、匹配的节点信息和新名称,并将这些信息作为一个列表存储在pairs中。 -
使用另外两层循环遍历
pairs列表中的每个元素。对于每个元素,首先通过调用match_node函数根据标签和属性找到对应的图谱节点。然后,更新节点的属性:删除原节点中的label属性,将新名称赋给name和名称属性,然后使用update方法将新属性更新到节点上。最后,使用graph.push方法将更新后的节点推送到图谱中。 -
读取一个名为
openkgdata_root的文件,将其中的数据加载为一个列表all_data。 -
清空
openkgdata_root文件的内容,并打印all_data的大小。 -
遍历
all_data列表中的每个元素,以及pairs列表中的每个元素。如果pair中的原实体与data中的名称匹配,则将pair中的新属性更新到data中,并添加label属性为新标签。最后,将更新后的data以JSON格式写入openkgdata_root文件中。
该代码通过匹配fusion数据中的实体和图谱中的节点,将fusion数据的属性更新到图谱中对应的节点,并将更新后的数据写入文件中,实现了将fusion数据保存到图谱的功能。
# 将fusion数据保存到图谱中
def Fusion2Graph(node, nodes):
    """
    原理:1.匹配旧实体、2.修改名称、update属性
    作用:将fusion数据保存到图谱中
    输入:fusion的数据
    输出:
    """
    pairs = []
    for i in node:
        for num in range(len(nodes)):
            if i[0][1] == nodes[num]['名称']:
                for key in i[0][0]:
                    # 原实体,新的label,新属性,新name
                    pairs.append([key, i[0][0][key][2], nodes[num], i[1]])

    for i in range(len(pairs)):
        for label in pairs[i][1]:
            attrs2 = {}
            attrs2['name'] = pairs[i][2]['名称']
            node = match_node(graph, label, attrs2)  # 找到对应的结点
            if node != None:
                break
        if 'label' in pairs[i][2]:
            del [pairs[i][2]['label']]
        pairs[i][2]['name'] = pairs[i][3]
        pairs[i][2]['名称'] = pairs[i][3]
        node.update(pairs[i][2])  # 修改结点的属性
        graph.push(node)  # 更新结点
    all_data = []
    f = open(openkgdata_root, 'r', encoding='utf-8')
    for data in f:
        data = json.loads(data)
        all_data.append(data)

    with open(openkgdata_root, 'w', encoding='utf-8') as fw:
        fw.write('')
    print(sys.getsizeof(all_data))
    for data in all_data:
        for pair in pairs:
            if pair[0] == data['名称']:
                for key, item in pair[2].items():
                    data[key] = item
                data['label'] = pair[1]
                print('yes!!!')
        with open(openkgdata_root, 'a', encoding='utf-8') as fa:
            fa.write(json.dumps(data, ensure_ascii=False))
            fa.write('\n')

    return node, pairs


 814
814


 被折叠的 条评论
为什么被折叠?
被折叠的 条评论
为什么被折叠?
 到【灌水乐园】发言


