


1.组件中的自定义事件
1.一种组件通信方式:子组件==》父组件
2.使用场景:A是父组件,B是子组件,B想给A传数据,那么就要在A中给B绑定自定义事件(事件的回调函数在A中)
3.绑定自定义事件:
①第一种方式:在父组件中:<Demo @hello="test">或<Demo v-on:hello="test">
②第二种方式:在父组件中:
<Demo ref="demo" />
......
mounted(){
	this.$refs.xxx.$on('hello',this.test)
}
③若想让自定义事件只能触发一次,可以使用once修饰符,或$once方法
4.触发自定义事件:this.$emit('hello',数据)
5.解绑自定义事件this.$off('hello')
6.组件上也可以绑定原生DOM事件,需要使用native修饰符
7.注意:通过this.$refs.xxx.$on('hello',回调)绑定自定义事件时,回调要么配置在methods中,要么用箭头函数,否则this指向会出问题。
2.全局事件总线
1.一种组件间通信的方式,适用于任意间组件的通信
2.设置全局事件总线:
new Vue({
	.....
	beforeCreate(){
		Vue.prototype.$bus=this;//设置全局事件总线,$bus就是当前应用的vm
	},
	...
})
3.使用事件总线:
1.接收数据:A组件想接收数据,则在A组件中给$bus绑定自定义事件,事件的回调留在A组件自身
methods(){
	demo(data){
		.....
	}
}
.....
mounted(){
	this.$bus.$on('xxx',数据)
}
2.提供数据:this.$bus.$emit('xxx',数据)
4.最好在beforeDestroy钩子中,用$off去解绑当前组件所用到的事件
beforeDestroy(){
	this.$bus.$off('xxxx')
}
3.消息订阅与发布
1.一种组件间通信 的方式,适用于任意组件间通信
2.使用步骤:
1.安装pubsub:npm i pubsub-js
2.引入:import pubsub from 'pubsub-js'
3.接收数据:A组件想接收数据,则在A组件中订阅消息,订阅的回调留在A组件自身
methods(){
	demo(_,data){.....}//第一个参数是消息的名字,用下划线占位
}
......
mounted(){
	this.pid=pubsub.subscrible('xxx',this.demo)//订阅消息
}
4.提供数据:pubsub.publish('xxx',数据)
5.最好在beforeDestroy钩子中,用PubSub.unsubscrible(pid)去取消订阅
比较:消息订阅与发布与事件总线相比,更推荐使用事件总线
4.nextTick
1.语法:this.$nextTick(回调函数)
2.作用:在下一次Dom更新结束后执行其指定的回调
3.什么时候用:当改变数据后,要基于更新后的新Dom进行某些操作时,要在nextTick所指定的回调函数中执行
this.$nextTick(function(){
	this.$refs.inputTitle.focus()
})
5.Vue封装的过渡与动画
1.作用:在插入,更新或移除DOM元素时,在合适的时候给元素添加样式类名
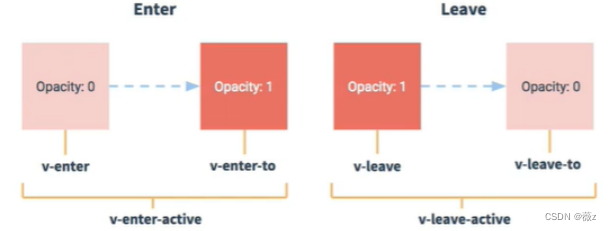
2.图示:
3.写法:
(1).元素进入的样式:
①v-enter:进入的起点
②v-enter-active:进入的过程中
③v-enter-to:进入的终点
(2).元素离开的样式:
①v-leave:进入的起点
②v-leave-active:进入的过程中
③v-leave-to:进入的终点
(3).使用<transition>包裹要过渡的元素,并配置name属性
<transition name='hello'>
	<h1 v-show='isShow'>你好啊</h1>
</transition>
(4)备注:若多个元素需要过渡,则需要使用:<transition-group>,且每个元素都要指定key值
13.Vue脚手架配置代理
(1)方法一:
在vue.config.js添加如下配置:
devServer:{
	proxy:"http://localhost:5000"
}
在app.vue:
methods:{
	getStydent(){
		axios.get('http://localhost:8080/students').then(
			response=>{
				console.log('请求成功了',response.data)
			},
			error=>{
				console.log('请求失败了',error.message)
			}
		)
	}
}
说明:
①优点:配置简单,请求资源时直接发给前端(8080)即可
②缺点:不能配置多个代理,不能灵活的控制请求是否走代理。
③工作方式:若按照上述配置代理。当请求了前端不存在的资源时,那么该请求会转发给服务器(优先匹配前端 资源)
(2)方法二:
编写vue.config.js配置具体代理如下:
module.exports={
	devServer:{
		proxy:{
			'/api':{//匹配所有以'/api'开头的请求路径
				target:'http://localhost:5000',//代理目标的基本路径
				changeOrigin:true,
				pathRewrite:{'^/api':''}
			}
		},
        '/api2':{//匹配所有以'/api2'开头的请求路径
				target:'http://localhost:5000',//代理目标的基本路径
				changeOrigin:true,
				pathRewrite:{'^/api2':''}
			}
		}
	}
}
/*
	changeOrigin设置为true,服务器收到的请求头中的host为:localhost:5000
	changeOrigin设置为false,服务器收到的请求头中的host为:localhost:8000
	vue中changeOrigin默认值为false,reat中changeOrigin默认值为true
*/
在app.vue:
methods:{
	getStudent(){
		axios.get('http://localhost:8080/api/students').then(
			response=>{
				console.log('请求成功了',response.data)
			},
			error=>{
				console.log('请求失败了',error.message)
			}
		)
	},
    getCars(){
		axios.get('http://localhost:8080/api2/cars').then(
			response=>{
				console.log('请求成功了',response.data)
			},
			error=>{
				console.log('请求失败了',error.message)
			}
		)
	}
}
说明:
①优点:可以配置多个代理,且可以灵活的控制请求是否走代理
②缺点:配置略微繁琐,请求资源时必须加前缀
6.插槽
1.作用:让父组件可以向子组件指定位置插入html结构,也是一种组件间通信的方式,适用于父组件===>子组件
2.分类:默认插槽,具名插槽,作用域插槽
3.使用方式:
①默认插槽:
父组件中:
	<Category>
		<div>html结构1</div>
	</Category>

子组件Category中:
	<template>
		<div>
           <!-- 定义插槽-->
            <slot>插槽默认内容</slot>
        </div>
	</tenplate>
②具名插槽:
父组件中:
	<Category>
		<template slot="center">
        	<div>
                html结构1
            </div>
        </template>

        <template>
        	<div>
                html结构2
            </div>
        </template>
	</Category>
子组件Category中:
	<template>
		<div>
        <!--定义插槽-->
          <slot name="center">插槽默认内容</slot>
          <slot name="footer">插槽默认内容</slot>
        </div>
	</template>
③作用域插槽:
1.理解:数据在组件的自身,但根据数据生成的结构需要组件的使用者来决定 。(games数据在Category组件中,但使用数据所遍历出来的结构由App组件决定)
2.具体编码:
父组件中:
	<Category>
		<template scope="scopeData">
        	<!--生成的是ul列表-->
            <ul>
                <li v-for="g in scopeData.games" :key="g">{{g}}</li>
            </ul>
        </template>
	</Category>

	<Category>
		<template slot-scope="scopeData">
        	<!--生成的是h4标题-->
            <h4 v-for="g in scopeData.games" :key="g">{{g}}</h4>
        </template>
	</Category>
子组件Category中:
	<template>
		<div>
            <slot :games="games"></slot>
        </div>
	</template>

	<script>
		export default{
            name:"Category",
            props:['title'],
            data(){
                return{
                    games:['红色警戒','小猪佩奇','穿越火线','超级玛丽']
                }
            }
        }
	</script>


 3245
3245


 被折叠的 条评论
为什么被折叠?
被折叠的 条评论
为什么被折叠?
 到【灌水乐园】发言


