


目录
高可用集群简介
前面k8s学习中,我们只使用一个master节点进行调度,当此节点dowm掉后k8s将无法进行后续的部署管理工作

常见的高可用集群为5哥work和3台master,加负载均衡
本项目将通过haproxy配置三台 master主机实现负载均衡,通过k8s三台master主机实现k8s集群高可用
配置解析
[root@k8s5 haproxy]# cat /etc/hosts
127.0.0.1 localhost localhost.localdomain localhost4 localhost4.localdomain4
::1 localhost localhost.localdomain localhost6 localhost6.localdomain6
192.168.56.171 k8s1 reg.westos.org
192.168.56.172 k8s2
192.168.56.173 k8s3
192.168.56.174 k8s4
192.168.56.175 k8s5
192.168.56.176 k8s6
haproxy负载均衡
k8s5,k8s6用来装haproxy,提供负载均衡,再装个网络工具
[root@k8s5 ~]# yum install -y haproxy net-tools
进入目录,修改文件
[root@k8s5 ~]# cd /etc/haproxy/
[root@k8s5 haproxy]# vim haproxy.cfg
#---------------------------------------------------------------------
defaults
mode http
log global
#option httplog
option dontlognull
option http-server-close
#option forwardfor except 127.0.0.0/8 #不支持,注释掉
option redispatch
retries 3
timeout http-request 10s
timeout queue 1m
timeout connect 10s
timeout client 1m
timeout server 1m
timeout http-keep-alive 10s
timeout check 10s
maxconn 3000
listen status *:80 #添加一个监测haproxy状态的模块,使用80端口
stats uri /status
stats auth admin:westos
#---------------------------------------------------------------------
# main frontend which proxys to the backends
#---------------------------------------------------------------------
frontend main *:6443 #前端,也是k8s集群的master,所以端口要区分,这里haproxy用6443端口,模式为tcp。
mode tcp
default_backend k8s
#---------------------------------------------------------------------
# round robin balancing between the various backends
#---------------------------------------------------------------------
backend k8s
mode tcp
balance roundrobin
server app1 192.168.56.172:6443 check #三个control-plane
server app2 192.168.56.173:6443 check
server app3 192.168.56.174:6443 check
启动,并查看端口是否到位
[root@k8s5 haproxy]# systemctl start haproxy
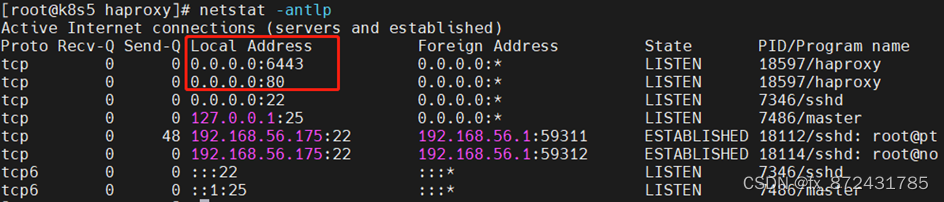
监控页面:http://192.168.56.175/status 查看haproxy的状态

测试成功后关闭服务,不要设置自启动
[root@k8s5 haproxy]# systemctl stop haproxy
设置免密
[root@k8s5 haproxy]# ssh-keygen
[root@k8s5 haproxy]# ssh-copy-id k8s6
k8s6同样工作
拷贝配置文件
[root@k8s5 haproxy]# scp haproxy.cfg k8s6:/etc/haproxy/
测试服务
[root@k8s6 haproxy]# systemctl restart haproxy
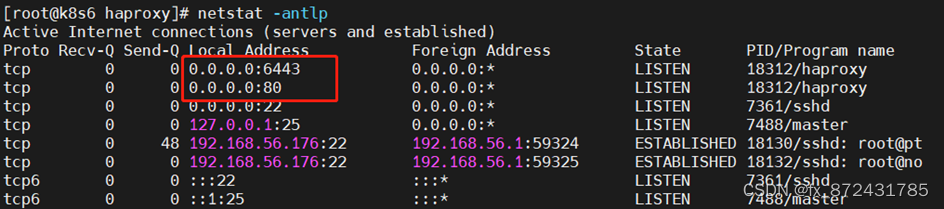
[root@k8s6 haproxy]# systemctl stop haproxy
pacemaker高可用
编辑repo源,加入高可用软件源套件路径
[root@k8s5 ~]# cd /etc/yum.repos.d/
[root@k8s5 yum.repos.d]# vim dvd.repo
[dvd]
name=rhel7.6
baseurl=file:///media
gpgcheck=0
[HighAvailability]
name=rhel7.6 HighAvailability
baseurl=file:///media/addons/HighAvailability
gpgcheck=0
同步配置文件
[root@k8s5 yum.repos.d]# scp dvd.repo k8s6:/etc/yum.repos.d/
两台同步安装软件,安装并开启pacemaker服务,
[root@k8s5 yum.repos.d]# yum install -y pacemaker pcs psmisc policycoreutils-python
[root@k8s6 ~]# yum install -y pacemaker pcs psmisc policycoreutils-python
[root@k8s5 ~]# systemctl enable --now pcsd.service
[root@k8s5 ~]# ssh k8s6 systemctl enable --now pcsd.service
设置用户密码
[root@k8s5 ~]# echo westos | passwd --stdin hacluster
[root@k8s5 ~]# ssh k8s6 'echo westos | passwd --stdin hacluster'
节点认证
[root@k8s5 ~]# pcs cluster auth k8s5 k8s6
Username: hacluster
Password: westos
k8s5: Authorized
k8s6: Authorized
创建集群
[root@k8s5 ~]# pcs cluster setup --name mycluster k8s5 k8s6
Destroying cluster on nodes: k8s5, k8s6...
k8s6: Stopping Cluster (pacemaker)...
k8s5: Stopping Cluster (pacemaker)...
k8s6: Successfully destroyed cluster
k8s5: Successfully destroyed cluster
Sending 'pacemaker_remote authkey' to 'k8s5', 'k8s6'
k8s5: successful distribution of the file 'pacemaker_remote authkey'
k8s6: successful distribution of the file 'pacemaker_remote authkey'
Sending cluster config files to the nodes...
k8s5: Succeeded
k8s6: Succeeded
Synchronizing pcsd certificates on nodes k8s5, k8s6...
k8s5: Success
k8s6: Success
Restarting pcsd on the nodes in order to reload the certificates...
k8s5: Success
k8s6: Success
启动集群,启动所有节点
[root@k8s5 ~]# pcs cluster start --all
k8s5: Starting Cluster (corosync)...
k8s6: Starting Cluster (corosync)...
k8s6: Starting Cluster (pacemaker)...
k8s5: Starting Cluster (pacemaker)...
开机自启
[root@k8s5 ~]# pcs cluster enable --all
k8s5: Cluster Enabled
k8s6: Cluster Enabled
禁用stonith,如当5这个点宕掉了,6就会让其断开连接,并且重启,作为新的backup
[root@k8s5 ~]# pcs property set stonith-enabled=false

添加集群资源
创建vip,调用脚本,IP地址不能别占用,监控ip30s依次
[root@k8s5 ~]# pcs resource create vip ocf:heartbeat:IPaddr2 ip=192.168.56.200 op monitor interval=30s
5的网卡上出现ip

将proxy开启自启权限交给集群,用op监控60s一次
[root@k8s5 ~]# pcs resource create haproxy systemd:haproxy op monitor interval=60s
添加组,约束vip和haproxy必须在同一个节点,并按照定义的顺序启动
[root@k8s5 ~]# pcs resource group add hagroup vip haproxy

此时vip掉了过30s可自动上线,haproxy停掉,60s自动重启上线,实现高可用和负载均衡。
部署containerd
禁用所有节点docker和cri-docker服务,在k8s1.24之后可直接调用containerd,所以直接绕过。
[root@k8s2 ~]# systemctl disable --now docker
[root@k8s2 ~]# systemctl disable --now cri-docker
修改配置
默认配置复制到config里
[root@k8s2 ~]# containerd config default | tee /etc/containerd/config.toml
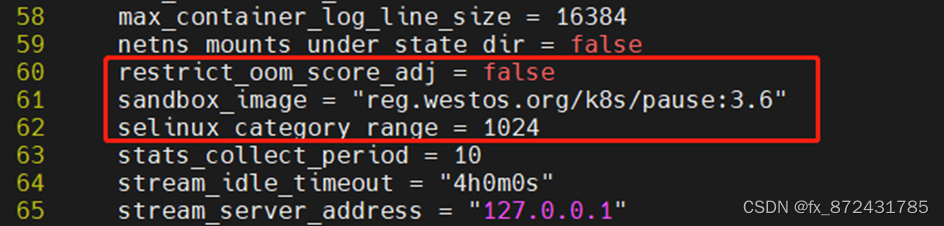
修改部分内容,将镜像路径修改为仓库,方便拉取,SystemdCgroup开启
[root@k8s2 ~]# cd /etc/containerd/
[root@k8s2 containerd]# vim config.toml
...
sandbox_image = "reg.westos.org/k8s/pause:3.6"
...
SystemdCgroup = true

测试containerd
启动
[root@k8s2 containerd ]# systemctl enable --now containerd
cri工具,代替docker使用,指定cri软链接到/run
[root@k8s2 ~]# crictl config runtime-endpoint unix:///run/containerd/containerd.sock
因为路径不同,cri重新拉取镜像
[root@k8s2 ~]# crictl img
[root@k8s2 docker]# crictl pull reg.westos.org/k8s/pause:3.6
containerd连接仓库
配置harbor私有仓库
[root@k8s2 containerd]# vim config.toml
...
[plugins."io.containerd.grpc.v1.cri".registry]
config_path = "/etc/containerd/certs.d"

创建路径
[root@k8s2 containerd]# mkdir -p /etc/containerd/certs.d/docker.io
访问默认的docker.io仓库时,直接访问仓库,并允许以下动作
[root@k8s2 containerd]# vim /etc/containerd/certs.d/docker.io/hosts.toml
server = "https://registry-1.docker.io"
[host."https://reg.westos.org"]
capabilities = ["pull", "resolve", "push"]
skip_verify = true #跳过校验
拷贝证书
[root@k8s2 containerd]# mkdir -p /etc/containerd/certs.d/reg.westos.org
[root@k8s2 containerd]# cp /etc/docker/certs.d/reg.westos.org/ca.crt /etc/containerd/certs.d/reg.westos.org/
重启服务
[root@k8s2 containerd]# systemctl restart containerd
拉取镜像成功
[root@k8s2 containerd]# crictl pull myapp:v1

配置其它节点
[root@k8s2 containerd]# scp -r certs.d/ config.toml k8s3:/etc/containerd/
[root@k8s2 containerd]# scp -r certs.d/ config.toml k8s4:/etc/containerd/
其它节点启动containerd服务
[root@k8s3 docker]# systemctl disable --now docker cri-docker
[root@k8s3 docker]# systemctl enable --now containerd
[root@k8s3 docker]# crictl config runtime-endpoint unix:///run/containerd/containerd.sock
[root@k8s4 ~]# systemctl disable --now docker cri-docker
[root@k8s4 ~]# systemctl enable --now containerd
[root@k8s4 ~]# crictl config runtime-endpoint unix:///run/containerd/containerd.sock
部署control-plane
清理所有节点calico插件,纯净实验环境
[root@k8s2 ~]# cd /etc/cni/net.d/
[root@k8s2 net.d]# ls
10-calico.conflist calico-kubeconfig
[root@k8s2 net.d]# rm -fr *
加载内核模块
[root@k8s2 ~]# vim /etc/modules-load.d/k8s.conf
overlay
br_netfilter
桥接出来
[root@k8s2 ~]# modprobe overlay
[root@k8s2 ~]# modprobe br_netfilter
[root@k8s2 ~]# vim /etc/sysctl.d/docker.conf
net.bridge.bridge-nf-call-iptables=1
net.bridge.bridge-nf-call-ip6tables=1
net.ipv4.ip_forward=1
[root@k8s2 ~]# sysctl --system
确认软件版本
[root@k8s2 ~]# rpm -q kubeadm kubelet kubectl
kubeadm-1.24.0-0.x86_64
kubelet-1.24.0-0.x86_64
kubectl-1.24.0-0.x86_64
初始化集群
生成初始化配置文件
[root@k8s2 ~]# kubeadm config print init-defaults > kubeadm-init.yaml
修改配置
[root@k8s2 ~]# vim kubeadm-init.yaml
apiVersion: kubeadm.k8s.io/v1beta3
bootstrapTokens:
- groups:
- system:bootstrappers:kubeadm:default-node-token
token: abcdef.0123456789abcdef
ttl: 24h0m0s
usages:
- signing
- authentication
kind: InitConfiguration
localAPIEndpoint:
advertiseAddress: 192.168.56.172 #本机ip
bindPort: 6443
nodeRegistration:
criSocket: unix:///var/run/containerd/containerd.sock
imagePullPolicy: IfNotPresent
name: k8s2 #本机主机名
taints: null
---
apiServer:
timeoutForControlPlane: 4m0s
apiVersion: kubeadm.k8s.io/v1beta3
certificatesDir: /etc/kubernetes/pki
clusterName: kubernetes
controlPlaneEndpoint: "192.168.56.200:6443" #负载均衡vip地址
controllerManager: {}
dns: {}
etcd:
local:
dataDir: /var/lib/etcd
imageRepository: reg.westos.org/k8s #本地私有仓库
kind: ClusterConfiguration
kubernetesVersion: 1.24.0
networking:
dnsDomain: cluster.local
podSubnet: 10.244.0.0/16 #pod分配地址段
serviceSubnet: 10.96.0.0/12
scheduler: {}
---
apiVersion: kubeproxy.config.k8s.io/v1alpha1 #配置ipvs模式
kind: KubeProxyConfiguration
mode: ipvs
初始化集群
[root@k8s2 ~]# kubeadm init --config kubeadm-init.yaml --upload-certs

部署网络组件
[root@k8s2 ~]# vim kube-flannel.yml

[root@k8s2 ~]# kubectl apply -f kube-flannel.yml
添加其它control-plane节点
[root@k8s3 ~]# kubeadm join 192.168.56.200:6443 --token abcdef.0123456789abcdef --discovery-token-ca-cert-hash sha256:8845bd441093179e02b51a239075a64b5386085bb702c11397c21abebb132d25 --control-plane --certificate-key 4e9c2d27983486ddabf62c3572463da5b3101b9fa185f17bfa8a265d4604d099
[root@k8s4 ~]# kubeadm join 192.168.56.200:6443 --token abcdef.0123456789abcdef --discovery-token-ca-cert-hash sha256:8845bd441093179e02b51a239075a64b5386085bb702c11397c21abebb132d25 --control-plane --certificate-key 4e9c2d27983486ddabf62c3572463da5b3101b9fa185f17bfa8a265d4604d099
查看节点,三个控制节点
[root@k8s2 ~]# kubectl get node
NAME STATUS ROLES AGE VERSION
k8s2 Ready control-plane 3m50s v1.24.0
k8s3 Ready control-plane 39s v1.24.0
k8s4 Ready control-plane 28s v1.24.0
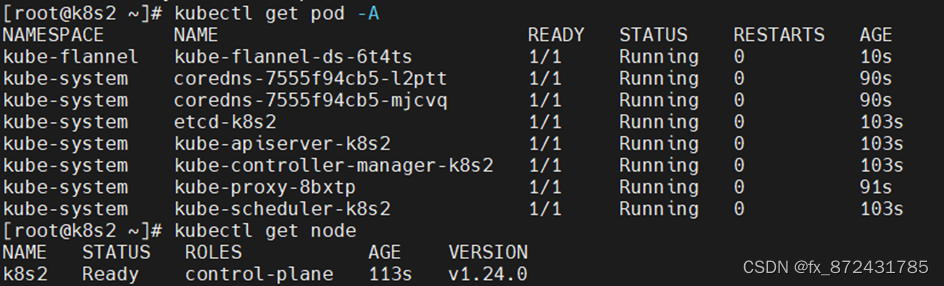
执行语句,其他节点也都可以操作集群
![]()
本实验的3个节点,允许down一台control-plane节点,down的节点重启后自动加入集群

部署worker node
新添加的节点需要初始化配置
- 禁用selinux、firewalld、swap分区
- 部署containerd
- 安装kubelet、kubeadm、kubectl
- 配置内核模块
执行token命令
[root@k8s7 ~]# kubeadm join 192.168.56.200:6443 --token abcdef.0123456789abcdef --discovery-token-ca-cert-hash sha256:8845bd441093179e02b51a239075a64b5386085bb702c11397c21abebb132d25
测试
[root@k8s2 ~]# kubectl get node
NAME STATUS ROLES AGE VERSION
k8s2 Ready control-plane 50m v1.24.0
k8s3 Ready control-plane 47m v1.24.0
k8s4 Ready control-plane 46m v1.24.0
k8s7 Ready <none> 21m v1.24.0
创建pod
[root@k8s2 ~]# kubectl create deployment myapp --image myapp:v1
查看pod
[root@k8s2 ~]# kubectl get pod -o wide
NAME READY STATUS RESTARTS AGE IP NODE NOMINATED NODE READINESS GATES
myapp-67984c8646-q9bmm 1/1 Running 0 19m 10.244.3.3 k8s7 <none> <none>


 1362
1362


 被折叠的 条评论
为什么被折叠?
被折叠的 条评论
为什么被折叠?
 到【灌水乐园】发言


