


🧑🎓 个人主页:Silence Lamb
📖 本章内容:【 基于MQTT实现消息的发布订阅】
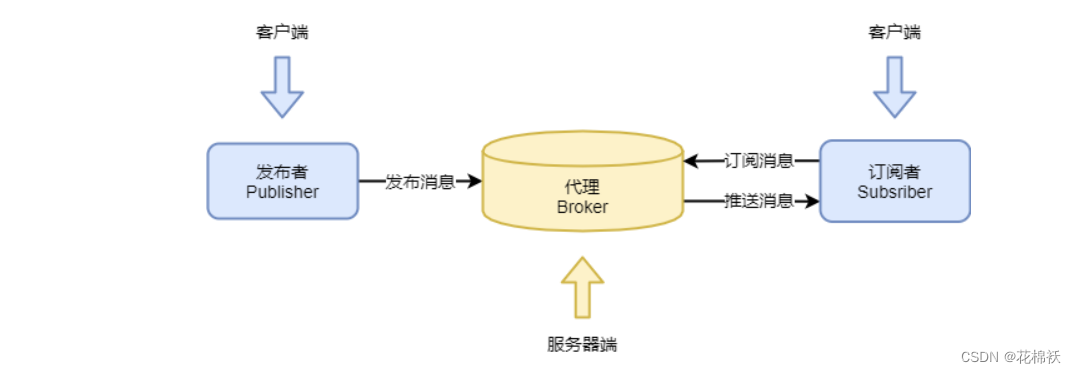
一、MQTT介绍
- 实现MQTT协议需要客户端和服务器端通讯完成
- 在通讯过程中, MQTT协议中有三种身份:发布者(Publish)、代理(Broker)(服务器)、订阅者(Subscribe)
- 其中,消息的发布者和订阅者都是客户端,消息代理是服务器,消息发布者可以同时是订阅者
二、实现MQTT
2.1【引入依赖】
<!--mqtt-->
<dependency>
	<groupId>org.springframework.boot</groupId>
	<artifactId>spring-boot-starter-integration</artifactId>
</dependency>
<dependency>
	<groupId>org.springframework.integration</groupId>
	<artifactId>spring-integration-stream</artifactId>
</dependency>
<dependency>
	<groupId>org.springframework.integration</groupId>
	<artifactId>spring-integration-mqtt</artifactId>
</dependency>
2.2【配置信息】
- 👉🏽可以不做任何更改
mqtt:
  username: silencelamb
  password: silencelamb # 密码
  hostUrl: tcp://broker.emqx.io:1883 # tcp://ip:端口
  clientId: mqttx_ec44e412 # 客户端id
  defaultTopic: silencelamb/# # 订阅主题
  timeout: 1000 # 超时时间 (单位:秒)
  keepalive: 60 # 心跳 (单位:秒)
  enabled: false # 是否使能mqtt功能
- 如果客户端订阅主题 topic/test/player1/#,它会收到使用下列主题名发布的消息
topic/test/player1

topic/test/player1/ranking

topic/test/player1/score/wimbledon
- 👉🏽读取配置信息
/**
 * @Author Michale
 * @CreateDate 2022/9/4
 * @Describe 读取MQQT配置信息
 */
@Data
@Component
@ConfigurationProperties(prefix = "mqqt")
public class MQQTProperties {

    @ApiModelProperty("用户名")
    private String username;

    @ApiModelProperty("密码")
    private String password;

    @ApiModelProperty("地址")
    private String hostUrl;

    @ApiModelProperty("客户端id")
    private String clientId;

    @ApiModelProperty("订阅主题")
    private String defaultTopic;

    @ApiModelProperty("超时时间")
    private int timeout;

    @ApiModelProperty("心跳")
    private int keepalive;

    @ApiModelProperty("MQQT开关")
    private boolean enabled;
}
2.3【MQQT配置类】
MQTT通用常量配置
/**
 * @author SilenceLamb
 * 2023年02月20日
 * @apiNote MQTT通用常量配置
 */
public class MqttConstant {
    @ApiModelProperty("mqtt 出站通道")
    public static final String MQTT_OUTBOUND_CHANNEL = "mqttOutboundChannel";

    @ApiModelProperty("mqtt 输入通道")
    public static final String MQTT_INPUT_CHANNEL = "mqttInputChannel";

    @ApiModelProperty("mqtt 收到主题")
    public static final String MQTT_RECEIVED_TOPIC = "mqttReceivedTopic";
}
创建MqttConfig配置类
/**
 * @author SilenceLamb
 * @apiNote MQTT配置类
 */
@Slf4j
@Configuration
public class MqttConfig {
    @Resource
    private MQTTProperties mqttProperties;
}
1【创建客户端工厂】
首先连接mqtt需要一个客户端, 那么我们就开一个客户端工厂
- 👉🏽 创建MqttPahoClientFactory
- 👉🏽 设置MQTT Broker连接属性
    /**
     * 创建MqttPahoClientFactory
     * 设置MQTT Broker连接属性
     */
    @Bean
    public MqttPahoClientFactory mqttClientFactory() {
        //创建MqttPahoClientFactory客户端工厂,用来创建MQTT客户端
        DefaultMqttPahoClientFactory factory = new DefaultMqttPahoClientFactory();
        MqttConnectOptions options = new MqttConnectOptions();
        //设置要用于连接的用户名
        options.setUserName(mqttProperties.getUsername());
        //设置用于连接的密码
        options.setPassword(mqttProperties.getPassword().toCharArray());
        //设置“保持活动状态”间隔
        options.setKeepAliveInterval(mqttProperties.getKeepalive());
        //设置如果连接丢失,客户端是否自动尝试重新连接到服务器
        options.setAutomaticReconnect(true);
        //设置连接超时值
        options.setConnectionTimeout(mqttProperties.getTimeout());
        //设置“最大飞行时间”。请在高流量环境中增加此值
        options.setMaxInflight(1000000);
        //多个服务器地址时处理
        options.setServerURIs(mqttProperties.getHostUrl().split(","));
        factory.setConnectionOptions(options);
        return factory;
    }
2【生产端的Handler】
创建出站消息通道
    /**
     * 出站消息通道
     * @return 消息通道
     */
    @Bean
    public MessageChannel mqttOutboundChannel() {
        return new DirectChannel();
    }
消息生产者 默认主题
    /**
     * 消息生产者 默认主题
     *
     * @return 消息处理程序
     */
    @Bean
    @ServiceActivator(inputChannel = MQTT_OUTBOUND_CHANNEL)
    public MessageHandler mqttOutbound() {
        //clientId每个连接必须唯一,否则,两个相同的clientId相互挤掉线
        String clientIdStr = mqttProperties.getClientId() + new SecureRandom().nextInt(10);
        MqttPahoMessageHandler messageHandler = new MqttPahoMessageHandler(clientIdStr, mqttClientFactory());
        //设置默认主题
        messageHandler.setDefaultTopic(mqttProperties.getDefaultTopic());
        //设置异步  async如果为true,则调用方不会阻塞。而是在发送消息时等待传递确认。默认值为false(发送将阻塞,直到确认发送)
        messageHandler.setAsync(true);
        //设置异步事件
        messageHandler.setAsyncEvents(true);
        messageHandler.setDefaultQos(0);
        return messageHandler;
    }
    /**
     * 当async和async事件(async - events)都为true时, 将发出MqttMessageSentEvent
     * 它包含消息、主题、客户端库生成的消息id、clientId和clientInstance(每次连接客户端时递增)
     */
    @EventListener(MqttMessageSentEvent.class)
    public void mqttMessageSentEvent(MqttMessageSentEvent event) {
        log.info("发送信息: info={}", event.toString());
    }

    /**
     * 当async和async事件(async - events)都为true时, 将发出MqttMessageDeliveredEvent
     * 当客户端确认传递时,将发出MqttMessageDeliveredEvent
     * 它包含messageId、clientId和clientInstance,使传递与发送相关。
     */
    @EventListener(MqttMessageDeliveredEvent.class)
    public void mqttMessageDeliveredEvent(MqttMessageDeliveredEvent event) {
        log.info("发送成功信息:  info={}", event.toString());
    }
3【消费端的Handler】
创建入站消息管道
    /**
     * 入站消息通道
     *
     * @return 消息通道
     */
    @Bean
    public MessageChannel mqttInputChannel() {
        return new DirectChannel();
    }
👉🏽 通过通道获取订阅的数据
    /**
     * 配置client,监听的topic
     */
    @Bean
    public MessageProducer inbound() {
        //clientId每个连接必须唯一,否则,两个相同的clientId相互挤掉线
        String serverIdStr = mqttProperties.getClientId() + UUID.randomUUID().toString();
        //MQTT 卫生消息驱动通道适配器
        MqttPahoMessageDrivenChannelAdapter adapter = new MqttPahoMessageDrivenChannelAdapter(serverIdStr, mqttClientFactory(), mqttProperties.getDefaultTopic());
        //设置转换器
        adapter.setConverter(new DefaultPahoMessageConverter());
        //设置完成超时
        adapter.setCompletionTimeout(mqttProperties.getTimeout());
        //设置服务质量
        adapter.setQos(0);
        //设置输出通道
        adapter.setOutputChannel(mqttInputChannel());
        return adapter;
    }
处理接收到的消息
    /**
     * 处理接收到的消息
     *
     * @return 接收客户端发来的的消息
     */
    @Bean
    @ServiceActivator(inputChannel = MQTT_INPUT_CHANNEL)
    public MessageHandler handler() {
        return message -> {
            MqttDeliveryToken token = new MqttDeliveryToken();
            String payload = message.getPayload().toString();
            String topic = message.getHeaders().get(MqttHeaders.RECEIVED_TOPIC).toString();
            //处理订阅到的所有的数据
            System.out.println(payload);
        };
    }
    /**
     * @apiNote 成功订阅到主题
     */
    @EventListener(MqttSubscribedEvent.class)
    public void mqttSubscribedEvent(MqttSubscribedEvent event) {
        log.info("成功订阅到主题:  info={}", event.toString());
    }
2.4【MQTT发送网关】
- 👉🏽 建议直接复制
package com.silencelamb.mqtt.service;

import org.springframework.integration.annotation.MessagingGateway;
import org.springframework.integration.mqtt.support.MqttHeaders;
import org.springframework.messaging.handler.annotation.Header;
import org.springframework.stereotype.Service;

import static com.silencelamb.mqtt.constant.MqttConstant.MQTT_OUTBOUND_CHANNEL;

/**
 * @Author Silencelamb
 * @apiNote  发送消息
 */
@Service("mqttSend")
@MessagingGateway(defaultRequestChannel = MQTT_OUTBOUND_CHANNEL)
public interface MqttSend {

    /**
     * 定义重载方法,用于消息发送
     *
     * @param payload 消息报文
     */
    void send(String payload);

    /**
     * 指定topic进行消息发送
     *
     * @param topic   主题
     * @param payload 消息报文
     */
    void send(@Header(MqttHeaders.TOPIC) String topic, String payload);

    /**
     * 指定topic和通道 进行消息发送
     *
     * @param topic   主题
     * @param qos     对消息处理的几种机制。
     *                0 表示的是订阅者没收到消息不会再次发送,消息会丢失。
     *                1 表示的是会尝试重试,一直到接收到消息,但这种情况可能导致订阅者收到多次重复消息。
     *                2 多了一次去重的动作,确保订阅者收到的消息有一次。
     * @param payload 消息报文
     */
    void send(@Header(MqttHeaders.TOPIC) String topic, @Header(MqttHeaders.QOS) int qos, String payload);
}
- 引入
import org.springframework.messaging.handler.annotation.Header;
2.5【处理接收到的消息】
/**
 * @Author SilenceLamb
 * @Describe 处理接收到的消息
 */
@Slf4j
@Component
public class MqttMessageHandle implements MessageHandler {

    /**
     * Handle the given message.
     *
     * @param message the message to be handled
     * @throws MessagingException if the handler failed to process the message
     */
    @Override
    @ServiceActivator(inputChannel = MQTT_INPUT_CHANNEL)
    public void handleMessage(Message<?> message) throws MessagingException {
        String topic = message.getHeaders().get(MQTT_RECEIVED_TOPIC).toString();
        String payload = message.getPayload().toString();
        log.info("订阅的主题:{} 发送的内容:{}", topic, payload);
    }
}
2.6【演示发送消息MQTT】
- 官网下载:https://mqttx.app/zh
- GitHub 下载:https://github.com/emqx/MQTTX/releases
创建消息实体类
/**
 * @Author Silencelamb
 * @CreateDate 2022/9/16
 * @Describe Mqqt消息体
 */
@Data
public class MqqtVo {

    @ApiModelProperty("订阅的主题")
    public  String topic ;

    @ApiModelProperty("发送的内容")
    public  String payload ;

}
创建客户端连接
mqtt:
username: silencelamb
password: silencelamb # 密码
hostUrl: tcp://broker.emqx.io:1883 # tcp://ip:端口
clientId: mqttx_ec44e412 # 客户端id
defaultTopic: silencelamb/# # 订阅主题
timeout: 1000 # 超时时间 (单位:秒)
keepalive: 60 # 心跳 (单位:秒)
enabled: false # 是否使能mqtt功能

👉🏽发送消息到MQTT客户端
-
客户端订阅主题
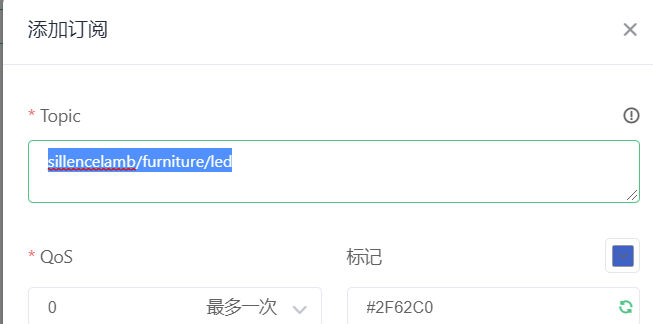
-
创建controller控制层
    /**
     * 发送消息
     *
     * @param mqttVo 消息内容
     * @return
     */
    @PostMapping("/led")
    public AjaxResult openLed(@RequestBody MqttVo mqttVo) {
        sendMessage.send(mqttVo.getTopic(), mqttVo.getPayload());
        return new AjaxResult().success();
    }
- 发送的消息内容
{

 "payload": "1",

 "topic": "sillencelamb/furniture/led"

}
-
http://localhost:8081/mqtt/led
-
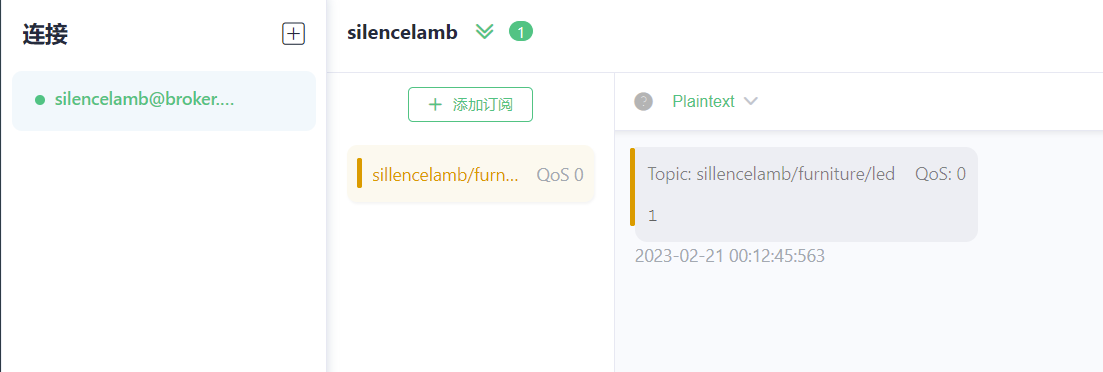
客户端接收到的消息
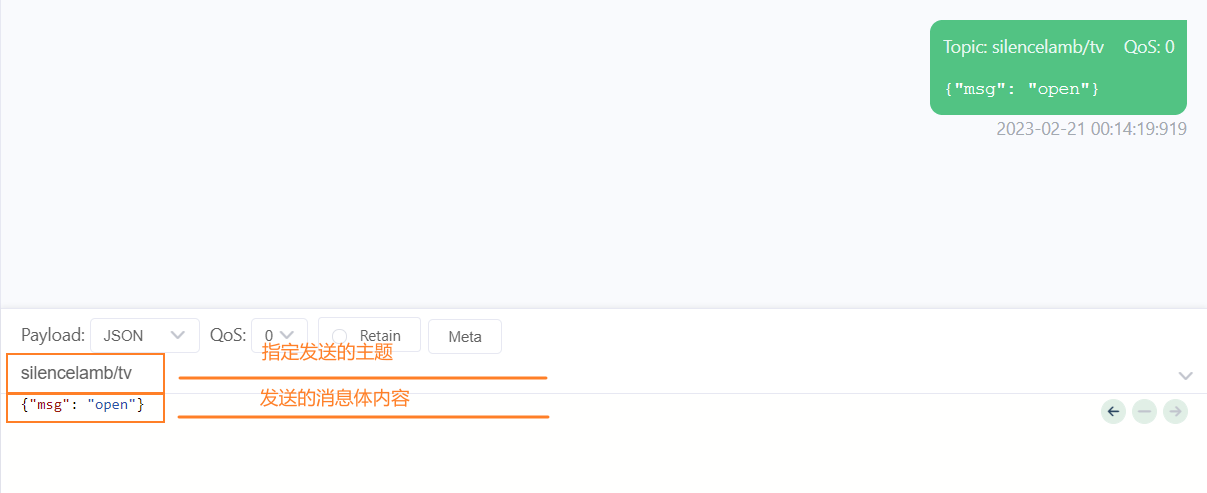
👉🏽MQQT客户端发送
-
使用客户端发送消息
-
控制台打印的信息


 1647
1647


 被折叠的 条评论
为什么被折叠?
被折叠的 条评论
为什么被折叠?
 到【灌水乐园】发言


