


1. Spring框架
1.1 Spring简介
- Spring就是分层的JavaSE应用full-strack轻量级开源框架,IOC(Inverse Of Control:反转控制)和AOP(Aspect Oriented Programming:面向切面编程)
- 什么是轻量级?一般情况下如果框架api使用比较简单,就叫轻量级
1.2 Spring的架构组成
1.2.1 Spring框架

最重要的核心容器Core Container:分为4个部分
- Beans ,容器主要放的就是定义的bean对象
- Core,核心
- Context,上下文
- SpEL,就是Spring的EL表达式
1.2.2 工厂
- CoreContariner核心容器,其实是搭建并管理了工厂
- 是工厂的设计模式
- 工厂中是用来生产项目中一个一个的对象
- 因此使用spring最重要的就是搭建工厂
- 该工厂加载配置文件:.xml文件,生产配置中记录的对象,我们通过getBean方法调用就可以了
1.3 控制反转
1.3.1 例题讲解
什么是反转控制? 反转了依赖关系的满足方式,由之前的直接创建依赖对象,变为由工厂推送。(变主动为被动,即反转)解决了具有依赖关系的组件之间的强耦合
举例说明
- 比如UserServiceImpl强耦合了UserDaoImpl,利用了反转控制,可以使UserServiceImpl不再引用任何一个UserDao的实现类例如UserDaoImpl,在需要UserDaoImpl的位置,我们只给一个属性UserDao userDao;并定义set/get方法,允许userDao属性接收spring赋值
public class UserServiceImpl implements UserService{

	private UserDao userDao;
    @Override
    public List<User> queryUser() {
    	List<User> list = userDao.queryUser();
        return list;
    }
    public void setUserDao(UserDao userDao){
    	this.userDao = userDao;
    }
}
1.3.2 先写一个spring-context.xml文件
- 上面我们说过了,反转控制,那么spring是怎么给UserServiceImpl类的UserDao属性赋值的呢?假设我们赋值的是UserDao的实现类UserDaoImpl
- 首先,我们在.xml配置文件中定义一个<beans>标签,里面写<bean></bean>
- <bean>标签的id随便给,id=“userDaoImpl”、class=”com/lyx/dao/impl/UserDaoImpl“,就是UserDaoImpl的路径

1.3.3 controller层
Control层调用Sevice层的时候,如下调用
        ClassPathXmlApplicationContext context = new ClassPathXmlApplicationContext("/spring-context.xml");
        UserDaoImpl userDao = (UserDaoImpl)context.getBean("userDaoImpl");
        UserServiceImpl userService = new UserServiceImpl();
        userService.setUserDao(userDao);
        userService.queryPerson();
运行结果:这里成功调用了UserDaoImpl;
理解说明
- Spring框架加载这个.xml配置文件,
- 怎么加载?ClassPathXmlApplicationContext类加载
ApplicationContext context = new ClassPathXmlApplicationContext("/spring-context.xml");
-
ClassPathXmlApplicationContext 是ApplicationContext接口的实现类,它是从类的根路径下加载配置文件
-
ApplicationContext接口,它代表应用上下文,可以通过它的实例获得Spring容器中的Bean对象
-
我们通过.getBean(”userDaoImpl“)生产对象
-
getBean()方法的参数给bean的id,返回的就是UserDaoImpl类型的对象,类型自己强转就行了
//Object userDaoImpl = context.getBean("userDaoImpl");
UserDaoImpl userDaoImpl = (UserDaoImpl)context.getBean("userDaoImpl");
- getBean方法的参数也可以是Class类型,这样就不需要强转了,因为你已经告诉它了,但是这种方法只适合只有一个UserDaoImpl,如果还有一个会报错
UserDaoImpl userDaoImpl = context.getBean(UserDaoImpl.class);
- 当然了,实现功能要先导Spring开发的基本包的坐标:Spring框架用到依赖
- 还有一点,.xml在项目加载的时候不会被编译到target测试文件里面,需要在pom.xml里面配置一个<build>
  <build>
        <resources>
            <resource>
                <directory>src/main/java</directory>
                <includes>
                    <include>*.xml</include>
                    <include>**/*.xml</include>
                </includes>
                <filtering>true</filtering>
            </resource>
        </resources>
    </build>
1.3.4 bean标签
<bean id="" class="" scope="" init-method="" destroy-method=""/>
id、class上面说过了
1.3.4.1 饿汉式、懒汉式
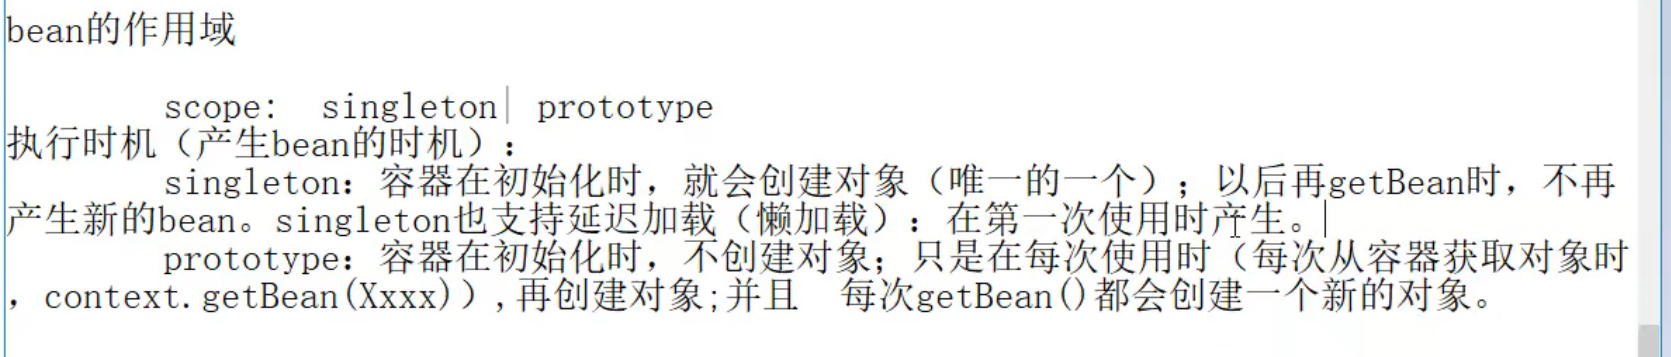
scope
- singleton单例
- bean标签有了属性scope=“singleton”,工厂被加载以后,也就是
ApplicationContext context = new ClassPathXmlApplicationContext("/spring-context.xml");
- 该行代码运行,工厂会创建,创建之后会将spring配置文件也就是(“/spring-context.xml”)配置文件中的所有对象都创建完成,spring-context.xml中我们定义了一个bean,如下
<?xml version="1.0" encoding="utf8" ?>
<beans xmlns="http://www.springframework.org/schema/beans"
       xmlns:xsi="http://www.w3.org/2001/XMLSchema-instance"
       xsi:schemaLocation="http://www.springframework.org/schema/beans
                           http://www.springframework.org/schema/beans/spring-beans.xsd
>

    <bean id="userService" class="com.lyx.service.impl.UserServiceImpl" scope="singleton">

    </bean>
</beans>
- 工厂会创建时直接创建该com.lyx.service.impl.UserServiceImpl的对象,以userService名称存放,getBean()调用
        ClassPathXmlApplicationContext context = new ClassPathXmlApplicationContext("/spring-context.xml");
        UserDaoImpl userService = (UserDaoImpl)context.getBean("userService");
        List<User> list = userService.queryUsers();
        for(User user : list){
        	System.out.println(user);
        }
- prototype多例
<?xml version="1.0" encoding="utf8" ?>
<beans xmlns="http://www.springframework.org/schema/beans"
       xmlns:xsi="http://www.w3.org/2001/XMLSchema-instance"
       xsi:schemaLocation="http://www.springframework.org/schema/beans
                           http://www.springframework.org/schema/beans/spring-beans.xsd
>

    <bean id="userService" class="com.lyx.service.impl.UserServiceImpl" scope="prototype">

    </bean>
</beans>
- 多列对应懒汉式,在运行
ApplicationContext context = new ClassPathXmlApplicationContext("/spring-context.xml");
- 该行代码时,工厂不会创建bean对象,只有我们调用
getBean(“userService”);时才会创建对象,多列的bean,需要JVM垃圾回收时才会销毁,单列的bean随工厂关闭才销毁
context.close();
1.3.4.2 其他属性
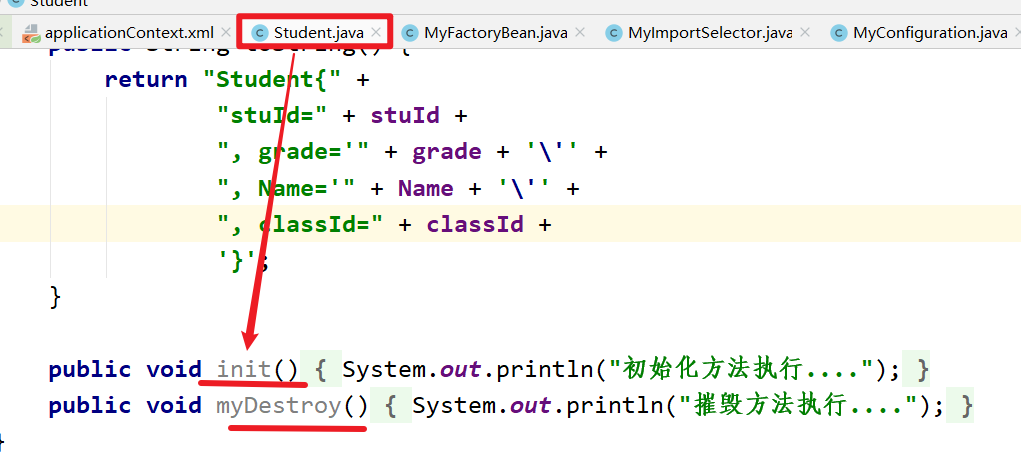
init-method
- 在class定义的包.类里面定义的初始化方法myInit()
public class UserServiceImpl implements UserService {

    private UserDao userDao;

    public void setUserDao(UserDao userDao) {
        this.userDao = userDao;
    }

    public List<User> queryUsers() {
        List<User> users = userDao.queryUsers();
        return users;
    }
    public void myDestroy(){
        System.out.println("销毁方法执行了");
    }
    public void myInit(){
        System.out.println("初始化方法执行了");
    }

}
在bean标签添加init-method属性,值就是刚刚写的myInit()方法
<?xml version="1.0" encoding="utf8" ?>
<beans xmlns="http://www.springframework.org/schema/beans"
       xmlns:xsi="http://www.w3.org/2001/XMLSchema-instance"
       xsi:schemaLocation="http://www.springframework.org/schema/beans
                           http://www.springframework.org/schema/beans/spring-beans.xsd
>

    <bean id="userService" class="com.lyx.service.impl.UserServiceImpl" scope="prototype" init-method="myInit">

    </bean>
</beans>
destroy-method
- 在class定义的包.类里面定义销毁方法myDestroy()
public class UserServiceImpl implements UserService {

    private UserDao userDao;

    public void setUserDao(UserDao userDao) {
        this.userDao = userDao;
    }

    public List<User> queryUsers() {
        List<User> users = userDao.queryUsers();
        return users;
    }
    public void myDestroy(){
        System.out.println("销毁方法执行了");
    }
    public void myInit(){
        System.out.println("初始化方法执行了");
    }

}
在bean标签添加destroy-method属性,值就是刚刚写的myDestroy()方法
<?xml version="1.0" encoding="utf8" ?>
<beans xmlns="http://www.springframework.org/schema/beans"
       xmlns:xsi="http://www.w3.org/2001/XMLSchema-instance"
       xsi:schemaLocation="http://www.springframework.org/schema/beans
                           http://www.springframework.org/schema/beans/spring-beans.xsd
>

    <bean id="userService" class="com.lyx.service.impl.UserServiceImpl" scope="prototype" init-method="myInit()" destroy-method="myDestroy">

    </bean>
</beans>
- 后台自动执行销毁方法,要手动.close才能看见销毁方法有没有执行
- 上面介绍多列的时候提到过,手动.close执行会销毁方法,需要的是单列模式,如果bean对象是多列,该销毁方法还是看不见
        ApplicationContext context = new ClassPathXmlApplicationContext("/spring-context.xml");
        Object userDao = context.getBean("userDao");
        ((ClassPathXmlApplicationContext)context).close();//强转为ApplicationContext子类
注解方式:
测试:
2. Spring配置文件
2.1 依赖注入之Set注入
- 在Spring创建对象的同时,为其属性赋值,我们称为依赖注入
- 上面讲解反转控制的时候我们在UserServiceImpl中定义了userDao属性的get/set方法,
public class UserServiceImpl implements UserService{

	private UserDao userDao;
    @Override
    public List<User> queryUser() {
    	List<User> list = userDao.queryUser();
        return list;
    }
    public void setUserDao(UserDao userDao){
    	this.userDao = userDao;
    }
}
- 在调用userServiceImpl的时候我们是getBean返回了userDao,并通过set方法赋值给userServiceImpl的userDao属性,才成功调用
public class Controller{
	public static void main(String[] args){
        ClassPathXmlApplicationContext context = new ClassPathXmlApplicationContext("/spring-context.xml");
        UserDaoImpl userDao = (UserDaoImpl)context.getBean("userDaoImpl");
        UserServiceImpl userService = new UserServiceImpl();
        userService.setUserDao(userDao);
        userService.queryPerson();
	}
}
- 现在来用依赖注入
- 直接getBean返回userServiceImpl对象
- 我们在.xml文件中创建userServiceImpl对象的bean同时,为其属性userDao赋值
- 配置在一个<property>标签中
- 这就是依赖注入
<?xml version="1.0" encoding="utf8" ?>
<beans xmlns="http://www.springframework.org/schema/beans"
       xmlns:xsi="http://www.w3.org/2001/XMLSchema-instance"
       xsi:schemaLocation="http://www.springframework.org/schema/beans
                           http://www.springframework.org/schema/beans/spring-beans.xsd"
>

    <bean id="userDaoImpl" class="com.lyx.dao.impl.userDaoImpl"></bean>
    <bean id="userServiceImpl" class="com.lyx.service.impl.userServiceImpl">
        <property name="userDao" ref="userDaoImpl"></property>
    </bean>
 </beans>

- 以后直接如下代码调用ServiceImpl类的方法
public class Controller{
	public static void main(String[] args){
        ClassPathXmlApplicationContext context = new ClassPathXmlApplicationContext("/spring-context.xml");
        UserServiceImpl userServiceImpl = (UserServiceImpl)context.getBean("userServiceImpl");
        userServiceImpl.queryPerson();
	}
}
- 对比一下之前的
public class Controller{
	public static void main(String[] args){
        ClassPathXmlApplicationContext context = new ClassPathXmlApplicationContext("/spring-context.xml");
        UserDaoImpl userDao = (UserDaoImpl)context.getBean("userDaoImpl");
        UserServiceImpl userService = new UserServiceImpl();
        userService.setUserDao(userDao);
        userService.queryPerson();
	}
}
- 以上代码在UserServiceImpl类中没有强耦合,我们把它所有要用到的对象,如userDaoImpl,都放到了容器中,spring搭建并管理工厂,工厂加载配置文件.xml文件,生产配置文件中记录的Bean对象
2.1.1 依赖注入之p命名空间注入
- 引入p命名空间
xmlns:p=“http://www.springframework.org/schema/p”


p:userDao-ref="userDao"相当于
<property name="userDao" ref="userDao"/>
p:username ="Gavin"相当于
<property name="username" value="Gavin"/>
完整代码如下:
   <?xml version="1.0" encoding="utf8" ?>
<beans xmlns="http://www.springframework.org/schema/beans"
       xmlns:p="http://www.springframework.org/schema/p"
       xmlns:xsi="http://www.w3.org/2001/XMLSchema-instance"
       xsi:schemaLocation="http://www.springframework.org/schema/beans
                           http://www.springframework.org/schema/beans/spring-beans.xsd
                           http://www.springframework.org/schema/p
                           http://www.springframework.org/schema/p/spring-p.xsd"
>
    <bean id="userDao" class="com.lyx.dao.impl.userDaoImpl"></bean>
    <bean id="userService" class="com.lyx.service.impl.userServiceImpl" p:userDao-ref="userDao"></bean>

</beans>
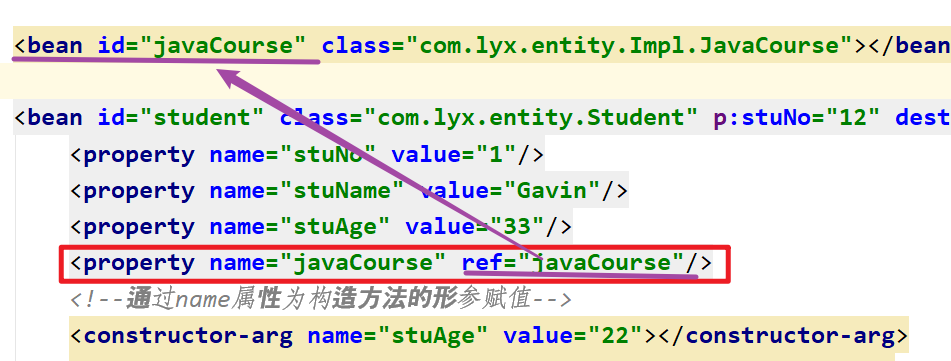
2.2 依赖注入之构造注入
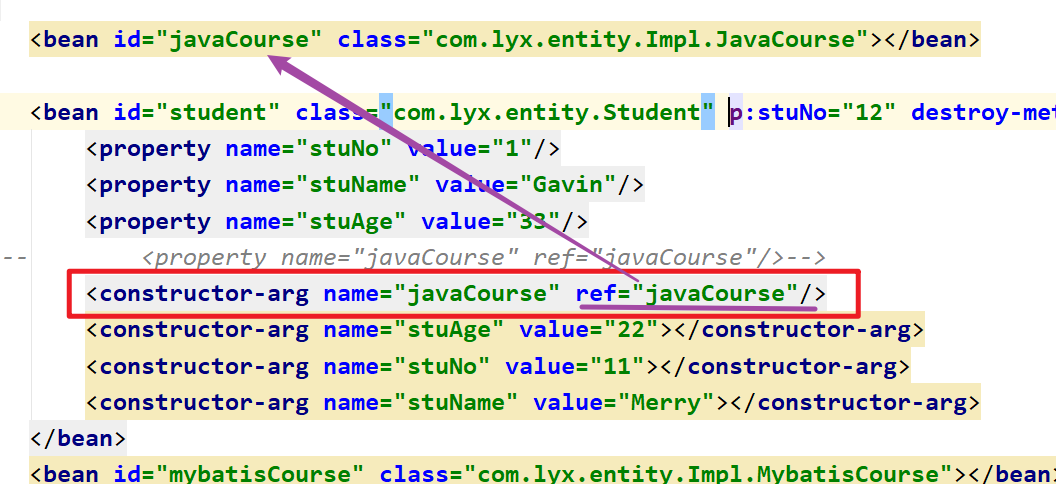
和以上差不多,只不过property标签换成了constructor-arg标签 该标签的name值为你当前bean的class值中类的构造方法的参数类型,ref的值就是<bean id=”userDao“ class=“com.lyx.dao.impl.UserDaoImpl”>的id值
   <?xml version="1.0" encoding="utf8" ?>
<beans xmlns="http://www.springframework.org/schema/beans"
       xmlns:p="http://www.springframework.org/schema/p"
       xmlns:xsi="http://www.w3.org/2001/XMLSchema-instance"
       xsi:schemaLocation="http://www.springframework.org/schema/beans
                           http://www.springframework.org/schema/beans/spring-beans.xsd
                           http://www.springframework.org/schema/p
                           http://www.springframework.org/schema/p/spring-p.xsd"
>
    <bean id="userDao" class="com.lyx.dao.impl.userDaoImpl"></bean>
    //set注入:2中方式
    //方式1
    <bean id="userService" class="com.lyx.service.impl.userServiceImpl" p:userDao-ref="userDao"></bean>
    //方式2
    <bean id="userServiceImpl" class="com.lyx.service.impl.userServiceImpl">
        <property name="userDao" ref="userDao"></property>
    </bean>

    //构造注入
    <bean id="userService" class="com.lyx.service.impl.userServiceImpl">
        <constructor-arg name="userDao" ref="userDao"></constructor-arg>
    </bean>

</beans>
对于构造注入,构造方法的形参,无论是String类型还是int、short、long类型,在赋值时都是value=“值”,因此建议,此种情况,需要配合name以及type属性指定一下
type属性是简单类型直接写类型名称,是对象写包名.类名
<bean id="userService" class="com.lyx.service.impl.userServiceImpl">
        <constructor-arg name="userDao" ref="userDao" type="com.lyx.dao.impl.userDaoImpl"></constructor-arg>
    </bean>
再举一个例子:
通过name属性为构造方法的形参赋值
不给name属性也能赋值,但是顺序必须一致
通过index属性也可以赋值

    <bean id="student" class="com.lyx.entity.Student" destroy-method="myDestroy" init-method="init">
        <property name="stuNo" value="1"/>
        <property name="stuName" value="Gavin"/>
        <property name="stuAge" value="33"/>
        <!--通过name属性为构造方法的形参赋值-->
        <constructor-arg name="stuAge" value="22"></constructor-arg>
        <constructor-arg name="stuNo" value="11"></constructor-arg>
        <constructor-arg name="stuName" value="Merry"></constructor-arg>
        <!--不给name属性也能赋值,但是顺序必须一致-->
        <constructor-arg value="11"></constructor-arg>
        <constructor-arg value="Merry"></constructor-arg>
        <constructor-arg value="22"></constructor-arg>
        <!--通过index属性也可以赋值-->
        <constructor-arg index="0" value="11"></constructor-arg>
        <constructor-arg index="1" value="Merry"></constructor-arg>
        <constructor-arg index="2" value="22"></constructor-arg>

    </bean>
以上构造方法的依赖注入有一种就够了,不然会报错,我为了方便写在一起。
当然了,UserServiceImpl类中要有构造方法
public class UserServiceImpl implements UserService{

	private UserDao userDao;
    @Override
    public List<User> queryUser() {
    	List<User> list = userDao.queryUser();
        return list;
    }
	 public userServiceImpl(userDaoImpl userDao) {
}
    public void setUserDao(UserDao userDao){
    	this.userDao = userDao;
    }
}
2.3 依赖注入之注入数据类型,set注入
- 以上注入都是把Dao注入给Service
- 除了对象的引用可以注入,普通数据类型,集合等到可以在容器中注入
- 比如Person类中的属性如下,有jdk8种数据类型,数组,集合,自建的Address类 ,有构造方法
- 注入实现如下

对于set类型、LIst类型、String[]数组类型。
<set> <list> <array>3个标签可以混着用
比如
private String[] hobbys;
依赖注入如下:
    <!-- 数组-->
    <property name="hobbys">
        <array>
            <value>football</value>
            <value>basketball</value>
        </array>
    </property>
也可以写成
    <!-- 数组-->
    <property name="hobbys">
        <list>
            <value>football</value>
            <value>basketball</value>
        </list>
    </property>
<list>也可以用<array>替换
这种混用的方式(不推荐),最好是Set用<set>,List用<list>,String[]用<array>
2.3.1 Person类
public class Address {
    private int id;
    private String city;

    public int getId() {return id; }
    public void setId(int id) {this.id = id;}
    public String getCity() {return city;}
    public void setCity(String city) { this.city = city;}
}
package com.lyx.entity;

import com.sun.xml.internal.ws.wsdl.writer.document.http.Address;

import javax.swing.*;
import javax.xml.ws.soap.Addressing;
import java.util.*;

public class Person {
    //基本数据类型
    private int id;
    private String name;
    private Date bornDate;
    //数组
    private String[] hobbys;
    //集合
    private Set<String> phones;
    private List<String> names;
    private Map<String,String> contries;
    //文件
    private Properties files;
    //自建类型
    private Address address;

    public int getId() { return id; }

    public void setId(int id) {this.id = id;}

    public String getName() {return name;}

    public void setName(String name) {this.name = name;}

    public Date getBornDate() {return bornDate;}

    public void setBornDate(Date bornDate) {this.bornDate = bornDate;}

    public String[] getHobbys() {return hobbys;}

    public void setHobbys(String[] hobbys) {this.hobbys = hobbys;}

    public Set<String> getPhones() {return phones;}

    public void setPhones(Set<String> phones) {this.phones = phones;}

    public List<String> getNames() {return names; }

    public void setNames(List<String> names) {this.names = names;}

    public Map<String, String> getContries() { return contries;}

    public void setContries(Map<String, String> contries) {this.contries = contries;}

    public Properties getFiles() {return files;}

    public void setFiles(Properties files) {this.files = files;}

    public Address getAddress() {return address;}

    public void setAddress(Address address) {this.address = address;}

    @Override
    public String toString() {
        return "Person{" +
                "id=" + id +
                ", name='" + name + '\'' +
                ", bornDate=" + bornDate +
                ", hobbys=" + Arrays.toString(hobbys) +
                ", phones=" + phones +
                ", names=" + names +
                ", contries=" + contries +
                ", files=" + files +
                ", address=" + address +
                '}';
    }
}
2.3.2 person-context.xml配置文件
<?xml version="1.0" encoding="utf8" ?>
<beans xmlns="http://www.springframework.org/schema/beans"
       xmlns:xsi="http://www.w3.org/2001/XMLSchema-instance"
       xsi:schemaLocation="http://www.springframework.org/schema/beans
                           http://www.springframework.org/schema/beans/spring-beans.xsd"
>
    <bean id="address" class="com.lyx.entity.Address">
        <property name="id" value="1"></property>
        <property name="city" value="China"></property>
    </bean>
	<bean name="person" class="com.lyx.entity.Person">
<!--    set注入-->
    <property name="id" value="1"></property>
    <property name="name" value="liuyuxin"></property>
    <property name="bornDate" value="2020/12/12 12:20:30"></property>
    <!-- 数组-->
    <property name="hobbys">
        <array>
            <value>football</value>
            <value>basketball</value>
        </array>
    </property>
    <!-- 集合-->
    <property name="phones">
        <set>
            <value>111</value>
            <value>222</value>
        </set>
    </property>
    <property name="names">
        <list>
            <value>tom</value>
            <value>jack</value>
        </list>
    </property>
    <property name="contries">
        <map>
            <entry key="zg" value="china"></entry>
            <entry key="els" value="russia"></entry>
        </map>
    </property>
    <property name="files">
        <props>
            <prop key="url">jdbc:mysql:xxx</prop>
            <prop key="username">root</prop>
        </props>
    </property>
    <!-- 对象-->
    <property name="address" ref="address"></property>
	</bean>
</beans>
2.4 引入其他配置文件

<?xml version="1.0" encoding="UTF8" ?>
<beans xmlns="http://www.springframework.org/schema/beans"
       xmlns:xsi="http://www.w3.org/2001/XMLSchema-instance"
       xsi:schemaLocation="http://www.springframework.org/schema/beans
                           http://www.springframework.org/schema/beans/spring-beans.xsd"
>
    <import resource="applicationContext-product.xml"/>
    <import resource="applicationContext-user.xml"/>
</beans>
2.5 特殊值的注入问题
2.5.1 大于号小于号
<value></value>里面要添加<小于号,>大于号,可以用<![CDATA[]]>来写:
<value> 我认为:<![CDATA[ 5>2 ]]>是真命题 </value>
<propery value="">的value里面要添加大于号小于号,只能用<和>
2.5.2 空值
如果value值为null,不能写value=“null"
<property value="null"/>
正确写法:
<property>
	<null/>
</property>
当然空值也可以是”“空字符串
直接什么都不写就可以了
//第一种方式
<property value=""/>
//第二种方式
<property>
	<value></value>
</property>
2.6 各种类型的自动装配

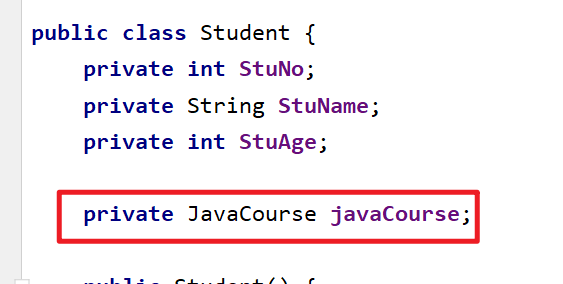
- Student 类里面包含对象类型的属性
- 在配置文件application-Context.xml中
2.6.1 自动装配autowire="byName"
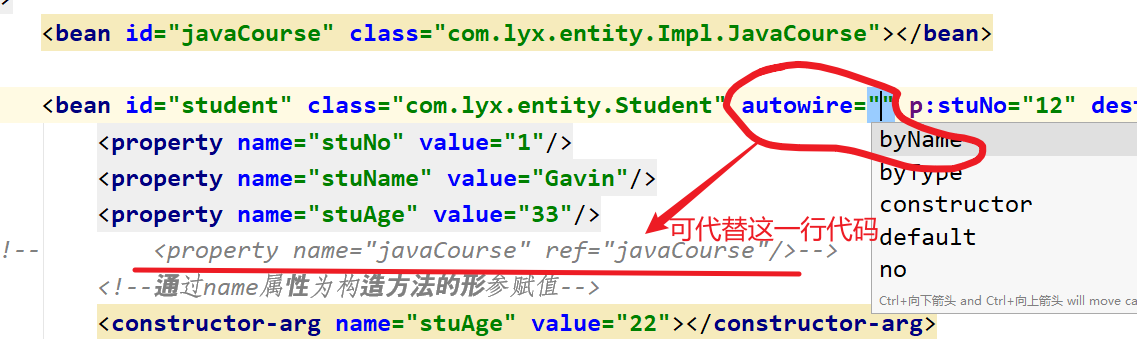
byName的意思是bean的id于类的属性名一致;
注意:只有对象类型可以,简单类型不能自动装配
2.6.2 自动装配autowire="byType"

bean的类型(class)与属性类型一致,
但是这种方式,如果出现2个类型一样的bean,则会报错
2.6.3 自动装配autowire="constructor"
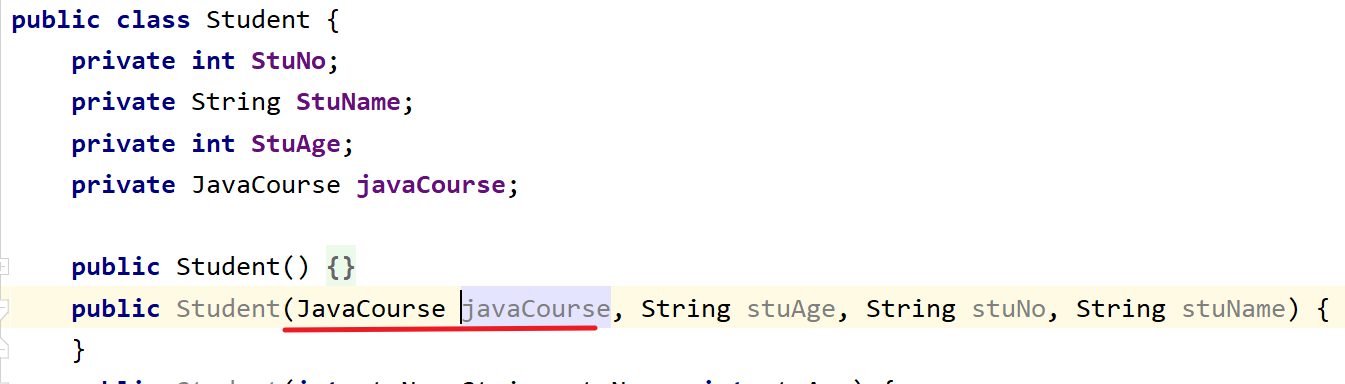
该Student类的构造方法里面需要JavaCourse类型的形参
配置如下
如下:
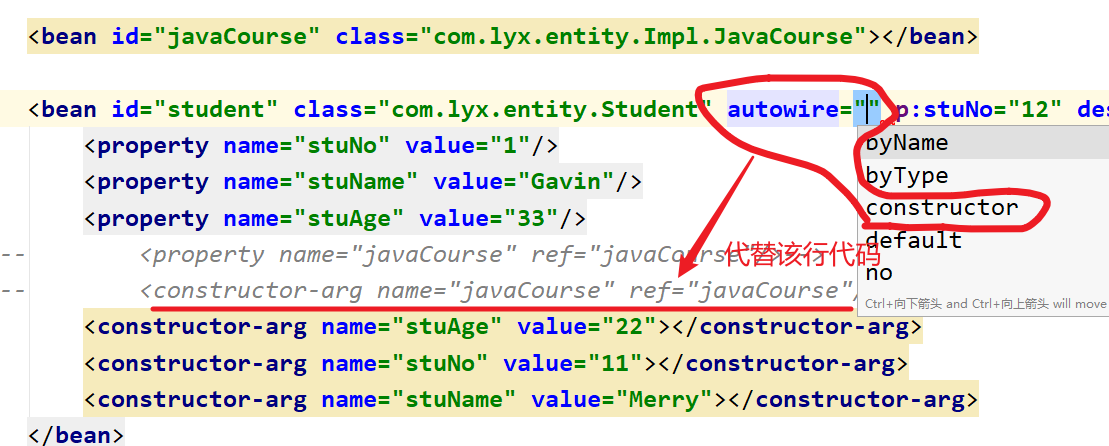
2.6.4 一次性设置全部的bean自动装配

<?xml version="1.0" encoding="UTF-8"?>
<beans xmlns:xsi="http://www.w3.org/2001/XMLSchema-instance"
       xmlns:p="http://www.springframework.org/schema/p"
       xmlns="http://www.springframework.org/schema/beans"

       xsi:schemaLocation="http://www.springframework.org/schema/beans
                           http://www.springframework.org/schema/beans/spring-beans.xsd
                           http://www.springframework.org/schema/p
                           http://www.springframework.org/schema/p/spring-p.xsd"
       default-autowire="byName"
>
3. Spring配置数据源
- 连接池可以用C3P0、我用的是Druid
jdbc.properties
jdbc.driverClass=com.mysql.jdbc.Driver
jdbc.url=jdbc:mysql://localhost:3308/companydb?useUnicode=true&characterEncoding=utf8
jdbc.username=root
jdbc.password=123456
jdbc.init=1
jdbc.minIdle=1
jdbc.maxActive=20
<?xml version="1.0" encoding="utf8" ?>
<beans xmlns="http://www.springframework.org/schema/beans"
       xmlns:context="http://www.springframework.org/schema/context"
       xmlns:p="http://www.springframework.org/schema/p"
       xmlns:aop="http://www.springframework.org/schema/aop"
       xmlns:tx="http://www.springframework.org/schema/tx"
       xmlns:xsi="http://www.w3.org/2001/XMLSchema-instance"
       xsi:schemaLocation="http://www.springframework.org/schema/beans
                           http://www.springframework.org/schema/beans/spring-beans.xsd
                           http://www.springframework.org/schema/p
                           http://www.springframework.org/schema/p/spring-p.xsd
                           http://www.springframework.org/schema/aop
                           http://www.springframework.org/schema/aop/spring-aop.xsd
                           http://www.springframework.org/schema/tx
                           http://www.springframework.org/schema/tx/spring-tx.xsd
                           http://www.springframework.org/schema/context
                           http://www.springframework.org/schema/context/spring-context.xsd "
>
    <!--    placeholder占位符-->
    <context:property-placeholder location="classpath:jdbc.properties"/>
    <bean id="dataSource" class="com.alibaba.druid.pool.DruidDataSource">
        <property name="driverClassName" value="${jdbc.driverClass}"/>
        <property name="url" value="${jdbc.url}"/>
        <property name="username" value="${jdbc.username}"/>
        <property name="password" value="${jdbc.password}"/>
        <property name="initialSize" value="${jdbc.init}"/>
        <property name="maxWait" value="60000"/>
        <property name="timeBetweenEvictionRunsMillis" value="50000"/>
        <property name="minEvictableIdleTimeMillis" value="3000"/>
    </bean>

</beans>
4. LOC使用注解开发
4.1 原始注解
注解开发主要是代替<bean>的配置,对于我们注解的类或者属性,.xml文件配置一个组件扫描,spring把注解了的类自动放入容器中
| 注解 | 说明 |
|---|---|
| @Component | |
| @Autowired和@Qualifier(”“) | |
| @Repository | |
| @Value | |
| @Scope(“”) | |
| @PostConstruct | |
| @PreDestroy |
4.1.1注解说明
Dao和Service的bean配置原始代码如下
    <bean id="userDaoImpl" class="com.lyx.dao.impl.userDaoImpl"></bean>
    <bean id="userServiceImpl" class="com.lyx.service.impl.userServiceImpl">
        <property name="userDao" ref="userDaoImpl"></property>
    </bean>
-
对于上面DaoImpl的配置,用注解代替,直接到bean的class的包的类下面,也就是这个userDaoImpl类,添加一个@Component(”“),里面的参数就是上面bean的id
-
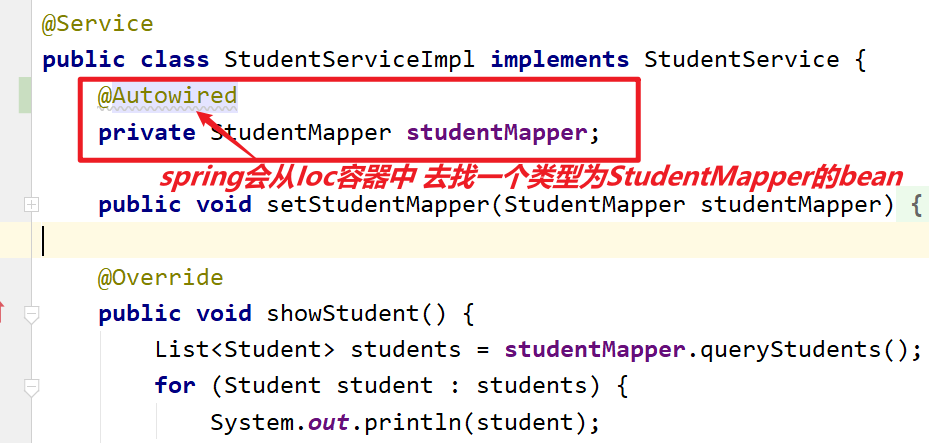
ServiceImpl的配置,同上,但因为有依赖注入,我们还要用@Autowired和@Qualifier(”“)@autowire与上面的自动装配一样,只添加@Autowired,默认是byType,要想byName,需要添加@Qualifier(“xx”), Qualifier里面参数是上面ref的值,也就是bean的id。
添加了@Autowired,spring会从Ioc容器中 找一个类型为StudentMapper的bean
-
注解加完了,在MyConfiguration配置类中
package com.lyx.annotation;
import com.alibaba.druid.pool.DruidDataSource;
import com.lyx.entity.Classroom;
import com.lyx.entity.Student;
import com.lyx.mapper.StudentMapper;
import com.lyx.service.StudentService;
import com.lyx.service.impl.StudentServiceImpl;
import org.mybatis.spring.SqlSessionFactoryBean;
import org.mybatis.spring.mapper.MapperScannerConfigurer;
import org.springframework.beans.factory.FactoryBean;
import org.springframework.beans.factory.annotation.Autowired;
import org.springframework.beans.factory.annotation.Value;
import org.springframework.context.annotation.*;
import org.springframework.core.io.Resource;
import org.springframework.stereotype.Controller;
import javax.sql.DataSource;
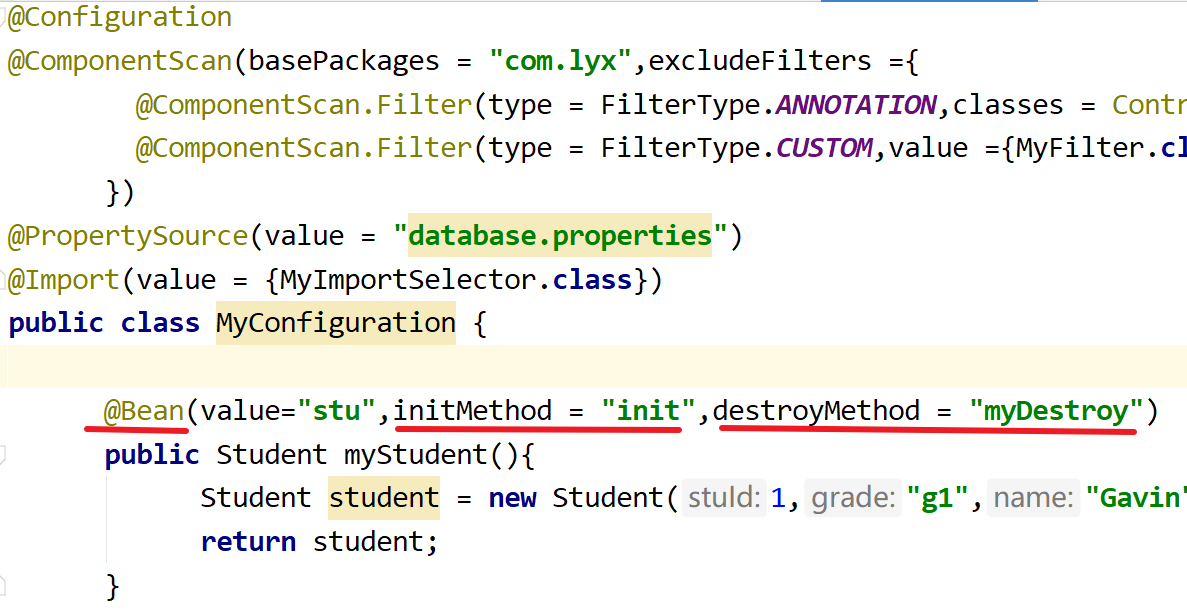
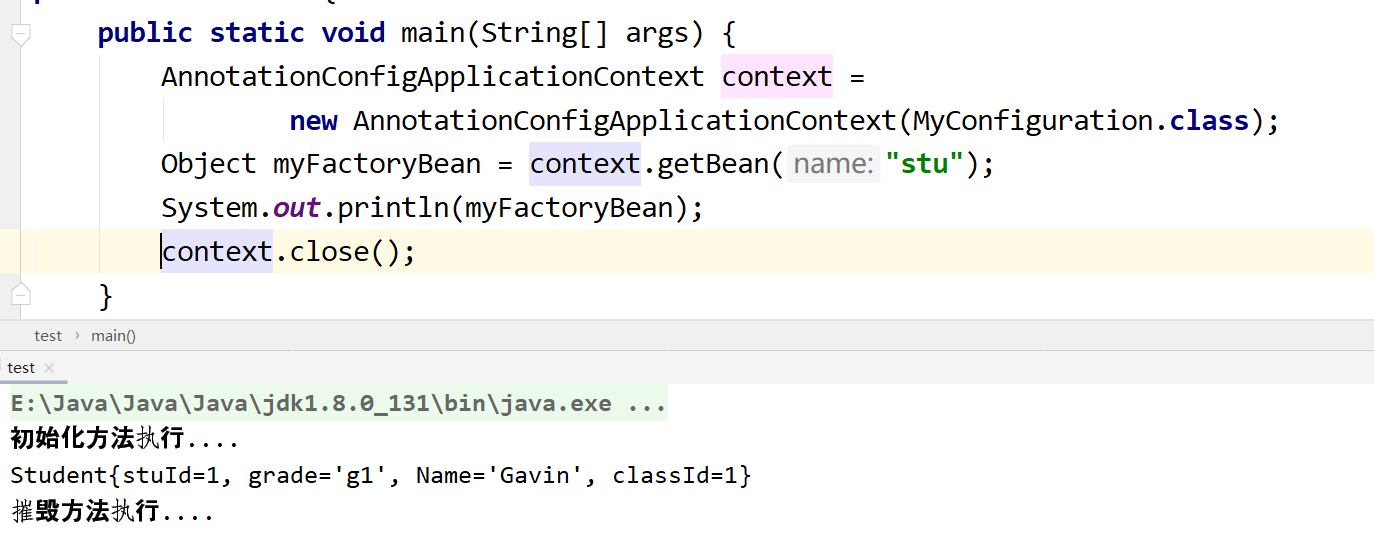
@Configuration
@ComponentScan(basePackages = "com.lyx")
@PropertySource("classpath:database.properties")
public class MyConfiguration {
@Value("${jdbc.driver}")
private String driver;
@Value("${jdbc.url}")
private String url;
@Value("${jdbc.username}")
private String username;
@Value("${jdbc.password}")
private String password;
@Bean
public DataSource dataSource(){
DruidDataSource ds = new DruidDataSource();
ds.setDriverClassName(driver);
ds.setUrl(url);
ds.setUsername(username);
ds.setPassword(password);
return ds;
}
@Bean
public SqlSessionFactoryBean sqlSessionFactoryBean(@Autowired DataSource dataSource){
SqlSessionFactoryBean sessionFactoryBean = new SqlSessionFactoryBean();
sessionFactoryBean.setTypeAliasesPackage("com.lyx.entity");
sessionFactoryBean.setDataSource(dataSource);
return sessionFactoryBean;
}
@Bean
public MapperScannerConfigurer mapperScannerConfigurer(){
MapperScannerConfigurer mapperScannerConfigurer = new MapperScannerConfigurer();
mapperScannerConfigurer.setBasePackage("com.lyx.mapper");
return mapperScannerConfigurer;
}
}
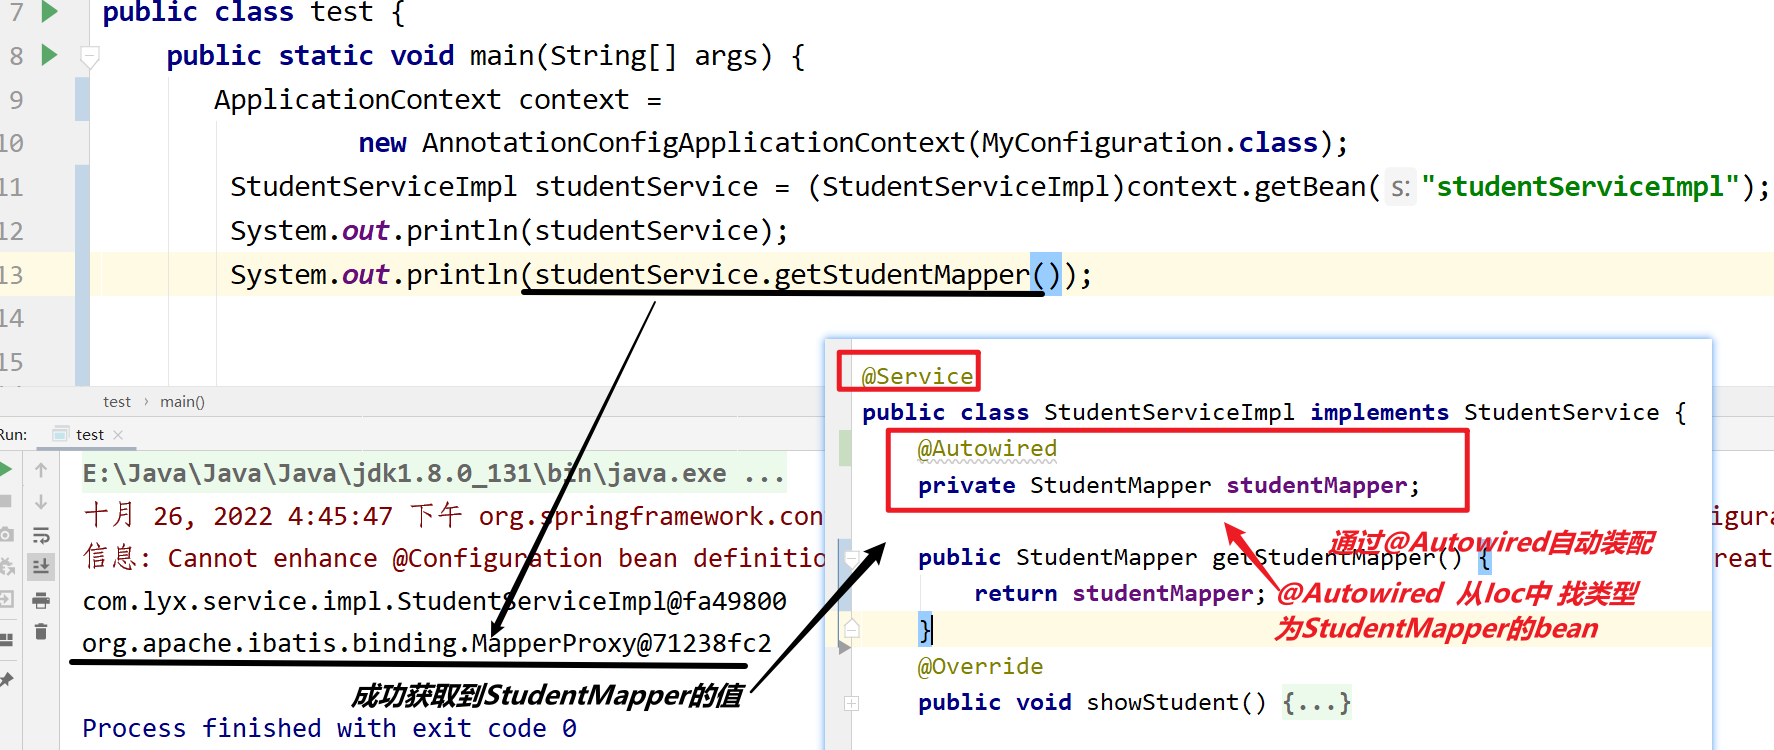
测试一下@Autowires注解是否成功找到StudentMapper类型的Bean
其他注解如下
- 对于以上的@Component,不方便区分dao层还是Service层亦或者是Controller层
- 所以对于本来要使用@Component的位置,我们在Dao层用@Repository,在Service层用@Service,在Controller层用@Controller
- 对于上面使用的@Autowired和@Qualifier(" ")我们可以合并成一个@Resource(name= " ")
- @Value注入普通属性,可以通过@Value(”${ jdbc.driver}“)获取jdbc.properties文件的值,赋值给添加这个注解的变量,jdbc.properties必须在.xml配置文件中<context:property-placeholder location=“classpath:jdbc.properties”/>被放入容器中
@Vaule("${jdbc.driver}")
private String driver;//driver=
-
@Scope(“”)标志Bean的作用范围,单例、多例,值为prototype和singleton
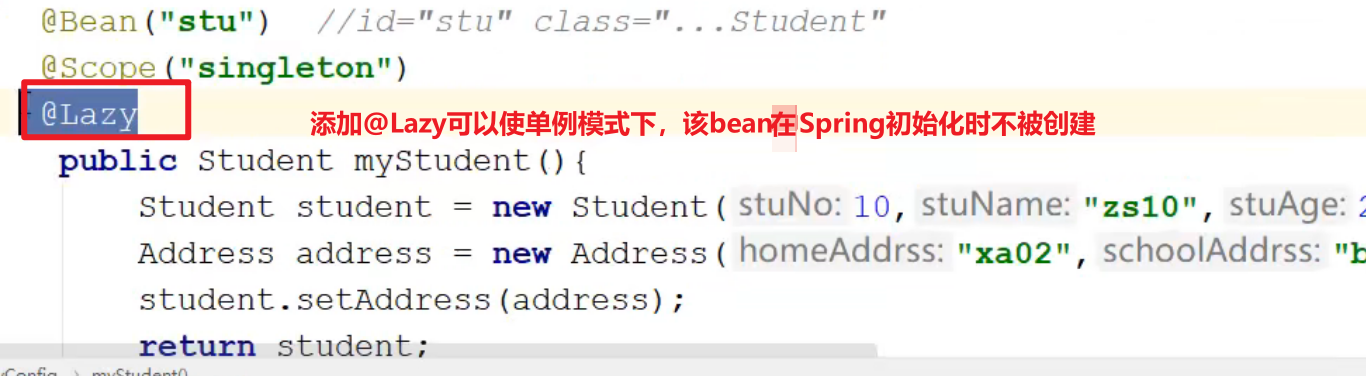
-
@PostConstruct,使用在方法上,标注该方法是Bean的初始化方法,类似于init-method
-
@PreDestroy,使用在方法上,标注该方法是Bean的摧毁方法,类似于destroy-method
4.1.2 Bean的生命周期详解:初始化,创建,销毁
复制上面提到的bean标签的其他属性
init-method
- 在class定义的包.类里面定义的初始化方法myInit()
public class UserServiceImpl implements UserService {

    private UserDao userDao;

    public void setUserDao(UserDao userDao) {
        this.userDao = userDao;
    }

    public List<User> queryUsers() {
        List<User> users = userDao.queryUsers();
        return users;
    }
    public void myDestroy(){
        System.out.println("销毁方法执行了");
    }
    public void myInit(){
        System.out.println("初始化方法执行了");
    }

}
在bean标签添加init-method属性,值就是刚刚写的myInit()方法
<?xml version="1.0" encoding="utf8" ?>
<beans xmlns="http://www.springframework.org/schema/beans"
       xmlns:xsi="http://www.w3.org/2001/XMLSchema-instance"
       xsi:schemaLocation="http://www.springframework.org/schema/beans
                           http://www.springframework.org/schema/beans/spring-beans.xsd
>

    <bean id="userService" class="com.lyx.service.impl.UserServiceImpl" scope="prototype" init-method="myInit">

    </bean>
</beans>
destroy-method
- 在class定义的包.类里面定义销毁方法myDestroy()
public class UserServiceImpl implements UserService {

    private UserDao userDao;

    public void setUserDao(UserDao userDao) {
        this.userDao = userDao;
    }

    public List<User> queryUsers() {
        List<User> users = userDao.queryUsers();
        return users;
    }
    public void myDestroy(){
        System.out.println("销毁方法执行了");
    }
    public void myInit(){
        System.out.println("初始化方法执行了");
    }

}
在bean标签添加destroy-method属性,值就是刚刚写的myDestroy()方法
<?xml version="1.0" encoding="utf8" ?>
<beans xmlns="http://www.springframework.org/schema/beans"
       xmlns:xsi="http://www.w3.org/2001/XMLSchema-instance"
       xsi:schemaLocation="http://www.springframework.org/schema/beans
                           http://www.springframework.org/schema/beans/spring-beans.xsd
>

    <bean id="userService" class="com.lyx.service.impl.UserServiceImpl" scope="prototype" init-method="myInit()" destroy-method="myDestroy">

    </bean>
</beans>
- 后台自动执行销毁方法,要手动.close才能看见销毁方法有没有执行
- 上面介绍多列的时候提到过,手动.close执行会销毁方法,需要的是单列模式,如果bean对象是多列,该销毁方法还是看不见
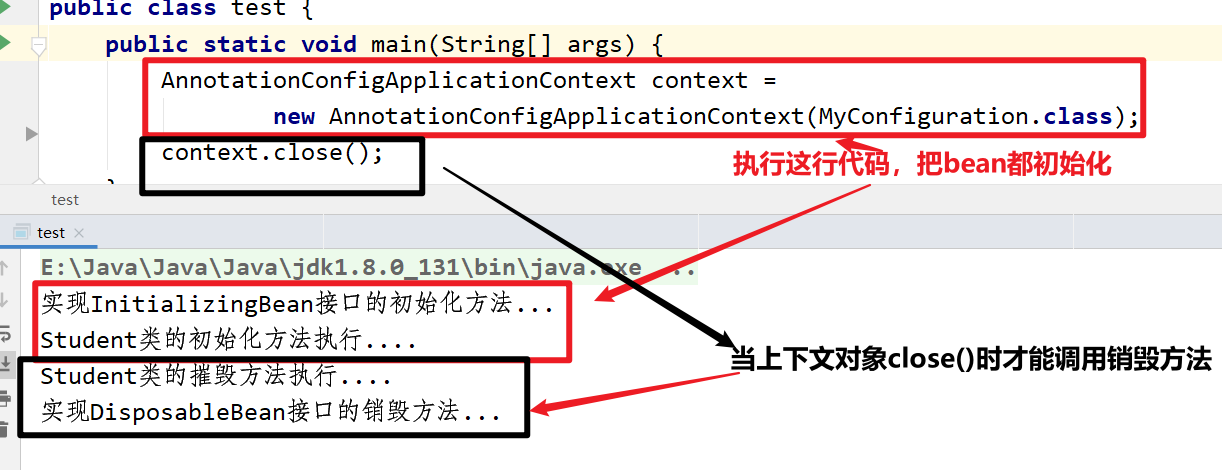
        ApplicationContext context = new ClassPathXmlApplicationContext("/spring-context.xml");
        Object userDao = context.getBean("userDao");
        ((ClassPathXmlApplicationContext)context).close();//强转为ApplicationContext子类
注解方式:
测试:
2. 通过注解@Postconstruct @PreDestroy实现初始化和销毁方法
将相应组件加入@Component注解、给初始化方法加@PostConstruct、给销毁方法加@PreDestroy
@PostConstruct:相当于方法一的init
@PreDestroy:相当于方法一的destroy
如果要获取@Component注解中的bean,那么该Bean的名字就是@Component (value=" xxx")的value值xxx
例如如下配置:
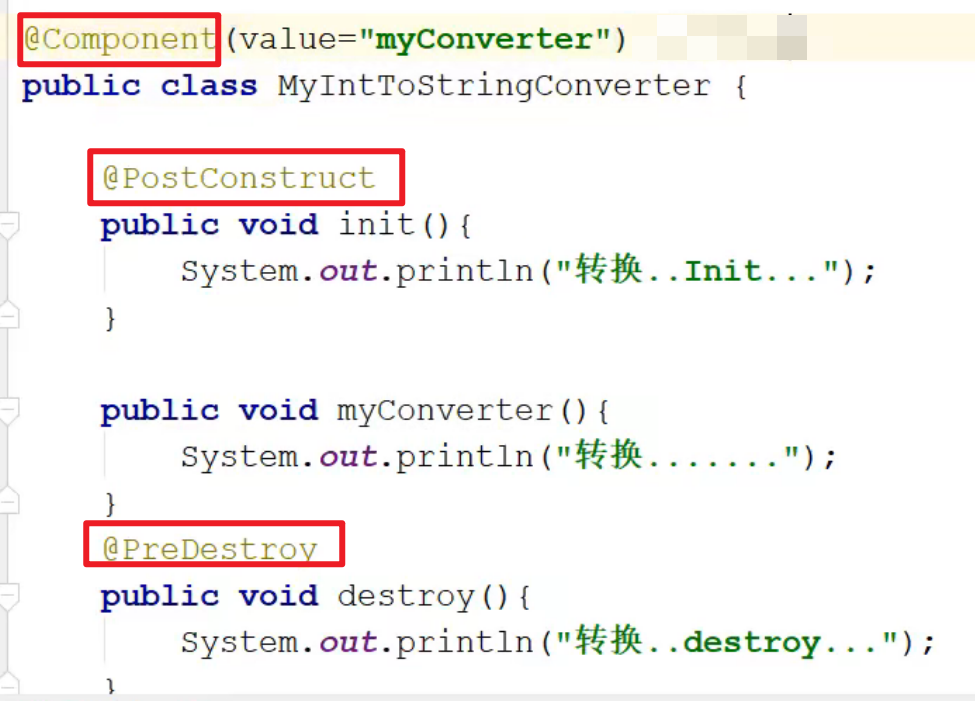
获取该类中的myConverter()方法
MyConverter myConverter = (MyConverter)context.getBean("myConverter");
myConverter.myConverter();
3. 通过实现接口InitializingBean,DisposableBean实现初始化和销毁方法
import org.springframework.beans.factory.DisposableBean;
import org.springframework.beans.factory.InitializingBean;
import org.springframework.stereotype.Component;

@Component(value = "myFun")
public class MyFunction implements InitializingBean, DisposableBean {
    @Override
    public void destroy() throws Exception {
        System.out.println("实现DisposableBean接口" +
                "的销毁方法...");
    }

    @Override
    public void afterPropertiesSet() throws Exception {
        System.out.println("实现InitializingBean接口" +
                "的初始化方法...");
    }
}
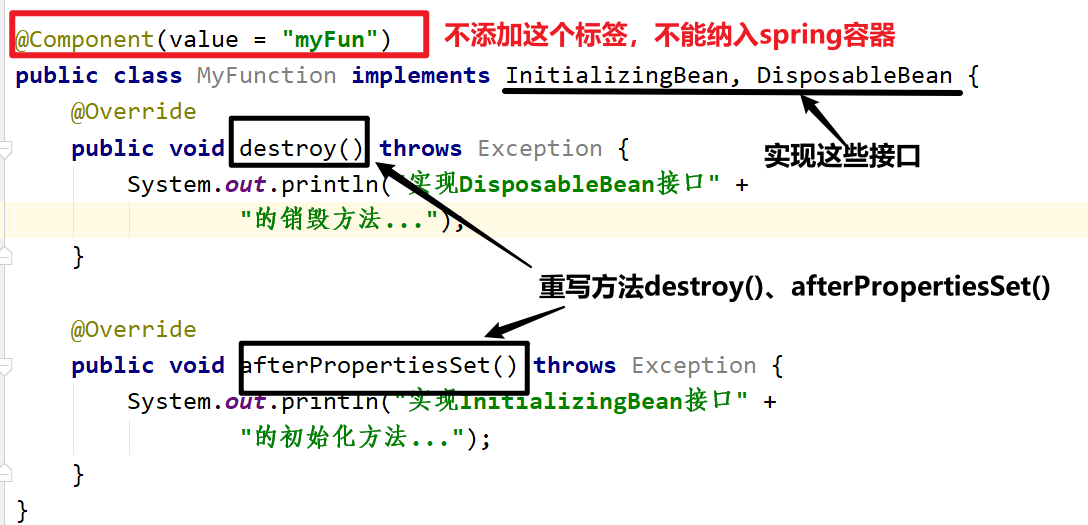
测试一下:
4. 通过实现接口BeanPostProcessor
刚刚是实现2个接口,这里只实现一个接口BeanPostProcessor
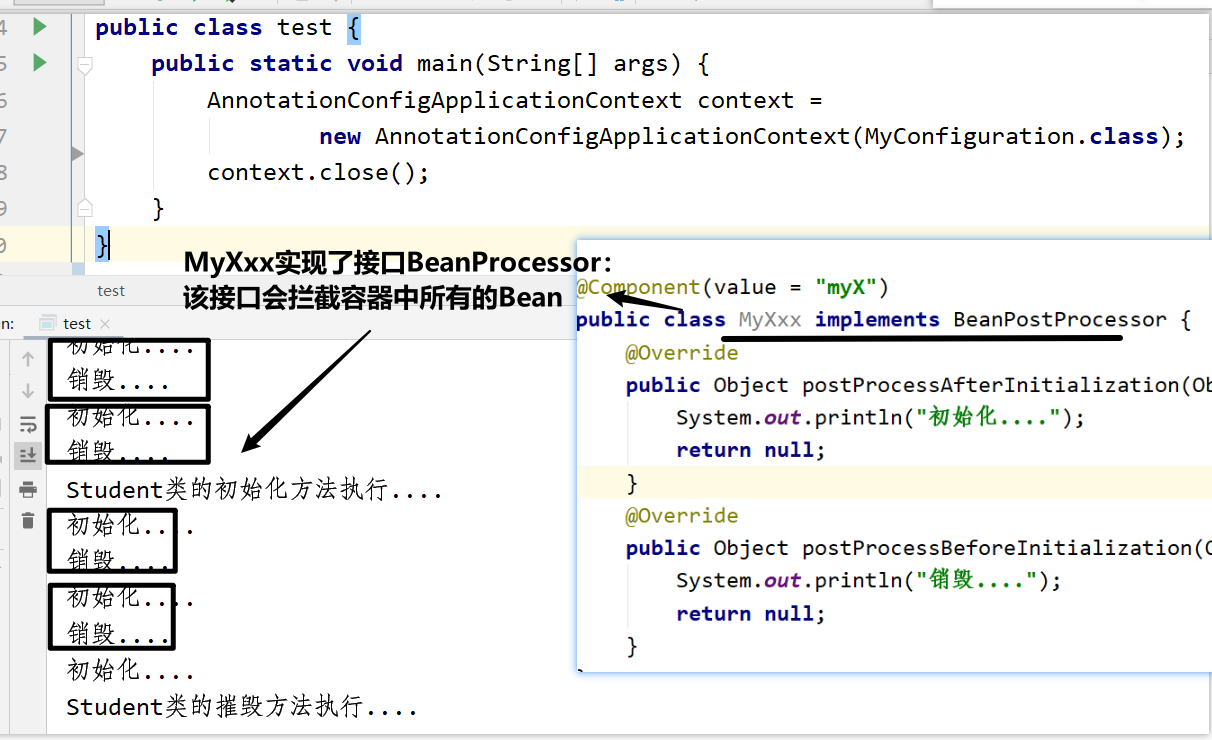
- 自定义类MyXxx实现接口BeanPostProcessor
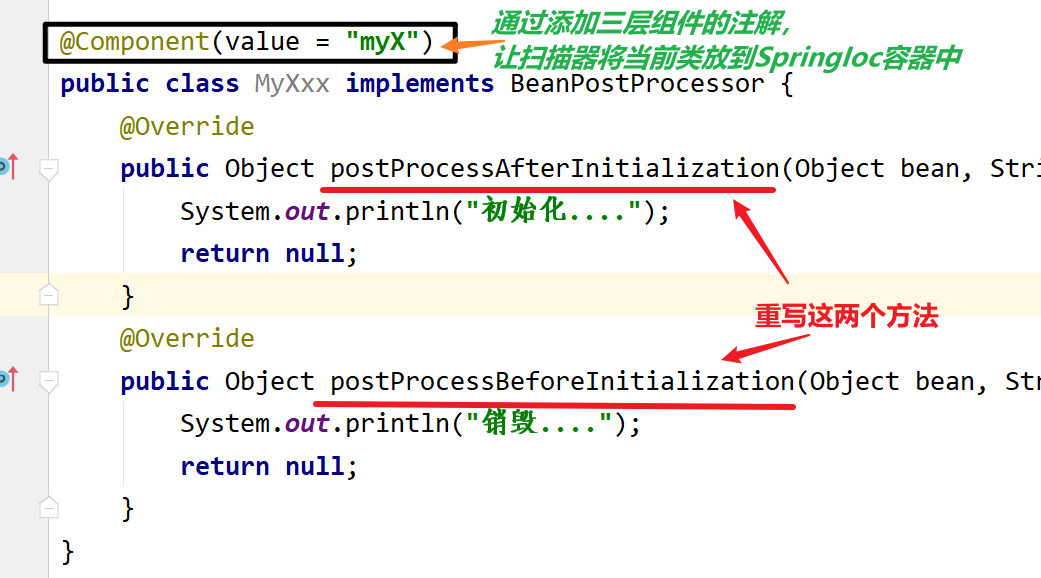
@Component(value = "myX")
public class MyXxx implements BeanPostProcessor {
    @Override
    public Object postProcessAfterInitialization(Object bean, String beanName) throws BeansException {
        System.out.println("初始化....");
        return null;
    }
    @Override
    public Object postProcessBeforeInitialization(Object bean, String beanName) throws BeansException {
        System.out.println("销毁....");
        return null;
    }
}
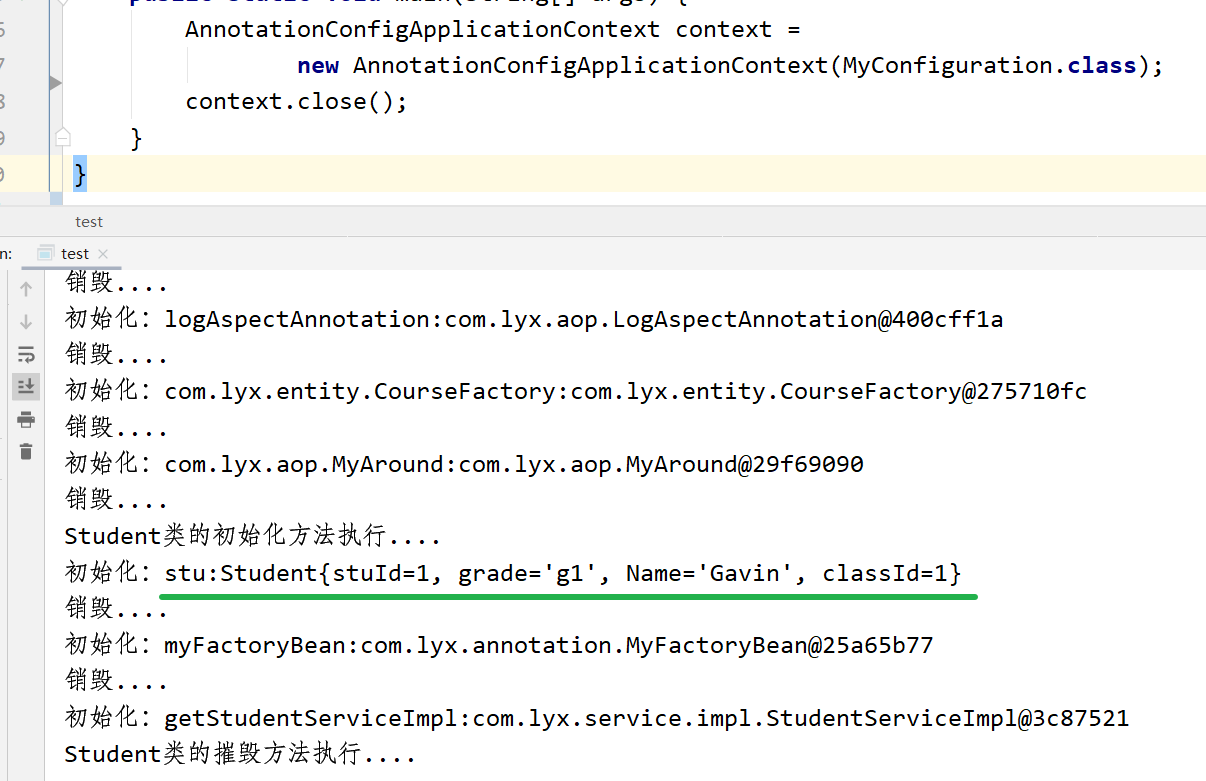
测试运行,发先打印了很多遍初始和销毁:BeanProocessor接口会拦截所有的Bean,给容器中所有的Bean加初始化、销毁方法
当拦截到Student类的bean时,给自动创建的Student对象添加属性:

import com.lyx.entity.Student;
import org.springframework.beans.BeansException;
import org.springframework.beans.factory.config.BeanPostProcessor;
import org.springframework.stereotype.Component;

@Component(value = "myX")
public class MyXxx implements BeanPostProcessor {
    @Override
    public Object postProcessAfterInitialization(Object bean, String beanName) throws BeansException {
        System.out.println("初始化:"+beanName+":"+bean);
        if(bean instanceof Student){
            Student student = (Student) bean;
            student.setStuId(2);
            student.setName("zs123456");
            student.setGrade("g2");
            student.setClassId(1);
            return student;
        }
        return bean;
    }
    @Override
    public Object postProcessBeforeInitialization(Object bean, String beanName) throws BeansException {
        System.out.println("销毁....");
        return bean;
    }
}
测试一下:
4.2 新注解
以上原始注解,不能全部替代xml配置文件的Bean在例如连接池这种Bean中,我们不能到它的包.类去添加注解,包括组件扫描,也扫描不了
| 注解 | 说明 |
|---|---|
| @Configuration | 用于指定当前类是一个Spring配置类,当创建容器时会从该类上加载注解 |
| @ComponentScan | 告知spring,哪些包中,有被注解的类、方法、属性,作用和Spring的xml配置文件中的<context:component-scan base-package=“com.lyx”/>一样 |
| @Bean | 使用在方法上,标注将该方法的返回值存储到Spring容器中 ,如@Bean(“dataSource”),Spring会将当前方法的返回值以指定名称(dataSource)存储到Spring容器中 |
| @PropertySource | 用来加载.properties文件中的配置,作用和Spring的xml配置文件中的 <context:property-placeholder location=“classpath:jdbc.properties”/>一样 |
| @Import | 用于导入其他配置文件,作用和Spring的xml配置文件中的<import resource=“classpath:spring.xml”/>一样,@Import({XXX.class,XXX.xml})可以导入多个配置文件 |
使用步骤看这篇文章:spring注解开发
5. AOP概念
先来看一下
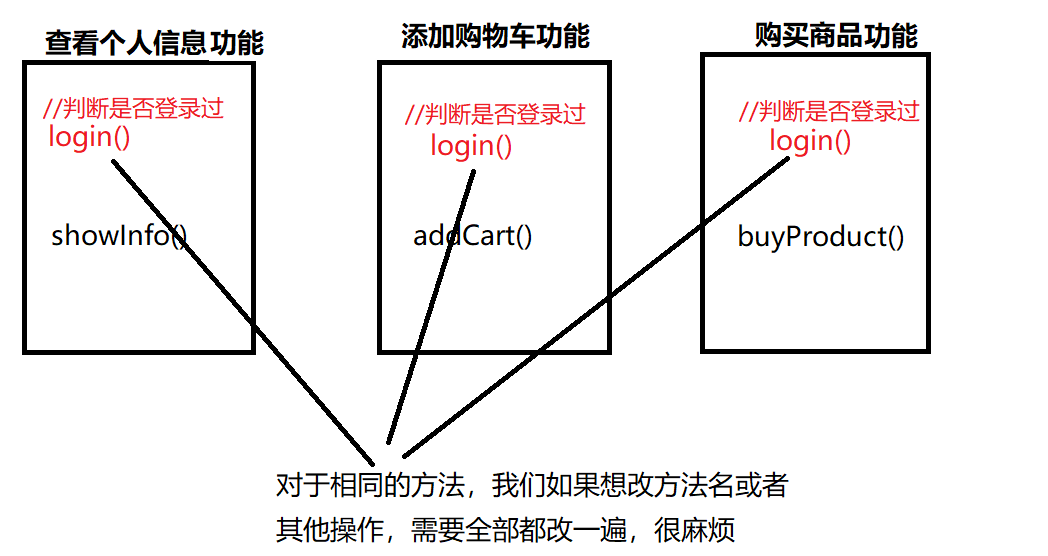
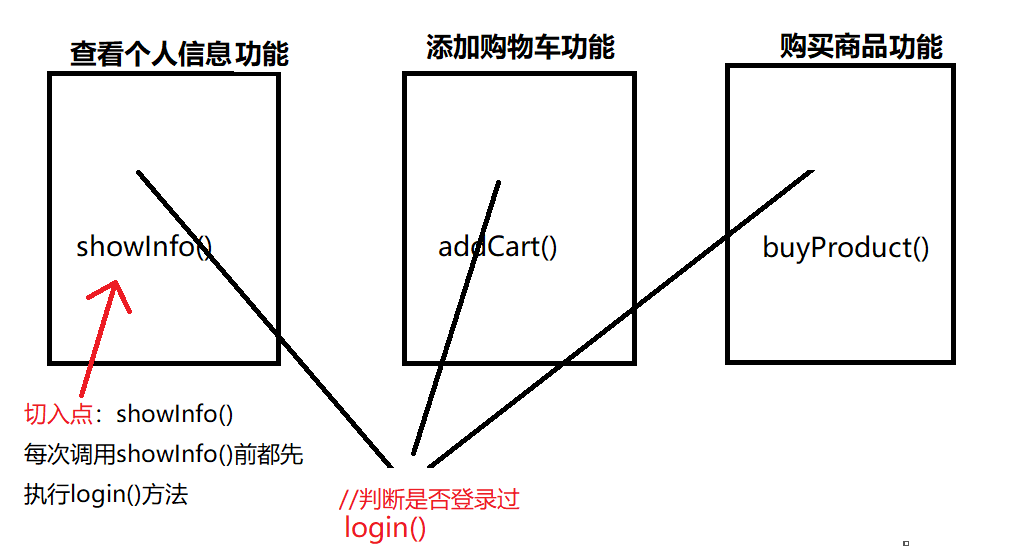
切入点:就是可以切入login()的方法(如:showInfo()方法)
切面:就是当前要切入的login()方法,它可以横切到多个业务之中
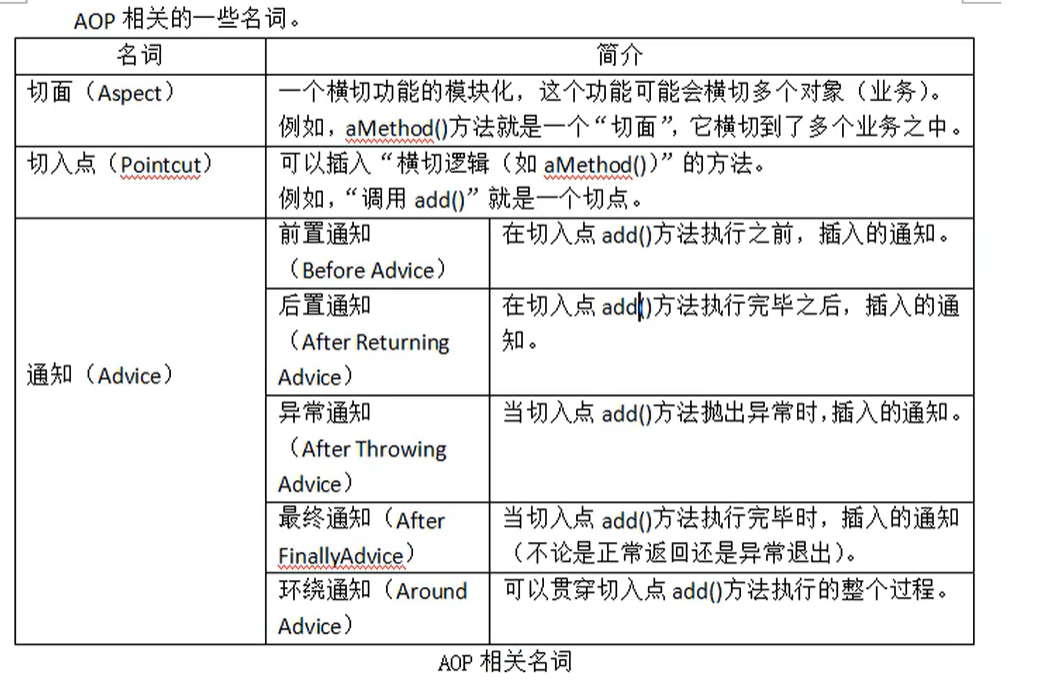
AOP相关的名词
5.1 环境搭建
- 导入依赖
<!-- https://mvnrepository.com/artifact/org.springframework/spring-aspects –>-->
<dependency>
<groupId>org.springframework</groupId>
<artifactId>spring-aspects</artifactId>
<version>5.1.6.RELEASE</version>
</dependency>

- spring-context.xml引入aop命名空间

- 定义一个额外功能:通知类
添加到UserServieImpl类的queryUser方法中,在执行该方法内部代码前调用
import org.springframework.aop.MethodBeforeAdvice;
import java.lang.reflect.Method;

public class MyBeforeAdvice implements MethodBeforeAdvice {
    @Override
    public void before(Method method, Object[] objects, Object o) throws Throwable {
        System.out.println("在方法执行前调用");
    }
}
- 到spring-context.xml文件中声明
<?xml version="1.0" encoding="utf8" ?>
<beans xmlns="http://www.springframework.org/schema/beans"
xmlns:aop="http://www.springframework.org/schema/aop"
xmlns:xsi="http://www.w3.org/2001/XMLSchema-instance" xsi:schemaLocation="http://www.springframework.org/schema/beans
http://www.springframework.org/schema/beans/spring-beans.xsd
http://www.springframework.org/schema/aop/spring-aop.xsd
http://www.springframework.org/schema/tx"
>
<!--添加额外功能的目标:原始业务-->
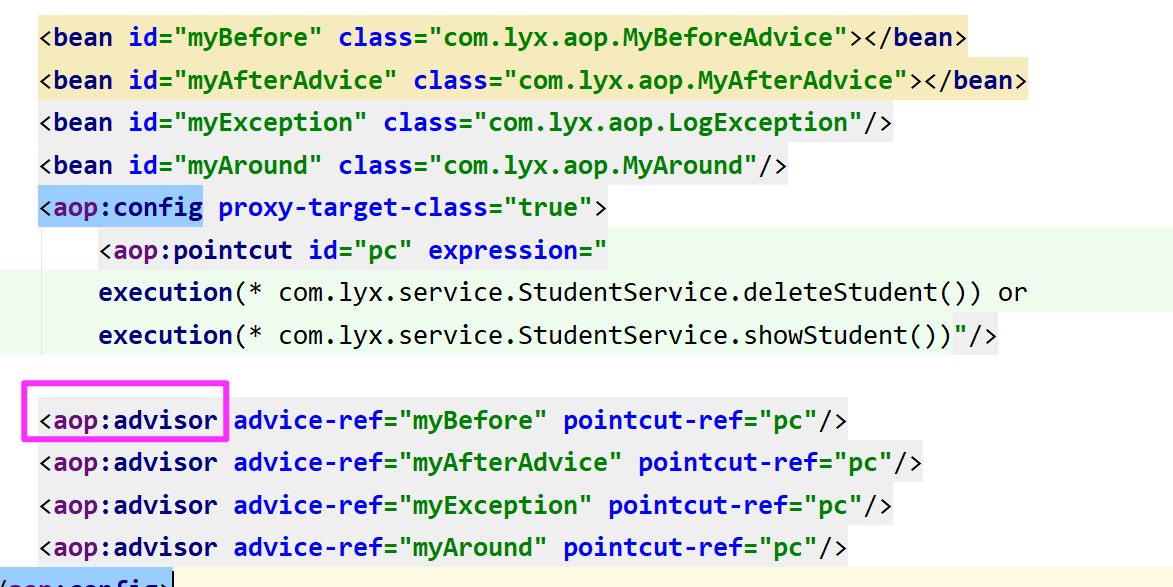
<bean id="userService" class="com.lyx.service.impl.service.userServiceImpl"></bean>
<!--额外功能:-->
<bean id="before" class="com.lyx.advice.MyBeforeAdvice"></bean>
<!--定义切入点-->
<aop:config>
<aop:pointcut id="pc_service" expression="execution(* queryUser())"/>
<aop:advisor advice-ref="before" pointcut-ref="pc_service"/>
</aop:config>
</beans>

5.调用如下
 public void test2(){
        ApplicationContext context = new ClassPathXmlApplicationContext("/spring-context.xml");
        //context.getBean()动态生成代理类,类型是目标接口
        UserService bean = (UserService)context.getBean("userService");
       //UserServiceImpl bean = (UserServiceImpl) context.getBean("userService");
       //UserServiceImpl bena = context.getBean(UserServiceImpl.class)
       //UserService bean = context.getBean(UserService.class);
        List<User> users = bean.queryUsers();
        for (User user : users) {
            System.out.println(user);
        }
运行结果
User{id=1, username='lyx', password='11', gender=1, registTime=Thu Jan 01 00:00:00 CST 1970}
User{id=2, username='nihaoy', password='1244', gender=1, registTime=Sat Apr 30 19:40:43 CST 2022}
User{id=7, username='yusan', password='123456', gender=1, registTime=Sat Apr 23 16:12:19 CST 2022}
5.2 通知类
5.2.1 前置通知类

5.2.2 后置通知类

public class MyAfterAdvice implements AfterReturningAdvice {
    @Override
    public void afterReturning(Object o, Method method, Object[] objects, Object o1) throws Throwable {
        System.out.println("在方法执行后调用:\n" +
                "调用方法的返回值:" +o+
                ",目标对象:"+o1+
                ",\n调用的方法名:"+method.getName()+
                ",调用方法的参数个数:"+objects.length);
    }
}

放到spring中
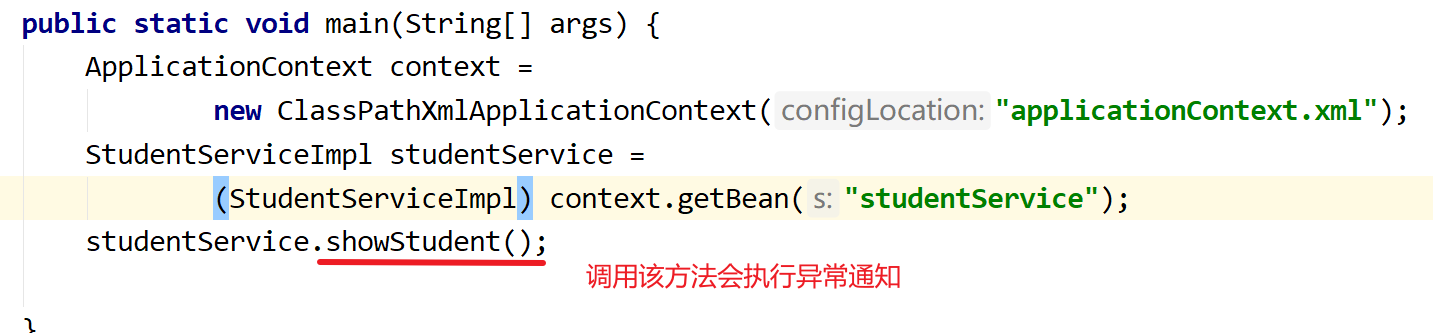
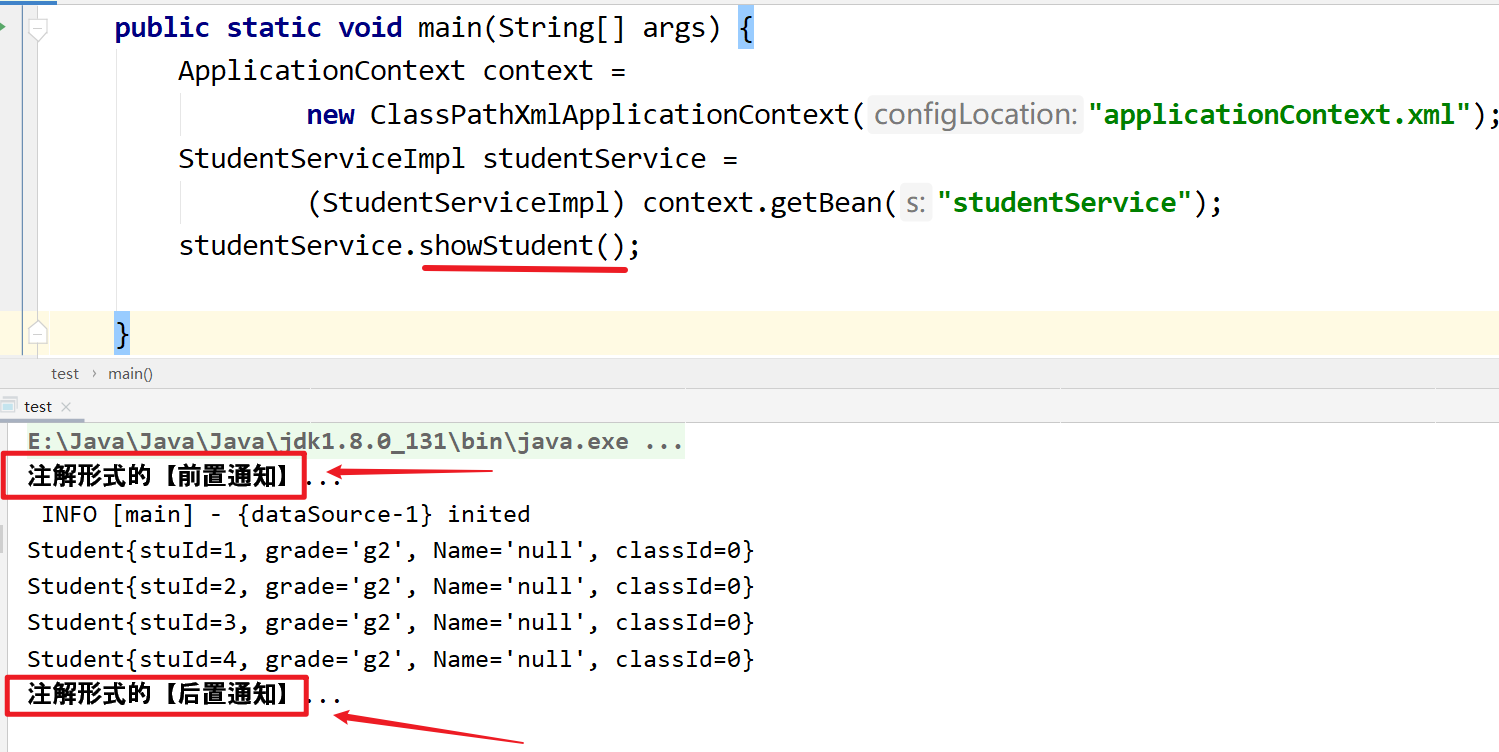
public static void main(String[] args) {
   ApplicationContext context = new ClassPathXmlApplicationContext("applicationContext.xml");
   StudentServiceImpl studentService = (StudentServiceImpl) context.getBean("studentService");
   studentService.showStudent();
}

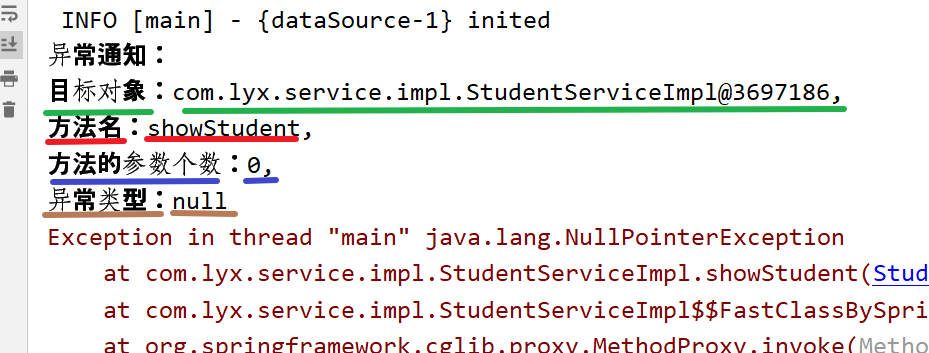
5.2.3 异常通知类

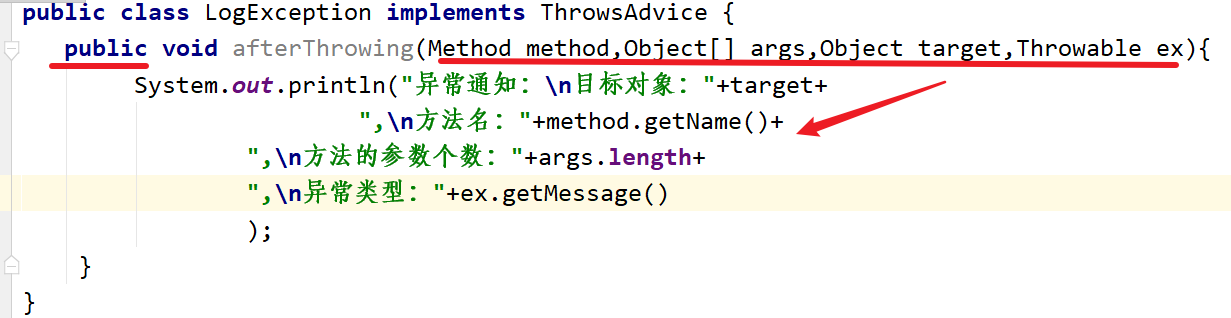
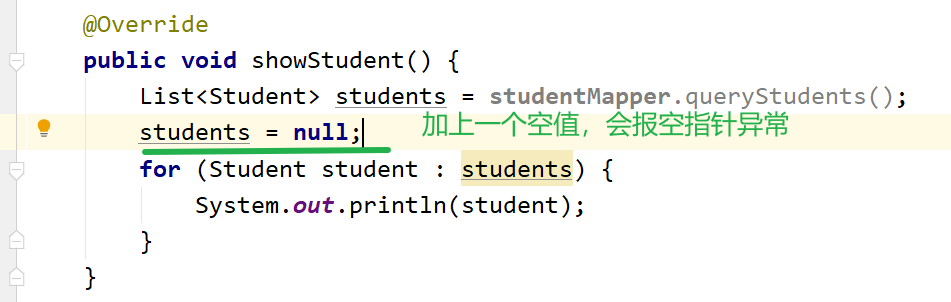
- args是Object[]类型,所以如果想打印参数列表可以:Arrays.toString(args),我这里打印长度.length就可以了
为目标类写一个会报错的代码:
在配置文件中声明:

运行结果:
5.2.4 环绕通知类


放行方法proceed()的返回值就是插入环绕通知的方法:目标方法showStudens()的返回值,我写的这个方法没有返回值,void
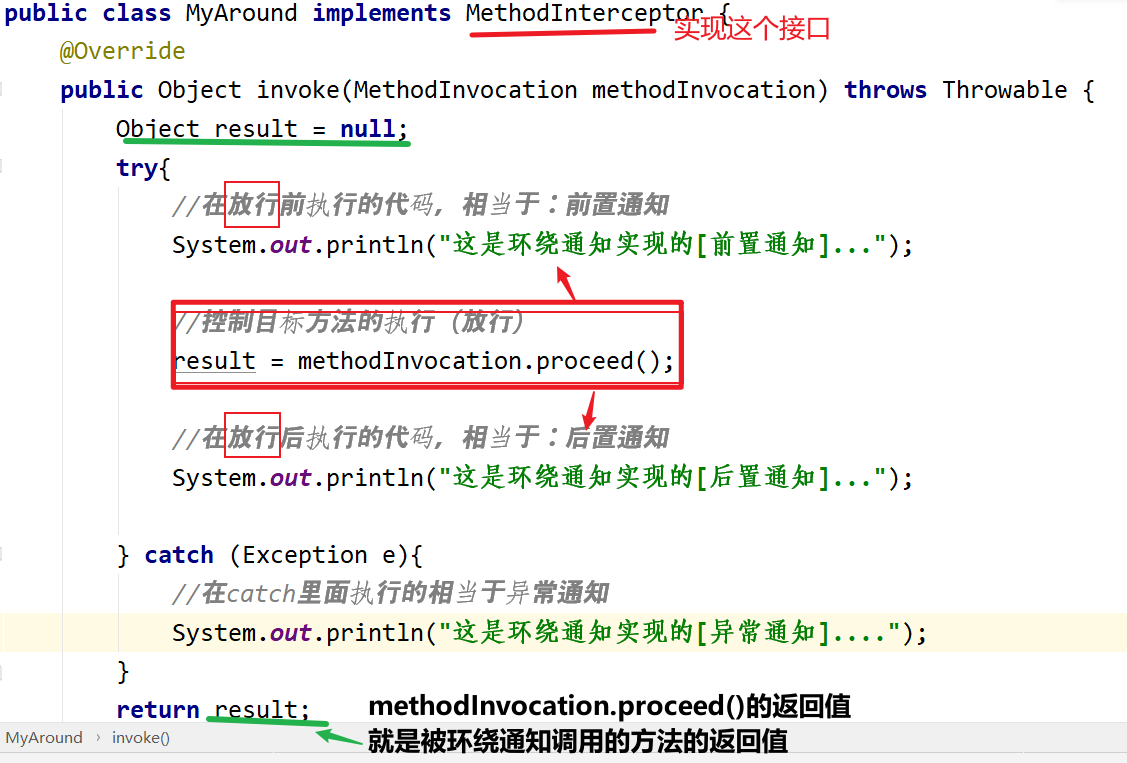
声明:
运行结果:

获取当前目标方法:

代码如下:
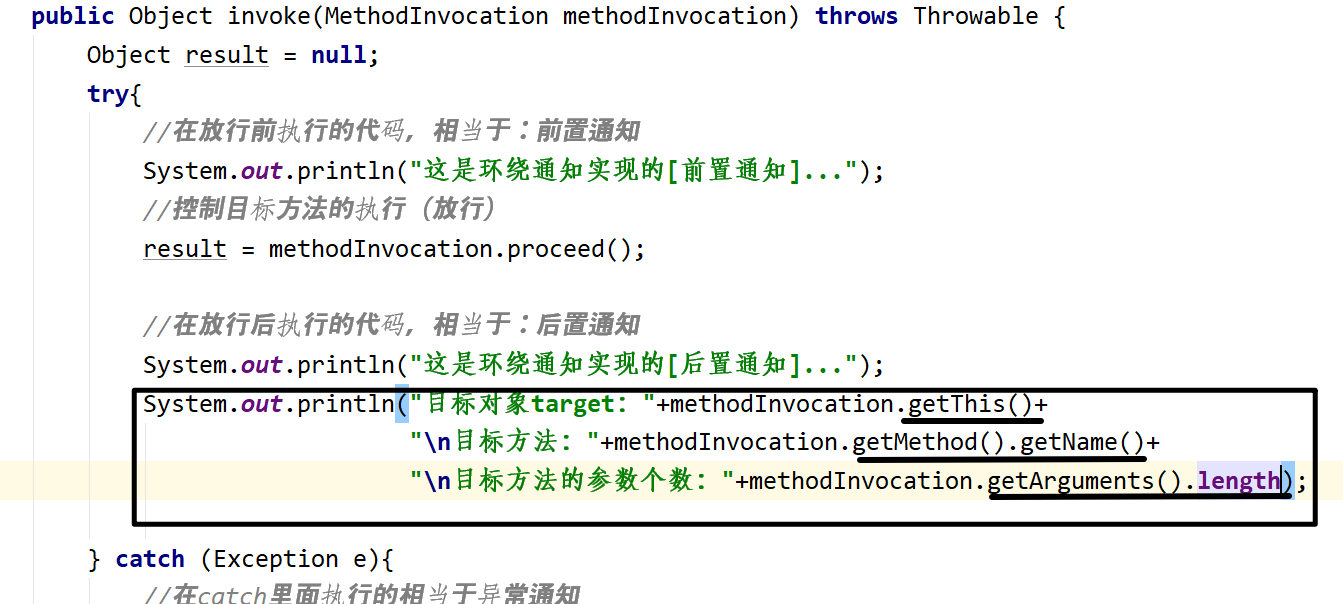
运行结果:

总代码,我放一起了,用到时候分开写
package com.lyx.advice;

import org.aopalliance.intercept.MethodInterceptor;
import org.aopalliance.intercept.MethodInvocation;
import org.springframework.aop.AfterReturningAdvice;
import org.springframework.aop.MethodBeforeAdvice;
import org.springframework.aop.ThrowsAdvice;

import java.lang.reflect.Method;

public class MyBeforeAdvice implements MethodBeforeAdvice {
    @Override
    public void before(Method method, Object[] objects, Object o) throws Throwable {
        System.out.println("在方法执行前调用");
    }
}
//后置通知,有异常不执行,方法会因异常而结束,无返回值
class MyAfterReturningAdvice implements AfterReturningAdvice{

    @Override
    public void afterReturning(Object o, Method method, Object[] objects, Object o1) throws Throwable {
        System.out.println("在方法执行后调用");
    }
}
//异常通知,有异常才会执行
class MyThrowsAdvice implements ThrowsAdvice{
    public void afterThrowing(Exception ex){
        System.out.println("有异常!!");
    }
}
//环绕通知
class MyMethodInterceptor implements MethodInterceptor{

    @Override
    public Object invoke(MethodInvocation methodInvocation) throws Throwable {
        System.out.println("事务开始");
        Object object = methodInvocation.proceed();
        System.out.println("事务结束");
        return object;
    }
}
5.2.5 spring-context.xml文件
<?xml version="1.0" encoding="utf8" ?>
<beans xmlns="http://www.springframework.org/schema/beans"
xmlns:aop="http://www.springframework.org/schema/aop"
xmlns:xsi="http://www.w3.org/2001/XMLSchema-instance" xsi:schemaLocation="http://www.springframework.org/schema/beans
http://www.springframework.org/schema/beans/spring-beans.xsd
http://www.springframework.org/schema/aop/spring-aop.xsd
http://www.springframework.org/schema/tx"
>
<!--目标:原始业务-->
<bean id="userService" class="com.lyx.service.impl.service.UserServiceImpl"></bean>
<!--通知:额外功能-->
<bean id="before" class="com.lyx.advice.MyBeforeAdvice"></bean>
<bean id="after" class="com.lyx.advice.MyAfterReturningAdvice"></bean>
<bean id="throws" class="com.lyx.advice.MyThrowsAdvice"></bean>
<bean id="mi" class="com.lyx.advice.MyMethodInterceptor"></bean>
<!--定义切入点-->
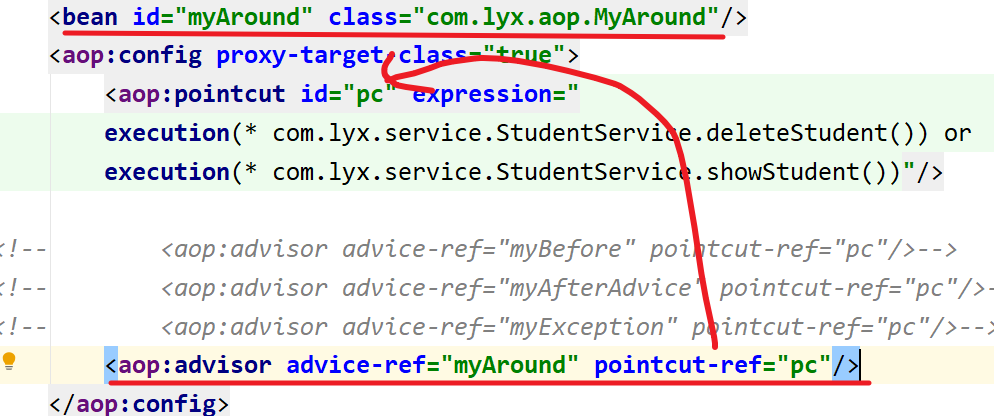
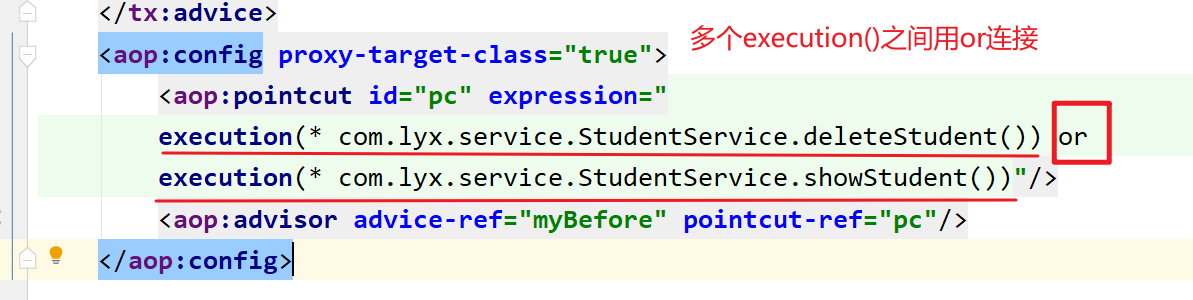
<aop:config>
<aop:pointcut id="pc_service" expression="execution(* queryUser())"/>
<aop:pointcut id="pc_service2" expression="execution(* queryUser())"/>
<aop:pointcut id="pc_service3" expression="execution(* queryUser())"/>
<aop:pointcut id="pc_service4" expression="execution(* queryUser())"/>
<aop:advisor advice-ref="before" pointcut-ref="pc_service"/>
<aop:advisor advice-ref="after" pointcut-ref="pc_service2"/>
<aop:advisor advice-ref="throws" pointcut-ref="pc_service3"/>
<aop:advisor advice-ref="mi" pointcut-ref="pc_service4"/>
</aop:config>
</beans>
运行结果如下

5.3 通配切入点
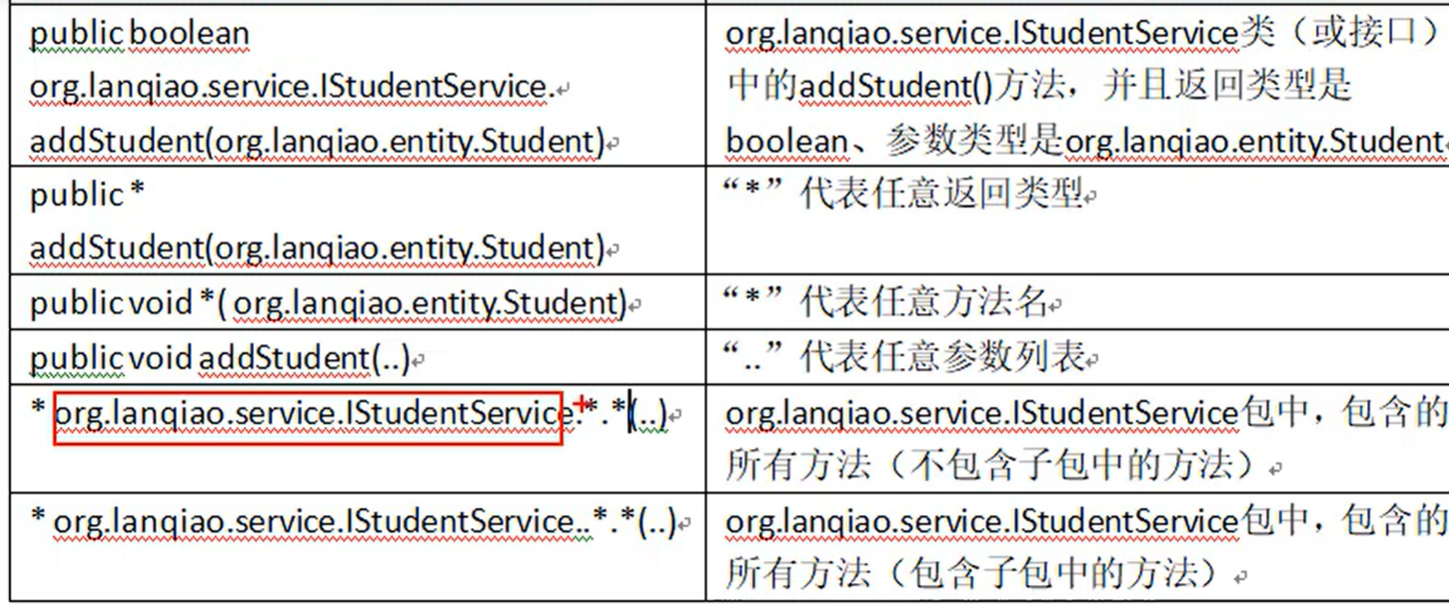
- execution内参数依次是修饰符、返回值、包.类、方法名、参数
5.3.1 匹配参数
* *(com.lyx.eneity.User)
匹配的是修饰符、返回值、包.类、方法名都随便用*代替,方法里面的参数必须是User类型的

如果想对多个方法前插入相同的方法,可以写在一起
5.3.2 匹配方法名(无参)
* queryUser()
匹配的是修饰符、返回值、包.类随便用*代替,方法名必须是queryUser,()括号里面不写,匹配的是无参的方法,如果要指定参数,参考上一个匹配参数
<aop:pointcut id="pc_service" expression="execution(* queryUser())"/>
5.3.3 匹配方法名(任意参数)
* queryUser(…)
匹配的是修饰符、返回值、包.类随便用*代替,方法名必须是queryUser,(…)括号里面的“…”,匹配的是任意参数
<aop:pointcut id="pc_service" expression="execution(* queryUser(..))"/>
5.3.4 匹配返回值类型
com.lyx.en.User * (…)
匹配的是修饰符随便、返回值必须是User类型、包.类和方法名随便用*代替、(…)括号里面的“…”,匹配的是任意参数
<aop:pointcut id="pc_service" expression="execution(com.lyx.en.User *(..))"/>
5.3.5 匹配类名
* com.lyx.en.User. * (…)
匹配的是修饰符随便、返回值随便、包.类必须是com.lyx.en.User、和方法名随便用*代替、(…)括号里面的“…”,匹配的是任意参数
<aop:pointcut id="pc_service" expression="execution(* com.lyx.en.User.*(..))"/>
5.3.5 匹配包名
* com.lyx.en.User.*.* (..)
匹配的是修饰符随便、返回值随便、包必须是com.lyx.en.User、类随便用*代替、方法名随便用*代替、(…)括号里面的“…”,匹配的是任意参数
上面括号里是两个点,不知道怎么显示出来是三个点
<aop:pointcut id="pc_service" expression="execution(* com.lyx.en.*.*(..))"/>
5.3.6 匹配包名、以及子包名
* com.lyx.en..* .* (..)
匹配的是修饰符随便、返回值随便、包必须是com.lyx.en.User、类随便用*代替、方法名随便用*代替、(…)括号里面的“…”,匹配的是任意参数
<aop:pointcut id="pc_service" expression="execution(* com.lyx.en.*.*(..))"/>
5.3.7 总结
6. AOP使用注解开发
xml原始代码如下:

注解方法:
6.1 @Aspect注解使用步骤
6.1.1 将LogAspectAnnotation类定义为通知类
6.1.2 配置文件中添加扫描器、开启注解对aop的支持
applicationContext.xml文件中添加


注意
运行发现报错了:

添加 proxy-target-class=“true” 属性,表示使用CGLIB动态代理织入增强
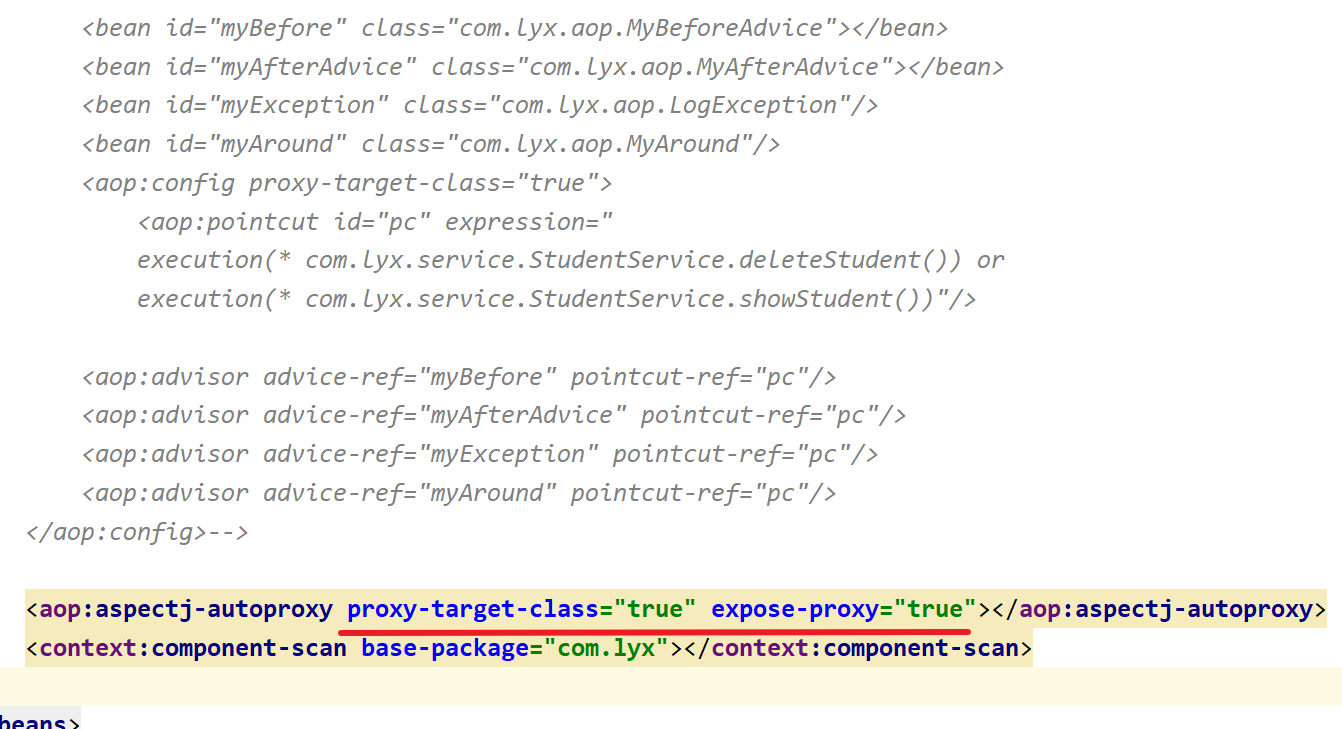
碰到的问题是
<aop:aspectj-autoproxy/> 其中<aop:aspectj-autoproxy/>有一个 proxy-target-class属性,默认为false,表示使用JDK动态代理技术织入增强;当配置为<aop:aspectj-autoproxy proxy-target-class="true"/>时,表示使用CGLIB动态代理技术织入增强。不过即使proxy-target-class设置为false,如果目标类没有声明接口,则Spring将自动使用CGLIB动态代理。
两者的区别:
JDK动态代理实现了接口的类或者直接代理接口,而CGLIB可以代理未实现任何接口的类。另外CGLIB是通过生成一个被代理类的子类来拦截被代理类的方法调用,因此不能代理被final修饰的类和方法。
来看我的通知类LogAspectAnnotation:
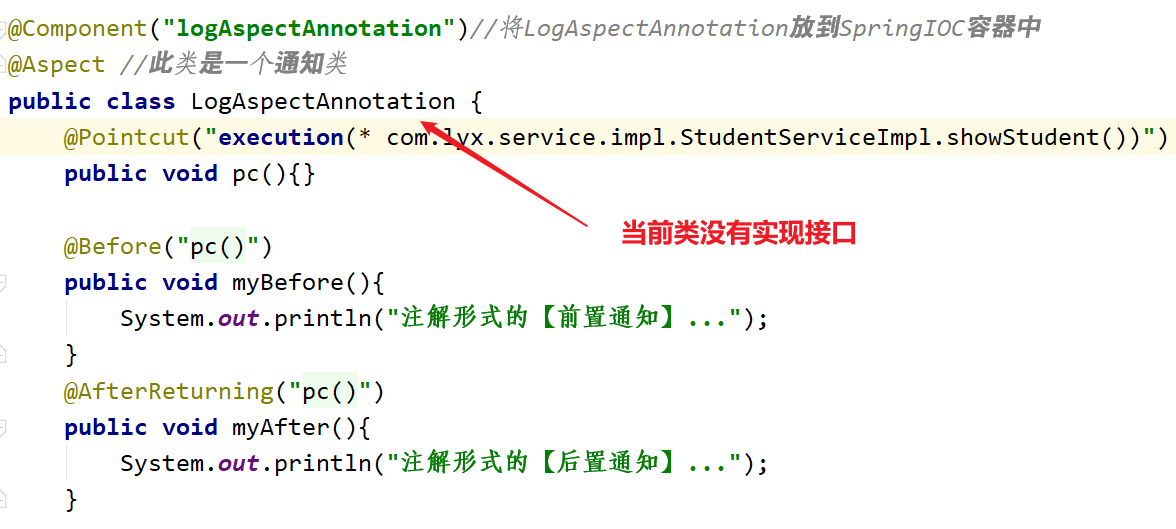
没有实现任何接口,所以要把proxy-target-class=“true”
再次运行
6.1.3 @Aspect注解与扫描器无关
@Aspect不需要加入扫描器,只需要开启即可;

    <!--只针对@Aspect注解-->
<aop:aspectj-autoproxy proxy-target-class="true" expose-proxy="true"></aop:aspectj-autoproxy>

    <!--只针对@Component @Repository @Service @Controller修饰的类产生的对象,将其增加到IOC容器中-->
<context:component-scan base-package="com.lyx"></context:component-scan>
6.1.4 完整代码

例题:
例1:
package com.lyx.aspect;
import org.aspectj.lang.JoinPoint;
import org.aspectj.lang.ProceedingJoinPoint;
import org.aspectj.lang.annotation.*;
import org.springframework.stereotype.Component;
import java.io.ObjectInputStream;
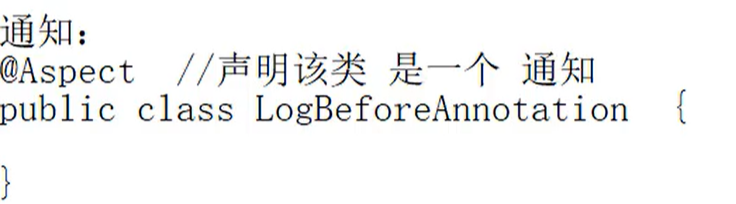
@Aspect //声明此类是一个切面类:会包含切入点pointcut和通知advice
@Component //声明组件,进入工厂
public class MyAspect {
//定义切入点
@Pointcut("execution(* com.lyx.service.UserServiceImpl.*(..))")
public void pc(){};
@Before("pc()")
public void mybefore(JoinPoint a){
System.out.println("target:"+a.getTarget());
System.out.println("args:"+a.getArgs());
System.out.println("method's name:"+a.getSignature().getName());
System.out.println("before........");
}
@AfterReturning(value = "pc()",returning = "ret")
public void myAfterReturning(JoinPoint a,Object ret){
System.out.println("after......:"+ret);
}
@AfterThrowing(value = "pc()",throwing = "ex")
public void myThrows(JoinPoint jp,Exception ex){
System.out.println("throws");
System.out.println("=="+ex.getMessage());
}
@Around("pc()")
public Object myInterceptor(ProceedingJoinPoint p) throws Throwable{
System.out.println("interceptor1....");
Object ret = p.proceed();
System.out.println("interceptor2....");
return ret;
}
}
例2
import org.aspectj.lang.annotation.AfterReturning;
import org.aspectj.lang.annotation.Aspect;
import org.aspectj.lang.annotation.Before;
import org.aspectj.lang.annotation.Pointcut;
import org.springframework.stereotype.Component;
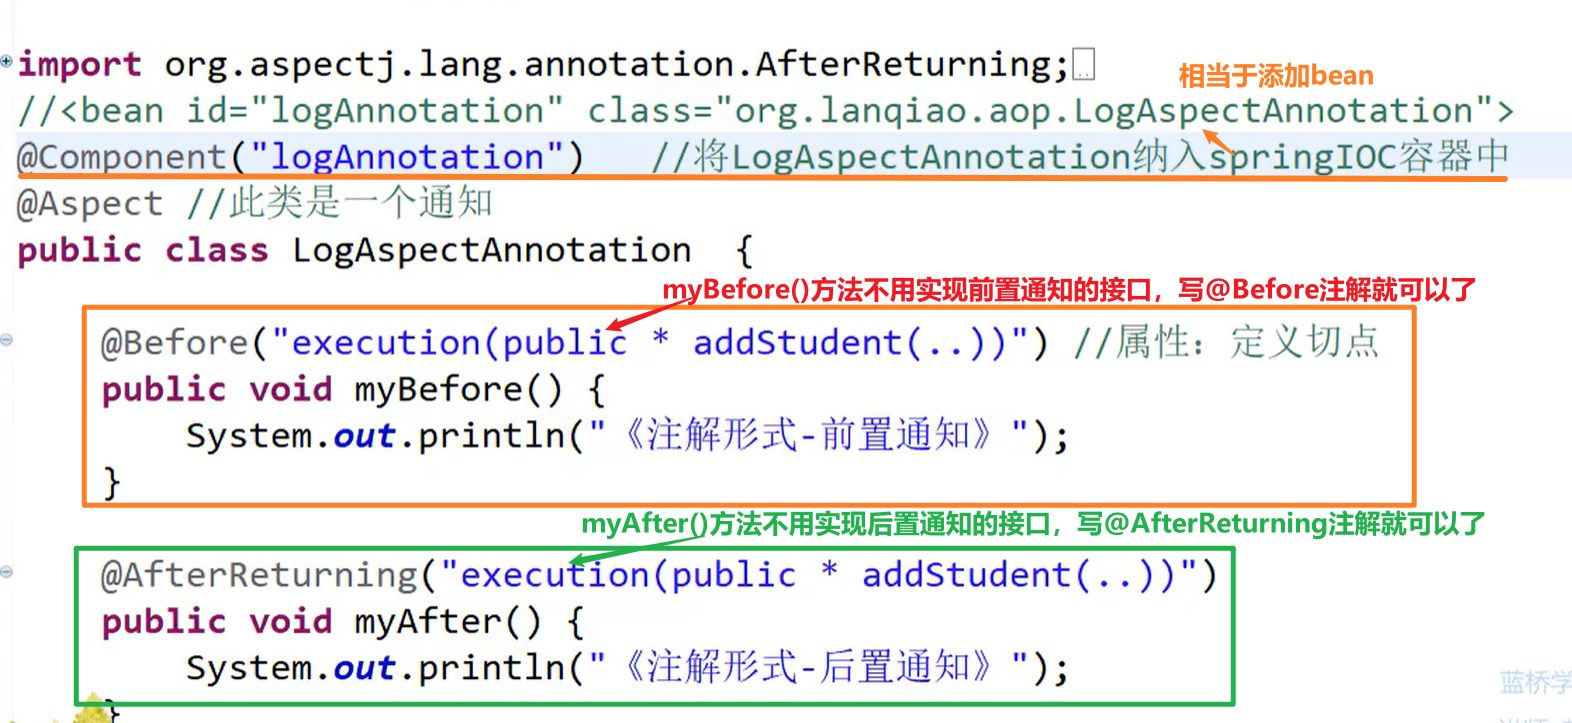
@Component("logAspectAnnotation")//将LogAspectAnnotation放到SpringIOC容器中
@Aspect //此类是一个通知类
public class LogAspectAnnotation {
@Pointcut("execution(* com.lyx.service.impl.StudentServiceImpl.showStudent())")
public void pc(){}
@Before("pc()")
public void myBefore(){
System.out.println("注解形式的【前置通知】...");
}
@AfterReturning("pc()")
public void myAfter(){
System.out.println("注解形式的【后置通知】...");
}
}
6.2 JointPoint对象
通过注解形式实现的aop,如果想要获取目标对象的一些参数,
则需要使用一个对象:JointPoint
代码如下:给前置后置通知myBefore()和myAfter()方法形参JoinPoint joinPoint

通过JointPoint对象获取目标方法
package com.lyx.aop;
import org.aspectj.lang.JoinPoint;
import org.aspectj.lang.annotation.AfterReturning;
import org.aspectj.lang.annotation.Aspect;
import org.aspectj.lang.annotation.Before;
import org.aspectj.lang.annotation.Pointcut;
import org.springframework.stereotype.Component;
import java.util.Arrays;
@Component("logAspectAnnotation")//将LogAspectAnnotation放到SpringIOC容器中
@Aspect //此类是一个通知类
public class LogAspectAnnotation {
@Pointcut("execution(* com.lyx.service.impl.StudentServiceImpl.showStudent())")
public void pc(){}
@Before("pc()")
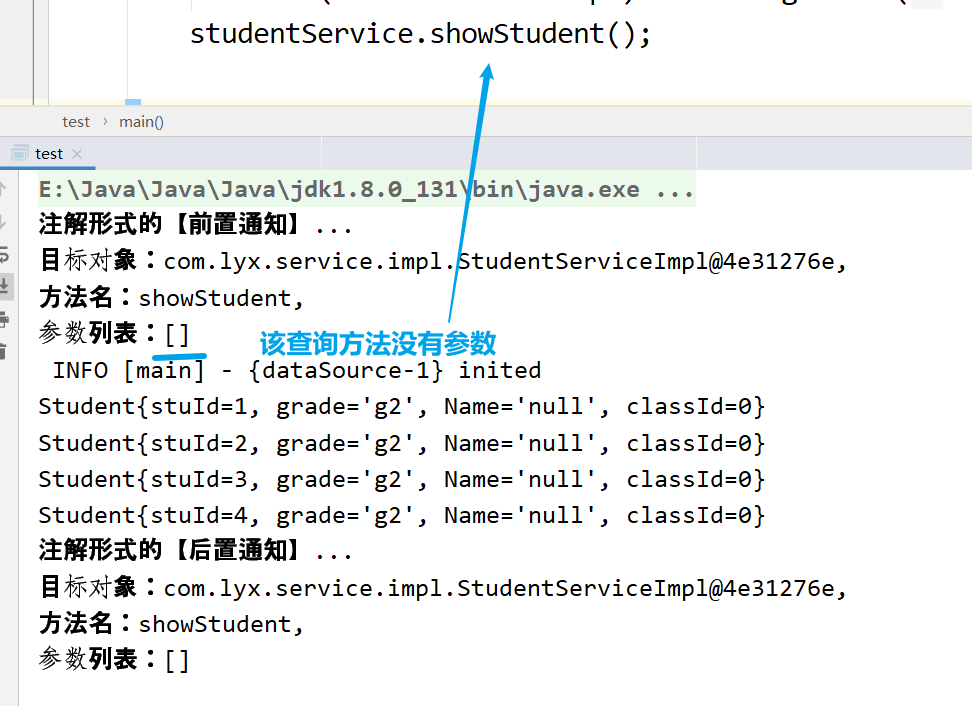
public void myBefore(JoinPoint joinPoint){
System.out.println("注解形式的【前置通知】...");
System.out.println("目标对象:"+joinPoint.getTarget()+
",\n方法名:"+joinPoint.getSignature().getName()+
",\n参数列表:"+ Arrays.toString(joinPoint.getArgs()));
}
@AfterReturning("pc()")
public void myAfter(JoinPoint joinPoint){
System.out.println("注解形式的【后置通知】...");
System.out.println("目标对象:"+joinPoint.getTarget()+
",\n方法名:"+joinPoint.getSignature().getName()+
",\n参数列表:"+ Arrays.toString(joinPoint.getArgs()));
}
}
运行结果:
6.3 注解形式目标方法的返回值
声明返回值的参数名
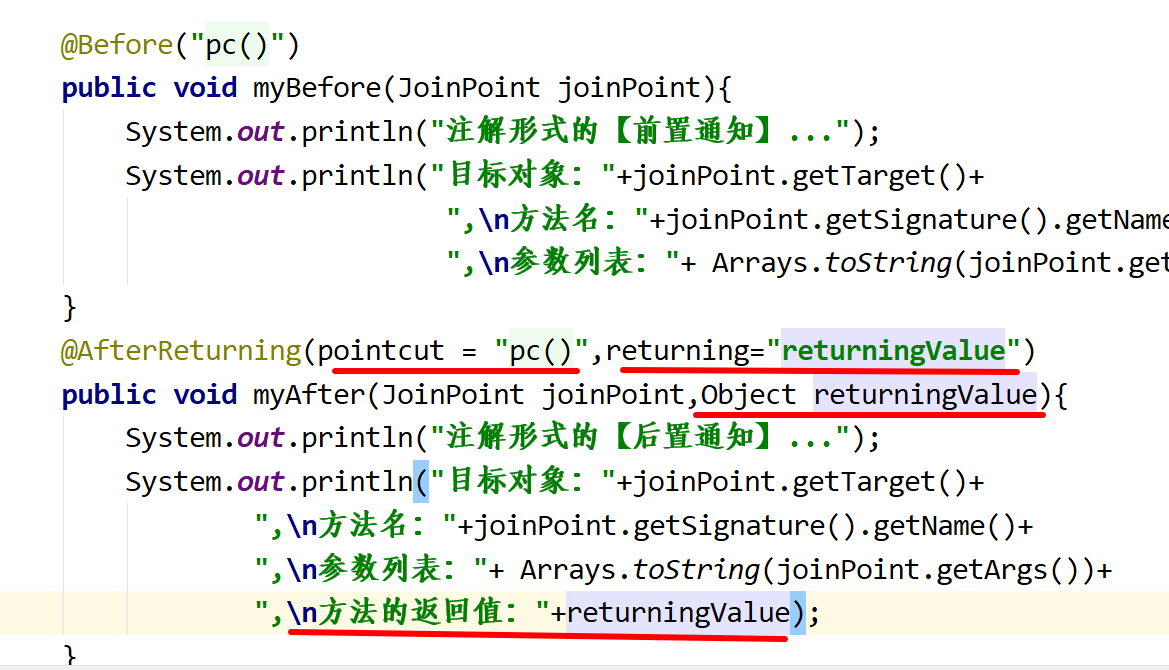
来看以下@AfterReturning的参数
- returning切入的目标类的返回值
- 看以下@AfterReturning方法的使用:spring @AfterReturning 返回值
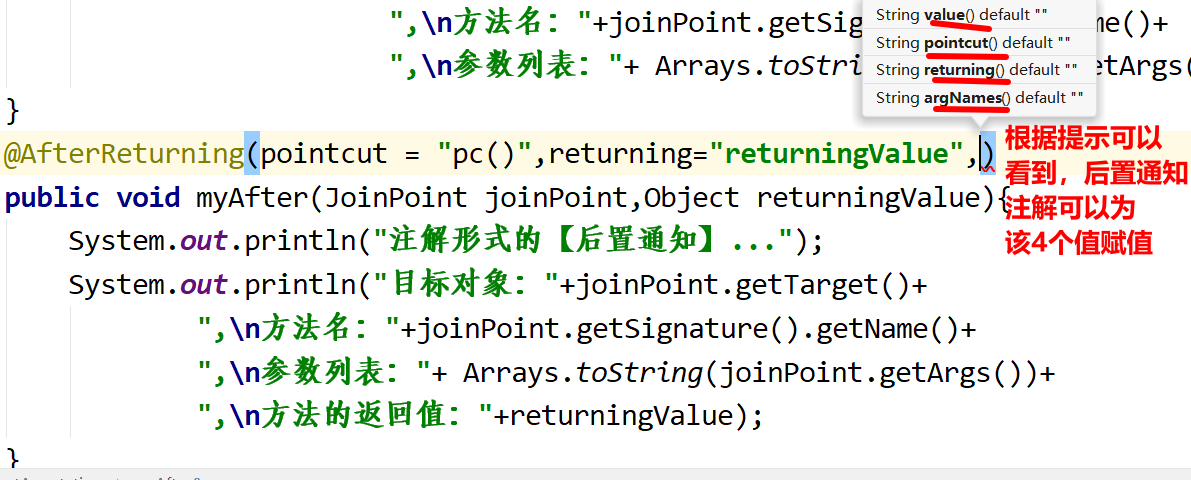
  @AfterReturning(pointcut = "pc()",returning="returningValue",argNames = "joinPoint,returningValue",value = "")
    public void myAfter(JoinPoint joinPoint,Object returningValue){
        System.out.println("注解形式的【后置通知】...");
        System.out.println("目标对象:"+joinPoint.getTarget()+
                ",\n方法名:"+joinPoint.getSignature().getName()+
                ",\n参数列表:"+ Arrays.toString(joinPoint.getArgs())+
                ",\n方法的返回值:"+returningValue);
    }
运行结果:

6.4 注解形式的环绕通知:参数类型ProceedingJointPoint
代码如下:
@Component("logAspectAnnotation")//将LogAspectAnnotation放到SpringIOC容器中
@Aspect //此类是一个通知类
public class LogAspectAnnotation {
@Pointcut("execution(* com.lyx.service.impl.StudentServiceImpl.showStudent())")
public void pc(){}
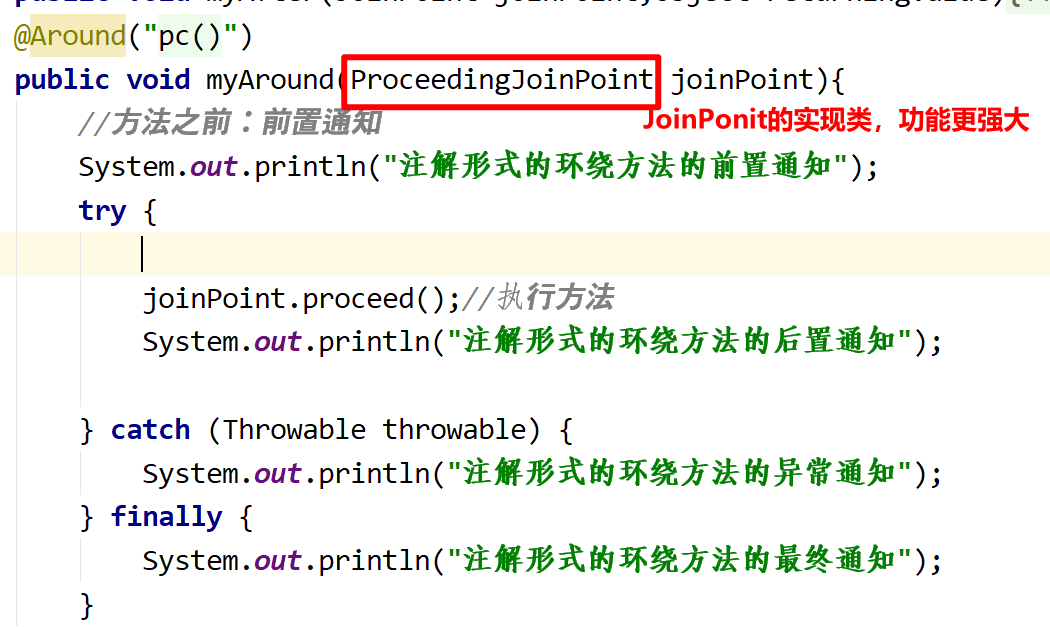
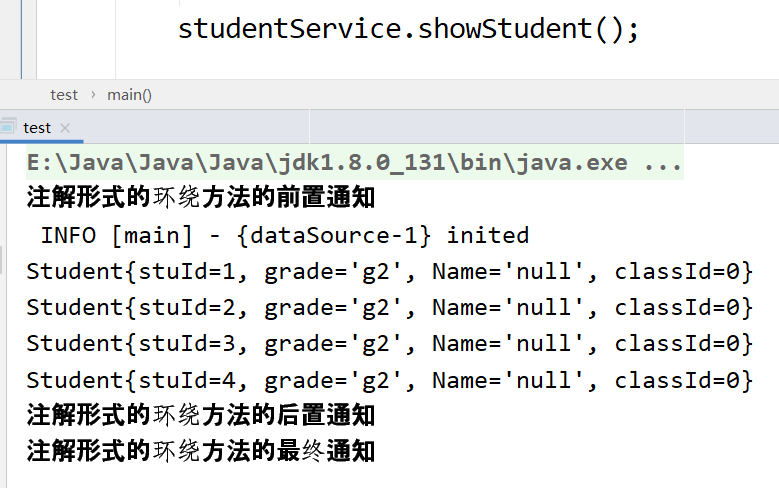
@Around("pc()")
public void myAround(ProceedingJoinPoint joinPoint){
//方法之前:前置通知
System.out.println("注解形式的环绕方法的前置通知");
try {
joinPoint.proceed();//执行方法
System.out.println("注解形式的环绕方法的后置通知");
} catch (Throwable throwable) {
System.out.println("注解形式的环绕方法的异常通知");
} finally {
System.out.println("注解形式的环绕方法的最终通知");
}
}
}
6.5 注解形式的异常通知和最终通知
@AfterThrowing和@After
package com.lyx.aop;
import org.aspectj.lang.JoinPoint;
import org.aspectj.lang.ProceedingJoinPoint;
import org.aspectj.lang.annotation.*;
import org.springframework.stereotype.Component;
import java.util.Arrays;
@Component("logAspectAnnotation")//将LogAspectAnnotation放到SpringIOC容器中
@Aspect //此类是一个通知类
public class LogAspectAnnotation {
@Pointcut("execution(* com.lyx.service.impl.StudentServiceImpl.showStudent())")
public void pc(){}
//异常通知
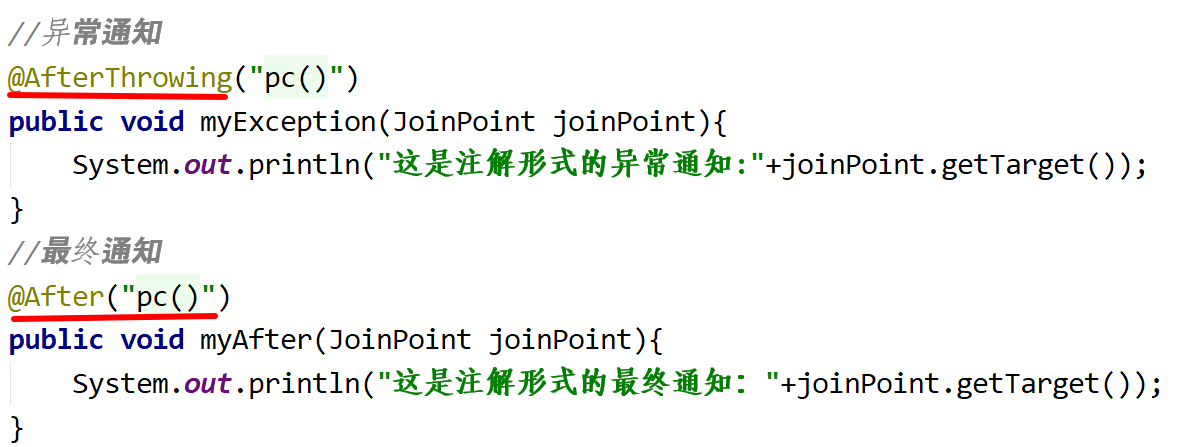
@AfterThrowing("pc()")
public void myException(JoinPoint joinPoint){
System.out.println("这是注解形式的异常通知:"+joinPoint.getTarget());
}
//最终通知
@After("pc()")
public void myAfter(JoinPoint joinPoint){
System.out.println("这是注解形式的最终通知:"+joinPoint.getTarget());
}
}
运行结果:

如果只捕获特定类型的异常,则可以通过第二个参数实现
演示只捕获空指针异常
运行结果:

代码:
@Component("logAspectAnnotation")//将LogAspectAnnotation放到SpringIOC容器中
@Aspect //此类是一个通知类
public class LogAspectAnnotation {
@Pointcut("execution(* com.lyx.service.impl.StudentServiceImpl.showStudent())")
public void pc(){}
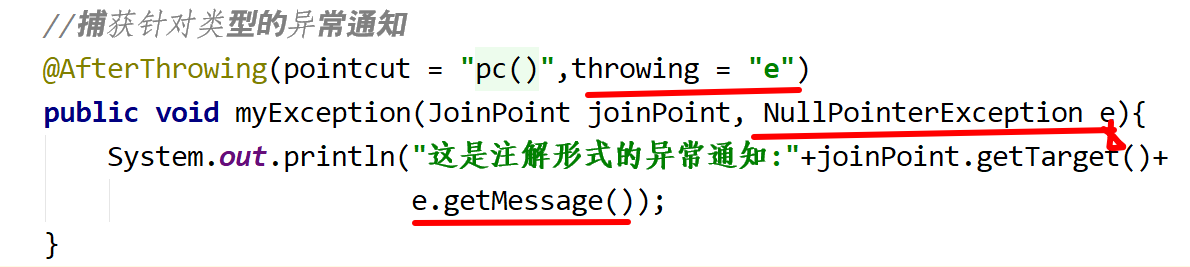
//捕获针对类型的异常通知
@AfterThrowing(pointcut = "pc()",throwing = "e")
public void myException(JoinPoint joinPoint, NullPointerException e){
System.out.println("这是注解形式的异常通知:"+joinPoint.getTarget()+
e.getMessage());
}
}
6.6 完整代码
package com.lyx.aop;

import org.apache.ibatis.jdbc.Null;
import org.aspectj.lang.JoinPoint;
import org.aspectj.lang.ProceedingJoinPoint;
import org.aspectj.lang.annotation.*;
import org.springframework.stereotype.Component;

import java.util.Arrays;

@Component("logAspectAnnotation")//将LogAspectAnnotation放到SpringIOC容器中
@Aspect //此类是一个通知类
public class LogAspectAnnotation {
    @Pointcut("execution(* com.lyx.service.impl.StudentServiceImpl.showStudent())")
    public void pc(){}

    @Before("pc()")
    public void myBefore(JoinPoint joinPoint){
        System.out.println("注解形式的【前置通知】...");
        System.out.println("目标对象:"+joinPoint.getTarget()+
                            ",\n方法名:"+joinPoint.getSignature().getName()+
                            ",\n参数列表:"+ Arrays.toString(joinPoint.getArgs()));
    }
    @AfterReturning(pointcut = "pc()",returning="returningValue",argNames = "joinPoint,returningValue",value = "")
    public void myAfter(JoinPoint joinPoint,Object returningValue){
        System.out.println("注解形式的【后置通知】...");
        System.out.println("目标对象:"+joinPoint.getTarget()+
                ",\n方法名:"+joinPoint.getSignature().getName()+
                ",\n参数列表:"+ Arrays.toString(joinPoint.getArgs())+
                ",\n方法的返回值:"+returningValue);
    }
    @Around("pc()")
    public void myAround(ProceedingJoinPoint joinPoint){
        //方法之前:前置通知
        System.out.println("注解形式的环绕方法的前置通知");
        try {

            joinPoint.proceed();//执行方法
            System.out.println("注解形式的环绕方法的后置通知");

        } catch (Throwable throwable) {
            System.out.println("注解形式的环绕方法的异常通知");
        } finally {
            System.out.println("注解形式的环绕方法的最终通知");
        }
    }
    //捕获针对类型的异常通知
    @AfterThrowing(pointcut = "pc()",throwing = "e")
    public void myException(JoinPoint joinPoint, NullPointerException e){
        System.out.println("这是注解形式的异常通知:"+joinPoint.getTarget()+
                           e.getMessage());
    }
    //最终通知
    @After("pc()")
    public void myAfter(JoinPoint joinPoint){
        System.out.println("这是注解形式的最终通知:"+joinPoint.getTarget());
    }

}
7. AOP使用Schema形式开发
7.1 < aop:aspect>标签的使用
< aop:advisor>大多用于事务管理
< aop:aspect>大多用于日志,缓存
- 不实现接口了,直接写一个普通类,自定义前置通知和后置通知
import org.aspectj.lang.JoinPoint;
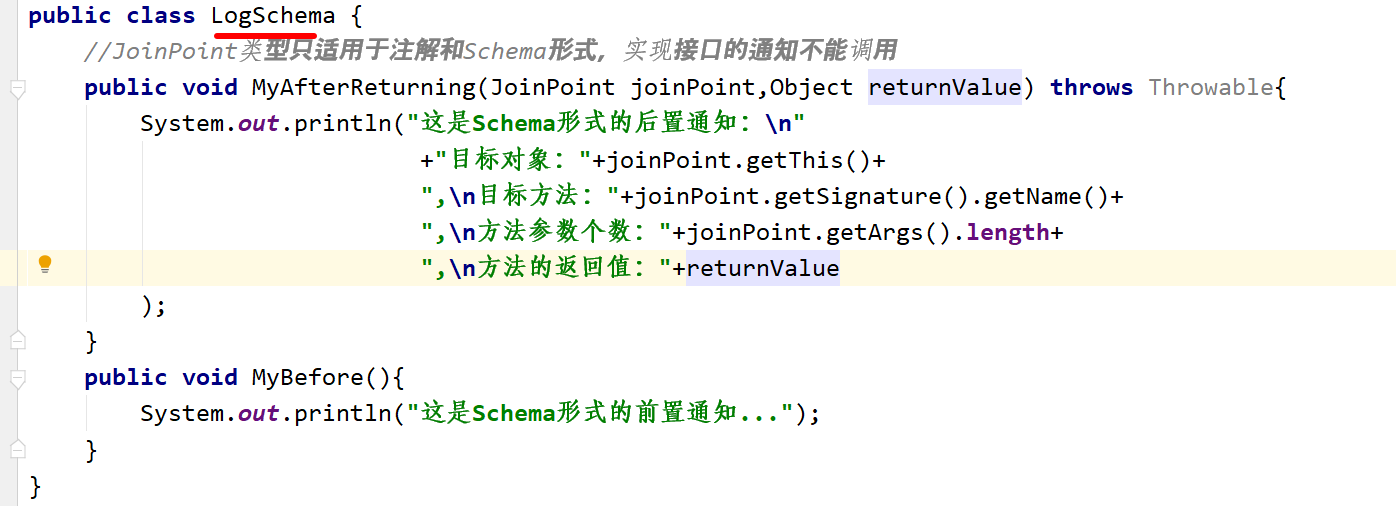
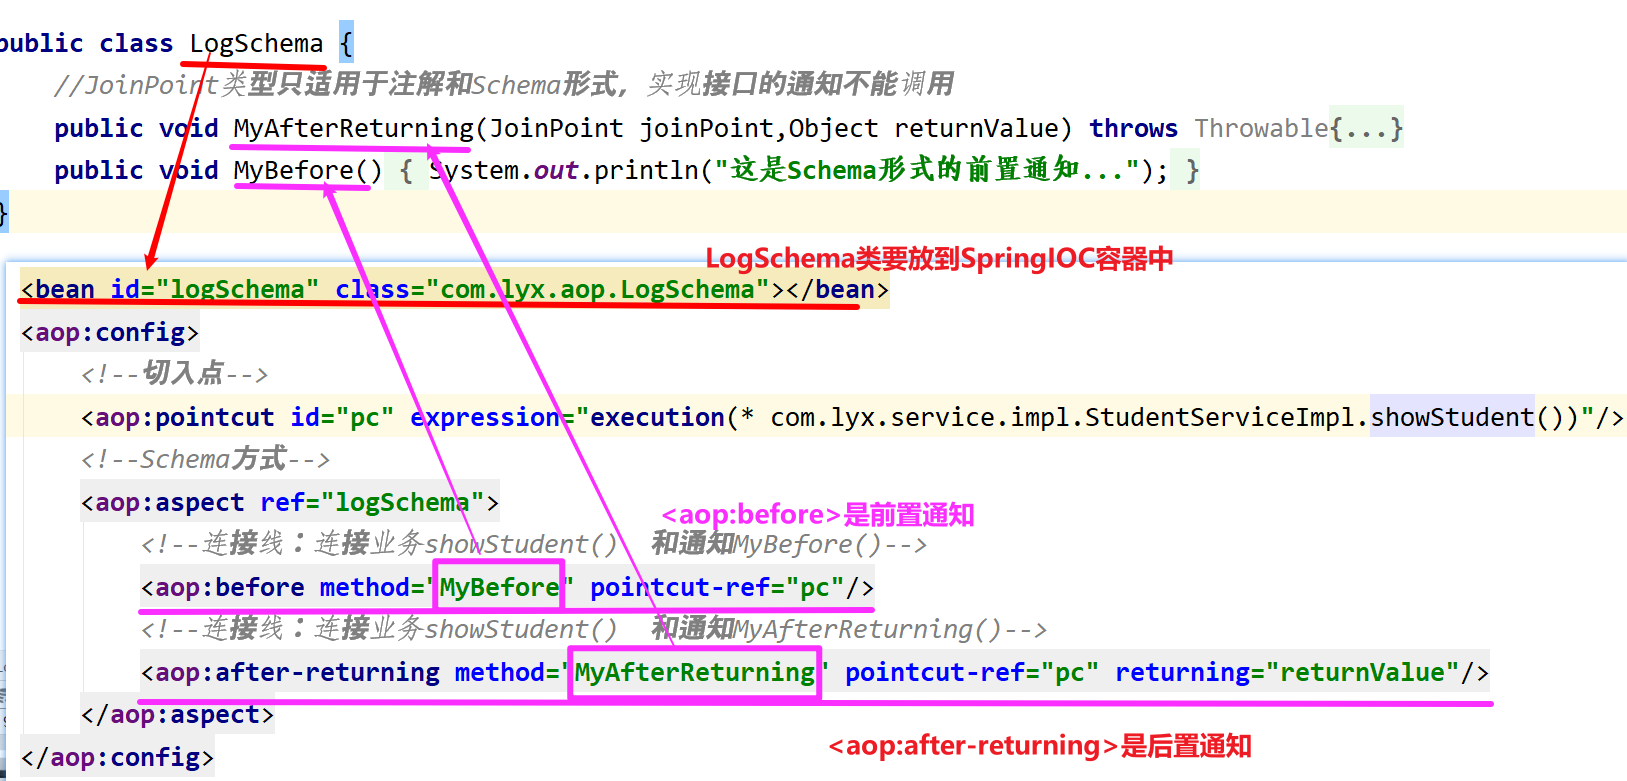
public class LogSchema {
//JoinPoint类型只适用于注解和Schema形式,实现接口的通知不能调用
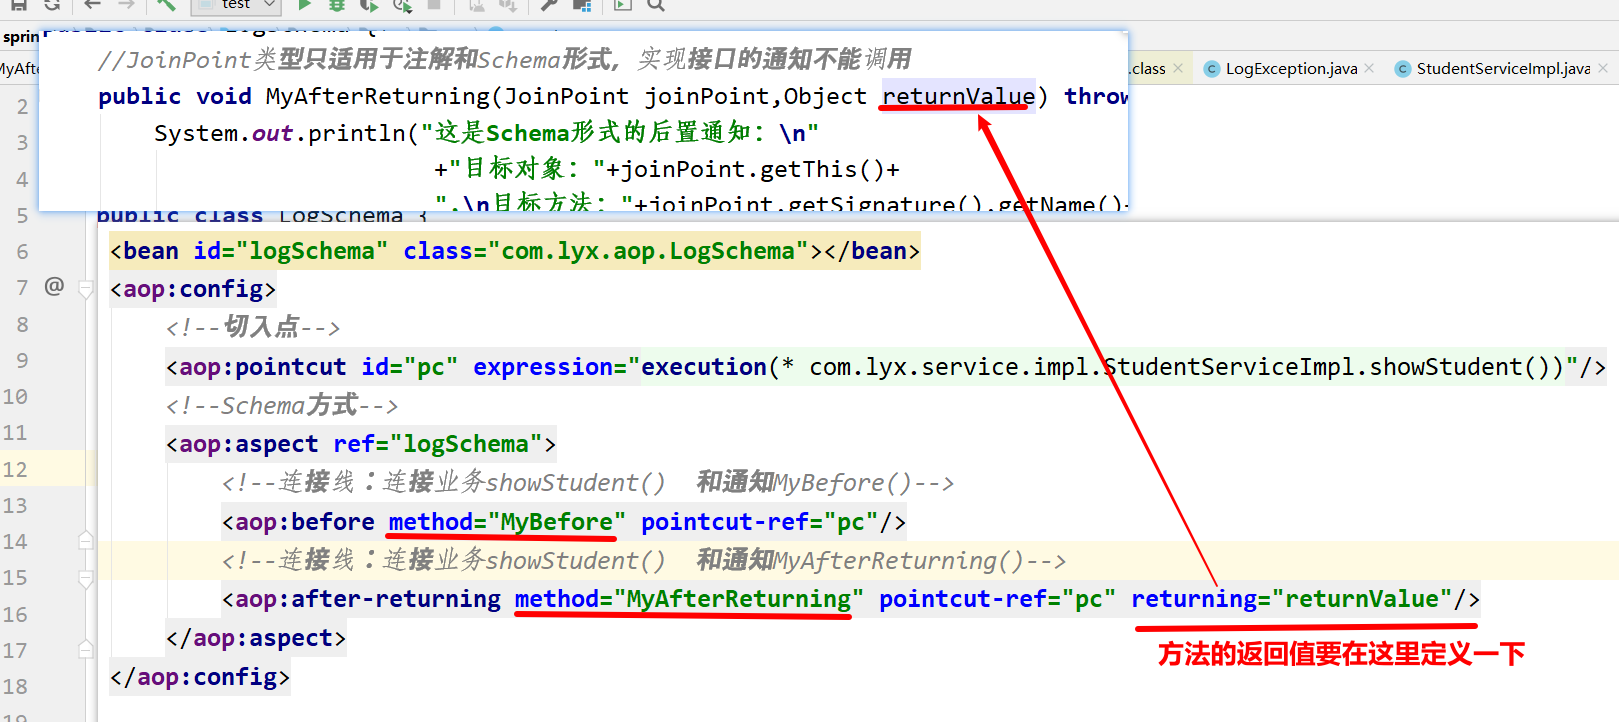
public void MyAfterReturning(JoinPoint joinPoint,Object returnValue) throws Throwable{
System.out.println("这是Schema形式的后置通知:\n"
+"目标对象:"+joinPoint.getThis()+
",\n目标方法:"+joinPoint.getSignature().getName()+
",\n方法参数个数:"+joinPoint.getArgs().length+
",\n方法的返回值:"+returnValue
);
}
public void MyBefore(){
System.out.println("这是Schema形式的前置通知...");
}
}
- 配置文件中
<bean id="logSchema" class="com.lyx.aop.LogSchema"></bean>
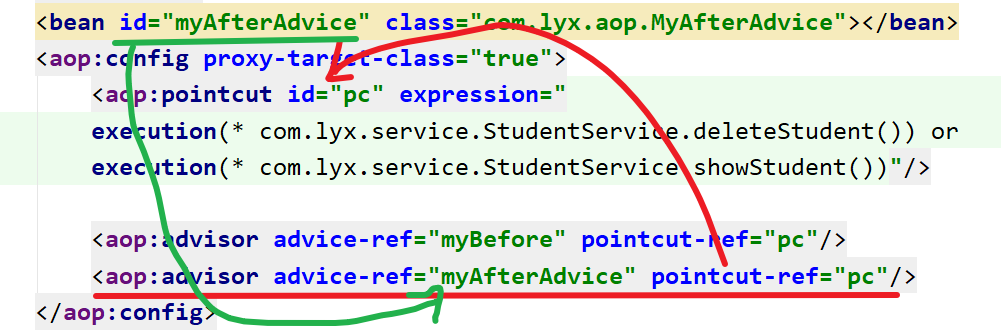
<aop:config>
<!--切入点-->
<aop:pointcut id="pc" expression="execution(* com.lyx.service.impl.StudentServiceImpl.showStudent())"/>
<!--Schema方式-->
<aop:aspect ref="logSchema">
<!--连接线:连接业务showStudent() 和通知MyBefore()-->
<aop:before method="MyBefore" pointcut-ref="pc"/>
<!--连接线:连接业务showStudent() 和通知MyAfterReturning()-->
<aop:after-returning method="MyAfterReturning" pointcut-ref="pc" returning="returnValue"/>
</aop:aspect>
</aop:config>
与我们之前写的相比:
以前用aop:advisor标签
现在用
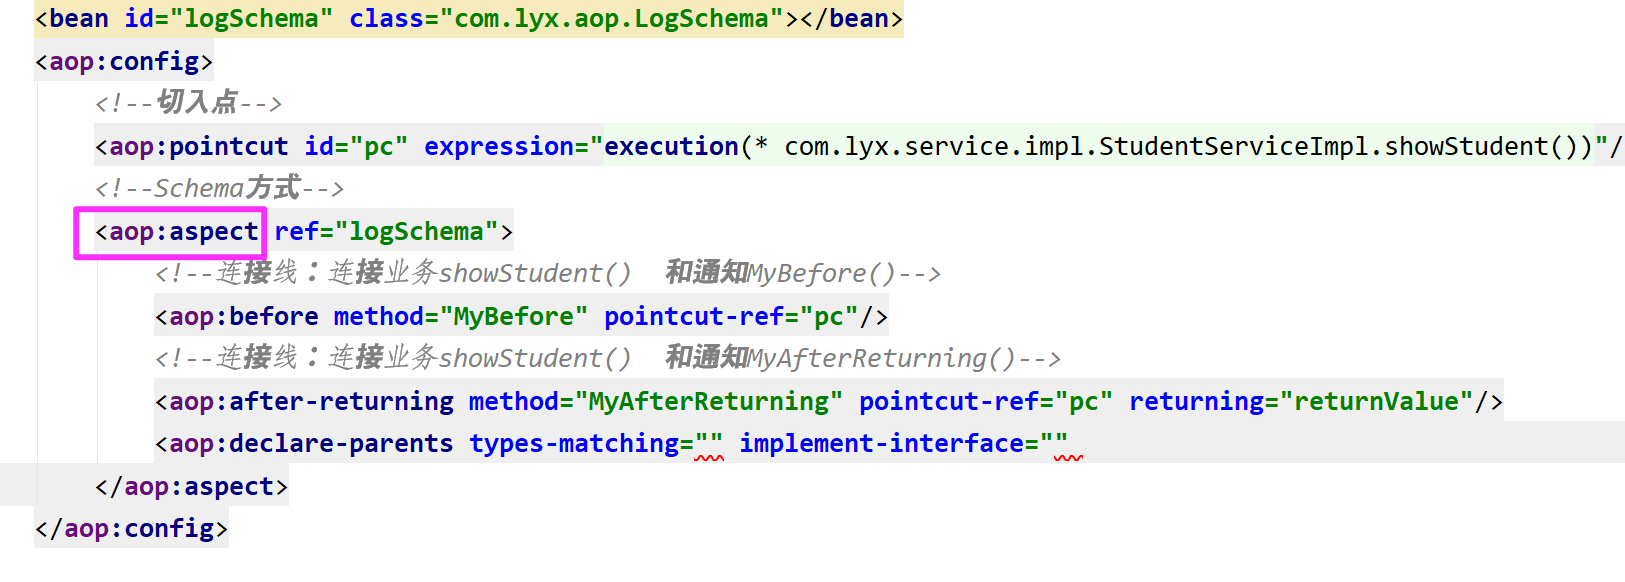
注意怎么对应的 这里使用到aop:before、aop:after-returning标签且在aop:aspect标签内部
最后注意一点,如果想通过后置通知拿到目标方法的返回值,需要自定义一个参数Object returnValue(名字任意),且要在spring配置文件中声明
上面写的是前置通知和后置通知,来看看异常通知
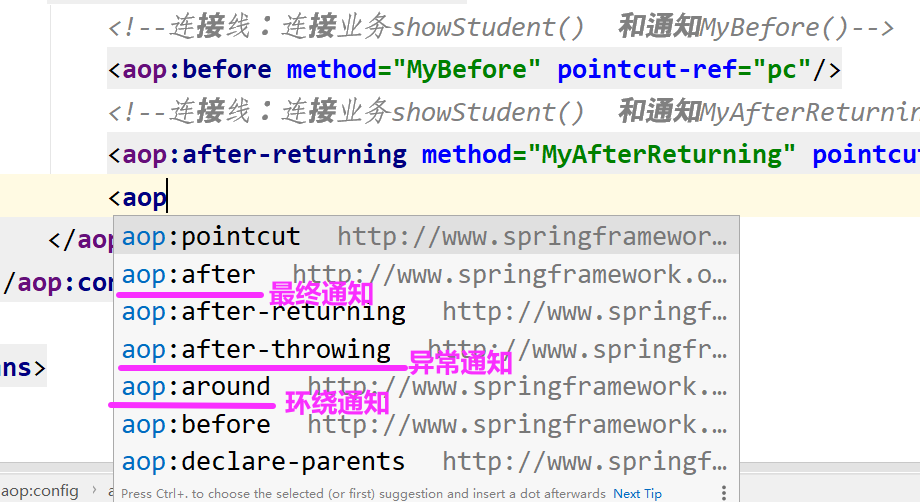
上面提示中其他我们都接触过了,可以看到最后还有一个aop:declare-parents,下面解释一下该标签的用法
7.2 <aop:declare-parents/>增加新的功能
AOP中declare-parents为特定的类增加新的功能
如果有这样一个需求,为一个已知的API添加一个新的功能。
由于是已知的API,我们不能修改其类,只能通过外部包装。但是如果通过之前的AOP前置或后置通知,又不太合理,最简单的办法就是实现某个我们自定义的接口,这个接口包含了想要添加的方法。
但是JAVA不是一门动态的语言,无法再编译后动态添加新的功能,这个时候就可以使用 aop:declare-parents 来做了.
目标方法的类和接口
public interface Person {
    public void dance();
}
public class Women implements Person {
    @Override
    public void dance() {
        System.out.println("they call it dance,I call it life");
    }
}
想要添加的新功能的类和接口
public interface WarmUp {
   public void doSports();
}
public class Jogging implements WarmUp {
    @Override
    public void doSports() {
        System.out.println("I go Jogging...");
    }
}
配置applicationContext.xml文件,实现AOP
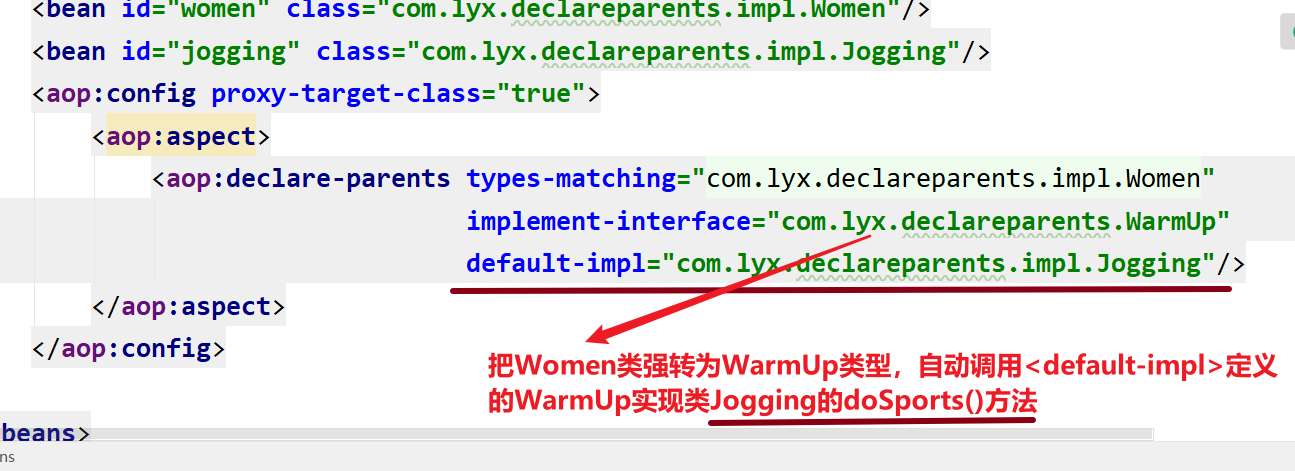
    <bean id="women" class="com.lyx.declareparents.impl.Women"/>
    <bean id="jogging" class="com.lyx.declareparents.impl.Jogging"/>
    <aop:config proxy-target-class="true">
        <aop:aspect>
            <aop:declare-parents types-matching="com.lyx.declareparents.impl.Women"
                                 implement-interface="com.lyx.declareparents.WarmUp"
                                 default-impl="com.lyx.declareparents.impl.Jogging"/>
        </aop:aspect>
    </aop:config>
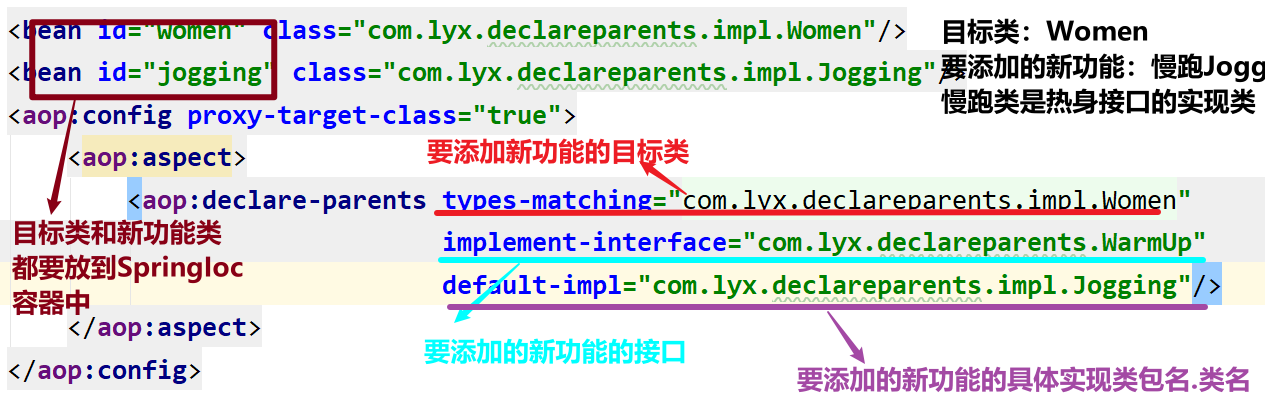
目标是 types-matching的类,spring让它实现 implement-interface所指向的接口, 而具体实现则通过default-impl或default-rel属性来赋予。
测试:
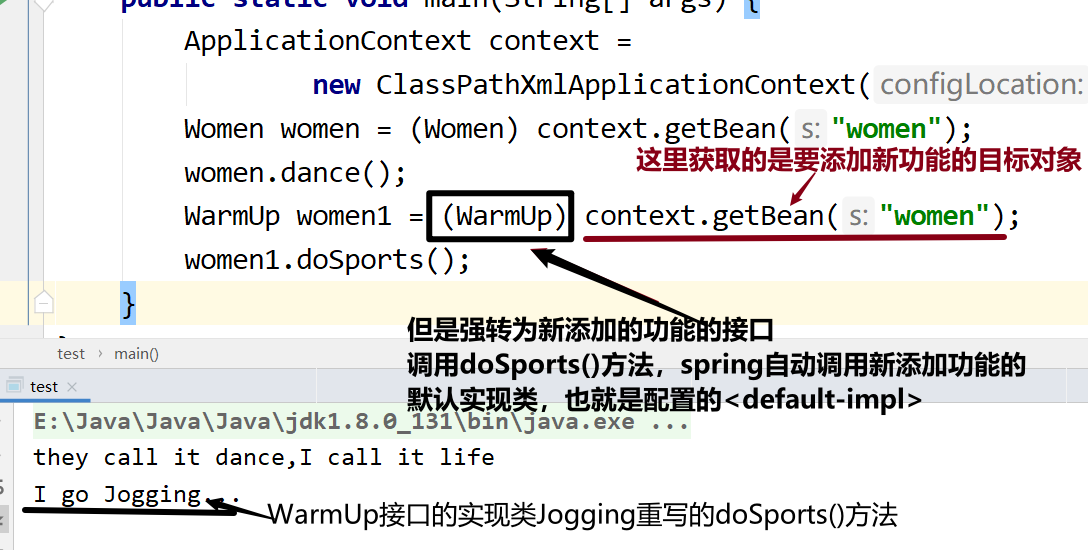
public class test {

    public static void main(String[] args) {
        ApplicationContext context =
                new ClassPathXmlApplicationContext("applicationContext.xml");
        Women women = (Women) context.getBean("women");
        women.dance();
        //这里注意是强转为目标类的接口WarmUp热身类
        WarmUp women1 = (WarmUp) context.getBean("women");
        women1.doSports();
    }
}
所以从spring容器中拿出来的 Women对象 可以被强转换成 WarmUp类型的对象。Spring帮我们使Women类自动实现了WarmUp接口,如何实现接口,这些都是spring背后做了很多事情。而不是代码显示地继承了它的接口。


 206
206


 被折叠的 条评论
为什么被折叠?
被折叠的 条评论
为什么被折叠?
 到【灌水乐园】发言


