


转载自用。。。。。
在微服务架构中,一个应用往往由多个服务组成,这些服务之间相互依赖,依赖关系错综复杂。
例如一个微服务系统中存在 A、B、C、D、E、F 等多个服务,它们的依赖关系如下图。
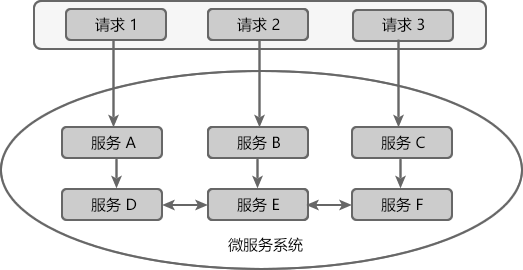
图1:服务依赖关系
通常情况下,一个用户请求往往需要多个服务配合才能完成。如图 1 所示,在所有服务都处于可用状态时,请求 1 需要调用 A、D、E、F 四个服务才能完成,请求 2 需要调用 B、E、D 三个服务才能完成,请求 3 需要调用服务 C、F、E、D 四个服务才能完成。
当服务 E 发生故障或网络延迟时,会出现以下情况:
- 即使其他所有服务都可用,由于服务 E 的不可用,那么用户请求 1、2、3 都会处于阻塞状态,等待服务 E 的响应。在高并发的场景下,会导致整个服务器的线程资源在短时间内迅速消耗殆尽。
- 所有依赖于服务 E 的其他服务,例如服务 B、D 以及 F 也都会处于线程阻塞状态,等待服务 E 的响应,导致这些服务的不可用。
- 所有依赖服务B、D 和 F 的服务,例如服务 A 和服务 C 也会处于线程阻塞状态,以等待服务 D 和服务 F 的响应,导致服务 A 和服务 C 也不可用。
从以上过程可以看出,当微服务系统的一个服务出现故障时,故障会沿着服务的调用链路在系统中疯狂蔓延,最终导致整个微服务系统的瘫痪,这就是“雪崩效应”。为了防止此类事件的发生,微服务架构引入了“熔断器”的一系列服务容错和保护机制。
熔断器
熔断器(Circuit Breaker)一词来源物理学中的电路知识,它的作用是当线路出现故障时,迅速切断电源以保护电路的安全。
在微服务领域,熔断器最早是由 Martin Fowler 在他发表的 《Circuit Breaker》一文中提出。与物理学中的熔断器作用相似,微服务架构中的熔断器能够在某个服务发生故障后,向服务调用方返回一个符合预期的、可处理的降级响应(FallBack),而不是长时间的等待或者抛出调用方无法处理的异常。这样就保证了服务调用方的线程不会被长时间、不必要地占用,避免故障在微服务系统中的蔓延,防止系统雪崩效应的发生。
Spring Cloud Hystrix
Spring Cloud Hystrix 是一款优秀的服务容错与保护组件,也是 Spring Cloud 中最重要的组件之一。
Spring Cloud Hystrix 是基于 Netflix 公司的开源组件 Hystrix 实现的,它提供了熔断器功能,能够有效地阻止分布式微服务系统中出现联动故障,以提高微服务系统的弹性。Spring Cloud Hystrix 具有服务降级、服务熔断、线程隔离、请求缓存、请求合并以及实时故障监控等强大功能。
Hystrix [hɪst'rɪks],中文含义是豪猪,豪猪的背上长满了棘刺,使它拥有了强大的自我保护能力。而 Spring Cloud Hystrix 作为一个服务容错与保护组件,也可以让服务拥有自我保护的能力,因此也有人将其戏称为“豪猪哥”。
在微服务系统中,Hystrix 能够帮助我们实现以下目标:
- 保护线程资源:防止单个服务的故障耗尽系统中的所有线程资源。
- 快速失败机制:当某个服务发生了故障,不让服务调用方一直等待,而是直接返回请求失败。
- 提供降级(FallBack)方案:在请求失败后,提供一个设计好的降级方案,通常是一个兜底方法,当请求失败后即调用该方法。
- 防止故障扩散:使用熔断机制,防止故障扩散到其他服务。
- 监控功能:提供熔断器故障监控组件 Hystrix Dashboard,随时监控熔断器的状态。
Hystrix 服务降级
Hystrix 提供了服务降级功能,能够保证当前服务不受其他服务故障的影响,提高服务的健壮性。
服务降级的使用场景有以下 2 种:
- 在服务器压力剧增时,根据实际业务情况及流量,对一些不重要、不紧急的服务进行有策略地不处理或简单处理,从而释放服务器资源以保证核心服务正常运作。
- 当某些服务不可用时,为了避免长时间等待造成服务卡顿或雪崩效应,而主动执行备用的降级逻辑立刻返回一个友好的提示,以保障主体业务不受影响。
我们可以通过重写 HystrixCommand 的 getFallBack() 方法或 HystrixObservableCommand 的 resumeWithFallback() 方法,使服务支持服务降级。
Hystrix 服务降级 FallBack 既可以放在服务端进行,也可以放在客户端进行。
Hystrix 会在以下场景下进行服务降级处理:
- 程序运行异常
- 服务超时
- 熔断器处于打开状态
- 线程池资源耗尽
示例1
下面我们就通过一个案例,分别演示下 Hystrix 服务端服务降级和客户端服务降级。
服务端服务降级
1. 在主工程 spring-cloud-demo2 下创建一个名为 micro-service-cloud-provider-dept-hystrix-8004 的服务提供者,并在其 pom.xml 中添加以下依赖。
- <?xml version="1.0" encoding="UTF-8"?>
- <project xmlns="http://maven.apache.org/POM/4.0.0" xmlns:xsi="http://www.w3.org/2001/XMLSchema-instance"
- xsi:schemaLocation="http://maven.apache.org/POM/4.0.0 https://maven.apache.org/xsd/maven-4.0.0.xsd">
- <modelVersion>4.0.0</modelVersion>
- <!--父pom-->
- <parent>
- <artifactId>spring-cloud-demo2</artifactId>
- <groupId>net.biancheng.c</groupId>
- <version>0.0.1-SNAPSHOT</version>
- </parent>
- <groupId>net.biancheng.c</groupId>
- <artifactId>micro-service-cloud-provider-dept-hystrix-8004</artifactId>
- <version>0.0.1-SNAPSHOT</version>
- <name>micro-service-cloud-provider-dept-hystrix-8004</name>
- <description>Demo project for Spring Boot</description>
- <properties>
- <java.version>1.8</java.version>
- </properties>
- <dependencies>
- <dependency>
- <groupId>org.springframework.boot</groupId>
- <artifactId>spring-boot-starter-web</artifactId>
- </dependency>
- <dependency>
- <groupId>org.springframework.boot</groupId>
- <artifactId>spring-boot-devtools</artifactId>
- <scope>runtime</scope>
- <optional>true</optional>
- </dependency>
- <dependency>
- <groupId>org.projectlombok</groupId>
- <artifactId>lombok</artifactId>
- <optional>true</optional>
- </dependency>
- <dependency>
- <groupId>org.springframework.boot</groupId>
- <artifactId>spring-boot-starter-test</artifactId>
- <scope>test</scope>
- </dependency>
- <!--添加 Spring Boot 的监控模块-->
- <dependency>
- <groupId>org.springframework.boot</groupId>
- <artifactId>spring-boot-starter-actuator</artifactId>
- </dependency>
- <!-- eureka 客户端-->
- <dependency>
- <groupId>org.springframework.cloud</groupId>
- <artifactId>spring-cloud-starter-netflix-eureka-client</artifactId>
- </dependency>
- <!--hystrix 依赖-->
- <dependency>
- <groupId>org.springframework.cloud</groupId>
- <artifactId>spring-cloud-starter-netflix-hystrix</artifactId>
- </dependency>
- </dependencies>
- <build>
- <plugins>
- <plugin>
- <groupId>org.springframework.boot</groupId>
- <artifactId>spring-boot-maven-plugin</artifactId>
- <configuration>
- <excludes>
- <exclude>
- <groupId>org.projectlombok</groupId>
- <artifactId>lombok</artifactId>
- </exclude>
- </excludes>
- </configuration>
- </plugin>
- </plugins>
- </build>
- </project>
2. 在类路径(即 /resources 目录)下添加一个配置文件 application.yml,配置内容如下。
- spring:
- application:
- name: microServiceCloudProviderDeptHystrix #微服务名称,对外暴漏的微服务名称,十分重要
- server:
- port: 8004
- ########################################### Spring cloud 自定义服务名称和 ip 地址###############################################
- eureka:
- client: #将客户端注册到 eureka 服务列表内
- service-url:
- #defaultZone: http://eureka7001:7001/eureka #这个地址是 7001注册中心在 application.yml 中暴露出来额注册地址 (单机版)
- defaultZone: http://eureka7001.com:7001/eureka/,http://eureka7002.com:7002/eureka/,http://eureka7003.com:7003/eureka/ #将服务注册到 Eureka 集群
- instance:
- instance-id: spring-cloud-provider-8004 #自定义服务名称信息
- prefer-ip-address: true #显示访问路径的 ip 地址
- #####################spring cloud 使用 Spring Boot actuator 监控完善信息###########################################
- # Spring Boot 2.50对 actuator 监控屏蔽了大多数的节点,只暴露了 heath 节点,本段配置(*)就是为了开启所有的节点
- management:
- endpoints:
- web:
- exposure:
- include: "*" # * 在yaml 文件属于关键字,所以需要加引号
- info:
- app.name: micro-service-cloud-provider-dept-hystrix
- company.name: c.biancheng.net
- build.aetifactId: @project.artifactId@
- build.version: @project.version@
3. 在 net.biancheng.c.service 包下创建一个名为 DeptService 的接口,代码如下。
- package net.biancheng.c.service;
- public interface DeptService {
- // hystrix 熔断器示例 ok
- public String deptInfo_Ok(Integer id);
- //hystrix 熔断器超时案例
- public String deptInfo_Timeout(Integer id);
- }
4. 在 net.biancheng.c.service.impl 包下,创建 DeptService 接口的实现类 DeptServiceImpl,代码如下。
- package net.biancheng.c.service.impl;
- import com.netflix.hystrix.contrib.javanica.annotation.HystrixCommand;
- import com.netflix.hystrix.contrib.javanica.annotation.HystrixProperty;
- import net.biancheng.c.service.DeptService;
- import org.springframework.stereotype.Service;
- import java.util.concurrent.TimeUnit;
- @Service("deptService")
- public class DeptServiceImpl implements DeptService {
- @Override
- public String deptInfo_Ok(Integer id) {
- return "线程池:" + Thread.currentThread().getName() + " deptInfo_Ok,id: " + id;
- }
- //一旦该方法失败并抛出了异常信息后,会自动调用 @HystrixCommand 注解标注的 fallbackMethod 指定的方法
- @HystrixCommand(fallbackMethod = "dept_TimeoutHandler",
- commandProperties =
- //规定 5 秒钟以内就不报错,正常运行,超过 5 秒就报错,调用指定的方法
- {@HystrixProperty(name = "execution.isolation.thread.timeoutInMilliseconds", value = "5000")})
- @Override
- public String deptInfo_Timeout(Integer id) {
- int outTime = 6;
- try {
- TimeUnit.SECONDS.sleep(outTime);
- } catch (InterruptedException e) {
- e.printStackTrace();
- }
- return "线程池:" + Thread.currentThread().getName() + " deptInfo_Timeout,id: " + id + " 耗时: " + outTime;
- }
- // 当服务出现故障后,调用该方法给出友好提示
- public String dept_TimeoutHandler(Integer id) {
- return "C语言中文网提醒您,系统繁忙请稍后再试!"+"线程池:" + Thread.currentThread().getName() + " deptInfo_Timeout,id: " + id;
- }
- }
我们可以看到 deptInfo_Timeout() 方法上使用 @HystrixCommand 注解,该注解说明如下:
- 参数 fallbackMethod 属性用于指定降级方法。
- 参数 execution.isolation.thread.timeoutInMilliseconds 用于设置自身调用超时时间的峰值,峰值内可以正常运行,否则执行降级方法
5. 在 net.biancheng.c.controller 包下创建一个名为 DeptController 的 Controller 类,代码如下。
- package net.biancheng.c.controller;
- import lombok.extern.slf4j.Slf4j;
- import net.biancheng.c.service.DeptService;
- import org.springframework.beans.factory.annotation.Autowired;
- import org.springframework.beans.factory.annotation.Value;
- import org.springframework.web.bind.annotation.*;
- @RestController
- @Slf4j
- public class DeptController {
- @Autowired
- private DeptService deptService;
- @Value("${server.port}")
- private String serverPort;
- @RequestMapping(value = "/dept/hystrix/ok/{id}")
- public String deptInfo_Ok(@PathVariable("id") Integer id) {
- String result = deptService.deptInfo_Ok(id);
- log.info("端口号:" + serverPort + " result:" + result);
- return result + ", 端口号:" + serverPort;
- }
- // Hystrix 服务超时降级
- @RequestMapping(value = "/dept/hystrix/timeout/{id}")
- public String deptInfo_Timeout(@PathVariable("id") Integer id) {
- String result = deptService.deptInfo_Timeout(id);
- log.info("端口号:" + serverPort + " result:" + result);
- return result + ", 端口号:" + serverPort;
- }
- }
6. 在 micro-service-cloud-provider-dept-hystrix-8004 的主启动类上,使用 @EnableCircuitBreaker 注解开启熔断器功能,代码如下。
- package net.biancheng.c;
- import org.springframework.boot.SpringApplication;
- import org.springframework.boot.autoconfigure.SpringBootApplication;
- import org.springframework.cloud.client.circuitbreaker.EnableCircuitBreaker;
- import org.springframework.cloud.netflix.eureka.EnableEurekaClient;
- @SpringBootApplication
- @EnableEurekaClient //开启 Eureka 客户端功能
- @EnableCircuitBreaker //激活熔断器功能
- public class MicroServiceCloudProviderDeptHystrix8004Application {
- public static void main(String[] args) {
- SpringApplication.run(MicroServiceCloudProviderDeptHystrix8004Application.class, args);
- }
- }
7. 依次启动服务注册中心(Eureka Server)集群和 micro-service-cloud-provider-dept-hystrix-8004,并使用浏览器访问“http://eureka7001.com:8004/dept/hystrix/ok/1”,结果如下图。
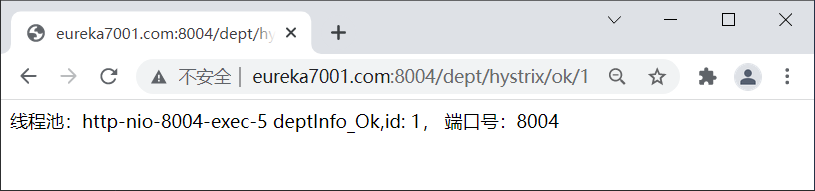
图2:Hystrix 正常服务案例
8. 使用浏览器访问“http://eureka7001.com:8004/dept/hystrix/timeout/1”,结果如下图。

图3:Hystrix 服务端服务降级
客户端服务降级
通常情况下,我们都会在客户端进行服务降级,当客户端调用的服务端的服务不可用时,客户端直接进行服务降级处理,避免其线程被长时间、不必要地占用。
客户端服务降级步骤如下。
1. 在 micro-service-cloud-consumer-dept-feign 的 pom.xml 中添加 Hystrix 的依赖,代码如下。
- <!--hystrix 依赖-->
- <dependency>
- <groupId>org.springframework.cloud</groupId>
- <artifactId>spring-cloud-starter-netflix-hystrix</artifactId>
- </dependency>
2. 在 micro-service-cloud-consumer-dept-feign 的 application.yml 中添加以下配置,开启客户端的 Hystrix 功能。
- feign:
- hystrix:
- enabled: true #开启客户端 hystrix
3. 在 net.biancheng.c.service 包下,创建一个名为 DeptHystrixService 的服务绑定接口,与 micro-service-cloud-provider-dept-hystrix-8004 中提供的服务接口进行绑定,代码如下。
- package net.biancheng.c.service;
- import org.springframework.cloud.openfeign.FeignClient;
- import org.springframework.stereotype.Component;
- import org.springframework.web.bind.annotation.PathVariable;
- import org.springframework.web.bind.annotation.RequestMapping;
- @Component
- @FeignClient(value = "MICROSERVICECLOUDPROVIDERDEPTHYSTRIX")
- public interface DeptHystrixService {
- @RequestMapping(value = "/dept/hystrix/ok/{id}")
- public String deptInfo_Ok(@PathVariable("id") Integer id);
- @RequestMapping(value = "/dept/hystrix/timeout/{id}")
- public String deptInfo_Timeout(@PathVariable("id") Integer id);
- }
4. 在 net.biancheng.c.controller 包下创建一个名为 HystrixController_Consumer 的 Controller ,代码如下。
- package net.biancheng.c.controller;
- import com.netflix.hystrix.contrib.javanica.annotation.DefaultProperties;
- import com.netflix.hystrix.contrib.javanica.annotation.HystrixCommand;;
- import lombok.extern.slf4j.Slf4j;
- import net.biancheng.c.service.DeptHystrixService;
- import org.springframework.web.bind.annotation.PathVariable;
- import org.springframework.web.bind.annotation.RequestMapping;
- import org.springframework.web.bind.annotation.RestController;
- import javax.annotation.Resource;
- @Slf4j
- @RestController
- public class HystrixController_Consumer {
- @Resource
- private DeptHystrixService deptHystrixService;
- @RequestMapping(value = "/consumer/dept/hystrix/ok/{id}")
- public String deptInfo_Ok(@PathVariable("id") Integer id) {
- return deptHystrixService.deptInfo_Ok(id);
- }
- //在客户端进行降级
- @RequestMapping(value = "/consumer/dept/hystrix/timeout/{id}")
- @HystrixCommand(fallbackMethod = "dept_TimeoutHandler") //为该请求指定专属的回退方法
- public String deptInfo_Timeout(@PathVariable("id") Integer id) {
- String s = deptHystrixService.deptInfo_Timeout(id);
- log.info(s);
- return s;
- }
- // deptInfo_Timeout方法的 专用 fallback 方法
- public String dept_TimeoutHandler(@PathVariable("id") Integer id) {
- log.info("deptInfo_Timeout 出错,服务已被降级!");
- return "C语言中文网提醒您:服务端系统繁忙,请稍后再试!(客户端 deptInfo_Timeout 专属的回退方法触发)";
- }
- }
5. 在配置文件 appliction.yml 中添加以下配置,在客户端配置请求超时的时间。
- ######################### Ribbon 客户端超时控制 ###################################
- ribbon:
- ReadTimeout: 6000 #建立连接所用的时间,适用于网络状况正常的情况下,两端两端连接所用的时间
- ConnectionTimeout: 6000 #建立连接后,服务器读取到可用资源的时间
- ######################配置请求超时时间##########################
- hystrix:
- command:
- default:
- execution:
- isolation:
- thread:
- timeoutInMilliseconds: 7000
- ####################配置具体方法超时时间 为 3 秒########################
- DeptHystrixService#deptInfo_Timeout(Integer):
- execution:
- isolation:
- thread:
- timeoutInMilliseconds: 3000
在配置文件中设计请求的超时时间时,需要注意以下 2 点:
1)Hystrix 可以来为所有请求(方法)设置超时时间(单位为毫秒),若请求超时则触发全局的回退方法进行处理。
hystrix.command.default.execution.isolation.thread.timeoutInMilliseconds=mmm
2)Hystrix 还可以为某个特定的服务请求(方法)设置超时时间,格式如下:
hystrix.command.xxx#yyy(zzz).execution.isolation.thread.timeoutInMilliseconds=mmm
格式说明如下:
- xxx:为包含该服务方法的类的名称(通常为服务绑定接口的名称),例如 DeptHystrixService 接口。
- yyy:服务方法名,例如 deptInfo_Timeout() 方法。
- zzz:方法内的参数类型,例如 Integer、String 等等
- mmm:要设置的超时时间,单位为毫秒(1 秒 =1000 毫秒)
6. 在 micro-service-cloud-consumer-dept-feign 的主启动类上,使用 @EnableHystrix 注解开启客户端 Hystrix 功能,代码如下。
- package net.biancheng.c;
- import org.springframework.boot.SpringApplication;
- import org.springframework.boot.autoconfigure.SpringBootApplication;
- import org.springframework.cloud.netflix.hystrix.EnableHystrix;
- import org.springframework.cloud.openfeign.EnableFeignClients;
- @SpringBootApplication
- @EnableFeignClients //开启 OpenFeign 功能
- @EnableHystrix //启用 Hystrix
- public class MicroServiceCloudConsumerDeptFeignApplication {
- public static void main(String[] args) {
- SpringApplication.run(MicroServiceCloudConsumerDeptFeignApplication.class, args);
- }
- }
7. 修改 micro-service-cloud-provider-dept-hystrix-8004 中 DeptServiceImpl 的代码,将 deptInfo_Timeout() 方法的运行时间修改为 4 秒(小于超时时间 5 秒),以保证服务端请求正常不被降级,代码如下。
- //一旦该方法失败并抛出了异常信息后,会自动调用 @HystrixCommand 注解标注的 fallbackMethod 指定的方法
- @HystrixCommand(fallbackMethod = "dept_TimeoutHandler",
- commandProperties =
- //规定 5 秒钟以内就不报错,正常运行,超过 5 秒就报错,调用指定的方法
- {@HystrixProperty(name = "execution.isolation.thread.timeoutInMilliseconds", value = "5000")})
- @Override
- public String deptInfo_Timeout(Integer id) {
- int outTime = 4;
- try {
- TimeUnit.SECONDS.sleep(outTime);
- } catch (InterruptedException e) {
- e.printStackTrace();
- }
- return "线程池:" + Thread.currentThread().getName() + " deptInfo_Timeout,id: " + id + " 耗时: " + outTime;
- }
8. 重启 micro-service-cloud-provider-dept-hystrix-8004 和 micro-service-cloud-consumer-dept-feign,使用浏览器访问“http://eureka7001.com:8004/dept/hystrix/timeout/1”,直接调用服务端的 deptInfo_Timeout() 方法,结果如下图。
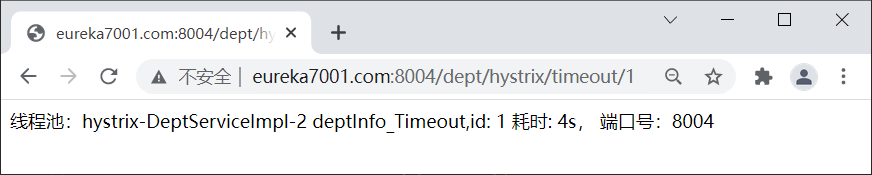
图4:Hystrix 服务端请求正常
9. 使用浏览器访问“http://eureka7001.com/consumer/dept/hystrix/timeout/1”,结果如下图。

图5:Hystrix 客户端服务降级
由图 5 可以看出,由于服务请求的耗时为 4 秒,超过了客户端为该请求指定的超时时间 (3 秒 ),因此该服务被降级处理,触发了其指定的回退方法。
全局降级方法
通过上面的方式实现服务降级时,需要针对所有业务方法都配置降级方法,这极有可能会造成代码的急剧膨胀。为了解决该问题,我们还可以为所有业务方法指定一个全局的回退方法,具体步骤如下。
1. 在 HystrixController_Consumer 的类名上标注 @DefaultProperties 注解,并通过其 defaultFallback 属性指定一个全局的降级方法,代码如下。
- @Slf4j
- @RestController
- @DefaultProperties(defaultFallback = "dept_Global_FallbackMethod") //全局的服务降级方法
- public class HystrixController_Consumer {
- ……
- }
2. 在 HystrixController_Consumer 中,创建一个名为 dept_Global_FallbackMethod 的全局回方法,代码如下。
- /**
- * 全局的 fallback 方法,
- * 回退方法必须和 hystrix 的执行方法在相同类中
- * @DefaultProperties(defaultFallback = "dept_Global_FallbackMethod") 类上注解,请求方法上使用 @HystrixCommand 注解
- */
- public String dept_Global_FallbackMethod() {
- return "C语言中文网提醒您,运行出错或服务端系统繁忙,请稍后再试!(客户端全局回退方法触发,)";
- }
注意:降级(FallBack)方法必须与其对应的业务方法在同一个类中,否则无法生效。
3. 在所有的业务方法上都标注 @HystrixCommand 注解,这里我们将 deptInfo_Timeout() 方法上的 @HystrixCommand(fallbackMethod = "dept_TimeoutHandler") 修改为 @HystrixCommand 即可,代码如下。
- //在客户端进行降级
- @RequestMapping(value = "/consumer/dept/hystrix/timeout/{id}")
- @HystrixCommand
- public String deptInfo_Timeout(@PathVariable("id") Integer id) {
- String s = deptHystrixService.deptInfo_Timeout(id);
- log.info(s);
- return s;
- }
注意:全局降级方法的优先级较低,只有业务方法没有指定其降级方法时,服务降级时才会触发全局回退方法。若业务方法指定它自己的回退方法,那么在服务降级时,就只会直接触发它自己的回退方法,而非全局回退方法。
4. 重启 micro-service-cloud-consumer-dept-feign,使用浏览器访问“http://eureka7001.com/consumer/dept/hystrix/timeout/1”,结果如下图。

图6:全局回退方法
解耦降级逻辑
不管是业务方法指定的降级方法还是全局降级方法,它们都必须和业务方法在同一个类中才能生效,业务逻辑与降级逻辑耦合度极高。
下面我们对业务逻辑与降级逻辑进行解耦,操作步骤如下。
1. 在 micro-service-cloud-consumer-dept-feign 的 net.biancheng.c.service 包下,新建 DeptHystrixService 接口的实现类 DeptHystrixFallBackService,统一为 DeptHystrixService 中的方法提供服务降级处理 ,代码如下。
- package net.biancheng.c.service;
- import org.springframework.stereotype.Component;
- /**
- * Hystrix 服务降级
- * 解耦回退逻辑
- */
- @Component
- public class DeptHystrixFallBackService implements DeptHystrixService {
- @Override
- public String deptInfo_Ok(Integer id) {
- return "--------------------C语言中文网提醒您,系统繁忙,请稍后重试!(解耦回退方法触发)-----------------------";
- }
- @Override
- public String deptInfo_Timeout(Integer id) {
- return "--------------------C语言中文网提醒您,系统繁忙,请稍后重试!(解耦回退方法触发)-----------------------";
- }
- }
注意:该类必须以组件的形式添加 Spring 容器中才能生效,最常用的方式就是在类上标注 @Component 注解。
2. 在服务绑定接口 DeptHystrixService 标注的 @FeignClient 注解中添加 fallback 属性,属性值为 DeptHystrixFallBackService.class,代码如下。
- package net.biancheng.c.service;
- import org.springframework.cloud.openfeign.FeignClient;
- import org.springframework.stereotype.Component;
- import org.springframework.web.bind.annotation.PathVariable;
- import org.springframework.web.bind.annotation.RequestMapping;
- @Component
- @FeignClient(value = "MICROSERVICECLOUDPROVIDERDEPTHYSTRIX", fallback = DeptHystrixFallBackService.class)
- public interface DeptHystrixService {
- @RequestMapping(value = "/dept/hystrix/ok/{id}")
- public String deptInfo_Ok(@PathVariable("id") Integer id);
- @RequestMapping(value = "/dept/hystrix/timeout/{id}")
- public String deptInfo_Timeout(@PathVariable("id") Integer id);
- }
3. 重启 micro-service-cloud-consumer-dept-feign,然后关闭服务端 micro-service-cloud-provider-dept-hystrix-8004,使用浏览器访问“http://eureka7001.com/consumer/dept/hystrix/ok/1”,结果如下图。

图7:Hystrix 解耦回退方法
Hystrix 服务熔断
熔断机制是为了应对雪崩效应而出现的一种微服务链路保护机制。
当微服务系统中的某个微服务不可用或响应时间太长时,为了保护系统的整体可用性,熔断器会暂时切断请求对该服务的调用,并快速返回一个友好的错误响应。这种熔断状态不是永久的,在经历了一定的时间后,熔断器会再次检测该微服务是否恢复正常,若服务恢复正常则恢复其调用链路。
熔断状态
在熔断机制中涉及了三种熔断状态:
- 熔断关闭状态(Closed):当服务访问正常时,熔断器处于关闭状态,服务调用方可以正常地对服务进行调用。
- 熔断开启状态(Open):默认情况下,在固定时间内接口调用出错比率达到一个阈值(例如 50%),熔断器会进入熔断开启状态。进入熔断状态后,后续对该服务的调用都会被切断,熔断器会执行本地的降级(FallBack)方法。
- 半熔断状态(Half-Open): 在熔断开启一段时间之后,熔断器会进入半熔断状态。在半熔断状态下,熔断器会尝试恢复服务调用方对服务的调用,允许部分请求调用该服务,并监控其调用成功率。如果成功率达到预期,则说明服务已恢复正常,熔断器进入关闭状态;如果成功率仍旧很低,则重新进入熔断开启状态。
三种熔断状态之间的转化关系如下图:
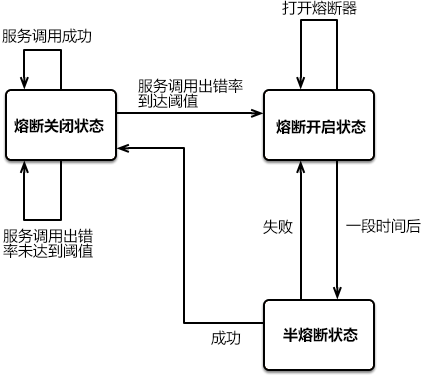
图8:三种熔断状态转换
Hystrix 实现熔断机制
在 Spring Cloud 中,熔断机制是通过 Hystrix 实现的。Hystrix 会监控微服务间调用的状况,当失败调用到一定比例时(例如 5 秒内失败 20 次),就会启动熔断机制。
Hystrix 实现服务熔断的步骤如下:
- 当服务的调用出错率达到或超过 Hystix 规定的比率(默认为 50%)后,熔断器进入熔断开启状态。
- 熔断器进入熔断开启状态后,Hystrix 会启动一个休眠时间窗,在这个时间窗内,该服务的降级逻辑会临时充当业务主逻辑,而原来的业务主逻辑不可用。
- 当有请求再次调用该服务时,会直接调用降级逻辑快速地返回失败响应,以避免系统雪崩。
- 当休眠时间窗到期后,Hystrix 会进入半熔断转态,允许部分请求对服务原来的主业务逻辑进行调用,并监控其调用成功率。
- 如果调用成功率达到预期,则说明服务已恢复正常,Hystrix 进入熔断关闭状态,服务原来的主业务逻辑恢复;否则 Hystrix 重新进入熔断开启状态,休眠时间窗口重新计时,继续重复第 2 到第 5 步。
示例
下面我们就通过一个实例来验证下 Hystrix 是如何实现熔断机制的。
1. 在 micro-service-cloud-provider-dept-hystrix-8004 中的 DeptService 接口中添加一个 deptCircuitBreaker() 方法,代码如下。
- package net.biancheng.c.service;
- public interface DeptService {
- // hystrix 熔断器示例 ok
- public String deptInfo_Ok(Integer id);
- //hystrix 熔断器超时案例
- public String deptInfo_Timeout(Integer id);
- // Hystrix 熔断机制案例
- public String deptCircuitBreaker(Integer id);
- }
2. 在 DeptService 接口的实现类 DeptServiceImpl 添加 deptCircuitBreaker() 的方法实现及其回退方法,代码如下。
- //Hystrix 熔断案例
- @Override
- @HystrixCommand(fallbackMethod = "deptCircuitBreaker_fallback", commandProperties = {
- //以下参数在 HystrixCommandProperties 类中有默认配置
- @HystrixProperty(name = "circuitBreaker.enabled", value = "true"), //是否开启熔断器
- @HystrixProperty(name = "metrics.rollingStats.timeInMilliseconds",value = "1000"), //统计时间窗
- @HystrixProperty(name = "circuitBreaker.requestVolumeThreshold", value = "10"), //统计时间窗内请求次数
- @HystrixProperty(name = "circuitBreaker.sleepWindowInMilliseconds", value = "10000"), //休眠时间窗口期
- @HystrixProperty(name = "circuitBreaker.errorThresholdPercentage", value = "60"), //在统计时间窗口期以内,请求失败率达到 60% 时进入熔断状态
- })
- public String deptCircuitBreaker(Integer id) {
- if (id < 0) {
- //当传入的 id 为负数时,抛出异常,调用降级方法
- throw new RuntimeException("c语言中文网提醒您,id 不能是负数!");
- }
- String serialNum = IdUtil.simpleUUID();
- return Thread.currentThread().getName() + "\t" + "调用成功,流水号为:" + serialNum;
- }
- //deptCircuitBreaker 的降级方法
- public String deptCircuitBreaker_fallback(Integer id) {
- return "c语言中文网提醒您,id 不能是负数,请稍后重试!\t id:" + id;
- }
在以上代码中,共涉及到了 4 个与 Hystrix 熔断机制相关的重要参数,这 4 个参数的含义如下表。
| 参数 | 描述 |
|---|---|
| metrics.rollingStats.timeInMilliseconds | 统计时间窗。 |
| circuitBreaker.sleepWindowInMilliseconds | 休眠时间窗,熔断开启状态持续一段时间后,熔断器会自动进入半熔断状态,这段时间就被称为休眠窗口期。 |
| circuitBreaker.requestVolumeThreshold | 请求总数阀值。 在统计时间窗内,请求总数必须到达一定的数量级,Hystrix 才可能会将熔断器打开进入熔断开启转态,而这个请求数量级就是 请求总数阀值。Hystrix 请求总数阈值默认为 20,这就意味着在统计时间窗内,如果服务调用次数不足 20 次,即使所有的请求都调用出错,熔断器也不会打开。 |
| circuitBreaker.errorThresholdPercentage | 错误百分比阈值。 当请求总数在统计时间窗内超过了请求总数阀值,且请求调用出错率超过一定的比例,熔断器才会打开进入熔断开启转态,而这个比例就是错误百分比阈值。错误百分比阈值设置为 50,就表示错误百分比为 50%,如果服务发生了 30 次调用,其中有 15 次发生了错误,即超过了 50% 的错误百分比,这时候将熔断器就会打开。 |
3. 在 DeptController 中添加一个 deptCircuitBreaker() 方法对外提供服务,代码如下。
- // Hystrix 服务熔断
- @RequestMapping(value = "/dept/hystrix/circuit/{id}")
- public String deptCircuitBreaker(@PathVariable("id") Integer id){
- String result = deptService.deptCircuitBreaker(id);
- log.info("result:"+result);
- return result;
- }
4. 重启 micro-service-cloud-provider-dept-hystrix-8004,使用浏览器访问“http://eureka7001.com:8004/dept/hystrix/circuit/1”,结果如下图。

图9:Hystrix 实现熔断机制 调用正确示例
5. 浏览器多次(调用次数大于请求总数阀值)访问“http://eureka7001.com:8004/dept/hystrix/circuit/-2”,使调用出错率大于错误百分比阀值,结果下图。

图10:Hystrix 实现熔断机制 错误调用
6. 重新将参数修改为正数(例如参数为 3),使用浏览器访问“http://eureka7001.com:8004/dept/hystrix/circuit/3”,结果如下图。

图11:Hystrix 熔断开启状态传入正数
通过图 11 可以看到,在熔断开启状态下,即使我们传入的参数已经是正数,调用的依然降级逻辑。
7. 继续连续访问“http://eureka7001.com:8004/dept/hystrix/circuit/3”,结果下图。
图12:Hystrix 进入熔断关闭状态
通过图 12 可以看出,当服务调用正确率上升到一定的利率后,Hystrix 进入熔断关闭状态。
Hystrix 故障监控
Hystrix 还提供了准实时的调用监控(Hystrix Dashboard)功能,Hystrix 会持续地记录所有通过 Hystrix 发起的请求的执行信息,并以统计报表的形式展示给用户,包括每秒执行请求的数量、成功请求的数量和失败请求的数量等。
下面我们就通过一个实例来搭建 Hystrix Dashboard,监控 micro-service-cloud-provider-dept-hystrix-8004 的运行情况。
1. 在父工程下新建一个名为 micro-service-cloud-consumer-dept-hystrix-dashboard-9002 的子模块,并在其 pom.xml 中添加以下依赖。
- <?xml version="1.0" encoding="UTF-8"?>
- <project xmlns="http://maven.apache.org/POM/4.0.0" xmlns:xsi="http://www.w3.org/2001/XMLSchema-instance"
- xsi:schemaLocation="http://maven.apache.org/POM/4.0.0 https://maven.apache.org/xsd/maven-4.0.0.xsd">
- <modelVersion>4.0.0</modelVersion>
- <parent>
- <artifactId>spring-cloud-demo2</artifactId>
- <groupId>net.biancheng.c</groupId>
- <version>0.0.1-SNAPSHOT</version>
- </parent>
- <groupId>net.biancheng.c</groupId>
- <artifactId>micro-service-cloud-consumer-dept-hystrix-dashboard-9002</artifactId>
- <version>0.0.1-SNAPSHOT</version>
- <name>micro-service-cloud-consumer-dept-hystrix-dashboard-9002</name>
- <description>Demo project for Spring Boot</description>
- <properties>
- <java.version>1.8</java.version>
- </properties>
- <dependencies>
- <dependency>
- <groupId>org.springframework.boot</groupId>
- <artifactId>spring-boot-starter</artifactId>
- </dependency>
- <!--Spring Boot 测试依赖-->
- <dependency>
- <groupId>org.springframework.boot</groupId>
- <artifactId>spring-boot-starter-test</artifactId>
- <scope>test</scope>
- </dependency>
- <!--hystrix-dashboard 监控的依赖-->
- <dependency>
- <groupId>org.springframework.cloud</groupId>
- <artifactId>spring-cloud-starter-netflix-hystrix-dashboard</artifactId>
- </dependency>
- <!--添加 Spring Boot 的监控模块-->
- <dependency>
- <groupId>org.springframework.boot</groupId>
- <artifactId>spring-boot-starter-actuator</artifactId>
- </dependency>
- <dependency>
- <groupId>org.springframework.boot</groupId>
- <artifactId>spring-boot-devtools</artifactId>
- </dependency>
- <dependency>
- <groupId>org.projectlombok</groupId>
- <artifactId>lombok</artifactId>
- </dependency>
- </dependencies>
- <build>
- <plugins>
- <plugin>
- <groupId>org.springframework.boot</groupId>
- <artifactId>spring-boot-maven-plugin</artifactId>
- </plugin>
- </plugins>
- </build>
- </project>
2. 在 micro-service-cloud-consumer-dept-hystrix-dashboard-9002 的 application.yml 中添加以下配置。
- server:
- port: 9002 #端口号
- #http://eureka7001.com:9002/hystrix 熔断器监控页面
- # localhost:8004//actuator/hystrix.stream 监控地址
- hystrix:
- dashboard:
- proxy-stream-allow-list:
- - "localhost"
3. 在 micro-service-cloud-consumer-dept-hystrix-dashboard-9002 的主启动类上添加 @EnableHystrixDashboard 注解,开启 Hystrix 监控功能,代码如下。
- package net.biancheng.c;
- import org.springframework.boot.SpringApplication;
- import org.springframework.boot.autoconfigure.SpringBootApplication;
- import org.springframework.cloud.netflix.hystrix.dashboard.EnableHystrixDashboard;
- @SpringBootApplication
- @EnableHystrixDashboard
- public class MicroServiceCloudConsumerDeptHystrixDashboard9002Application {
- public static void main(String[] args) {
- SpringApplication.run(MicroServiceCloudConsumerDeptHystrixDashboard9002Application.class, args);
- }
- }
4. 在 micro-service-cloud-provider-dept-hystrix-8004 的 net.biancheng.c.config 包下,创建一个名为 HystrixDashboardConfig 的配置类,代码如下。
- package net.biancheng.c.config;
- import com.netflix.hystrix.contrib.metrics.eventstream.HystrixMetricsStreamServlet;
- import org.springframework.boot.web.servlet.ServletRegistrationBean;
- import org.springframework.context.annotation.Bean;
- import org.springframework.context.annotation.Configuration;
- @Configuration
- public class HystrixDashboardConfig {
- /**
- * Hystrix dashboard 监控界面必须配置
- * @return
- */
- @Bean
- public ServletRegistrationBean getServlet() {
- HystrixMetricsStreamServlet streamServlet = new HystrixMetricsStreamServlet();
- ServletRegistrationBean registrationBean = new ServletRegistrationBean(streamServlet);
- registrationBean.setLoadOnStartup(1);
- registrationBean.addUrlMappings("/actuator/hystrix.stream");//访问路径
- registrationBean.setName("hystrix.stream");
- return registrationBean;
- }
- }
5. 启动 micro-service-cloud-consumer-dept-hystrix-dashboard-9002,使用浏览器访问“http://eureka7001.com:9002/hystrix”,结果如下图。
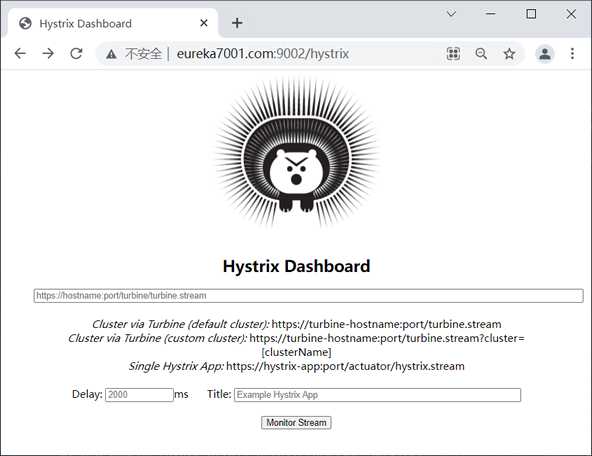
图13:Hystrix 监控页面
6. 重启 micro-service-cloud-provider-dept-hystrix-8004,并将以下信息填到 Hystrix 监控页面中,如下图。
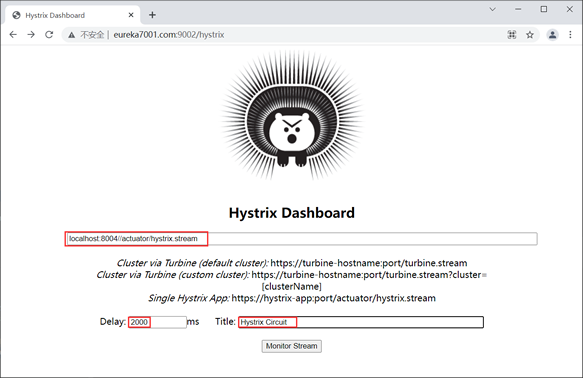
图14:Hystrix 监控信息
7. 点击下方的 Monitor Stream 按钮,跳转到 Hystrix 对 micro-service-cloud-provider-dept-hystrix-8004 的监控页面,如下图。
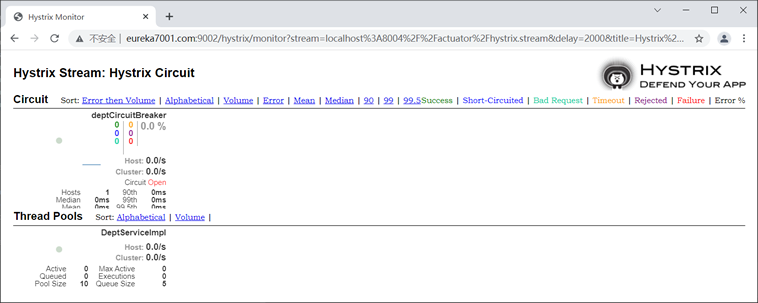
图15:Hystrix 监控微服务运行情况
8. 使用浏览器多次访问“http://eureka7001.com:8004/dept/hystrix/circuit/1”和 “http://eureka7001.com:8004/dept/hystrix/circuit/-1”,查看 Hystrix 监控页面,如下图。

图16:Hystrix 监控服务运行情况


 2388
2388


 被折叠的 条评论
为什么被折叠?
被折叠的 条评论
为什么被折叠?
 到【灌水乐园】发言


