


目录
一、简介
本文主要讲解了利用Spring Security框架,实现单点登录的流程。
Demo项目是基于RBAC模型设计的数据表,并采用MyBatis Plus实现基本的数据增删改查功能,默认已完成该操作。(附:数据表SQL语句)
单点登录的英文名叫做:Single Sign On(简称sso),指在同一帐号平台下的多个应用系统中,用户只需登录一次,即可访问所有相互信任的系统。特别适合微服务项目。
本文为笔者原创,如有转载请注明出处!话不多说,直接上流程!
二、配置类
首先,添加相关依赖,如下:
        <!--SpringMvc 依赖-->
        <dependency>
            <groupId>org.springframework.boot</groupId>
            <artifactId>spring-boot-starter-web</artifactId>
        </dependency>
        <!-- Spring Security依赖-->
        <dependency>
            <groupId>org.springframework.boot</groupId>
            <artifactId>spring-boot-starter-security</artifactId>
        </dependency>
        <!-- FastJson-->
        <dependency>
            <groupId>com.alibaba</groupId>
            <artifactId>fastjson</artifactId>
            <version>2.0.21</version>
        </dependency>
        <!-- JWT依赖(Java JWT)-->
        <dependency>
            <groupId>io.jsonwebtoken</groupId>
            <artifactId>jjwt</artifactId>
            <version>0.9.1</version>
        </dependency>
        <!--Lombok-->
        <dependency>
            <groupId>org.projectlombok</groupId>
            <artifactId>lombok</artifactId>
        </dependency>
在项目中,添加config包,并在其中添加配置类 SecurityConfiguration.java,继承 WebSecurityConfigurerAdapter 类并重写configure方法。
注意:需要开启权限验证,必须在启动类或者配置类中添加注解。笔者是在配置类添加的:@EnableGlobalMethodSecurity(prePostEnabled = true)
如下:
@Configuration
@EnableGlobalMethodSecurity(prePostEnabled = true)
public class SecurityConfiguration extends WebSecurityConfigurerAdapter {

     @Override
    protected void configure(HttpSecurity http) throws Exception {
        // super.configure(http);

        http.csrf().disable();
        http.cors();

        // 同一个路径配置多个规则,以第一个为准
        String[] permitUrls = new String[]{
                "/user/login", //登录请求路径
                "/doc.html",
                "/**/*.js",
                "/**/*.css",
                "/favicon.ico",
                "/swagger-resources",
                "/v2/api-docs"
        };
        http.authorizeRequests()
                .mvcMatchers(permitUrls)
                .permitAll() // 即上面的路径数组,不需要鉴权即可访问
                .anyRequest() // 除上面的路径外,都需要鉴权
                .authenticated();

        // 是否启用登录表单
        // http.formLogin();

    }

}
如果我们不添加密码编辑器,那么就会使用明文密码,这是不安全的,所以,我们需要在配置类将密码编辑器的bean注册到上下文容器中,如下:
    @Bean
    public PasswordEncoder pwEncoder() {
        return new BCryptPasswordEncoder();
    }
配置类中,添加认证管理器的bean对象到上下文容器中,如下:
    @Bean
    @Override
    public AuthenticationManager authenticationManagerBean() throws Exception {
        return super.authenticationManagerBean();
    }
到这里,配置类就暂时写完了(ps:后续需要将过滤器加入到过滤器链)
三、UserDetailsService接口的实现类
首先,需要封装一个LoginUserDetail对象,继承 Spring Security框架核心包中的一个User类,该对象主要是封装了登录用户相关的信息。注意:构造器必须调用父类的构造器,将相关信息封装在里面。
package com.example.sso.secutity;

import lombok.Getter;
import lombok.experimental.Accessors;
import org.springframework.security.core.GrantedAuthority;
import org.springframework.security.core.userdetails.User;

import java.util.Collection;


/**
 * 登录验证对象(用户名、密码)
 */
@Getter
@Accessors(chain = true)
public class LoginUserDetail extends User {
    private Long userId;

    /**
     * 构造器
     *
     * @param username    用户名
     * @param password    密码
     * @param enabled     是否启用
     * @param authorities 权限集合
     */
    public LoginUserDetail(Long userId, String username, String password, boolean enabled, Collection<? extends GrantedAuthority> authorities) {
        super(username, password, enabled, true, true, true, authorities);
        this.userId = userId;
    }
}
UserDetailsService接口是Spring Security框架核心包中的一个接口,实现该接口需要重写loadUserByUsername(String s)方法,方法的返回值即上面的LoginUserDetail,作用是为认证管理器提供用户信息。
package com.example.sso.secutity;

import com.baomidou.mybatisplus.core.conditions.query.LambdaQueryWrapper;
import com.example.sso.pojo.entity.User;
import com.example.sso.service.IUserService;
import io.jsonwebtoken.lang.Assert;
import org.springframework.beans.factory.annotation.Autowired;
import org.springframework.security.core.GrantedAuthority;
import org.springframework.security.core.authority.SimpleGrantedAuthority;
import org.springframework.security.core.userdetails.UserDetails;
import org.springframework.security.core.userdetails.UserDetailsService;
import org.springframework.security.core.userdetails.UsernameNotFoundException;
import org.springframework.stereotype.Service;

import java.util.List;
import java.util.stream.Collectors;


@Service
public class UserDetailsServiceImpl implements UserDetailsService {
    @Autowired
    IUserService userService;


    @Override
    public UserDetails loadUserByUsername(String username) throws UsernameNotFoundException {
        User user = userService.getOne(new LambdaQueryWrapper<User>().eq(User::getUsername, username));
        Assert.isTrue(user != null, "用户信息不存在");
        // 根据用户名,查询权限列表
        List<String> permissions = userService.listPermissionsByUser(user);
        // 将权限从String转为GrantedAuthority
        List<GrantedAuthority> authorities = permissions.stream().
                map(item -> (GrantedAuthority) new SimpleGrantedAuthority(item)).collect(Collectors.toList());
        return new LoginUserDetail(user.getId(), username, user.getPassword(), user.getEnable(), authorities);
    }
}
四、过滤器
过滤器的作用是,当接收到外部的请求时,会先对请求进行一系列的处理之后再放行,之后才会转到Controller层进行处理。所以,我们使用过滤器对每个请求的请求头携带的jwt信息进行检测,并且解析出权限信息封装到上下文中。
在创建过滤器之前,先创建一个 LoginPrincipal 类,作用是封装登录用户的信息。如下:
package com.example.sso.secutity;

import lombok.AllArgsConstructor;
import lombok.Data;
import lombok.NoArgsConstructor;

import java.io.Serializable;


/**
 * 当事人信息对象
 */
@Data
@NoArgsConstructor
@AllArgsConstructor
public class LoginPrincipal implements Serializable {
    private Long userId;
}
新建filter包,新建 JwtHandlerFilter 过滤器类,继承OncePerRequestFilter类,并强制重写doFilterInternal方法。
重写的方法主要做以下几件事:1.获取请求头的jwt信息;2.解析jwt,获得权限信息;3.将权限信息封装到上下文中。代码如下:
package com.example.sso.filter;

import com.alibaba.fastjson.JSON;
import com.baomidou.mybatisplus.core.toolkit.StringUtils;
import com.example.sso.secutity.LoginPrincipal;
import io.jsonwebtoken.*;
import lombok.extern.slf4j.Slf4j;
import org.springframework.beans.factory.annotation.Value;
import org.springframework.security.authentication.UsernamePasswordAuthenticationToken;
import org.springframework.security.core.Authentication;
import org.springframework.security.core.authority.SimpleGrantedAuthority;
import org.springframework.security.core.context.SecurityContextHolder;
import org.springframework.stereotype.Component;
import org.springframework.web.filter.OncePerRequestFilter;

import javax.servlet.FilterChain;
import javax.servlet.ServletException;
import javax.servlet.http.HttpServletRequest;
import javax.servlet.http.HttpServletResponse;
import java.io.IOException;
import java.io.PrintWriter;
import java.util.List;


/**
 * jwt处理过滤器
 */
@Component("jwtHandlerFilter")
@Slf4j
public class JwtHandlerFilter extends OncePerRequestFilter {
    @Value("${jwt.secret-key}")
    private String secretKey;
    @Override
    protected void doFilterInternal(HttpServletRequest request, HttpServletResponse response, FilterChain filterChain) throws ServletException, IOException {
        // 删除上下文信息,避免线程安全问题
        SecurityContextHolder.clearContext();

        String jwt = request.getHeader("Authorization");
        log.debug("获取客户端携带的token:{}", jwt);
        if (StringUtils.isBlank(jwt) ) {
            // 对于无效的JWT,直接放行,交由后续的组件进行处理
            log.debug("获取到的token被视为无效,当前过滤器将放行...");
            filterChain.doFilter(request, response);
            return;
        }

        // 尝试解析JWT
        Claims claims;
        Long userId;
        String authorities;
        try {
            claims = Jwts.parser()
                    .setSigningKey(secretKey)
                    .parseClaimsJws(jwt)
                    .getBody();

            userId = claims.get("User-Id", Long.class);
            authorities = claims.get("Authorities", String.class);
            log.info("从jwt获取到权限信息:{}", authorities);

        } catch (ExpiredJwtException e) {
            // 这个异常是jwt有效期过了
            log.debug("解析JWT时出现ExpiredJwtException");
            e.printStackTrace();

            response.setContentType("text/html; charset=utf-8");
            PrintWriter writer = response.getWriter();
            writer.println("用户登录信息过期,请重新登录");
            return;
        } catch (MalformedJwtException e) {
            // 这个异常是解析jwt失败
            log.debug("解析JWT时出现MalformedJwtException");
            e.printStackTrace();

            response.setContentType("text/html; charset=utf-8");
            PrintWriter writer = response.getWriter();
            writer.println("用户登录信息过期,请重新登录");
            return;
        } catch (SignatureException e) {
            // 这个异常是解析jwt时签名错误
            log.debug("解析JWT时出现SignatureException");
            e.printStackTrace();

            response.setContentType("text/html; charset=utf-8");
            PrintWriter writer = response.getWriter();
            writer.println("用户登录信息过期,请重新登录");
            return;
        } catch (Throwable e) {
            log.debug("解析JWT时出现其他异常");
            e.printStackTrace();

            response.setContentType("text/html; charset=utf-8");
            PrintWriter writer = response.getWriter();
            writer.println("用户登录信息过期,请重新登录");
            return;
        }

        // 处理权限信息
        List<SimpleGrantedAuthority> grantedAuthorities
                = JSON.parseArray(authorities, SimpleGrantedAuthority.class);
        // 登录当事人信息
        LoginPrincipal loginPrincipal = new LoginPrincipal(userId);
        // 创建Authentication对象(用户验证对象)
        Authentication authentication = new UsernamePasswordAuthenticationToken(
                loginPrincipal, null, grantedAuthorities);

        // 将Authentication对象存入到 SecurityContext
        SecurityContextHolder.getContext().setAuthentication(authentication);

        // 过滤器链继续向后传递,即:放行
        filterChain.doFilter(request, response);

    }

}
到此,过滤器就创建完成了。还记得之前说的,需要在配置类中把过滤器加入到过滤器链中吗?因此,完整的配置类代码如下:
package com.example.sso.config;

import com.example.sso.filter.JwtHandlerFilter;
import org.springframework.beans.factory.annotation.Autowired;
import org.springframework.context.annotation.Bean;
import org.springframework.context.annotation.Configuration;
import org.springframework.security.authentication.AuthenticationManager;
import org.springframework.security.config.annotation.method.configuration.EnableGlobalMethodSecurity;
import org.springframework.security.config.annotation.web.builders.HttpSecurity;
import org.springframework.security.config.annotation.web.configuration.WebSecurityConfigurerAdapter;
import org.springframework.security.crypto.bcrypt.BCryptPasswordEncoder;
import org.springframework.security.crypto.password.PasswordEncoder;
import org.springframework.security.web.authentication.UsernamePasswordAuthenticationFilter;


@Configuration
@EnableGlobalMethodSecurity(prePostEnabled = true)
public class SecurityConfiguration extends WebSecurityConfigurerAdapter {
    @Autowired
    JwtHandlerFilter jwtHandlerFilter;

    @Bean
    public PasswordEncoder pwEncoder() {
        return new BCryptPasswordEncoder();
    }

    @Bean
    @Override
    public AuthenticationManager authenticationManagerBean() throws Exception {
        return super.authenticationManagerBean();
    }

    @Override
    protected void configure(HttpSecurity http) throws Exception {
        // super.configure(http);

        http.csrf().disable();
        http.cors();

        // 同一个路径配置多个规则,以第一个为准
        String[] permitUrls = new String[]{
                "/user/login",
                "/doc.html",
                "/**/*.js",
                "/**/*.css",
                "/favicon.ico",
                "/swagger-resources",
                "/v2/api-docs"
        };
        http.authorizeRequests()
                .mvcMatchers(permitUrls)
                .permitAll()
                .anyRequest()
                .authenticated();

        // 是否启用登录表单
        // http.formLogin();

        // 添加过滤器
        http.addFilterBefore(jwtHandlerFilter, UsernamePasswordAuthenticationFilter.class);


    }


}
五、登录业务流程
直接将Controller和Service层的代码展示出来,如下:
UserController类:
package com.example.sso.controller;

import com.alibaba.fastjson.JSONObject;
import com.example.sso.pojo.dto.LoginDTO;
import com.example.sso.service.IUserService;
import lombok.extern.slf4j.Slf4j;
import org.springframework.beans.factory.annotation.Autowired;
import org.springframework.web.bind.annotation.PostMapping;
import org.springframework.web.bind.annotation.RequestBody;
import org.springframework.web.bind.annotation.RequestMapping;
import org.springframework.web.bind.annotation.RestController;


/**
 * 用户表
 *
 * @author darko
 * @date 2023-08-27
 */
@RestController
@Slf4j
@RequestMapping("/User")
public class UserController {
    @Autowired
    IUserService userService;

    @PostMapping("/user/login")
    public JSONObject login(@RequestBody LoginDTO dto) {
        String jwt = userService.login(dto);
        return jwt;
    }

}
LoginDTO 类:
package com.example.sso.pojo.dto;

import io.swagger.annotations.ApiModelProperty;
import lombok.Data;
import lombok.experimental.Accessors;


@Data
@Accessors(chain = true)
public class LoginDTO {
    /**
     * 用户名
     */
    @ApiModelProperty(value = "用户名")
    private String username;
    /**
     * 密码
     */
    @ApiModelProperty(value = "密码")
    private String password;
}
IUserService 接口:
package com.example.sso.service;

import com.baomidou.mybatisplus.extension.service.IService;
import com.example.sso.pojo.dto.LoginDTO;
import com.example.sso.pojo.entity.User;

import java.util.List;


/**
 * 用户表
 *
 * @author darko
 * @date 2023-08-27
 */
public interface IUserService extends IService<User> {
    String login(LoginDTO dto);
    List<String> listPermissionsByUser(User user);
}
UserServiceImpl 类:
package com.example.sso.service.impl;

import com.alibaba.fastjson.JSON;
import com.baomidou.mybatisplus.core.conditions.query.LambdaQueryWrapper;
import com.baomidou.mybatisplus.core.toolkit.StringUtils;
import com.baomidou.mybatisplus.extension.service.impl.ServiceImpl;
import com.example.sso.mapper.UserMapper;
import com.example.sso.pojo.dto.LoginDTO;
import com.example.sso.pojo.entity.Permission;
import com.example.sso.pojo.entity.RolePermission;
import com.example.sso.pojo.entity.User;
import com.example.sso.secutity.LoginUserDetail;
import com.example.sso.service.IPermissionService;
import com.example.sso.service.IRolePermissionService;
import com.example.sso.service.IRoleService;
import com.example.sso.service.IUserService;
import io.jsonwebtoken.Jwts;
import io.jsonwebtoken.SignatureAlgorithm;
import io.jsonwebtoken.lang.Assert;
import lombok.extern.slf4j.Slf4j;
import org.springframework.beans.factory.annotation.Autowired;
import org.springframework.beans.factory.annotation.Value;
import org.springframework.context.annotation.Primary;
import org.springframework.security.authentication.AuthenticationManager;
import org.springframework.security.authentication.UsernamePasswordAuthenticationToken;
import org.springframework.security.core.Authentication;
import org.springframework.stereotype.Service;

import java.util.HashMap;
import java.util.List;
import java.util.stream.Collectors;


/**
 * 用户表
 *
 * @author darko
 * @date 2023-08-27
 */
@Primary
@Service
@Slf4j
public class UserServiceImpl extends ServiceImpl<UserMapper, User> implements IUserService {
    @Autowired
    AuthenticationManager authenticationManager;
    @Value("${sso.jwt.secret-key}")
    private String secretKey;
    @Autowired
    IRoleService roleService;
    @Autowired
    IRolePermissionService rolePermissionService;
    @Autowired
    IPermissionService permissionService;

    @Override
    public String login(LoginDTO dto) {
        // 检验用户信息
        String username = dto.getUsername();
        String password = dto.getPassword();
        Assert.isTrue(StringUtils.isNotBlank(username) && StringUtils.isNotBlank(password)
                , "用户名或密码错误");
        User user = this.getOne(new LambdaQueryWrapper<User>().eq(User::getUsername, username));
        Assert.isTrue(user != null, "用户信息不存在");

        // 交给认证管理器去验证密码,如果认证不通过,会抛出异常 AuthenticationException
        Authentication authentication = new UsernamePasswordAuthenticationToken(username, password);
        Authentication authResult = authenticationManager.authenticate(authentication);
        log.debug("登录通过,认证管理器返回:{}", authResult);

        // 认证通过,封装 jwt
        LoginUserDetail userDetails = (LoginUserDetail) authResult.getPrincipal();
        HashMap<String, Object> claims = new HashMap<>();
        claims.put("User-Id", userDetails.getUserId());
        claims.put("Authorities", JSON.toJSONString(userDetails.getAuthorities()));

        String jwt = Jwts.builder()
                // Header
                .setHeaderParam("alg", "HS256")
                .setHeaderParam("typ", "JWT")
                // Payload
                .setClaims(claims)
                // Signature
                .signWith(SignatureAlgorithm.HS256, secretKey)
                .compact();

        log.info("登录成功,返回jwt:{}", jwt);
        return jwt;
    }

    @Override
    public List<String> listPermissionsByUser(User user) {
        Assert.isTrue(user.getRoleId() != null, "用户角色不存在");
        return permissionService.list(
                new LambdaQueryWrapper<Permission>().in(
                        Permission::getId,
                        rolePermissionService.list(new LambdaQueryWrapper<RolePermission>().eq(RolePermission::getRoleId, user.getRoleId()))
                                .stream().map(RolePermission::getPermissionId).collect(Collectors.toList())
                )
        ).stream().map(Permission::getValue).collect(Collectors.toList());
    }
}
六、测试
至此,所有的流程都走完了。接下来,让我们来测试下效果。
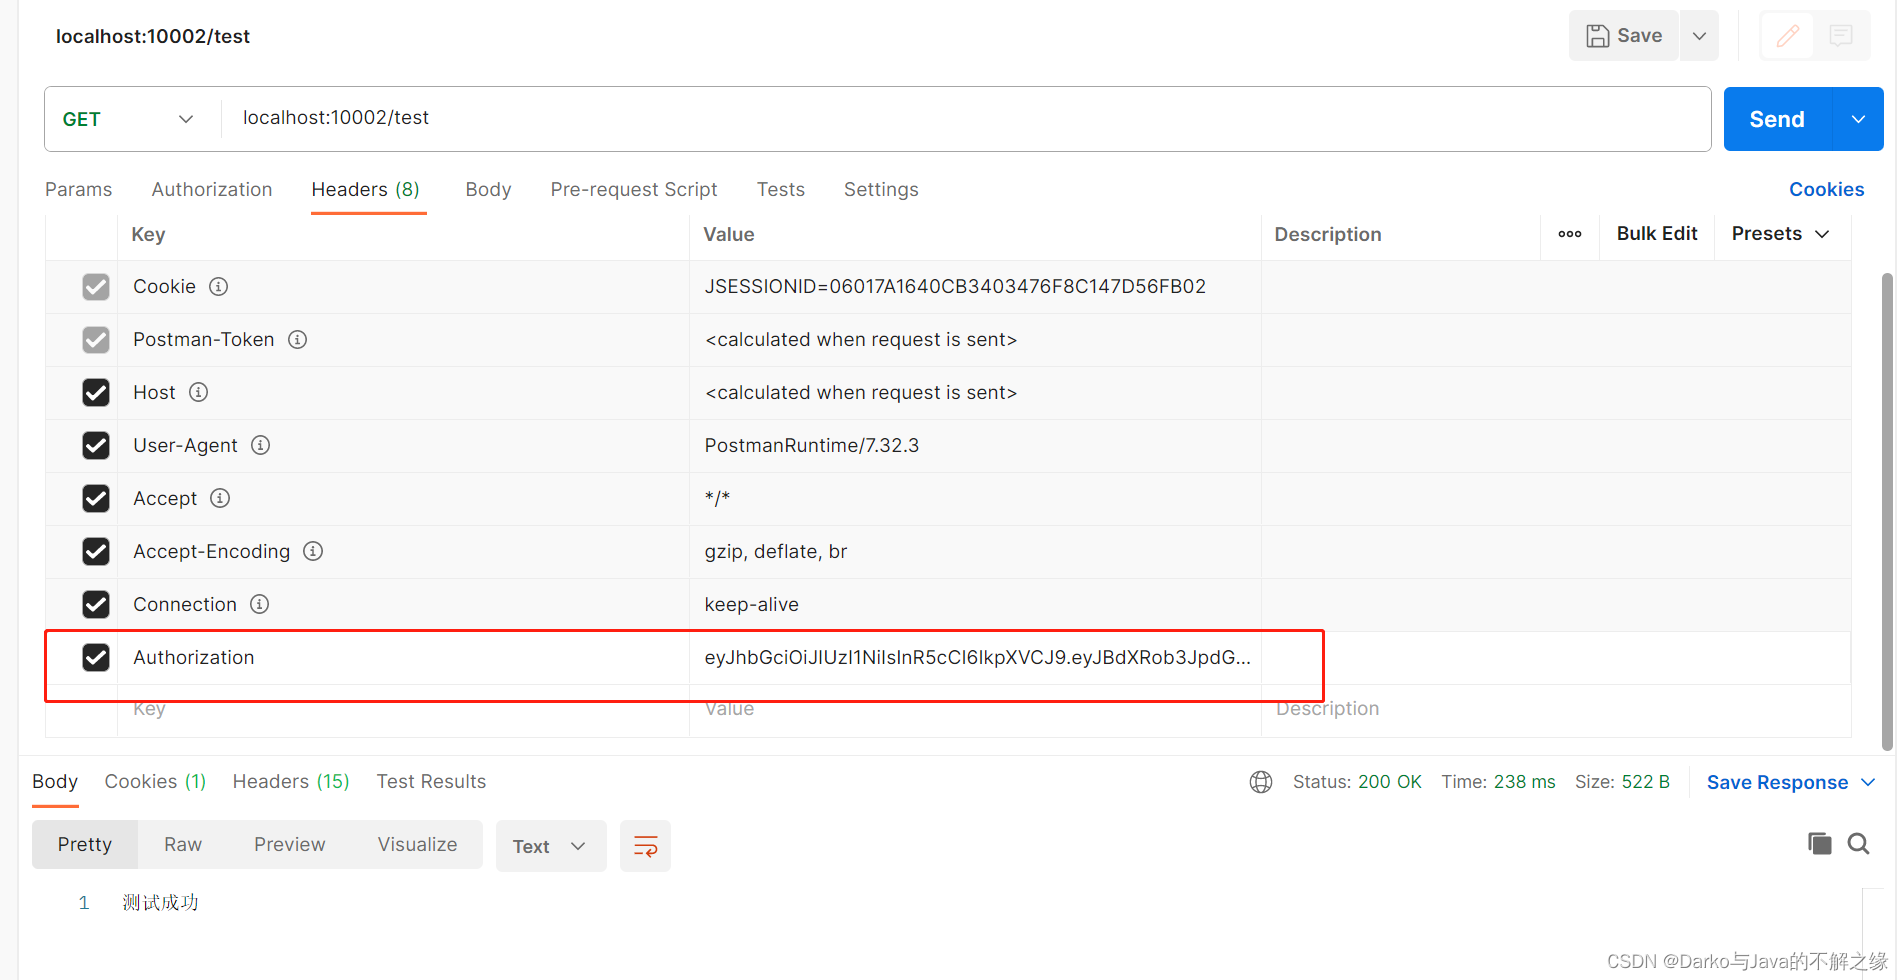
在UserController类中添加一个测试方法,如下:
@GetMapping("/test")
@PreAuthorize("hasAuthority('/admin')")
public String test() {
return "测试成功";
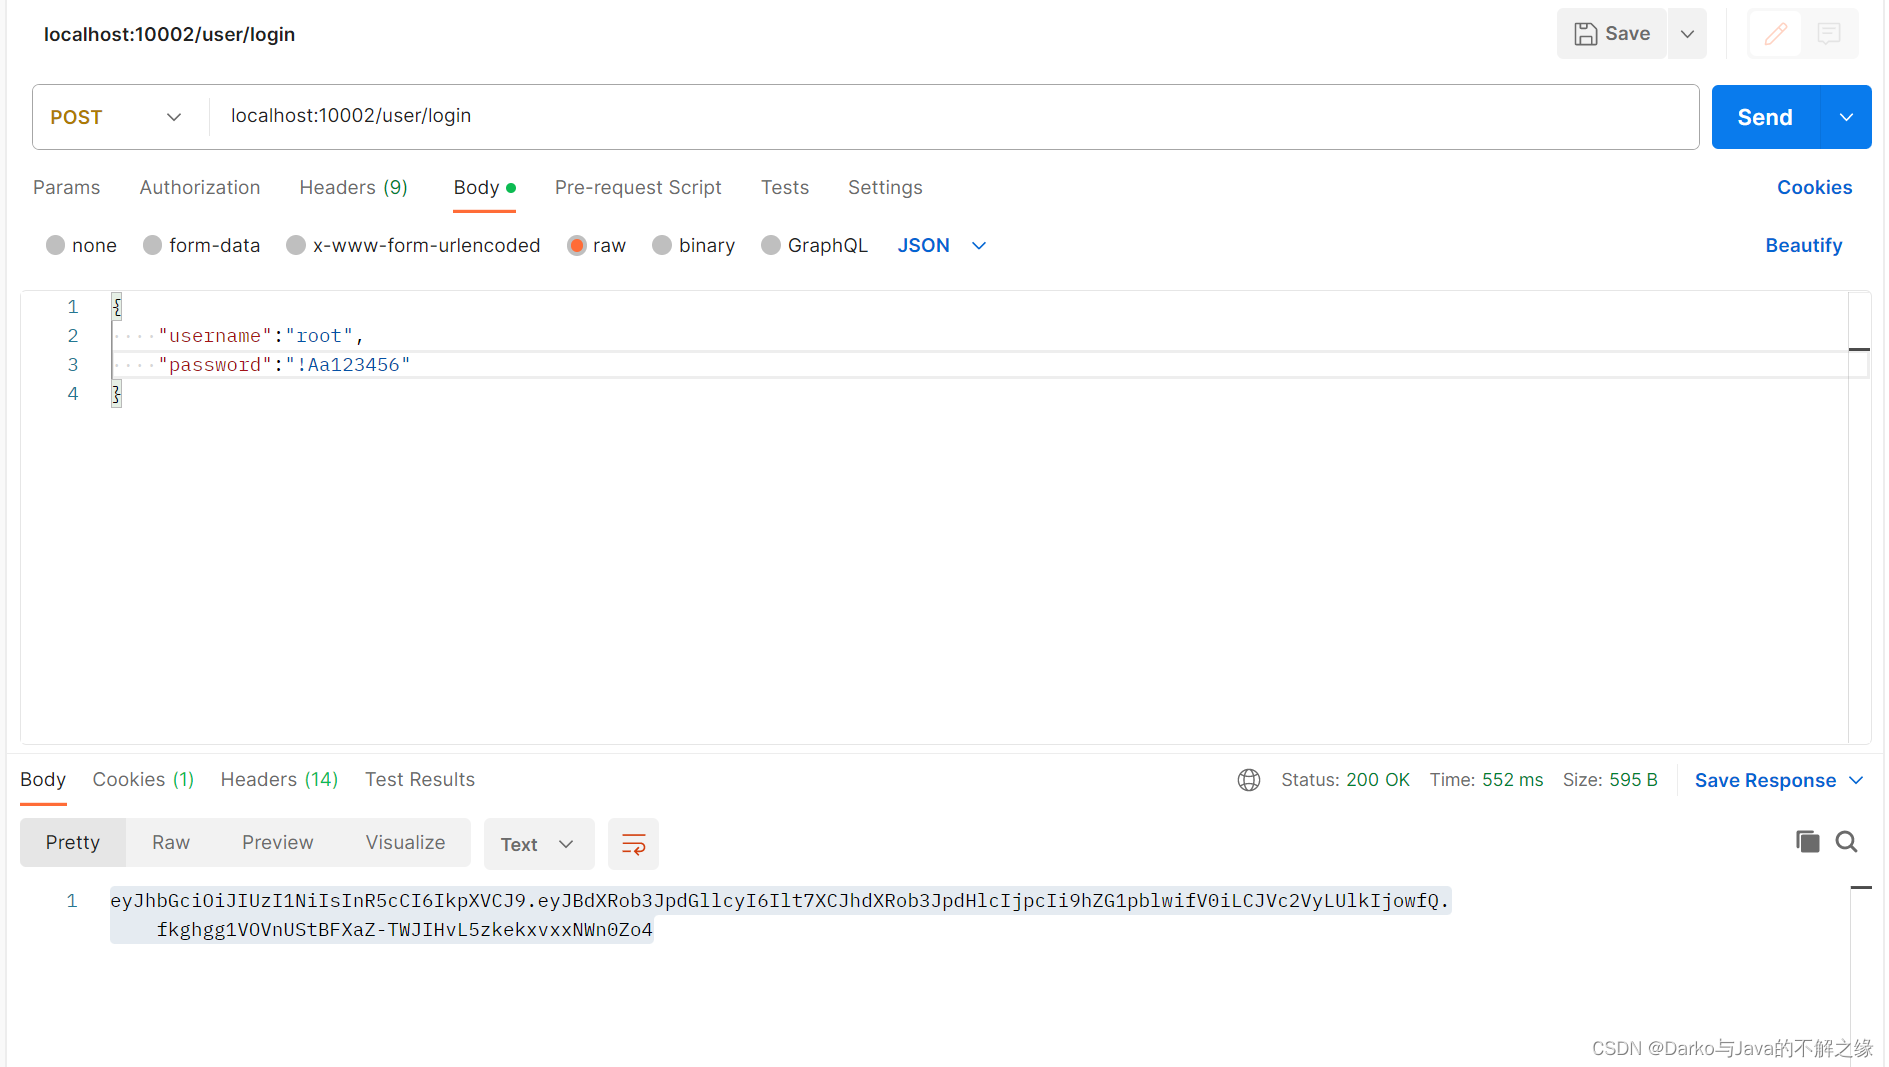
}用postman测试,首先登录用户获取jwt
将获取到的jwt,添加到请求头,发起测试请求,结果显示:测试成功!
以上就是Spring Security框架实现单点登录的流程,Demo项目可以在此获取,选择master分支即可下载。
如有错误之处,敬请指正!


 7007
7007


 被折叠的 条评论
为什么被折叠?
被折叠的 条评论
为什么被折叠?
 到【灌水乐园】发言


