


引言
没有引言
文章目录
自定义starter-步骤分析
- 当导入redis坐标时,SpringBoot自动创建Jedis的Bean。
- 创建RedisTemplate Bean, 并完成序列化和反序列化操作
步骤:
- 创建 heima-redis-spring-boot-starter 模块,添加依赖
- 添加配置属性类
- 添加配置类(创建 Jedis Bean和RedisTemplate Bean)
- 并定义META-INF/spring.factories 文件中,让SpringBoot自动加载
- 在测试模块中引入自定义的 heima-redis-spring-boot-starter 依赖,测试获取 Jedis 的Bean,操作 redis。
创建 qunyakeji-redis-spring-boot-starter 模块,添加依赖
<parent>
  <groupId>org.springframework.boot</groupId>
  <artifactId>spring-boot-starter-parent</artifactId>
  <version>2.3.10.RELEASE</version>
  <relativePath/> <!-- lookup parent from repository -->
</parent>

<properties>
  <java.version>1.8</java.version>
  <redis.version>2.3.9.RELEASE</redis.version>
</properties>
<dependencies>
  <dependency>
    <groupId>org.springframework.boot</groupId>
    <artifactId>spring-boot-starter</artifactId>
  </dependency>
  <dependency>
    <groupId>org.springframework.boot</groupId>
    <artifactId>spring-boot-configuration-processor</artifactId>
    <optional>true</optional>
  </dependency>

  <dependency>
    <groupId>org.springframework.data</groupId>
    <artifactId>spring-data-redis</artifactId>
    <scope>compile</scope>
  </dependency>
  <dependency>
      <groupId>redis.clients</groupId>
      <artifactId>jedis</artifactId>
    </dependency>

    <dependency>
        <groupId>org.projectlombok</groupId>
        <artifactId>lombok</artifactId>
    </dependency>

    <dependency>
        <groupId>com.fasterxml.jackson.core</groupId>
        <artifactId>jackson-databind</artifactId>
        <version>2.11.4</version>
    </dependency>
</dependencies>
添加配置属性类
package com.crow.sh.autoconfigure;

import lombok.Data;
import org.springframework.boot.context.properties.ConfigurationProperties;

import java.time.Duration;

/**
 * @Description: 自动化默认属性配置类
 * @Version: V1.0
 */
@Data
@ConfigurationProperties(prefix = "qunyakeji.redis")
public class RedisProperties {

    /**
     * 数据库默认:0
     */
    private int database = 0;


    /**
     * Redis主机默认:localhost
     */
    private String host = "localhost";

    /**
     * Redis登录密码默认为空
     */
    private String password;

    /**
     * Redis端口默认:6379
     */
    private int port = 6379;

    /**
     * 连接超时时间: 默认2s
     */
    private Duration timeout = Duration.ofSeconds(2);

}
添加配置类(创建 Jedis Bean和RedisTemplate Bean)
package com.crow.sh.autoconfigure;

import org.springframework.boot.autoconfigure.condition.ConditionalOnClass;
import org.springframework.boot.autoconfigure.condition.ConditionalOnMissingBean;
import org.springframework.boot.context.properties.EnableConfigurationProperties;
import org.springframework.context.annotation.Bean;
import org.springframework.context.annotation.Configuration;
import org.springframework.data.redis.connection.jedis.JedisConnectionFactory;
import org.springframework.data.redis.core.RedisOperations;
import org.springframework.data.redis.core.RedisTemplate;
import org.springframework.data.redis.serializer.Jackson2JsonRedisSerializer;
import org.springframework.data.redis.serializer.RedisSerializer;

/**
 * @Description: 自动化配置类
 * @Version: V1.0
 */
@Configuration(proxyBeanMethods = false)
@ConditionalOnClass(RedisOperations.class)
@EnableConfigurationProperties(RedisProperties.class)
public class QunyakejiRedisAutoConfiguration {


    private RedisProperties redisProperties;

    public QunyakejiRedisAutoConfiguration(RedisProperties redisProperties) {
        this.redisProperties = redisProperties;
    }

    @Bean
    public RedisSerializer<Object> redisKeySerializer() {
        return new Jackson2JsonRedisSerializer<Object>(Object.class);
    }

    @Bean
    public RedisSerializer<Object> redisValueSerializer() {
        return new Jackson2JsonRedisSerializer<Object>(Object.class);
    }

    /**
     * RedisTemplate配置
     */
    @Bean
    @ConditionalOnMissingBean(name = "redisTemplate")
    public RedisTemplate<String, Object> redisTemplate() {
        JedisConnectionFactory factory = new JedisConnectionFactory();

        // 设置相关属性
        factory.setHostName(redisProperties.getHost());
        factory.setPort(redisProperties.getPort());
        factory.setDatabase(redisProperties.getDatabase());
        factory.setPassword(redisProperties.getPassword());
        factory.setTimeout((int) redisProperties.getTimeout().getSeconds());

        // 创建RedisTemplate
        RedisTemplate<String, Object> redisTemplate = new RedisTemplate<>();
        redisTemplate.setConnectionFactory(factory);

        redisTemplate.setDefaultSerializer(this.redisValueSerializer());
        redisTemplate.setKeySerializer(this.redisKeySerializer());
        redisTemplate.setHashKeySerializer(this.redisKeySerializer());
        redisTemplate.afterPropertiesSet();

        System.out.println("********* QunyakejiRedisAutoConfiguration redisTemplate is init ********* ");
        return redisTemplate;
    }

}
定义META-INF/spring.factories 文件中,让SpringBoot自动加载
org.springframework.boot.autoconfigure.EnableAutoConfiguration=\
  com.crow.sh.autoconfigure.qunyakejiRedisAutoConfiguration
安装到本地仓库,即可使用
自定义starter-集成
目的:验证自定义starter是否可以使用
实现:新建 boot_qunyakejiredis_test 项目中引入依赖
<!--1、引入SpringBoot父工程-->
<parent>
  <groupId>org.springframework.boot</groupId>
  <artifactId>spring-boot-starter-parent</artifactId>
  <version>2.3.10.RELEASE</version>
</parent>


<dependencies>
  <!--web 启动器  SpringBoot对web的支持-->
  <dependency>
    <groupId>org.springframework.boot</groupId>
    <artifactId>spring-boot-starter-web</artifactId>
  </dependency>

  <dependency>
    <groupId>org.springframework.boot</groupId>
    <artifactId>spring-boot-starter-test</artifactId>
  </dependency>

  <dependency>
    <groupId>com.crow.sh</groupId>
    <artifactId>qunyakeji-redis-spring-boot-starter</artifactId>
    <version>1.0-SNAPSHOT</version>
  </dependency>

</dependencies>
使用redis
package com.crow.sh;

import org.junit.jupiter.api.Test;
import org.springframework.beans.factory.annotation.Autowired;
import org.springframework.boot.test.context.SpringBootTest;
import org.springframework.data.redis.core.RedisTemplate;

/**
 * @Description:
 * @Version: V1.0
 */
@SpringBootTest
public class RedisTest {

    @Autowired
    RedisTemplate redisTemplate;


    @Test
    public void testRedis() {
        redisTemplate.boundValueOps("hello").set("123456");

        Object hello = redisTemplate.boundValueOps("hello").get();
        System.out.println(hello);
    }
}
健康监控服务
引入依赖
<dependency>
    <groupId>org.springframework.boot</groupId>
    <artifactId>spring-boot-starter-actuator</artifactId>
</dependency>
- 启动项目访问:
http://localhost:{port}/actuator/**
暴露所有监控信息为HTTP
management:
  endpoints:
    enabled-by-default: true #暴露所有端点信息
    web:
      exposure:
        include: '*'  #以web方式暴露

  endpoint:
    health:
      enabled: true   # 开启健康检查详细信息
      show-details: always
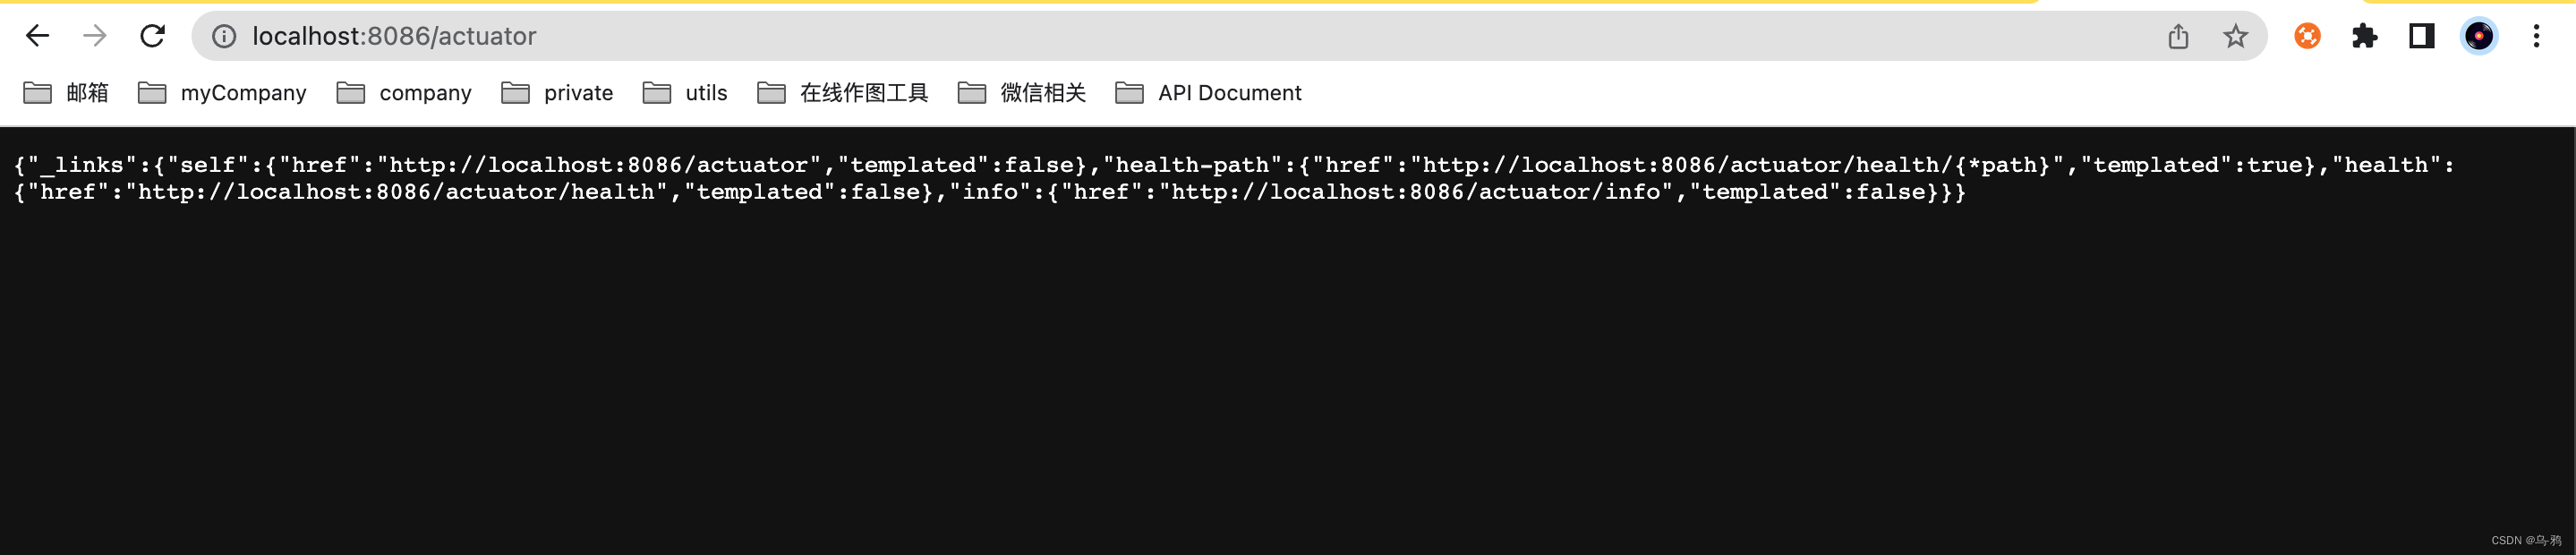
访问 http://localhost:{port}/actuator 会发现内容多了,里面的地址分别都可以访问,记录的是对应的健康监测的信息。

随便访问一个

监控-Admin可视化
Spring Boot Admin 有两个角色,客户端(Client)和服务端(Server)。
Spring Boot Admin为注册的应用程序提供以下功能:
- 显示健康状况
- 显示详细信息,例如
- JVM和内存指标
- micrometer.io指标
- 数据源指标
- 缓存指标
- 显示内部信息
- 关注并下载日志文件
- 查看JVM系统和环境属性
- 查看Spring Boot配置属性
- 支持Spring Cloud的可发布/ env-和// refresh-endpoint
- 轻松的日志级别管理
- 与JMX-beans交互
- 查看线程转储
- 查看http-traces
- 查看审核事件
- 查看http端点
- 查看预定的任务
- 查看和删除活动会话(使用spring-session)
- 查看Flyway / Liquibase数据库迁移
- 下载heapdump
- 状态更改通知(通过电子邮件,Slack,Hipchat等)
- 状态更改的事件日志(非持久性)
官方文档都有就不阐述了:传送🚪
搭建Server端
创建 qunyakeji_admin_server 模块,引入依赖
<parent>
    <groupId>org.springframework.boot</groupId>
    <artifactId>spring-boot-starter-parent</artifactId>
    <version>2.3.10.RELEASE</version>
    <relativePath/> <!-- lookup parent from repository -->
</parent>

<dependencies>
    <dependency>
        <groupId>de.codecentric</groupId>
        <artifactId>spring-boot-admin-starter-server</artifactId>
        <version>2.3.1</version>
    </dependency>
    <dependency>
        <groupId>org.springframework.boot</groupId>
        <artifactId>spring-boot-starter-web</artifactId>
    </dependency>

</dependencies>
开启注解支持
package com.crow.sh;

import de.codecentric.boot.admin.server.config.EnableAdminServer;
import org.springframework.boot.SpringApplication;
import org.springframework.boot.autoconfigure.SpringBootApplication;

@SpringBootApplication
@EnableAdminServer
public class AdminApplication {
    public static void main(String[] args) {
        SpringApplication.run(AdminApplication.class, args);
    }
}
修改个性端口,我这里是18999
搭建Client端
在任意服务里面引入依赖
<dependency>
    <groupId>de.codecentric</groupId>
    <artifactId>spring-boot-admin-starter-client</artifactId>
    <version>2.3.1</version>
</dependency>
配置文件
# 执行admin.server地址
spring:
  boot:
    admin:
      client:
        url: http://localhost:18999  # admin 服务地址
        instance:
          prefer-ip: true   # 显示IP
  application:
    name: boot_data  # 项目名称

management:
  endpoints:
    enabled-by-default: true #暴露所有端点信息
    web:
      exposure:
        include: '*'  #以web方式暴露

  endpoint:
    health:
      enabled: true   # 开启健康检查详细信息
      show-details: always
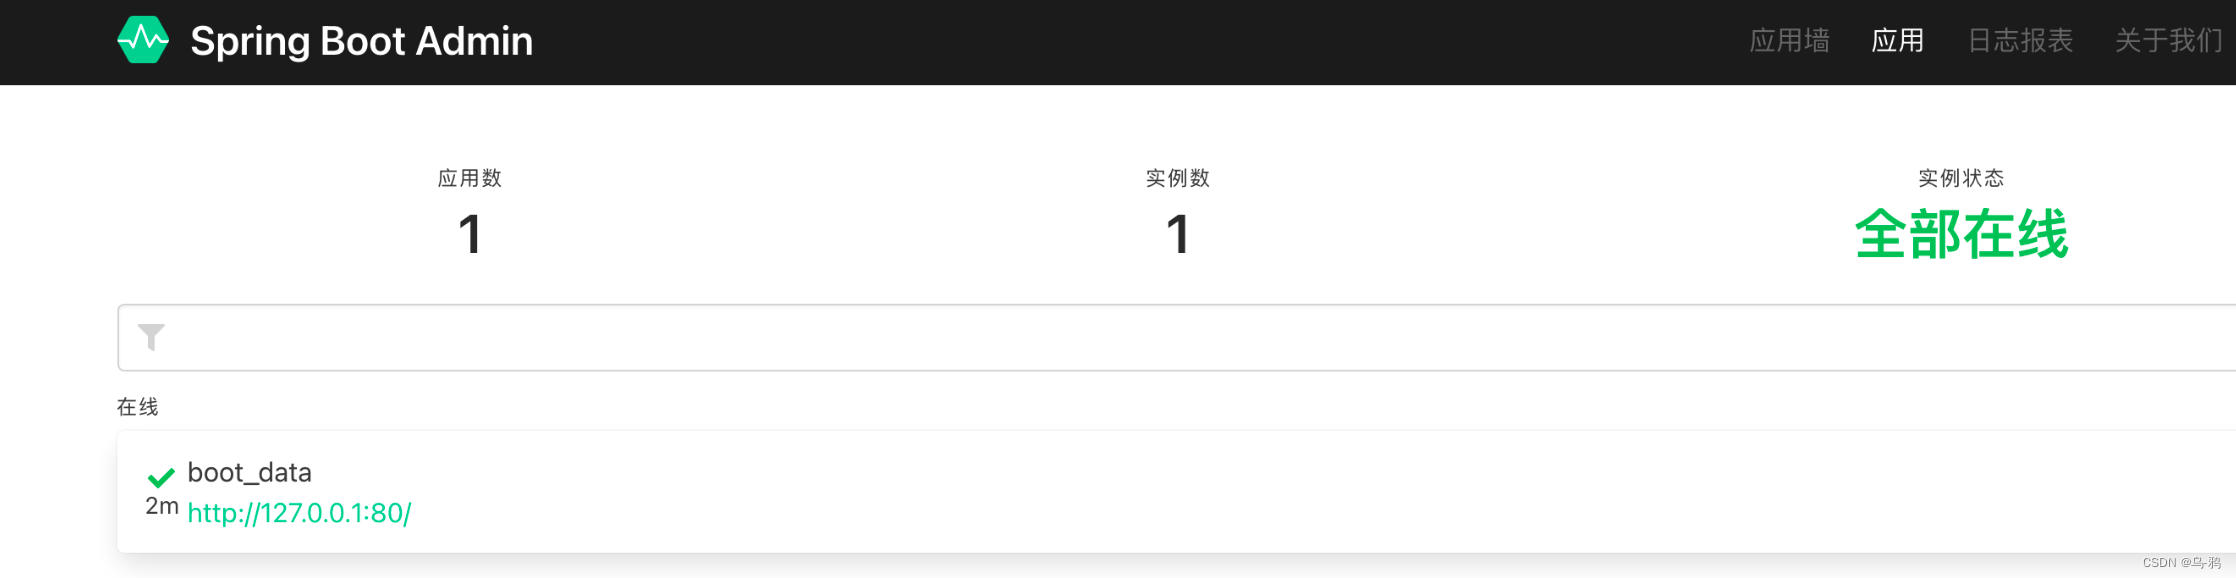
启动服务,访问admin Server http://localhost:18999/
憋大招
在准备架构师资料整理,梳理怎么写这个专栏的博客,近期情绪比较低落,进度有些慢,可能会发一些草稿,也可能不发


 4235
4235


 被折叠的 条评论
为什么被折叠?
被折叠的 条评论
为什么被折叠?
 到【灌水乐园】发言


