


学习目标:
1. 掌握Spring Boot整合MyBatis的使用
2. 掌握Spring Boot整合JPA的使用
3. 掌握Spring Boot整合Redis的使用
(一)整合mybatis
- 引入依赖
<!-- MySQL数据库连接驱动 -->
<dependency>
<groupId>com.mysql</groupId>
<artifactId>mysql-connector-j</artifactId>
<scope>runtime</scope>
</dependency>
- 新建Comment类
@Data
public class Comment {
private Integer id;
private String content;
private String author;
private Integer articleId;
@Override
public String toString() {
return "Person{" +
"id=" + id +
", content='" + content +
", author='" + author +
", articleId=" + articleId +
'}';
}
}
- 新建Article类
public class Article {
private Integer id;
private String title;
private String content;
private List<Comment> commentList;
}
- 编写配置文件- application.properties
spring.datasource.url=jdbc:mysql://localhost:3306/blog_system?serverTimezone=UTC&useSSL=false
spring.datasource.username=root
spring.datasource.password=root123
- 通过注解方式整合mybatis
提示:如果接口文件过多,可以在启动类上添加@MapperScan(“接口文件所在的包名”),不必再接口文件上添加@Mapper.
新建CommentMapper接口
通过 @Select("SELECT * FROM t_comment WHERE id =#{id}") 方式查询记录
其他数据库操作参照 该接口详细说明
@Mapper
public interface CommentMapper {
@Select("SELECT * FROM t_comment WHERE id =#{id}")
public Comment findById(Integer id);
@Insert("INSERT INTO t_comment(content,author,articleId) " +
"values (#{content},#{author},#{articleId})")
public int insertComment(Comment comment);
@Update("UPDATE t_comment SET content=#{content} WHERE id=#{id}")
public int updateComment(Comment comment);
@Delete("DELETE FROM t_comment WHERE id=#{id}")
public int deleteComment(Integer id);
}
测试:
@Resource
private CommentMapper commentMapper ;
@Test
public void getCommentMapperTest(){
System.out.println(commentMapper.findById(1));
}
修改某自动缺省值:
ALTER TABLE blog_system.t_comment MODIFY COLUMN created date DEFAULT '2023-04-30' NOT NULL COMMENT '评论时间';
$ 和 # 的区别(引用下面博文介绍,侵删):
mybatis中#和$的区别_mybatis中$和井号区别_码农小安的博客-CSDN博客
- 通过使用配置文件的方式整合mybatis (建议使用此方法)
6.1 新增ArticleMapper接口
@Mapper
public interface ArticleMapper {
public Article selectArticle(int id);
public int updateArticle(Article article);
}
6.2 创建 ArticleMapper.xml
如何创建mybatis的xml文件:
IDEA中快速创建xml文件(含mybatis-config.xml、XxxMapeer.xml)_idea创建xml文件_Coder_Cui的博客-CSDN博客
<?xml version="1.0" encoding="UTF-8" ?>
<!DOCTYPE mapper
PUBLIC "-//mybatis.org//DTD Mapper 3.0//EN"
"http://mybatis.org/dtd/mybatis-3-mapper.dtd">
<mapper namespace="com.example.spbdata.mapper.ArticleMapper">
<!-- 1、查询文章详细(包括评论信息) -->
<select id="selectArticle" resultMap="articleWithComment">
SELECT a.*,c.id c_id,c.content c_content,c.author
FROM t_article a,t_comment c
WHERE a.id=c.id AND a.id = #{id}
</select>
<resultMap id="articleWithComment" type="Article">
<id property="id" column="id" />
<result property="title" column="title" />
<result property="content" column="content" />
<collection property="commentList" ofType="Comment">
<id property="id" column="c_id" />
<result property="content" column="c_content" />
<result property="author" column="author" />
</collection>
</resultMap>
<!-- 2、根据文章id更新文章信息 -->
<update id="updateArticle" parameterType="Article" >
UPDATE t_article
<set>
<if test="title !=null and title !=''">
title=#{title},
</if>
<if test="content !=null and content !=''">
content=#{content}
</if>
</set>
WHERE id=#{id}
</update>
</mapper>
6.3 配置XML影射路径(PS:后续若无特别说明,配置文件均是在application.properties
或application.yml中进行)
#MyBatis的xml配置文件路径(注意与你项目路径一致)
mybatis.mapper-locations=classpath:mapper/*.xml
#配置XML影射文件中指定的实体类别名路径
mybatis.type-aliases-package=com.example.spbdata.domain
6.4 测试
@Resource
private ArticleMapper articleMapper ;
@Test void updArticleTest(){
Article article = new Article();
article.setId(13);
article.setTitle("Spring Boot 2 权威发布222");
System.out.println(articleMapper.updateArticle(article));
}
(二)整合JPA
- 导入依赖
<!-- Spring Data JPA依赖启动器 -->
<dependency>
<groupId>org.springframework.boot</groupId>
<artifactId>spring-boot-starter-data-jpa</artifactId>
</dependency>
- 设置ORM实体类,并指定映射的表名 Discuss
@Entity(name = "t_comment") // 设置ORM实体类,并指定映射的表名
@Data
//@Table(name="t_comment")
public class Discuss {
@Id // 表明映射对应的主键id
@GeneratedValue(strategy = GenerationType.IDENTITY) // 设置主键自增策略
private Integer id;
private String content;
private String author;
@Column(name = "article_id") //指定映射的表字段名
private Integer aId;
@Override
public String toString() {
return "Discuss{" +
"id=" + id +
", content='" + content + '\'' +
", author='" + author + '\'' +
", aId=" + aId +
'}';
}
}
- 编写Repository接口DiscussRepository
public interface DiscussRepository extends JpaRepository<Discuss,Integer> {
// 1、查询author非空的Discuss评论集合
public List<Discuss> findByAuthorNotNull();
// 2、根据文章id分页查询Discuss评论集合
@Query("SELECT c FROM t_comment c WHERE c.aId = ?1")
public List<Discuss> getDiscussPaged(Integer aid,Pageable pageable);
// 3、使用元素SQL语句,根据文章id分页查询Discuss评论集合
//nativeQuery = true nativeQuery=true是什么意思?_nativequery = true_Micheal_YCC的博客-CSDN博客
@Query(value = "SELECT * FROM t_comment WHERE a_Id = ?1",nativeQuery = true)
public List<Discuss> getDiscussPaged2(Integer aid, Pageable pageable);
//4、 根据评论id修改评论作者author
@Transactional
@Modifying
@Query("UPDATE t_comment c SET c.author = ?1 WHERE c.id = ?2")
public int updateDiscuss(String author,Integer id);
// 5、根据评论id删除评论
@Transactional
@Modifying
@Query("DELETE t_comment c WHERE c.id = ?1")
public int deleteDiscuss(Integer id);
}
- 测试
新增 JpaTests 测试类
@SpringBootTest
public class JpaTests {
@Resource
private DiscussRepository discussRepository ;
// 1、使用JpaRepository内部方法进行数据操作
@Test
public void selectCommet(){
Optional<Discuss> discuss = discussRepository.findById(1);
if(discuss.isPresent()){
System.out.println(discuss.get());
}
}
/**
* 分页查询
*/
@Test
void getCommentPaged(){
// org.springframework.data.domain.Pageable;
Pageable pageable = PageRequest.of(0,3);
List<Discuss> discuss = discussRepository.getDiscussPaged(1,pageable);
discuss.forEach(value -> System.out.println(value));
}
/**
* 分页查询2
*/
@Test
void getCommentPaged2(){
// org.springframework.data.domain.Pageable;
Pageable pageable = PageRequest.of(0,3);
// could not extract ResultSet; SQL [n/a]; nested exception is org.hibernate.exception.SQLGrammarException:
// could not extract ResultSet
// sql语句用 aid 会报错,需要改为 article_id
List<Discuss> discuss = discussRepository.getDiscussPaged2(1,pageable);
discuss.forEach(value -> System.out.println(value));
}
}
(三)整合redis
- Redis优点
(1)存取速度快
(2)支持丰富的数据类型
(3)操作具有原子性
(4)提供多种功能
- 安装redis以及redis查看工具RedisDesktopManager
redis默认端口是 6379
- 引入依赖
<!-- Spring Data Redis依赖启动器 -->
<dependency>
<groupId>org.springframework.boot</groupId>
<artifactId>spring-boot-starter-data-redis</artifactId>
</dependency>
- 定义三个实体类 Person Address Family
@RedisHash("persons") // 指定操作实体类对象在Redis数据库中的存储空间
public class Person {
@Id // 标识实体类主键
private String id;
@Indexed // 标识对应属性在Redis数据库中生成二级索引
private String firstname;
@Indexed
private String lastname;
private Address address;
private List<Family> familyList;
- 编写Repository接口PersonRepository
public interface PersonRepository extends CrudRepository<Person, String> {
List<Person> findByLastname(String lastname);
Page<Person> findPersonByLastname(String lastname, Pageable page);
List<Person> findByFirstnameAndLastname(String firstname, String lastname);
List<Person> findByAddress_City(String city);
List<Person> findByFamilyList_Username(String username);
}
- 在配置文件中配置redis连接信息
spring.redis.host=127.0.0.1
# Redis???????
spring.redis.port=6379
# Redis?????????????
spring.redis.password=
- 测试
新增RedisTests类进行增改查删操作测试。
@SpringBootTest
public class RedisTests {
@Autowired
private PersonRepository repository;
@Test
public void savePerson() {
Person person =new Person("张","有才");
Person person2 =new Person("James","Harden");
// 创建并添加住址信息
Address address=new Address("北京","China");
person.setAddress(address);
// 创建并添加家庭成员
List<Family> list =new ArrayList<>();
Family dad =new Family("父亲","张良");
Family mom =new Family("母亲","李香君");
list.add(dad);
list.add(mom);
person.setFamilyList(list);
// 向Redis数据库添加数据
Person save = repository.save(person);
Person save2 = repository.save(person2);
System.out.println(save);
System.out.println(save2);
}
@Test
public void selectPerson() {
List<Person> list = repository.findByAddress_City("北京");
System.out.println(list);
}
@Test
public void updatePerson() {
Person person = repository.findByFirstnameAndLastname("张","有才").get(0);
person.setLastname("小明");
Person update = repository.save(person);
System.out.println(update);
}
@Test
public void deletePerson() {
Person person = repository.findByFirstnameAndLastname("张","小明").get(0);
if(person != null)
repository.delete(person);
}
}
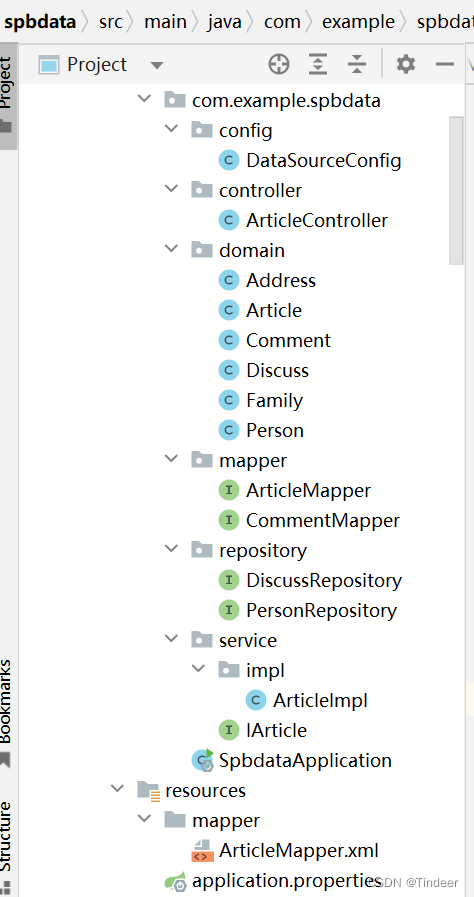
项目整体布局
附件:依赖
<dependencies>
<dependency>
<groupId>org.springframework.boot</groupId>
<artifactId>spring-boot-starter-data-jpa</artifactId>
</dependency>
<dependency>
<groupId>org.mybatis.spring.boot</groupId>
<artifactId>mybatis-spring-boot-starter</artifactId>
<version>2.3.0</version>
</dependency>
<!-- MySQL数据库连接驱动 -->
<dependency>
<groupId>com.mysql</groupId>
<artifactId>mysql-connector-j</artifactId>
<scope>runtime</scope>
</dependency>
<dependency>
<groupId>org.springframework.boot</groupId>
<artifactId>spring-boot-starter-test</artifactId>
<scope>test</scope>
</dependency>
<dependency>
<groupId>org.springframework.boot</groupId>
<artifactId>spring-boot-starter-web</artifactId>
<version>2.0.1.RELEASE</version>
</dependency>
<!-- Spring Data Redis依赖启动器 -->
<dependency>
<groupId>org.springframework.boot</groupId>
<artifactId>spring-boot-starter-data-redis</artifactId>
</dependency>
<!-- Spring Data JPA依赖启动器 -->
<dependency>
<groupId>org.springframework.boot</groupId>
<artifactId>spring-boot-starter-data-jpa</artifactId>
</dependency>
<!-- 阿里巴巴的Druid数据源依赖启动器 -->
<dependency>
<groupId>com.alibaba</groupId>
<artifactId>druid-spring-boot-starter</artifactId>
<version>1.1.10</version>
</dependency>
</dependencies>
PS:项目源码和数据库建表语句,可联系本人私下发送。


 3549
3549


 被折叠的 条评论
为什么被折叠?
被折叠的 条评论
为什么被折叠?
 到【灌水乐园】发言


