


 本文介绍了两种方法在Spring Boot中将properties配置文件内容读取并绑定到JavaBean中。方法一是使用@Component和@ConfigurationProperties注解,方法二是通过@EnableConfigurationProperties和@ConfigurationProperties组合。这两种方式都使得Java代码能够方便地使用配置文件中的数据。
首先抛出一个问题:如何使用Java读取到properties文件中的内容,并且把它封装到JavaBean中,以供随时使用
这就需要用到今天要说的配置绑定。
方法一:@Component+@ConfigurationProperties
1、先创建一个实体类,并加上@ConfigurationProperties注解
package demo.boot.bean;

import org.springframework.boot.context.properties.ConfigurationProperties;
import org.springframework.stereotype.Component;

/**
 * 只有在容器中的组件,才会拥有springboot提供的强大功能
 */
@Component
@ConfigurationProperties(prefix = "mycar")
public class Car {

    private String brand;
    private int price;

    public Car() {
    }

    public Car(String brand, int price) {
        this.brand = brand;
        this.price = price;
    }

    public String getBrand() {
        return brand;
    }

    public void setBrand(String brand) {
        this.brand = brand;
    }

    public int getPrice() {
        return price;
    }

    public void setPrice(int price) {
        this.price = price;
    }

    @Override
    public String toString() {
        return "Car{" +
                "brand='" + brand + '\'' +
                ", price=" + price +
                '}';
    }
}
2、创建一个properties文件,在里面写点需要读取的东西
mycar.brand=BYD
mycar.price=300000
3、写一个控制类
package demo.boot.controller;

import demo.boot.bean.Car;
import org.springframework.beans.factory.annotation.Autowired;
import org.springframework.web.bind.annotation.RequestMapping;
import org.springframework.web.bind.annotation.RestController;


//@ResponseBody
//@Controller
@RestController     //@ResponseBody和@Controller的合体
public class HelloController {

    @Autowired
    Car car;

    @RequestMapping("/car")
    public Car car(){
        return car;
    }

}
4、运行起来
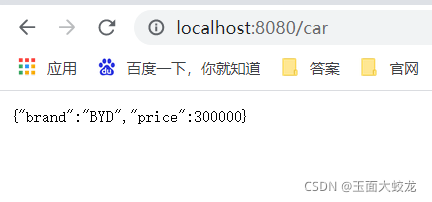
可以看到java代码已经成功读取到properties文件里的内容,并且封装到Javabean中
方法二:@EnableConfigurationProperties+@ConfigurationProperties
1、实体类(不需要加@Component注解)
package demo.boot.bean;

import org.springframework.boot.context.properties.ConfigurationProperties;
import org.springframework.stereotype.Component;


@ConfigurationProperties(prefix = "mycar")
public class Car {

    private String brand;
    private int price;

    public Car() {
    }

    public Car(String brand, int price) {
        this.brand = brand;
        this.price = price;
    }

    public String getBrand() {
        return brand;
    }

    public void setBrand(String brand) {
        this.brand = brand;
    }

    public int getPrice() {
        return price;
    }

    public void setPrice(int price) {
        this.price = price;
    }

    @Override
    public String toString() {
        return "Car{" +
                "brand='" + brand + '\'' +
                ", price=" + price +
                '}';
    }
}
2、配置类
package demo.boot.config;

import demo.boot.bean.Car;
import demo.boot.bean.Pet;
import demo.boot.bean.User;
import org.springframework.boot.context.properties.EnableConfigurationProperties;
import org.springframework.context.annotation.Bean;
import org.springframework.context.annotation.Configuration;

/**
 ** 1 配置类里面使用@Bean标注在方法上给容器注册组件,默认也是单实例的
 *  2 配置类本身也是组件
 *  3 proxyBeanMethods:代理bean的方法
 *      Full(proxyBeanMethods = true)       若是组件间相互依赖,调成true
 *      Lite(proxyBeanMethods = false)      若是组件间相互不依赖,调成false,提高运行速度
 */
@Configuration(proxyBeanMethods = true)      //告诉springboot这是一个配置类
@EnableConfigurationProperties(Car.class)    //1 开启car的配置绑定功能
                                            // 2 把Car这个组件自动注册到容器中去
public class MyConfig {


}
3、控制器类(和方法一一样)
package demo.boot.controller;

import demo.boot.bean.Car;
import org.springframework.beans.factory.annotation.Autowired;
import org.springframework.web.bind.annotation.RequestMapping;
import org.springframework.web.bind.annotation.RestController;


//@ResponseBody
//@Controller
@RestController     //@ResponseBody和@Controller的合体
public class HelloController {

    @Autowired
    Car car;

    @RequestMapping("/car")
    public Car car(){
        return car;
    }

}


 1279
1279

 被折叠的 条评论
为什么被折叠?
被折叠的 条评论
为什么被折叠?
 到【灌水乐园】发言


