


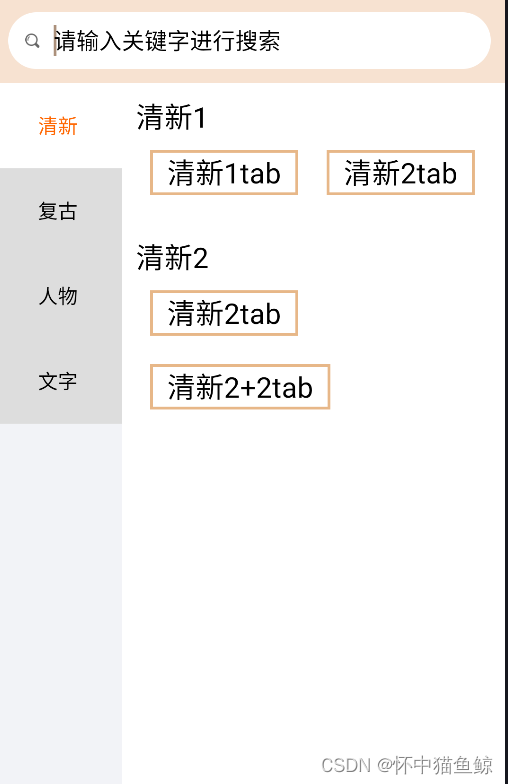
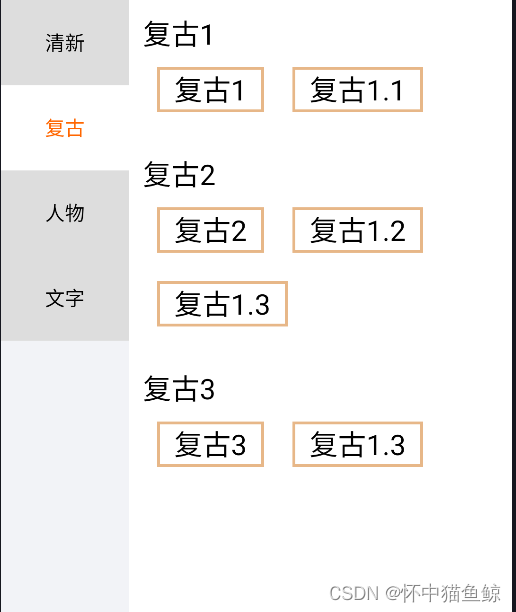
1.整体布局,结合项目(一)在FunctionFragment创建整体布局。搜索框布局应该include引入,这里我就没单独抽取。
<?xml version="1.0" encoding="utf-8"?>
<LinearLayout xmlns:android="http://schemas.android.com/apk/res/android"
    android:layout_width="match_parent"
    android:layout_height="match_parent"
    android:orientation="vertical">
    <LinearLayout
        android:layout_width="match_parent"
        android:layout_height="60dp"
        android:gravity="center"
        android:background="@color/home_top_bg">
        <RelativeLayout
            android:id="@+id/search_part"
            android:layout_width="match_parent"
            android:layout_height="40dp"
            android:layout_gravity="center"
            android:layout_margin="10dp"
            android:background="@drawable/bg_search">

            <ImageView
                android:id="@+id/searchImg"
                android:layout_width="10dp"
                android:layout_height="10dp"
                android:layout_centerVertical="true"
                android:layout_marginLeft="12dp"
                android:src="@mipmap/home_search_icon" />

            <EditText
                android:id="@+id/inputData"
                android:layout_width="match_parent"
                android:layout_height="match_parent"
                android:layout_marginLeft="7dp"
                android:layout_toRightOf="@+id/searchImg"
                android:background="@null"
                android:hint="请输入关键字进行搜索"
                android:imeOptions="actionSearch"
                android:maxLength="10"
                android:paddingLeft="3dp"
                android:singleLine="true"
                android:textColor="@color/black"
                android:textColorHint="@color/black"
                android:textSize="16sp" />
        </RelativeLayout>
    </LinearLayout>


    <LinearLayout
        android:layout_width="match_parent"
        android:layout_height="0dp"
        android:layout_weight="1"
        android:orientation="horizontal">
        <androidx.recyclerview.widget.RecyclerView
            android:id="@+id/fun_recy"
            android:layout_width="0dp"
            android:layout_height="match_parent"
            android:background="#F2F3F7"
            android:layout_weight="1"/>
        <FrameLayout
            android:id="@+id/fun_framelayout"
            android:layout_width="0dp"
            android:layout_height="match_parent"
            android:layout_weight="3"
            android:background="@color/white"/>

    </LinearLayout>

</LinearLayout>
2.左侧列表适配器和item布局
public class FunRecyAdapter extends RecyclerView.Adapter<FunRecyAdapter.ViewHolder> {
    private Context context;
    private   List<Fun_Bean.DatasBean> data;

    public FunRecyAdapter(Context context,   List<Fun_Bean.DatasBean> data) {
        this.context = context;
        this.data = data;
    }

    @NonNull
    @Override
    public ViewHolder onCreateViewHolder(@NonNull ViewGroup parent, int viewType) {
        View inflate = LayoutInflater.from(context).inflate(R.layout.fun_recy_item, parent, false);
        ViewHolder viewHolder = new ViewHolder(inflate);
        return viewHolder;
    }

    @SuppressLint("ResourceAsColor")
    @Override
    public void onBindViewHolder(@NonNull ViewHolder holder, int position) {
        holder.itemView.setId(position);
        holder.tv.setText(data.get(position).getShowName());

        if(data.get(position).isCheck()){
            holder.itemView.setBackgroundResource(R.drawable.act_recy_bg);
            holder.tv.setTextColor(Color.parseColor("#FF6600"));

        }else{
            holder.itemView.setBackgroundColor(Color.parseColor("#DDDDDD"));
            holder.tv.setTextColor(Color.parseColor("#FF000000"));
        }

        holder.itemView.setOnClickListener(new View.OnClickListener() {
            @Override
            public void onClick(View view) {
                mSelectorListener.onSelect(view,position);
            }
        });

    }

    @Override
    public int getItemCount() {
        return data.size()==0?0:data.size();
    }

    class ViewHolder extends RecyclerView.ViewHolder{

        private final TextView tv;

        public ViewHolder(@NonNull View itemView) {
            super(itemView);
            tv = itemView.findViewById(R.id.tv);
        }
    }
    public interface OnSelectorListener{
        void onSelect(View view,int position);
    }
    public void setOnSelectorListener(OnSelectorListener listener){
        mSelectorListener=listener;
    }
    private OnSelectorListener mSelectorListener;
}
fun_recy_item.xml
<?xml version="1.0" encoding="utf-8"?>
<LinearLayout xmlns:android="http://schemas.android.com/apk/res/android"
    android:layout_width="match_parent"
    android:layout_height="wrap_content"
    android:minHeight="60dp"
    android:gravity="center"
    android:orientation="vertical" >

    <TextView
        android:id="@+id/tv"
        android:layout_width="wrap_content"
        android:layout_height="wrap_content"
        android:layout_gravity="center" />

</LinearLayout>
3.创建右侧具体分类列表fragement-FunRightFragment
public class FunRightFragment extends Fragment {

    private RecyclerView mRecy;
    private Fun_Bean.DatasBean info;

    @Nullable
    @Override
    public View onCreateView(@NonNull LayoutInflater inflater, @Nullable ViewGroup container, @Nullable Bundle savedInstanceState) {

        View view = inflater.inflate(R.layout.fun_right_fg, null);
        mRecy = view.findViewById(R.id.fun_right_fg_rcy);
        //得到数据
        info = (Fun_Bean.DatasBean) getArguments().getSerializable("info");
        initViews();
        return view;
    }
    private void initViews() {
        // 设置布局管理器
        mRecy.setLayoutManager(new LinearLayoutManager(getActivity(), LinearLayoutManager.VERTICAL, false));
        List<Fun_Bean.DatasBean.ItemDTO> item = info.getItem();
        // 实例化Adapter对象
        Fun_Right_recy_Adapter adapter = new Fun_Right_recy_Adapter(getActivity(), item);
        // 设置Adapter
        mRecy.setAdapter(adapter);
        adapter.notifyDataSetChanged();


  }
}
fun_right_fg.xml
<?xml version="1.0" encoding="utf-8"?>
<LinearLayout xmlns:android="http://schemas.android.com/apk/res/android"
    android:layout_width="match_parent"
    android:layout_height="match_parent"
    android:orientation="vertical">

    <androidx.recyclerview.widget.RecyclerView
        android:id="@+id/fun_right_fg_rcy"
        android:layout_width="match_parent"
        android:layout_height="match_parent" />

</LinearLayout>
Fun_Right_recy_Adapter,右侧fragment里面列表的适配器,这个列表里面就是流式布局
public class Fun_Right_recy_Adapter extends RecyclerView.Adapter<Fun_Right_recy_Adapter.ViewHolder> {
    private Context context;
    private List<Fun_Bean.DatasBean.ItemDTO> data;

    public Fun_Right_recy_Adapter(Context context,   List<Fun_Bean.DatasBean.ItemDTO> data) {
        this.context = context;
        this.data = data;
    }

    @NonNull
    @Override
    public ViewHolder onCreateViewHolder(@NonNull ViewGroup parent, int viewType) {
        View inflate = LayoutInflater.from(context).inflate(R.layout.fun_right_fg_item, parent, false);
        ViewHolder viewHolder = new ViewHolder(inflate);
        return viewHolder;
    }

    @SuppressLint("ResourceAsColor")
    @Override
    public void onBindViewHolder(@NonNull ViewHolder holder, int position) {
        holder.tv_title.setText(data.get(position).getTitle());
        // flexbox布局动态添加标签
        List<Fun_Bean.DatasBean.ItemDTO.TabDTO> tags = data.get(position).getTab();
        for (int i = 0; i < tags.size(); i++) {
            String temp = tags.get(i).getQ();
            View tagView = LayoutInflater.from(context).inflate(R.layout.item_tag_cell, null, false);
            TextView tag = tagView.findViewById(R.id.tv_tag);
            tag.setText(temp);
            // 设置标签点击事件
            tag.setOnClickListener(view -> itemCellClicker.onItemClick(temp));
            holder.flexbox_layout.addView(tagView);
        }


    }

    @Override
    public int getItemCount() {
        return data.size()==0?0:data.size();
    }

    class ViewHolder extends RecyclerView.ViewHolder{

        private final TextView tv_title;
        private final FlexboxLayout flexbox_layout;

        public ViewHolder(@NonNull View itemView) {
            super(itemView);
            tv_title = itemView.findViewById(R.id.tv_title);
            flexbox_layout = itemView.findViewById(R.id.flexbox_layout);
        }
    }
    public interface ItemCellClicker{
        void onItemClick(String tag);
    }

    // 流式布局标签点击事件
    public ItemCellClicker itemCellClicker;
    // 设置点击事件回调
    public void setItemCellClicker(ItemCellClicker itemCellClicker){
        this.itemCellClicker = itemCellClicker;
    }
}
fun_right_fg_item.xml 右侧fragment列表的子布局
<?xml version="1.0" encoding="utf-8"?>
<LinearLayout xmlns:android="http://schemas.android.com/apk/res/android"
    xmlns:app="http://schemas.android.com/apk/res-auto"
    xmlns:tools="http://schemas.android.com/tools"
    android:layout_width="match_parent"
    android:layout_height="wrap_content"
    android:orientation="vertical"
    android:padding="10dp">

    <TextView
        app:layout_constraintTop_toTopOf="parent"
        app:layout_constraintLeft_toLeftOf="parent"
        android:id="@+id/tv_title"
        android:text="Hello android"
        android:textSize="20sp"
        android:textColor="@color/black"
        android:layout_width="wrap_content"
        android:layout_height="wrap_content"/>
    <!--流式布局-->
    <com.google.android.flexbox.FlexboxLayout
        android:id="@+id/flexbox_layout"
        android:orientation="horizontal"
        app:flexWrap="wrap"
        android:layout_width="match_parent"
        android:layout_height="wrap_content"/>

</LinearLayout>
item_tag_cell.xml 是流式布局子布局
<LinearLayout xmlns:android="http://schemas.android.com/apk/res/android"
    xmlns:app="http://schemas.android.com/apk/res-auto"
    xmlns:tools="http://schemas.android.com/tools"
    android:layout_width="match_parent"
    android:layout_height="wrap_content"
    android:padding="10dp">

    <TextView
        android:id="@+id/tv_tag"
        android:paddingHorizontal="12dp"
        android:gravity="center"
        android:background="@drawable/flow_item_bg"
        android:text="Hello android"
        android:textSize="20sp"
        android:textColor="@color/black"
        android:layout_width="wrap_content"
        android:layout_height="32dp"/>

</LinearLayout>
4.绑定适配,创建Fragment,自己写假数据
public class FunctionFragment extends Fragment {

    private RecyclerView mRecy;
    private FunRecyAdapter mAdater;
    FunRightFragment functionFragment;
    private FragmentTransaction fragmentTransaction;
    private Bundle mBundle;

    @Nullable
    @Override
    public View onCreateView(@NonNull LayoutInflater inflater, @Nullable ViewGroup container, @Nullable Bundle savedInstanceState) {
        View inflate = inflater.inflate(R.layout.frg_function, container, false);

        return inflate;
    }

    @Override
    public void onViewCreated(@NonNull View view, @Nullable Bundle savedInstanceState) {
        super.onViewCreated(view, savedInstanceState);
        initView(view);
    }

    private void initView(View view) {
        mRecy = view.findViewById(R.id.fun_recy);
        mRecy.setLayoutManager(new LinearLayoutManager(getActivity(), LinearLayoutManager.VERTICAL, false));
        String response="创建个json。。。。自己写吧";
        Fun_Bean fun_bean = new Gson().fromJson(response, Fun_Bean.class);
        mAdater = new FunRecyAdapter(getActivity(), fun_bean.getData());
        mRecy.setAdapter(mAdater);
        fun_bean.getData().get(0).setCheck(true);

        //创建Fragment对象
        functionFragment = new FunRightFragment();
        fragmentTransaction = getActivity().getSupportFragmentManager().beginTransaction();
        fragmentTransaction.replace(R.id.fun_framelayout, functionFragment);

        //传递数据到Fragment
        mBundle = new Bundle();
        mBundle.putSerializable("info", fun_bean.getData().get(0));
        functionFragment.setArguments(mBundle);
        fragmentTransaction.commit();

        mAdater.setOnSelectorListener((view1, position) -> {
            Fun_Bean.DatasBean datasBean = fun_bean.getData().get(position);
            for (int i = 0; i < fun_bean.getData().size(); i++) {
                if (fun_bean.getData().get(i).getShowName().equals(datasBean.getShowName())) {
                    fun_bean.getData().get(i).setCheck(true);
                } else {
                    fun_bean.getData().get(i).setCheck(false);
                }
            }
            mAdater.notifyDataSetChanged();
            //右侧fragment
            //创建Fragment对象
            functionFragment = new FunRightFragment();
            fragmentTransaction = getActivity().getSupportFragmentManager().beginTransaction();
            fragmentTransaction.replace(R.id.fun_framelayout, functionFragment);

            //传递数据到Fragment
            mBundle = new Bundle();
            mBundle.putSerializable("info", fun_bean.getData().get(position));
            functionFragment.setArguments(mBundle);
            fragmentTransaction.commit();
        });

    }
  //流式布局
    implementation 'com.google.android.flexbox:flexbox:3.0.0'


 967
967


 被折叠的 条评论
为什么被折叠?
被折叠的 条评论
为什么被折叠?
 到【灌水乐园】发言


