


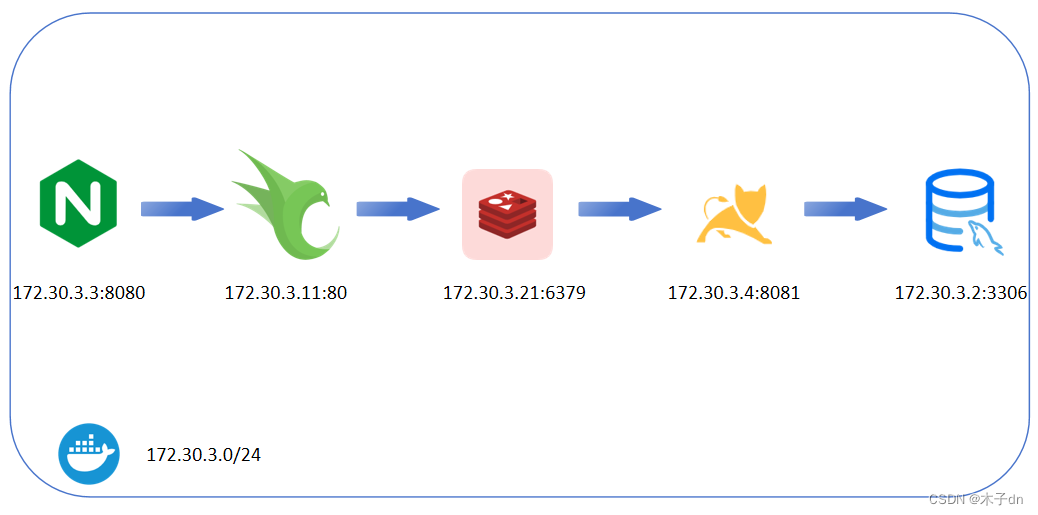
通过本文章,可以完成多级缓存架构中的Redis缓存。

一、Redis服务
在docker/docker-compose.yml中,添加redis服务块
  redis:
    container_name: redis
    image: redis:7.2
    volumes:
      - ./redis/redis.conf:/usr/local/etc/redis/redis.conf
    ports:
      - "6379:6379"
    command: ["redis-server", "/usr/local/etc/redis/redis.conf"]
    networks:
      multi-cache:
        ipv4_address: 172.30.3.21
二、Redis缓存预热
在spirngboot项目启动时,将固定的热点数据提前加载到redis中。
1. 引入依赖
pom.xml添加如下依赖
		<dependency>
            <groupId>org.springframework.boot</groupId>
            <artifactId>spring-boot-starter-data-redis</artifactId>
        </dependency>
        <dependency>
            <groupId>io.lettuce</groupId>
            <artifactId>lettuce-core</artifactId>
            <version>6.1.4.RELEASE</version> <!-- 或更高版本 -->
        </dependency>
        <!-- https://mvnrepository.com/artifact/com.alibaba.fastjson2/fastjson2 -->
        <dependency>
            <groupId>com.alibaba.fastjson2</groupId>
            <artifactId>fastjson2</artifactId>
            <version>2.0.41</version>
        </dependency>
application.yml添加如下配置
spring:
  redis:
    host: 172.30.3.21
2. handler类实现
新建config.RedisHandler类,内容如下,主要是重写afterPropertiesSet,完成缓存预热逻辑,saveItem和deleteItemById函数给之后的章节使用。
@Component
public class RedisHandler implements InitializingBean {
    @Autowired
    private StringRedisTemplate redisTemplate;
    @Autowired
    private IItemService itemService;
    @Autowired
    private IItemStockService stockService;
    @Override
    public void afterPropertiesSet() throws Exception {
        List<Item> itemList = itemService.list();
        for (Item item : itemList) {
            String json = JSON.toJSONString(item);
            redisTemplate.opsForValue().set("item:id:"+item.getId(), json);
        }
        List<ItemStock> stockList = stockService.list();
        for (ItemStock stock : stockList) {
            String json = JSON.toJSONString(stock);
            redisTemplate.opsForValue().set("item:stock:id:"+stock.getId(), json);
        }
    }

    public void saveItem(Item item){
        String json = JSON.toJSONString(item);
        redisTemplate.opsForValue().set("item:id:"+item.getId(), json);
    }

    public void deleteItemById(Long id){
        redisTemplate.delete("item:id:"+id);
    }
}
三、整合Redis缓存
改进openresty的docker/openresty1/lualib/common.lua,如下
local redis = require('resty.redis')
local red = redis:new()
red:set_timeouts(1000, 1000, 1000)
-- 创建一个本地缓存对象item_cache
local item_cache = ngx.shared.item_cache;
-- 关闭redis连接的工具方法,其实是放入连接池
local function close_redis(red)
local pool_max_idle_time = 10000 -- 连接的空闲时间,单位是毫秒
local pool_size = 100 --连接池大小
local ok, err = red:set_keepalive(pool_max_idle_time, pool_size)
if not ok then
ngx.log(ngx.ERR, "放入redis连接池失败: ", err)
end
end
-- 查询redis的方法 ip和port是redis地址,key是查询的key
local function read_redis(ip, port, key)
-- 获取一个连接
local ok, err = red:connect(ip, port)
if not ok then
ngx.log(ngx.ERR, "连接redis失败 : ", err)
return nil
end
-- 查询redis
local resp, err = red:get(key)
-- 查询失败处理
if not resp then
ngx.log(ngx.ERR, "查询Redis失败: ", err, ", key = " , key)
end
--得到的数据为空处理
if resp == ngx.null then
resp = nil
ngx.log(ngx.ERR, "查询Redis数据为空, key = ", key)
end
close_redis(red)
return resp
end
-- 函数,向openresty本身发送类似/path/item/10001请求,根据conf配置,将被删除/path前缀并代理至tomcat程序
local function read_get(path, params)
local rsp = ngx.location.capture('/path'..path,{
method = ngx.HTTP_GET,
args = params,
})
if not rsp then
ngx.log(ngx.ERR, "http not found, path: ", path, ", args: ", params);
ngx.exit(404)
end
return rsp.body
end
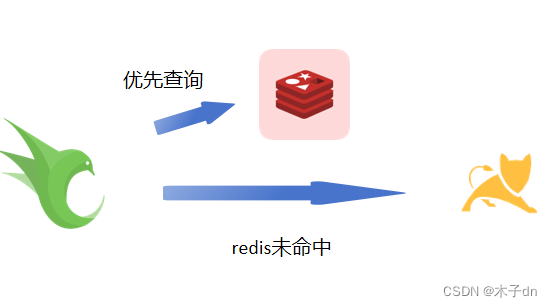
-- 函数,如果本地有缓存,使用缓存,如果没有代理到tomcat然后将数据存入缓存
local function read_data(key, expire, path, params)
-- query local cache
local rsp = item_cache:get(key)
-- query redis
if not rsp then
ngx.log(ngx.ERR, "local cache miss, try redis, key: ", key)
rsp = read_redis("172.30.3.21", 6379, key)
if not rsp then
ngx.log(ngx.ERR, "redis cache miss, try tomcat, key: ", key)
rsp = read_get(path, params)
end
end
-- write into local cache
item_cache:set(key, rsp, expire)
return rsp
end
local _M = {
read_get = read_get,
read_redis = read_redis,
read_data = read_data
}
return _M
item.lua不需要用改动。
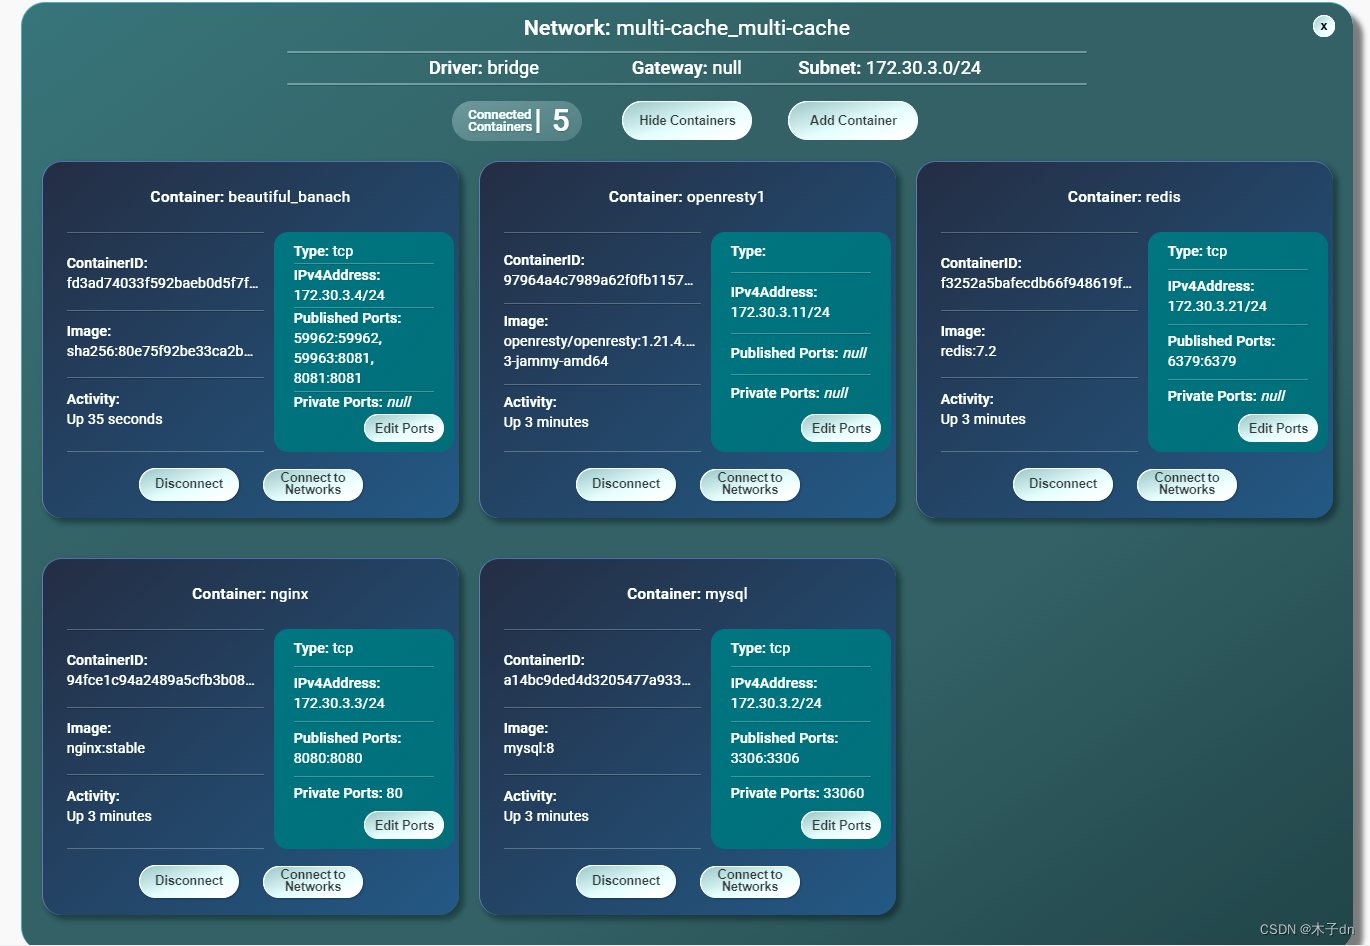
四、运行
到此为止,docker-compose.yml内容应该如下
version: '3.8'

networks:
  multi-cache:
    driver: bridge
    ipam:
      driver: default
      config:
        - subnet: 172.30.3.0/24

services:
  mysql:
    container_name: mysql
    image: mysql:8
    volumes:
      - ./mysql/conf/my.cnf:/etc/mysql/conf.d/my.cnf
      - ./mysql/data:/var/lib/mysql
      - ./mysql/logs:/logs
    ports:
      - "3306:3306"
    environment:
      - MYSQL_ROOT_PASSWORD=1009
    networks:
      multi-cache:
        ipv4_address: 172.30.3.2

  nginx:
    container_name: nginx
    image: nginx:stable
    volumes:
      - ./nginx/conf/nginx.conf:/etc/nginx/nginx.conf
      - ./nginx/conf/conf.d/default.conf:/etc/nginx/conf.d/default.conf
      - ./nginx/dist:/usr/share/nginx/dist
    ports:
      - "8080:8080"
    networks:
      multi-cache:
        ipv4_address: 172.30.3.3

  openresty1:
    container_name: openresty1
    image: openresty/openresty:1.21.4.3-3-jammy-amd64
    volumes:
      - ./openresty1/conf/nginx.conf:/usr/local/openresty/nginx/conf/nginx.conf
      - ./openresty1/conf/conf.d/default.conf:/etc/nginx/conf.d/default.conf
      - ./openresty1/lua:/usr/local/openresty/nginx/lua
      - ./openresty1/lualib/common.lua:/usr/local/openresty/lualib/common.lua
    networks:
      multi-cache:
        ipv4_address: 172.30.3.11

  redis:
    container_name: redis
    image: redis:7.2
    volumes:
      - ./redis/redis.conf:/usr/local/etc/redis/redis.conf
    ports:
      - "6379:6379"
    command: [ "redis-server", "/usr/local/etc/redis/redis.conf" ]
    networks:
      multi-cache:
        ipv4_address: 172.30.3.21
删除原来的multiCache,重新启动各项服务。
docker-compose -p multi-cache up -d
启动springboot程序。
五、测试
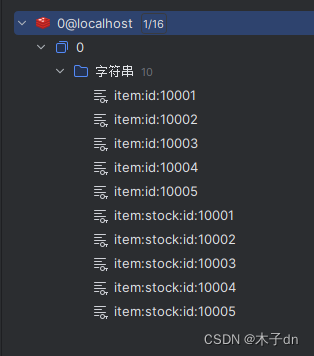
1. redis缓存预热
springboot程序启动后,出现查询日志,查看redis数据库发现自动存入了数据。
2. redis缓存命中
清空openresty容器日志,访问http://localhost:8080/item.html?id=10001,查看日志,发现两次commonUtils.read_data都只触发到查询redis,没到查询tomcat。
2024-01-12 16:06:18 2024/01/12 08:06:18 [error] 7#7: *1 [lua] common.lua:59: read_data(): local cache miss, try redis, key: item:id:10001, client: 172.30.3.3, server: localhost, request: "GET /api/item/10001 HTTP/1.0", host: "nginx-cluster", referrer: "http://localhost:8080/item.html?id=10001"
2024-01-12 16:06:18 2024/01/12 08:06:18 [error] 7#7: *1 [lua] common.lua:59: read_data(): local cache miss, try redis, key: item:stock:id:10001, client: 172.30.3.3, server: localhost, request: "GET /api/item/10001 HTTP/1.0", host: "nginx-cluster", referrer: "http://localhost:8080/item.html?id=10001"
2024-01-12 16:06:18 172.30.3.3 - - [12/Jan/2024:08:06:18 +0000] "GET /api/item/10001 HTTP/1.0" 200 466 "http://localhost:8080/item.html?id=10001" "Mozilla/5.0 (Windows NT 10.0; Win64; x64) AppleWebKit/537.36 (KHTML, like Gecko) Chrome/121.0.0.0 Safari/537.36 Edg/121.0.0.0"
查看springboot程序日志,也没有查询记录,说明redis缓存命中成功。
六、高可用集群
对于redis高可用集群,可以参考以下专栏文章。
https://blog.csdn.net/m0_51390969/category_12546314.html?spm=1001.2014.3001.5482


 276
276


 被折叠的 条评论
为什么被折叠?
被折叠的 条评论
为什么被折叠?
 到【灌水乐园】发言


