


目录:
参考的博客
iOS通知底层实现原理
[iOS开发]单例模式\通知\代理
iOS NSNotification使用及原理实现
单例模式
什么是单例模式
单例模式在整个工程中,相当于一个全局变量,就是不论在哪里需要用到这个类的实例变量,都可以通过单例方法来取得,而且一旦你创建了一个单例类,不论你在多少个洁面中初始化调用了这个单例方法取得对象,它们所有的对象都是指向的同一块内存的存储空间(即单例类保证了该类的实例对象是唯一存在的一个)
单例模式的优缺点
优点:
- 单例模式可以保证系统中一个类只有一个实例而且该实例易于外界访问,从而方便对实例个数的控制并节约系统资源。
- 单例因为类控制了实例化的过程,所以类可以更加灵活的修改实例化的过程
缺点:
- 单例对象一旦建立,对象指针式保存在静态区,单例对象在堆中分配的内存空间会在应用程序中止后才会被释放(和静态变量相似,只要进程在,单例对象就在)。
- 单例类无法继承,因此很难进行类的扩展。
- 单例不适用于变化的对象,如果同一类型的对象总是要在不同的用例场景发生变化,单例就回引起数据的错误,不能保存彼此的状态。
实现方式
懒汉式:
实现原理和懒加载很想,如果在程序中不适用这个对象,那么就不会创建,只有在你使用代码创建这个对象,才会创建。这种思想在iOS开发中是很重要的,也是最常见的时间换空间的做法 (其实就是在第一次使用单例的时候才进行初始化)
如果要保证应用中就只有一个对象,就应该让类的alloc方法只会进行一次内存空间的分配。所以我们需要重写alloc方法,这里提供了两种方法,一种是alloc,一种是allocWithZone方法
- 其实在
alloc调用的底层也是allocWithZone方法,所以在此,我们只需要重写allocWithZone方法
id manager;
+ (instancetype)allocWithZone:(struct _NSZone *)zone
{
    if (manager == nil) {
        // 调用super的allocWithZone方法来分配内存空间
        manager = [super allocWithZone:zone];
    }
    return manager;
}
在涉及到多线程时,我们就需要对其进行加锁,来避免 (一个线程进if判断为空,然后进去创建对象,在还没有返回的时候,另一条线程又进入if判断,判断仍然为空,再次进入,导致保证不了只有一个单例对象)
然后我们去加个锁:
id manager;
+ (instancetype)allocWithZone:(struct _NSZone *)zone
{
    // 在这里加一把锁(利用本类为锁)进行多线程问题的解决
    @synchronized(self){
        if (manager == nil) {
            // 调用super的allocWithZone方法来分配内存空间
            manager = [super allocWithZone:zone];
        }
    }
    return manager;
}
这样的话就可以解决多线程并发的问题了,但是,每次进行alloc的时候都会加锁和判断锁的存在,这一点是可以进行优化的:
id manager;
+ (instancetype)allocWithZone:(struct _NSZone *)zone
{
    // 在这里判断,为了优化资源,防止多次加锁和判断锁
    if (manager == nil) {
        // 在这里加一把锁(利用本类为锁)进行多线程问题的解决
        @synchronized(self){
            if (manager == nil) {
                // 调用super的allocWithZone方法来分配内存空间
                manager = [super allocWithZone:zone];
            }
        }
    }
    return manager;
}
这样的话在判断锁或加锁之前多加一条单例对象是否为空的判断就可以省去多余的锁判断,但是这样的话还不够优化,我们还可以使用GCD方法进行一个优化:
首先我们来看一个GCD的API:
dispatch_once一次性代码(只会执行一次):
	static dispatch_once_t onceToken;
	dispatch_once(&onceToken, ^{
		//此处编写只执行一次的代码(这里main默认是线程安全的)
	});
同时对manager应该使用static以避免被extern进行了操作
这里我们浅讲一下static和extern的区别:
static:定义在变量或函数前面,它的含义是改变默认的external链接属性,使它们的作用域限定在本文件内部,这样其他类的文件就不能对它做引用和修改了,保证了单例的一个安全性。extern:修饰符extern用在变量或者函数的声明前,用来说明“此变量/函数是在别处定义的,要在此处引用,并可以对该变量/函数进行修改”
加了static的GCD版的代码例子如下:
//加了static限制其作用域,保证其不会被引用它的其他类修改
static id manager;
+ (instancetype)allocWithZone:(struct _NSZone *)zone {
    static dispatch_once_t onceToken;
    dispatch_once(&onceToken, ^{
        manager = [super allocWithZone:zone];
    });
    return manager;
}
另外呢,我们也可以通过自己定义一个初始化单例的类方法来作为外部创建单例对象的接口:
static id manager;
//自定义创建单例的类方法接口
+ (instancetype)sharedManger{
	static dispatch_once_t onceToken;
	dispatch_once(&onceToken, ^{
        manager = [super allocWithZone:zone];
    });
    return manager;
}

//但是这时候我们还是得确保安全去重写一下allocWithZone方法,否则外部如果采用alloc的方法来创建单例对象的时候就会每alloc一遍就会新创建一个该对象,单例就失去了意义
+ (instancetype)allocWithZone:(struct _NSZone *)zone {
    if (manager == nil) {
        manager = [super allocWithZone:zone];
    }
    return manager;
}
举一个真实的懒汉式创建单例的例子:
先创建一个继承于NSObject的类manager作为单例类
接下来就是第一种情况的实现代码:
manager.h文件中:
#import <Foundation/Foundation.h>

NS_ASSUME_NONNULL_BEGIN

@interface manager : NSObject
//单例封装的一个方法
- (void)print;
//创建单例的接口类方法
+ (instancetype) sharedManager;

@end

NS_ASSUME_NONNULL_END


manager.m文件中:
#import "manager.h"

@implementation manager

static id myManager;
+ (instancetype) sharedManager {
    static dispatch_once_t onceToken;
    dispatch_once(&onceToken, ^{
        myManager = [[manager alloc] init];
        NSLog(@"使用GCD方法创建了一次单例!");
    });
    return myManager;
}

- (void)print {
    NSLog(@"调用了单例对象!");
}

//由于alloc方法中会调用allocWithZone:方法,所以我们通过重写allocWithZone:方法来打印标记文字,旨在让每次调用alloc方法时,都会在此处打印一句话
+ (instancetype)allocWithZone:(struct _NSZone *)zone {
    myManager = [super allocWithZone:zone];
    NSLog(@"调用alloc重新创建了一个单例!");
    return myManager;
}

@end


ViewController.h文件中:
#import <UIKit/UIKit.h>

@interface ViewController : UIViewController

@end


//ViewController.m文件中:
#import "ViewController.h"
#import "manager.h"

@interface ViewController ()

@end

@implementation ViewController

- (void)viewDidLoad {
    [super viewDidLoad];
    // Do any additional setup after loading the view.

    //调用我们的GCD方法的接口创建单例并调用单例封装的方法
    [[manager sharedManager] print];
    //调用alloc方法来创建单例并调用单例封装的方法
    [[manager alloc] print];
}

@end
上方的例子运行结果如下:

我们可以看到调用alloc方法的时候仍然重写创建了一个manager对象,这与我们单例的规定不符。
接下来就是第二种情况的实现代码:
manager.h文件:
#import <Foundation/Foundation.h>

NS_ASSUME_NONNULL_BEGIN

@interface manager : NSObject

- (void)print;

+ (instancetype) sharedManager;

@end

NS_ASSUME_NONNULL_END


manager.m文件:
#import "manager.h"

@implementation manager

static id myManager;
+ (instancetype) sharedManager {
    static dispatch_once_t onceToken;
    dispatch_once(&onceToken, ^{
        myManager = [[manager alloc] init];
        NSLog(@"使用GCD方法创建了一次单例!");
    });
    return myManager;
}

- (void)print {
    NSLog(@"调用了单例对象!");
}

//重写了allocWithZone:方法,只在保证myManager对象为空的时候进行一次初始化,其余情况都不做处理,直接返回已有的myManager对象
+ (instancetype)allocWithZone:(struct _NSZone *)zone {
    if (myManager == nil) {
        myManager = [super allocWithZone:zone];
    }
    return myManager;
}

@end


ViewController.h文件:
#import <UIKit/UIKit.h>

@interface ViewController : UIViewController

@end


ViewController.m文件:
#import "ViewController.h"
#import "manager.h"

@interface ViewController ()

@end

@implementation ViewController

- (void)viewDidLoad {
    [super viewDidLoad];
    // Do any additional setup after loading the view.

    //调用我们的GCD方法的接口创建单例并调用单例封装的方法
    [[manager sharedManager] print];
    //调用alloc方法来创建单例并调用单例封装的方法
    [[manager alloc] print];
}

@end
这个例子的运行打印结果如下:

可以看到即使后面再调用了alloc方法来创建单例,也没有去重复创建,而是直接用先前创建好的单例对象去调用了封装的方法
饿汉式:
在使用代码去创建对象之前就已经创建好了对象。
load方法:当类加载到运行环境中的时候就会调用且仅调用一次,同时注意一个类只会加载一次(类加载有别于引用类,可以这么说,所有类都会在程序启动的时候加载一次,不管有没有在目前显示的视图类中引用到,这个涉及到了App的启动流程)initialize方法:当第一次使用类的时候加载且仅加载一次
二者相比较:
- 在不考虑开发者主动使用的情况下,系统最多会调用一次
- 如果父类和子类都被调用,父类的调用一定在子类之前
- 都是为了应用运行前创建合适的运行环境
在使用时都不要过重地依赖于这两个方法,除非真正必要
它们的相同点在于:方法只会被调用一次。
load 是只要类所在文件被引用就会被调用,而 initialize 是在类或者其子类的第一个方法被调用前调用。所以如果类没有被引用进项目,就不会有 load 调用;但即使类文件被引用进来,但是没有使用,那么 initialize 也不会被调用。
文档也明确阐述了方法调用的顺序:父类(Superclass)的方法优先于子类(Subclass)的方法,类中的方法优先于分类(Category)中的方法:
+(void)load | +(void)initialize | |
|---|---|---|
| 执行时机 | 在程序运行后立即执行 | 在类的方法第一次被调用时执行 |
| 若自身未定义,是否沿用父类的方法? | 否 | 是 |
| 类别中的定义 | 全都执行,但后于类中的方法 | 覆盖类中的该方法,只执行一个(即覆盖后只执行分类中的) |
饿汉式的代码如下:
static id manager;
+ (void)load {
    //只会加载一次也就不需要加锁
    manager = [[self alloc] init];
}

+ (instancetype)sharedManger{
    if (manager == nil) {
    	manager = [super allocWithZone:zone];
    }
    return. manager;
}

//但是这时候我们还是得确保安全去重写一下allocWithZone方法,否则外部如果采用alloc的方法来创建单例对象的时候就会每alloc一遍就会新创建一个该对象,单例就失去了意义
+ (instancetype)allocWithZone:(struct _NSZone *)zone {
    if (manager == nil) {
        manager = [super allocWithZone:zone];
    }
    return manager;
}
由于在类被加载的时候会调用且调用一次load方法,而load方法里面又调用了alloc方法进行对象的初始化,所以,第一次调用肯定是已经创建好了对象,而且这时候不会存在多线程的问题。当我们去手动使用sharedManager方法的时候是无论如何都过不了判断的,所以就不会存在多线程并发的问题了。
再一个需要我们关注的重点就是: 重写allocWithZone:方法的问题,由于alloc方法中也是调用的allocWithZone:方法,所以我们重写allocWithZone:方法,在其中添加判断等操作是最有效的控制只执行初始化一次的手段,因为如果不重写allocWithZone:方法的话,如果外面的类创建单例对象的时候没有用到类似于sharedManger方法的我们自定义的方法接口,而是直接用了alloc等系统的初始化接口,就会导致重复初始化单例对象的现象,使单例失去意义。
但其实如果我们能够保证只去调用自定义的接口创建单例的话,也可以不去重写allocWithZone:方法。
接下来我们展示一种饿汉式的实现代码:
manager.h文件中:
#import <Foundation/Foundation.h>

NS_ASSUME_NONNULL_BEGIN

@interface manager : NSObject

- (void)print;

+ (instancetype) sharedManager;

@end

NS_ASSUME_NONNULL_END


manager.m文件中:
#import "manager.h"

@implementation manager

static id myManager;

//我们采用了在load方法中实现单例对象的初始化
+ (void)load {
    myManager = [[myManager alloc] init];
}

+ (instancetype) sharedManager {
    if (myManager == nil) {
        myManager = [[myManager alloc] init];
    }
    return myManager;
}

- (void)print {
    NSLog(@"调用了单例对象!");
}

+ (instancetype)allocWithZone:(struct _NSZone *)zone {
    if (myManager == nil) {
        myManager = [super allocWithZone:zone];
    }
    return myManager;
}

@end


ViewController.h文件中:
#import <UIKit/UIKit.h>

@interface ViewController : UIViewController

@end


ViewController.m文件中:
#import "ViewController.h"
#import "manager.h"

@interface ViewController ()

@end

@implementation ViewController

- (void)viewDidLoad {
    [super viewDidLoad];
    // Do any additional setup after loading the view.

    //调用alloc方法来创建单例并调用单例封装的方法
    [[manager alloc] print];
    //调用我们的GCD方法的接口创建单例并调用单例封装的方法
    [[manager sharedManager] print];
}

@end
这次的运行结果如下:

通知
最熟悉的观察者模式
- 观察者和被观察者都无需知晓对方,只需要通过标记在
NSNotificationCenter中找到监听该通知所对应的类,从而调用该类的方法。 - 并且在
NSNotificationCenter中,观察者可以只订阅某一特定的通知,并对其做出相应,而不用对某一个类发的所有通知都进行更新操作。 NSNotificationCenter对观察者的调用不是随机的,而是遵循注册顺序一一执行的,并且在该线程内是同步的。
通知的具体使用步骤:
- 创建通知对象
NSNotification *notice = [NSNotification notificationWithName:@"send" object:self userInfo:@{@"name":_renameTextField.text,@"pass":_repassTextField.text}];
- 通知中心发送通知
[[NSNotificationCenter defaultCenter] postNotification:notice];
- 注册通知 添加观察者来指定一个方法、名称和对象,接受到通知时执行这个指定的方法。
[[NSNotificationCenter defaultCenter] addObserver:self selector:@selector(recive:) name:@"send" object:nil];
- 接受通知后调用的方法
- (void)recive:(NSNotification *)notice {
    NSDictionary *dictionary = notice.userInfo;
    _nameTextField.text = dictionary[@"name"];
    _passTextField.text = dictionary[@"pass"];
}
总结一下通知的用法:
- 接收通知的类注册监听者并实现接收通知的事件函数
- 触发通知的类在适当的时候发送通知
具体的使用样例可以详见该博客:[iOS]-通知传值
通知底层实现原理
在iOS9.0之前,通知中心对观察者对象进行unsafe_unretained引用,当被引用的对象释放时不会自动置为nil,指针仍指向该内存空间,造成了野指针,引起EXC_BAD_ACCESS崩溃。
在iOS9.0之后,不对观察对象进行移除也不会造成崩溃,这是因为通知中心对观察者做了弱引用(weak引用),对象销毁时会对对象的指针置空。在代码编写过程中,基于严谨性,最好在注册了通知之后,也要removeObserver。
我们可以通过看通知的实现机制来了解通知中心是怎么实现对观察者的引用的。由于苹果对Foundation源码是不开源的,我们具体就参考一下GNUStep的源码实现。GNUStep的源码地址为:GNUStep源码GitHub下载地址, 具体源码可以进行查看。
首先我们先讲解一下通知中的各个部分,方便后续理解:(以下内容学习自:iOS NSNotification使用及原理实现)
NSNotification
NSNotification包含了消息发送的一些信息,包括name消息名称、object消息发送者、userinfo消息发送者携带的额外信息,其类结构如下:
@interface NSNotification : NSObject <NSCopying, NSCoding>

@property (readonly, copy) NSNotificationName name;
@property (nullable, readonly, retain) id object;
@property (nullable, readonly, copy) NSDictionary *userInfo;

- (instancetype)initWithName:(NSNotificationName)name object:(nullable id)object userInfo:(nullable NSDictionary *)userInfo API_AVAILABLE(macos(10.6), ios(4.0), watchos(2.0), tvos(9.0)) NS_DESIGNATED_INITIALIZER;
- (nullable instancetype)initWithCoder:(NSCoder *)coder NS_DESIGNATED_INITIALIZER;

@end

@interface NSNotification (NSNotificationCreation)

+ (instancetype)notificationWithName:(NSNotificationName)aName object:(nullable id)anObject;
+ (instancetype)notificationWithName:(NSNotificationName)aName object:(nullable id)anObject userInfo:(nullable NSDictionary *)aUserInfo;

- (instancetype)init /*API_UNAVAILABLE(macos, ios, watchos, tvos)*/;	/* do not invoke; not a valid initializer for this class */

@end
可以通过实例方式构建NSNotification对象,也可以通过类方式构建;
NSNotificationCenter
NSNotificationCenter消息通知中心,全局单例模式(每个进程都默认有一个默认的通知中心,用于进程内通信),通过如下方法获取通知中心:
+ (NSNotificationCenter *)defaultCenter
对于macOS系统,每个进程都有一个默认的分布式通知中心NSDistributedNotificationCenter,具体可参见NSDistributedNotificationCenter
具体的注册通知消息方法如下:
//注册观察者
- (void)addObserver:(id)observer selector:(SEL)aSelector name:(nullable NSNotificationName)aName object:(nullable id)anObject;
- (id <NSObject>)addObserverForName:(nullable NSNotificationName)name object:(nullable id)obj queue:(nullable NSOperationQueue *)queue usingBlock:(void (^)(NSNotification *note))block API_AVAILABLE(macos(10.6), ios(4.0), watchos(2.0), tvos(9.0));
注册观察者方法提供了两种形式:selector及block,对于添加指定观察者对象的方式,observer不能为nil;block方式会执行copy方法,返回的是使用的匿名观察者对象,且指定观察者处理消息的操作对象NSOperationQueue
对于指定的消息名称name及发送者对象object都可以为空,即接收所有消息及所有发送对象发送的消息;若指定其中之一或者都指定,则表示接收指定消息名称及发送者的消息
对于block方式指定的queue队列可为nil,则默认在发送消息线程处理;若指定主队列,即主线程处理,避免执行UI操作导致异常
注意:注册观察者通知消息应避免重复注册,会导致重复处理通知消息,且block对持有外部对象,因此需要避免引发循环引用问题
消息发送方法如下:
//发送消息
- (void)postNotification:(NSNotification *)notification;
- (void)postNotificationName:(NSNotificationName)aName object:(nullable id)anObject;
- (void)postNotificationName:(NSNotificationName)aName object:(nullable id)anObject userInfo:(nullable NSDictionary *)aUserInfo;
可以通过NSNotification包装的通知消息对象发送消息,也可以分别指定消息名称、发送者及携带的信息来发送,且为同步执行模式,需要等待所有注册的观察者处理完成该通知消息,方法才会返回继续往下执行,且对于block形式处理通知对象是在注册消息指定的队列中执行,对于非block方式是在同一线程处理
注意:消息发送类型需要与注册时类型一致,即若注册观察者同时指定了消息名称及发送者,则发送消息也需要同时指定消息名称及发送者,否则无法接收到消息
移除观察者方法如下:
//移除观察者
- (void)removeObserver:(id)observer;
- (void)removeObserver:(id)observer name:(nullable NSNotificationName)aName object:(nullable id)anObject;
可移除指定的观察者所有通知消息,即该观察者不再接收任何消息,一般用于观察者对象dealloc释放后调用,但在iOS9及macos10.11之后不需要手动调用,dealloc已经自动处理
If your app targets iOS 9.0 and later or macOS 10.11 and later, you don't need to unregister an observer in its dealloc method. Otherwise, you should call this method or removeObserver:name:object: before observer or any object specified in addObserverForName:object:queue:usingBlock: or addObserver:selector:name:object:is deallocated.
翻译如下:
如果你的应用目标是iOS 9.0及更高版本或macOS 10.11及更高版本,你不需要在dealloc方法中注销观察者。否则,您应该调用此方法或在取消分配addObserverForName:object:queue:usingBlock:或addObserver:selector:name:object:中指定的任何对象之前删除观察者:name:object:方法。
也可以指定消息名称或者发送者移除单一或者所有的消息(通过置nil可移除对应类型下的所有消息)
NSNotificationQueue
NSNotificationQueue通知队列实现了通知消息的管理,如消息发送时机、消息合并策略,并且为先入先出方式管理消息,但实际消息发送仍然是通过NSNotificationCenter通知中心完成;
@interface NSNotificationQueue : NSObject
@property (class, readonly, strong) NSNotificationQueue *defaultQueue;

- (instancetype)initWithNotificationCenter:(NSNotificationCenter *)notificationCenter NS_DESIGNATED_INITIALIZER;

- (void)enqueueNotification:(NSNotification *)notification postingStyle:(NSPostingStyle)postingStyle;
- (void)enqueueNotification:(NSNotification *)notification postingStyle:(NSPostingStyle)postingStyle coalesceMask:(NSNotificationCoalescing)coalesceMask forModes:(nullable NSArray<NSRunLoopMode> *)modes;

- (void)dequeueNotificationsMatching:(NSNotification *)notification coalesceMask:(NSUInteger)coalesceMask;
可以通过defaultQueue获取当前线程绑定的通知消息队列,也可以通过initWithNotificationCenter:来指定通知管理中心,具体的消息管理策略如下:
NSPostingStyle:用于配置通知什么时候发送
NSPostASAP:在当前通知调用或者计时器结束发出通知NSPostWhenIdle:当runloop处于空闲时发出通知NSPostNow:在合并通知完成之后立即发出通知
NSNotificationCoalescing(注意这是一个NS_OPTIONS):用于配置如何合并通知:
NSNotificationNoCoalescing:不合并通知NSNotificationCoalescingOnName:按照通知名字合并通知NSNotificationCoalescingOnSender:按照传入的object合并通知
对于NSNotificationQueue通知队列若不是指定NSPostNow立即发送模式,则可以通过runloop实现异步发送
NSNotification与多线程
对于NSNotification与多线程官方文档说明如下:
In a multithreaded application, notifications are always delivered in the thread in which the notification was posted, which may not be the same thread in which an observer registered itself.
翻译如下:
在多线程应用程序中,通知始终在发布通知的线程中传递,该线程可能与观察者注册自身的线程不同。
即是NSNotification的发送与接收处理都是在同一个线程中,对于block形式则是接收处理在指定的队列中处理,上面已说明这点,这里重点说明下如何接收处理在其他线程处理。
For example, if an object running in a background thread is listening for notifications from the user interface, such as a window closing, you would like to receive the notifications in the background thread instead of the main thread. In these cases, you must capture the notifications as they are delivered on the default thread and redirect them to the appropriate thread.
翻译如下:
例如,如果在后台线程中运行的对象正在侦听来自用户界面的通知,例如窗口关闭,则您希望在后台线程而不是主线程中接收通知。在这些情况下,您必须在通知在默认线程上传递时捕获通知,并将其重定向到适当的线程。
如官方说明;对于处理通知线程不是主线程的,如后台线程,存在此处理场景,并且官方也提供了具体的实施方案:
一种重定向的实现思路是自定义一个通知队列(注意,不是NSNotificationQueue对象,而是一个数组),让这个队列去维护那些我们需要重定向的Notification。我们仍然是像平常一样去注册一个通知的观察者,当Notification来了时,先看看post这个Notification的线程是不是我们所期望的线程,如果不是,则将这个Notification存储到我们的队列中,并发送一个mach信号到期望的线程中,来告诉这个线程需要处理一个Notification。指定的线程在收到信号后,将Notification从队列中移除,并进行处理。
官方demo如下:
@interface MyThreadedClass: NSObject
/* Threaded notification support. */
@property NSMutableArray *notifications;
@property NSThread *notificationThread;
@property NSLock *notificationLock;
@property NSMachPort *notificationPort;

- (void) setUpThreadingSupport;
- (void) handleMachMessage:(void *)msg;
- (void) processNotification:(NSNotification *)notification;
@end
通知线程定义类MyThreadedClass包含了用于记录所有通知消息的通知消息队列notifications,记录当前通知接收线程notificationThread,多线程并发处理需要的互斥锁NSLock,用于线程间通信通知处理线程处理通知消息的NSMachPort;并提供了设置线程属性、处理mach消息及处理通知消息的实例方法
对于setUpThreadSupport方法如下:
- (void) setUpThreadingSupport {
    if (self.notifications) {
        return;
    }
    self.notifications      = [[NSMutableArray alloc] init];
    self.notificationLock   = [[NSLock alloc] init];
    self.notificationThread = [NSThread currentThread];

    self.notificationPort = [[NSMachPort alloc] init];
    [self.notificationPort setDelegate:self];
    [[NSRunLoop currentRunLoop] addPort:self.notificationPort
            forMode:(NSString __bridge *)kCFRunLoopCommonModes];
}
主要是初始化类属性,并指定NSMachPort代理及添加至处理线程的runloop中;若mach消息到达而接收线程的runloop没有运行时,内核会保存此消息,直到下一次runloop运行;也可以通过performSelectro:inThread:withObject:waitUtilDone:modes实现,不过对于子线程需要开启runloop,否则该方法失效,且需指定waitUtilDone参数为NO异步调用
NSMachPortDelegate协议方法处理如下:
- (void) handleMachMessage:(void *)msg {
    [self.notificationLock lock];

    while ([self.notifications count]) {
        NSNotification *notification = [self.notifications objectAtIndex:0];
        [self.notifications removeObjectAtIndex:0];
        [self.notificationLock unlock];
        [self processNotification:notification];
        [self.notificationLock lock];
    };

    [self.notificationLock unlock];
}
NSMachPort协议方法主要是检查需要处理的任何通知消息并迭代处理(防止并发发送大量端口消息,导致消息丢失),处理完成后同步从消息队列中移除;
通知处理方法如下:
- (void)processNotification:(NSNotification *)notification {
    if ([NSThread currentThread] != notificationThread) {
        // Forward the notification to the correct thread.
        [self.notificationLock lock];
        [self.notifications addObject:notification];
        [self.notificationLock unlock];
        [self.notificationPort sendBeforeDate:[NSDate date]
                components:nil
                from:nil
                reserved:0];
    }
    else {
        // Process the notification here;
    }
}
为区分NSMachPort协议方法内部调用及通知处理消息回调,需要通过判定当前处理线程来处理不同的通知消息处理方式;对于通知观察回调,将消息添加至消息队列并发送线程间通信mach消息;其实本方案的核心就是通过线程间异步通信NSMachPort来通知接收线程处理通知队列中的消息;
对于接收线程需要调用如下方法启动通知消息处理:
[self setupThreadingSupport];
[[NSNotificationCenter defaultCenter]
        addObserver:self
        selector:@selector(processNotification:)
        name:@"NotificationName"//通知消息名称,可自定义
        object:nil];
官方也给出了此方案的问题及思考:
First, all threaded notifications processed by this object must pass through the same method (processNotification:). Second, each object must provide its own implementation and communication port. A better, but more complex, implementation would generalize the behavior into either a subclass of NSNotificationCenter or a separate class that would have one notification queue for each thread and be able to deliver notifications to multiple observer objects and methods
翻译如下:
首先,此对象处理的所有线程通知必须通过相同的方法(processNotification:)。第二,每个对象必须提供自己的实现和通信端口。更好但更复杂的实现将行为概括为NSNotificationCenter的一个子类或一个单独的类,每个线程有一个通知队列,并且能够向多个观察者对象和方法传递通知
其中指出更好地方式是自己去子类化一个NSNotficationCenter(github上有大佬实现了此方案,可参考GYNotificationCenter)或者单独写一个类类处理这种转发。
原理解析
通过通知开源gnustep-base-1.25.0代码来分析通知的具体实现
_GSIMapTable映射表数据结构图如下:
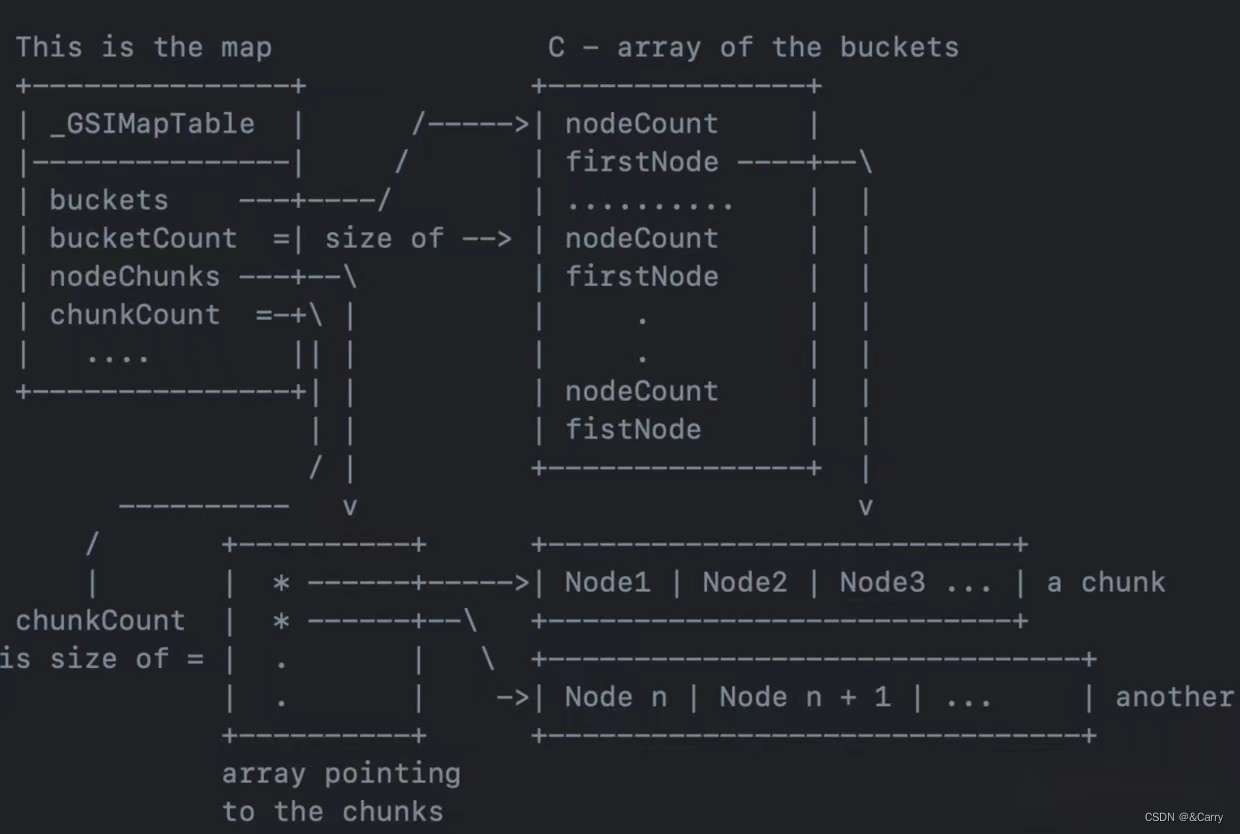
相关的数据结构如下:
typedef struct _GSIMapBucket GSIMapBucket_t;
typedef struct _GSIMapNode GSIMapNode_t;

typedef GSIMapBucket_t *GSIMapBucket;
typedef GSIMapNode_t *GSIMapNode;

typedef struct _GSIMapTable GSIMapTable_t;
typedef GSIMapTable_t *GSIMapTable;

struct	_GSIMapNode {
    GSIMapNode	nextInBucket;	/* Linked list of bucket.	*/
    GSIMapKey	key;
#if	GSI_MAP_HAS_VALUE
    GSIMapVal	value;
#endif
};

struct	_GSIMapBucket {
    uintptr_t	nodeCount;	/* Number of nodes in bucket.	*/
    GSIMapNode	firstNode;	/* The linked list of nodes.	*/
};

struct	_GSIMapTable {
  NSZone	*zone;
  uintptr_t	nodeCount;	/* Number of used nodes in map.	*/
  uintptr_t	bucketCount;	/* Number of buckets in map.	*/
  GSIMapBucket	buckets;	/* Array of buckets.		*/
  GSIMapNode	freeNodes;	/* List of unused nodes.	*/
  uintptr_t	chunkCount;	/* Number of chunks in array.	*/
  GSIMapNode	*nodeChunks;	/* Chunks of allocated memory.	*/
  uintptr_t	increment;
#ifdef	GSI_MAP_EXTRA
  GSI_MAP_EXTRA	extra;
#endif
};
GSIMapTable映射表包含了指向GSIMapNode单链表节点的指针数组nodeChunks,通过buckets数组记录单链表节点指针数组的各个链表的节点数量及链表首部地址,其中bucketCount、nodeCount及chunkCount分别记录了node节点、节点单链表信息数组、节点单链表指针数组的数目;
具体的从映射表中添加/删除的代码如下:
GS_STATIC_INLINE GSIMapBucket
GSIMapPickBucket(unsigned hash, GSIMapBucket buckets, uintptr_t bucketCount)
{
    return buckets + hash % bucketCount;
}

GS_STATIC_INLINE GSIMapBucket
GSIMapBucketForKey(GSIMapTable map, GSIMapKey key)
{
    return GSIMapPickBucket(GSI_MAP_HASH(map, key),
                            map->buckets, map->bucketCount);
}

GS_STATIC_INLINE void
GSIMapLinkNodeIntoBucket(GSIMapBucket bucket, GSIMapNode node)
{
    node->nextInBucket = bucket->firstNode;
    bucket->firstNode = node;
}

GS_STATIC_INLINE void
GSIMapUnlinkNodeFromBucket(GSIMapBucket bucket, GSIMapNode node)
{
    if (node == bucket->firstNode)
    {
        bucket->firstNode = node->nextInBucket;
    }
    else
    {
        GSIMapNode	tmp = bucket->firstNode;

        while (tmp->nextInBucket != node)
        {
            tmp = tmp->nextInBucket;
        }
        tmp->nextInBucket = node->nextInBucket;
    }
    node->nextInBucket = 0;
}
其实就是一个hash表结构,既可以以数组的形式取到每个单链表首元素,也可以以链表的形式获取,通过数组能够方便取到每个单向链表,再利用链表结构增删。
通知全局对象表结构如下:
typedef struct NCTbl {
    Observation		*wildcard;	/* Get ALL messages*///获取所有消息
    GSIMapTable		nameless;	/* Get messages for any name.*///获取任何名称的消息
    GSIMapTable		named;		/* Getting named messages only.*///仅获取命名消息
    unsigned		lockCount;	/* Count recursive operations.	*///递归运算计数
    NSRecursiveLock	*_lock;		/* Lock out other threads.	*///锁定其他线程
    Observation		*freeList;
    Observation		**chunks;
    unsigned		numChunks;
    GSIMapTable		cache[CACHESIZE];
    unsigned short	chunkIndex;
    unsigned short	cacheIndex;
} NCTable;
其中数据结构中重要的是两张GSIMapTable表:named、nameless,及单链表wildcard
named,保存着传入通知名称的通知hash表nameless,保存没有传入通知名称但传入了消息发送者object的hash表wildcard,保存既没有通知名称又没有传入object的通知的单链表
保存含有通知名称的通知表named需要注册object对象,因此该表结构体通过传入的name作为key,其中value同时也为GSIMapTable表用于存储对应的object对象的observer对象;
对没有传入通知名称只传入object对象的通知表nameless而言,只需要保存object与observer的对应关系,因此object作为key用observer作为value
具体的添加观察者的核心函数(block形式只是该函数的包装)大致代码如下:
- (void) addObserver: (id)observer
            selector: (SEL)selector
                name: (NSString*)name
              object: (id)object
{
    Observation	*list;
    Observation	*o;
    GSIMapTable	m;
    GSIMapNode	n;

    //入参检查异常处理
    ...
		//table加锁保持数据一致性
    lockNCTable(TABLE);
		//创建Observation对象包装相应的调用函数
    o = obsNew(TABLE, selector, observer);
		//处理存在通知名称的情况
    if (name)
    {
        //table表中获取相应name的节点
        n = GSIMapNodeForKey(NAMED, (GSIMapKey)(id)name);
        if (n == 0)
        {
           //未找到相应的节点,则创建内部GSIMapTable表,以name作为key添加到talbe中
          m = mapNew(TABLE);
          name = [name copyWithZone: NSDefaultMallocZone()];
          GSIMapAddPair(NAMED, (GSIMapKey)(id)name, (GSIMapVal)(void*)m);
          GS_CONSUMED(name)
        }
        else
        {
            //找到则直接获取相应的内部table
          	m = (GSIMapTable)n->value.ptr;
        }

        //内部table表中获取相应object对象作为key的节点
        n = GSIMapNodeForSimpleKey(m, (GSIMapKey)object);
        if (n == 0)
        {
          	//不存在此节点,则直接添加observer对象到table中
            o->next = ENDOBS;//单链表observer末尾指向ENDOBS
            GSIMapAddPair(m, (GSIMapKey)object, (GSIMapVal)o);
        }
        else
        {
          	//存在此节点,则获取并将obsever添加到单链表observer中
            list = (Observation*)n->value.ptr;
            o->next = list->next;
            list->next = o;
        }
    }
    //只有观察者对象情况
    else if (object)
    {
      	//获取对应object的table
        n = GSIMapNodeForSimpleKey(NAMELESS, (GSIMapKey)object);
        if (n == 0)
        {
          	//未找到对应object key的节点,则直接添加observergnustep-base-1.25.0
            o->next = ENDOBS;
            GSIMapAddPair(NAMELESS, (GSIMapKey)object, (GSIMapVal)o);
        }
        else
        {
          	//找到相应的节点则直接添加到链表中
            list = (Observation*)n->value.ptr;
            o->next = list->next;
            list->next = o;
        }
    }
    //处理即没有通知名称也没有观察者对象的情况
    else
    {
      	//添加到单链表中
        o->next = WILDCARD;
        WILDCARD = o;
    }
		//解锁
    unlockNCTable(TABLE);
}
对于block形式代码如下:
- (id) addObserverForName: (NSString *)name
                   object: (id)object
                    queue: (NSOperationQueue *)queue
               usingBlock: (GSNotificationBlock)block
{
    GSNotificationObserver *observer =
        [[GSNotificationObserver alloc] initWithQueue: queue block: block];

    [self addObserver: observer
             selector: @selector(didReceiveNotification:)
                 name: name
               object: object];

    return observer;
}

- (id) initWithQueue: (NSOperationQueue *)queue
               block: (GSNotificationBlock)block
{
    self = [super init];
    if (self == nil)
        return nil;

    ASSIGN(_queue, queue);
    _block = Block_copy(block);
    return self;
}

- (void) didReceiveNotification: (NSNotification *)notif
{
    if (_queue != nil)
    {
        GSNotificationBlockOperation *op = [[GSNotificationBlockOperation alloc]
            initWithNotification: notif block: _block];

        [_queue addOperation: op];
    }
    else
    {
        CALL_BLOCK(_block, notif);
    }
}
对于block形式通过创建GSNotificationObserver对象,该对象会通过Block_copy拷贝block,并确定通知操作队列,通知的接收处理函数didReceiveNotification中是通过addOperation来实现指定操作队列处理,否则直接执行block
发送通知的核心函数大致逻辑如下:
- (void) _postAndRelease: (NSNotification*)notification
{
    //入参检查校验
    //创建存储所有匹配通知的数组GSIArray
   	//加锁table避免数据一致性问题
    //获取所有WILDCARD中的通知并添加到数组中
    //查找NAMELESS表中指定对应消息发送者对象object的通知并添加到数组中
	//查找NAMED表中相应的通知并添加到数组中
    //解锁table
    //遍历整个数组并依次调用performSelector:withObject处理通知消息发送
    //解锁table并释放资源
}
上面发送的重点就是获取所有匹配的通知,并通过performSelector:withObject发送通知消息,因此通知发送和接收通知的线程是同一个线程(block形式通过操作队列来指定队列处理)。
总结一下:
通知全局对象是一个名为NCTbl的结构体,里头有三个重要的成员变量,分别是是两张GSIMapTable表:named、nameless,及单链表wildcard,其中named是存放传入了通知名称的通知的hash表,nameless是存放没有传入通知名称但是传入了消息发送者object的通知的hash表,wildcard是存既没有传入通知名称,也没有传入消息发送者的通知的链表。然后我们每次注册一个通知的时候,所注册的那个通知就会按照上面我们讲的 1. 是否传入通知名称 2. 是否传入消息发送者 3. 是否通知名称和消息发送者都没传入 这三种类型来对号入座放入相应的NCTbl的结构体中的GSIMapTable或wildcard。接着==我们每次发送通知(发送消息)==的时候,就是先创建存储所有匹配通知的数组GSIArray,接着按照 1. 获取所有wildcard中符合条件的通知并添加到数组GSIArray 2. 在nameless表中查找符合条件的通知并添加到数组GSIArray 3. 在named表中查找符合条件的通知并添加到数组GSIArray 的这么一个流程,最后待所有符合条件的通知都添加好之后,就遍历整个GSIArray数组并依次调用performSelector:withObject处理通知消息发送,以上就是全部的通知实现原理流程。
代理
又称委托代理,是iOS中常用的一种设计模式
协议,是多个类共享的一个方法列表,在协议中所列出的方法没有相应的实现,由其它类来实现。
委托是指给一个对象提供机会对另一对象中的变化做出反应或者响应另一个对象的行为。其基本思想是协同解决问题
从方法的定义我们不难看出委托模式能够起到两方面的作用:
- 代理协助对象主体完成某项操作,将需要定制化的操作通过代理来自定义实现,达到和子类化对象主体同样的作用。
- 事件监听,代理对象监听对象主体的某些重要事件,对事件做出具体响应或通知事件交给需要作出响应的对象来处理。
具体的代理的使用案例详见:[iOS开发]-属性传值和协议传值中的协议传值案例部分。
代理的循环引用
举个例子:
如果一个UIViewController 对象a通过retain持有了UITableView对象b,这个UITableView对象b的delegate又是a, 如果这个delegate是retain或strong方式的,那基本上就没有机会释放这两个对象了。自己在设计使用delegate模式时,也要注意这点。
因为循环引用而产生的内存泄露也是Instrument都无法发现的,所以要特别小心,可以将delegate的属性关键字设置为weak,就可以避免循环引用。
KVO\KVC\单例模式\通知\代理\Block 总结
- KVO/通知 -------> 观察者模式
- KVC --------> KVC模式
- 单例模式
- 代理模式
1. 代理和通知的区别:
- 效率:代理比通知高;
- 关联:
delegate是强关联,委托和代理双方互相知道。通知是弱关联,不需要知道是谁发,也不需要知道是谁接收。 - 代理是一对一的关系,通知是一对多的关系。
delegate一般是行为需要别人来完成。通知是全局通知。 - 代理要实现对多个类发出消息可以通过将代理者添加入集合类后遍历,或通过消息转发来实现。
2. KVO和通知的区别:
- 相同: 都是一对多的关系;
- 不同: 通知是需要被观察者先主动发出通知,观察者注册监听再响应,比
KVO多了发送通知这一步。 - 监听范围:
KVO是监听一个值的变化。通知不局限于监听属性的变化,还可以对多种多样的状态变化进行监听,监听范围广,使用更灵活。 - 使用场景:
KVO的一般使用场景是监听数据变化,通知是全局通知。
3. block和代理的区别:
- 相同点:
block和代理都是回调的方式。使用场景相同。 - 不同点:
block集中代码块,而代理分散代码块。所以block更适用于轻便、简单的回调,如网络传输。 代理适用于公共接口较多的情况,这样做也更易于解耦代码架构。block运行成本高。block出栈时,需要将使用的数据从栈内存拷贝到堆内存。当然如果是对象就是加引用计数,使用完或block置为nil后才消除。 代理只是保存了一个对象指针,直接回调,并没有额外消耗。相对C的函数指针,只是多做了一个查表动作。
4. 单例优缺点:
- 优点:
- 一个类只被实例化一次,提供了对唯一实例的受控访问
- 节省系统资源
- 允许可变数目的实例
- 缺点:
- 一个类只有一个对象,可能造成责任过重,在一定程度上违背了“单一职责原则”
- 由于单例模式中没有抽象层,因此单例类的扩展有很大的困难
- 滥用单例将带来一些负面问题,比如为了节省资源将数据库连接池对象设计为单例类,可能会导致共享连接池对象的程序过多而出现连接池溢出;如果实例化的对象长时间不被利用,系统会认为是垃圾而被回收,这将导致对象状态的丢失


 1874
1874


 被折叠的 条评论
为什么被折叠?
被折叠的 条评论
为什么被折叠?
 到【灌水乐园】发言


