


0、前言
1. 看尚硅谷的springBoot2视频教程的笔记,主要结合尚硅谷的文档笔记和视频截图再加上一些自己的理解
2. 视频教程地址: https://www.bilibili.com/video/BV19K4y1L7MT/?spm_id_from=333.999.0.0
1、springBoot介绍
1.1 springBoot优缺点
优点:
1.创建独立的spring应用

2.内嵌web服务器(tomcat等)

3.自动starter依赖,简化了构建配置

4.自动配置spring以及第三方功能

5.提供了生产条件的监控,健康检查以及外部化配置

6..无代码生产、无需编写xml

总结:springBoot是整合spring框架1一站式框架

            springBoot是简化spring技术栈的快速开发脚手架
缺点:
1.springBoot的版本更新很快,需要时刻关注版本变化

2.springBoot封装太深, 内部原理复杂,学习源码困难
1.2 springBoot的特点
1.2.1 依赖管理
- 父项目依赖管理子项目
依赖管理 <parent> <groupId>org.springframework.boot</groupId> <artifactId>spring-boot-starter-parent</artifactId> <version>2.3.4.RELEASE</version> </parent> 他的父项目 <parent> <groupId>org.springframework.boot</groupId> <artifactId>spring-boot-dependencies</artifactId> <version>2.3.4.RELEASE</version> </parent> 几乎声明了所有开发中常用的依赖的版本号,自动版本仲裁机制 - 开发导入starter场景启动器
1、见到很多 spring-boot-starter-* : *就某种场景 2、只要引入starter,这个场景的所有常规需要的依赖我们都自动引入 3、SpringBoot所有支持的场景 https://docs.spring.io/spring-boot/docs/current/reference/html/using-spring-boot.html#using-boot-starter 4、见到的 *-spring-boot-starter: 第三方为我们提供的简化开发的场景启动器。 5、所有场景启动器最底层的依赖 <dependency> <groupId>org.springframework.boot</groupId> <artifactId>spring-boot-starter</artifactId> <version>2.3.4.RELEASE</version> <scope>compile</scope> </dependency> - 无需关注版本号,springBoot会自动进行版本仲裁
1、引入依赖默认都可以不写版本
2、引入非版本仲裁的jar,要写版本号。
1.2.2 自动配置
- 自动配置tomcat
- 自动导入springMVC
- 自动配置好扫描包组件
- 自动配置常见的web设置
- 会自动加载所有的配置项,以及会自动赋默认值
- …
1.3 SpringBoot的容器功能
1.3.1 添加组件的注解
- @Configuration(proxyBeanMethod = true)
proxyBeanMethod = true : 开启代理对象调用方法
开启后proxyBeanMethod,调用组件的时候默认开启==单实例==模式
使用场景:加在配置类前面,替代xml配置文件
-
@Bean、@Component、@Service、@Controller、@Respiratory
@Bean
使用场景:配置类内,用于标识该方法作为一个bean加入到容器中@Component、@Service、@Controller、@Respiratory
使用场景:标识一个类到容器中间 -
@ComponentScan
使用场景:在主程序类(引导类内),设置了扫描包的路径,不设置的话,SpringBoot默认是引导类同级和下一级目录
-
@Import
@Import({User.class, DBHelper.class})
使用场景:配置类前,用于将标识的几个类加入到容器中去
-
@Conditiona
条件装配,满足条件的话才对配置类内的组件加入到容器间去
使用场景:配置类前面或和@Bean搭配使用
注意:
1.组件创建之间有着先后顺序,一个依赖另外一个组件的组件添加上条件装配时,如果被依赖的组件在它之后被创建的话,本组件因为条件装配的原因是不会被创建的。
所以写配置类的时候被依赖的组件需要优先在配置类内部创建
2.该注解写在@Bean前面和配置类前面都可以 只是作用范围的不同而已
- @ImportResource
@ImportResource(“classpath:beans.xml”)
将某个配置文件内部的所有配置都导入到配置类内部,然后转化为配置类的内容
使用场景:在配置类前加上
- SpringBootApplication()
用于标识该类为主程序类(引导类)
使用场景:主程序类(引导类)前
1.3.2 配置绑定的注解
-
@ConfigurationProperties
读取配置文件内部前缀为mycar的数据,属性注入到该组件
@ConfigurationProperties(prefix = “mycar”)
使用场景:一般加在JavaBean前面
注意:使用的@ConfigurationPorperties注解的前提是该JavaBean已经被加入到容器当中,所以一般该注解要搭配@Component使用
-
@EnableConfiguraionProperties({xxx.class,xxx.class})
使使用 @ConfigurationProperties 注解的类生效,
说白了 @EnableConfigurationProperties 相当于把使用 @ConfigurationProperties 的类进行了一次注入。
使用场景:在配置类前面
实操测试: 莫名其妙我的这个注解失效了,暂时先不管了。那就不要使用该方法去注入配置文件的属性了
1.4 SpringBoot的自动配置原理入门
1.4.1 自动配置流程
自动配置流程:
SpringBoot先加载所有的自动配置类 xxxxxAutoConfiguration
每个自动配置类按照条件进行生效,默认都会绑定配置文件指定的值。xxxxProperties里面拿。xxxProperties和配置文件进行了绑定
生效的配置类就会给容器中装配很多组件
只要容器中有这些组件,相当于这些功能就有了
定制化配置
用户直接自己@Bean替换底层的组件
用户去看这个组件是获取的配置文件什么值就去修改。
xxxxxAutoConfiguration —> 组件 —> xxxxProperties里面拿值 ----> application.properties
1.开启springBoot后,springBoot先自动加载所有的自动配置类(xxxx.AutoConfiguration)
2.对加载完后的自动配置类,按照内部写好的条件规则按需生效,所以并不是全部都会开始生效的
@EnableAutoConfigurationProperties(xxxx.class) -----> @ConfigurationProperties(xxxxProperties.classs) ----> 从yml配置文件内部拿值
-----> IOC容器内部已经注册好了组件
1.4.2 引导加载自动配置类
@SpringBootApplication内部有三个注解
@SpringBootConfiguration
@EnableAutoConfiguration
@ComponentScan(excludeFilters = { @Filter(type = FilterType.CUSTOM, classes = TypeExcludeFilter.class),
        @Filter(type = FilterType.CUSTOM, classes = AutoConfigurationExcludeFilter.class) })
public @interface SpringBootApplication{}
-
@SpringBootConfiguration
等价于@Configuration,表示当前类为一个配置类
-
@EnableAutoConfiguration
开启自动配置,@EnableAutoConfiguration内部有两个注解
@AutoConfigurationPackage
@Import(AutoConfigurationImportSelector.class)
public @interface EnableAutoConfiguration {}
-
@AutoConfigurationPackage
自动配置包,指定了默认配置包的规则
@Import(AutoConfigurationPackages.Registrar.class)  //给容器中导入一个组件
public @interface AutoConfigurationPackage {}

//利用Registrar给容器中导入一系列组件
//将指定的一个包下的所有组件导入进来?MainApplication 所在包下。
给容器导入Registrar组件,该组件会给容器批量导入一系列组件 -
@Import(AutoConfigurationImportSelector.class)
1、利用getAutoConfigurationEntry(annotationMetadata);给容器中批量导入一些组件
2、调用List<String> configurations = getCandidateConfigurations(annotationMetadata, attributes)获取到所有需要导入到容器中的配置类
3、利用工厂加载 Map<String, List<String>> loadSpringFactories(@Nullable ClassLoader classLoader);得到所有的组件
4、从META-INF/spring.factories位置来加载一个文件。
    默认扫描我们当前系统里面所有META-INF/spring.factories位置的文件
    spring-boot-autoconfigure-2.3.4.RELEASE.jar包里面也有META-INF/spring.factories
- @ComponentScan
设置默认扫描包路径
1.4.3 按需自动加载自动配置类
虽然内部写死了上百个配置类,但是按照条件装配规则(@Conditional),实际上最终只会按需配置加载部分
1.4.4 修改默认配置
- 在用户自己配置的属性配置和本身自带的配置之间,以用户配置的为准
- 用户想要修改默认配置的话,只要在配置文件内部修改即可(yml或yaml或properties文件)
1.5 开发小技巧
1.5.1 Lombok
简化了JavaBean的开发,使JavaBean类的代码更加简洁
导入Maven依赖,在IDEA下载安装LomBok插件
        <dependency>
            <groupId>org.projectlombok</groupId>
            <artifactId>lombok</artifactId>
        </dependency>

idea中搜索安装lombok插件
Lombok使用注解介绍:
-
@Data
加在JavaBean前面,会在编译的时候自动创建好JavaBean的get和set方
-
@Tostring
用法同理,会在编译的时候自动创建好JavaBean的toString方法
-
@AllArgsConstructor和@NoArgsConstructor
用法同理,会在编译的时候自动创建好该JavaBean类的全参构造器和无参构造器
-
@Slf4j
1.5.2 dev-tools
作用:快速同步我们对项目的修改,使我们可以不用重启服务器就可以实现对项目的修改
导入依赖
        <dependency>
            <groupId>org.springframework.boot</groupId>
            <artifactId>spring-boot-devtools</artifactId>
            <optional>true</optional>
        </dependency>
在IDEA使用快捷键Ctrl+F9 可以快速构建项目
1.5.3 Spring Initailizr(项目初始化向导)
图形化快速构建SpringBoot项目
- 自动依赖引入
- 自动创建项目结构
- 自动编写好主配置类
2、SpringBoot核心技术
2.1 springBoot配置文件
2.1.1 properties
2.1.2 yml(yaml)
YAML 是 “YAML Ain’t Markup Language”(YAML 不是一种标记语言)的递归缩写。在开发的这种语言时,YAML 的意思其实是:“Yet Another Markup Language”(仍是一种标记语言)。
非常适合用来做以数据为中心的配置文件
2.1.3 yml基本语法
● key: value;kv之间有空格
● 大小写敏感
● 使用缩进表示层级关系
● 缩进不允许使用tab,只允许空格
● 缩进的空格数不重要,只要相同层级的元素左对齐即可
● '#‘表示注释
● 字符串无需加引号,如果要加,’'与""表示字符串内容 会被 转义/不转义
2.1.4 yml数据类型
- 字面量:单个的、不可再分的值。date、boolean、string、number、null
key: xxxx - 对象:键值对的集合。map、hash、set、object
行内写法: k: {k1:v1,k2:v2,k3:v3} #或 k: k1: v1 k2: v2 k3: v3 - 数组:一组按次序排列的值。array、list、queue
行内写法:  k: [v1,v2,v3]
#或者
k:
 - v1
 - v2
 - v3
2.1.5 yml实例
@Data
public class Person {

    private String userName;
    private Boolean boss;
    private Date birth;
    private Integer age;
    private Pet pet;
    private String[] interests;
    private List<String> animal;
    private Map<String, Object> score;
    private Set<Double> salarys;
    private Map<String, List<Pet>> allPets;
}

@Data
public class Pet {
    private String name;
    private Double weight;
}
# yaml表示以上对象
person:
  userName: zhangsan
  boss: false
  birth: 2019/12/12 20:12:33
  age: 18
  pet:
    name: tomcat
    weight: 23.4
  interests: [篮球,游泳]
  animal:
    - jerry
    - mario
  score:
    english:
      first: 30
      second: 40
      third: 50
    math: [131,140,148]
    chinese: {first: 128,second: 136}
  salarys: [3999,4999.98,5999.99]
  allPets:
    sick:
      - {name: tom}
      - {name: jerry,weight: 47}
    health: [{name: mario,weight: 47}]
2.2 web开发
2.2.1 SpringMVC自动配置概览
前言:大部分的场景配置是不需要我们去自定义配置的
自动配置内容一览:
-
Inclusion of ContentNegotiatingViewResolver and BeanNameViewResolver beans
内容协商视图解析器和BeanName视图解析器
-
Support for serving static resources, including support for WebJars (covered later in this document))
静态资源(包括webjars)
-
Automatic registration of Converter, GenericConverter, and Formatter beans.
自动注册 Converter,GenericConverter,Formatter
-
Support for HttpMessageConverters (covered later in this document).、
支持 HttpMessageConverters (后来我们配合内容协商理解原理)
-
Automatic registration of MessageCodesResolver (covered later in this document).
自动注册 MessageCodesResolver (国际化用)
-
Static index.html support
静态index.html 页支持
-
Custom Favicon support (covered later in this document)
自定义 Favicon
-
Automatic use of a ConfigurableWebBindingInitializer bean (covered later in this document).
自动使用 ConfigurableWebBindingInitializer ,(DataBinder负责将请求数据绑定到JavaBean上)
2.2.2 简单功能分析
1. 静态资源访问
注意:如果是直接通过请求来访问静态资源的话,我们是不需要额外添加前缀的的(否则会报错找不到)。除非我们自定义添加了静态资源访问前缀。
springMVC底层会根据我们访问请求里的静态资源名去默认的静态资源存放地址去寻找匹配的静态资源。
- 静态资源目录
默认的静态资源目录是:类路径下/static, /public, /resources , / META-INF/resources
访问静态资源目录的URL: 当前项目根路径+(可选)设置的静态资源前缀+静态资源名
原理:在底层使用了静态映射/** ,拦截了所有请求
请求 —> Controller映射查找,找不到下一步 ----> 静态资源处理器负责查找资源,找不到下一步 —> 404
如何改变(添加)默认的静态资源查找路径:
spring:
  mvc:
    static-path-pattern: /res/**

  resources:
    static-locations: [classpath:/haha/]
  # static-path-pattern: 给静态资源添加寻找路径前缀
  # static-localtion: 添加一个新的默认静态资源寻找路径
2. 欢迎页与自定义Favcon.ico
== 1.欢迎页==
没有指定具体访问路径时的默认index页面
配置:
-
将一个命名为index.html页面放在默认静态资源访问目录下
-
注意:静态资源访问前缀与欢迎页的配置在SpringBoot代码底层会有冲突,所以记得这二者不能同时配置
具体原因:
![[外链图片转存失败,源站可能有防盗链机制,建议将图片保存下来直接上传(img-UbeGwgUG-1679301099470)(118e8c305f9520dc1c9a9aa18cf03d29.png)]](https://img-blog.csdnimg.cn/1135f40babea47b386ebd2c0122d2e23.png)
欢迎页的配置底层源码,如果staticPathPattern不是/**那么欢迎页就不会被加载到.
所以设置欢迎页的同时,记得不要配置静态资源前缀staticPathPattern
== 2.Favcon.ico==
配置了该静态资源,那么访问的页面图标将会加上该静态资源,就比如下面这个绿色的小图标

配置步骤:
将一个图片命名为favicon.ico加入到静态资源目录即可
3. 静态资源配置原理
- springBoot启动默认加载 xxxAutoConfiguration类(自动加载类)
- springMVC功能的==自动配置类==WebMvcAutoConfiguraiton生效
- 配置文件的相关属性与xxx进行了绑定。
WebMvcProperties==spring.mvc

ResourceProperties==spring.resources
other:
-
配置类只有一个有参构造器的情况下
该构造器的所有参数都会从容器中去取得
ps: 初始化WebMvcAutoConfigurationAdapter组件
    //有参构造器所有参数的值都会从容器中确定
//ResourceProperties resourceProperties;获取和spring.resources绑定的所有的值的对象
//WebMvcProperties mvcProperties 获取和spring.mvc绑定的所有的值的对象
//ListableBeanFactory beanFactory Spring的beanFactory
//HttpMessageConverters 找到所有的HttpMessageConverters
//ResourceHandlerRegistrationCustomizer 找到 资源处理器的自定义器。=========
//DispatcherServletPath
//ServletRegistrationBean   给应用注册Servlet、Filter....
    public WebMvcAutoConfigurationAdapter(ResourceProperties resourceProperties, WebMvcProperties mvcProperties,
                ListableBeanFactory beanFactory, ObjectProvider<HttpMessageConverters> messageConvertersProvider,
                ObjectProvider<ResourceHandlerRegistrationCustomizer> resourceHandlerRegistrationCustomizerProvider,
                ObjectProvider<DispatcherServletPath> dispatcherServletPath,
                ObjectProvider<ServletRegistrationBean<?>> servletRegistrations) {
            this.resourceProperties = resourceProperties;
            this.mvcProperties = mvcProperties;
            this.beanFactory = beanFactory;
            this.messageConvertersProvider = messageConvertersProvider;
            this.resourceHandlerRegistrationCustomizer = resourceHandlerRegistrationCustomizerProvider.getIfAvailable();
            this.dispatcherServletPath = dispatcherServletPath;
            this.servletRegistrations = servletRegistrations;
        }
- 资源处理的默认规则
@Override
        public void addResourceHandlers(ResourceHandlerRegistry registry) {
            if (!this.resourceProperties.isAddMappings()) {
                logger.debug("Default resource handling disabled");
                return;
            }
            Duration cachePeriod = this.resourceProperties.getCache().getPeriod();
            CacheControl cacheControl = this.resourceProperties.getCache().getCachecontrol().toHttpCacheControl();
            //webjars的规则
            if (!registry.hasMappingForPattern("/webjars/**")) {
                customizeResourceHandlerRegistration(registry.addResourceHandler("/webjars/**")
                        .addResourceLocations("classpath:/META-INF/resources/webjars/")
                        .setCachePeriod(getSeconds(cachePeriod)).setCacheControl(cacheControl));
            }

            //
            String staticPathPattern = this.mvcProperties.getStaticPathPattern();
            if (!registry.hasMappingForPattern(staticPathPattern)) {
                customizeResourceHandlerRegistration(registry.addResourceHandler(staticPathPattern)
                        .addResourceLocations(getResourceLocations(this.resourceProperties.getStaticLocations()))
                        .setCachePeriod(getSeconds(cachePeriod)).setCacheControl(cacheControl));
            }
        }
spring:
#  mvc:
#    static-path-pattern: /res/**

  resources:
    add-mappings: false   禁用所有静态资源规则
@ConfigurationProperties(prefix = "spring.resources", ignoreUnknownFields = false)
public class ResourceProperties {

    private static final String[] CLASSPATH_RESOURCE_LOCATIONS = { "classpath:/META-INF/resources/",
            "classpath:/resources/", "classpath:/static/", "classpath:/public/" };

    /**
     * Locations of static resources. Defaults to classpath:[/META-INF/resources/,
     * /resources/, /static/, /public/].
     */
    private String[] staticLocations = CLASSPATH_RESOURCE_LOCATIONS;
所以: 静态资源才会默认从以下四个目录去寻找
“classpath:/META-INF/resources/”,“classpath:/resources/”, “classpath:/static/”, “classpath:/public/”
-
欢迎页的处理规则
    HandlerMapping:处理器映射。保存了每一个Handler能处理哪些请求。

    @Bean
        public WelcomePageHandlerMapping welcomePageHandlerMapping(ApplicationContext applicationContext,
                FormattingConversionService mvcConversionService, ResourceUrlProvider mvcResourceUrlProvider) {
            WelcomePageHandlerMapping welcomePageHandlerMapping = new WelcomePageHandlerMapping(
                    new TemplateAvailabilityProviders(applicationContext), applicationContext, getWelcomePage(),
                    this.mvcProperties.getStaticPathPattern());
            welcomePageHandlerMapping.setInterceptors(getInterceptors(mvcConversionService, mvcResourceUrlProvider));
            welcomePageHandlerMapping.setCorsConfigurations(getCorsConfigurations());
            return welcomePageHandlerMapping;
        }

    WelcomePageHandlerMapping(TemplateAvailabilityProviders templateAvailabilityProviders,
            ApplicationContext applicationContext, Optional<Resource> welcomePage, String staticPathPattern) {
        if (welcomePage.isPresent() && "/**".equals(staticPathPattern)) {
            //要用欢迎页功能,必须是/**
            logger.info("Adding welcome page: " + welcomePage.get());
            setRootViewName("forward:index.html");
        }
        else if (welcomeTemplateExists(templateAvailabilityProviders, applicationContext)) {
            // 调用Controller  /index
            logger.info("Adding welcome page template: index");
            setRootViewName("index");
        }
    }
在此处底层代码 “/**”.equals(staticPathPattern 写死了欢迎页的默认资源访问前缀为无
-
favicon
2.2.3 请求参数处理
0.请求映射
1. rest使用与原理
● @xxxMapping;
● Rest风格支持(使用HTTP请求方式动词来表示对资源的操作)
○ 以前:/getUser 获取用户 /deleteUser 删除用户 /editUser 修改用户 /saveUser 保存用户
○ 现在: /user GET-获取用户 DELETE-删除用户 PUT-修改用户 POST-保存用户
○ 核心Filter;HiddenHttpMethodFilter
■ 用法: 表单method=post,隐藏域 _method=put
■ SpringBoot中手动开启
○ 扩展:如何把_method 这个名字换成我们自己喜欢的。
    自定义传输的_method属性的名字为_m
//    @Bean
//    public HiddenHttpMethodFilter hiddenHttpMethodFilter(){
//        HiddenHttpMethodFilter hiddenHttpMethodFilter = new HiddenHttpMethodFilter();
//        hiddenHttpMethodFilter.setMethodParam("_m");
//        return hiddenHttpMethodFilter;
//    }
Rest原理(表单提交要使用REST的时候)
● 表单提交会带上_method=PUT
● 请求过来被HiddenHttpMethodFilter拦截
○ 请求是否正常,并且是POST
■ 获取到_method的值。
■ 兼容以下请求;PUT.DELETE.PATCH
■ 原生request(post),包装模式requesWrapper重写了getMethod方法,返回的是传入的值。
■ 过滤器链放行的时候用wrapper。以后的方法调用getMethod是调用requesWrapper的。
Rest使用客户端工具,
● 如PostMan直接发送Put、delete等方式请求,无需Filter。
在SpringBoot内想要使用Rest,需要在配置文件内开启对应的配置
spring:
  mvc:
    hiddenmethod:
      filter:
        enabled: true   #开启页面表单的Rest功能
2.请求映射原理
- springMVC的请求映射处理都是从org.springframework.web.servlet.DispatcherServlet---->doDispatch()
protected void doDispatch(HttpServletRequest request, HttpServletResponse response) throws Exception {
        HttpServletRequest processedRequest = request;
        HandlerExecutionChain mappedHandler = null;
        boolean multipartRequestParsed = false;

        WebAsyncManager asyncManager = WebAsyncUtils.getAsyncManager(request);

        try {
            ModelAndView mv = null;
            Exception dispatchException = null;

            try {
                processedRequest = checkMultipart(request);
                multipartRequestParsed = (processedRequest != request);

                // 找到当前请求使用哪个Handler(Controller的方法)处理
                mappedHandler = getHandler(processedRequest);

                //HandlerMapping:处理器映射。/xxx->>xxxx
- 所有的映射都是会保存到HandlerMapping里面
- 然后SringMVC拦截到请求后会分析请求是归于哪一个HandlerMapping,再之后遍历该HandlerMapping去匹配对应的映射
- SpringBoot自动配置欢迎页的 WelcomePageHandlerMapping 。访问 /能访问到index.html
- SpringBoot自动配置了默认 的 RequestMappingHandlerMapping
- 请求进来,挨个尝试所有的HandlerMapping看是否有请求信息
- 如果有就找到这个请求对应的handler
- 如果没有就是下一个 HandlerMapping
- 我们需要一些自定义的映射处理,我们也可以自己给容器中放HandlerMapping。自定义 HandlerMapping
- 当找到一个HandlerMapping后,遍历HandlerMapping的handler去匹配合适的handler
    protected HandlerExecutionChain getHandler(HttpServletRequest request) throws Exception {
        if (this.handlerMappings != null) {
            for (HandlerMapping mapping : this.handlerMappings) {
                HandlerExecutionChain handler = mapping.getHandler(request);
                if (handler != null) {
                    return handler;
                }
            }
        }
        return null;
    }
注意:因为是for循环匹配所有,所以可能会出现匹配到多个的可能性,所以请求一定不能出现可以匹配到多个的情况,否则会报错
1.普通参数与基本注解
1.注解
-
@PathVariable
使用场景:方法参数前面,配合@RequestMapping将Rest风格的请求附带的参数赋值到方法的参数上面去
有@PathVariable(“xxx”) 绑定单个变量参数方式和@PathVariable Map<String,String> xxx 使用map来接收所有 参数两种方式;
-
@RequestHeader
使用场景:方法参数前面,将RequestHeader的某个或全部信息保存到方法参数里
使用方式:同理,有单个和Map<String,String>两种方式
-
@RequestParam
使用场景:方法参数前面,解析请求,并且读取指定的数据赋值给标注的方法参数
使用方式:同理,单个和Map<String,String>两种方式
注意:Rest风格的请求无法读取
-
@CookieValue
使用场景:方法参数前面,可以将请求的Cookie信息保存到方法的参数里
使用方式:@Cookie(“指定类别的信息”) xxxx:
@Cookie Cookie xxx; 使用cookie类型的变量去保存全部cookie信息 -
@RequestBody
使用场景:方法前面,标识该方法的返回值不会被视图解析器解析,而是直接作为返回值返回到页面上。 -
@RequestAttribute
使用场景:获取request作用域的信息
使用方式:@Request(“key”) 有key获得value
-
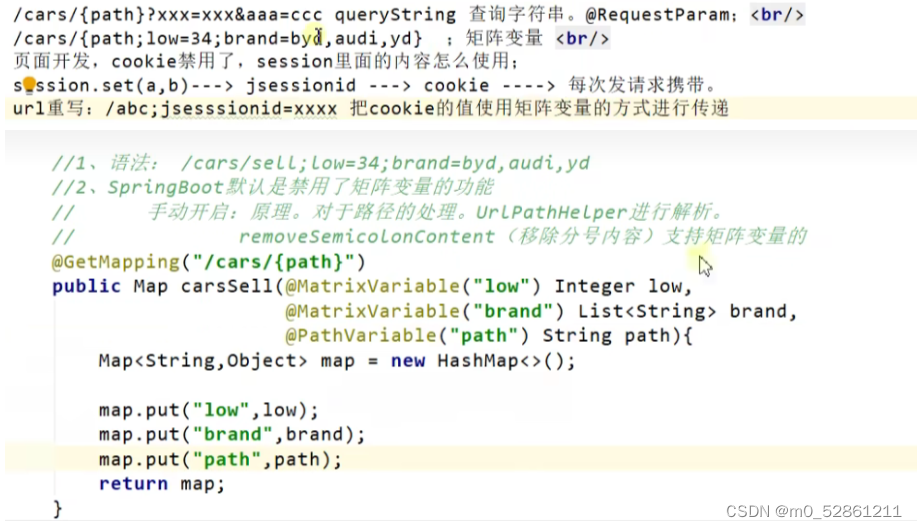
@MatrixVariable(value=“xx”,pathVar=“xx”)
使用场景:在方法参数前面,发送的请求携带着矩阵类型数据的时候
- 当URL为这种形式的时候:/cell;abc=123;type=1;hh=1,2,3,4,5,6
- cell为矩阵名字,abc、type、hh都是cell矩阵变量的参数数据
使用方式:见下面使用例子,
分号前面是矩阵url,矩阵变量是将一整个矩阵封装为一层路径(矩阵变量+矩阵数据)来进行发送请求的
pathVar 指定矩阵变量 value: 指定矩阵变量内部的值注意 SpringBoot的springMVC功能默认禁用了@MatrixVariable,需要我们自己在配置类内手动开启
![[外链图片转存失败,源站可能有防盗链机制,建议将图片保存下来直接上传(img-rmve5k13-1679301099471)(C:\Users\洪陈炜\Desktop\springBoot\springBoot\img\1.png)]](https://img-blog.csdnimg.cn/eda52ee7f0584439bbd45fa276e85858.png)
![[外链图片转存失败,源站可能有防盗链机制,建议将图片保存下来直接上传(img-vFa5sjln-1679301099471)(9fbcb5e8dd9f9b7451bee9e27f4926d0.png)]](https://img-blog.csdnimg.cn/b01e158896db449391ecd15025b91c2a.png)
使用例子

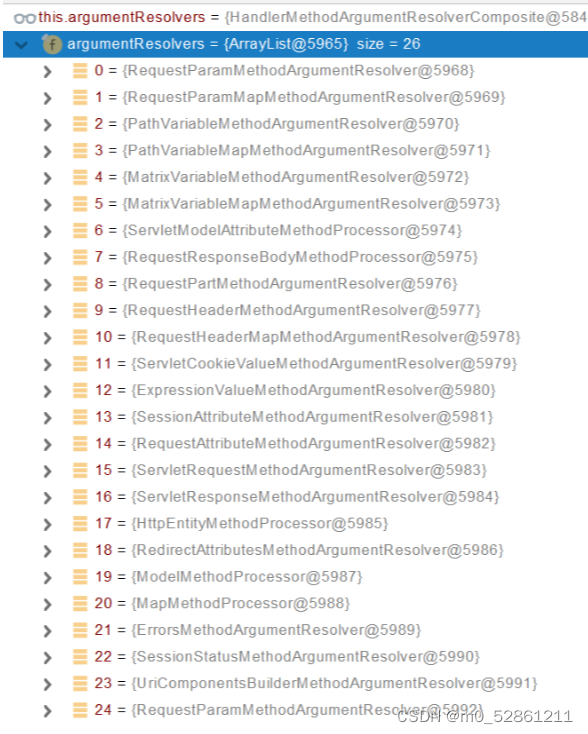
参数解析原理:
得到所有的参数列表,然后遍历每一个参数,对参数和所有参数解析器进行匹配(看参数加上了哪一种注解),判断参数符合哪一个参数解析器,匹配成功的话,得到参数解析器。然后由参数解析器去解析参数。得到参数的值
注意:@PathVariable使用map和不使用map方式用的参数解析器是不一样的哦。其他注解同理
2.Servlet原生API原理:
WebRequest、ServletRequest、MultipartRequest、 HttpSession、javax.servlet.http.PushBuilder、Principal、InputStream、Reader、HttpMethod、Locale、TimeZone、ZoneId
ServletRequestMethodArgumentResolver 该参数解析器解析以上参数类型:
@Override
	public boolean supportsParameter(MethodParameter parameter) {
		Class<?> paramType = parameter.getParameterType();
		return (WebRequest.class.isAssignableFrom(paramType) ||
				ServletRequest.class.isAssignableFrom(paramType) ||
				MultipartRequest.class.isAssignableFrom(paramType) ||
				HttpSession.class.isAssignableFrom(paramType) ||
				(pushBuilder != null && pushBuilder.isAssignableFrom(paramType)) ||
				Principal.class.isAssignableFrom(paramType) ||
				InputStream.class.isAssignableFrom(paramType) ||
				Reader.class.isAssignableFrom(paramType) ||
				HttpMethod.class == paramType ||
				Locale.class == paramType ||
				TimeZone.class == paramType ||
				ZoneId.class == paramType);
	}
3.复杂参数解析:
-
主要关注于Map和Model(map、model里面的数据会被放在request的请求域 request.setAttribute)、RedirectAttributes( 重定向携带数据)、ServletResponse(response)
-
model和Map最终都会被放在请求作用域内,只不过都是在进行页面渲染的时候执行的
-
Model和Map类型的参数,最终返回的类型是同一个mavContainer.getModel(),Model和Map的数据都会被添加到同一个类型变量传递给同一个mavContainer.getModel()
-
如下图所示,model和map的数据被存储在同一个defaultModel下

4.自定义对象参数绑定原理:
HTTP请求----> HandlerMapping---->Handler ---->获取参数列表 ---->判断是不是简单参数
---->发现是自定义对象参数 ----> 创建一个数据绑定器,内部创建一个空的对象
---->寻找赋值参数对应的数据转换器Converter---->然后将转换好的属性参数赋值给该空的对象的属性
因为HTTP传输过来的数据默认都是文本类型,所以在赋值的时候会根据需要使用转换器Converter进行类型转换
2.(重要)参数处理原理&&过程
0.大体步骤
● HandlerMapping中找到能处理请求的Handler(Controller.method())
● 为当前Handler 找一个适配器 HandlerAdapter;** RequestMappingHandlerAdapter**
● 适配器执行目标方法并确定方法参数的每一个值
具体介绍:
1.HandlerAdapter (适配器)

适配器有许多种,不同的适配器负责着不同的功能
0- 支持方法上标注@RequestMapping注解,负责请求映射方面的功能事务
1- 支持函数式编程
…
2.执行与请求映射相关的目标方法Handler
// Actually invoke the handler.
//DispatcherServlet -- doDispatch
mv = ha.handle(processedRequest, response, mappedHandler.getHandler());
//利用反射执行相关方法
mav = invokeHandlerMethod(request, response, handlerMethod); //执行目标方法

//ServletInvocableHandlerMethod
Object returnValue = invokeForRequest(webRequest, mavContainer, providedArgs);
//获取方法的参数值
Object[] args = getMethodArgumentValues(request, mavContainer, providedArgs);
3.参数解析器-HandlerMethodArgumentResolver
确定将要执行的目标方法的每一个参数的值是什么;
SpringMVC目标方法能写多少种参数类型。取决于参数解析器
- 参数解析器有许多种,每一种参数解析器负责解析一种或者多种参数类型,SpringMVC会对方法的每一个参数的类型进行判断,然后才会开始赋值操作
- 在判断参数的参数类型的时候,会遍历参数解析器列表去寻求适配
-
每一个参数解析器都实现了HandlerMethodArgumentResolver接口,该接口需要实现以下两个方法

方法一:决定该参数解析器支持解析的参数类型
方法二:判断什么情况下是否执行方法一
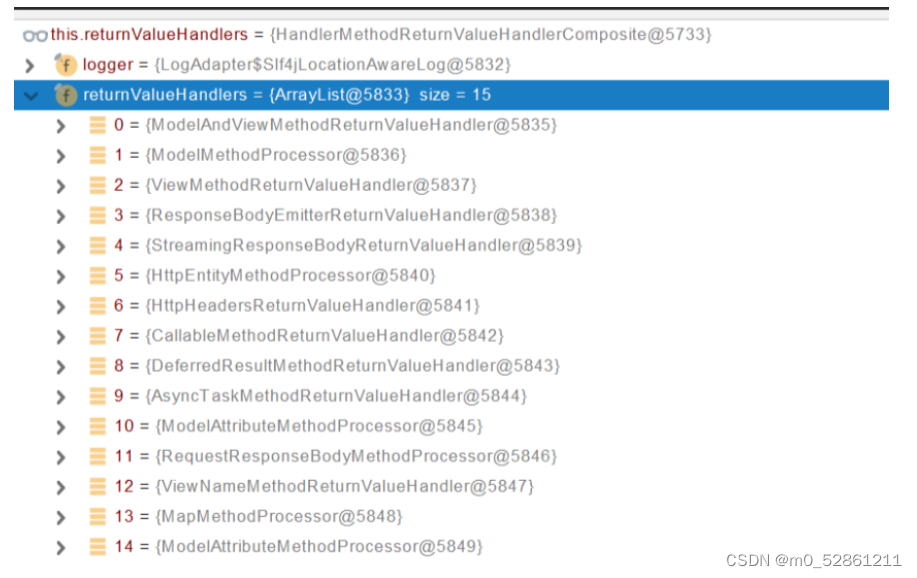
4.返回值处理器returnValueHandles

返回值处理器决定将返回值处理为什么类型,相当于一个返回值加工工厂
SpringMVC可以转换的返回值类型:
ModelAndView
Model
View
ResponseEntity
ResponseBodyEmitter
StreamingResponseBody
HttpEntity
HttpHeaders
Callable
DeferredResult
ListenableFuture
CompletionStage
WebAsyncTask
有 @ModelAttribute 且为对象类型的
@ResponseBody 注解 ---> RequestResponseBodyMethodProcessor;
5.如何确定目标方法的每一个参数的值
-
挨个判断所有参数解析器哪一个参数解析器支持解析这个参数
@Nullable private HandlerMethodArgumentResolver getArgumentResolver(MethodParameter parameter) { HandlerMethodArgumentResolver result = this.argumentResolverCache.get(parameter); if (result == null) { for (HandlerMethodArgumentResolver resolver : this.argumentResolvers) { if (resolver.supportsParameter(parameter)) { result = resolver; this.argumentResolverCache.put(parameter, result); break; } } } return result; } -
匹配到的参数解析器调用resolveArgument方法去解析这个参数的值
调用各自 HandlerMethodArgumentResolver 的 resolveArgument 方法即可 -
如果遇到自定义类型参数,该怎么解析——封装该Pojo
 在判断参数类型的时候,会先有一个参数处理器先判断该参数是否属于简单类型参数

 ServletModelAttributeMethodProcessor
public static boolean isSimpleValueType(Class<?> type) {
		return (Void.class != type && void.class != type &&
				(ClassUtils.isPrimitiveOrWrapper(type) ||
				Enum.class.isAssignableFrom(type) ||
				CharSequence.class.isAssignableFrom(type) ||
				Number.class.isAssignableFrom(type) ||
				Date.class.isAssignableFrom(type) ||
				Temporal.class.isAssignableFrom(type) ||
				URI.class == type ||
				URL.class == type ||
				Locale.class == type ||
				Class.class == type));
	}
-
在判断该类型是自定义类型后,会创建一个WebDataBinder(web数据绑定器),绑定器内部会创建一个空的
JavaBean对象
-
然后WebDataBinder绑定器会将参数的值与JavaBean里面的属性进行绑定,将数据与JavaBean的属性产生映射
-
在将数据绑定后想要赋值的时候,因为数据传输的时候是以文本传输的,所以在赋值的时候,需要将数据进行类型转化
-
WebDataBinder会利用它里面的Converters转换器将请求数据转换成指定的数据类型,再次封装到JavaBean内部,于是这样就完成了参数赋值
拓展:
	虽然SpringMVC的WebDataBinder和他的Converter已经可以很便捷的完成参数的赋值了,但是我们也可以自定义一个Converter。可以实现更加灵活自由的参数绑定赋值。

	就比如:想要将请求数据的一个数据==“啊,3”==赋值为一个pet的JavaBean,如果是自带的类型转换器是无法直接进行转化的。但是我们可以通过在实现了WebMvcConfigurer接口的配置类自定义Converter来实现这个功能
    //1、WebMvcConfigurer定制化SpringMVC的功能
            @Override
            public void addFormatters(FormatterRegistry registry) {
                registry.addConverter(new Converter<String, Pet>() {

                    @Override
                    public Pet convert(String source) {
                        // 啊猫,3
                        if(!StringUtils.isEmpty(source)){
                            Pet pet = new Pet();
                            String[] split = source.split(",");
                            pet.setName(split[0]);
                            pet.setAge(Integer.parseInt(split[1]));
                            return pet;
                        }
                        return null;
                    }
                });
            }
6.目标方法执行完成
在执行完目标方法之后,并且往model==/map/==modelAndView内添加了数据之后。
所有的数据都会放在WebMvcConfigurer容器内部;该容器内部不仅存放添加的数据model,而且还包含了之后将要前往的页面地址view.

7.处理派发结果
接收model变量,将model变量内部存放的数据都挨个放在请求域内。视图解析器解析view,跳转到指定的页面
protected void exposeModelAsRequestAttributes(Map<String, Object> model,
			HttpServletRequest request) throws Exception {

    //model中的所有数据遍历挨个放在请求域中
		model.forEach((name, value) -> {
			if (value != null) {
				request.setAttribute(name, value);
			}
			else {
				request.removeAttribute(name);
			}
		});
	}
2.2.4 响应JSON与内容协商
1.响应JSON
-
导入Maven依赖
web场景自动引入了json场景
    <dependency>
      <groupId>org.springframework.boot</groupId>
      <artifactId>spring-boot-starter-json</artifactId>
      <version>2.3.4.RELEASE</version>
      <scope>compile</scope>
    </dependency>
加入该依赖后,服务器会自动给前端发送JSON数据
-
返回值处理器
- 返回值处理器原理

 	1. 返回值处理器会先判断是否支持该返回值类型(supportReturnType)
 	2. 如果支持该类型,那么就会调用handleReturnValue进行处理
 	3. **RequestResponseBodyMethodProcessor** 可以处理返回值标了@ResponseBody 注解
 - 利用MessageConverters消息转换器将返回数据处理为目标类型(JSON)
   1. 内容协商:浏览器会以请求头或请求参数的方式告诉服务器它能够接收的数据类型(存放于**MediaType**),服务器会根据浏览器的接收类型和自身能够生产的返回值类型对返回值的类型进行调整。最终求得一种双方都能接受的情况
   2. 底层,服务器先得到浏览器所有能够接受的数据类型列表,与服务器内部可以转化(生产)的数据类型转换器HttpMessageConverter进行遍历对比,看最终谁能够处理该情况?
      - MappingJackson2HttpMessageConverter可以将对象写为json
      - MappingJackson2HttpMessageConverter将对象转为json再写出去
2.HttpMessageConverter原理
-
MessageConverter规范
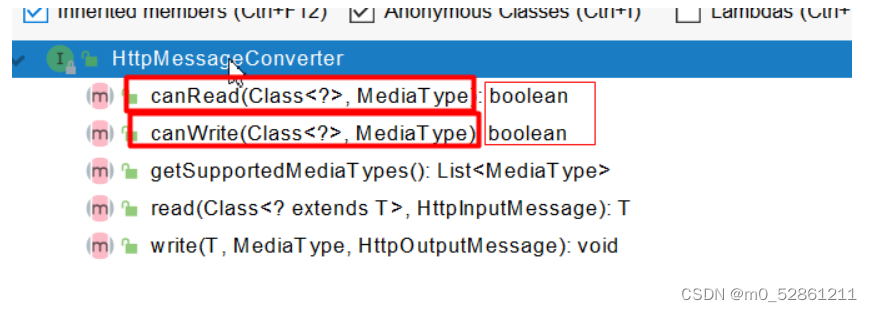
HttpMessageConverter: 看是否支持将 此 Class类型的对象,转为MediaType类型的数据。
例子:Person对象转为JSON。或者 JSON转为Person
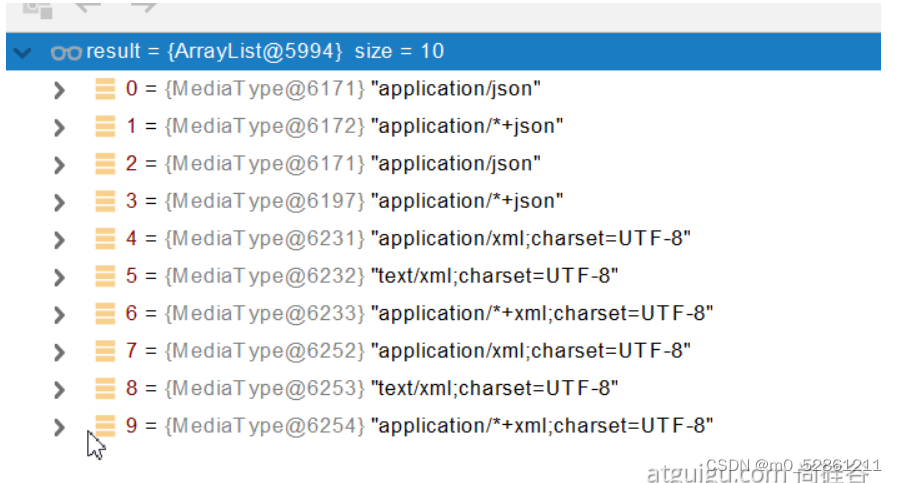
- 默认的MessageConverter

0 - 只支持Byte类型的
1 - String
2 - String
3 - Resource
4 - ResourceRegion
5 - DOMSource.*class * SAXSource.class) \ StAXSource.**class **\**StreamSource.class Source.class
6 -** MultiValueMap**
7 - true
8 - true
9 - 支持注解方式xml处理的。
最终 MappingJackson2HttpMessageConverter 把对象转为JSON(利用底层的jackson的objectMapper转换的)
3.内容协商
根据客户端接收能力不同,返回不同媒体类型的数据
-
引入Maven依赖
<dependency> <groupId>com.fasterxml.jackson.dataformat</groupId> <artifactId>jackson-dataformat-xml</artifactId> </dependency> -
浏览器可以发送的内容协商策略
-
在请求头内携带 requestHeader内容协商策略

-
在浏览器请求参数内携带 Paramete内容协商策略
-
需要提前在yml配置文件内部开启协商功能
spring: contentnegotiation: favor-parameter: true #开启请求参数内容协商模式 -
在请求中携带参数format
format的值只能是json或xml
发请求: http://localhost:8080/test/person?format=json
-
-
messageConverter的内容协商策略如果满足了一个策略并且可以实现,那么就会直接返回数据,不会再接下来使用另外的内容协商策略
(先到先得)
4.内容协商原理
-
判断当前响应头是否有确定的媒体类型 MediaType
-
获取客户端(post,浏览器) 支持接收的内容类型(application/xml等等)- - -
- contentNegotiationManager 内容协商管理器 默认使用基于请求头的策略

此处为Header请求头策略
- HeaderContentNegotiationStrategy 确定客户端可以接收的内容类型

-
遍历循环所有当前系统的 MessageConverter,看谁支持操作这个对象(Person)
(第一次遍历MessageConverter,找到可以操作person对象的Converter) (找到谁能读)
-
找到支持操作Person的converter,把converter支持的媒体类型统计出来。
-
客户端需要【application/xml】。服务端能力【10种、json、xml】
-
进行内容协商的最佳匹配媒体类型 (确定了返回值转换的最佳类型)
-
用 支持 将对象转为 最佳匹配媒体类型 的converter。调用它进行转化 (找到谁能写)
(第二次遍历MessageConverter,找到可以操作person对象转换为最佳媒体类型的Converter)

-
ps:
导入了jackson处理xml的包,xml的converter就会自动进来
WebMvcConfigurationSupport
jackson2XmlPresent = ClassUtils.isPresent("com.fasterxml.jackson.dataformat.xml.XmlMapper", classLoader);

if (jackson2XmlPresent) {
			Jackson2ObjectMapperBuilder builder = Jackson2ObjectMapperBuilder.xml();
			if (this.applicationContext != null) {
				builder.applicationContext(this.applicationContext);
			}
			messageConverters.add(new MappingJackson2XmlHttpMessageConverter(builder.build()));
		}
5.自定义MessageConverter
目标完成效果: 输入以下请求,可以在请求头或者请求参数内指定返回数据的类型(为自定义类型)
[外链图片转存失败,源站可能有防盗链机制,建议将图片保存下来直接上传(img-FoW7svEM-1679301099473)(image-20230227153517570.png)]
步骤:
1. 创建一个MessageConverter类,实现HttpMessageConverter<?>接口.
- public boolean canWrite(): 判断某个类型是否可以被写出(贪简便设置成返回true即可)
- public List getSupportedMediaTypes():供返回值处理器读取该MessageConverter可以处理的数据类型,一定要在此处加上能单独标识我们自定义返回值类型的MediaType
- 比如"application/x-hcw",x-hcw是我们随便起名的,但是一定要能唯一标识我们的自定义返回类型
- public void write(): 决定了converter将会以怎样的形式写出数据
public class myConverter01 implements HttpMessageConverter<pet> {
    @Override
    public boolean canRead(Class<?> clazz, MediaType mediaType) {
        return false;
    }

    @Override
    public boolean canWrite(Class<?> clazz, MediaType mediaType) {
        return clazz.isAssignableFrom(pet.class);
        //        return false;
    }

    @Override //获取所有支持的媒体类型
    public List<MediaType> getSupportedMediaTypes() {
        return MediaType.parseMediaTypes("application/x-hcw");
    }

    @Override
    public pet read(Class<? extends pet> clazz, HttpInputMessage inputMessage) throws IOException, HttpMessageNotReadableException {
        return null;
    }

    @Override //自定义协议的写出
    public void write(pet pet, MediaType contentType, HttpOutputMessage outputMessage) throws IOException, HttpMessageNotWritableException {
        String data = pet.toString();
        //将数据以流的累些写出
        OutputStream body = outputMessage.getBody();
        body.write(data.getBytes());
    }
}
2.在自定义的WebMvcConfigurer配置类下实现extendMessageConverters方法
@Bean
public WebMvcConfigurer WebMvcConfigurer(){
	return new WebMvcConfigurer(){
	       @Override  //在此处加入自己自定义的converter
            public void extendMessageConverters(List<HttpMessageConverter<?>> converters) {
                converters.add(new myConverter01());
            }
   }
 }
该方法让返回值处理器读取到我们自定义的httpMessageConverter
到此处,我们已经可以实现了在请求头添加自定义的请求返回值类型,不过还不能在请求参数实现下一步功能。
3.在第二步的基础之上再实现configureContentNegotiation方法
-
在第二步,虽然实现了自定义MessageConverter的添加,但是作用范围仅局限于请求头,想要将作用范围添加到请求参数,则需要其他操作
-
在第二步的基础之上再实现configureContentNegotiation方法
该方法则是会自定义一个内容协商策略(会覆盖原有的内容协商策略),在该方法内我们可以将自定义messageConverter应用到所有的范围内。
        @Override
            public void configureContentNegotiation(ContentNegotiationConfigurer configurer) {
                //请求参数内容协商策略
                Map<String, MediaType> map1 = new HashMap<>();
                map1.put("json",MediaType.APPLICATION_JSON);
                map1.put("xml",MediaType.APPLICATION_XML);
                map1.put("gg",MediaType.parseMediaType("application/x-hcw"));
                ParameterContentNegotiationStrategy parameterContentNegotiationStrategy = new ParameterContentNegotiationStrategy(map1);
                //请求头内容协商策略
                HeaderContentNegotiationStrategy headerContentNegotiationStrategy = new HeaderContentNegotiationStrategy();
                //添加自定义的策略到configure配置内
                configurer.strategies(Arrays.asList(parameterContentNegotiationStrategy,headerContentNegotiationStrategy));
//                WebMvcConfigurer.super.configureContentNegotiation(configurer);
            }
4.完整WebMvcConfigurer代码展示
@Bean
    public WebMvcConfigurer WebMvcConfigurer(){
        return new WebMvcConfigurer(){
//          自定义内容协商策略,添加了这个以后,默认使用该内容协商策略,不使用原先的两种内容协商策略(会被该内容协商策略给覆盖)
            //在该内容协商策略里,添加了对于请求头和请求参数的内容协商策略的部分
            @Override
            public void configureContentNegotiation(ContentNegotiationConfigurer configurer) {
                //请求参数内容协商策略
                Map<String, MediaType> map1 = new HashMap<>();
                map1.put("json",MediaType.APPLICATION_JSON);
                map1.put("xml",MediaType.APPLICATION_XML);
                map1.put("gg",MediaType.parseMediaType("application/x-hcw"));
                ParameterContentNegotiationStrategy parameterContentNegotiationStrategy = new ParameterContentNegotiationStrategy(map1);
                //请求头内容协商策略
                HeaderContentNegotiationStrategy headerContentNegotiationStrategy = new HeaderContentNegotiationStrategy();
                //添加自定义的策略到configure配置内
                configurer.strategies(Arrays.asList(parameterContentNegotiationStrategy,headerContentNegotiationStrategy));
//                WebMvcConfigurer.super.configureContentNegotiation(configurer);
            }

            @Override  //在此处加入自己自定义的converter
            public void extendMessageConverters(List<HttpMessageConverter<?>> converters) {
                converters.add(new myConverter01());
            }

            //手动设置urlPathHelper 开启读取矩阵的设置
            public void configurePathMatch(PathMatchConfigurer c1){
                UrlPathHelper urlPathHelper = new UrlPathHelper();
                urlPathHelper.setRemoveSemicolonContent(false);
                c1.setUrlPathHelper(urlPathHelper);
            }
        };
    }
2.2.5 视图解析与模板引擎
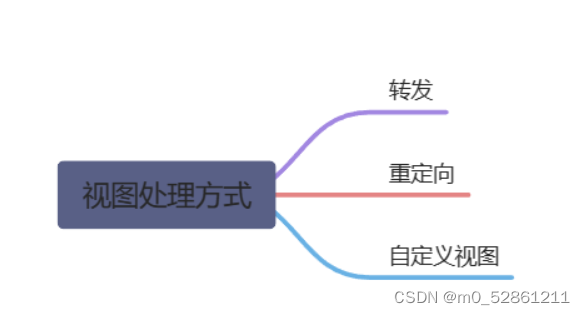
1.视图解析
视图解析:SpringBoot默认不支持 JSP,需要引入第三方模板引擎技术实现页面渲染
-
视图解析原理流程
- 目标方法处理的过程中,所有数据都会被放在 ModelAndViewContainer 里面。包括数据和视图地址。
- 方法的参数是一个自定义类型对象(从请求参数中确定的),把他重新放在 ModelAndViewContainer
- 任何目标方法执行完成以后都会返回 ModelAndView(数据和视图地址)
- processDispatchResult 处理派发结果(页面该如何响应)
- render(mv, request, response); 进行页面渲染逻辑
- 根据方法的String返回值得到 View 对象【定义了页面的渲染逻辑】
- 所有的视图解析器尝试是否能根据当前返回值得到View对象
- 得到了 redirect:/main.html --> Thymeleaf new RedirectView()
- ContentNegotiationViewResolver视图解析器里面包含了下面所有的视图解析器,内部还是利用下面所有视图解析器得到视图对象
- view.render(mv.getModelInternal(), request, response); 视图对象调用自定义的render进行页面渲染工作
- ps:RedirectView如何渲染[重定向到一个页面]
- 获取目标URL
- response.sendRedirect(encodeURL)
-
视图解析:
-
- 返回值以 forward: 开始: new InternalResourceView(forwardUrl); --> 转发request.getRequestDispatcher(path).forward(request, response);
- 返回值以 redirect: 开始: new RedirectView() --》 render就是重定向
- 返回值是普通字符串: new ThymeleafView()—>
-
所有配置都在ThymeleafProperties内设置好的
2.模板引擎-Thymeleaf
0. thymeleaf使用指南
https://www.thymeleaf.org/doc/tutorials/3.0/usingthymeleaf.html#setting-value-to-specific-attributes
1.基本语法
- 表达式
| 表达式名字 | 语法 | 用途 |
|---|---|---|
| 变量取值 | ${…} | 获取请求域、session域、对象等值 |
| 选择变量 | *{…} | 获取上下文对象值 |
| 消息 | #{…} | 获取国际化等值 |
| 链接 | @{…} | 生成链接 |
| 片段表达式 | ~{…} | jsp:include 作用,引入公共页面片段 |
- 字面量
文本值: ‘one text’ , ‘Another one!’ **,…**数字: 0 , 34 , 3.0 , 12.3 **,…**布尔值: true , false
空值: null
变量: one,two,… 变量不能有空格
- 文本操作
字符串拼接: +
**变量替换: **|The name is ${name}|
- 数学运算
运算符: + , - , * , / , %
- 布尔运算
运算符: and , or
一元运算: ! , not
- 比较运算
比较: > , < , >= , <= ( gt , lt , ge , le **)**等式: == , != ( eq , ne )
- 条件运算
If-then: (if) ? (then)
If-then-else: (if) ? (then) : (else)
Default: (value) ?: (defaultvalue)
- 特殊操作
无操作: _
2.设置属性值th:attr
设置单个值
<form action="subscribe.html" th:attr="action=@{/subscribe}">
  <fieldset>
    <input type="text" name="email" />
    <input type="submit" value="Subscribe!" th:attr="value=#{subscribe.submit}"/>
  </fieldset>
</form>
设置多个值
<img src="../../images/gtvglogo.png" th:attr="src=@{/images/gtvglogo.png},title=#{logo},alt=#{logo}" />
以上两个的代替写法 th:xxxx
<input type="submit" value="Subscribe!" th:value="#{subscribe.submit}"/>
<form action="subscribe.html" th:action="@{/subscribe}">
3.迭代
<tr th:each="prod : ${prods}">
        <td th:text="${prod.name}">Onions</td>
        <td th:text="${prod.price}">2.41</td>
        <td th:text="${prod.inStock}? #{true} : #{false}">yes</td>
</tr>
<tr th:each="prod,iterStat : ${prods}" th:class="${iterStat.odd}? 'odd'">
  <td th:text="${prod.name}">Onions</td>
  <td th:text="${prod.price}">2.41</td>
  <td th:text="${prod.inStock}? #{true} : #{false}">yes</td>
</tr>
4.条件运算
<a href="comments.html"
th:href="@{/product/comments(prodId=${prod.id})}"
th:if="${not #lists.isEmpty(prod.comments)}">view</a>
<div th:switch="${user.role}">
  <p th:case="'admin'">User is an administrator</p>
  <p th:case="#{roles.manager}">User is a manager</p>
  <p th:case="*">User is some other thing</p>
</div>
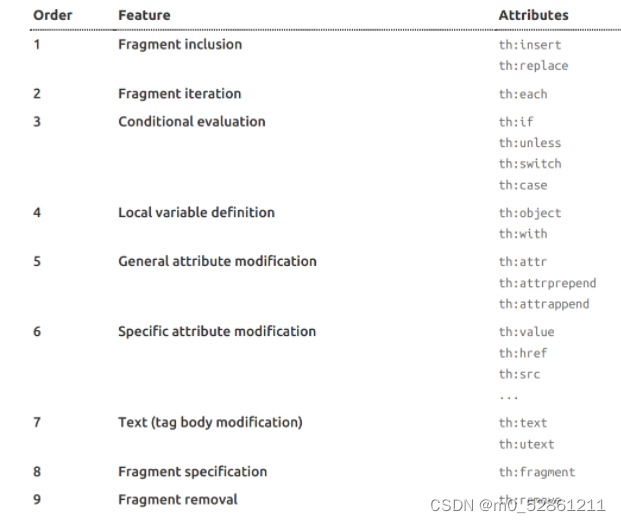
5.属性优先级
3.thymeleaf的使用
1.引入starter
        <dependency>
            <groupId>org.springframework.boot</groupId>
            <artifactId>spring-boot-starter-thymeleaf</artifactId>
        </dependency>
2.自动配置好thymeleaf
@Configuration(proxyBeanMethods = false)
@EnableConfigurationProperties(ThymeleafProperties.class)
@ConditionalOnClass({ TemplateMode.class, SpringTemplateEngine.class })
@AutoConfigureAfter({ WebMvcAutoConfiguration.class, WebFluxAutoConfiguration.class })
public class ThymeleafAutoConfiguration { }
自动配好的策略
- 1、所有thymeleaf的配置值都在 ThymeleafProperties
- 2、配置好了 SpringTemplateEngine
- 3、配好了 ThymeleafViewResolver
- 4、我们只需要直接开发页面
	public static final String DEFAULT_PREFIX = "classpath:/templates/";

	public static final String DEFAULT_SUFFIX = ".html";  //xxx.html
3.页面开发
<!DOCTYPE html>
<html lang="en" xmlns:th="http://www.thymeleaf.org">
<head>
    <meta charset="UTF-8">
    <title>Title</title>
</head>
<body>
<h1 th:text="${msg}">哈哈</h1>
<h2>
    <a href="www.atguigu.com" th:href="${link}">去百度</a>  <br/>
    <a href="www.atguigu.com" th:href="@{link}">去百度2</a>
</h2>
</body>
</html>
2.2.6 拦截器
1.实现拦截器
-
创建一个实现了HandlerInterceptor接口的拦截器类
@Component public class myInterceptor01 implements HandlerInterceptor { @Override public boolean preHandle(HttpServletRequest request, HttpServletResponse response, Object handler) throws Exception { System.out.println("开始拦截请求"); return true; } @Override public void postHandle(HttpServletRequest request, HttpServletResponse response, Object handler, ModelAndView modelAndView) throws Exception { HandlerInterceptor.super.postHandle(request, response, handler, modelAndView); } @Override public void afterCompletion(HttpServletRequest request, HttpServletResponse response, Object handler, Exception ex) throws Exception { HandlerInterceptor.super.afterCompletion(request, response, handler, ex); } } -
在WebMvcConfigurer配置类内实现addInterceptors方法
/*只代表当前目录下,/**同时还包含了子文件夹
@Override
public void addInterceptors(InterceptorRegistry registry) {
   registry.addInterceptor(new myInterceptor01())
           .addPathPatterns("/**")
           .excludePathPatterns("/setRequest01","/getRequest01");
}
- 添加拦截器的注意事项
拦截器和filter一样都是拦截请求,只不过拦截器拦截的是Dispatcher和controller之间的请求。filter过滤的是客户端和Dispatcher之间的请求。注意:经controller返回的返回值被视图解析器解析后向视图的跳转也算是请求;
比如如下方法:
方法的请求映射为"/setRequest01",方法返回值为"forward:/getRequest01"
如果只是在拦截器将"/setRequest01"加入白名单,但不把"/getRequest01"加入白名单,这个方法最终也是不会执行成功的。对于静态资源的访问也是同理的。
@RequestMapping(value = "/setRequest01")
public String setRequest01(HttpServletRequest servletRequest){
    servletRequest.setAttribute("hh","123456");
    return "forward:/getRequest01";
}
           @Override
            public void addInterceptors(InterceptorRegistry registry) {
               registry.addInterceptor(new myInterceptor01())
                       .addPathPatterns("/**")
                       .excludePathPatterns("/setRequest01","/getRequest01");
            }
2.拦截器底层实现原理
1、根据当前请求,找到**HandlerExecutionChain【**可以处理请求的handler以及handler的所有 拦截器】
2、先来顺序执行 所有拦截器的 preHandle方法
- 1、如果当前拦截器prehandler返回为true。则执行下一个拦截器的preHandle
- 2、如果当前拦截器返回为false。直接 倒序执行所有已经执行了的拦截器的 afterCompletion;
3、如果任何一个拦截器返回false。直接跳出不执行目标方法
4、所有拦截器都返回True。执行目标方法
5、倒序执行所有拦截器的postHandle方法。
6、前面的步骤有任何异常都会直接倒序触发 afterCompletion
7、页面成功渲染完成以后,也会倒序触发 afterCompletion
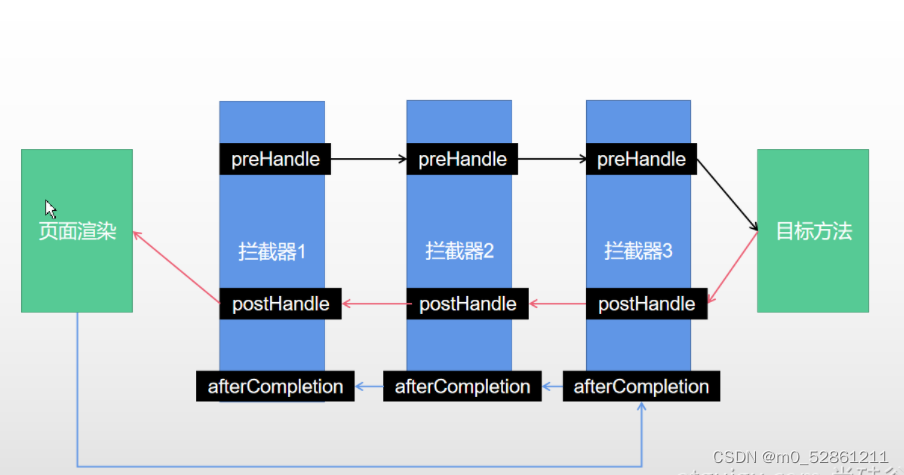
多个拦截器之间的拦截方法执行顺序
2.2.7 文件上传
1.避雷排坑
springBoot下ServletContext.getRealPath(“”)是内嵌tomcat的temp目录:

原因:
springBoot内部定义的COMMON_DOC_ROOTS目录是=={ “src/main/webapp”, “public”, “static” }==
在执行getRealPath的时候会在当前项目下挨个在这几个目录下匹配文件。如果匹配不到,那么就会在内嵌tomcat的temp目录下创建该路径。如果没有在项目下创建这几个目录的话,ServletContext.getRealPath(“”)获取的路径都是错的。
解决方案:
创建这三个目录其中之一,把文件放入其中即可
2.实现文件上传
- 前端代码如下
<form th:action="@{/upFiles}" method="post" enctype="multipart/form-data" >
    上传单个文件: <input type="file" name="singleFile"><br>
    上传多个文件: <input type="file" name="ManyFiles" multiple><br>
    提交: <input type="submit"><br>
</form>
注意点:
- 前端input组件multpie标签实现多文件上传(可以选中多个文件)
- 前端form表单的method必须是post
- form表单的enctype属性需要设置为**“multipart/form-data”**
-
后端代码如下
@ResponseBody //上传文件
@PostMapping(value = "/upFiles")
public String upFiles(@RequestPart("singleFile")MultipartFile multipartFile01,
                      @RequestPart("ManyFiles")MultipartFile[] multipartFiles,
                      HttpSession session) throws IOException {
    String originalFilename = multipartFile01.getOriginalFilename();
    //获取服务器中photo目录的路径
    String pics = "pics";
    File file = new File(pics);
    if(!file.exists()){
        file.mkdir();
    }
    String path = file.getAbsolutePath();
    System.out.println(path);
    String singlePath = path+File.separator+originalFilename;
    System.out.println(singlePath);
    multipartFile01.transferTo(new File(singlePath));
    for(MultipartFile multipartFile: multipartFiles){
        multipartFile.transferTo(new File(path+File.separator+multipartFile.getOriginalFilename()));
    }
    return "success";
}
注意:参考①避雷排坑,servletContext.getRealPath(" ")有风险
3.文件下载
实现代码:
   @ResponseBody  //下载文件
    @RequestMapping(value = "/downLoadFiles")
    public ResponseEntity<byte[]> downLoadFile(HttpSession session) throws IOException {
        ServletContext servletContext = session.getServletContext();
        String realPath = servletContext.getRealPath("/1.png");
        System.out.println(realPath);
        InputStream inputStream = Files.newInputStream(new File(realPath).toPath());
        byte[] bytes = new byte[inputStream.available()];
        inputStream.read(bytes);
        MultiValueMap<String,String> header = new HttpHeaders();
        String fileName = "1.png";
        header.add("Content-Disposition", "attachment;filename="+ fileName);
        HttpStatus httpStatus = HttpStatus.OK;
        ResponseEntity<byte[]> responseEntity = new ResponseEntity<>(bytes,header,httpStatus);
        inputStream.close();
        return responseEntity;
    }
4.**文件上传自动配置原理
文件上传自动配置类—MultipartAutoConfiguration—MultipartProperties
-
自动配置好了 StandardServletMultipartResolver 【文件上传解析器】
-
原理步骤:
-
- 1、请求进来使用文件上传解析器判断(isMultipart)并封装(resolveMultipart,返回MultipartHttpServletRequest)文件上传请求
- 2、参数解析器来解析请求中的文件内容封装成MultipartFile
- **3、将request中文件信息封装为一个Map;**MultiValueMap<String, MultipartFile>FileCopyUtils。实现文件流的拷贝
    @PostMapping("/upload")
    public String upload(@RequestParam("email") String email,
                         @RequestParam("username") String username,
                         @RequestPart("headerImg") MultipartFile headerImg,
                         @RequestPart("photos") MultipartFile[] photos)

- 携带文件流的request请求进来时,文件上传解析器判断是否携带文件Multipart,有则将请求进一步封装为MultipartHttpServletRequest文件上传请求。
- 在参数处理阶段,参数解析器将请求中携带的每一个Multipart文件类型封装为MultipartFile类型
- 将request中所有的MultipartFile类型的参数全部封装在一个Map之中,MultiValueMap<String, MultipartFile>FileCopyUtils。实现文件流的拷贝
2.2.8 异常处理
1.错误处理——默认规则
- 默认情况下,Spring Boot提供
/error处理所有错误的映射 - 对于机器客户端,它将生成JSON响应,其中包含错误,HTTP状态和异常消息的详细信息。对于浏览器客户端,响应一个“ whitelabel”错误视图,以HTML格式呈现相同的数据
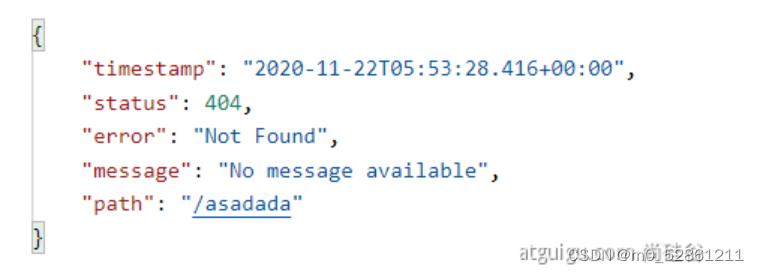
机器客户端响应错误信息
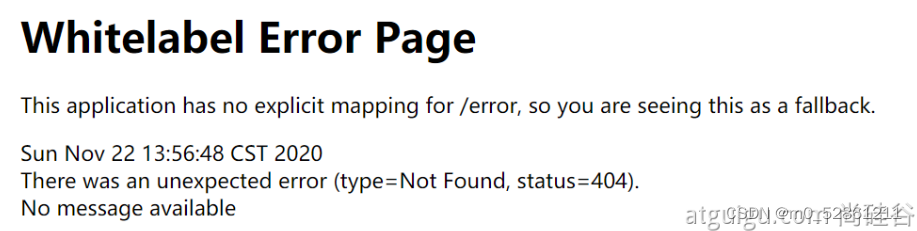
浏览器客户端响应错误信息
- 若要对默认错误规则进行自定义,可以添加view给视图解析器解析为error(在此处为template下的error)
- error/下的4xx,5xx页面会被自动解析;

- 要完全替换默认行为,可以实现
ErrorController并注册该类型的Bean定义,或添加ErrorAttributes类型的组件以使用现有机制但替换其内容。
2.错误处理——定制错误处理逻辑
-
自定义错误处理页面
- error/404.html error/5xx.html;有精确的错误状态码页面就匹配精确,没有就找 4xx.html;如果都没有就触发白页
-
@ControllerAdvice+@ExceptionHandler处理全局异常;底层是 ExceptionHandlerExceptionResolver 支持的
-
@ResponseStatus+自定义异常 ;底层是 ResponseStatusExceptionResolver ,把responsestatus注解的信息底层调用 response.sendError(statusCode, resolvedReason);tomcat发送的/error
-
Spring底层的异常,如 参数类型转换异常;DefaultHandlerExceptionResolver 处理框架底层的异常。
- response.sendError(HttpServletResponse.SC_BAD_REQUEST, ex.getMessage());

-
自定义实现 HandlerExceptionResolver 处理异常;可以作为默认的全局异常处理规则
-
ErrorViewResolver 实现自定义处理异常;
-
- response.sendError 。error请求就会转给controller
- 你的异常没有任何人能处理。tomcat底层 response.sendError。error请求就会转给controller
- basicErrorController 要去的页面地址是 ErrorViewResolver ;
3.异常处理自动配置原理
ErrorMvcAutoConfiguration 异常处理规则自动配置类
组件:
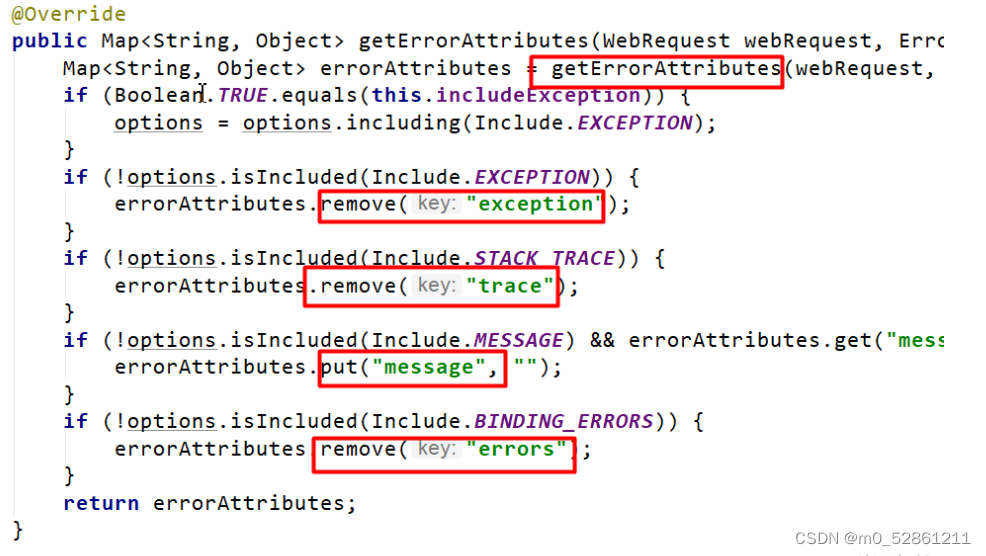
- DefaultErrorAttributes
定义错误页面内可以包含那些数据
-
BasicErrorController
(接收请求,返回错误页面),浏览器白页,机器客户端json页面
- 处理默认/error路径的请求,页面响应默认错误页(白页)
- 容器中放组件BeanViewResolver(beanName视图解析器);会按照返回的视图名称的id去容器中去寻找view对象
-
DefaultErrorViewResolver
- 如果发生错误,会以http的状态码作为视图地址(viewName),找到真正的页面
- /error/404.html、5xx.html
4.异常处理步骤流程
- 执行目标方法,目标方法运行期间有任何异常都会被catch、而且标志当前请求结束;并且用 dispatchException
- 进入视图解析流程(页面渲染)
processDispatchResult(processedRequest, response, mappedHandler, mv, dispatchException)
- mv = processHandlerException;处理handler发生的异常,处理完成返回ModelAndView;(在视图跳转/渲染阶段遇到了异常)
-
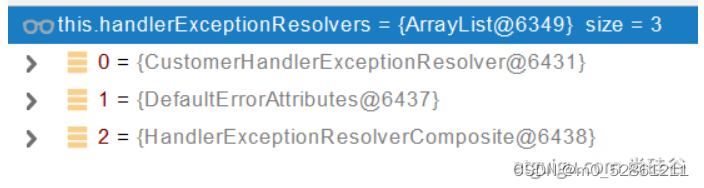
1.遍历所有的 handlerExceptionResolvers,看谁能处理当前异常【HandlerExceptionResolver处理器异常解析器】(没有的话就由默认异常解析器出手)

-
2.系统默认的 异常解析器

-
- 1、DefaultErrorAttributes先来处理异常。把异常信息保存到request域,并且返回null;(第一步,先保存异常信息)
- 2、解析被抛出的异常
-
-
-
1、如果没有任何人能处理最终底层就会发送 /error 请求。会被底层的BasicErrorController处理(返回 异常视图)
-
2、解析错误视图;遍历所有的 ErrorViewResolver 看谁能解析。
(在异常视图解析器内问问谁可以处理这个ErrorView)
[外链图片转存失败,源站可能有防盗链机制,建议将图片保存下来直接上传(img-Ti0rTvpP-1679301099474)(4-12.png)]
(如果都不行,那么就由默认异常视图解析器进行解析)
-
-
-
-
- 3、默认的 DefaultErrorViewResolver ,作用是把响应状态码作为错误页的地址,error/500.html
- 4、模板引擎最终响应这个页面 error/500.html
-
2.2.9 Web原生组件注入(servlet、Filter、Listener)
1.使用Servlet API
- 创建对应的组件类,添加Servlet原生组件注解(@WebServlet,@WebFilter,@WebListener)
- 在主程序类加上servlet组价扫描注解@ServletComponentScan(basePackages = “com”),指定扫描包路径
- 注意:web原生组件注入的Servlet是不会被Spring的拦截器拦截到的,是会直接响应的
- 创建对应的组件类Servlet
@WebServlet("/myServlet01")
public class servletTest01 extends HttpServlet{
    @Override
    protected void doGet(HttpServletRequest req, HttpServletResponse resp) throws ServletException, IOException {
        System.out.println("MyServlet01");
    }

    @Override
    protected void doPost(HttpServletRequest req, HttpServletResponse resp) throws ServletException, IOException {
        super.doPost(req, resp);
    }

    @Override
    public void service(ServletRequest req, ServletResponse res) throws ServletException, IOException {
        super.service(req, res);
    }
}
- 创建对应的组件类Filter
@Slf4j
@WebFilter(urlPatterns = "/myServlet01")
public class filter01 implements Filter {
    @Override
    public void init(FilterConfig filterConfig) throws ServletException {
        log.info("Filter开始初始化");
        Filter.super.init(filterConfig);
    }
    @Override
    public void doFilter(ServletRequest servletRequest, ServletResponse servletResponse, FilterChain filterChain) throws IOException, ServletException {
        log.info("开始执行Filter");
        filterChain.doFilter(servletRequest,servletResponse);
    }
    @Override
    public void destroy() {
        log.info("Filter开始销毁");
        Filter.super.destroy();
    }
}
- 创建对应的组件类listener
@Slf4j
@WebListener
public class listener implements ServletContextListener {
    @Override
    public void contextInitialized(ServletContextEvent sce) {
        log.info("监听器开始初始化");
        ServletContextListener.super.contextInitialized(sce);
    }

    @Override
    public void contextDestroyed(ServletContextEvent sce) {
        System.out.println("监听器开始销毁");
        ServletContextListener.super.contextDestroyed(sce);
    }
}
4.开启Servlet组件扫描
@ServletComponentScan(basePackages = "com")
5.开始执行测试即可
2.使用RegistrationBean(SpringBoot)
ServletRegistrationBean`, `FilterRegistrationBean`, and `ServletListenerRegistrationBean
使用以上三种RegistrationBean可以创建对应的组件(Servlet,Filter,Listener)
-
在一个配置类内部注入这几个RegistrationBean
-
在对应的RegistrationBean内注册组件即可
@Configuration(proxyBeanMethods = false) //开启单实例模式,减少资源的亢余
public class servletConfig {
    @Bean
    public ServletRegistrationBean servletRegistration(){
        servletTest01 servletTest01 = new servletTest01();
        return new ServletRegistrationBean(servletTest01,"/myServlet01");
    }
    @Bean
    public FilterRegistrationBean filterRegistrationBean(){
        filter01 filter01 = new filter01();
        FilterRegistrationBean<Filter> filterFilterRegistrationBean = new FilterRegistrationBean<>(filter01);
        filterFilterRegistrationBean.setUrlPatterns(Arrays.asList("/myServlet01"));
        return filterFilterRegistrationBean;
    }
    @Bean
    public ServletListenerRegistrationBean servletListenerRegistrationBean(){
        return new ServletListenerRegistrationBean(new listener01());
    }

}
3.DispatcherServlet是如何注册组件的&&为什么使用Servlet原生API不会被拦截器响应
扩展:DispatchServlet 如何注册进来
- 容器中自动配置了 DispatcherServlet 属性绑定到 WebMvcProperties;对应的配置文件配置项是 spring.mvc。
- 通过 ServletRegistrationBean 把 DispatcherServlet 配置进来。
- 默认映射的是 / 路径。
-
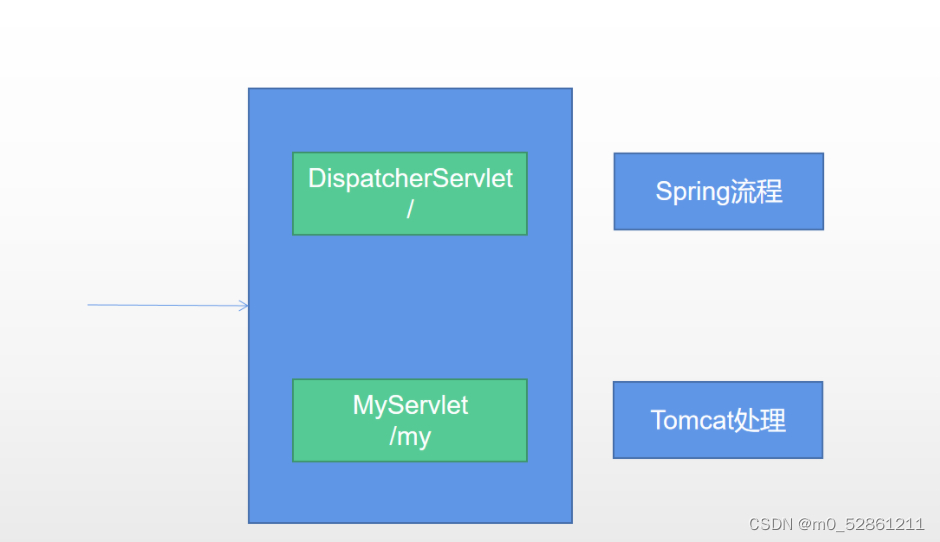
在使用原生Servlet的API的时候,是在DispatcherServlet之外添加了一个我们自定义的servlet,当请求到来的时候,
(服务器内有多个不同的Servlet)又由于请求的精确匹配原则,优先是由我们自定义的servlet来进行处理,
servlet又交由Tomcat处理==(Tomcat流程)==
-
使用RegistrationBean注册servlet的时候,是将servlet组件交由DispatcherServlet进行注册,DispatcherServlet会
安排一个路径映射给我们自定义的Servlet。(所以实际上整个服务器只有一个DispatcherServlet一个Servlet)当请求
到来的时候,只会交到DispatcherServlet进行处理,这个时候拦截器才会被起到作用==(spring流程)==
2.2.10 嵌入式Servlet容器
1.切换嵌入式Servlet容器
想要切换Servlet服务器,只需要排除当前Servlet服务器的依赖jar包,然后加入其他服务器的依赖jar包
<dependency>
    <groupId>org.springframework.boot</groupId>
    <artifactId>spring-boot-starter-web</artifactId>
    <exclusions>
        <exclusion>
            <groupId>org.springframework.boot</groupId>
            <artifactId>spring-boot-starter-tomcat</artifactId>
        </exclusion>
    </exclusions>
</dependency>
-
原理
-
- SpringBoot应用启动发现当前是Web应用。web场景包-导入tomcat
- web应用会创建一个web版的ioc容器
ServletWebServerApplicationContext ServletWebServerApplicationContext启动的时候寻找**ServletWebServerFactory**``(Servlet 的web服务器工厂---> Servlet 的web服务器)- SpringBoot底层默认有很多的WebServer工厂;
TomcatServletWebServerFactory,JettyServletWebServerFactory, orUndertowServletWebServerFactory 底层直接会有一个自动配置类。ServletWebServerFactoryAutoConfigurationServletWebServerFactoryAutoConfiguration导入了ServletWebServerFactoryConfiguration(配置类)ServletWebServerFactoryConfiguration 配置类 根据动态判断系统中到底导入了那个Web服务器的包。(默认是web-starter导入tomcat包),容器中就有 TomcatServletWebServerFactoryTomcatServletWebServerFactory 创建出Tomcat服务器并启动;TomcatWebServer 的构造器拥有初始化方法initialize---this.tomcat.start();内嵌服务器,就是手动把启动服务器的代码调用(tomcat核心jar包存在)
1. springBoot启动
2. 导入web配置
3.创建一个Web版的ioc容器
4.容器寻找特定的webServerFactoryBean
5.特定的webServerFactoryBean创建特定的webServer(web服务器)
ps:
在第三步骤之后,ServletWebServerFactoryAutoConfiguration(底层的ServletWebServerFactory自动配置类会读取配置类ServletWebServerFactoryConfiguration)判断当前web应用导入的是哪一个webServer的包,然后找关于这个webServer的webServerFactoryBean
2.定制Servlet容器
-
实现 WebServerFactoryCustomizer
-
- 把配置文件的值和
**ServletWebServerFactory 进行绑定**
- 把配置文件的值和
-
方法一:修改配置文件 server.xxx(服务器的配置属性都在server.servlet…)
-
方法二:直接自定义 ConfigurableServletWebServerFactory
xxxxxCustomizer:定制化器,可以改变xxxx的默认规则
import org.springframework.boot.web.server.WebServerFactoryCustomizer;
import org.springframework.boot.web.servlet.server.ConfigurableServletWebServerFactory;
import org.springframework.stereotype.Component;

@Component
public class CustomizationBean implements WebServerFactoryCustomizer<ConfigurableServletWebServerFactory> {

    @Override
    public void customize(ConfigurableServletWebServerFactory server) {
        server.setPort(9000);
    }
}
2.2.11 定制化的原理
1.定制化方式
- (易)修改配置文件
- (难)xxxxxCustomizer
- (难度中等)编写自定义的配置类 xxxConfiguration;+ @Bean替换、增加容器中默认组件;视图解析器
- (最推荐,最经常使用)Web应用 编写一个配置类实现 WebMvcConfigurer 即可定制化web功能;+ @Bean给容器中再扩展一些组件
@Configuration
public class AdminWebConfig implements WebMvcConfigurer
- (难度最大,风险最大)@EnableWebMvc + WebMvcConfigurer 弃用默认的配置,从头到尾自定义一个新的WebMvcConfigur
-
- 原理
- 1、WebMvcAutoConfiguration 默认的SpringMVC的自动配置功能类。静态资源、欢迎页…
- 2、一旦使用 @EnableWebMvc 、。会 @Import(DelegatingWebMvcConfiguration.class)
- 3、DelegatingWebMvcConfiguration 的 作用,只保证SpringMVC最基本的使用
-
-
-
把所有系统中的 WebMvcConfigurer 拿过来。所有功能的定制都是这些 WebMvcConfigurer 合起来一起生效
-
自动配置了一些非常底层的组件。RequestMappingHandlerMapping、这些组件依赖的组件都是从容器中获取
-
public class DelegatingWebMvcConfiguration extends WebMvcConfigurationSupport
(WebMvcAutoConfiguration 里面的配置要能生效 必须没有WebMvcConfigurationSupport.class,如果存在该类的话,那么webMvc的默认配置都不会自动加载!)
-
-
-
- 4、WebMvcAutoConfiguration 里面的配置要能生效 必须 @ConditionalOnMissingBean(WebMvcConfigurationSupport.class)
- 5、@EnableWebMvc 导致了 WebMvcAutoConfiguration 没有生效。
2.定制化模板
场景starter - xxxxAutoConfiguration - 导入xxx组件 - 绑定xxxProperties –绑定配置文件项
作为使用者,我们只要关注引入场景starter和绑定配置文件项即可
2.3 数据访问
2.3.1 SQL
1.数据源的自动配置-HikariDataSource
-
导入JDBC场景依赖
        <dependency>
            <groupId>org.springframework.boot</groupId>
            <artifactId>spring-boot-starter-data-jdbc</artifactId>
        </dependency>
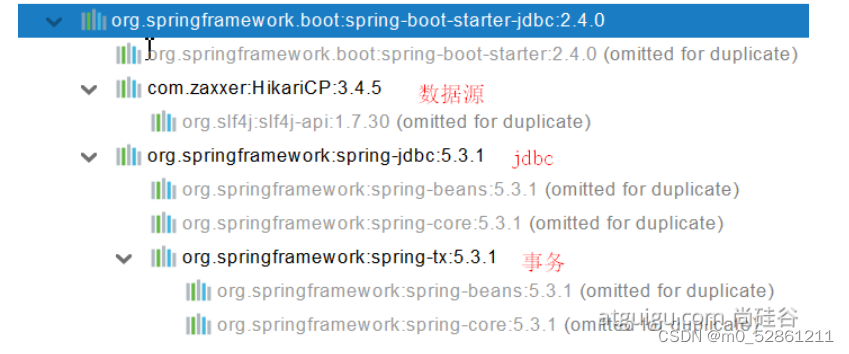
认真看,少了一个数据库连接驱动,为什么导入JDBC场景,官方不导入驱动?官方不知道我们接下要操作什么数据库。
- 修改默认mysql数据库驱动版本(默认版本是8.0以上)(若安装的mysql数据库版本是8.0以上即无需修改版本)
默认版本:<mysql.version>8.0.22</mysql.version>

        <dependency>
            <groupId>mysql</groupId>
            <artifactId>mysql-connector-java</artifactId>
<!--            <version>5.1.49</version>-->
        </dependency>
想要修改版本
1、直接依赖引入具体版本(maven的就近依赖原则)
2、重新声明版本(maven的属性的就近优先原则)(设置全局版本)
    <properties>
        <java.version>1.8</java.version>
        <mysql.version>5.1.49</mysql.version>
    </properties>
2.分析datasource自动配置
自动配置的类
-
DataSourceAutoConfiguration : 数据源的自动配置
-
- 修改数据源相关的配置:spring.datasource
- 数据库连接池的配置,是自己容器中没有DataSource才自动配置的
- 底层配置好的连接池是:HikariDataSource
	@Configuration(proxyBeanMethods = false)
	@Conditional(PooledDataSourceCondition.class)
	@ConditionalOnMissingBean({ DataSource.class, XADataSource.class })
	@Import({ DataSourceConfiguration.Hikari.class, DataSourceConfiguration.Tomcat.class,
			DataSourceConfiguration.Dbcp2.class, DataSourceConfiguration.OracleUcp.class,
			DataSourceConfiguration.Generic.class, DataSourceJmxConfiguration.class })
	protected static class PooledDataSourceConfiguration
-
DataSourceTransactionManagerAutoConfiguration: 事务管理器的自动配置
-
JdbcTemplateAutoConfiguration: JdbcTemplate的自动配置,可以来对数据库进行crud
-
- 可以修改这个配置项@ConfigurationProperties(prefix = “spring.jdbc”) 来修改JdbcTemplate
- @Bean@Primary JdbcTemplate;容器中有这个组件
-
JndiDataSourceAutoConfiguration: jndi的自动配置
-
XADataSourceAutoConfiguration: 分布式事务相关的
3.配置dataSource
  datasource:
    url: jdbc:mysql://localhost:3306/bookdb?serverTimezone=UTC
    username: root
    password: "123456"
    driver-class-name: com.mysql.cj.jdbc.Driver
4.使用第三方Druid数据源
-
Druid官方文档
-
使用Druid的方式
- 使用自定义配置(不推荐,想看的自己去看尚硅谷笔记和Druid官方文档)
- 使用Druid的starter场景依赖
-
使用Druid
-
导入Druid的starter场景
<dependency> <groupId>com.alibaba</groupId> <artifactId>druid-spring-boot-starter</artifactId> <version>1.1.17</version> </dependency> -
配置示例
spring:
  datasource:
    url: jdbc:mysql://localhost:3306/bookdb?serverTimezone=UTC
    username: root
    password: 123456
    driver-class-name: com.mysql.cj.jdbc.Driver

    druid:
      aop-patterns: com.atguigu.admin.*  #监控SpringBean
      filters: stat,wall     # 底层开启功能,stat(sql监控),wall(防火墙)

      stat-view-servlet:   # 配置监控页功能
        enabled: true
        login-username: admin
        login-password: admin
        resetEnable: false

      web-stat-filter:  # 监控web
        enabled: true
        urlPattern: /*
        exclusions: '*.js,*.gif,*.jpg,*.png,*.css,*.ico,/druid/*'


      filter:
        stat:    # 对上面filters里面的stat的详细配置
          slow-sql-millis: 1000
          logSlowSql: true
          enabled: true
        wall:
          enabled: true
          config:
            drop-table-allow: false
5.**整合使用MyBatis操作
0.前置准备
- MyBatis在GitHub上面的项目地址
https://github.com/mybatis
- 配置MyBatis的starter
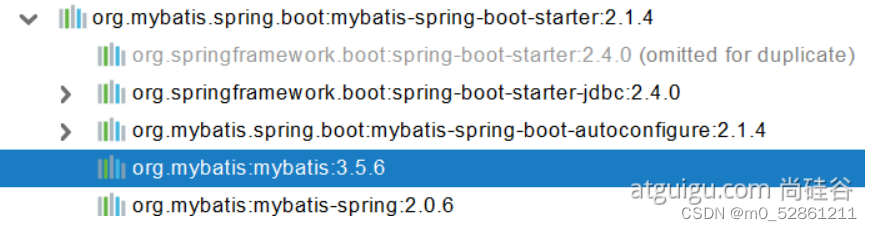
        <dependency>
            <groupId>org.mybatis.spring.boot</groupId>
            <artifactId>mybatis-spring-boot-starter</artifactId>
            <version>2.1.4</version>
        </dependency>
1.纯配置文件 使用MyBatis
可以自己创建一个MyBatis-config.xml 在里面配置MyBatis相关的配置(不推荐)
# 配置mybatis规则
mybatis:
  config-location: classpath:mybatis/mybatis-config.xml  #全局配置文件位置
  mapper-locations: classpath:mybatis/mapper/*.xml  #sql映射文件位置

Mapper接口--->绑定Xml
<?xml version="1.0" encoding="UTF-8" ?>
<!DOCTYPE mapper
        PUBLIC "-//mybatis.org//DTD Mapper 3.0//EN"
        "http://mybatis.org/dtd/mybatis-3-mapper.dtd">
<mapper namespace="com.atguigu.admin.mapper.AccountMapper">
<!--    public Account getAcct(Long id); -->
    <select id="getAcct" resultType="com.atguigu.admin.bean.Account">
        select * from  account_tbl where  id=#{id}
    </select>
</mapper>
配置 private Configuration configuration;
mybatis.configuration下面的所有,就是相当于改mybatis全局配置文件中的值
(推荐)在导入MyBatis的starter后,springBoot在启动的时候就会配置好MyBatis的默认配置,在yaml文件内配置一些关键配置即可
# 配置mybatis规则
mybatis:
#  config-location: classpath:mybatis/mybatis-config.xml
  mapper-locations: classpath:mybatis/mapper/*.xml # 指定XXXmapper.xml的扫描路径
  configuration:
    map-underscore-to-camel-case: true	# 开启数据库字段驼峰转换配置

 可以不写全局;配置文件,所有全局配置文件的配置都放在configuration配置项中即可
springBoot下的简化(变化):
- 全局配置文件
- SqlSessionFactory: 自动配置好了
- SqlSession:自动配置了 SqlSessionTemplate 组合了SqlSession
- @Import(AutoConfiguredMapperScannerRegistrar.class);
- Mapper: 只要我们写的操作MyBatis的接口标准了 @Mapper 就会被自动扫描进来
(或者在主程序类加上了注解@MapperScan指明mapper接口扫描的包路径)
怎么开始使用:
- 导入mybatis官方starter
- 编写mapper接口。标准@Mapper注解
- 编写sql映射文件并绑定mapper接口
- 在application.yaml中指定Mapper配置文件的位置,以及指定全局配置文件的信息 (可以不写,直接用默认的,修改配置直接在yaml内就行)
2.纯注解模式操作(开发比较少用到,但是学下也不错)
只适用于比较简单的SQL语句,复杂的SQL还是使用xml配置文件比较好
不写xxxMapper.xml配置文件,一些sql执行语句全部在Mapper接口文件的方法上加入对应注解来实现
@Select(“xxxxxxxxx”)
@delete(“xxxxxxxxx”)
@insert(“xxxxxxxxx”)
3.混合模式操作(配置文件方式+注解方式 混合使用)
- 直接在yml配置MyBatis相关的配置,不写全局配置文件
- 在resource下创建mapper文件存放对应的XXXMapper.xml文件
- 在指定目录下创建mapper接口文件(接口文件需要加上注解@Mapper让MyBatis扫描识别到)
- 对于比较简单的SQL语句,可以使用注解模式来操作,但是在比较复杂的SQL语句就使用xml文件配置
4.整合MyBatis-plus实现简单的CRUD
略
2.3.2 NOSQL
1.redis配置
        <dependency>
            <groupId>org.springframework.boot</groupId>
            <artifactId>spring-boot-starter-data-redis</artifactId>
        </dependency>
自动配置:
- RedisAutoConfiguration 自动配置类。RedisProperties 属性类 --> spring.redis.xxx是对redis的配置
- 连接工厂是准备好的。LettuceConnectionConfiguration、JedisConnectionConfiguration
- 自动注入了RedisTemplate<Object, Object> : xxxTemplate;
- 自动注入了StringRedisTemplate;k:v都是String
- key:value
- 底层只要我们使用 StringRedisTemplate、RedisTemplate就可以操作redis
redis环境搭建
1、阿里云按量付费redis。经典网络
2、申请redis的公网连接地址
3、修改白名单 允许0.0.0.0/0 访问
2.4 单元测试
2.4.1 JUnit5的变化
Spring Boot 2.2.0 版本开始引入 JUnit 5 作为单元测试默认库
作为最新版本的JUnit框架,JUnit5与之前版本的Junit框架有很大的不同。由三个不同子项目的几个不同模块组成。
JUnit 5 = JUnit Platform + JUnit Jupiter + JUnit Vintage
JUnit Platform: Junit Platform是在JVM上启动测试框架的基础,不仅支持Junit自制的测试引擎,其他测试引擎也都可以接入。
JUnit Jupiter: JUnit Jupiter提供了JUnit5的新的编程模型,是JUnit5新特性的核心。内部 包含了一个测试引擎,用于在Junit Platform上运行。
JUnit Vintage: 由于JUint已经发展多年,为了照顾老的项目,JUnit Vintage提供了兼容JUnit4.x,Junit3.x的测试引擎。

注意:
SpringBoot 2.4 以上版本移除了默认对 Vintage 的依赖。如果需要兼容junit4需要自行引入(不能使用junit4的功能 @Test**)**
JUnit 5’s Vintage Engine Removed from **spring-boot-starter-test,如果需要继续兼容junit4需要自行引入vintage**
<dependency>
  <groupId>org.springframework.boot</groupId>
  <artifactId>spring-boot-starter-test</artifactId>
  <scope>test</scope>
</dependency>
2.4.2 JUntil5常用注解
- **@Test 😗*表示方法是测试方法。但是与JUnit4的@Test不同,他的职责非常单一不能声明任何属性,拓展的测试将会由Jupiter提供额外测试
- **@ParameterizedTest 😗*表示方法是参数化测试,下方会有详细介绍
- **@RepeatedTest 😗*表示方法可重复执行,下方会有详细介绍
- **@DisplayName 😗*为测试类或者测试方法设置展示名称
- **@BeforeEach 😗*表示在每个单元测试之前执行
- **@AfterEach 😗*表示在每个单元测试之后执行
- **@BeforeAll 😗*表示在所有单元测试之前执行
- **@AfterAll 😗*表示在所有单元测试之后执行
- **@Tag 😗*表示单元测试类别,类似于JUnit4中的@Categories
- **@Disabled 😗*表示测试类或测试方法不执行,类似于JUnit4中的@Ignore
- **@Timeout 😗*表示测试方法运行如果超过了指定时间将会返回错误
- **@ExtendWith 😗*为测试类或测试方法提供扩展类引用
import org.junit.jupiter.api.Test; //注意这里使用的是jupiter的Test注解!!


public class TestDemo {

  @Test
  @DisplayName("第一次测试")
  public void firstTest() {
      System.out.println("hello world");
  }
2.4.3 断言(assertions)
断言(assertions)是测试方法中的核心部分,用来对测试需要满足的条件进行验证。这些断言方法都是 org.junit.jupiter.api.Assertions 的静态方法。JUnit 5 内置的断言可以分成如下几个类别:
检查业务逻辑返回的数据是否合理。
所有的测试运行结束以后,会有一个详细的测试报告;
1.简单断言
| 方法 | 说明 |
|---|---|
| assertEquals | 判断两个对象或两个原始类型是否相等 |
| assertNotEquals | 判断两个对象或两个原始类型是否不相等 |
| assertSame | 判断两个对象引用是否指向同一个对象 |
| assertNotSame | 判断两个对象引用是否指向不同的对象 |
| assertTrue | 判断给定的布尔值是否为 true |
| assertFalse | 判断给定的布尔值是否为 false |
| assertNull | 判断给定的对象引用是否为 null |
| assertNotNull | 判断给定的对象引用是否不为 null |
@Test
@DisplayName("simple assertion")
public void simple() {
     assertEquals(3, 1 + 2, "simple math");
     assertNotEquals(3, 1 + 1);

     assertNotSame(new Object(), new Object());
     Object obj = new Object();
     assertSame(obj, obj);

     assertFalse(1 > 2);
     assertTrue(1 < 2);

     assertNull(null);
     assertNotNull(new Object());
}
2.数组断言
判断两个数组是否相等
@Test
@DisplayName("array assertion")
public void array() {
 assertArrayEquals(new int[]{1, 2}, new int[] {1, 2});
}
3.组合断言
支持Lambda形式的函数接口
只有当组合断言内部全部断言都通过的时候断言才被通过
@Test
@DisplayName("assert all")
public void all() {
 assertAll("Math",
    () -> assertEquals(2, 1 + 1),
    () -> assertTrue(1 > 0)
 );
}
4.异常断言
断定被断言业务代码一定会抛出异常,没有抛出异常那么就是有问题的
@Test
@DisplayName("异常测试")
public void exceptionTest() {
    // 断定一定会抛出异常 没有抛出异常那么就会抛出断言的异常
    ArithmeticException exception = Assertions.assertThrows(
           //扔出断言异常
            ArithmeticException.class, () -> System.out.println(1 % 0));

}
5.超时断言
断定该业务代码一定在我规定的时间内运行 超出预期时间的话 那么就会抛出断言异常
@Test
@DisplayName("超时测试")
public void timeoutTest() {
    //如果测试方法时间超过1s将会异常
    Assertions.assertTimeout(Duration.ofMillis(1000), () -> Thread.sleep(500));
}
6.快速失败
自己手动抛出断言失败
@Test
@DisplayName("fail")
public void shouldFail() {
 fail("This should fail");
}
2.4.4 前置条件(assumptions)
JUnit 5 中的前置条件(assumptions【假设】)类似于断言,不同之处在于不满足的断言会使得测试方法失败,而不满足的前置条件只会使得测试方法的执行终止。前置条件可以看成是测试方法执行的前提,当该前提不满足时,就没有继续执行的必要
前置条件不满足的情况下,该测试方法会划分到skip下,而不是error
@DisplayName("前置条件")
public class AssumptionsTest {
 private final String environment = "DEV";

 @Test
 @DisplayName("simple")
 public void simpleAssume() {
    Assumptions.assumeTrue(Objects.equals(this.environment, "DEV"));
    Assumptions.assumeFalse(() -> Objects.equals(this.environment, "PROD"));
 }

 @Test
 @DisplayName("assume then do")
 public void assumeThenDo() {
    Assumptions.assumingThat(
       Objects.equals(this.environment, "DEV"),
       () -> System.out.println("In DEV")
    );
 }
}
assumeTrue 和 assumFalse 确保给定的条件为 true 或 false,不满足条件会使得测试执行终止。assumingThat 的参数是表示条件的布尔值和对应的 Executable 接口的实现对象。只有条件满足时,Executable 对象才会被执行;当条件不满足时,测试执行并不会终止。
2.4.5 嵌套测试
JUnit 5 可以通过 Java 中的内部类和@Nested 注解实现嵌套测试,从而可以更好的把相关的测试方法组织在一起。在内部类中可以使用@BeforeEach 和@AfterEach 注解,而且嵌套的层次没有限制。
@DisplayName("A stack")
class TestingAStackDemo {
    Stack<Object> stack;
    @Test
    @DisplayName("is instantiated with new Stack()")
    void isInstantiatedWithNew() {
        // 在嵌套测试的情况下,外层的断言是无法调用内层的beforeAll/Each等提前/之后的测试方法
        new Stack<>();
    }
    @Nested
    @DisplayName("when new")
    class WhenNew {
        @BeforeEach
        void createNewStack() {
            stack = new Stack<>();
        }
        @Test
        @DisplayName("is empty")
        // 内层的测试方法可以驱动外层的测试方法
        void isEmpty() {
            assertTrue(stack.isEmpty());
        }
        @Test
        @DisplayName("throws EmptyStackException when popped")
        void throwsExceptionWhenPopped() {
            assertThrows(EmptyStackException.class, stack::pop);
        }
        @Test
        @DisplayName("throws EmptyStackException when peeked")
        void throwsExceptionWhenPeeked() {
            assertThrows(EmptyStackException.class, stack::peek);
        }
        @Nested
        @DisplayName("after pushing an element")
        class AfterPushing {
            String anElement = "an element";
            @BeforeEach
            void pushAnElement() {
                stack.push(anElement);
            }
            @Test
            @DisplayName("it is no longer empty")
            void isNotEmpty() {
                assertFalse(stack.isEmpty());
            }
            @Test
            @DisplayName("returns the element when popped and is empty")
            void returnElementWhenPopped() {
                assertEquals(anElement, stack.pop());
                assertTrue(stack.isEmpty());
            }
            @Test
            @DisplayName("returns the element when peeked but remains not empty")
            void returnElementWhenPeeked() {
                assertEquals(anElement, stack.peek());
                assertFalse(stack.isEmpty());
            }
        }
    }
}
2.4.6 参数化测试
参数化测试是JUnit5很重要的一个新特性,它使得用不同的参数多次运行测试成为了可能,也为我们的单元测试带来许多便利。
利用**@ValueSource**等注解,指定入参,我们将可以使用不同的参数进行多次单元测试,而不需要每新增一个参数就新增一个单元测试,省去了很多冗余代码。
@ValueSource: 为参数化测试指定入参来源,支持八大基础类以及String类型,Class类型
@NullSource: 表示为参数化测试提供一个null的入参
@EnumSource: 表示为参数化测试提供一个枚举入参
@CsvFileSource:表示读取指定CSV文件内容作为参数化测试入参
@MethodSource:表示读取指定方法的返回值作为参数化测试入参(注意方法返回需要是一个流)
当然如果参数化测试仅仅只能做到指定普通的入参还达不到让我觉得惊艳的地步。让我真正感到他的强大之处的地方在于他可以支持外部的各类入参。如:CSV,YML,JSON 文件甚至方法的返回值也可以作为入参。只需要去实现ArgumentsProvider接口,任何外部文件都可以作为它的入参。
@ParameterizedTest
@ValueSource(strings = {"one", "two", "three"})
@DisplayName("参数化测试1")
public void parameterizedTest1(String string) {
    System.out.println(string);
    Assertions.assertTrue(StringUtils.isNotBlank(string));
}


@ParameterizedTest
@MethodSource("method")    //指定方法名
@DisplayName("方法来源参数")
public void testWithExplicitLocalMethodSource(String name) {
    System.out.println(name);
    Assertions.assertNotNull(name);
}

static Stream<String> method() {
    return Stream.of("apple", "banana");
}
2.5 指标监控

2.5.1 SpringBoot Actuator
1.简介
未来每一个微服务在云上部署以后,我们都需要对其进行监控、追踪、审计、控制等。SpringBoot就抽取了Actuator场景,使得我们每个微服务快速引用即可获得生产级别的应用监控、审计等功能。
2.依赖引入
        <dependency>
            <groupId>org.springframework.boot</groupId>
            <artifactId>spring-boot-starter-actuator</artifactId>
        </dependency>
3.版本变化
![[外链图片转存失败,源站可能有防盗链机制,建议将图片保存下来直接上传(img-s3rV38DU-1679301099476)(image-20230318140008292.png)]](https://img-blog.csdnimg.cn/1e07c5f48671436787625af04a0c7494.png)
4.在配置文件内的配置
# 注意: management.endpoint.端点名.xxx 配置具体某个端点的信息
management:
  endpoints:
    enabled-by-default: true #暴露所有端点信息
    web:
      exposure:
        include: '*'  #以web方式暴露
5.测试实例
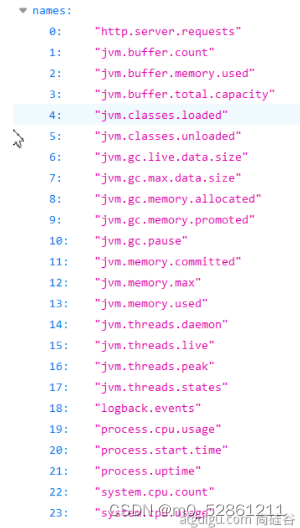
http://localhost:8080/actuator/beans
http://localhost:8080/actuator/configprops
http://localhost:8080/actuator/metrics 最常用,在metrics后加上对应的指标就可以监控对应的指标了
http://localhost:8080/actuator/metrics/jvm.gc.pause
http://localhost:8080/actuator/endpointName/detailPath
2.5.2 Actuator Endpoint
1. 最常使用的端点
| ID | 描述 |
|---|---|
auditevents | 暴露当前应用程序的审核事件信息。需要一个AuditEventRepository组件。 |
beans | 显示应用程序中所有Spring Bean的完整列表。 |
caches | 暴露可用的缓存。 |
conditions | 显示自动配置的所有条件信息,包括匹配或不匹配的原因。 |
configprops | 显示所有@ConfigurationProperties。 |
env | 暴露Spring的属性ConfigurableEnvironment |
flyway | 显示已应用的所有Flyway数据库迁移。 需要一个或多个Flyway组件。 |
health | 显示应用程序运行状况信息。 |
httptrace | 显示HTTP跟踪信息(默认情况下,最近100个HTTP请求-响应)。需要一个HttpTraceRepository组件。 |
info | 显示应用程序信息。 |
integrationgraph | 显示Spring integrationgraph 。需要依赖spring-integration-core。 |
loggers | 显示和修改应用程序中日志的配置。 |
liquibase | 显示已应用的所有Liquibase数据库迁移。需要一个或多个Liquibase组件。 |
metrics | 显示当前应用程序的“指标”信息。 |
mappings | 显示所有@RequestMapping路径列表。 |
scheduledtasks | 显示应用程序中的计划任务。 |
sessions | 允许从Spring Session支持的会话存储中检索和删除用户会话。需要使用Spring Session的基于Servlet的Web应用程序。 |
shutdown | 使应用程序正常关闭。默认禁用。 |
startup | 显示由ApplicationStartup收集的启动步骤数据。需要使用SpringApplication进行配置BufferingApplicationStartup。 |
threaddump | 执行线程转储。 |
如果您的应用程序是Web应用程序(Spring MVC,Spring WebFlux或Jersey),则可以使用以下附加端点:
| ID | 描述 |
|---|---|
heapdump | 返回hprof堆转储文件。 |
jolokia | 通过HTTP暴露JMX bean(需要引入Jolokia,不适用于WebFlux)。需要引入依赖jolokia-core。 |
logfile | 返回日志文件的内容(如果已设置logging.file.name或logging.file.path属性)。支持使用HTTPRange标头来检索部分日志文件的内容。 |
prometheus | 以Prometheus服务器可以抓取的格式公开指标。需要依赖micrometer-registry-prometheus。 |
最常用的Endpoint(端点名字)
- Health:监控状况
- Metrics:运行时指标
- Loggers:日志记录
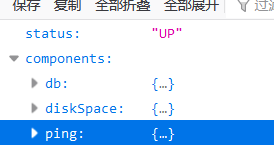
2.Health Endpoint
所有组件全部健康才会返回健康信息
健康检查端点,我们一般用于在云平台,平台会定时的检查应用的健康状况,我们就需要Health Endpoint可以为平台返回当前应用的一系列组件健康状况的集合。
重要的几点:
- health endpoint返回的结果,应该是一系列健康检查后的一个汇总报告
- 很多的健康检查默认已经自动配置好了,比如:数据库、redis等
- 可以很容易的添加自定义的健康检查机制
3.Metrics Endpoint
提供详细的、层级的、空间指标信息,这些信息可以被pull(主动推送)或者push(被动获取)方式得到;
1、开启与禁用Endpoints
- 默认所有的Endpoint除过shutdown都是开启的。
- 需要开启或者禁用某个Endpoint。配置模式为 management.endpoint..enabled = true
management:
  endpoints:
    enabled-by-default: false # 关闭全部监控
  endpoint: # 挨个开启监控
    beans:
      enabled: true
    health:
      enabled: true
禁用所有的Endpoint然后手动开启指定的Endpoint
2、暴露Endpoints
支持的暴露方式
- HTTP:默认只暴露health和info Endpoint
- JMX:默认暴露所有Endpoint
- 除过health和info,剩下的Endpoint都应该进行保护访问。如果引入SpringSecurity,则会默认配置安全访问规则
| ID | JMX | Web |
|---|---|---|
auditevents | Yes | No |
beans | Yes | No |
caches | Yes | No |
conditions | Yes | No |
configprops | Yes | No |
env | Yes | No |
flyway | Yes | No |
health | Yes | Yes |
heapdump | N/A | No |
httptrace | Yes | No |
info | Yes | Yes |
integrationgraph | Yes | No |
jolokia | N/A | No |
logfile | N/A | No |
loggers | Yes | No |
liquibase | Yes | No |
metrics | Yes | No |
mappings | Yes | No |
prometheus | N/A | No |
scheduledtasks | Yes | No |
sessions | Yes | No |
shutdown | Yes | No |
startup | Yes | No |
threaddump | Yes | No |
2.5.3 定制EndPoint(端点)
1.定制Health信息
向health加入自定义组件的方法
@Component
public class MyComHealthIndicator extends AbstractHealthIndicator {

    /**
     * 真实的检查方法
     * @param builder
     * @throws Exception
     */
    @Override
    protected void doHealthCheck(Health.Builder builder) throws Exception {
        //mongodb。  获取连接进行测试
        Map<String,Object> map = new HashMap<>();
        // 检查完成
        if(1 == 2){
//            builder.up(); //健康
            builder.status(Status.UP);
            map.put("count",1);
            map.put("ms",100);
        }else {
//            builder.down();
            builder.status(Status.OUT_OF_SERVICE);
            map.put("err","连接超时");
            map.put("ms",3000);
        }


        builder.withDetail("code",100)
                .withDetails(map);
    }
}
在配置文件内配置
management:
    health:
      enabled: true
      show-details: always #总是显示详细信息。可显示每个模块的状态信息
2.定制info信息
常用两种方式
- 方式一: 在配置文件内修改
info:
  appName: boot-admin
  version: 2.0.1
  mavenProjectName: @project.artifactId@  #使用@@可以获取maven的pom文件值
  mavenProjectVersion: @project.version@
- 方式二: 编写InfoContributor
自定义一个类 实现InfoContributor接口, 实现contribute方法
import java.util.Collections;

import org.springframework.boot.actuate.info.Info;
import org.springframework.boot.actuate.info.InfoContributor;
import org.springframework.stereotype.Component;

@Component
public class ExampleInfoContributor implements InfoContributor {

    @Override
    public void contribute(Info.Builder builder) {
        builder.withDetail("example",
                Collections.singletonMap("key", "value"));
    }

}
3.定制Metrics信息
class MyService{
    Counter counter;
    public MyService(MeterRegistry meterRegistry){
         counter = meterRegistry.counter("myservice.method.running.counter");
    }

    public void hello() {
        counter.increment();
    }
}


//也可以使用下面的方式
@Bean
MeterBinder queueSize(Queue queue) {
    return (registry) -> Gauge.builder("queueSize", queue::size).register(registry);
}
4.定制EndPoint
@EndPoint(id= “”)将该类标识为一个端点
@Component 将该类加入到容器当中
每个端点类必须实现一个读方法和一个写方法
@ReadOperation 标识该方法为读方法
@WriteOperation 标识该方法为写方法
@Component
@Endpoint(id = "container")
public class DockerEndpoint {


    @ReadOperation
    public Map getDockerInfo(){
        return Collections.singletonMap("info","docker started...");
    }

    @WriteOperation
    private void restartDocker(){
        System.out.println("docker restarted....");
    }

}
2.6 高级特性&&原理解析
2.6.1 profile原理解析
1、Profile功能
为了方便多环境适配,springboot简化了profile功能。
1、application-profile功能
- 默认配置文件 application.yaml;任何时候都会加载
- 指定环境配置文件 application-{env}.yaml
![[外链图片转存失败,源站可能有防盗链机制,建议将图片保存下来直接上传(img-1WJQXDma-1679301099477)(image-20230318194816279.png)]](https://img-blog.csdnimg.cn/94ec52746178491a9b7dd31e32fe3a88.png)
-
激活指定环境
-
- 配置文件激活
- 命令行激活:java -jar xxx.jar –spring.profiles.active=prod --person.name=haha
-
-
- 修改配置文件的任意值,命令行优先
-
-
默认配置与环境配置同时生效
-
同名配置项,profile配置优先
2、@Profile条件装配功能
@Configuration(proxyBeanMethods = false)
@Profile("production")
public class ProductionConfiguration {

    // ...

}
![[外链图片转存失败,源站可能有防盗链机制,建议将图片保存下来直接上传(img-r9cZ2mvI-1679301099477)(image-20230318195424791.png)]](https://img-blog.csdnimg.cn/28ffb27a750c49019d32427952a8cf2f.png)
该图表示只有当项目配置yaml为test的情况下才生效
==@ConfigurationProperties(“person”)==的配置内容
注意: @profile不仅可以标识在类上 还可以标识在方法上面
3、profile分组
spring.profiles.group.production[0]=proddb
spring.profiles.group.production[1]=prodmq

使用:--spring.profiles.active=production  激活
2.6.2 外部化配置
读取外部文件作为自己的配置文件
常用:Java属性文件、YAML文件、环境变量、命令行参数;
1、配置文件查找位置
同名配置的优先级是上一级覆盖下一级
(1) classpath 根路径 (resouece下)
(2) classpath 根路径下config目录 (resouece下)
(3) jar包当前目录,(当前项目下,Java下)
(4) jar包当前目录的config目录 (当前项目下,Java下)
(5) /config子目录的直接子目录 (Linux下)
2、配置文件加载顺序:
- 当前jar包内部的application.properties和application.yml
- 当前jar包内部的application-{profile}.properties 和 application-{profile}.yml
- 引用的外部jar包的application.properties和application.yml
- 引用的外部jar包的application-{profile}.properties 和 application-{profile}.yml
3、 指定环境优先,外部优先,后面的可以覆盖前面的同名配置项
2.6.3 自定义starter
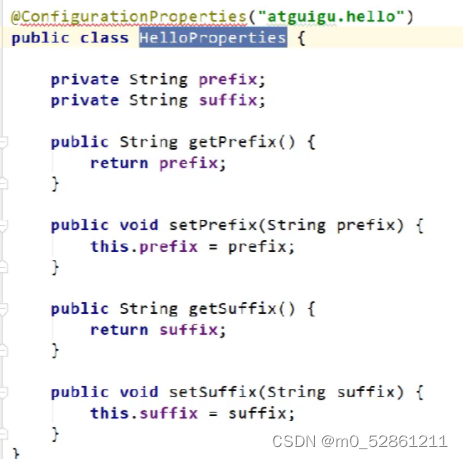
1、自定义一个启动类 读取helloProperties类内的属性
![[外链图片转存失败,源站可能有防盗链机制,建议将图片保存下来直接上传(img-40ypsOFw-1679301099478)(image-20230318203445649.png)]](https://img-blog.csdnimg.cn/04025c4667f34e3a84b1e5e8e6648b80.png)
2、 helloProperties类的属性设置为读取配置文件内的属性
所以可以在配置文件内部修改
3、自定义一个自动配置类
![[外链图片转存失败,源站可能有防盗链机制,建议将图片保存下来直接上传(img-7ZZWY1yb-1679301099478)(image-20230318203944658.png)]](https://img-blog.csdnimg.cn/d05f8e929b9b4b6684ed77b55ea4bc61.png)
将该项目(整个项目)使用Maven打包安装到本地Maven仓库之中 然后在其他项目之中引入该jar包的Maven坐标地址即可启动该starter
4、在resource下创建META-INF文件夹创建spring.factories
然后在该文件内部写下想要自动加载的自动类路径
![[外链图片转存失败,源站可能有防盗链机制,建议将图片保存下来直接上传(img-u2VLinha-1679301099478)(image-20230318205032322.png)]](https://img-blog.csdnimg.cn/0508cbe51f904c1fb3c07cb48123ee13.png)
2.6.4 springBoot启动原理&&过程

-
创建 SpringApplication
-
- 保存一些信息。
- 判定当前应用的类型。ClassUtils。Servlet
- bootstrappers**:初始启动引导器(List):去spring.factories文件中找** org.springframework.boot.Bootstrapper
- 找 ApplicationContextInitializer;去spring.factories****找 ApplicationContextInitializer
-
-
- List<ApplicationContextInitializer<?>> initializers
-
-
- 找 ApplicationListener ;应用监听器。去spring.factories找 ApplicationListener
-
-
- List<ApplicationListener<?>> listeners
-
-
运行 SpringApplication
-
- StopWatch
- 记录应用的启动时间
- 创建引导上下文(Context环境)createBootstrapContext()
-
-
- 获取到所有之前的 bootstrappers 挨个执行 intitialize() 来完成对引导启动器上下文环境设置
-
-
- 让当前应用进入headless模式。java.awt.headless
- 获取所有 RunListener(运行监听器)【为了方便所有Listener进行事件感知】
-
-
- getSpringFactoriesInstances 去spring.factories找 SpringApplicationRunListener.
-
-
- 遍历 SpringApplicationRunListener 调用 starting 方法;
-
-
- 相当于通知所有感兴趣系统正在启动过程的人,项目正在 starting。
-
-
- 保存命令行参数;ApplicationArguments
- 准备环境 prepareEnvironment();
-
-
- 返回或者创建基础环境信息对象。StandardServletEnvironment
- 配置环境信息对象。
-
-
-
-
- 读取所有的配置源的配置属性值。
-
-
-
-
- 绑定环境信息
- 监听器调用 listener.environmentPrepared();通知所有的监听器当前环境准备完成
-
-
- 创建IOC容器(createApplicationContext())
-
-
- 根据项目类型(Servlet)创建容器,
- 当前会创建 AnnotationConfigServletWebServerApplicationContext
-
-
- 准备ApplicationContext IOC容器的基本信息 prepareContext()
-
-
- 保存环境信息
- IOC容器的后置处理流程。
- 应用初始化器;applyInitializers;
-
-
-
-
- 遍历所有的 ApplicationContextInitializer 。调用 initialize.。来对ioc容器进行初始化扩展功能
- 遍历所有的 listener 调用 contextPrepared。EventPublishRunListenr;通知所有的监听器contextPrepared
-
-
-
-
- 所有的监听器 调用 contextLoaded。通知所有的监听器 contextLoaded;
-
-
- **刷新IOC容器。**refreshContext
-
-
- 创建容器中的所有组件(Spring注解)
-
-
- 容器刷新完成后工作?afterRefresh
- 所有监听 器 调用 listeners.started(context); 通知所有的监听器 started
- **调用所有runners;**callRunners()
-
-
- 获取容器中的 ApplicationRunner
- 获取容器中的 CommandLineRunner
- 合并所有runner并且按照@Order进行排序
- 遍历所有的runner。调用 run 方法
-
-
- 如果以上有异常,
-
-
- 调用Listener 的 failed
-
-
- 调用所有监听器的 running 方法 listeners.running(context); 通知所有的监听器 running
- **running如果有问题。继续通知 failed 。调用所有 Listener 的 **failed;**通知所有的监听器 failed


 3431
3431


 被折叠的 条评论
为什么被折叠?
被折叠的 条评论
为什么被折叠?
 到【灌水乐园】发言


