


案例完整文件
Vue----任务列表案例
文章目录
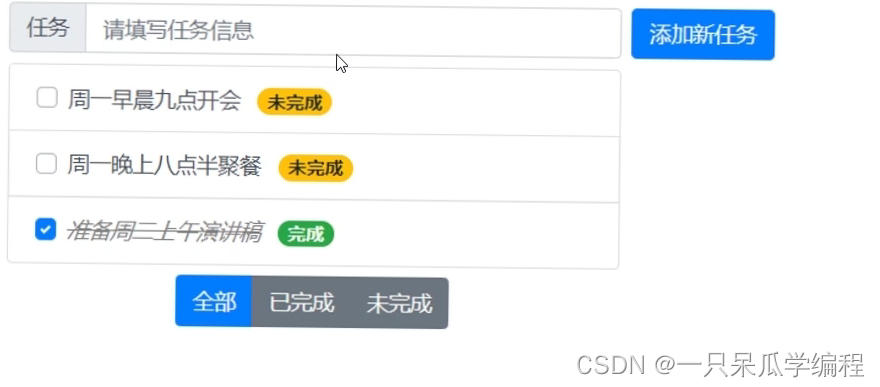
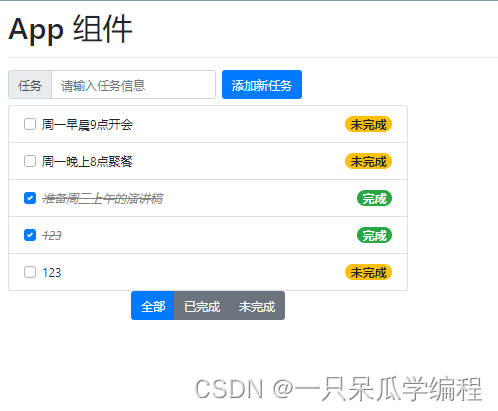
1. 案例效果
2. 用到的知识点
① vite 创建项目
② 组件的封装与注册
③ props
④ 样式绑定
⑤ 计算属性
⑥ 自定义事件
⑦ 组件上的 v-model
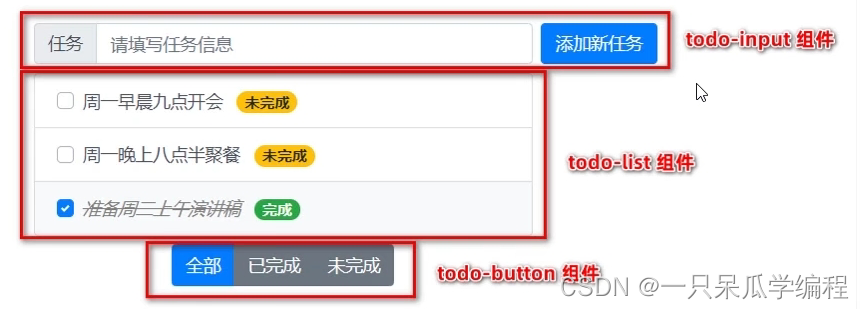
3. 整体实现步骤
① 使用 vite 初始化项目
② 梳理项目结构
③ 封装 todo-list 组件
④ 封装 todo-input 组件
⑤ 封装 todo-button 组件
4. 初始化项目
-
在终端运行以下的命令,初始化 vite 项目:
npm init vite-app todos -
使用 vscode 打开项目,并安装依赖项:
npm i -
安装 less 语法相关的依赖项:
npm i less -D
5. 梳理项目结构
-
重置 index.css 中的全局样式如下:
:root { font-size: 12px; } body { padding: 8px; } -
重置 App.vue 组件的代码结构如下:
<template> <div> <h1>App 组件</h1> </div> </template> <script> export default { name: 'App', data() { return { // 任务列表的数据 todolist: [ { id: 1, task: '周一早晨9点开会', done: false }, { id: 2, task: '周一晚上8点聚餐', done: false }, { id: 3, task: '准备周三上午的演讲稿', done: true }, ] } } } </script> <style lang="less" scoped> </style> -
删除 components 目录下的 HelloWorld.vue 组件。
-
在终端运行以下的命令,把项目运行起来:
npm run dev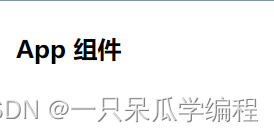
6. 封装 todo-list 组件
6.1 创建并注册 TodoList 组件
-
在 src/components/todo-list/ 目录下新建 TodoList.vue 组件:
<template> <dir> <h3>todolist 组件</h3> </dir> </template> <script> export default { name: 'TodoList' } </script> <style lang="less" scoped> </style> -
在 App.vue 组件中导入并注册 TodoList.vue 组件:
-
在 App.vue 的 template 模板结构中使用注册的 TodoList 组件:
<template>
  <div>
    <h1>App 组件</h1>
    <hr>
    <!-- 使用TodoList组件 -->
    <todo-list></todo-list>
  </div>
</template>

<script>
import TodoList from './components/todo-list/TodoList.vue'

export default {
  name: 'App',
  data() {
    return {
      // 任务列表的数据
      todolist: [
        { id: 1, task: '周一早晨9点开会', done: false },
        { id: 2, task: '周一晚上8点聚餐', done: false },
        { id: 3, task: '准备周三上午的演讲稿', done: true },
      ]
    }
  },
  components: {
    TodoList
  }
}
</script>

<style lang="less" scoped>

</style>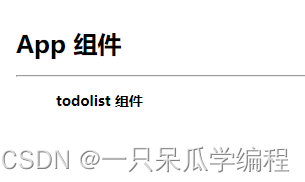
6.2 基于 bootstrap 渲染列表组件
-
下载 bootstrap.css 拷贝到 src/assets/ 静态资源目录中。
bootstap.css -
在 main.js 入口文件中,导入 src/assets/css/bootstrap.css 样式表:
import { createApp } from 'vue' import App from './App.vue' // 导入 bootstrap.css 样式表 // npm 安装 bootstrap 但是有样式不能显示 // import '../node_modules/bootstrap/dist/css/bootstrap.css' import './assets/bootstrap.css' import './index.css' createApp(App).mount('#app') -
根据 bootstrap 提供的列表组(https://v4.bootcss.com/docs/components/list-group/#with
-badges)和复选框( https://v4.bootcss.com/docs/components/forms/#checkboxes-and-radios-1 )渲染列表组件的基本效果:<template> <div> <ul class="list-group"> <!-- 列表组 --> <li class="list-group-item d-flex justify-content-between align-items-center"> <!-- 复选框 --> <div class="custom-control custom-checkbox"> <input type="checkbox" class="custom-control-input" id="customCheck1"> <label class="custom-control-label" for="customCheck1">Check this custom checkbox</label> </div> <!-- 徽标 --> <span class="badge badge-success badge-pill">完成</span> <span class="badge badge-warning badge-pill">未完成</span> </li> </ul> </div> </template> <script> export default { name: 'TodoList' } </script> <style lang="less" scoped> </style>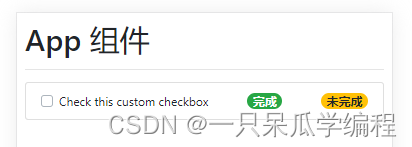
6.3 为 TodoList 声明 props 属性
-
为了接受外界传递过来的列表数据,需要在 TodoList 组件中声明如下的 props 属性:
<script> export default { name: 'TodoList', props: { // 列表数据 list: { type: Array, required: true, default: [] } } } </script> -
在 App 组件中通过 list 属性,将数据传递到 TodoList 组件之中:
<template>
  <div>
    <h1>App 组件</h1>
    <hr>
    <!-- 使用TodoList组件 -->
    <todo-list :list="todolist"></todo-list>
  </div>
</template>
6.4 渲染列表的 DOM 结构
-
通过 v-for 指令,循环渲染列表的 DOM 结构:
-
通过 v-if 和 v-else 指令,按需渲染 badge 效果:
<template>
  <div>
    <ul class="list-group">
      <!-- 列表组 -->
      <li
        class="list-group-item d-flex justify-content-between align-items-center"
        v-for="item in list"
        :key="item.id"
      >
        <!-- 复选框 -->
        <div class="custom-control custom-checkbox">
          <input
            type="checkbox"
            class="custom-control-input"
            :id="item.id"
          >
          <label class="custom-control-label" :for="item.id">{{item.task}}</label>
        </div>
        <!-- 徽标 -->
        <span class="badge badge-success badge-pill" v-if="item.done">完成</span>
        <span class="badge badge-warning badge-pill" v-else>未完成</span>
      </li>
    </ul>
  </div>
</template>
-
通过 v-model 指令,双向绑定任务的完成状态:
<template>
  <div>
    <ul class="list-group">
      <!-- 列表组 -->
      <li
        class="list-group-item d-flex justify-content-between align-items-center"
        v-for="item in list"
        :key="item.id"
      >
        <!-- 复选框 -->
        <div class="custom-control custom-checkbox">
          <!-- list 接收的是父组件传递过来的数组的引用 -->
          <!-- 在子组件修改,父组件中数组中的元素的值会跟着改变 -->
          <input
            type="checkbox"
            class="custom-control-input"
            :id="item.id"
            v-model="item.done"
          >
          <label class="custom-control-label" :for="item.id">{{item.task}}</label>
        </div>
        <!-- 徽标 -->
        <span class="badge badge-success badge-pill" v-if="item.done">完成</span>
        <span class="badge badge-warning badge-pill" v-else>未完成</span>
      </li>
    </ul>
  </div>
</template>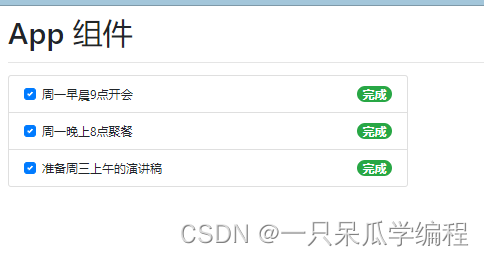
-
通过 v-bind 属性绑定,动态切换元素的 class 类名:
<style lang="less" scoped>
  .list-group {
    width: 400px;
  }

  .delete {
    text-decoration: line-through;
    color: gray;
    font-style: italic;
  }
</style>
<!-- 复选框 --> <div class="custom-control custom-checkbox"> <!-- list 接收的是父组件传递过来的数组的引用 --> <!-- 在子组件修改,父组件中数组中的元素的值会跟着改变 --> <input type="checkbox" class="custom-control-input" :id="item.id" v-model="item.done" > <label class="custom-control-label" :class="item.done ? 'delete' : ''" :for="item.id" >{{item.task}}</label> </div>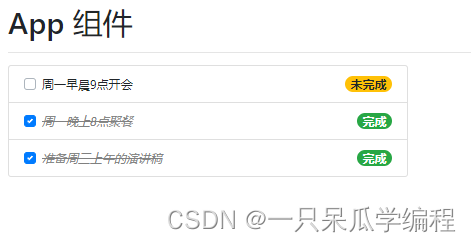
7. 封装 todo-input 组件
7.1 创建并注册 TodoInput 组件
-
在 src/components/todo-input/ 目录下新建 TodoInput.vue 组件:
<template> <div> <h1>TodoInput</h1> </div> </template> <script> export default { name: 'TodoInput' } </script> <style lang="less" scoped> </style> -
在 App.vue 组件中导入并注册 TodoInput.vue 组件:
<template>
  <div>
    <h1>App 组件</h1>
    <hr>
    <!-- 使用TodoInput组件 -->
    <todo-input></todo-input>
    <!-- 使用TodoList组件 -->
    <todo-list :list="todolist"></todo-list>
  </div>
</template>

<script>
import TodoList from './components/todo-list/TodoList.vue'
import TodoInput from './components/todo-input/TodoInput.vue'

export default {
  name: 'App',
  data() {
    return {
      // 任务列表的数据
      todolist: [
        { id: 1, task: '周一早晨9点开会', done: false },
        { id: 2, task: '周一晚上8点聚餐', done: false },
        { id: 3, task: '准备周三上午的演讲稿', done: true },
      ]
    }
  },
  components: {
    TodoList,
    TodoInput
  }
}
</script>

<style lang="less" scoped>

</style>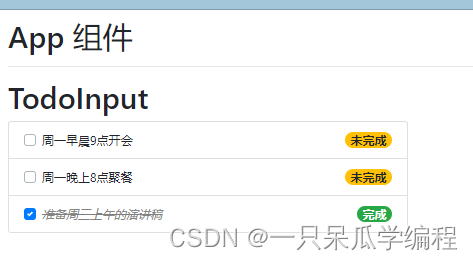
7.2 基于 bootstrap 渲染组件结构
-
根据 bootstrap 提供的 inline-forms(https://v4.bootcss.com/docs/components/forms/#in
line-forms)渲染 TodoInput 组件的基本结构。 -
在 TodoInput 组件中渲染如下的 DOM 结构:
<template>
  <div>
    <form class="form-inline">
      <div class="input-group mb-2 mr-sm-2">
        <div class="input-group-prepend">
          <div class="input-group-text">任务</div>
        </div>
        <input type="text" class="form-control" placeholder="请输入任务信息">
      </div>
      <button type="submit" class="btn btn-primary mb-2">添加新任务</button>
    </form>
  </div>
</template>

<script>
export default {
  name: 'TodoInput'
}
</script>

<style lang="less" scoped>

</style>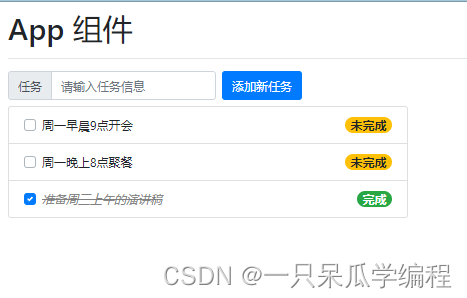
7.3 通过自定义事件向外传递数据
-
在 TodoList 组件的 data 中声明如下的数据:
<script> export default { name: 'TodoInput', data() { return { taskname: '' } } } </script> -
为 input 输入框进行 v-model 的双向数据绑定:
<input type="text" class="form-control" placeholder="请输入任务信息" v-model.trim="taskname" > -
监听 form 表单的 submit 事件,阻止默认提交行为并指定事件处理函数:
<form class="form-inline" @submit.prevent="onFormSubmit"> -
在 methods 中声明 onFormSubmit 事件处理函数如下:
  methods: {
    // 表单提交的事件处理函数
    onFormSubmit() {
    // 1. 判断任务名称是否为空
    if (!this.taskname) return alert('任务名称不能为空!')
    // 2. 触发自定义的 add 事件,并向外界传递数据
    // 3. 清空文本框
    }
  }
-
声明自定义事件如下:
emits: ['add'], -
进一步完善 onFormSubmit 事件处理函数如下:
  emits: ['add'],
  methods: {
    // 表单提交的事件处理函数
    onFormSubmit() {
    // 1. 判断任务名称是否为空
    if (!this.taskname) return alert('任务名称不能为空!')
    // 2. 触发自定义的 add 事件,并向外界传递数据
    this.$emit( 'add', this.taskname )
    // 3. 清空文本框
    this.taskname = ''
    }
  }
7.4 实现添加任务的功能
-
在 App.vue 组件中监听 TodoInput 组件自定义的 add 事件:
<!-- 使用TodoInput组件 --> <todo-input @add="onAddNewTask"></todo-input> -
在 App.vue 组件的 data 中声明 nextId 来模拟 id 自增 +1 的操作:
data() { return { // 任务列表的数据 todolist: [ { id: 1, task: '周一早晨9点开会', done: false }, { id: 2, task: '周一晚上8点聚餐', done: false }, { id: 3, task: '准备周三上午的演讲稿', done: true }, ], nextId: 4 } }, -
在 App.vue 组件的 methods 中声明 onAddNewTask 事件处理函数如下:
  methods: {
    onAddNewTask( taskname ) {
      this.todolist.push( {
        id: this.nextId,
        task: taskname,
        done: false
      } )
      this.nextId++
    }
  },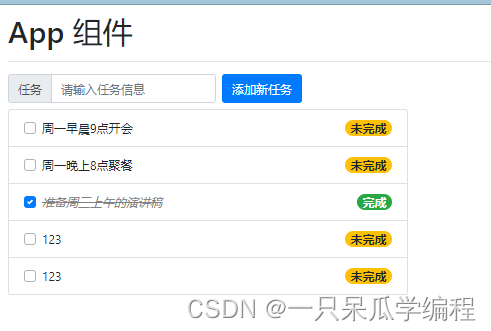
8. 封装 todo-button 组件
8.1 创建并注册 TodoButton 组件
-
在 src/components/todo-button/ 目录下新建 TodoButton.vue 组件:
<template> <div> <h3>TodoButton</h3> </div> </template> <script> export default { name: 'TodoButton' } </script> <style> </style> -
在 App.vue 组件中导入并注册 TodoButton.vue 组件:
<template>
  <div>
    <h1>App 组件</h1>
    <hr>
    <!-- 使用TodoInput组件 -->
    <todo-input @add="onAddNewTask"></todo-input>
    <!-- 使用TodoList组件 -->
    <todo-list :list="todolist"></todo-list>
    <!-- 使用TodoButton组件 -->
    <todo-button></todo-button>
  </div>
</template>

<script>
import TodoList from './components/todo-list/TodoList.vue'
import TodoInput from './components/todo-input/TodoInput.vue'
import TodoButton from './components/todo-button/TodoButton.vue'

export default {
  name: 'App',
  data() {
    return {
      // 任务列表的数据
      todolist: [
        { id: 1, task: '周一早晨9点开会', done: false },
        { id: 2, task: '周一晚上8点聚餐', done: false },
        { id: 3, task: '准备周三上午的演讲稿', done: true },
      ],
      nextId: 4
    }
  },
  methods: {
    onAddNewTask( taskname ) {
      this.todolist.push( {
        id: this.nextId,
        task: taskname,
        done: false
      } )
      this.nextId++
    }
  },
  components: {
    TodoList,
    TodoInput,
    TodoButton
  }
}
</script>

<style lang="less" scoped>

</style>
8.2 基于 bootstrap 渲染组件结构
-
根据 bootstrap 提供的 Button group(https://v4.bootcss.com/docs/components/button-group/)渲染 Todobutton 组件的基本结构。
-
在 TodoButton 组件中渲染如下的 DOM 结构:
<template>
  <div>
    <div class="btn-group" role="group" aria-label="Basic example">
      <button type="button" class="btn btn-secondary">全部</button>
      <button type="button" class="btn btn-secondary">已完成</button>
      <button type="button" class="btn btn-secondary">未完成</button>
    </div>
  </div>
</template>

<script>
export default {
  name: 'TodoButton'
}
</script>

<style>

</style>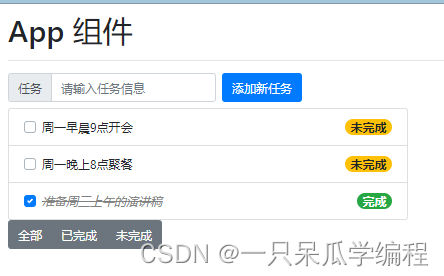
-
并通过 button-container 类名美化组件的样式:
<template>
  <div class="button-container">
    <div class="btn-group" role="group" aria-label="Basic example">
      <button type="button" class="btn btn-secondary">全部</button>
      <button type="button" class="btn btn-secondary">已完成</button>
      <button type="button" class="btn btn-secondary">未完成</button>
    </div>
  </div>
</template>

<script>
export default {
  name: 'TodoButton'
}
</script>

<style lang="less" scoped>
  .button-container {
    width: 400px;
    text-align: center;
  }
</style>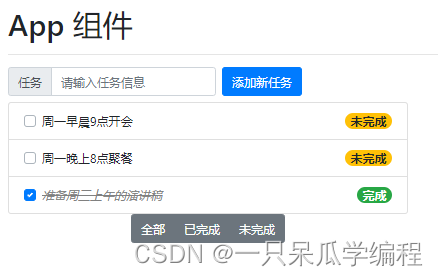
8.3 通过 props 指定默认激活的按钮
-
在 TodoButton 组件中声明如下的 props,用来指定默认激活的按钮的索引:
<script> export default { name: 'TodoButton', props: { active: { type: Number, required: true, // 默认激活索引为0的按钮 // 0 全部,1 已完成,2 未完成 default: 0 } } } </script> -
通过 动态绑定 class 类名 的方式控制按钮的激活状态:
<template> <div class="button-container"> <div class="btn-group" role="group" aria-label="Basic example"> <button type="button" class="btn" :class="active===0 ? 'btn-primary' : 'btn-secondary'" >全部</button> <button type="button" class="btn" :class="active===1 ? 'btn-primary' : 'btn-secondary'" >已完成</button> <button type="button" class="btn" :class="active===2 ? 'btn-primary' : 'btn-secondary'" >未完成</button> </div> </div> </template> -
在 App 组件中声明默认激活项的索引,并通过属性绑定的方式传递给 TodoButton 组件:
      nextId: 4,
      activeBtnIndex: 0
<!-- 使用TodoButton组件 --> <todo-button :active="activeBtnIndex"></todo-button>
8.4 通过 v-model 更新激活项的索引
需求分析:
父 -> 子 通过 props 传递了激活项的索引(active) 子 -> 父 需要更新父组件中激活项的索引
这种场景下适合在组件上使用 v-model 指令,维护组件内外数据的同步。
-
为 TodoButton 组件中的三个按钮分别绑定 click 事件处理函数如下:
<template> <div class="button-container"> <div class="btn-group" role="group" aria-label="Basic example"> <button type="button" class="btn" :class="active===0 ? 'btn-primary' : 'btn-secondary'" @click="onbtnClick(0)" >全部</button> <button type="button" class="btn" :class="active===1 ? 'btn-primary' : 'btn-secondary'" @click="onbtnClick(1)" >已完成</button> <button type="button" class="btn" :class="active===2 ? 'btn-primary' : 'btn-secondary'" @click="onbtnClick(2)" >未完成</button> </div> </div> </template> -
在 TodoButton 组件中声明如下的自定义事件,用来更新父组件通过 v-model 指令传递过来的 props 数据:
<script> export default { name: 'TodoButton', emits: ['update:active'], props: { active: { type: Number, required: true, // 默认激活索引为0的按钮 // 0 全部,1 已完成,2 未完成 default: 0 } } } </script> -
在 TodoButton 组件的 methods 节点中声明 onBtnClick 事件处理函数如下:
  methods: {
    onbtnClick( index ) {
      // 1. 如果当前点击的按钮的索引值,等于 props 传递过来的索引值,则没必要触发 update:active 自定义事件
      if (index === this.active) return
      // 2. 通过 this.$emit() 方法触发自定义事件
      this.$emit('update:active', index)
    }
  }
<!-- 使用TodoButton组件 --> <todo-button v-model:active="activeBtnIndex"></todo-button>
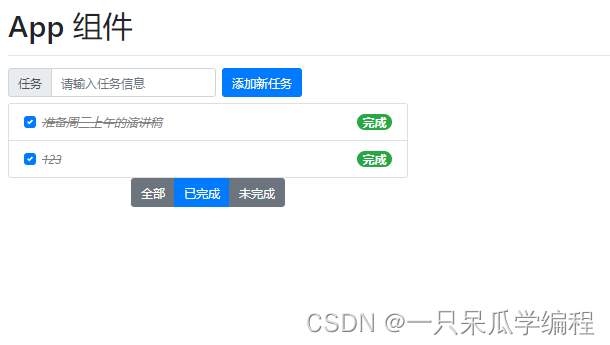
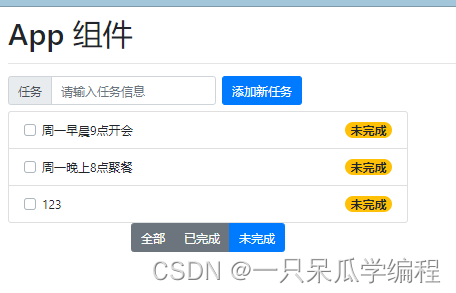
8.5 通过计算属性动态切换列表的数据
点击不同的按钮,切换显示不同的列表数据。此时可以根据当前激活按钮的索引,动态计算出要显示的列表数据并返回即可!
-
在 App 根组件中声明如下的计算属性:
computed: { // 根据激活按钮的索引值,动态计算要展示的列表数据 tasklist() { // 对“源数据”进行 switch...case 的匹配,并返回“计算之后的结果” switch (this.activeBtnIndex) { case 0: return this.todolist case 1: return this.todolist.filter(x => x.done) case 2: return this.todolist.filter(x => !x.done) } } }, -
在 App 根组件的 DOM 结构中,将 TodoList 组件的 :list=“todolist” 修改为:
    <!-- 使用TodoList组件 -->
    <todo-list :list="tasklist"></todo-list>
9. 最终效果


 2095
2095


 被折叠的 条评论
为什么被折叠?
被折叠的 条评论
为什么被折叠?
 到【灌水乐园】发言


