


消息队列
定义
消息指的是两个应用间传递的数据。数据的类型有很多种形式,可能只包含文本字符串,也可能包含嵌入对象。
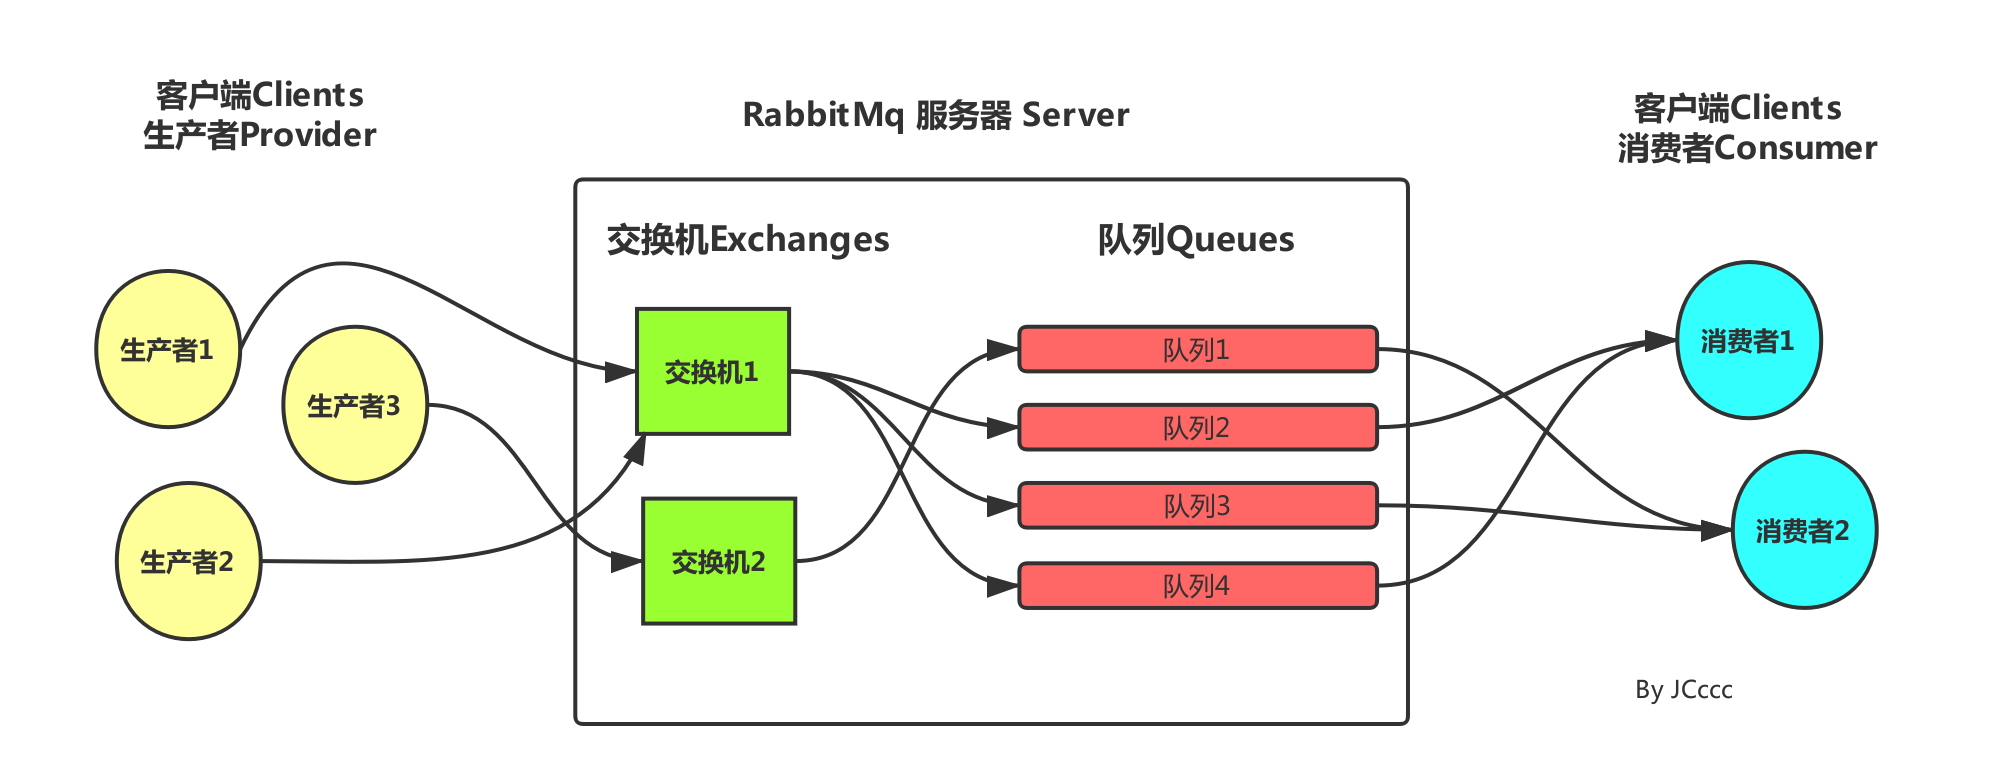
“消息队列(Message Queue)”是在消息的传输过程中保存消息的容器。在消息队列中,通常有生产者和消费者两个角色。生产者只负责发送数据到消息队列,谁从消息队列中取出数据处理,他不管。消费者只负责从消息队列中取出数据处理,他不管这是谁发送的数据。
作用
应用解耦
任务异步处理
削峰填谷
常见MQ
| RabbitMQ | ActiveMQ | RocketMQ | Kafka | |
|---|---|---|---|---|
| 公司社区 | Rabbit | Apache | 阿里 | Apache |
| 开发语言 | Erlang | Java | Java | Scala&Java |
| 协议支持 | AMQP,XMPP,SMTP,STOMP | OpenWire,STOMP,REST,XMPP,AMQP | 自定义 | 自定义协议,社区封装了 http协议支持 |
| 客户端支持语言 | 官方支持Erlang,Java,Ruby等,社区产出多种API,几乎支持所有语言 | Java,C,C++, Python,PHP,Perl,.net等 | Java,C++ | 官方支持Java,社区产出多种API,如PHP,Python等 |
| 单机吞吐量 | 万级(其次) | 万级(最差) | 十万级(最好) | 十万级(次之) |
| 消息延迟 | 微妙级 | 毫秒级 | 毫秒级 | 毫秒以内 |
| 功能特性 | 并发能力强,性能极其好,延时低,社区活跃,管理界面丰富 | 老牌产品,成熟度高,文档较多 | MQ功能比较完备,扩展性佳 | 只支持主要的MQ功能,毕竟是为大数据领域准备的 |
RabbbitMQ下载安装
安装erlang
到erlang官网下载windows版安装包。安装完成后配置环境变量;在控制台使用 erl -version 验证
安装RabbbitMQ
到官网下载后安装
[外链图片转存失败,源站可能有防盗链机制,建议将图片保存下来直接上传(img-BmP21kkV-1683276786869)(D:\公共资料\科目一\科目一\image-20230505163254793.png)]
进入其sbin目录下,打开cmd窗口,输入 rabbitmq-plugins enable rabbitmq_management 安装管理页面插件
然后双击rabbitmq-server.bat启动脚本,
打开浏览器输入http://localhost:15672,账号密码默认是:guest/guest
Linux下安装:https://juejin.cn/post/7071589818886520869
Spring整合RabbitMQ – 生产者
创建项目
spring项目
添加依赖
        <dependency>
            <groupId>org.springframework.boot</groupId>
            <artifactId>spring-boot-starter-amqp</artifactId>
            <version>2.7.9</version>
        </dependency>
配置文件
spring.rabbitmq.host=localhost
spring.rabbitmq.port=5672
spring.rabbitmq.username=guest
spring.rabbitmq.password=guest
#使用默认配置: /
生产者代码
常规配置
package com.example.demospringboot.mq.common;

public class RabbitMQConfig {
    /**
     * RabbitMQ的队列名称
     */
    public static final String RABBIT_TOPIC = "topic";

    /**
     * RabbitMQ的队列名称
     */
    public static final String RABBIT_DIRECT_QUEUE = "TestDirectQueue";

    /**
     * RabbitMQ的Direct交换机名称
     */
    public static final String RABBIT_DIRECT_EXCHANGE = "TestDirectExchange";

    public static final String RABBIT_TOPIC_EXCHANGE = "topicExchange";

    /**
     * RabbitMQ的Direct交换机和队列绑定的匹配建
     */
    public static final String RABBIT_DIRECT_ROUTING = "TestDirectRouting";

    /**
     * RabbitMQ的TOPIC_EXCHANGE交换机名称
     */
    public static final String TOPIC_EXCHANGE_DEMO_NAME = "topic.exchange.demo.name";

    /**
     * RabbitMQ的TOPIC_EXCHANGE交换机的队列A的名称
     */
    public static final String TOPIC_EXCHANGE_QUEUE_A = "topic.queue.a";

    /**
     * RabbitMQ的TOPIC_EXCHANGE交换机的队列B的名称
     */
    public static final String TOPIC_EXCHANGE_QUEUE_B = "topic.queue.b";

    /**
     * RabbitMQ的TOPIC_EXCHANGE交换机的队列C的名称
     */
    public static final String TOPIC_EXCHANGE_QUEUE_C = "topic.queue.c";
}
交换机、队列、路由绑定
package com.example.demospringboot.mq.common;

import org.springframework.amqp.core.Binding;
import org.springframework.amqp.core.BindingBuilder;
import org.springframework.amqp.core.DirectExchange;
import org.springframework.amqp.core.Queue;
import org.springframework.context.annotation.Bean;
import org.springframework.context.annotation.Configuration;

@Configuration
public class DirectRabbitConfig {
    // 队列
    @Bean
    public Queue TestDirectQueue() {
        /**
         * new Queue("TestDirectQueue",true,true,false);
         * durable:是否持久化,默认是false,持久化队列:会被存储在磁盘上,当消息代理重启时仍然存在,暂存队列:当前连接有效
         * exclusive:默认也是false,只能被当前创建的连接使用,而且当连接关闭后队列即被删除。此参考优先级高于durable
         * autoDelete:是否自动删除,当没有生产者或者消费者使用此队列,该队列会自动删除。
         * 一般设置一下队列的持久化就好,其余两个就是默认false
         */
        return new Queue(RabbitMQConfig.RABBIT_DIRECT_QUEUE,true);
    }
    // 交换机
    //Direct交换机 起名:TestDirectExchange
    @Bean
    DirectExchange TestDirectExchange() {
        //  return new DirectExchange("TestDirectExchange",true,true);
        return new DirectExchange(RabbitMQConfig.RABBIT_DIRECT_EXCHANGE,true,false);
    }

    //绑定  将队列和交换机绑定, 并设置用于匹配键:TestDirectRouting
    @Bean
    Binding bindingDirect() {
        return BindingBuilder.bind(TestDirectQueue()).to(TestDirectExchange()).with(RabbitMQConfig.RABBIT_DIRECT_ROUTING);
    }
}
package com.example.demospringboot.mq.service;

import org.springframework.amqp.core.Binding;
import org.springframework.amqp.core.BindingBuilder;
import org.springframework.amqp.core.Queue;
import org.springframework.amqp.core.TopicExchange;
import org.springframework.context.annotation.Bean;
import org.springframework.context.annotation.Configuration;

@Configuration
public class TopicRabbitConfig {
    public final static String one = "topic.one";

    public final static String two = "topic.two";

    public final static String three = "topic.three.one";

    public final static String any = "topic.#";

    public final static String anyone = "topic.*";

    public final static String topicExchange = "topicExchange";

    @Bean
    public Queue firstQueue() {
        return new Queue(one);
    }

    @Bean
    public Queue secondQueue() {
        return new Queue(two);
    }

    @Bean
    public Queue thirdQueue() {
        return new Queue(three);
    }

    @Bean
    public TopicExchange exchange() {
        return new TopicExchange(topicExchange);
    }

    @Bean
    public Binding bindingTopic() {
        return BindingBuilder.bind(firstQueue()).to(exchange()).with(one);
    }

    @Bean
    public Binding bindingExchange2() {
        return BindingBuilder.bind(secondQueue()).to(exchange()).with(two);
    }

    @Bean
    public Binding bindingExchange3() {
        return BindingBuilder.bind(secondQueue()).to(exchange()).with(any);
    }

    @Bean
    public Binding bindingExchange4() {
        return BindingBuilder.bind(secondQueue()).to(exchange()).with(anyone);
    }
}
web接口调用
package com.example.demospringboot.mq.controller;

import com.example.demospringboot.mq.common.RabbitMQConfig;

import org.springframework.amqp.rabbit.core.RabbitTemplate;
import org.springframework.beans.factory.annotation.Autowired;
import org.springframework.web.bind.annotation.GetMapping;
import org.springframework.web.bind.annotation.PathVariable;
import org.springframework.web.bind.annotation.RequestMapping;
import org.springframework.web.bind.annotation.RequestParam;
import org.springframework.web.bind.annotation.RestController;

import java.time.LocalDateTime;
import java.time.format.DateTimeFormatter;
import java.util.HashMap;
import java.util.Map;
import java.util.UUID;

@RestController
@RequestMapping("/mq")
public class MQController {
    @Autowired
    RabbitTemplate rabbitTemplate;//使用RabbitTemplate,这提供了接收/发送等等方法

    @GetMapping("/sendDirectMessage")
    public String sendDirectMessage() {
        String msgId = UUID.randomUUID().toString();
        String msgData = RabbitMQConfig.RABBIT_DIRECT_QUEUE + ":hello,world";
        String createTime = LocalDateTime.now().format(DateTimeFormatter.ofPattern("yyyy-MM-dd HH:mm:ss"));
        Map<String, Object> map = new HashMap<>();
        map.put("messageId", msgId);
        map.put("messageData", msgData);
        map.put("createTime", createTime);

        //将消息携带绑定键值:TestDirectRouting 发送到交换机TestDirectExchange
        rabbitTemplate.convertAndSend(RabbitMQConfig.RABBIT_DIRECT_EXCHANGE, RabbitMQConfig.RABBIT_DIRECT_ROUTING, map);
        return msgId;
    }

    @GetMapping("/sendTopicMessage/{topic}")
    public String sendTopicMessage(@PathVariable String topic) {
        String msgId = String.valueOf(UUID.randomUUID());
        String msgData = topic + ":hello,world";
        String createTime = LocalDateTime.now().format(DateTimeFormatter.ofPattern("yyyy-MM-dd HH:mm:ss"));
        Map<String, Object> map = new HashMap<>();
        map.put("messageId", msgId);
        map.put("messageData", msgData);
        map.put("createTime", createTime);

        //将消息携带绑定键值:TestDirectRouting 发送到交换机TestDirectExchange
        rabbitTemplate.convertAndSend(RabbitMQConfig.RABBIT_TOPIC_EXCHANGE, "topic." + topic, map);
        return msgId;
    }
}
Spring整合RabbitMQ–消费端
引入依赖
        <dependency>
            <groupId>org.springframework.boot</groupId>
            <artifactId>spring-boot-starter-amqp</artifactId>
            <version>2.7.9</version>
        </dependency>
配置文件修改
spring.rabbitmq.host=localhost
spring.rabbitmq.port=5672
spring.rabbitmq.username=guest
spring.rabbitmq.password=guest
#如果生产方配置了vhost,还需配置vhost
常用交换机类型
-
Direct Exchange
直连型交换机,根据消息携带的路由键将消息投递给对应队列。
大致流程,有一个队列绑定到一个直连交换机上,同时赋予一个路由键 routing key 。
然后当一个消息携带着路由值为X,这个消息通过生产者发送给交换机时,交换机就会根据这个路由值X去寻找绑定值也是X的队列。 -
Fanout Exchange
扇型交换机,这个交换机没有路由键概念,就算你绑了路由键也是无视的。 这个交换机在接收到消息后,会直接转发到绑定到它上面的所有队列。
-
Topic Exchange
主题交换机,这个交换机其实跟直连交换机流程差不多,但是它的特点就是在它的路由键和绑定键之间是有规则的。
这是最常用的交换机类型,下面示例代码只以这种类型为例
简单地介绍下规则:
*(星号) 用来表示一个单词 (必须出现的)
#(井号) 用来表示任意数量(零个或多个)单词
通配的绑定键是跟队列进行绑定的,举个小例子
队列Q1 绑定键为 TT.* 队列Q2绑定键为 TT.# 如果一条消息携带的路由键为 TT.B,那么队列Q1将会收到; 如果一条消息携带的路由键为TT.AA.BB,那么队列Q2将会收到; -
Header Exchange
头部交换机,这种交换机用的相对没这么多。它跟上面三种有点区别,它的路由不是用routingKey进行路由匹配,而是在匹配请求头中所带的键值进行路由。
Topic Exchange消费数据示例
注解
最简单方便且常用的消息监听
package com.example.consumer.mq_cosumer;

import com.rabbitmq.client.Channel;

import org.springframework.amqp.core.Message;
import org.springframework.amqp.rabbit.annotation.RabbitListener;
import org.springframework.context.annotation.Configuration;

import java.io.IOException;

@Configuration
public class MessageManualListener {
    int count = 0;

    @RabbitListener(queues = {"topic.one","topic.two.#"}, //消费的队列列表
        ackMode = "MANUAL" // 消息应答模式,分为三种: NONE(默认应答,自动确认,下发即为确认)、MANUAL(手动确认消息)、AUTO(自动确认消息,除非MessageListener抛出异常)
    )
    public void receiveMsg(Message message, Channel channel) throws IOException {
        try {
            /**
            * 业务流程,正常消费
            */
            System.out.println("注解接收消息:" + new String(message.getBody()));
            if (count == 1) {
                throw new Exception();
            }
            count++;

            // 手动应答确认消息
            channel.basicAck(message.getMessageProperties().getDeliveryTag(), true);
        } catch (Exception e) {
            // 手动将消息投递回原来队列,只会处理一条消息
            channel.basicReject(message.getMessageProperties().getDeliveryTag(), true);
            // 要处理多条消息,可使用:
            // channel.basicNack(message.getMessageProperties().getDeliveryTag(), true, true);
            // 但是需要注意,第二个参数为true时,basicNack是将DeliveryTag小于当前DeliveryTag的都退回队列,
            // 第二个参数为false时,与basicReject一样只会处理当前tag
        }
    }
}
-
手动确认模式的三种应答
-
basic.ack 肯定确认
void basicAck(long deliveryTag, boolean multiple) throws IOException; 参数一说明当前tag,即队列中的唯一id; 参数二为true时代表批量确认消息 -
basic.nack 否定确认
AMQP 0-9-1的RabbitMQ扩展
void basicNack(long deliveryTag, boolean multiple, boolean requeue) throws IOException; 参数一说明当前tag,即队列中的唯一id; 参数二是指是否针对多条消息;如果是true,也就是说当前通道的消息截止到当前这条消息的,都拒绝确认。 参数三为true时代表是否投递回RabbitMQ队列 -
basic.reject 否定确认
void basicReject(long deliveryTag, boolean requeue) throws IOException;
参数一依然是当前消息到的数据的唯一id;
参数二是指是否重新入列,为true时代表是否投递回RabbitMQ队列
-
实现接口MessageListener
与注解相比更加灵活,适用于比较复杂的需要自定义的消息接收系统
- 实现ChannelAwareBatchMessageListener接口
package com.example.consumer.mq_cosumer;

import com.rabbitmq.client.Channel;

import org.springframework.amqp.core.Message;
import org.springframework.amqp.rabbit.listener.api.ChannelAwareBatchMessageListener;
import org.springframework.stereotype.Component;

import java.io.ByteArrayInputStream;
import java.io.ObjectInputStream;
import java.util.List;
import java.util.Map;

@Component
public class MyAckReceiver implements ChannelAwareBatchMessageListener {
    int count = 0;

    @Override
    public void onMessage(Message message, Channel channel) throws Exception {
        if (null == message || null == channel) {
            return;
        }
        long deliveryTag = message.getMessageProperties().getDeliveryTag();
        try {
            byte[] body = message.getBody();
            ObjectInputStream inputStream = new ObjectInputStream(new ByteArrayInputStream(body));
            Map<String, String> msgMap = (Map<String, String>) inputStream.readObject();
            String messageId = msgMap.get("messageId");
            String messageData = msgMap.get("messageData");
            String createTime = msgMap.get("createTime");
            inputStream.close();
            System.out.println("消费消息来自:" + message.getMessageProperties().getConsumerQueue());
            System.out.println("messageId:" + messageId + "  messageData:" + messageData + "  createTime" + createTime);
            if (count == 3) {
                throw new RuntimeException();
            }
            count++;
            channel.basicAck(deliveryTag, true);
        } catch (Exception e) {
            channel.basicReject(deliveryTag, true);
        }
    }

    @Override
    public void onMessageBatch(List<Message> list, Channel channel) {
        list.forEach(message -> {
            try {
                onMessage(message, channel);
            } catch (Exception e) {
                throw new RuntimeException(e);
            }
        });
    }
}
- 使用SimpleMessageListenerContainer
SimpleMessageListenerContainer:简单消息监听容器。这个类有很多设置:监听队列(多个队列)、自动启动、自动声明功能、设置事务特性、事务管理器、事务属性、事务容量(并发)、是否开启事务、回滚消息等、设置消费者数量、最大最小数量、批量消费、设置消息确认和自动确认模式、是否重回队列、异常捕获handler函数等。
package com.example.consumer.mq_cosumer;

import org.springframework.amqp.core.AcknowledgeMode;
import org.springframework.amqp.rabbit.connection.CachingConnectionFactory;
import org.springframework.amqp.rabbit.listener.SimpleMessageListenerContainer;
import org.springframework.beans.factory.annotation.Autowired;
import org.springframework.context.annotation.Bean;
import org.springframework.context.annotation.Configuration;

@Configuration
public class MQListenerConfig {
    @Autowired
    private CachingConnectionFactory connectionFactory;

    @Autowired
    private MyAckReceiver myAckReceiver;

    @Bean
    public SimpleMessageListenerContainer simpleMessageListenerContainer() {

        SimpleMessageListenerContainer container = new SimpleMessageListenerContainer(
            connectionFactory);
        // 当前消费者数量
        container.setConcurrentConsumers(1);
        // 最大消费者数量
        container.setMaxConcurrentConsumers(5);
        // 手动确认消息
        container.setAcknowledgeMode(AcknowledgeMode.MANUAL);

        //设置一个队列
        container.setQueueNames(RabbitMQConfig.RABBIT_TOPIC_QUEUE);
        //如果同时设置多个如下: 前提是队列都是必须已经创建存在的
        //  container.setQueueNames("TestDirectQueue","TestDirectQueue2","TestDirectQueue3");

        //另一种设置队列的方法,如果使用这种情况,那么要设置多个,就使用addQueues
        //container.setQueues(new Queue("TestDirectQueue",true));
        //container.addQueues(new Queue("TestDirectQueue2",true));
        //container.addQueues(new Queue("TestDirectQueue3",true));
        container.setMessageListener(myAckReceiver);
        return container;
    }
}
注解@QueueBinding
在知道生产者相关信息后,消费者可以使用此注解自定义队列来消费消息
package com.cc.rabbitmq;

import com.cc.pojo.People;
import com.fasterxml.jackson.databind.ObjectMapper;
import com.rabbitmq.client.Channel;
import org.springframework.amqp.core.Message;
import org.springframework.amqp.rabbit.annotation.Exchange;
import org.springframework.amqp.rabbit.annotation.Queue;
import org.springframework.amqp.rabbit.annotation.QueueBinding;
import org.springframework.amqp.rabbit.annotation.RabbitListener;
import org.springframework.context.annotation.Configuration;

import java.io.IOException;

@Configuration
public class PeopleMqListener {
    @RabbitListener(
            bindings = @QueueBinding(
                    value = @Queue(name = "com.xxx.topic.people"),//队列
                    exchange = @Exchange("amp.topic"),//交换机
                    key = "topic.#"//路由
            ),
            ackMode = "MANUAL"
    )
    public void receiveMsg(Message message, Channel channel) throws IOException {
        long deliveryTag = message.getMessageProperties().getDeliveryTag();
        try {
            ObjectMapper mapper = new ObjectMapper();
            People people = mapper.readValue(message.getBody(), People.class);
            System.out.println(people.toString());
            channel.basicAck(deliveryTag, true);
        } catch (IOException e) {
            channel.basicNack(deliveryTag, false, true);
            e.printStackTrace();
        }

    }
}
补充
如果RabbitMQ的交换机中队列没有消息,客户端可能报错。此时可以声明所需的队列:
package com.example.consumer.mq_cosumer;

import org.springframework.amqp.core.Binding;
import org.springframework.amqp.core.BindingBuilder;
import org.springframework.amqp.core.HeadersExchange;
import org.springframework.amqp.core.Queue;
import org.springframework.amqp.core.TopicExchange;
import org.springframework.context.annotation.Bean;
import org.springframework.context.annotation.Configuration;

@Configuration
public class TopicRabbitConfig {
    public final static String one = "topic.one";

    public final static String two = "topic.two";

    public final static String three = "topic.three.one";

    public final static String any = "topic.#";

    public final static String anyone = "topic.*";

    public final static String topicExchange = "topicExchange";

    @Bean
    public Queue firstQueue() {
        return new Queue(one);
    }

    @Bean
    public Queue secondQueue() {
        return new Queue(two);
    }

    @Bean
    public Queue thirdQueue() {
        return new Queue(three);
    }
}
参考资料
官方文档
RabbitMQ: https://www.rabbitmq.com/confirms.html#automatic-requeueing
SpringAMQP: https://docs.spring.io/spring-amqp/reference/html/
个人博客
https://www.cnblogs.com/ZhuChangwu/p/14093107.html
https://blog.csdn.net/qq_35387940/article/details/100514134
https://juejin.cn/post/7071589818886520869
https://developer.aliyun.com/article/769883?accounttraceid=a30b8d2b7ffa43dfb8e5621a3264f4e2zksv#slide-0
https://bbs.huaweicloud.com/blogs/345528


 209
209


 被折叠的 条评论
为什么被折叠?
被折叠的 条评论
为什么被折叠?
 到【灌水乐园】发言


