


图解 Bert
大家可以访问 图解Bert 获取更加优质的阅读体验。

图解BERT一文还在持续更新中。
环境搭建
按序执行以下命令完成环境搭建:
git clone https://github.com/DA-southampton/Read_Bert_Code.git
cd Read_Bert_Code
conda create -n Read_Bert_Code python=3.9.22
conda activate Read_Bert_Code
本文使用的是谷歌的中文预训练模型:chinese_L-12_H-768_A-12.zip,模型有点大,我就不上传了,如果本地不存在,就点击这里直接下载,或者直接命令行运行
wget https://storage.googleapis.com/bert_models/2018_11_03/chinese_L-12_H-768_A-12.zip
预训练模型下载下来之后,进行解压,然后将tf模型转为对应的pytorch版本即可。对应代码如下:
export BERT_BASE_DIR=/Users/zhandaohong/Read_Bert_Code/chinese_L-12_H-768_A-12

python convert_tf_checkpoint_to_pytorch.py \
  --tf_checkpoint_path $BERT_BASE_DIR/bert_model.ckpt \
  --bert_config_file $BERT_BASE_DIR/bert_config.json \
  --pytorch_dump_path $BERT_BASE_DIR/pytorch_model.bin
转化成功之后,将模型放入到仓库对应位置:
Read_Bert_Code/bert_read_step_to_step/prev_trained_model/
并重新命名为:
bert-base-chinese
其次是准备训练数据,这里我准备做一个文本分类任务,使用的是Tnews数据集,这个数据集来源是这里,分为训练,测试和开发集,我已经上传到了仓库中,具体位置在
Read_Bert_Code/bert_read_step_to_step/chineseGLUEdatasets/tnews
需要注意的一点是,因为我只是为了了解内部代码情况,所以准确度不是在我的考虑范围之内,所以我只是取其中的一部分数据,其中训练数据使用1k,测试数据使用1k,开发数据1k。
准备就绪,使用pycharm导入项目,准备调试,我的调试文件是run_classifier.py文件,对应的参数为
--model_type=bert --model_name_or_path=prev_trained_model/bert-base-chinese --task_name="tnews" --do_train --do_eval --do_lower_case --data_dir=./chineseGLUEdatasets/tnews --max_seq_length=128 --per_gpu_train_batch_size=16 --per_gpu_eval_batch_size=16 --learning_rate=2e-5 --num_train_epochs=4.0 --logging_steps=100 --save_steps=100 --output_dir=./outputs/tnews_output/ --overwrite_output_dir
然后启动 run_classifier.py 文件进行调试即可 , 所参考源仓库未提供requirements.txt文件,因此需要大家自行完成运行时缺失依赖包的安装。
数据预处理
- 输入数据格式
{
  "guid": "train-0",
  "label": "104",              // 文本分类任务: 文本对应的标签
  "text_a": "股票中的突破形态",
  "text_b": null               // NSP任务: 用于判断给出的两个句子是否连续
}
NSP (Next Sentence Prediction)
- 文本分词 & 借助字典映射为word id
"股票中的突破形态" --> ['股', '票', '中', '的', '突', '破', '形', '态'] --> [5500, 4873, 704, 4638, 4960, 4788, 2501, 2578]
对于字典中不存在的词 , 用
[UNK]表示, 对应的id为 100
-
过长截断策略 (待补充)
-
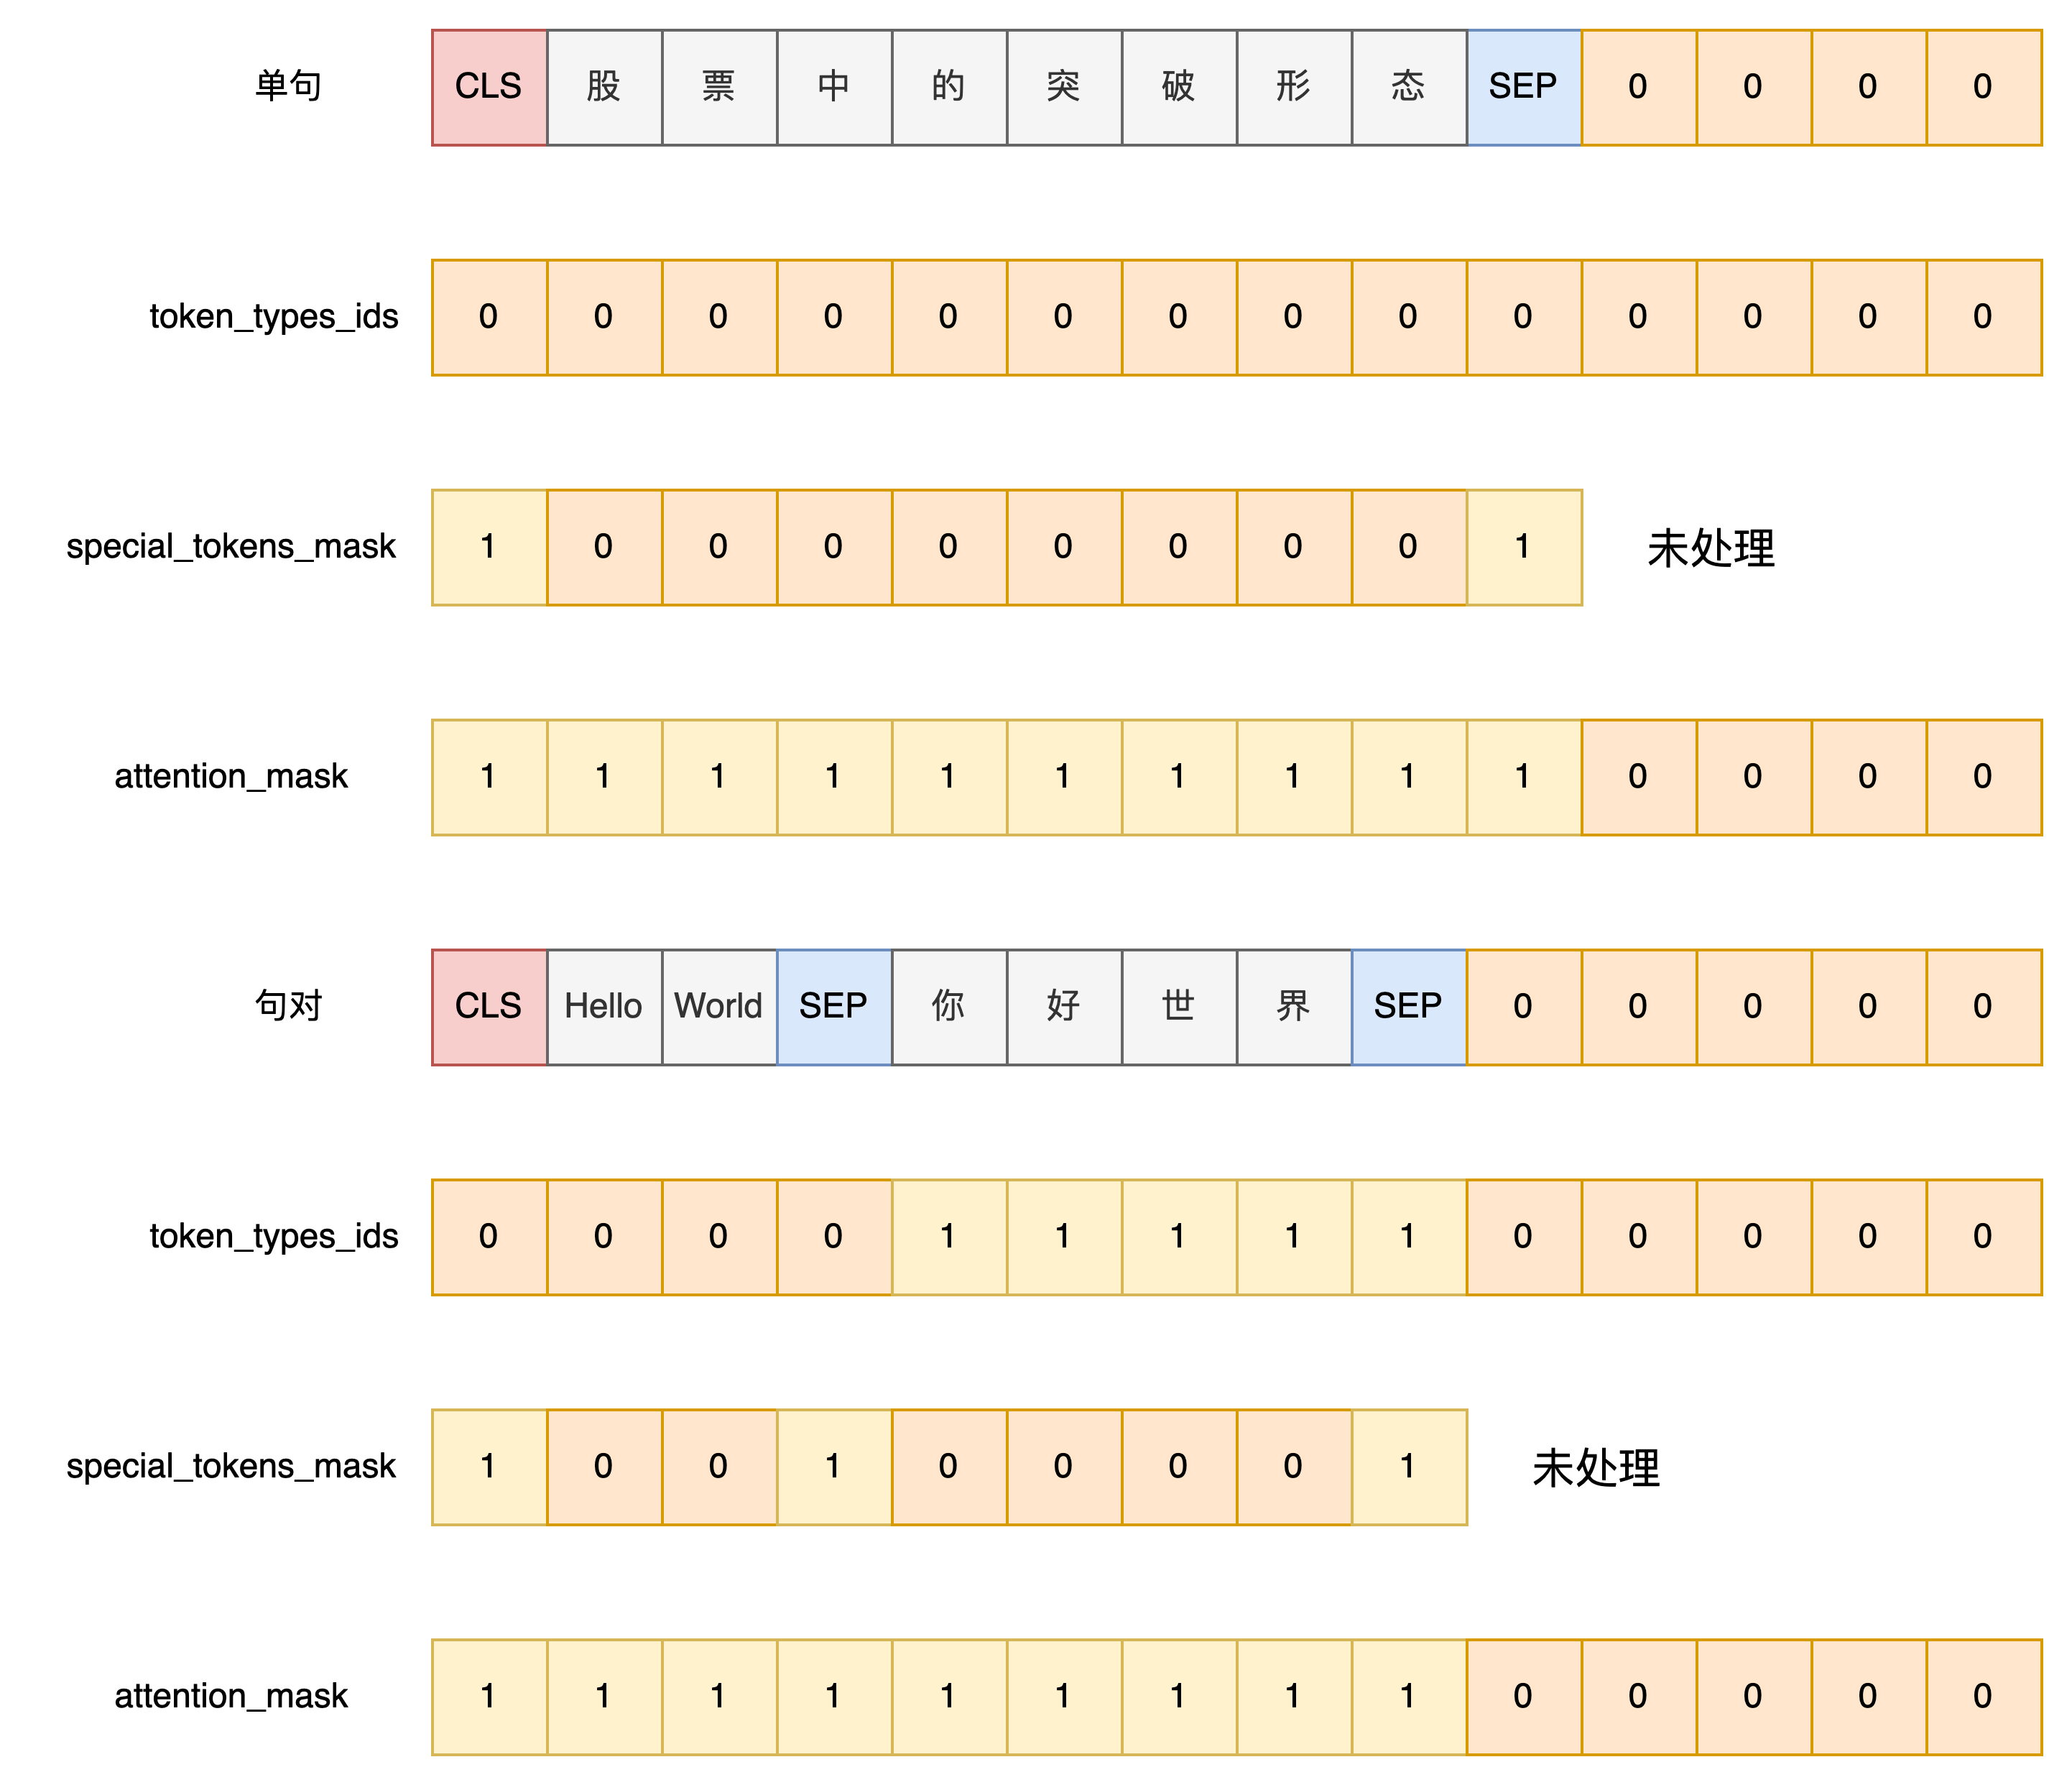
添加特殊Token标记
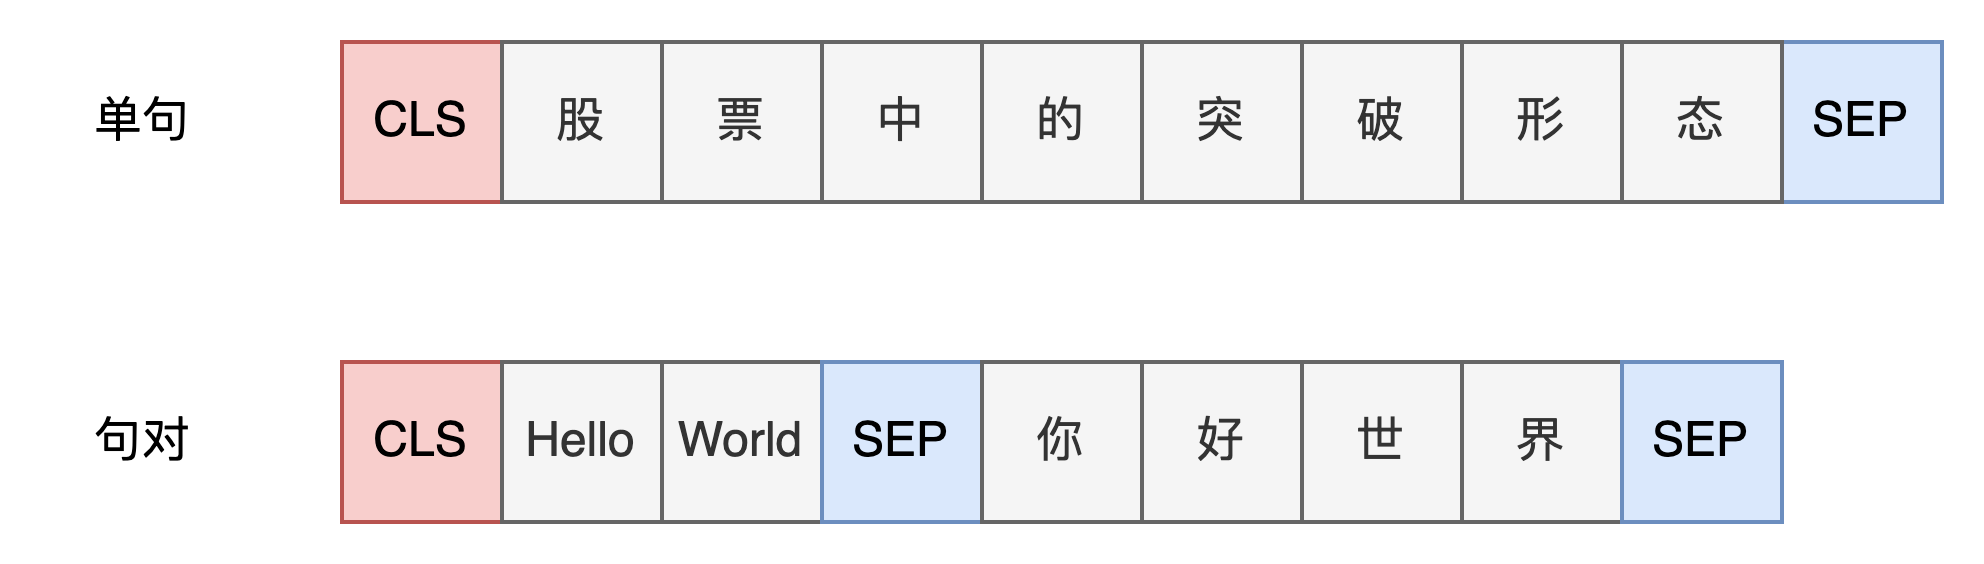
[101, 5500, 4873, 704, 4638, 4960, 4788, 2501, 2578, 102]
BertTokenizer中的特殊token id:
[CLS]: 101[SEP]: 102[MASK]: 103[UNK]: 100[PAD]: 0
    # BertTokenizer
    def build_inputs_with_special_tokens(self, token_ids_0, token_ids_1=None):
        if token_ids_1 is None:
            return [self.cls_token_id] + token_ids_0 + [self.sep_token_id]
        cls = [self.cls_token_id]
        sep = [self.sep_token_id]
        return cls + token_ids_0 + sep + token_ids_1 + sep
- 创建句子辨识列表,用以区分不同的句子
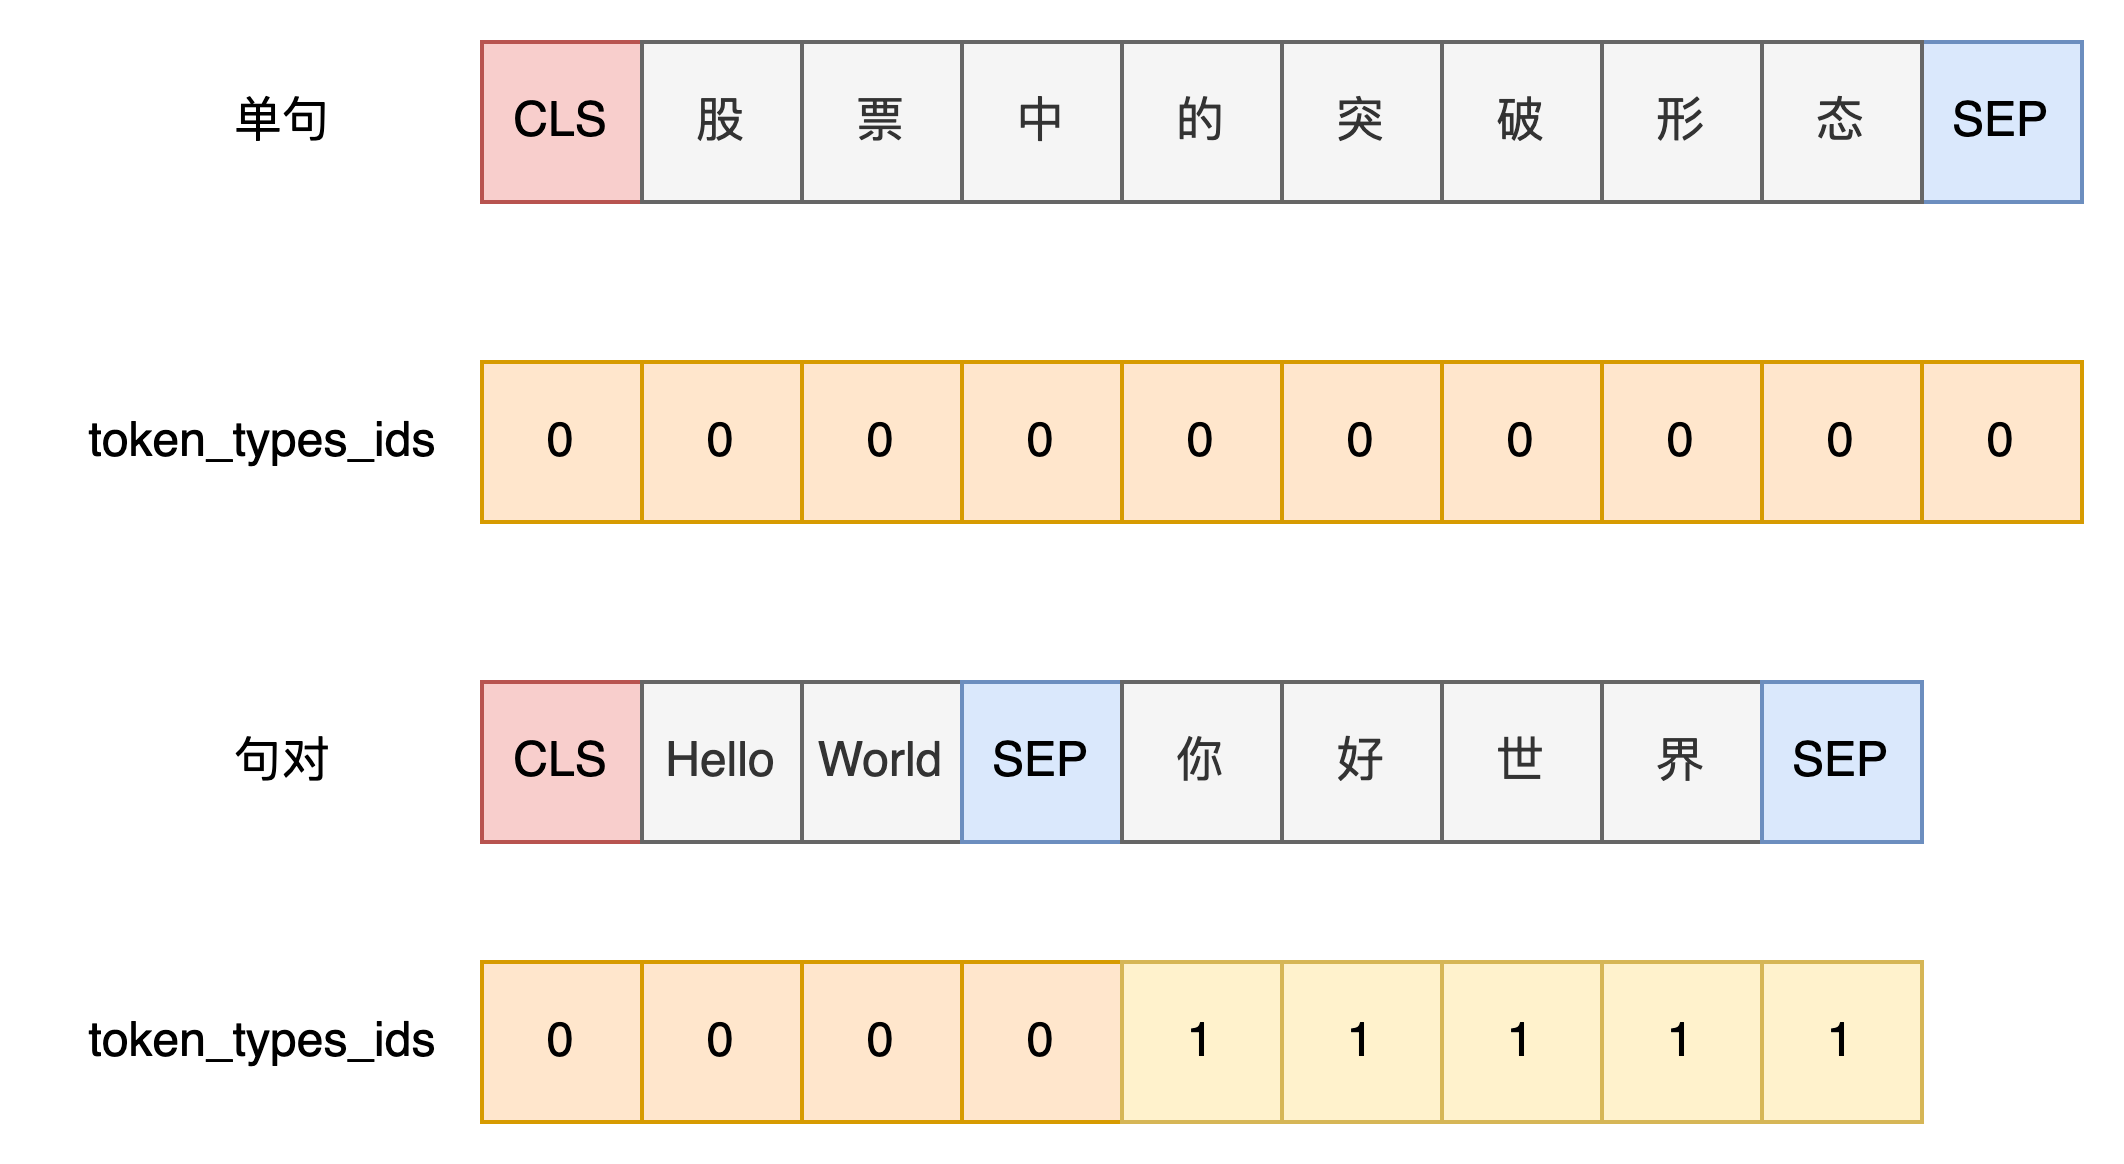
     # BertTokenizer
     def create_token_type_ids_from_sequences(self, token_ids_0, token_ids_1=None):
        """
        Creates a mask from the two sequences passed to be used in a sequence-pair classification task.
        A BERT sequence pair mask has the following format:
        0 0 0 0 0 0 0 0 0 0 1 1 1 1 1 1 1 1 1 1 1
        | first sequence    | second sequence

        if token_ids_1 is None, only returns the first portion of the mask (0's).
        """
        sep = [self.sep_token_id]
        cls = [self.cls_token_id]
        if token_ids_1 is None:
            return len(cls + token_ids_0 + sep) * [0]
        return len(cls + token_ids_0 + sep) * [0] + len(token_ids_1 + sep) * [1]
- 创建用以区分special tokens部分的mask列表
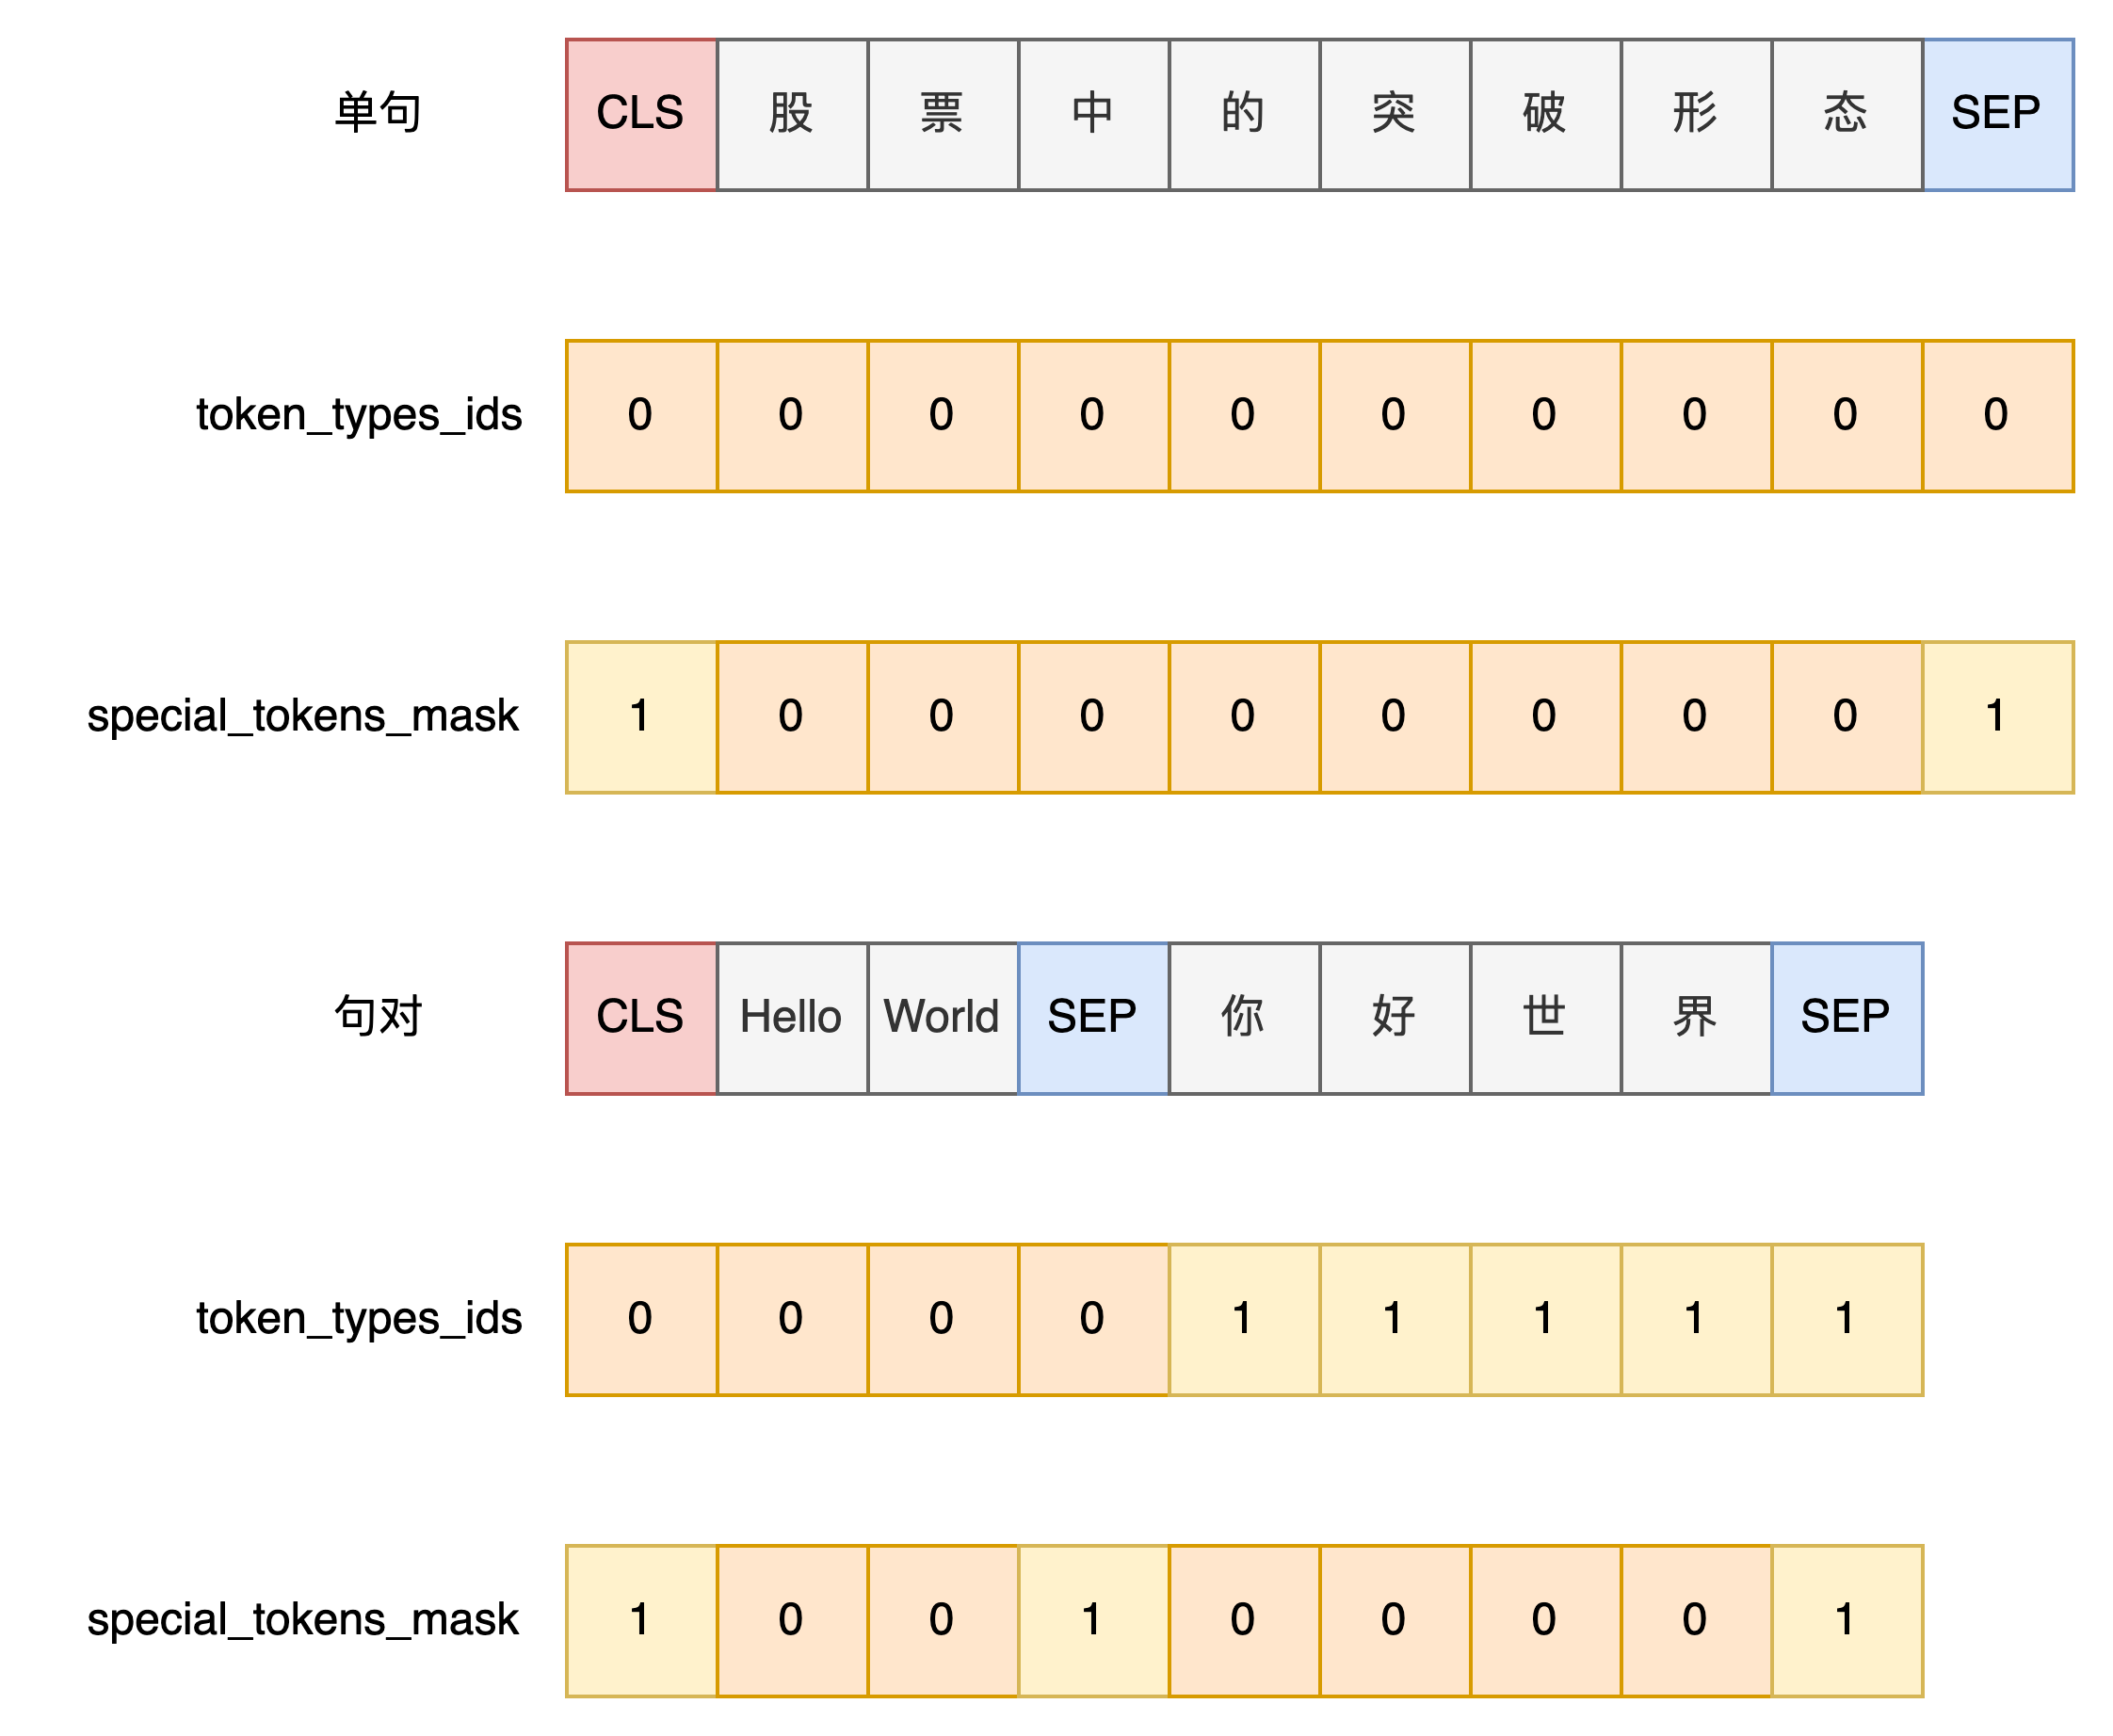
    # BertTokenizer
    def get_special_tokens_mask(self, token_ids_0, token_ids_1=None, already_has_special_tokens=False):
        if token_ids_1 is not None:
            return [1] + ([0] * len(token_ids_0)) + [1] + ([0] * len(token_ids_1)) + [1]
        return [1] + ([0] * len(token_ids_0)) + [1]
- 超长截断
       # PreTrainedTokenizer
       if max_length and len(encoded_inputs["input_ids"]) > max_length:
            encoded_inputs["input_ids"] = encoded_inputs["input_ids"][:max_length]
            encoded_inputs["token_type_ids"] = encoded_inputs["token_type_ids"][:max_length]
            encoded_inputs["special_tokens_mask"] = encoded_inputs["special_tokens_mask"][:max_length]
- 生成padding部分的mask列表
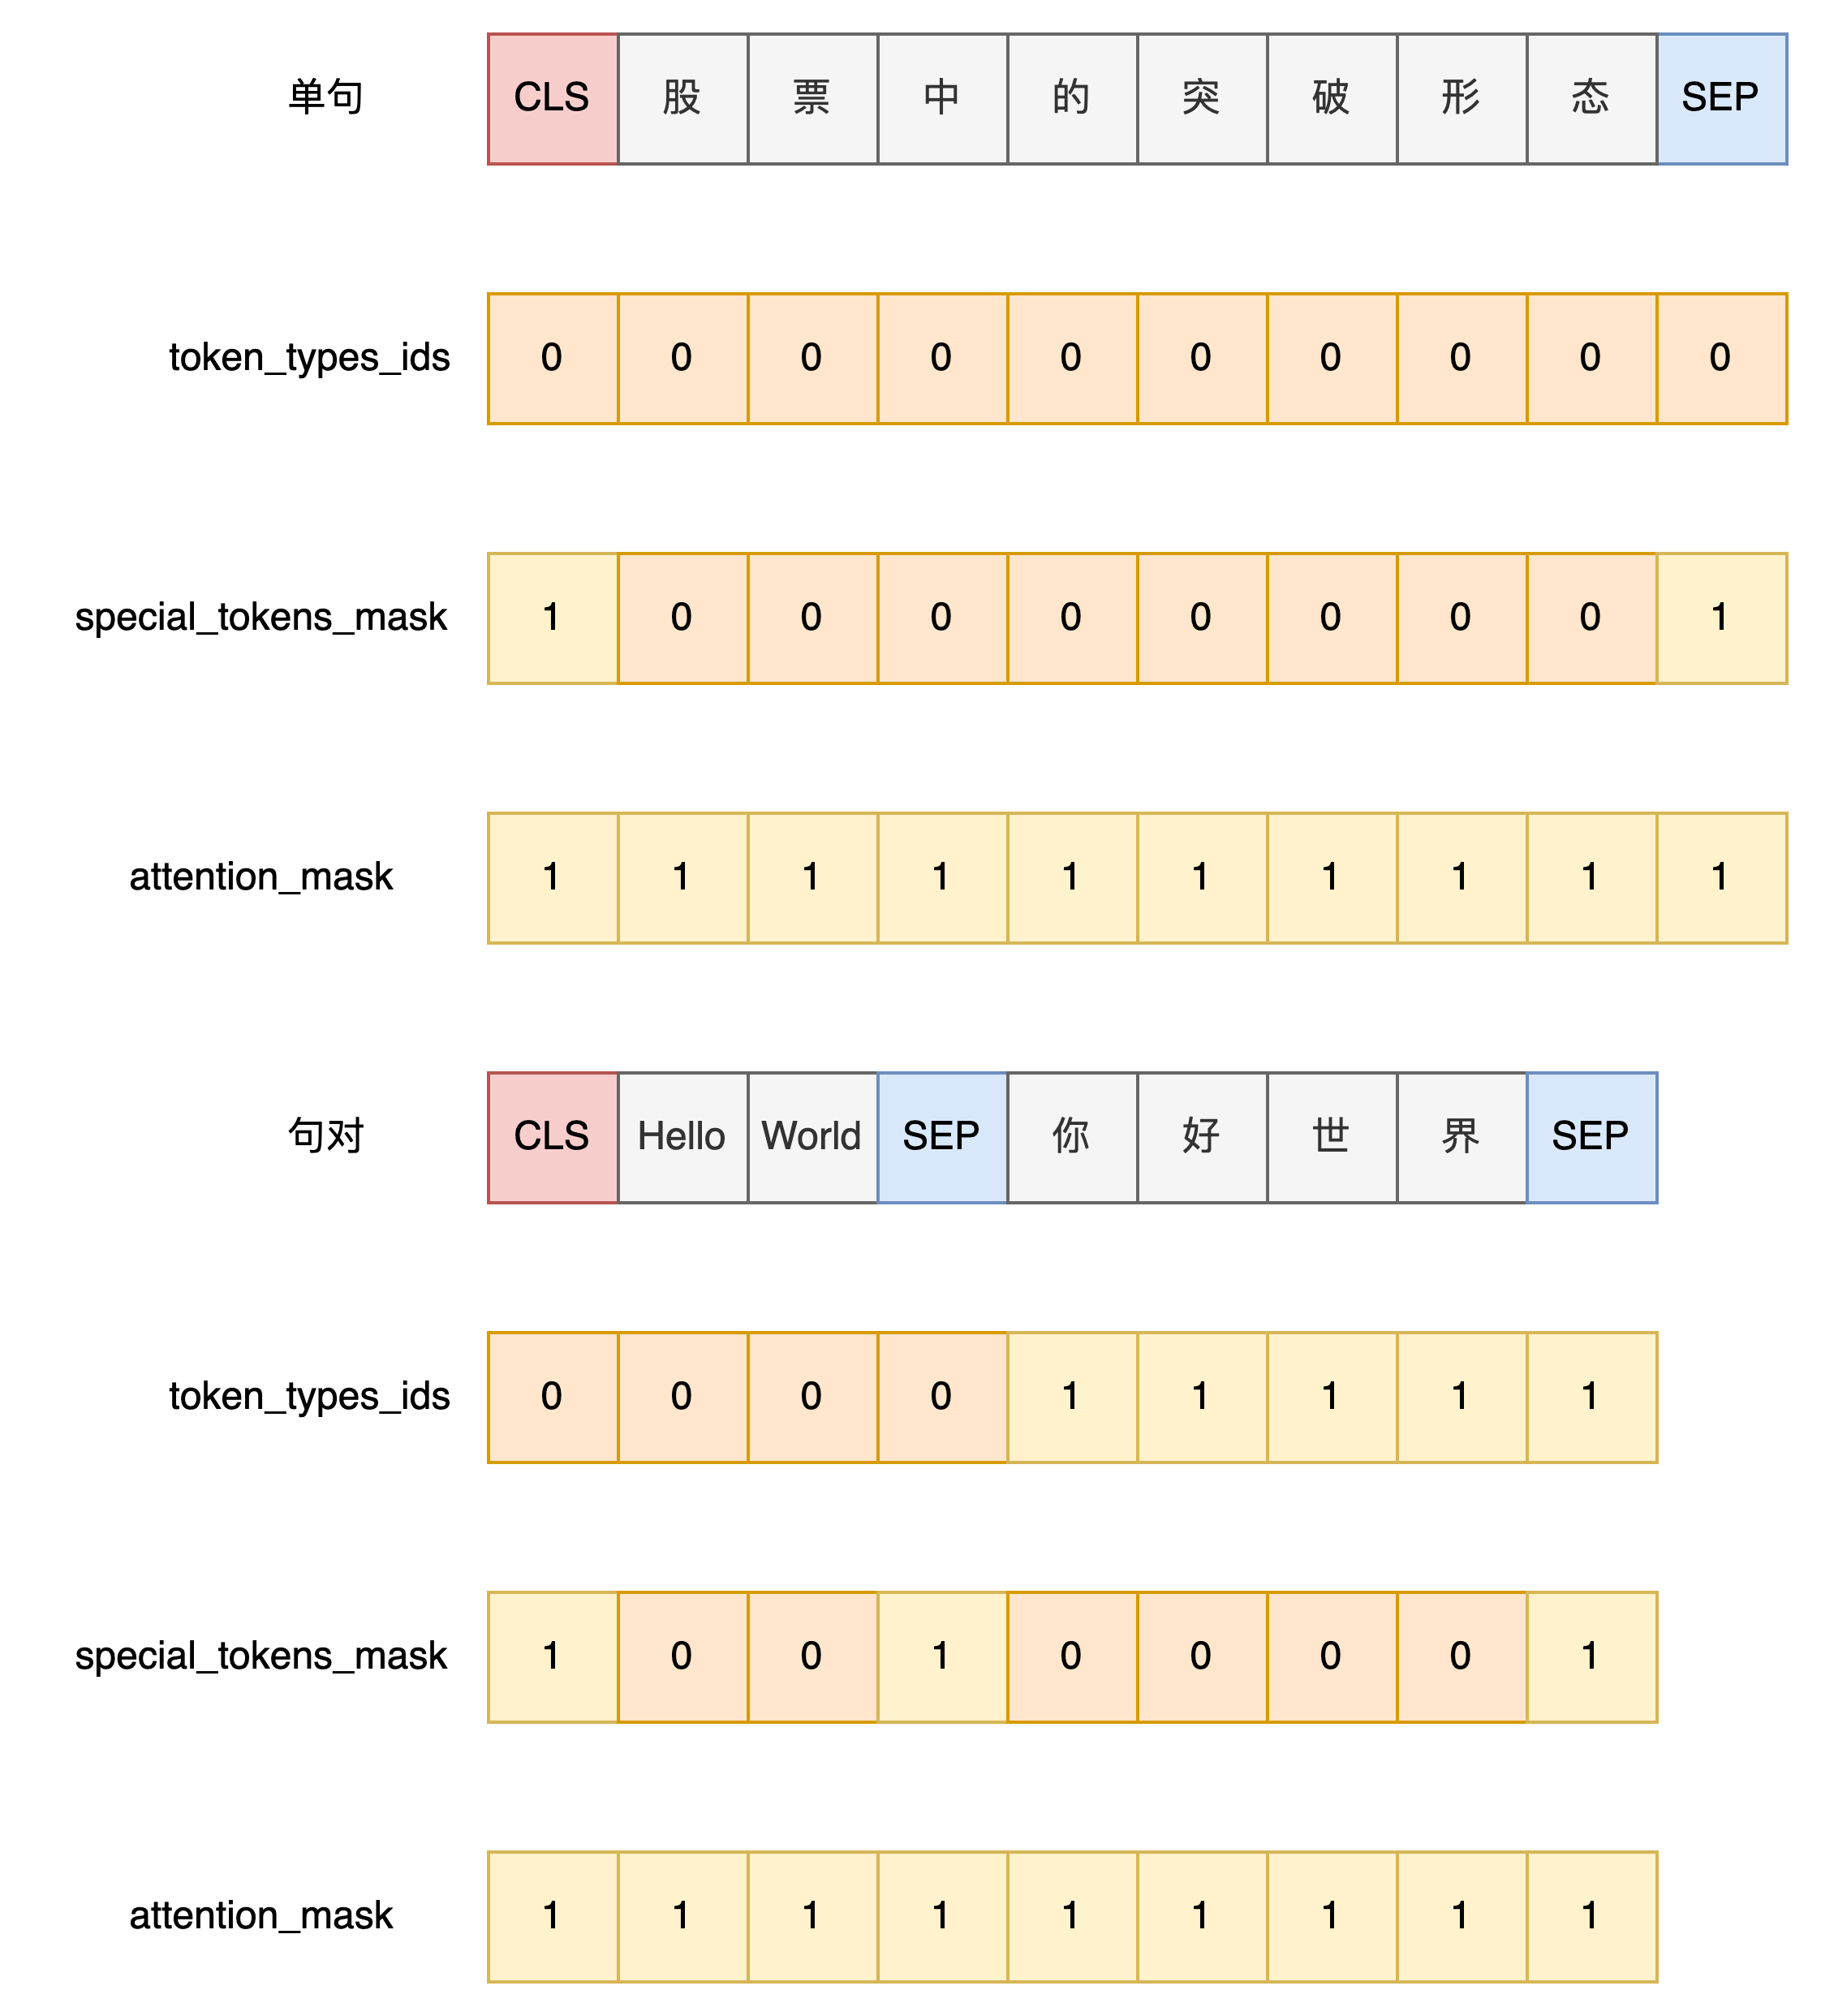
        # 生成注意力掩码,真实token对应1,填充token对应0
        attention_mask = [1 if mask_padding_with_zero else 0] * len(input_ids)
- 所有序列都填充到max_length长度,不足长度用padding填充
        # 记录输入长度
        input_len = len(input_ids)
        # 计算需要填充的长度 --- 所有输入序列等长,都等于max_length
        padding_length = max_length - len(input_ids)
        # 右填充
        input_ids = input_ids + ([pad_token] * padding_length)
        attention_mask = attention_mask + ([0 if mask_padding_with_zero else 1] * padding_length)
        token_type_ids = token_type_ids + ([pad_token_segment_id] * padding_length)
- 数据集中每一个样本最终都会解析得到一个InputFeatures

features.append(
            InputFeatures(input_ids=input_ids,
                          attention_mask=attention_mask,
                          token_type_ids=token_type_ids,
                          label=label,
                          input_len=input_len))
label 是当前文本对应的类别标签
input_len 是序列实际长度(含special tokens)
- 数据集预处理完后,将InputFeatures List列表组装起来得到需要的DataSet
dataset = TensorDataset(all_input_ids, all_attention_mask, all_token_type_ids, all_lens,all_labels)
模型架构
DataLoader
    train_sampler = RandomSampler(train_dataset) if args.local_rank == -1 else DistributedSampler(train_dataset)
    train_dataloader = DataLoader(train_dataset, sampler=train_sampler, batch_size=args.train_batch_size,collate_fn=collate_fn)
DataLoader 设置的回调方法cllote_fn负责对返回的一个batch,在返回前进行预处理:
def collate_fn(batch):
    all_input_ids, all_attention_mask, all_token_type_ids, all_lens, all_labels = map(torch.stack, zip(*batch))
    max_len = max(all_lens).item() # 计算当前批次中所有序列的实际最大长度
    all_input_ids = all_input_ids[:, :max_len] # 按照本批次序列中最大长度进行截断: max_length --> max_len
    all_attention_mask = all_attention_mask[:, :max_len]
    all_token_type_ids = all_token_type_ids[:, :max_len]
    return all_input_ids, all_attention_mask, all_token_type_ids, all_labels
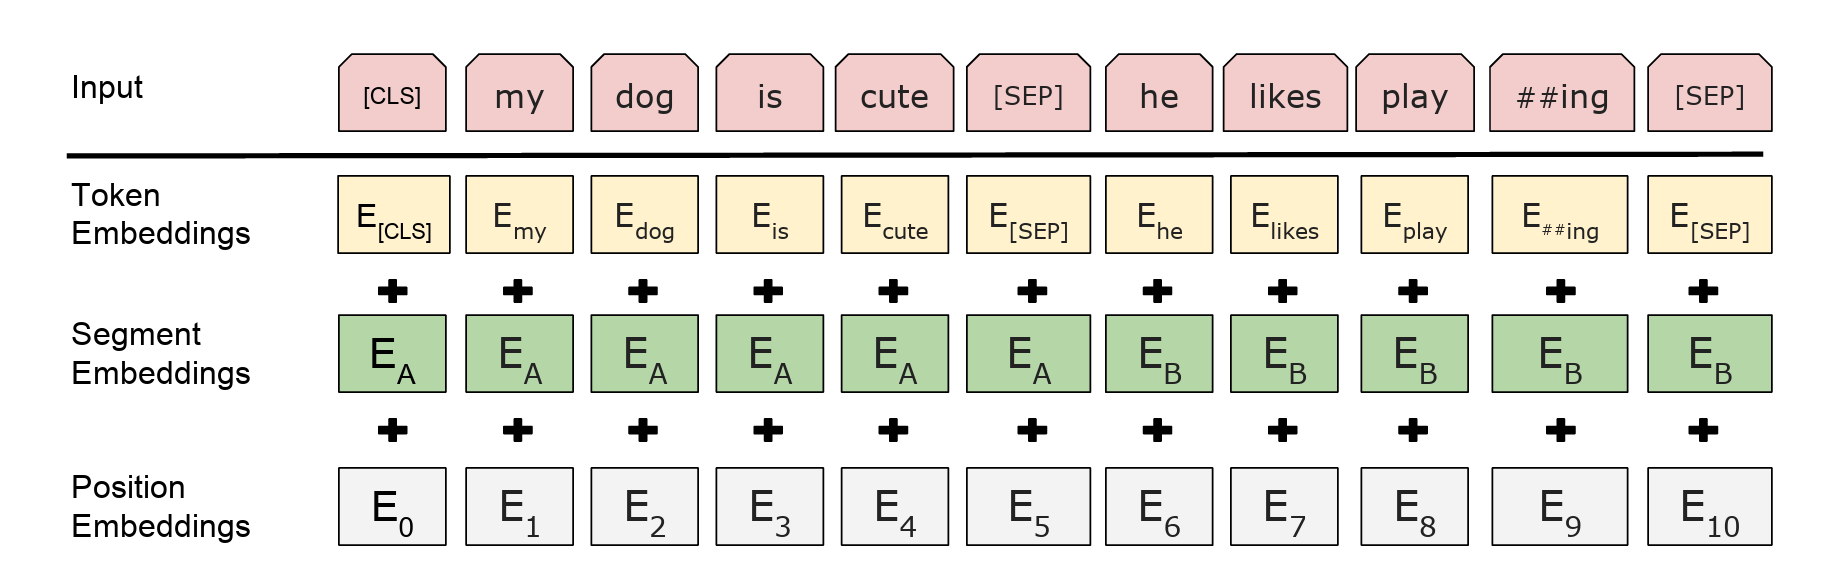
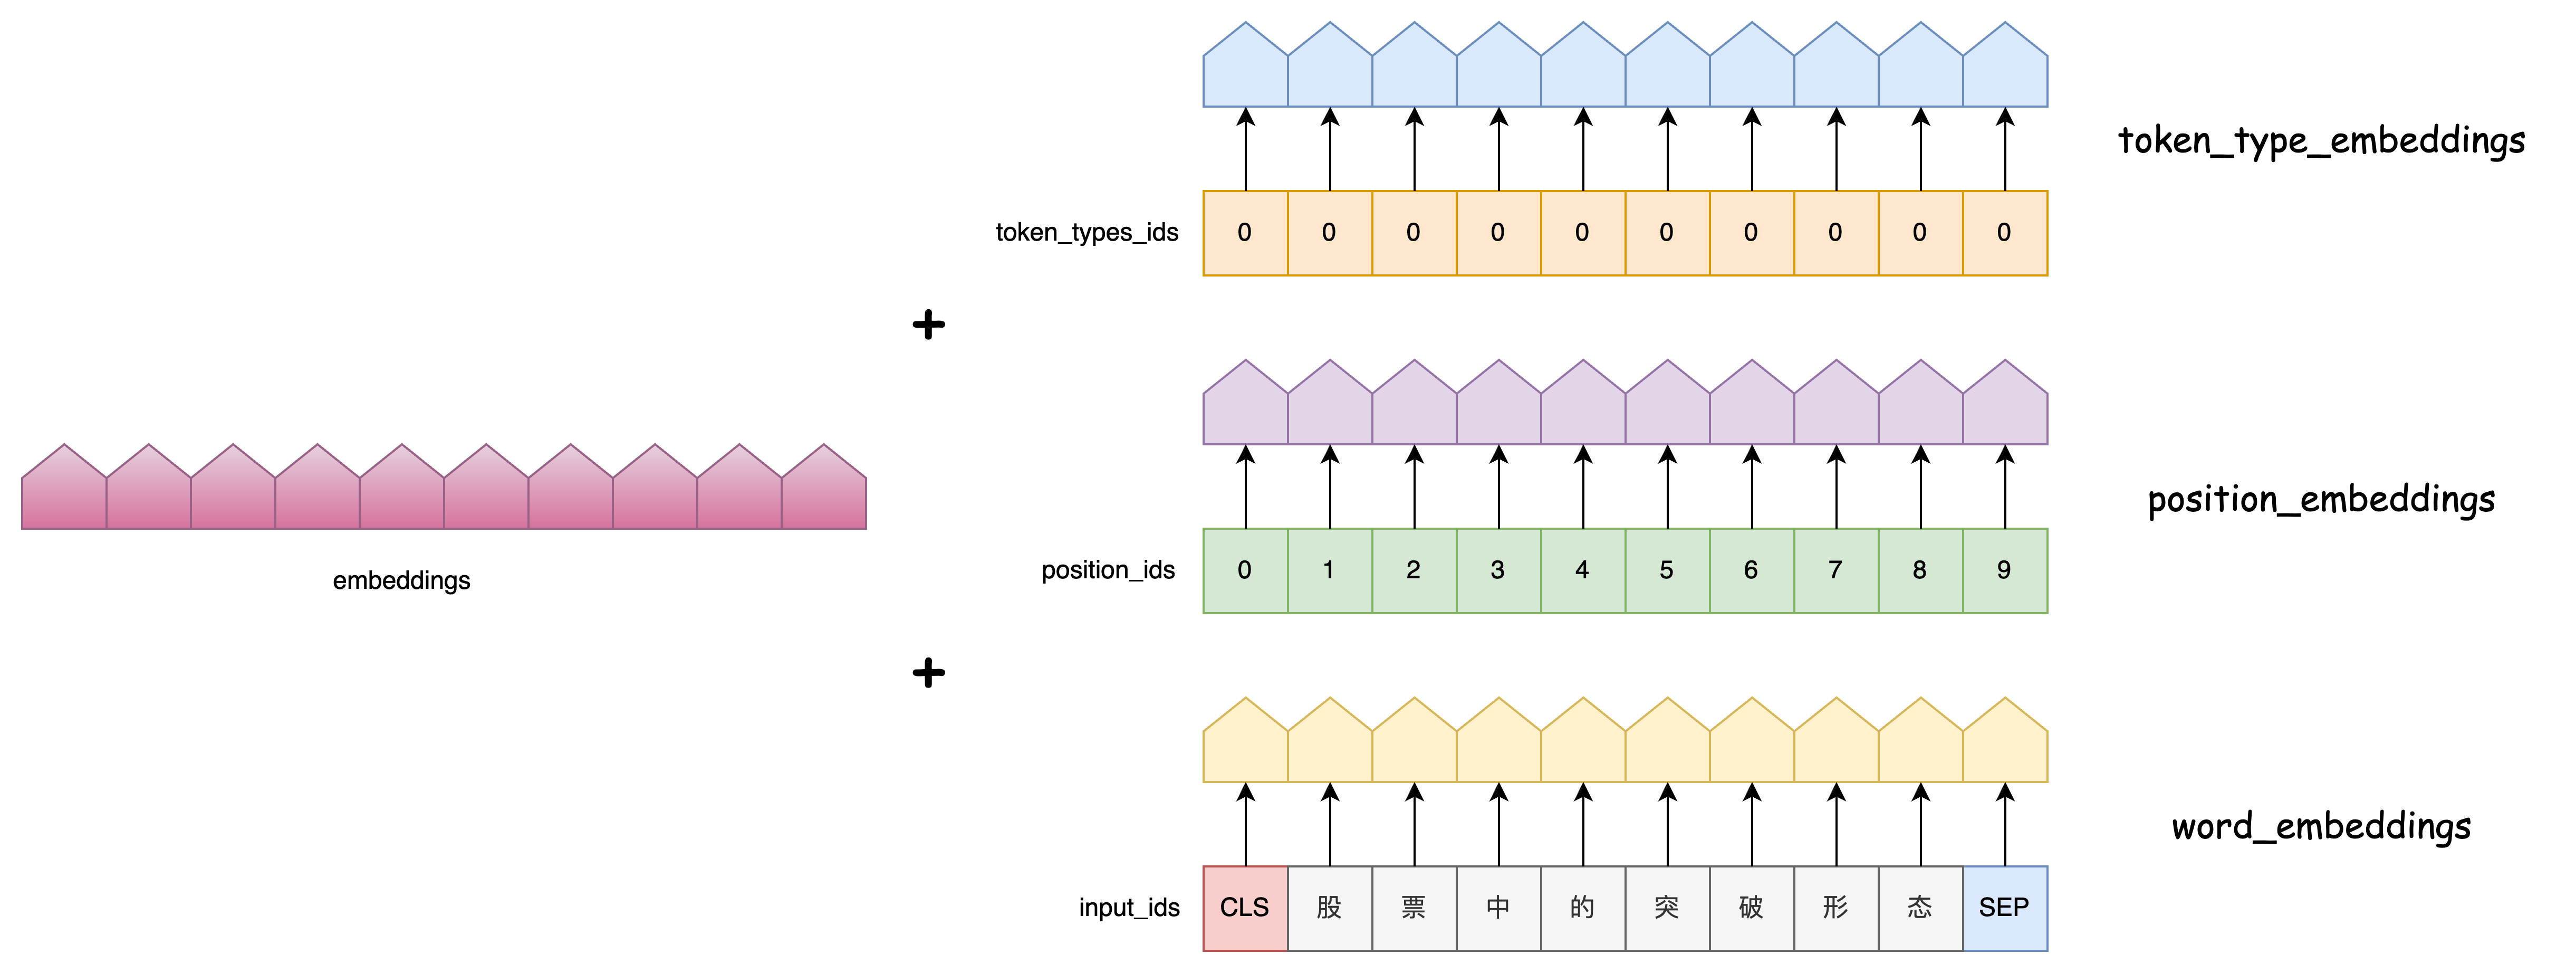
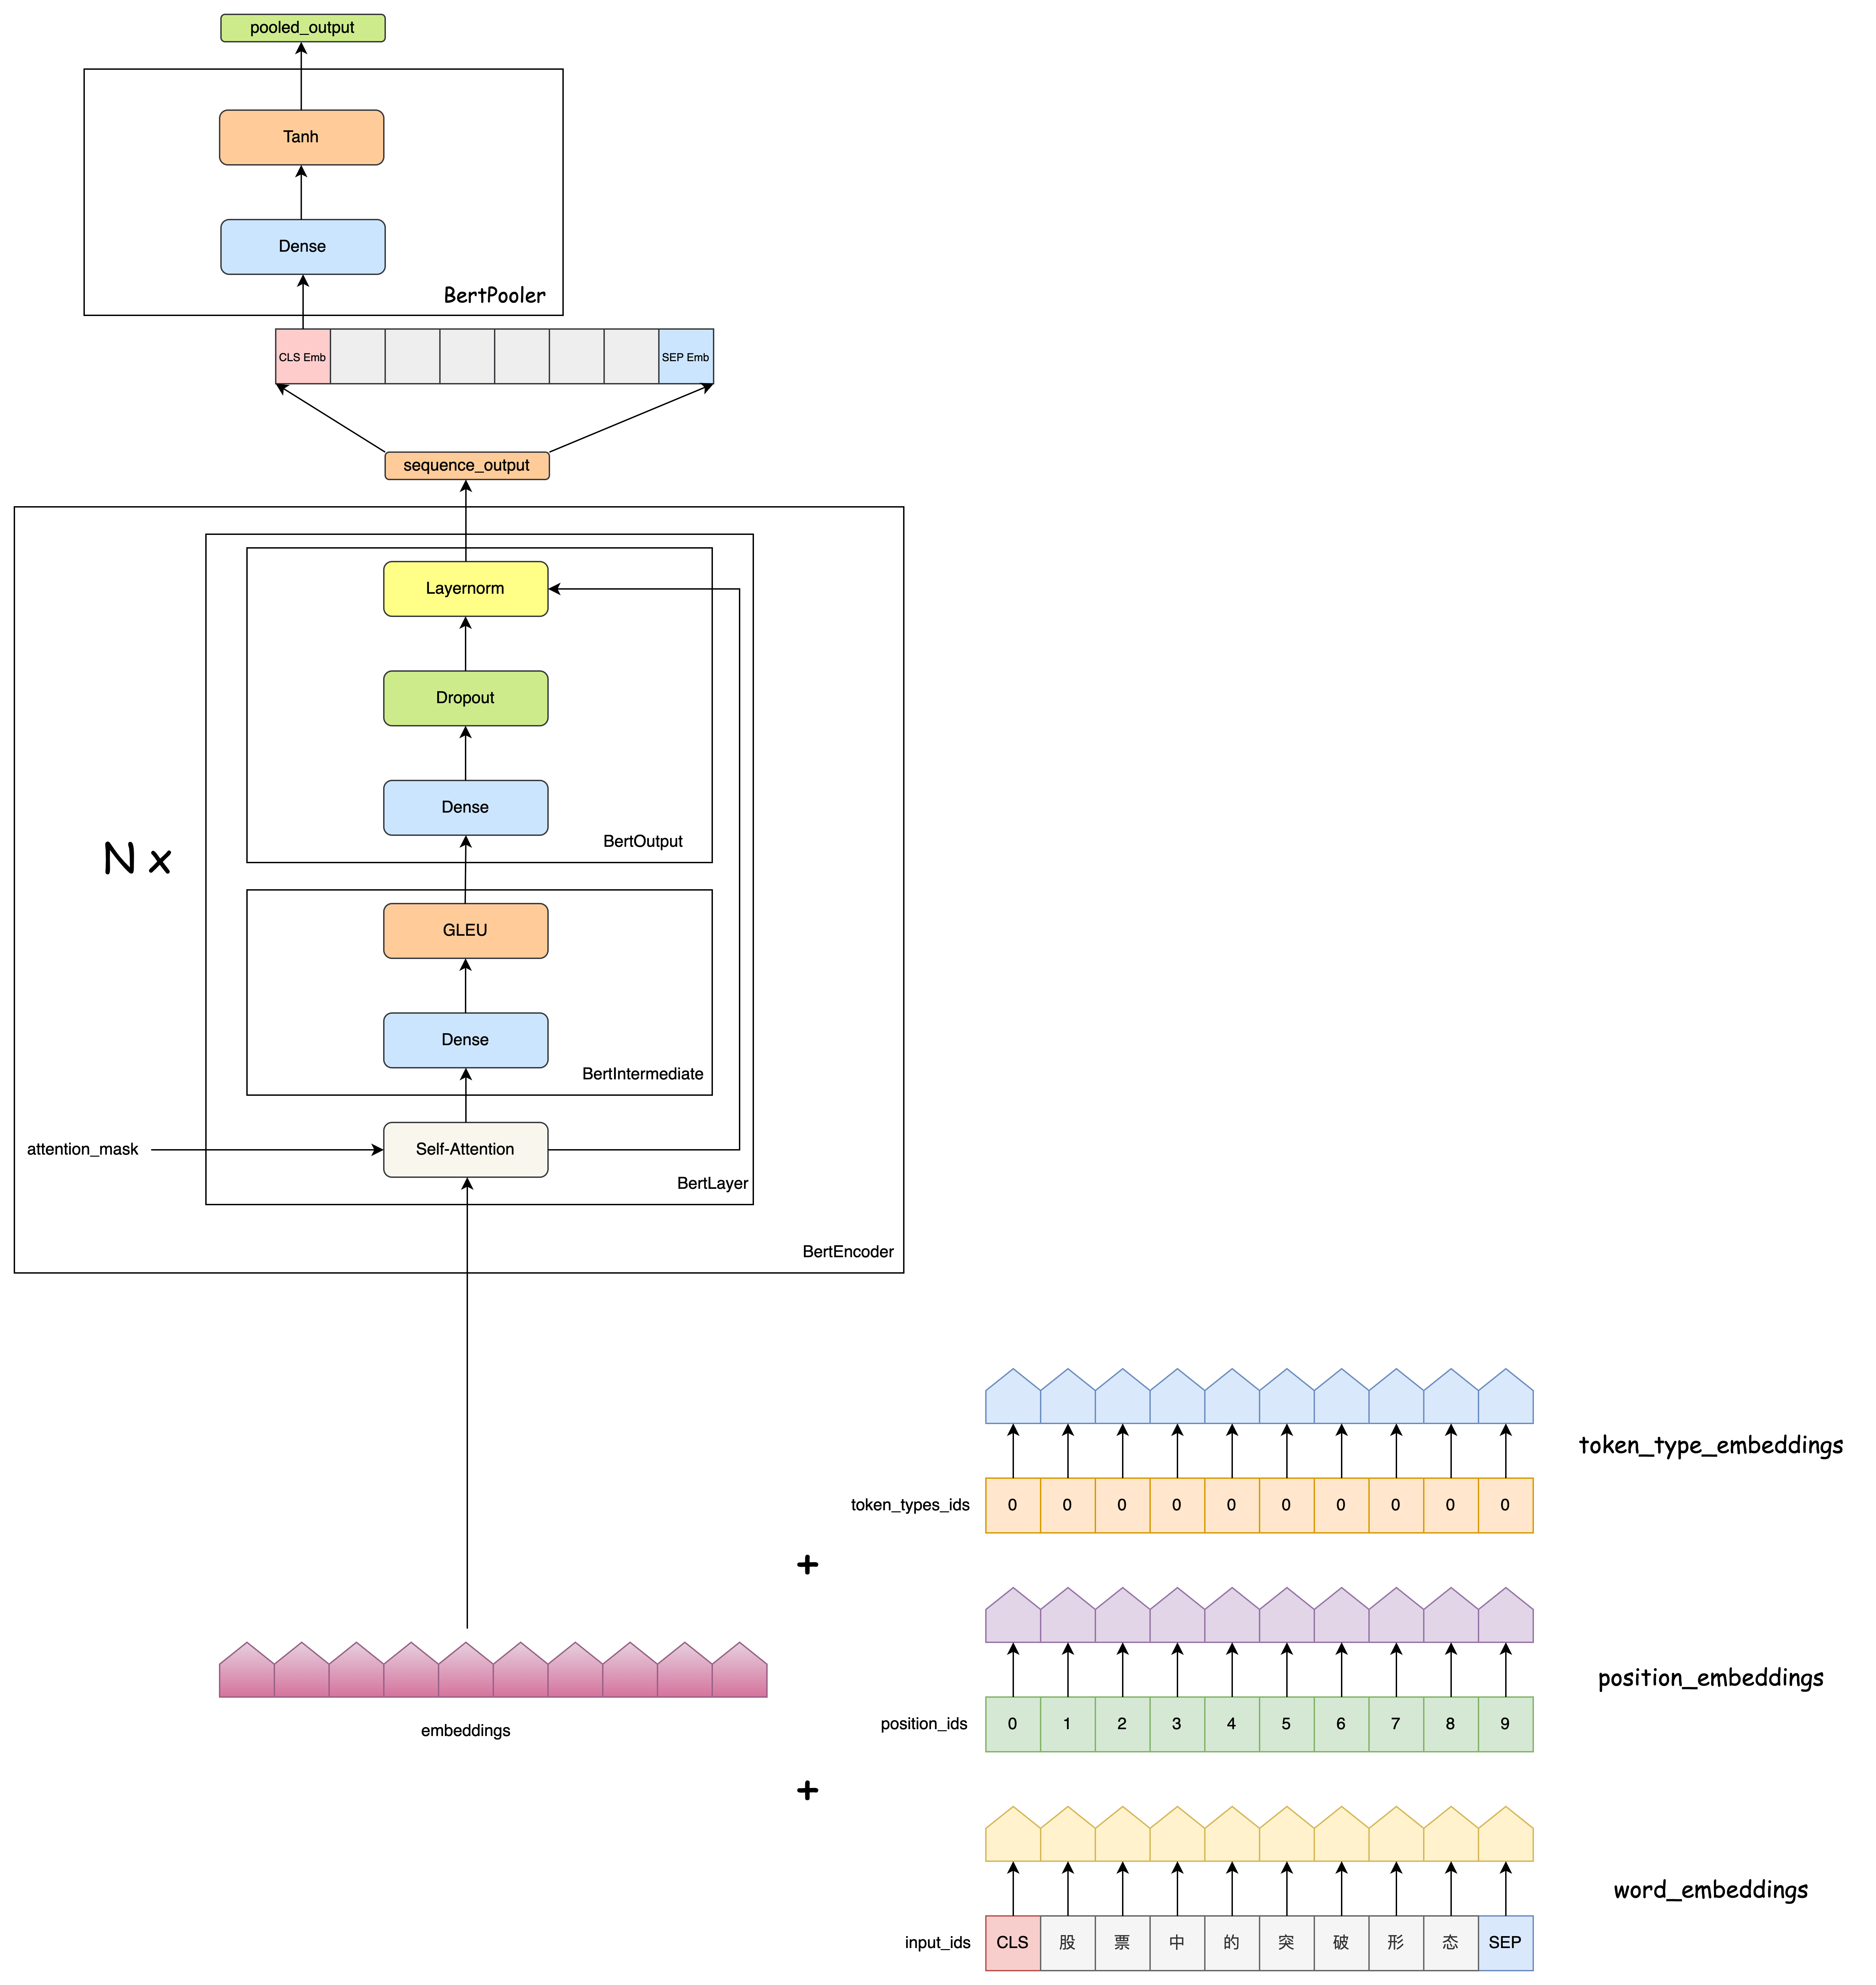
BertEmbeddings
class BertEmbeddings(nn.Module):
    def __init__(self, config):
        super(BertEmbeddings, self).__init__()
        self.word_embeddings = nn.Embedding(config.vocab_size, config.hidden_size, padding_idx=0)
        self.position_embeddings = nn.Embedding(config.max_position_embeddings, config.hidden_size)
        self.token_type_embeddings = nn.Embedding(config.type_vocab_size, config.hidden_size)
        self.LayerNorm = BertLayerNorm(config.hidden_size, eps=config.layer_norm_eps)
        self.dropout = nn.Dropout(config.hidden_dropout_prob)

    def forward(self, input_ids, token_type_ids=None, position_ids=None):
        seq_length = input_ids.size(1)
        if position_ids is None:
            # 为当前批次中的每个序列样本生成一个位置序列: (1,2,3,4,5,...) , 构成一个位置序列矩阵
            position_ids = torch.arange(seq_length, dtype=torch.long, device=input_ids.device)
            position_ids = position_ids.unsqueeze(0).expand_as(input_ids)
        if token_type_ids is None:
            token_type_ids = torch.zeros_like(input_ids)

        words_embeddings = self.word_embeddings(input_ids)
        position_embeddings = self.position_embeddings(position_ids) # 位置编码为可学习的矩阵
        token_type_embeddings = self.token_type_embeddings(token_type_ids) # 让模型自己学会区分不同的句子

        embeddings = words_embeddings + position_embeddings + token_type_embeddings
        embeddings = self.LayerNorm(embeddings)
        embeddings = self.dropout(embeddings)
        return embeddings
BertEncoder
BertLayer
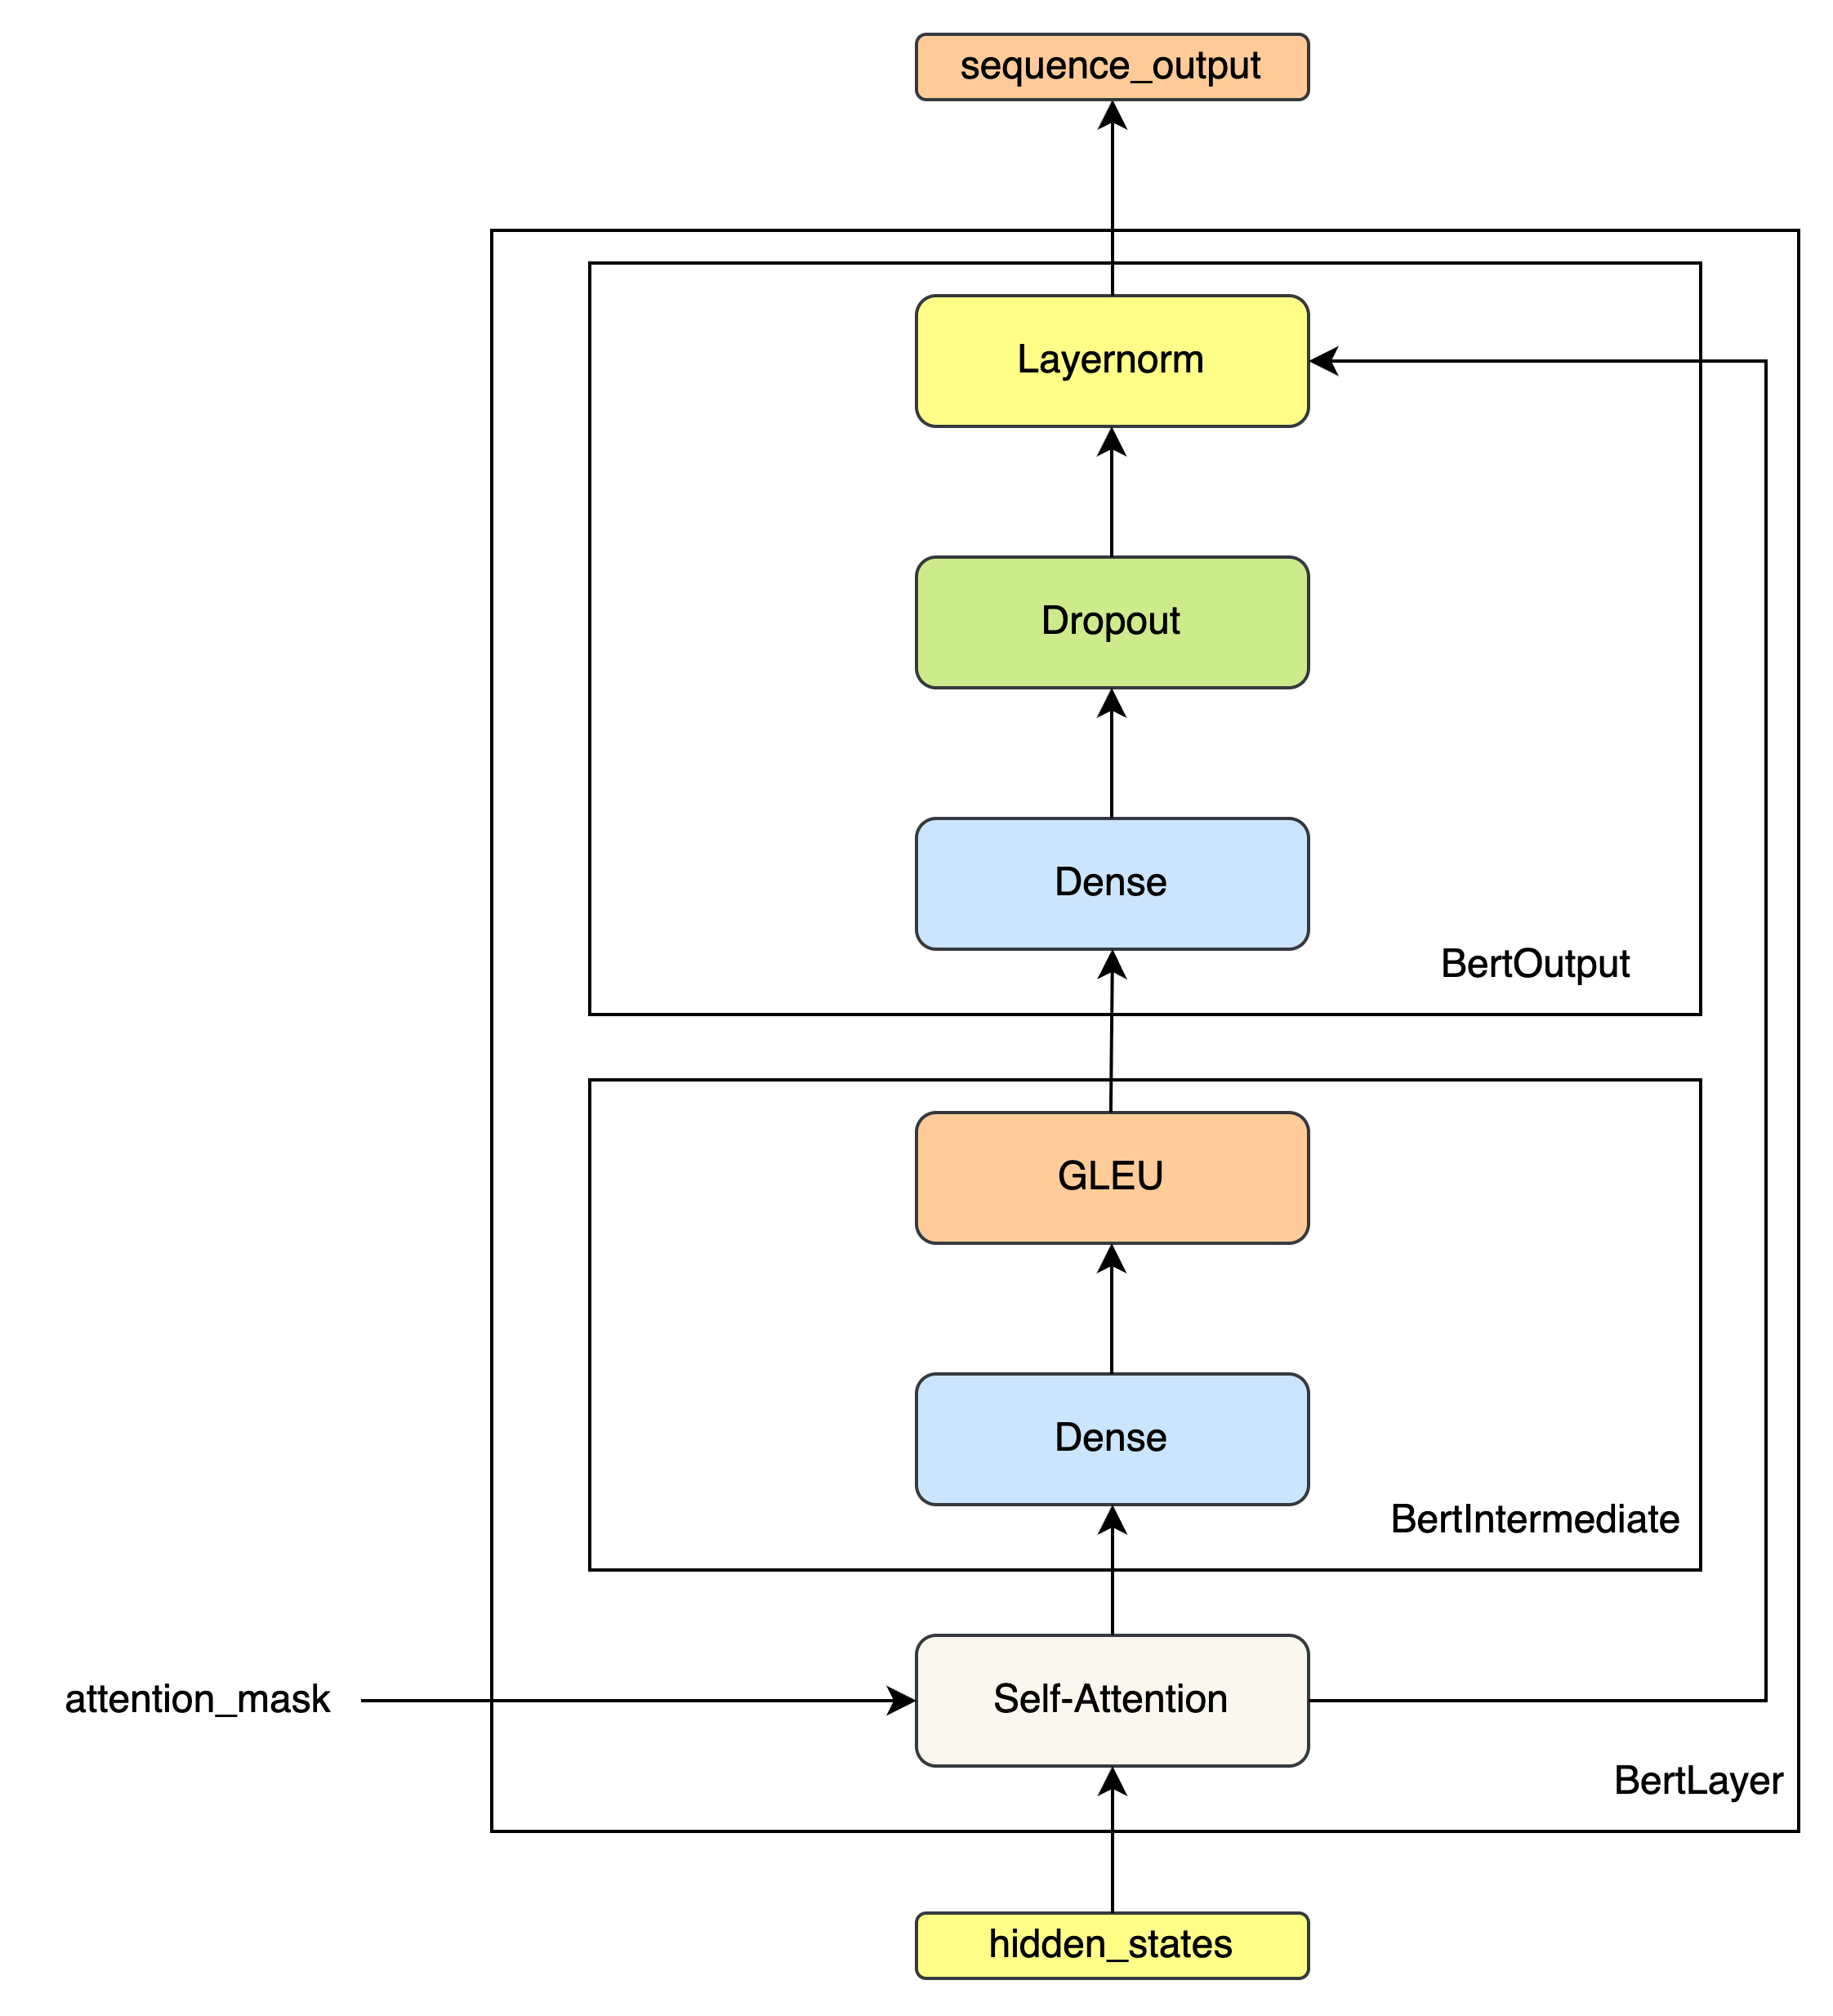
class BertIntermediate(nn.Module):
    def __init__(self, config):
        super(BertIntermediate, self).__init__()
        self.dense = nn.Linear(config.hidden_size, config.intermediate_size) # (768,3072)
        # 激活函数 - GLEU
        if isinstance(config.hidden_act, str) or (sys.version_info[0] == 2 and isinstance(config.hidden_act, unicode)):
            self.intermediate_act_fn = ACT2FN[config.hidden_act]
        else:
            self.intermediate_act_fn = config.hidden_act

    def forward(self, hidden_states):
        hidden_states = self.dense(hidden_states)
        hidden_states = self.intermediate_act_fn(hidden_states)  # 激活函数 - GLEU
        return hidden_states

class BertOutput(nn.Module):
    def __init__(self, config):
        super(BertOutput, self).__init__()
        self.dense = nn.Linear(config.intermediate_size, config.hidden_size) # (3072,768)
        self.LayerNorm = BertLayerNorm(config.hidden_size, eps=config.layer_norm_eps)
        self.dropout = nn.Dropout(config.hidden_dropout_prob)

    def forward(self, hidden_states, input_tensor):
        hidden_states = self.dense(hidden_states)
        hidden_states = self.dropout(hidden_states)
        hidden_states = self.LayerNorm(hidden_states + input_tensor)
        return hidden_states

class BertLayer(nn.Module):
    def __init__(self, config):
        super(BertLayer, self).__init__()
        self.attention = BertAttention(config)
        self.intermediate = BertIntermediate(config)
        self.output = BertOutput(config)

    def forward(self, hidden_states, attention_mask=None):
        attention_output = self.attention(hidden_states, attention_mask)
        intermediate_output = self.intermediate(attention_output)
        layer_output = self.output(intermediate_output, attention_output)
        return layer_output
BertEncoder
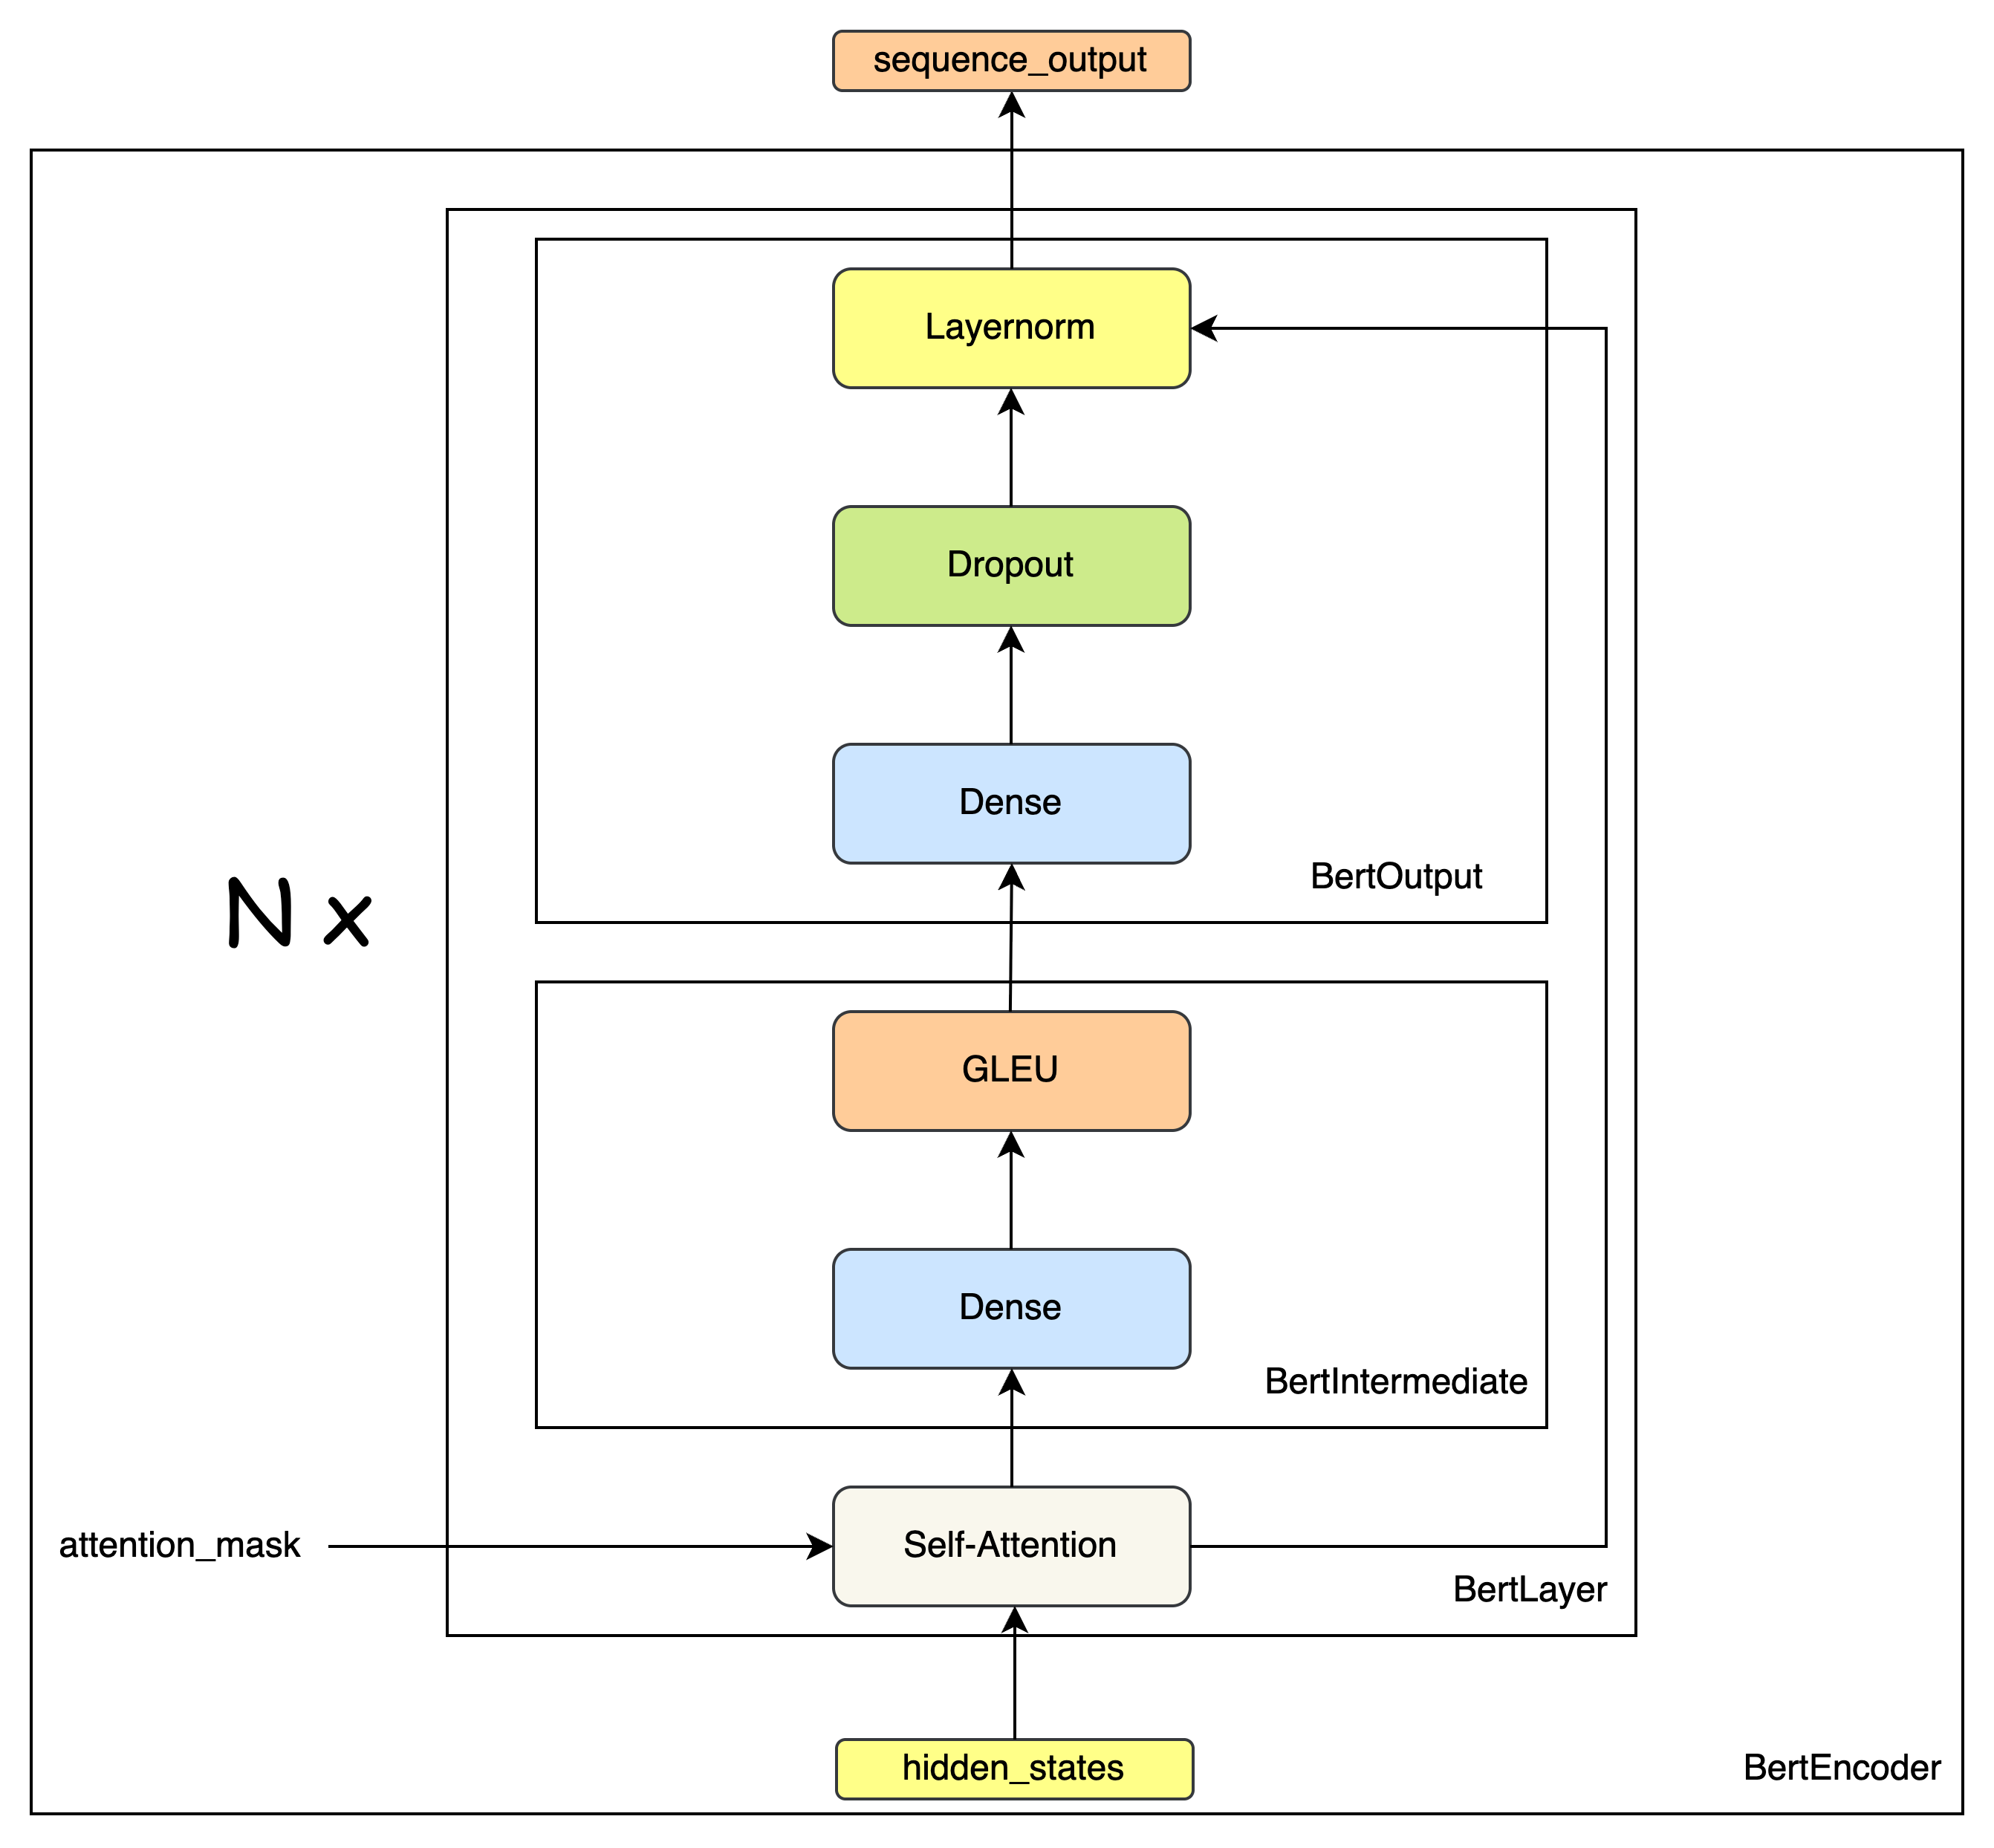
class BertEncoder(nn.Module):
    def __init__(self, config):
        super(BertEncoder, self).__init__()
        self.layer = nn.ModuleList([BertLayer(config) for _ in range(config.num_hidden_layers)])

    def forward(self, hidden_states, attention_mask=None, head_mask=None):
        for i, layer_module in enumerate(self.layer):
            hidden_states = layer_module(hidden_states, attention_mask, head_mask[i])
        return hidden_states
BertPooler
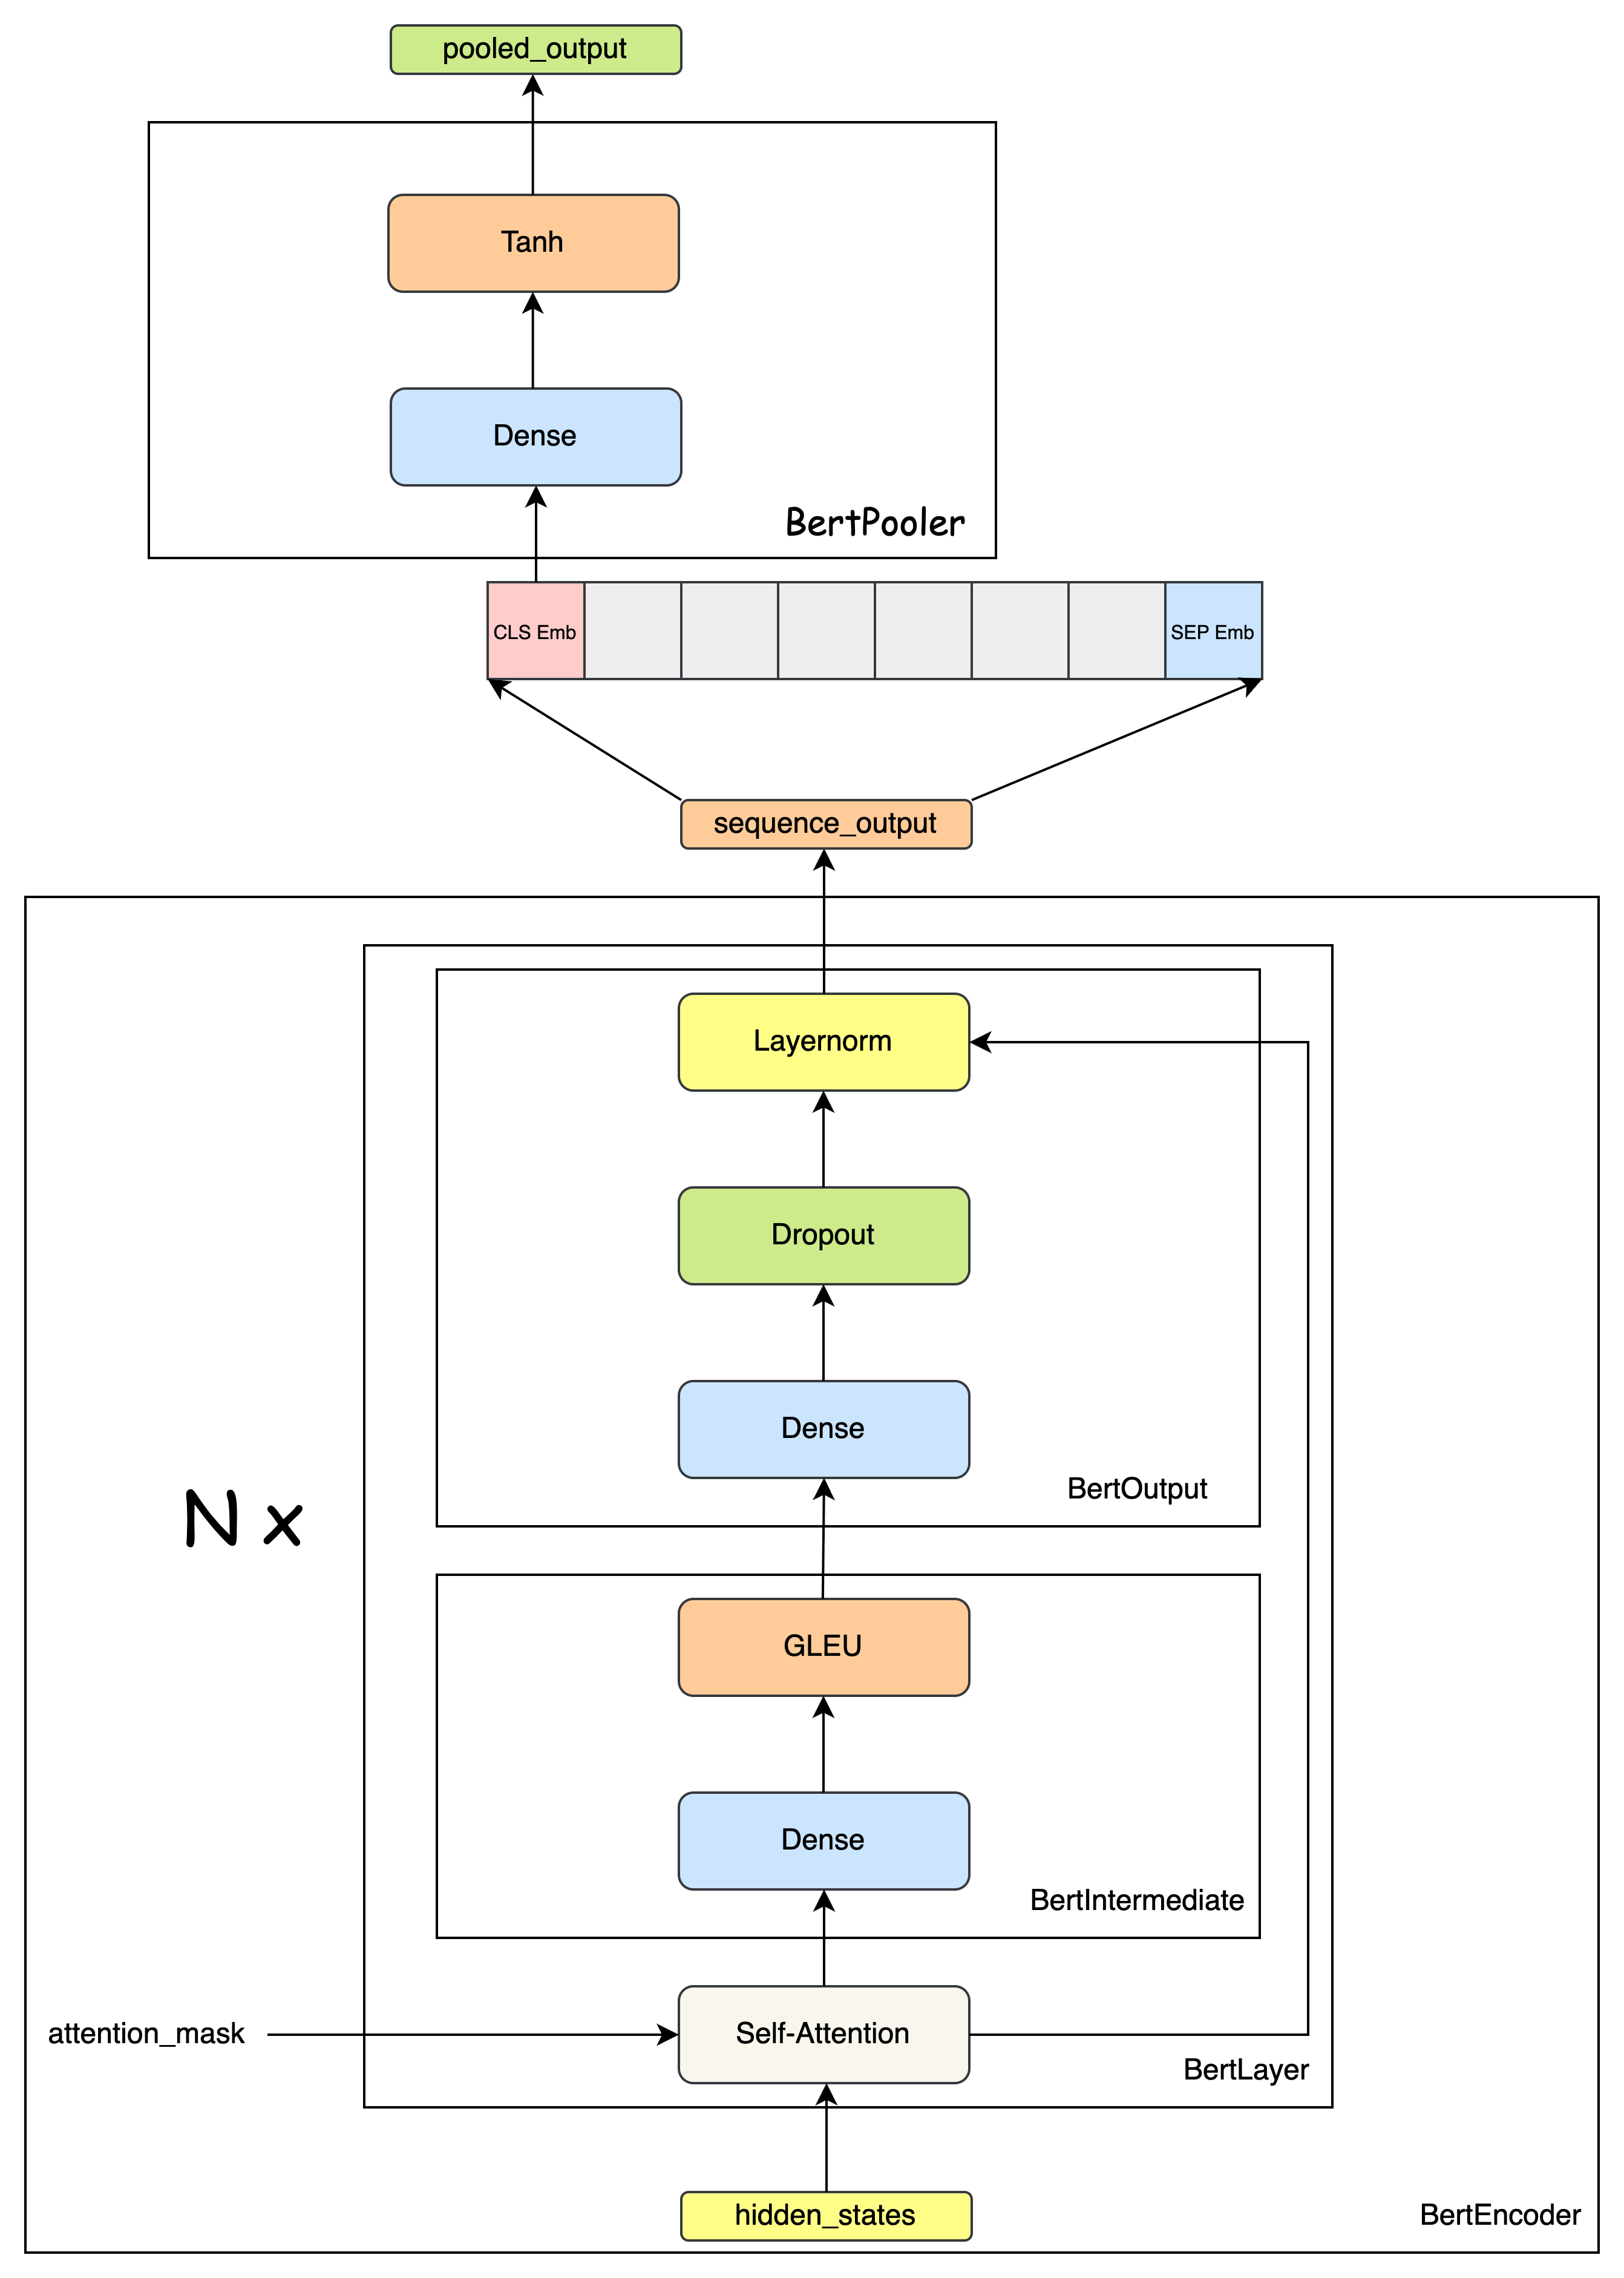
class BertPooler(nn.Module):
    def __init__(self, config):
        super(BertPooler, self).__init__()
        self.dense = nn.Linear(config.hidden_size, config.hidden_size)
        self.activation = nn.Tanh()

    def forward(self, hidden_states):
        # We "pool" the model by simply taking the hidden state corresponding
        # to the first token.
        first_token_tensor = hidden_states[:, 0] # CLS Token Context Embeddings
        pooled_output = self.dense(first_token_tensor)
        pooled_output = self.activation(pooled_output)
        return pooled_output
BertModel
class BertModel(BertPreTrainedModel):
    def __init__(self, config):
        super(BertModel, self).__init__(config)
        self.embeddings = BertEmbeddings(config)
        self.encoder = BertEncoder(config)
        self.pooler = BertPooler(config)
        self.init_weights()

    def forward(self, input_ids, attention_mask=None, token_type_ids=None, position_ids=None, head_mask=None):
        extended_attention_mask = attention_mask.unsqueeze(1).unsqueeze(2)
        extended_attention_mask = extended_attention_mask.to(dtype=next(self.parameters()).dtype) # fp16 compatibility
        extended_attention_mask = (1.0 - extended_attention_mask) * -10000.0

        embedding_output = self.embeddings(input_ids, position_ids=position_ids, token_type_ids=token_type_ids)
        sequence_output = self.encoder(embedding_output,
                                       extended_attention_mask, # padding mask
                                      )
        pooled_output = self.pooler(sequence_output)

        outputs = (sequence_output, pooled_output,)
        return outputs
BertForSequenceClassification
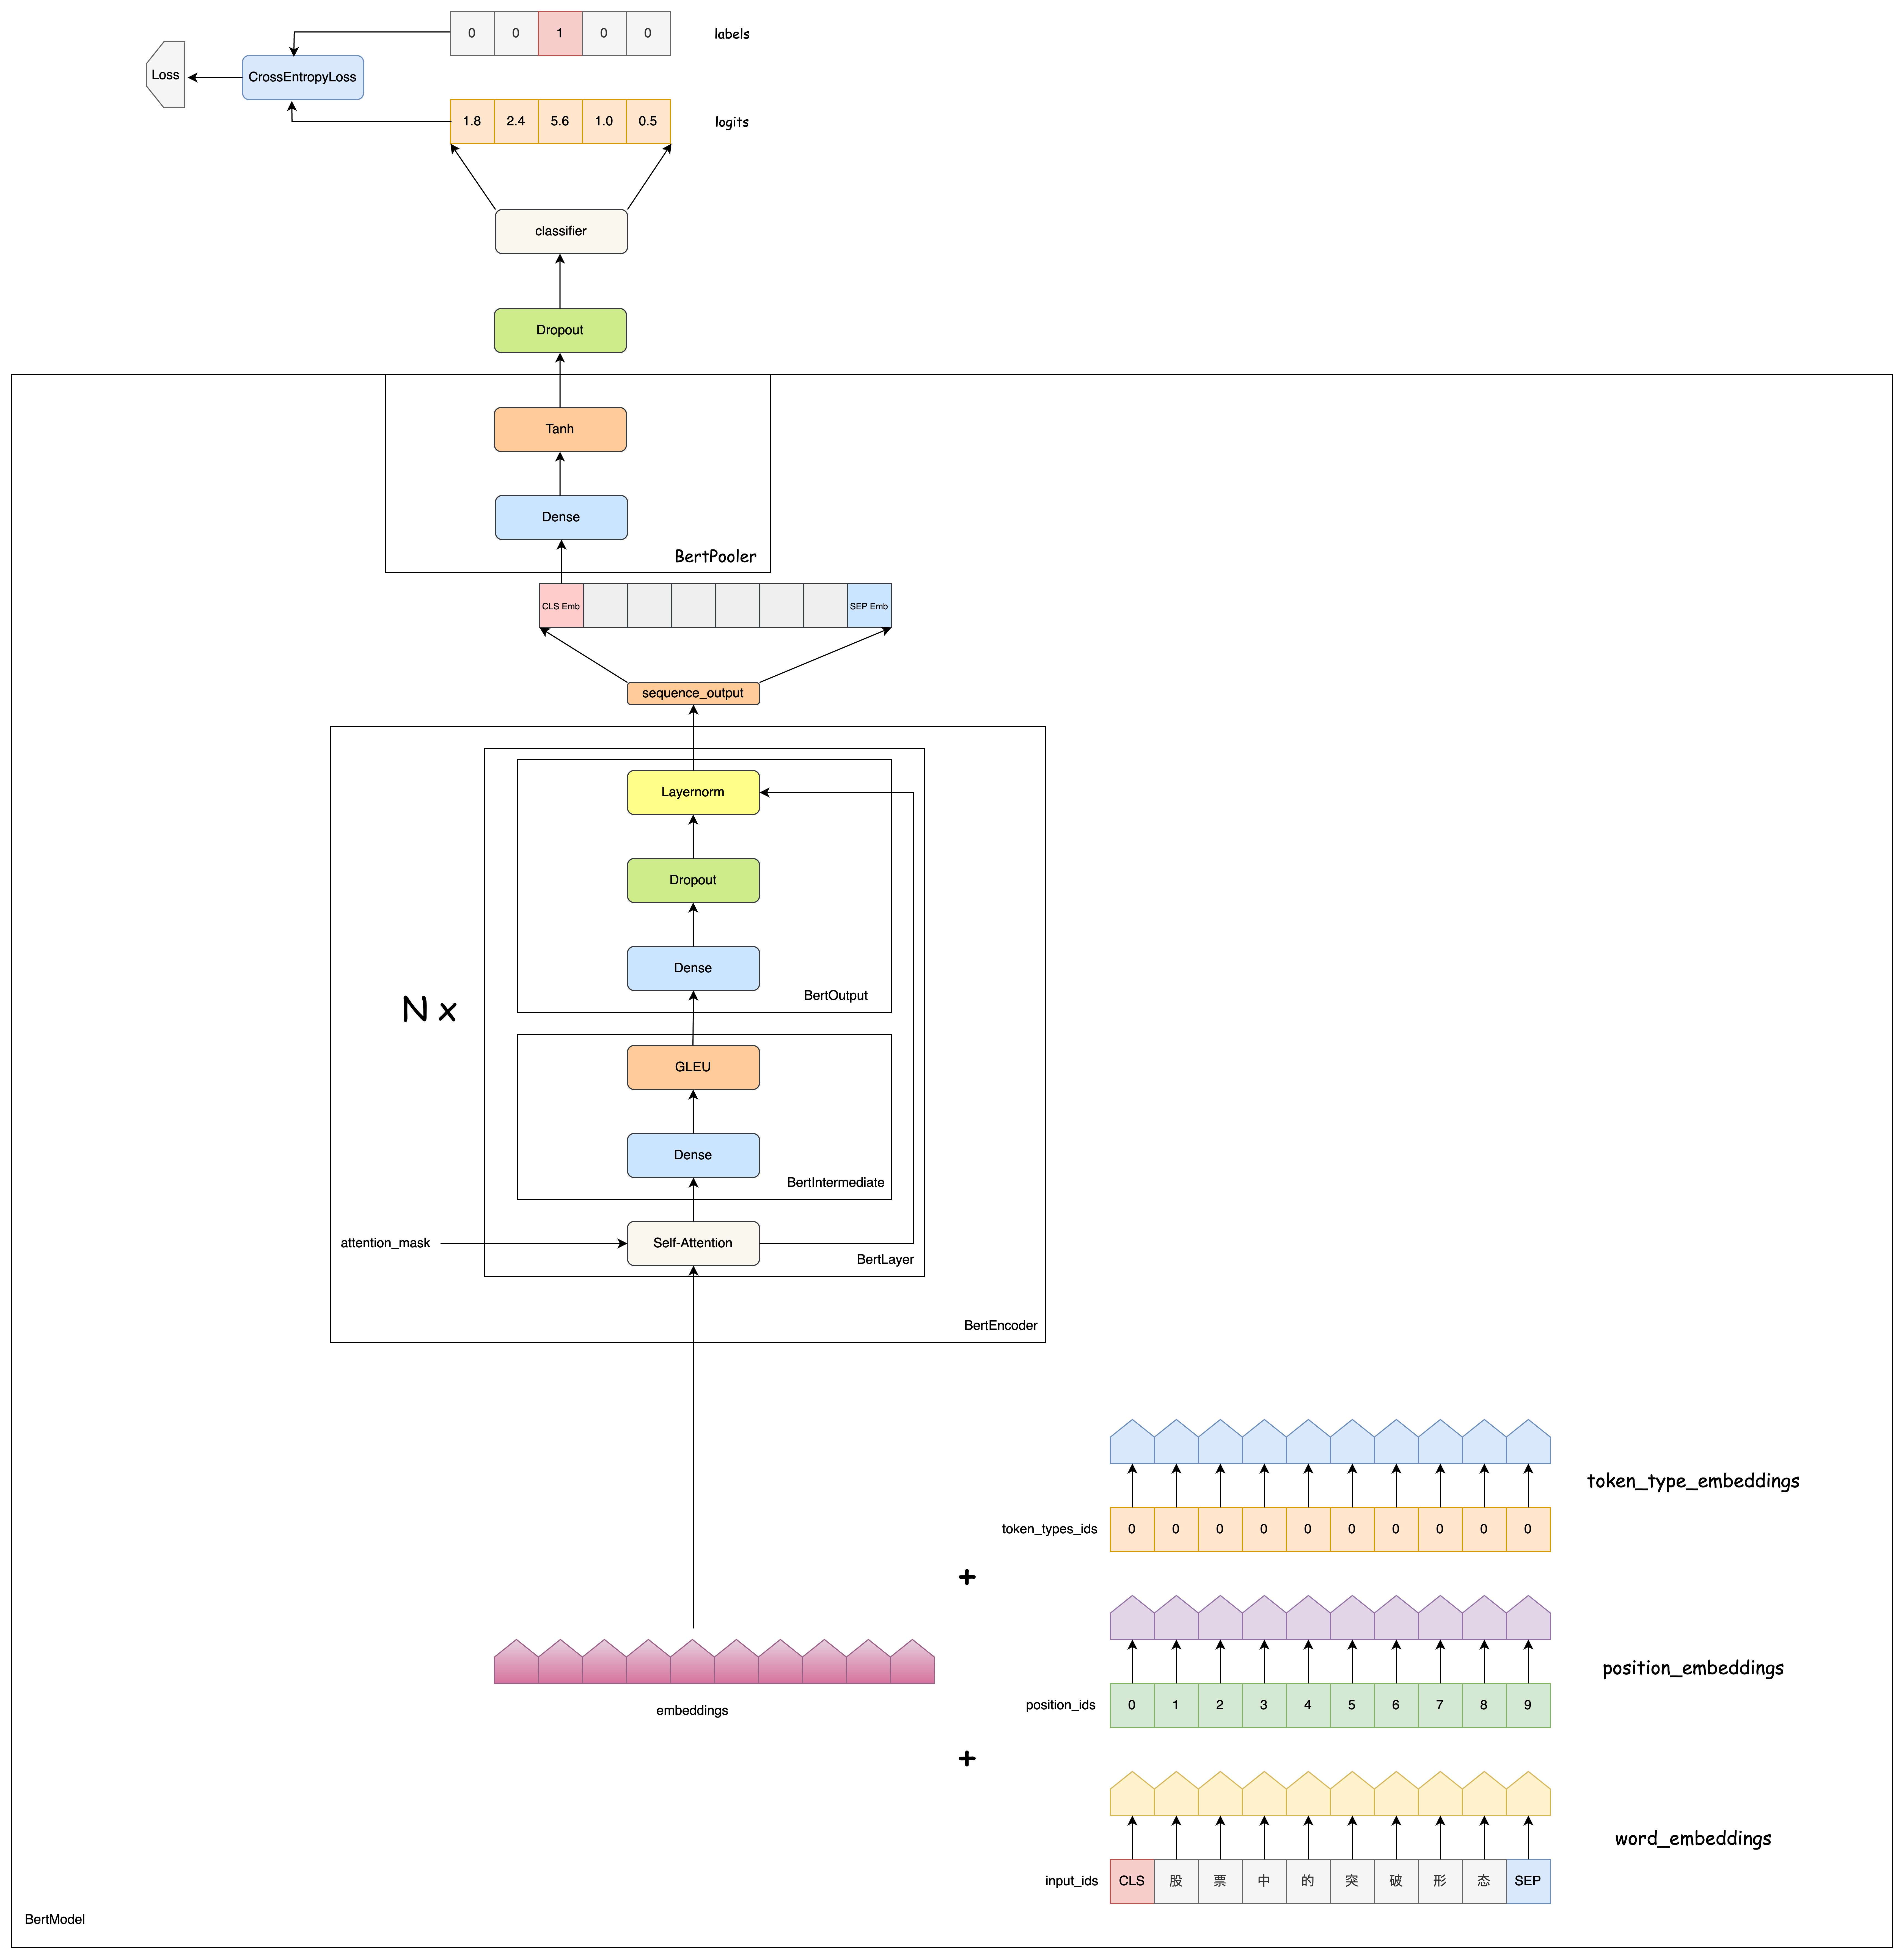
class BertForSequenceClassification(BertPreTrainedModel):
    def __init__(self, config):
        super(BertForSequenceClassification, self).__init__(config)
        self.num_labels = config.num_labels
        self.bert = BertModel(config)
        self.dropout = nn.Dropout(config.hidden_dropout_prob)
        self.classifier = nn.Linear(config.hidden_size, self.config.num_labels)

        self.init_weights()

    def forward(self, input_ids, attention_mask=None, token_type_ids=None,
                position_ids=None, head_mask=None, labels=None):

        outputs = self.bert(input_ids,
                            attention_mask=attention_mask, # padding mask
                            token_type_ids=token_type_ids,
                            position_ids=position_ids,
                            head_mask=head_mask) # None ?

        pooled_output = outputs[1] # 对于分类任务来说,只需要去除CLS Token用于分类任务即可

        pooled_output = self.dropout(pooled_output)
        logits = self.classifier(pooled_output)

        outputs = (logits,) + outputs[2:]  # add hidden states and attention if they are here

        if labels is not None:
            if self.num_labels == 1:
                #  We are doing regression
                loss_fct = MSELoss()
                loss = loss_fct(logits.view(-1), labels.view(-1))
            else:
                loss_fct = CrossEntropyLoss()
                loss = loss_fct(logits.view(-1, self.num_labels), labels.view(-1))
            outputs = (loss,) + outputs

        return outputs  # (loss), logits, (hidden_states), (attentions)
BertAttention
BertSelfAttention
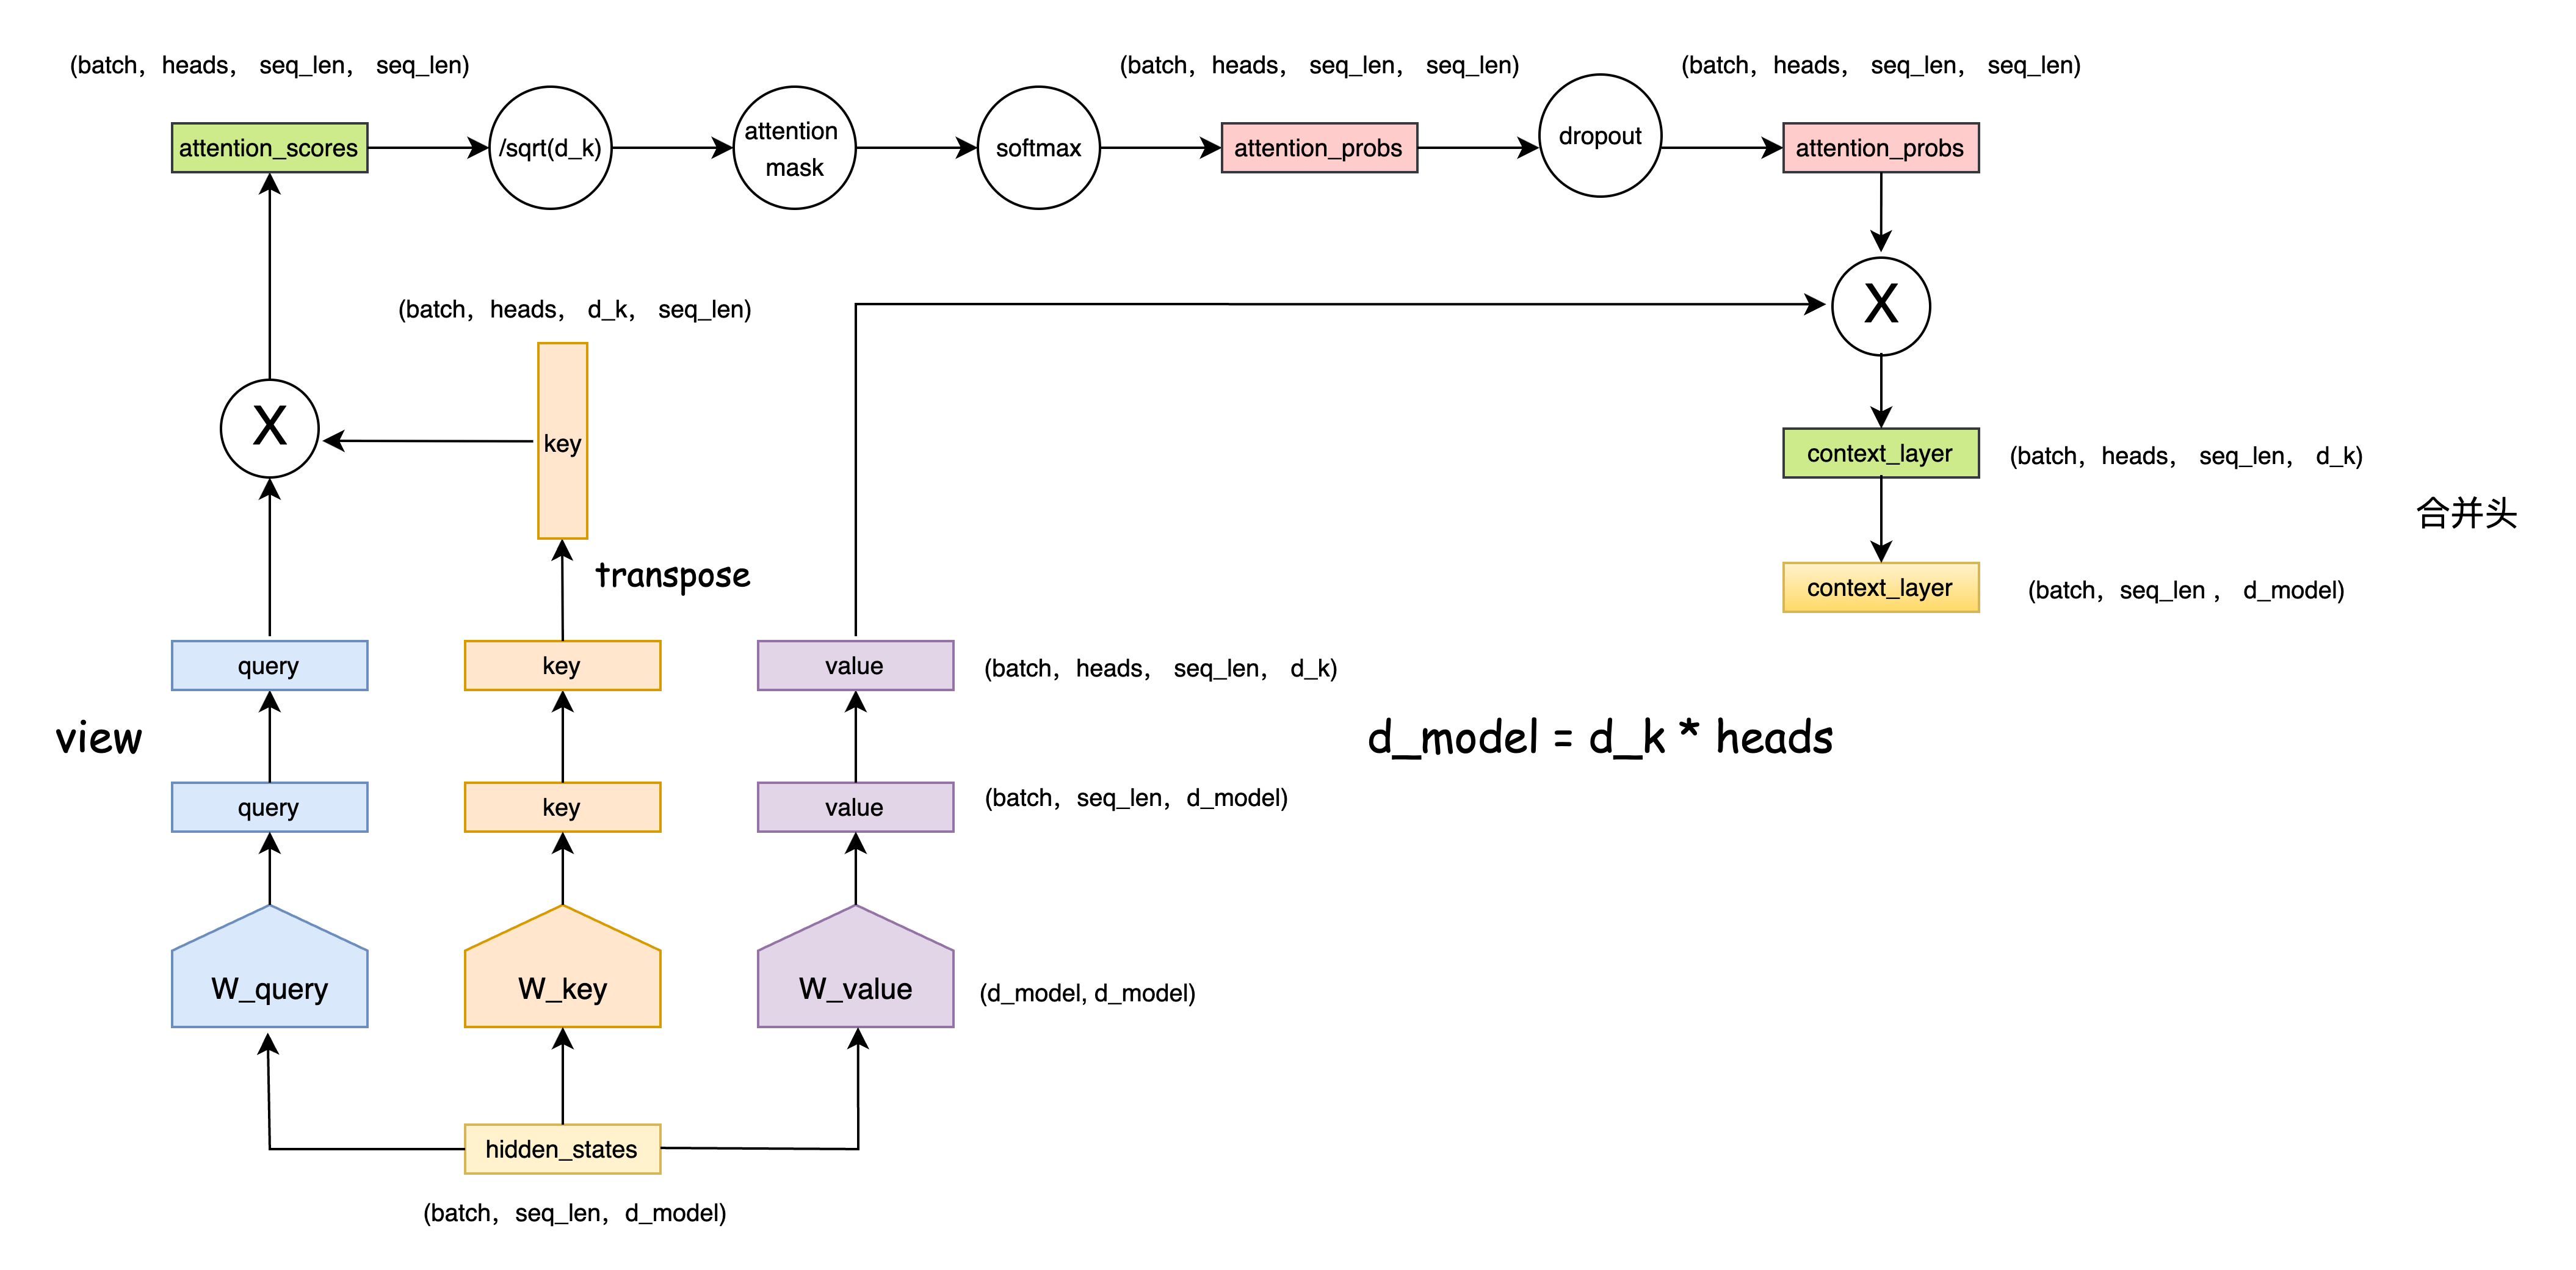
class BertSelfAttention(nn.Module):
    def __init__(self, config):
        super(BertSelfAttention, self).__init__()
        self.output_attentions = config.output_attentions

        self.num_attention_heads = config.num_attention_heads
        self.attention_head_size = int(config.hidden_size / config.num_attention_heads)
        self.all_head_size = self.num_attention_heads * self.attention_head_size

        self.query = nn.Linear(config.hidden_size, self.all_head_size)
        self.key = nn.Linear(config.hidden_size, self.all_head_size)
        self.value = nn.Linear(config.hidden_size, self.all_head_size)

        self.dropout = nn.Dropout(config.attention_probs_dropout_prob)

    def transpose_for_scores(self, x):
        new_x_shape = x.size()[:-1] + (self.num_attention_heads, self.attention_head_size)
        x = x.view(*new_x_shape)
        return x.permute(0, 2, 1, 3)

    def forward(self, hidden_states, attention_mask=None, head_mask=None):
        mixed_query_layer = self.query(hidden_states)
        mixed_key_layer = self.key(hidden_states)
        mixed_value_layer = self.value(hidden_states)
        # view 成多头格式: (batch,heads,seq_len,d_k)
        query_layer = self.transpose_for_scores(mixed_query_layer)
        key_layer = self.transpose_for_scores(mixed_key_layer)
        value_layer = self.transpose_for_scores(mixed_value_layer)

        # Take the dot product between "query" and "key" to get the raw attention scores.
        attention_scores = torch.matmul(query_layer, key_layer.transpose(-1, -2)) # (batch,heads,d_k,seq_len)
        attention_scores = attention_scores / math.sqrt(self.attention_head_size)
        if attention_mask is not None:
            # Apply the attention mask is (precomputed for all layers in BertModel forward() function)
            attention_scores = attention_scores + attention_mask

        # Normalize the attention scores to probabilities.
        attention_probs = nn.Softmax(dim=-1)(attention_scores)

        # This is actually dropping out entire tokens to attend to, which might
        # seem a bit unusual, but is taken from the original Transformer paper.
        attention_probs = self.dropout(attention_probs)

        context_layer = torch.matmul(attention_probs, value_layer)

        context_layer = context_layer.permute(0, 2, 1, 3).contiguous()
        new_context_layer_shape = context_layer.size()[:-2] + (self.all_head_size,)
        context_layer = context_layer.view(*new_context_layer_shape) # 合并头结果
        return context_layer
BertSelfOutput
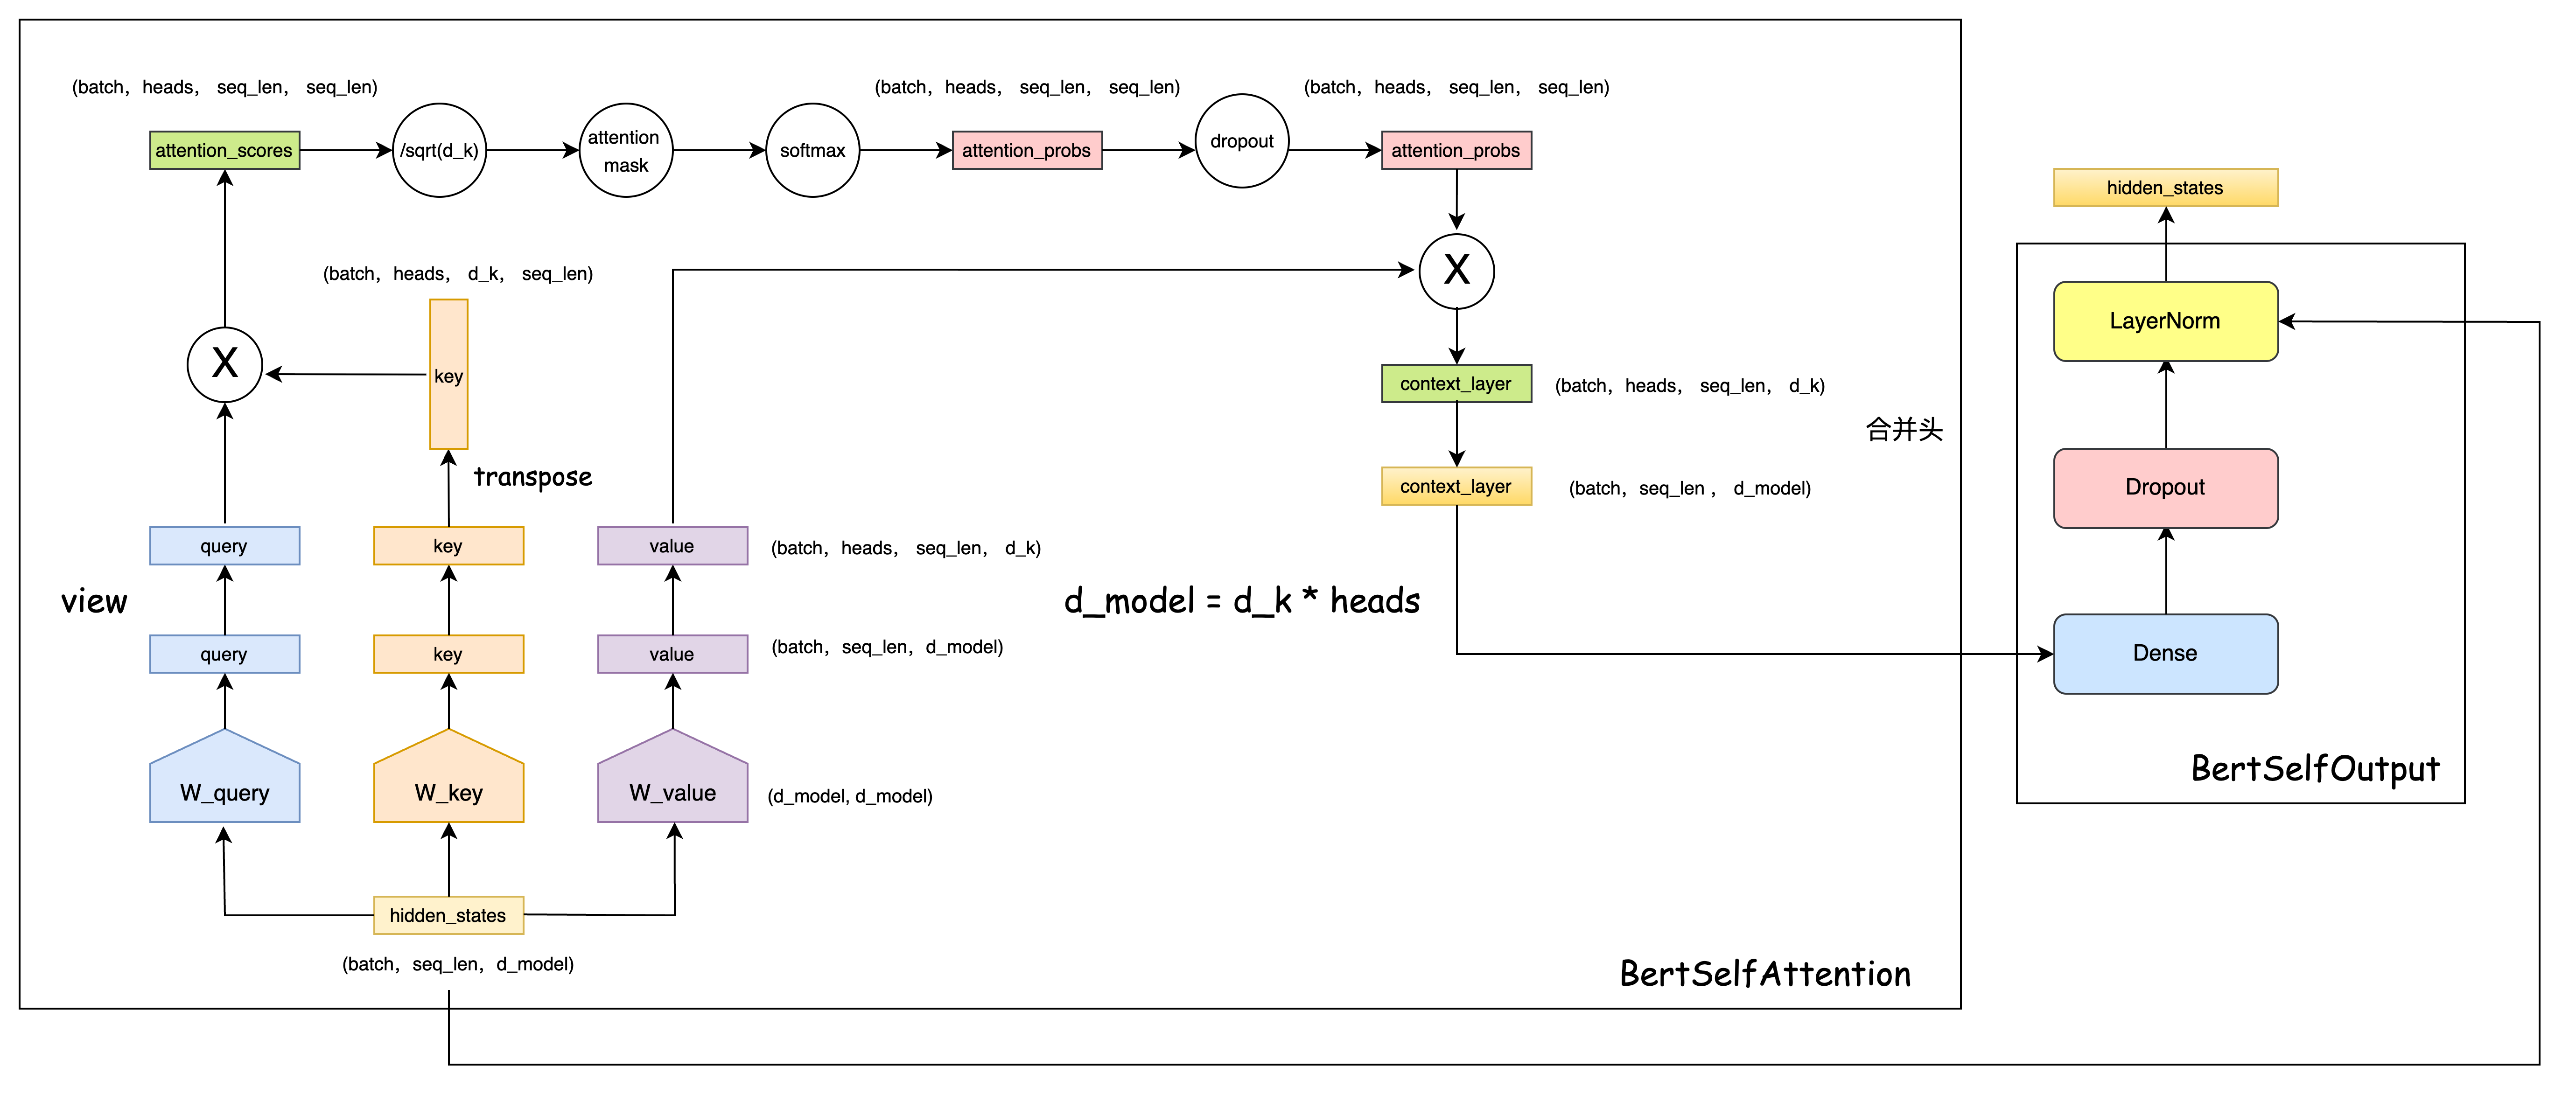
class BertSelfOutput(nn.Module):
    def __init__(self, config):
        super(BertSelfOutput, self).__init__()
        self.dense = nn.Linear(config.hidden_size, config.hidden_size)
        self.LayerNorm = BertLayerNorm(config.hidden_size, eps=config.layer_norm_eps)
        self.dropout = nn.Dropout(config.hidden_dropout_prob)

    # 残差链接 + 层归一化
    def forward(self, hidden_states, input_tensor):
        hidden_states = self.dense(hidden_states)
        hidden_states = self.dropout(hidden_states)
        hidden_states = self.LayerNorm(hidden_states + input_tensor)
        return hidden_states
BertAttention

class BertAttention(nn.Module):
    def __init__(self, config):
        super(BertAttention, self).__init__()
        self.self = BertSelfAttention(config)
        self.output = BertSelfOutput(config)

    def forward(self, input_tensor, attention_mask=None):
        self_outputs = self.self(input_tensor, attention_mask) # 多头自注意力机制
        attention_output = self.output(self_outputs, input_tensor)
        return attention_output
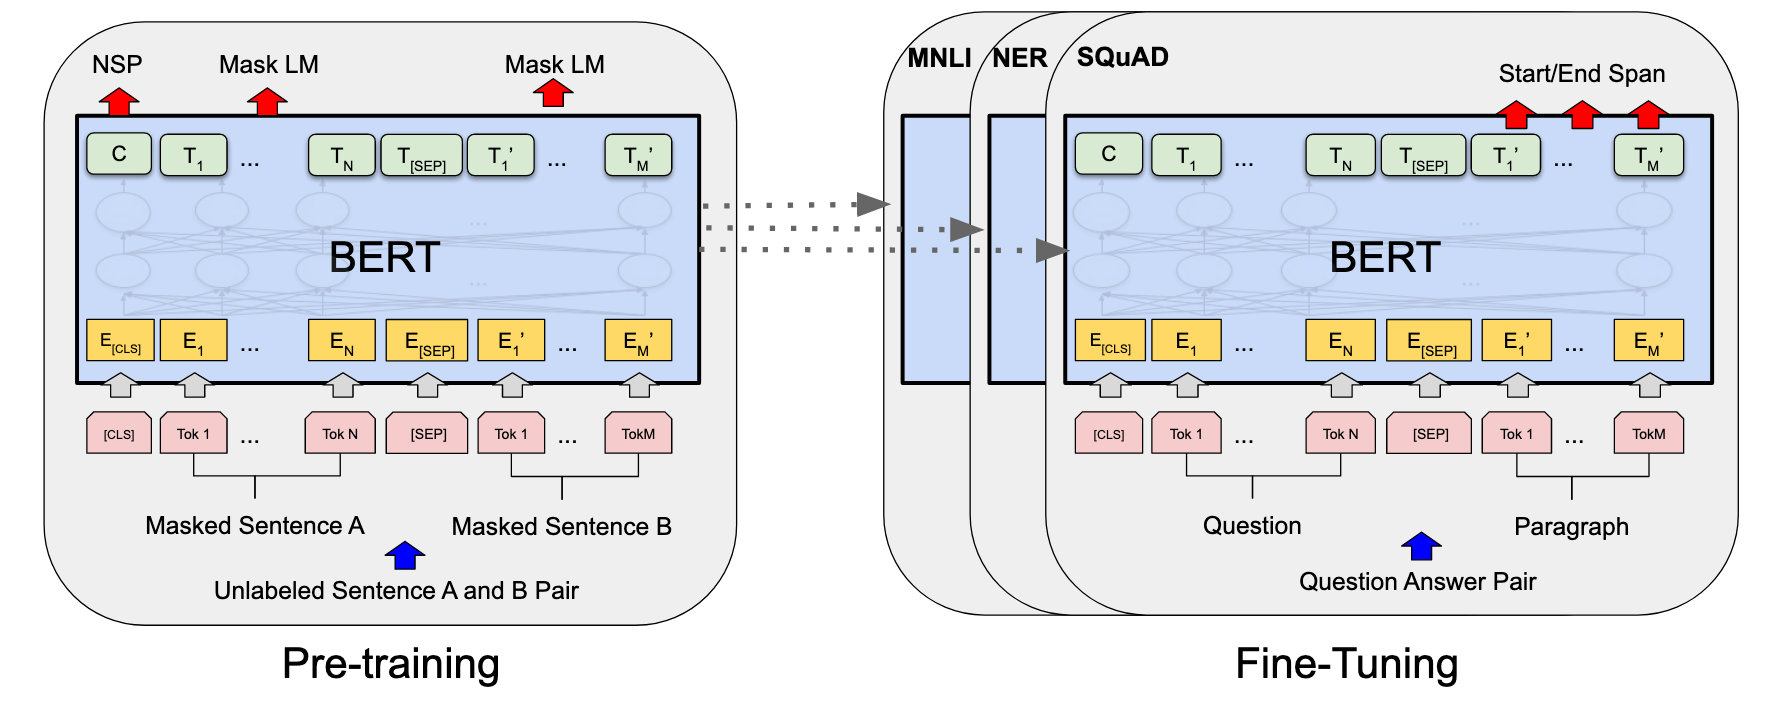
预训练
BertPredictionHeadTransform
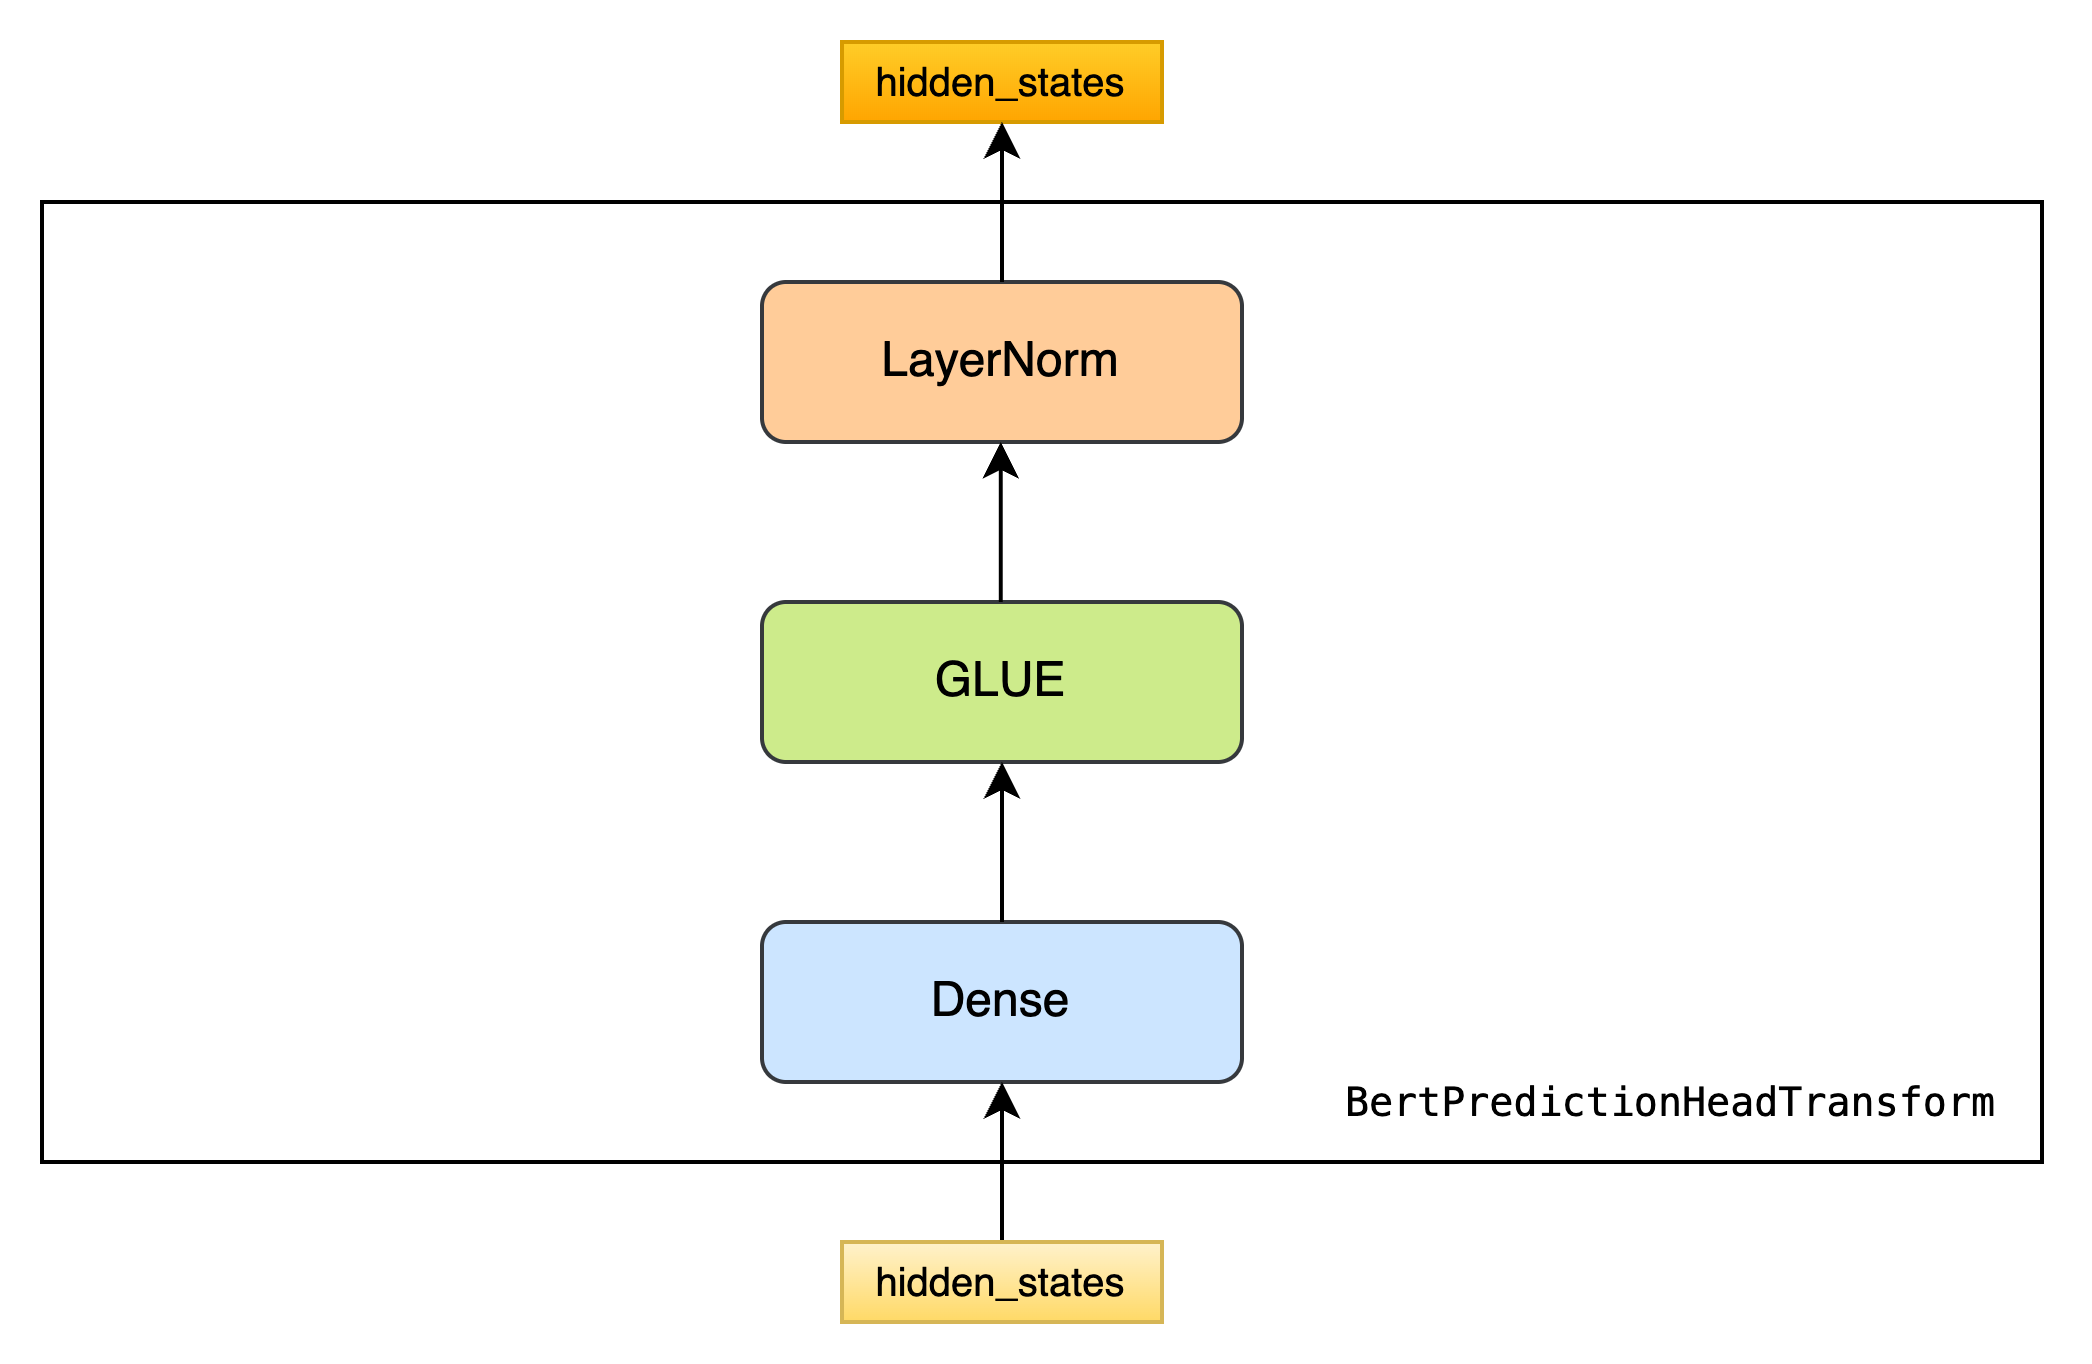
class BertPredictionHeadTransform(nn.Module):
    def __init__(self, config):
        super(BertPredictionHeadTransform, self).__init__()
        self.dense = nn.Linear(config.hidden_size, config.hidden_size)
        if isinstance(config.hidden_act, str) or (sys.version_info[0] == 2 and isinstance(config.hidden_act, unicode)):
            self.transform_act_fn = ACT2FN[config.hidden_act]
        else:
            self.transform_act_fn = config.hidden_act
        self.LayerNorm = BertLayerNorm(config.hidden_size, eps=config.layer_norm_eps)

    def forward(self, hidden_states):
        hidden_states = self.dense(hidden_states)
        hidden_states = self.transform_act_fn(hidden_states)
        hidden_states = self.LayerNorm(hidden_states)
        return hidden_states
BertLMPredictionHead
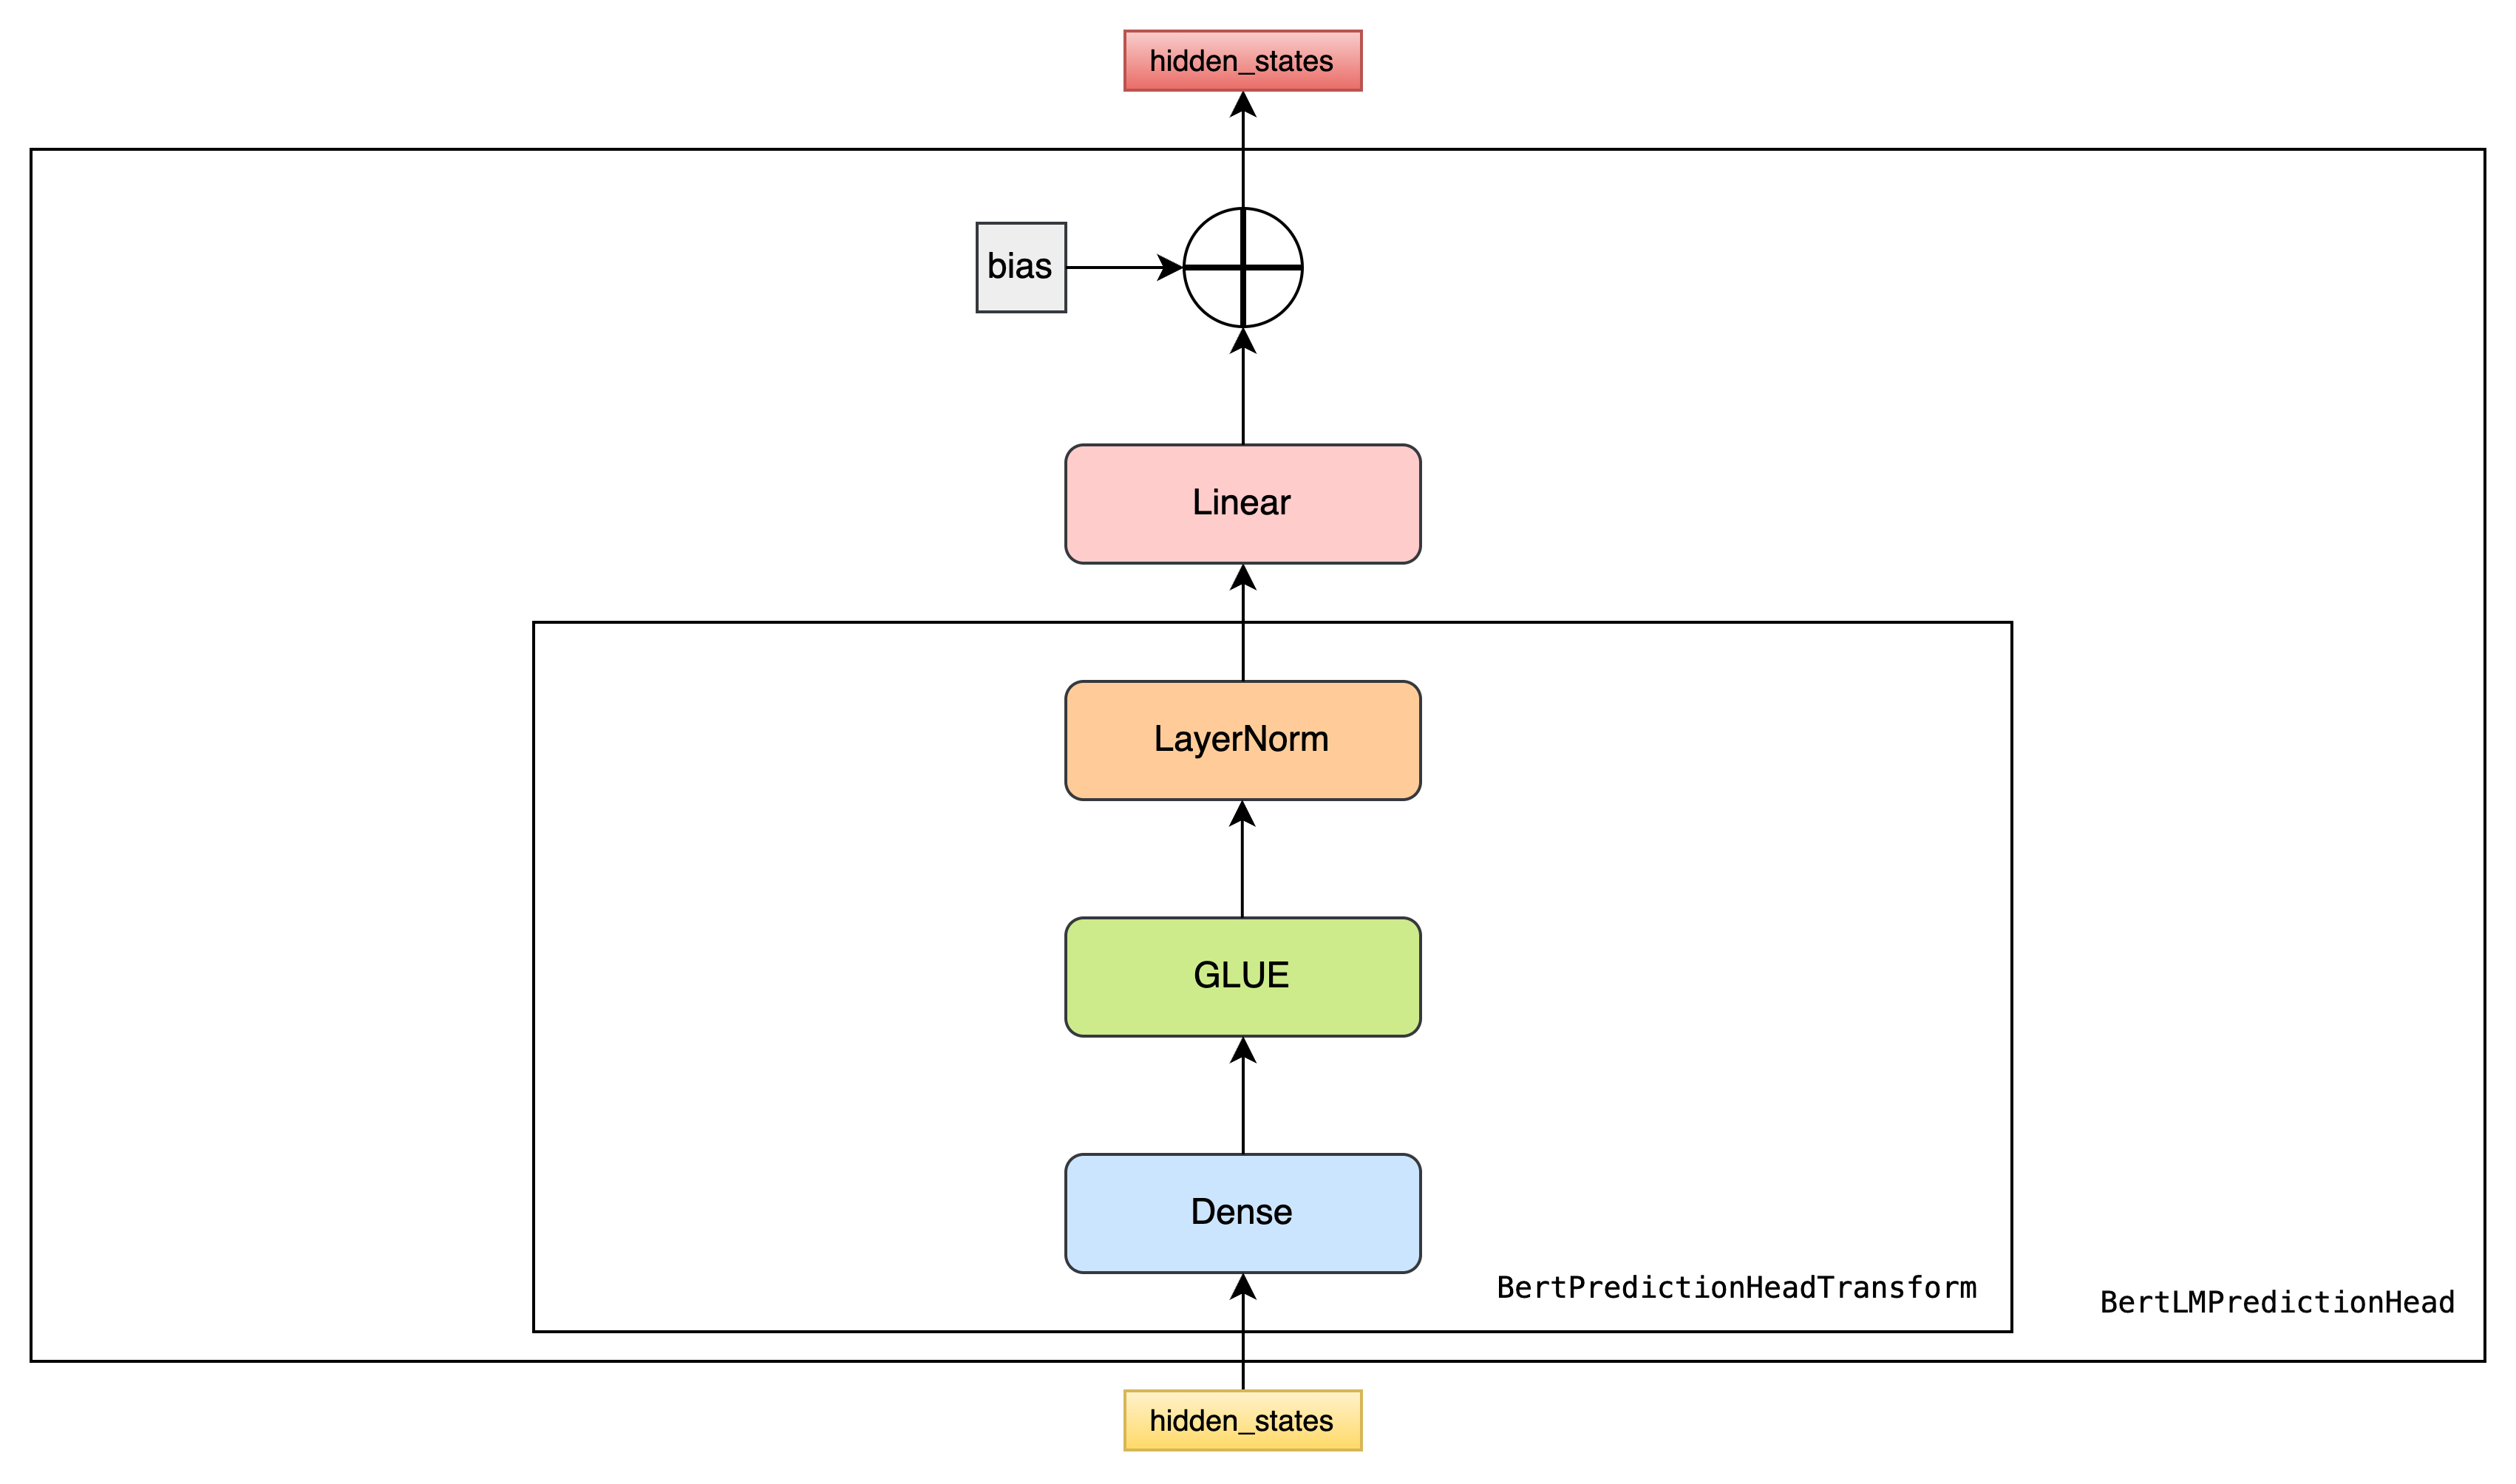
class BertLMPredictionHead(nn.Module):
    def __init__(self, config):
        super(BertLMPredictionHead, self).__init__()
        self.transform = BertPredictionHeadTransform(config)

        # The output weights are the same as the input embeddings, but there is
        # an output-only bias for each token.
        self.decoder = nn.Linear(config.hidden_size,
                                 config.vocab_size,
                                 bias=False)

        self.bias = nn.Parameter(torch.zeros(config.vocab_size))

    def forward(self, hidden_states):
        hidden_states = self.transform(hidden_states)
        hidden_states = self.decoder(hidden_states) + self.bias
        return hidden_states
BertPreTrainingHeads
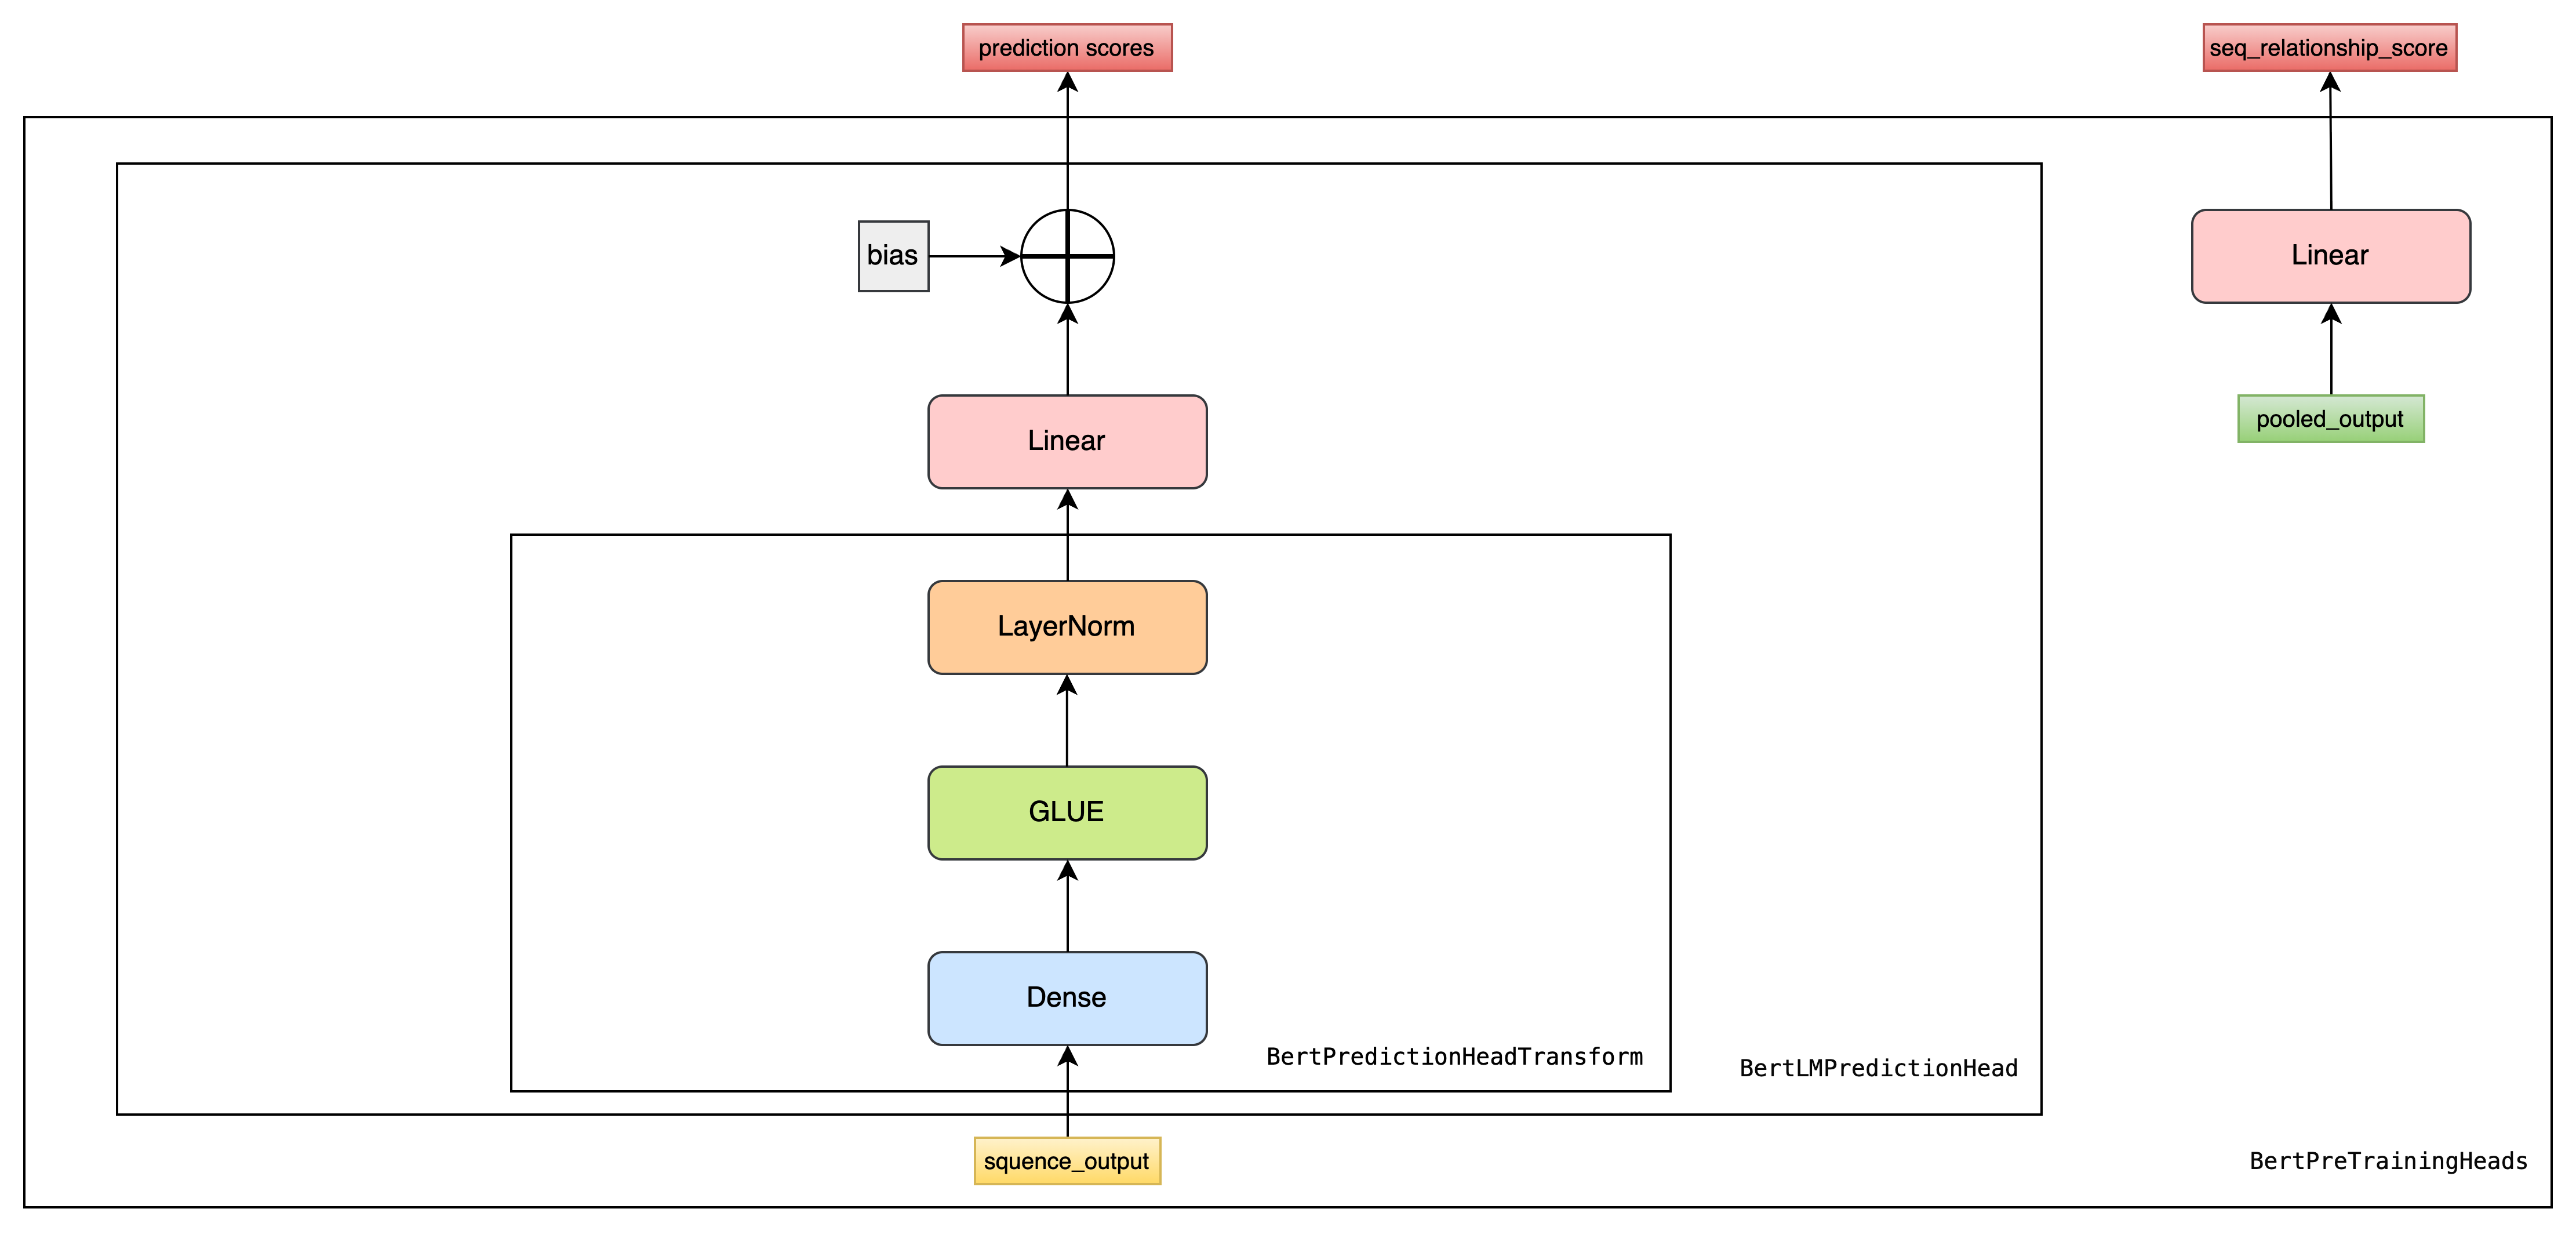
class BertPreTrainingHeads(nn.Module):
    def __init__(self, config):
        super(BertPreTrainingHeads, self).__init__()
        self.predictions = BertLMPredictionHead(config)
        self.seq_relationship = nn.Linear(config.hidden_size, 2)

    def forward(self, sequence_output, pooled_output):
        prediction_scores = self.predictions(sequence_output) #
        seq_relationship_score = self.seq_relationship(pooled_output) # 两个句子是否为上下句关系
        return prediction_scores, seq_relationship_score
BertForPreTraining

class BertForPreTraining(BertPreTrainedModel):
    def __init__(self, config):
        super(BertForPreTraining, self).__init__(config)
        self.bert = BertModel(config)
        self.cls = BertPreTrainingHeads(config)

    def forward(self, input_ids, attention_mask=None, token_type_ids=None, position_ids=None, head_mask=None,
                masked_lm_labels=None, next_sentence_label=None):

        outputs = self.bert(input_ids,
                            attention_mask=attention_mask,
                            token_type_ids=token_type_ids,
                            position_ids=position_ids,
                            head_mask=head_mask)

        sequence_output, pooled_output = outputs[:2] # 隐藏层输出,CLS Token Embeddings
        prediction_scores, seq_relationship_score = self.cls(sequence_output, pooled_output)

        outputs = (prediction_scores, seq_relationship_score,)
        # 计算掩码语言损失 和 下一个句子预测损失
        if masked_lm_labels is not None and next_sentence_label is not None:
            loss_fct = CrossEntropyLoss(ignore_index=-1)
            masked_lm_loss = loss_fct(prediction_scores.view(-1, self.config.vocab_size), masked_lm_labels.view(-1))
            next_sentence_loss = loss_fct(seq_relationship_score.view(-1, 2), next_sentence_label.view(-1))
            total_loss = masked_lm_loss + next_sentence_loss
            outputs = (total_loss,) + outputs

        return outputs  # (loss), prediction_scores, seq_relationship_score, (hidden_states), (attentions)
其他下游任务
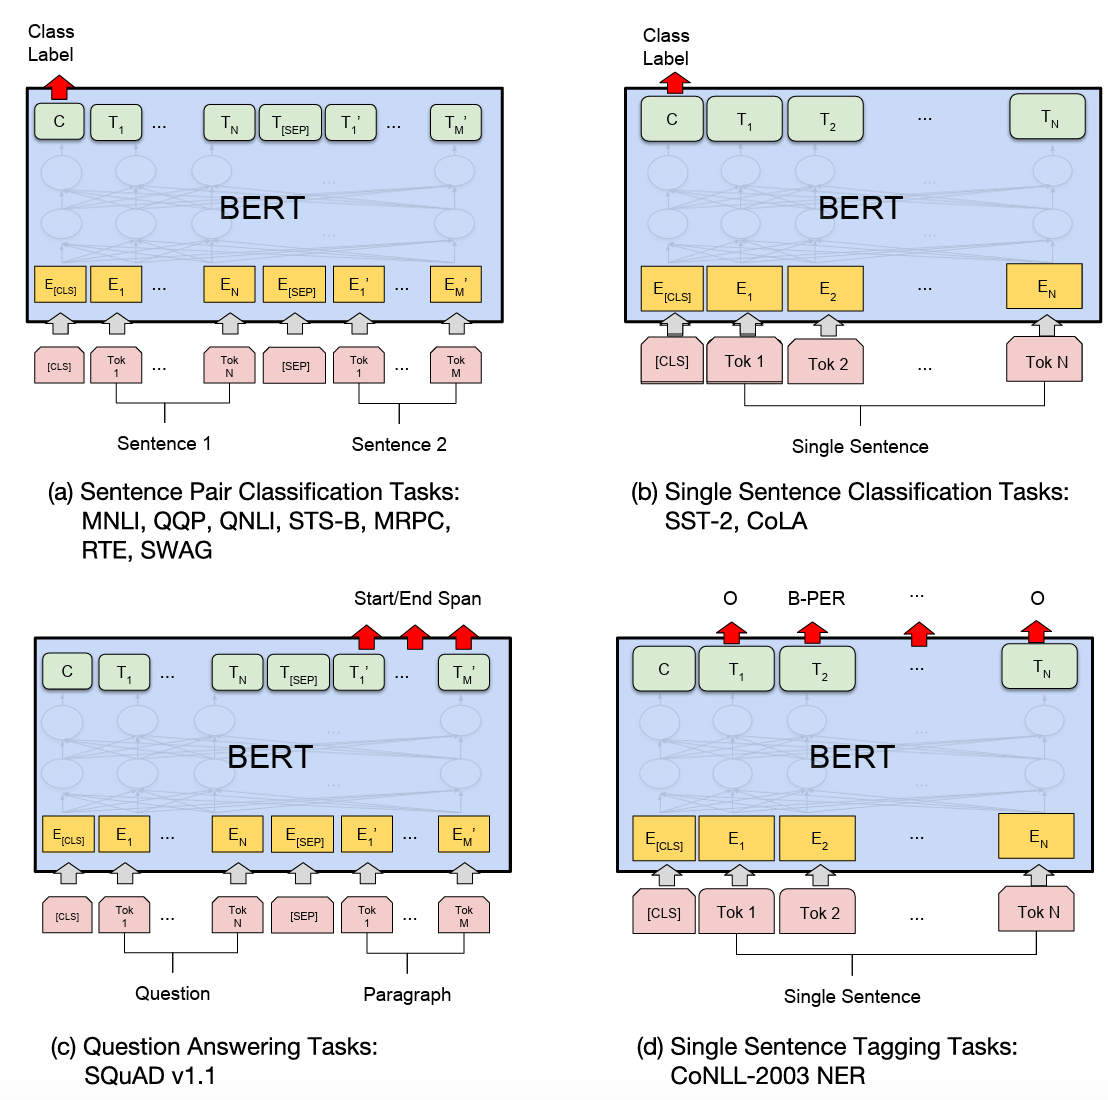
问答任务
在 BERT 的问答任务中,典型的输入是一个包含 问题(Question) 和 上下文(Context) 的文本对。例如:
问题: “谁写了《哈姆雷特》?”
上下文: “莎士比亚是英国文学史上最伟大的作家之一,他写了包括《哈姆雷特》、《麦克白》等著名悲剧。”
- 输入格式(Tokenization 后的形式),在使用
BertTokenizer编码后,输入会变成如下结构:
[CLS] 问题 tokens [SEP] 上下文 tokens [SEP]
- BERT 的输出(Outputs),通过调用
self.bert(...),你将得到一个包含多个元素的 tuple 输出:
outputs = self.bert(input_ids, attention_mask=attention_mask, token_type_ids=token_type_ids)
返回值形如:
(
    sequence_output,          # (batch_size, seq_length, hidden_size)
    pooled_output,            # (batch_size, hidden_size)
)
主要输出项解释:
✅ sequence_output: 最终每个 token 的表示
- 形状:
(batch_size, seq_length, hidden_size) - 是模型最后一层所有 token(包括问题和上下文)的隐藏状态。
- 在问答任务中,我们主要使用它来预测答案的起始和结束位置。
✅ pooled_output: 句子级别表示(不常用)
- 形状:
(batch_size, hidden_size) - 是
[CLS]token 经过一层全连接后的输出。 - 在分类任务中更有用,在问答任务中一般不会使用这个输出。
- 如何利用 BERT 输出做问答预测?
在 BertForQuestionAnswering 中,使用了如下逻辑:
logits = self.qa_outputs(sequence_output)  # (batch_size, seq_length, 2)
start_logits, end_logits = logits.split(1, dim=-1)  # split into start and end
start_logits = start_logits.squeeze(-1)  # (batch_size, seq_length)
end_logits = end_logits.squeeze(-1)
qa_outputs 层的作用:
- 是一个线性层:
nn.Linear(config.hidden_size, 2) - 将每个 token 的
hidden_size向量映射成两个分数:一个是该 token 作为答案开始的可能性,另一个是作为答案结束的可能性。
输出解释:
start_logits: 每个 token 是答案起点的得分(未归一化)。end_logits: 每个 token 是答案终点的得分。
比如对于一个长度为 128 的序列,每个 token 都有一个对应的 start/end 分数:
start_scores = torch.softmax(start_logits, dim=-1)  # softmax 得到概率
end_scores = torch.softmax(end_logits, dim=-1)

# 找出最可能是 start 和 end 的位置
start_index = torch.argmax(start_scores)
end_index = torch.argmax(end_scores)
如果 start_index <= end_index,那么可以组合这两个索引得到答案 span。
代码实现
class BertForQuestionAnswering(BertPreTrainedModel):
    def __init__(self, config):
        super(BertForQuestionAnswering, self).__init__(config)
        self.num_labels = config.num_labels # 通常是 2,即 start 和 end
        self.bert = BertModel(config)
        self.qa_outputs = nn.Linear(config.hidden_size, config.num_labels)

    def forward(self, input_ids, attention_mask=None, token_type_ids=None, position_ids=None, head_mask=None,
                start_positions=None, end_positions=None):

        outputs = self.bert(input_ids,
                            attention_mask=attention_mask,
                            token_type_ids=token_type_ids,
                            position_ids=position_ids)

        sequence_output = outputs[0]
        # (batch,seq_len,hidden_size) ---> (batch,seq_len,2)
        logits = self.qa_outputs(sequence_output)

        start_logits, end_logits = logits.split(1, dim=-1)
        start_logits = start_logits.squeeze(-1) # (batch,seq_len)
        end_logits = end_logits.squeeze(-1)

        outputs = (start_logits, end_logits,)
        # 计算交叉熵损失
        if start_positions is not None and end_positions is not None:
            # sometimes the start/end positions are outside our model inputs, we ignore these terms
            # ignored_index = seq_len
            ignored_index = start_logits.size(1)
            # clamp_ 是 PyTorch 中的一个方法,用于将张量中的值限制在指定的范围内。
            # 它的语法是 tensor.clamp_(min, max) ,表示将张量中的值限制在 min 和 max 之间。
            # 如果值小于 min ,则将其设置为 min ;如果值大于 max ,则将其设置为 max 。
            start_positions.clamp_(0, ignored_index)
            end_positions.clamp_(0, ignored_index)

            # ignore_index: 用于指定在计算损失时忽略的标签索引。
            loss_fct = CrossEntropyLoss(ignore_index=ignored_index)
            # 分别计算答案起始下标和结束下标预测得到的交叉熵损失
            start_loss = loss_fct(start_logits, start_positions)
            end_loss = loss_fct(end_logits, end_positions)
            total_loss = (start_loss + end_loss) / 2
            outputs = (total_loss,) + outputs

        return outputs  # (loss), start_logits, end_logits
易混淆
BERT 是一个 基于上下文编码(Contextual Encoder) 的模型,不是自回归生成器。它不会“生成”新的文本,而是对输入文本中每个 token 的角色进行分类(如判断哪个是答案的开始、结束)。所以最终的答案只能来自原始输入文本中的某一段子串。
📚 详细解释
- ✅ BERT 是一个 Encoder-only 模型
-
BERT 只包含 Transformer 的 encoder 部分。
-
它的作用是给定一个完整的句子(或两个句子),对每个 token 生成一个上下文相关的表示(contextualized representation)。
-
它不具有生成能力,不能像 GPT 这样的 decoder-only 模型那样逐词生成新内容。
- 🔍 QA 任务的本质:定位答案 span 而非生成答案
在 SQuAD 这类抽取式问答任务中:
-
答案必须是原文中的连续片段(span)。
-
所以模型的任务是:
-
给出问题和上下文;
-
在上下文中找到最可能的答案起始位置和结束位置;
-
最终答案就是上下文中这两个位置之间的字符串。
-
BERT 做的就是这个定位任务,而不是重新生成一个新的答案。
- 🧩 输入与输出的关系
answer_tokens = input_ids[0][start_index : end_index + 1]
answer = tokenizer.decode(answer_tokens, skip_special_tokens=True)
这段代码的意思是:
-
start_index和end_index是模型预测出的答案的起始和结束位置。 -
我们从原始输入的
input_ids中取出对应的 token ID 子序列。 -
使用 tokenizer 把这些 token ID 解码成自然语言文本。
-
得到的就是答案。
这其实就是在说:
“根据你的理解,答案应该在这段文字中的第 X 到第 Y 个词之间,请把这部分原文告诉我。”
- 🧪 举个例子
假设原始上下文是:
The capital of France is Paris.
经过 Tokenizer 编码后可能是:
[CLS] the capital of france is paris [SEP]
如果模型预测 start_index=5,end_index=5,那么对应的就是单词 "paris",这就是答案。
⚠️ 注意事项
-
不能超出上下文范围
- start/end positions 必须落在上下文部分(即 token_type_id == 1 的区域)。
- 否则答案可能不合理(比如取到了问题部分的内容)。
-
特殊 token 不计入答案
[CLS],[SEP]等会被skip_special_tokens=True自动跳过。
-
无法处理不在原文中的答案
- 如果正确答案没有出现在上下文中,BERT 无法“编造”出来。
- 这是抽取式问答模型的局限性。
💡 对比:生成式 vs 抽取式问答
| 类型 | 模型代表 | 是否能生成新文本 | 答案是否必须在原文中 | 示例 |
|---|---|---|---|---|
| 抽取式 | BERT | ❌ | ✅ | 答案是原文中的一段 |
| 生成式 | T5 / BART / GPT | ✅ | ❌ | 答案可以是任意文本 |
如果你希望模型能“自己写答案”,那就需要使用生成式模型。
✅ 总结
| 问题 | 回答 |
|---|---|
为什么答案来自 input_ids? | 因为 BERT 是编码器模型,只做抽取式问答,答案必须是原文中的一段文本。 |
| BERT 能不能自己生成答案? | 不能,BERT 不具备生成能力,只能对输入文本中的 token 做分类。 |
| 如何获取答案? | 根据预测的 start/end index,从 input_ids 中提取 token,并用 tokenizer 解码成自然语言。 |
Token分类任务
Token 分类任务是指对输入文本中的每个 token 进行分类,常见的应用场景包括:
- 命名实体识别 (NER)
- 词性标注 (POS)
- 语义角色标注 (SRL)
class BertForTokenClassification(BertPreTrainedModel):
    def __init__(self, config):
        super(BertForTokenClassification, self).__init__(config)
        self.num_labels = config.num_labels
        self.bert = BertModel(config)
        self.dropout = nn.Dropout(config.hidden_dropout_prob)
        self.classifier = nn.Linear(config.hidden_size, config.num_labels)

    def forward(self, input_ids, attention_mask=None, token_type_ids=None,
                position_ids=None, head_mask=None, labels=None):

        outputs = self.bert(input_ids,
                            attention_mask=attention_mask,
                            token_type_ids=token_type_ids,
                            position_ids=position_ids,
                            head_mask=head_mask)

        sequence_output = outputs[0] # (batch,seq_len,hidden_size)

        sequence_output = self.dropout(sequence_output)
        logits = self.classifier(sequence_output) # (batch,seq_len,num_labels)

        outputs = (logits,)
        if labels is not None:
            loss_fct = CrossEntropyLoss()
            # Only keep active parts of the loss
            if attention_mask is not None:
                active_loss = attention_mask.view(-1) == 1
                active_logits = logits.view(-1, self.num_labels)[active_loss]
                active_labels = labels.view(-1)[active_loss]
                loss = loss_fct(active_logits, active_labels)
            else:
                loss = loss_fct(logits.view(-1, self.num_labels), labels.view(-1))
            outputs = (loss,) + outputs

        return outputs  # (loss), scores
多项选择任务
多项选择任务是指给定一个问题和多个候选答案,模型需要从中选择最合适的答案。常见的应用场景包括:
-
阅读理解任务
-
问答系统中的候选答案选择
-
对话系统中的候选回复选择
在 多项选择题(Multiple Choice) 任务中,BERT 的输入组织形式与普通分类或问答任务略有不同。你需要为每个选项分别构造一个完整的 BERT 输入序列,并将它们组合成一个批次进行处理。
✅ 假设你有一个问题 + 4 个选项:
问题:谁写了《哈姆雷特》?
A. 雨果
B. 歌德
C. 莎士比亚
D. 托尔斯泰
对于这样的多选问题,BERT 的输入方式是:
对每一个选项,都单独构造一个 [CLS] + 问题 + [SEP] + 选项内容 + [SEP] 的输入序列。
也就是说,模型会对每个选项分别编码 ,然后从中选出最合适的那个。
class BertForMultipleChoice(BertPreTrainedModel):
    def __init__(self, config):
        super(BertForMultipleChoice, self).__init__(config)
        self.bert = BertModel(config)
        self.dropout = nn.Dropout(config.hidden_dropout_prob)
        self.classifier = nn.Linear(config.hidden_size, 1)

    def forward(self, input_ids, attention_mask=None, token_type_ids=None,
                position_ids=None, head_mask=None, labels=None):
        # 获取选项个数
        num_choices = input_ids.shape[1] # (batch_size, num_choices, seq_length)
        # 将选项展平,以便一起处理: (batch_size * num_choices, seq_length)
        input_ids = input_ids.view(-1, input_ids.size(-1))
        attention_mask = attention_mask.view(-1, attention_mask.size(-1)) if attention_mask is not None else None
        token_type_ids = token_type_ids.view(-1, token_type_ids.size(-1)) if token_type_ids is not None else None
        position_ids = position_ids.view(-1, position_ids.size(-1)) if position_ids is not None else None

        outputs = self.bert(input_ids,
                            attention_mask=attention_mask,
                            token_type_ids=token_type_ids,
                            position_ids=position_ids,
                            head_mask=head_mask)

        pooled_output = outputs[1] # (batch_size * num_choices, hidden_size)

        pooled_output = self.dropout(pooled_output)
        logits = self.classifier(pooled_output) # (batch_size * num_choices, 1)
        reshaped_logits = logits.view(-1, num_choices) # (batch_size , num_choices, 1)

        outputs = (reshaped_logits,)

        if labels is not None:
            loss_fct = CrossEntropyLoss()
            loss = loss_fct(reshaped_logits, labels)
            outputs = (loss,) + outputs

        return outputs  # (loss), reshaped_logits, (hidden_states), (attentions)
在前向传播中,会将这些输入展平,变成:
input_ids.view(-1, seq_length) # (batch_size * num_choices, seq_length)
这样就能让 BERT 对每个选项分别进行编码。
BERT 输出后,再对每个选项做分类打分,最后重新 reshape 成 (batch_size, num_choices) 形式,用于计算交叉熵损失。


 被折叠的 条评论
为什么被折叠?
被折叠的 条评论
为什么被折叠?
 到【灌水乐园】发言


