


基于SSM框架的《超市订单管理系统》Web项目开发(第三天)用户管理,模糊查询,精准匹配,分页显示数据
昨天我们完善了登录的功能模块和退出的功能模块,今天我们将实现超市订单管理系统的用户管理功能模块中的用户列表和查询用户功能。
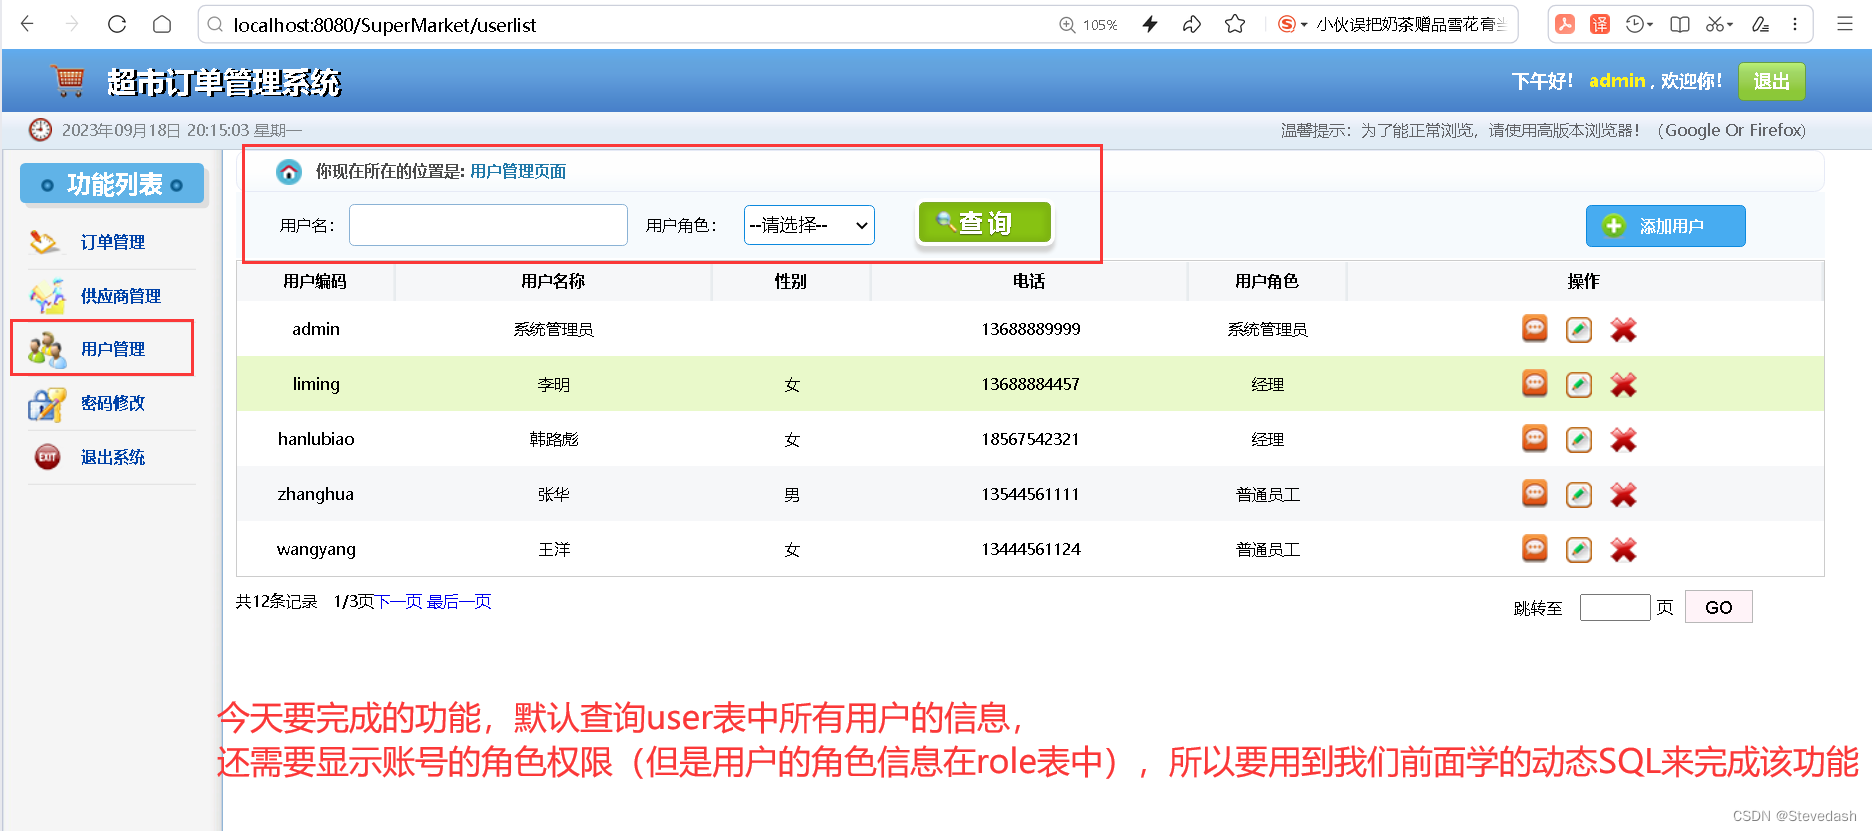
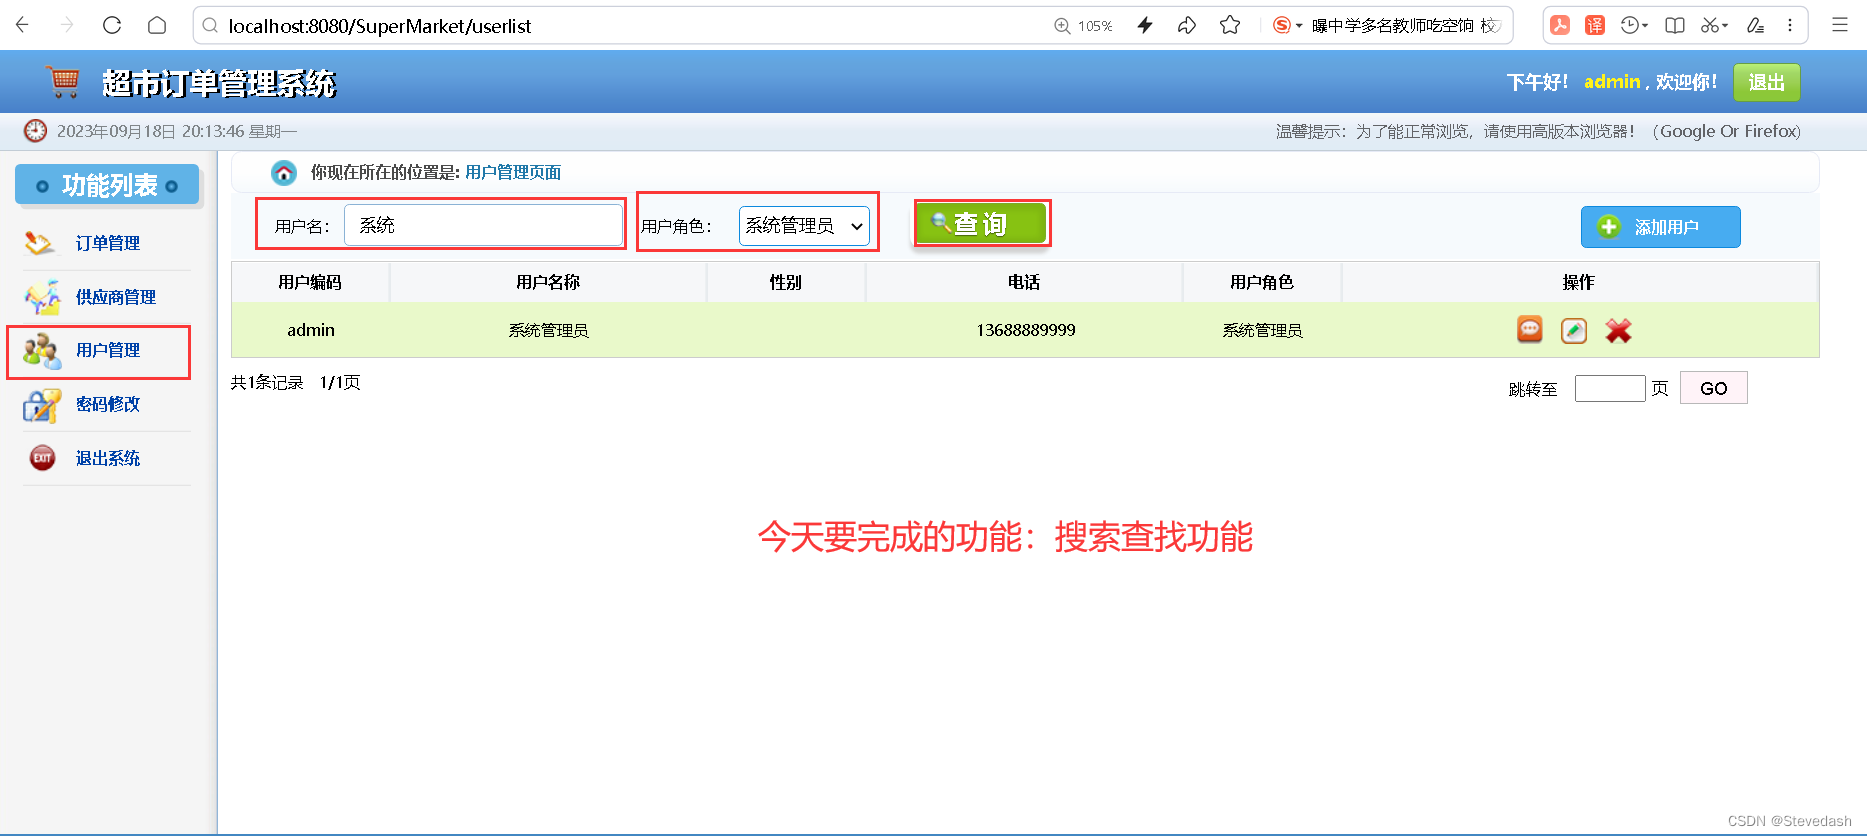
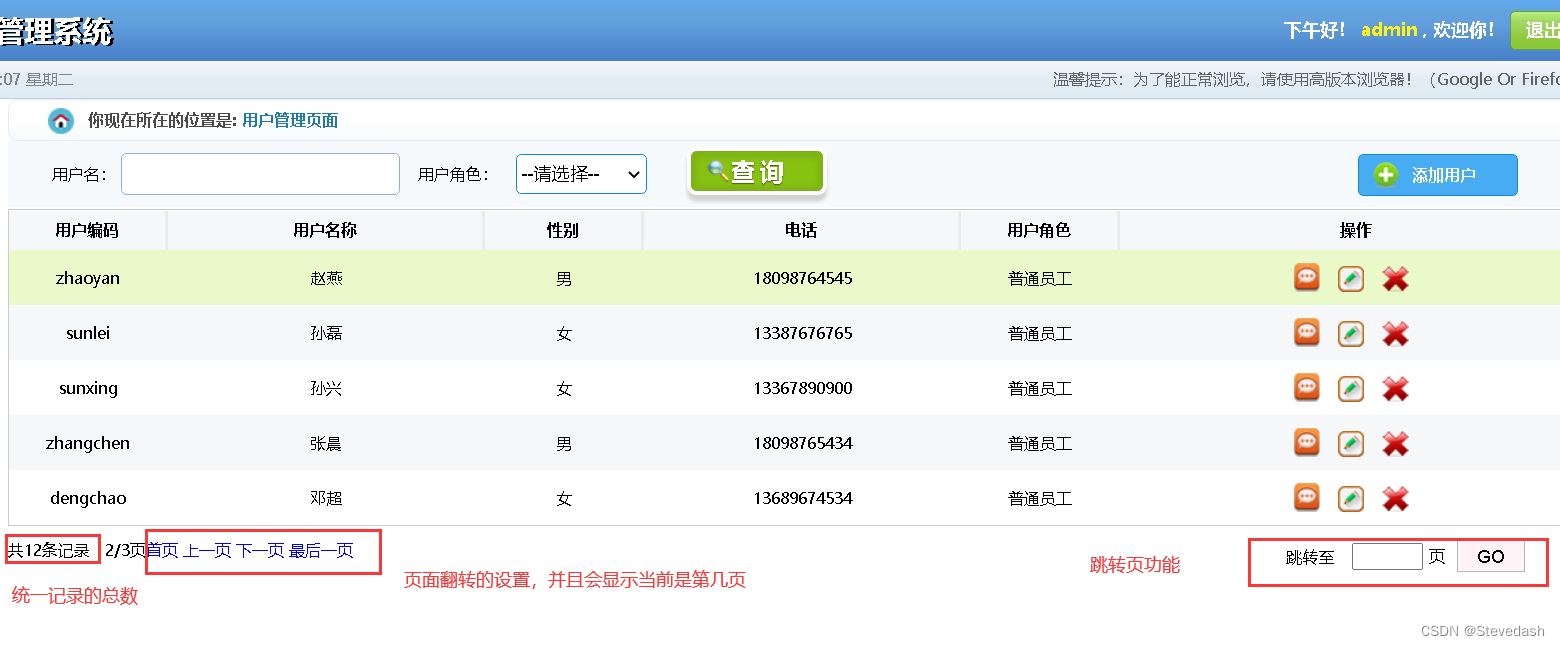
今天要完成的功能有:
对用户信息的显示和查询,其中重点有以下三点 :
(1) 查询:用户名称(模糊匹配)、用户角色(精确匹配)。
(2) 分页显示数据列表。(后期会讲解如何用插件完成,现在要手写实现一下,虽然难,但是理解了就对我们的学习很有帮助)
一、使用SSM读取Role表中的所有数据
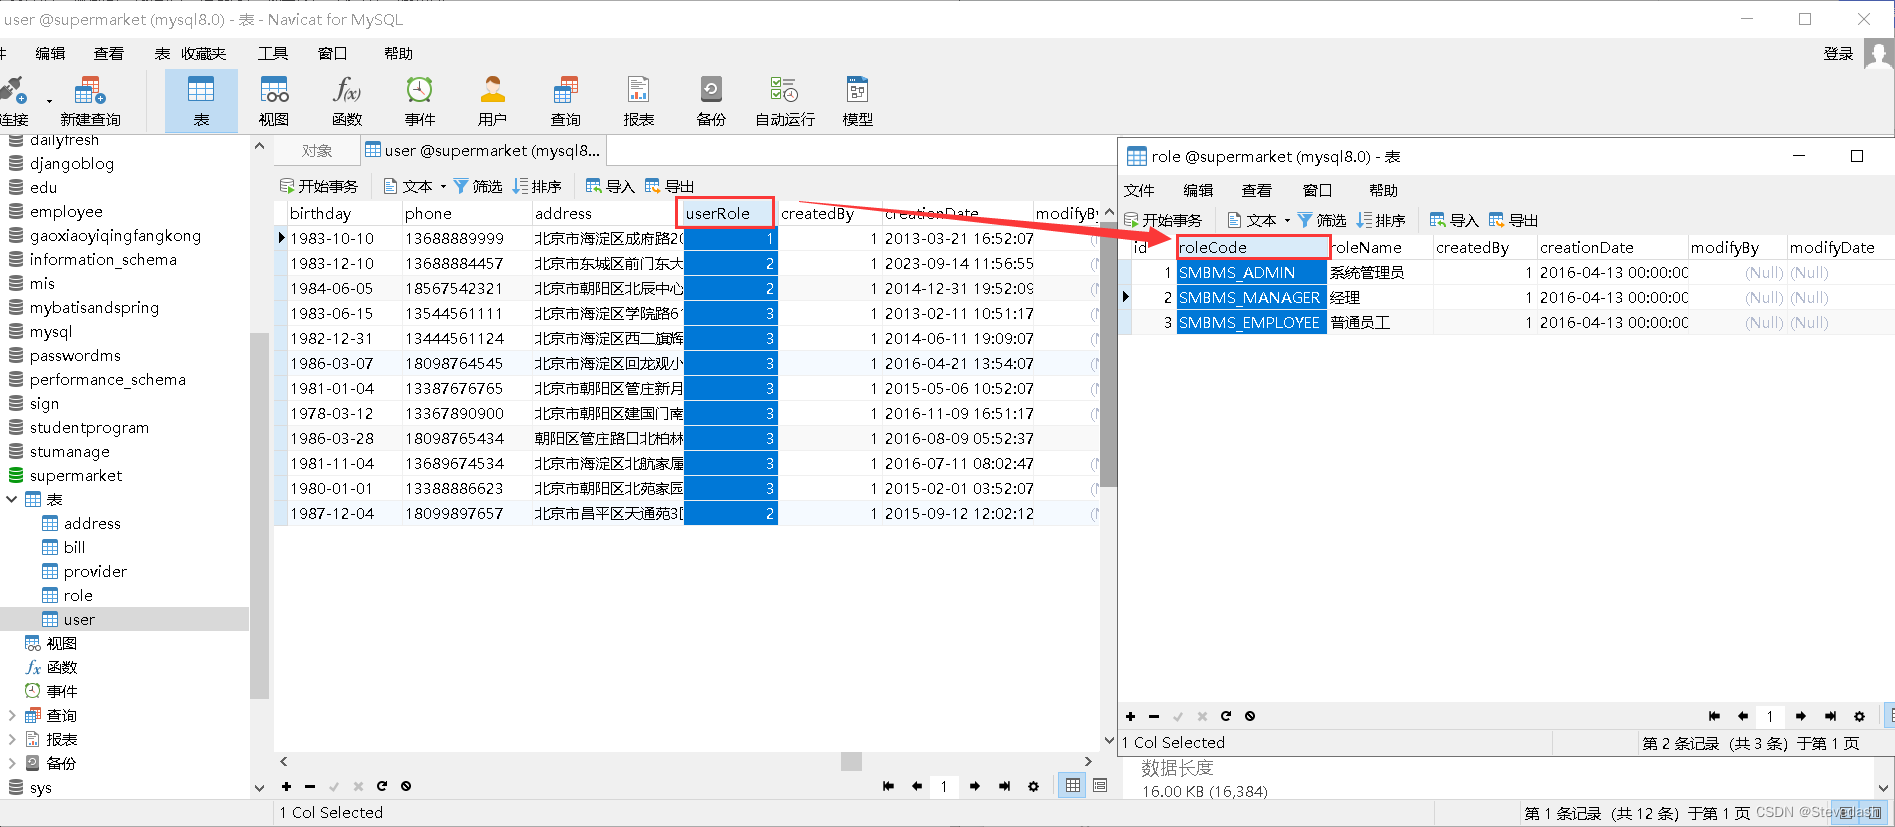
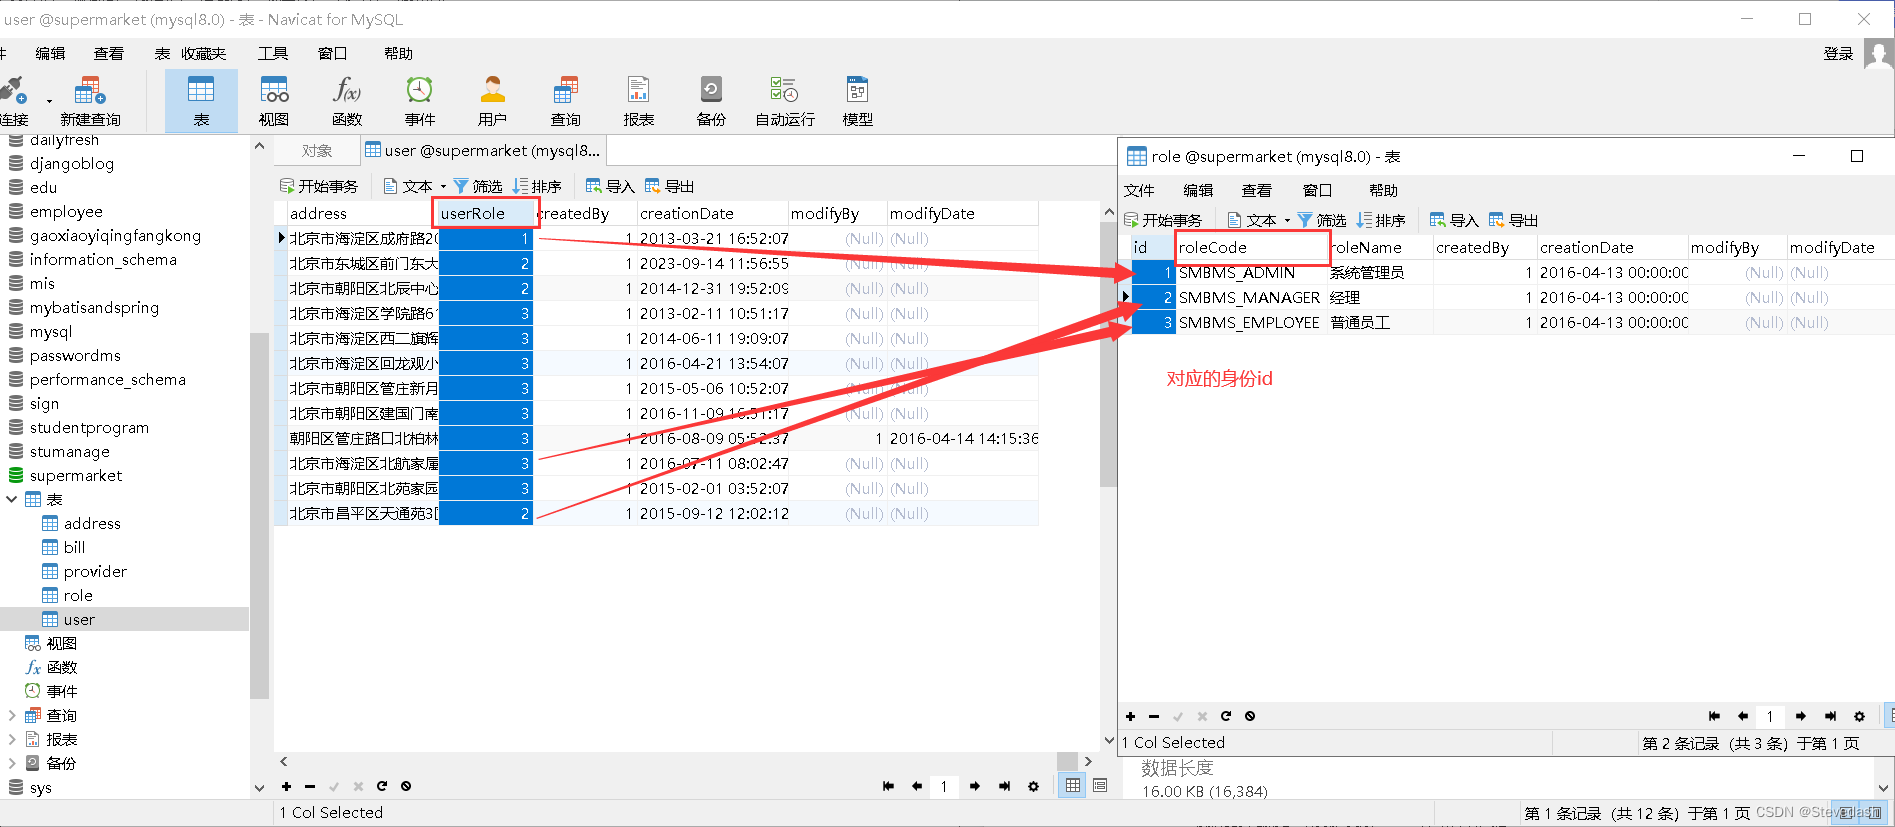
因为要想读取用户表user中的所有数据,需要用到账号角色信息,而账号角色信息存储在role表中,因此我们要想办法显示出来。所以要处理一下user表和role表的对应关系。
那么先读取角色表role的所有信息,尝试pojo->dao->Service的处理过程,跟昨天是一致的
①在pojo包下,添加用户角色表role的pojo类Role
这里就不说了,老办法idea链接databas自动生成pojo类
//Role.java
package com.steveDash.pojo;


public class Role {

  private Integer id;
  private String roleCode;
  private String roleName;
  private Integer createdBy;
  private java.util.Date creationDate;
  private Integer modifyBy;
  private java.util.Date modifyDate;


  public Integer getId() {
    return id;
  }

  public void setId(Integer id) {
    this.id = id;
  }


  public String getRoleCode() {
    return roleCode;
  }

  public void setRoleCode(String roleCode) {
    this.roleCode = roleCode;
  }


  public String getRoleName() {
    return roleName;
  }

  public void setRoleName(String roleName) {
    this.roleName = roleName;
  }


  public Integer getCreatedBy() {
    return createdBy;
  }

  public void setCreatedBy(Integer createdBy) {
    this.createdBy = createdBy;
  }


  public java.util.Date getCreationDate() {
    return creationDate;
  }

  public void setCreationDate(java.util.Date creationDate) {
    this.creationDate = creationDate;
  }


  public Integer getModifyBy() {
    return modifyBy;
  }

  public void setModifyBy(Integer modifyBy) {
    this.modifyBy = modifyBy;
  }


  public java.util.Date getModifyDate() {
    return modifyDate;
  }

  public void setModifyDate(java.util.Date modifyDate) {
    this.modifyDate = modifyDate;
  }

}
②在dao层下,新建RoleMapper.xml映射文件
<?xml version="1.0" encoding="UTF-8" ?>
<!DOCTYPE mapper PUBLIC "-//mybatis.org//DTD Mapper 3.0//EN"
        "http://mybatis.org/dtd/mybatis-3-mapper.dtd">

<mapper namespace="com.steveDash.dao.RoleMapper">
    <select id="getRoleList" resultType="Role">
        select * from role
    </select>
</mapper>
这里创建了一个查询,读取了role表中的所有数据
③同样在dao层下,创建RoleMapper接口,声明getRoleList()方法
这里要注意方法名必须与RoleMapper映射文件中sql语句的映射id一致!
package com.steveDash.dao;

import com.steveDash.pojo.Role;

import java.util.List;

public interface RoleMapper {
    public List<Role> getRoleList();
}
这里的返回类型是List<Role>,因为是多条数据,且全都是Role类型的对象,因此如此声明返回值。
PS:这里是泛型,我的高级编程文章中也有讲解到泛型的学习。
④Service层下,新建RoleService接口和上面的RoleMapper接口基本一致,也可以修改方法名(自己记得调用该方法名即可)
package com.steveDash.service;

import com.steveDash.pojo.Role;

import java.util.List;

public interface RoleService {
    public List<Role> getRoleList();
}
新建RoleService的实现类RoleServiceImpl,代码如下
package com.steveDash.service;

import com.steveDash.dao.RoleMapper;
import org.springframework.stereotype.Service;
import com.steveDash.pojo.Role;

import javax.annotation.Resource;
import java.util.List;

@Service("roleService")
public class RoleServiceImpl implements RoleService {
    @Resource
    private RoleMapper roleMapper;//引用前面的RoleMapper

    public RoleMapper getRoleMapper() {
        return roleMapper;
    }

    public void setRoleMapper(RoleMapper roleMapper) {
        this.roleMapper = roleMapper;
    }

    @Override
    public List<Role> getRoleList() {
       List<Role> roleList=null;
       try{
           roleList=roleMapper.getRoleList();
       }catch (RuntimeException e){
           e.printStackTrace();
           throw e;
       }
       return roleList;
    }
}
这里使用的注解的方式注册实体Bean**,有个常见的做法或者说是推荐做法就是,Mybatis使用XML方式,Spring和SpringMVC使用注解开发模式**。
还有我们这里引用了前面的RoleMapper,千万要记得生成getter和setter方法,因为依赖注入依靠的是构造器和setter方法
二、对用户表进行查询和显示的dao->Service层操作
可以看到,不做查询的时候就是默认查询全部的用户,并且还显示了用户角色这一信息,因为用户表User中的用户角色UserRole只是一个id,具体的角色名称RoleName在Role表中
那么要如何把俩个表关联起来呢?细心的读者,可能应该猜到了,多表关联查询,也就是动态SQL语句,一对一关联映射。(一个用户只对应一个身份)
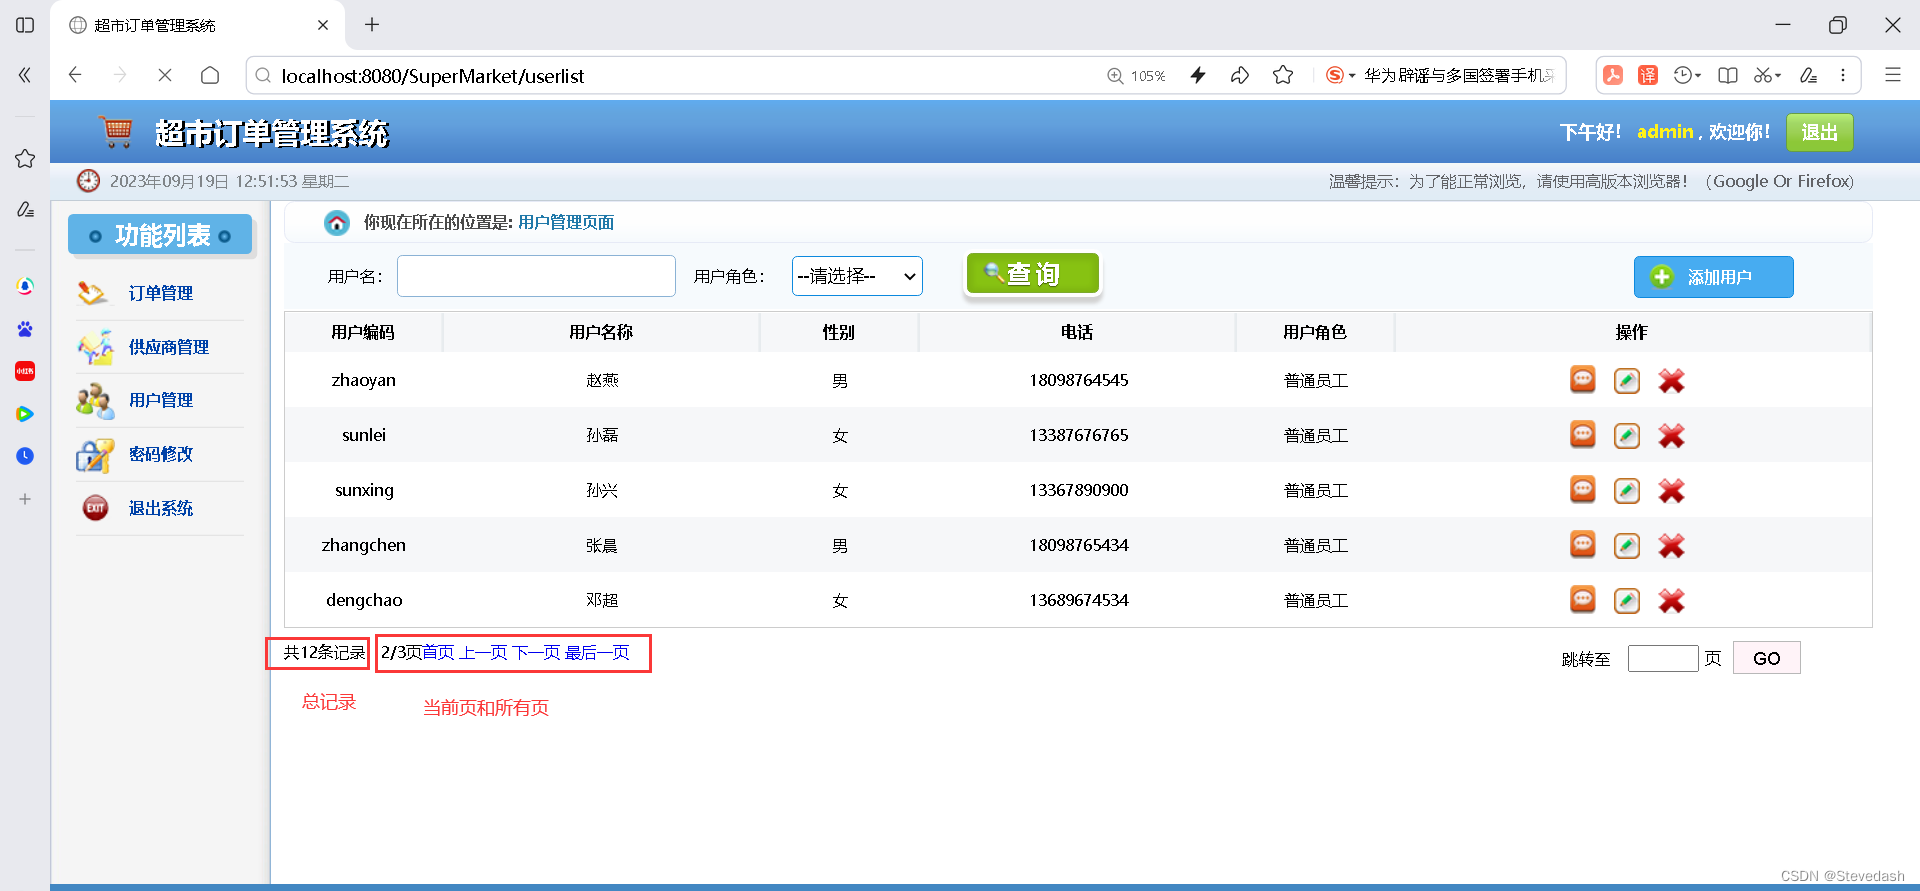
从这个需求图也能看出,还有一个分页的功能,因为上线的系统,一般来说数据都很多,是没有办法一次性显示完的,每一页都只会显示一部分,因此这里我们设置每页显示的是五个用户。用户点击下一页再更新显示下一页的数据。
为了实现分页,我们就不能在select语句中一次性把全部数据读出来(这样会给传输和服务器带来巨大的负担),这时我们需要使用select语句中的limit用法。
PS:

Select语句中limit的用法。

格式: select * from table where ... limit m,n
(注意limit语句要放在select语句最后面)
用法:查询从第m+1条记录开始,读取n条记录。其中n如果省略,默认为0

注意只在MySQL中起作用。
在分页技术中经常使用。

下面通过两个例子看SQL语句中limit用法是怎样的:

举例:

1、select * from Customer LIMIT 10;--检索前10行数据,即显示1-10条数据;

2、select * from Customer LIMIT 1,10;--检索从第2行开始,一共10条记录,即显示第2....11记录;

3、select * from Customer limit 5,10;--检索从第6行开始,10条数据,即显示第6,7....15记录;

4、select * from Customer limit 6,10;--检索从第7行开始,10条数据,即显示第7,8...16记录。
那么就来进行功能的实现吧
1.添加显示用户表user的记录数量的查询
用户可以输入用户名(username)或用户角色 (userRole) ,进行查询,但是返结果是显示有多少条记录,这是为了后面分页的时候使用。请注意我们使用的动态SQL语句 和多表关联:
由于是对用户表进行操作,因此我们放到前面的user的操作中,不用另外创建文件。
①dao层下,UserMapper.xml新增getUserCount(),用来查询用户记录总数。
<!-- 查询用户计录数-->
<select id="getUserCount" resultType="int" >
    select count(1) as count from user u join role r on u.userRole = r.id
    <where>
        <if test="userName != null and userName != ''">
            u.userName like CONCAT ('%',#{userName},'%')
        </if>
        <if test="userRole != null and userRole!=0">
            and u.userRole = #{userRole}
        </if>
    </where>
</select>
②同样是在dao层下,UserMapper接口中,添加方法getUserCount
package com.steveDash.dao;

import com.steveDash.pojo.User;
import org.apache.ibatis.annotations.Param;

import java.util.List;


public interface UserMapper {
    public User getUserByUserCode(@Param("userCode") String userCode);
   	//获取用户记录总数
    public int getUserCount(@Param("userName")String userName, @Param("userRole")Integer userRole);


}
@Param 注解通常用于告诉框架或者持久层(如 MyBatis)方法接受的是哪个参数。主要目的是解决方法参数名称与 SQL 语句中的参数名称不匹配的问题,以确保框架能够正确地映射参数。
③在service层中,往UserService中添加这个方法,以及在UserServiceImpl中实现这个方法
UserService接口添加该方法:
package com.steveDash.service;

import com.steveDash.pojo.User;

import java.util.List;

public interface UserService {
    public User getUserByUserCode(String userCode);
    //获取用户记录总数
    public int getUserCount(String queryUserName,int queryUserRole);

}
UserServiceImpl中实现该方法
package com.steveDash.service;

import com.steveDash.dao.UserMapper;
import com.steveDash.pojo.User;
import org.springframework.stereotype.Service;

import javax.annotation.Resource;
import java.util.List;

@Service("userServiceImpl")
public class UserServiceImpl implements UserService {
    @Resource
    private UserMapper userMapper;

    public UserMapper getUserMapper() {
        return userMapper;
    }

    public void setUserMapper(UserMapper userMapper) {
        this.userMapper = userMapper;
    }

    @Override
    public User getUserByUserCode(String userCode) {
        try{
        return userMapper.getUserByUserCode(userCode);
    }catch (RuntimeException e){
            e.printStackTrace();
            throw e;
        }
    }

    @Override
    public int getUserCount(String queryUserName, int queryUserRole) {
        int count = 0;
        try {
            count=userMapper.getUserCount(queryUserName,queryUserRole);
        }
        catch (Exception e) {
            e.printStackTrace();
        }
        return count;
    }


}
到这里获取用户记录总数就已经完成了。那么先放着进行下一步操作
2.添加显示user用户表中的信息查询
用户可以输入用户名(username)或用户角色 (userRole) ,进行查询,但是和上面不同的是,我们这次返结果是显示用户表的信息,不是有多少条记录。
在这里我们要使用多表关联查询,将User表和Role表关联起来,读取用户角色名称roleName
①确认好主表,返回的是User类型,所以我们在User类中添加一个Role类做为它的成员变量
package com.steveDash.pojo;

import org.springframework.stereotype.Component;

@Component
public class User {

  private Integer id;
  private String userCode;
  private String userName;
  private String userPassword;
  private Integer gender;
  private java.util.Date birthday;
  private String phone;
  private String address;
  private Integer userRole;
  private Integer createdBy;
  private java.util.Date creationDate;
  private Integer modifyBy;
  private java.util.Date modifyDate;
  private Role role;//一对一的多表联合查询,用于存储用户角色类


  public Integer getId() {
    return id;
  }

  public void setId(Integer id) {
    this.id = id;
  }


  public String getUserCode() {
    return userCode;
  }

  public void setUserCode(String userCode) {
    this.userCode = userCode;
  }


  public String getUserName() {
    return userName;
  }

  public void setUserName(String userName) {
    this.userName = userName;
  }


  public String getUserPassword() {
    return userPassword;
  }

  public void setUserPassword(String userPassword) {
    this.userPassword = userPassword;
  }


  public Integer getGender() {
    return gender;
  }

  public void setGender(Integer gender) {
    this.gender = gender;
  }


  public java.util.Date getBirthday() {
    return birthday;
  }

  public void setBirthday(java.util.Date birthday) {
    this.birthday = birthday;
  }


  public String getPhone() {
    return phone;
  }

  public void setPhone(String phone) {
    this.phone = phone;
  }


  public String getAddress() {
    return address;
  }

  public void setAddress(String address) {
    this.address = address;
  }


  public Integer getUserRole() {
    return userRole;
  }

  public void setUserRole(Integer userRole) {
    this.userRole = userRole;
  }


  public Integer getCreatedBy() {
    return createdBy;
  }

  public void setCreatedBy(Integer createdBy) {
    this.createdBy = createdBy;
  }


  public java.util.Date getCreationDate() {
    return creationDate;
  }

  public void setCreationDate(java.util.Date creationDate) {
    this.creationDate = creationDate;
  }


  public Integer getModifyBy() {
    return modifyBy;
  }

  public void setModifyBy(Integer modifyBy) {
    this.modifyBy = modifyBy;
  }


  public java.util.Date getModifyDate() {
    return modifyDate;
  }

  public void setModifyDate(java.util.Date modifyDate) {
    this.modifyDate = modifyDate;
  }

  public Role getRole() {
    return role;
  }

  public void setRole(Role role) {
    this.role = role;
  }

  @Override
  public String toString() {
    return "User{" +
            "id=" + id +
            ", userCode='" + userCode + '\'' +
            ", userName='" + userName + '\'' +
            ", userPassword='" + userPassword + '\'' +
            ", gender=" + gender +
            ", birthday=" + birthday +
            ", phone='" + phone + '\'' +
            ", address='" + address + '\'' +
            ", userRole=" + userRole +
            ", createdBy=" + createdBy +
            ", creationDate=" + creationDate +
            ", modifyBy=" + modifyBy +
            ", modifyDate=" + modifyDate +
            '}';
  }
}
记得添加了Role类作为变量,要记得设置getter和setter方法
②在dao层下,往UserMapper.xml中添加查询
该查询,根据用户的名称userName,用户角色userRole,当前记录currentPageNo,每页数量pageSize进行查询,返回查到的所有记录:(这里就用到我们上面讲的limit方法)
<!-- 创建一个对用户表分页的查询 -->
<select id="getUserListByPage" resultMap="UserWithRoleName">
    select u.*,r.* from user u join role r on u.userRole = r.id
    <where>
        <if test="userName != null and userName != ''">
            and u.userName like CONCAT ('%',#{userName},'%')
        </if>
        <if test="userRole != null  and userRole!=0">
            and u.userRole = #{userRole}
        </if>
    </where>
    order by u.id  limit #{currentPageNo},#{pageSize}
</select>
<resultMap id="UserWithRoleName" type="User">
    <id property="id" column="id" />
    <association property="role" javaType="Role">
        <id property="id" column="id" />
    </association>
</resultMap>
根据我们前面学的,association用于一对一的情况,若是对多表关联查询的动态SQL这些知识不太熟悉的话,可以看看我的第三天文章动态SQL的学习和第四天文章多表关联映射和缓存机制。
PS:请注意,上面我们使用了临时表,同时还使用了limit,显示从第currentPageNo+1条记录开始,pageSize条记录的内容。
③往resources->mybatis-config.xml,添加自动映射和Mybatis的二级缓存设置
ps:我们在关联映射和缓存机制的文章中,已经讲过了,添加的setting需要在typeAliases上,不然会报错,有遗忘的可以返回过去查看一下。
<?xml version="1.0" encoding="UTF-8" ?>
<!DOCTYPE configuration PUBLIC "-//mybatis.org//DTD Config 3.0//EN"
        "http://mybatis.org/dtd/mybatis-3-config.dtd">

<configuration>
    <settings>
        <!-- 开启自动映射,多表关联查询时,后面的resultMap使用自动映射,即不需要列出所有字段名-->
        <setting name="autoMappingBehavior" value="FULL" />
        <!-- 开启二级缓存机制,一级缓存是默认开启的-->
        <setting name="cacheEnabled" value="true"/>
    </settings>
    <typeAliases>
        <package name="com.steveDash.pojo" />
    </typeAliases>
</configuration>
④在dao层下,往UserMapper接口中,给上面的映射添加一个方法
package com.steveDash.dao;

import com.steveDash.pojo.User;
import org.apache.ibatis.annotations.Param;

import java.util.List;


public interface UserMapper {
    public User getUserByUserCode(@Param("userCode") String userCode);
    //获取用户记录总数
    public int getUserCount(@Param("userName")String userName, @Param("userRole")Integer userRole);
    //根据条件查询用户列表
    public List<User> getUserListByPage(@Param("userName")String userName,
                                        @Param("userRole")Integer userRole,
                                        @Param("currentPageNo")Integer currentPageNo,
                                        @Param("pageSize")Integer pageSize);


}
⑤在service层中,往UserService中添加该方法和上面的UserMapper接口一样,往UserServiceImpl中实现该方法的具体细节
UserService接口下:
package com.steveDash.service;

import com.steveDash.pojo.User;

import java.util.List;

public interface UserService {
    public User getUserByUserCode(String userCode);
    //获取用户记录总数
    public int getUserCount(String queryUserName,int queryUserRole);
    //根据条件查询用户列表
    public List<User> getUserListByPage (String queryUserName,int queryUserRole,int currentPageNo, int pageSize);

}
实现类UserServiceImpl中实现上面的查询操作
package com.steveDash.service;

import com.steveDash.dao.UserMapper;
import com.steveDash.pojo.User;
import org.springframework.stereotype.Service;

import javax.annotation.Resource;
import java.util.List;

@Service("userServiceImpl")
public class UserServiceImpl implements UserService {
    @Resource
    private UserMapper userMapper;

    public UserMapper getUserMapper() {
        return userMapper;
    }

    public void setUserMapper(UserMapper userMapper) {
        this.userMapper = userMapper;
    }

    @Override
    public User getUserByUserCode(String userCode) {
        try{
        return userMapper.getUserByUserCode(userCode);
    }catch (RuntimeException e){
            e.printStackTrace();
            throw e;
        }
    }

    @Override
    public int getUserCount(String queryUserName, int queryUserRole) {
        int count = 0;
        try {
            count=userMapper.getUserCount(queryUserName,queryUserRole);
        }
        catch (Exception e) {
            e.printStackTrace();
        }
        return count;
    }

    @Override
    public List<User> getUserListByPage(String queryUserName, int queryUserRole, int currentPageNo, int pageSize) {
        List<User> userList = null;

        try {
            userList=userMapper.getUserListByPage(queryUserName,queryUserRole,currentPageNo,pageSize);
        }
        catch (Exception e) {

            e.printStackTrace();
        }
        return userList;
    }


}
导入该引入的包,比如import java.utils.List
到这里我们已经完成了数据查询的分页数据处理,接下来我们需要根据后台传过来的值进行显示在VIEW端,并且在View端选择第几页,把currentPageNo和pageSize值传给service端决定读取哪一页的数据。
3.整合SSM实现数据显示和查询分页
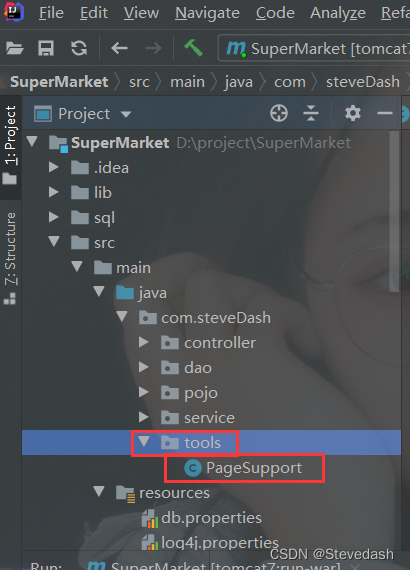
①新建tools包,往其中添加分页支持类PageSupport.java
package com.steveDash.tools;

public class PageSupport {
    //当前页码-来自于用户输入
    private int currentPageNo = 1;

    //总数量(表)
    private int totalCount = 0;

    //页面容量
    private int pageSize = 0;

    //总页数-totalCount/pageSize(+1)
    private int totalPageCount = 1;

    public int getCurrentPageNo() {
        return currentPageNo;
    }

    public void setCurrentPageNo(int currentPageNo) {
        if(currentPageNo > 0){
            this.currentPageNo = currentPageNo;
        }
    }

    public int getTotalCount() {
        return totalCount;
    }

    public void setTotalCount(int totalCount) {
        if(totalCount > 0){
            this.totalCount = totalCount;
            //设置总页数
            this.setTotalPageCountByRs();
        }
    }
    public int getPageSize() {
        return pageSize;
    }

    public void setPageSize(int pageSize) {
        if(pageSize > 0){
            this.pageSize = pageSize;
        }
    }

    public int getTotalPageCount() {
        return totalPageCount;
    }

    public void setTotalPageCount(int totalPageCount) {
        this.totalPageCount = totalPageCount;
    }

    public void setTotalPageCountByRs(){
        if(this.totalCount % this.pageSize == 0){//如果总行数除以每页行数可以除尽
            this.totalPageCount = this.totalCount / this.pageSize; //就有总行/每页多少行 页
        }else if(this.totalCount % this.pageSize > 0){ //如果总行数除以每页行数可以除不尽
            this.totalPageCount = this.totalCount / this.pageSize + 1;//就有总行/每页多少行+1 页
        }else{
            this.totalPageCount = 0;
        }
    }
}
在这个类里面,我们实现分页所用到的方法
稍微解释一下代码:
说明:上面的类主要有三个成员变量:
- currentPageNo:当前显示第几条记录
- totalCount:一共有多少条记录
- totalPageCount:一共有多少页
其中currentPageNo和totalCount将由前端传过来。这个类主要功能是用setTotalPageCountByRs()方法计算出一共有多少页,给totalPageCount赋值,方法是:如果totalCount能整除pageSize,那就一共有totalCount/pageSize页 ,如果不能整除,就有totalCount/pageSize+1页
例如:如果一共12行,每页6行,那么就有12/6=2页
如果一共12行,每页5行,就有12/5+1=3页 (取整)
PS:这一段可能有点难,涉及到了一部分算法,需要认真阅读并且消化代码才能理解。
②在controller包中,找到UserController类,往其中添加查询用户方法getUserList(),并跳转至userlist.jsp页面
先要添加用户对象
@Resource
	private RoleService roleService;
package com.steveDash.controller;
import com.steveDash.pojo.User;
import com.steveDash.service.RoleService;
import com.steveDash.service.UserService;
import com.steveDash.tools.PageSupport;
import org.apache.log4j.Logger;
import org.springframework.stereotype.Controller;
import org.springframework.ui.Model;
import org.springframework.web.bind.annotation.RequestMapping;
import org.springframework.web.bind.annotation.RequestMethod;
import org.springframework.web.bind.annotation.RequestParam;
import javax.annotation.Resource;
import javax.servlet.http.HttpSession;
import java.util.Date;
import java.util.List;
import com.steveDash.pojo.Role;
@Controller
public class UserController {
@Resource
private UserService userService;
@Resource
private RoleService roleService;
private Logger logger= Logger.getLogger(UserController.class);
@RequestMapping("/default")
public String hello(){
System.out.println("访问到Controller");
return "default";
}
@RequestMapping(value="/main")
public String welcome(HttpSession session) {
if(session.getAttribute("user") == null){ //如果用户没有登录就直接来到main.html就回到login
return "redirect:/syserror";
}
else
return "welcome";
}
@RequestMapping("/searchUser")
public String search(){
System.out.println("欢迎访问搜索页");
return "searchUser";
}
@RequestMapping("/dosearchUser")
public String searchUser(@RequestParam("username") String username, Model model){
System.out.println("用户想要查询的用户名是:"+username);
model.addAttribute("username",username);//把值放到model中传到前端
return "result";
}
@RequestMapping(value="/login")
public String showLoginPage(){
System.out.println("进入登录页面");
return "login";
}
@RequestMapping(value="/dologin")
public String doLogin(@RequestParam("userCode") String userCode, @RequestParam("userPassword") String userPassword, Model model, HttpSession session){
//读取用户和密码
System.out.println("帐号和密码是"+userCode+"-"+userPassword);
User user=userService.getUserByUserCode(userCode);
if(user!=null){
if(userPassword.equals(user.getUserPassword())){
session.setAttribute("user",user);//添加session值
return "redirect:/main"; //密码正确就去welcome.jsp
}else{
//登录失败就回到login.jsp
model.addAttribute("error", "用户名或密码不正确");
return "login";
}
}else{
//登录失败就返回login.jsp
model.addAttribute("error", "用户名不正确");
return "login";
}
}
@RequestMapping(value = "/logout")
public String logout(HttpSession session){
session.removeAttribute("user");//清除掉Session 中的user值
return "redirect:/login";//返回login.jsp
}
@RequestMapping("/syserror")//出错页面
public String sysError(){
return "syserror";
}
@RequestMapping("/useradd")
public String showRegisterPage(){
logger.info("欢迎来到新增用户页面");
return "useradd";
}
@RequestMapping(value = "/useraddsave",method = RequestMethod.POST)
public String doRegister(User user,HttpSession session){
//添加用户表的createBy值
user.setCreatedBy(((User)session.getAttribute("user")).getId());
//添加用户表的createdDte值
user.setCreationDate((new Date()));
if(userService.addUser(user)==true){//如果添加成功就返回
return "redirect:/userlist";
}
return "useradd";//添加不成功则返回注册界面
}
//获取用户列表
@RequestMapping(value="/userlist")
public String getUserList(Model model,HttpSession session,
@RequestParam(value="queryname",required=false) String queryUserName,
@RequestParam(value="queryUserRole",required=false) String queryUserRole,
@RequestParam(value="pageIndex",required=false) String pageIndex) {
if(session.getAttribute("user") == null){ //如果用户没有登录就直接来到userlist就回到syserror
return "redirect:/syserror";
}
int _queryUserRole = 0;
List<User> userList = null;
//设置页面容量
int pageSize = 5;
//当前页码
int currentPageNo = 1;
if(queryUserName == null){
queryUserName = "";
}
if(queryUserRole != null && !queryUserRole.equals("")){
_queryUserRole = Integer.parseInt(queryUserRole);
}
if(pageIndex != null){
try{
currentPageNo = Integer.valueOf(pageIndex);
}catch(NumberFormatException e){
return "redirect:/syserror";
}
}
//总数量(表)
int totalCount = userService.getUserCount(queryUserName,_queryUserRole);
//总页数
PageSupport pages=new PageSupport();
pages.setCurrentPageNo(currentPageNo);
pages.setPageSize(pageSize);
pages.setTotalCount(totalCount);
int totalPageCount = pages.getTotalPageCount();
//控制首页和尾页
//设置分页的每一页的显示从哪里开始
int start = ((currentPageNo-1) * pageSize);
if(currentPageNo < 1){
currentPageNo = 1;
}else if(currentPageNo > totalPageCount){
currentPageNo = totalPageCount;
}
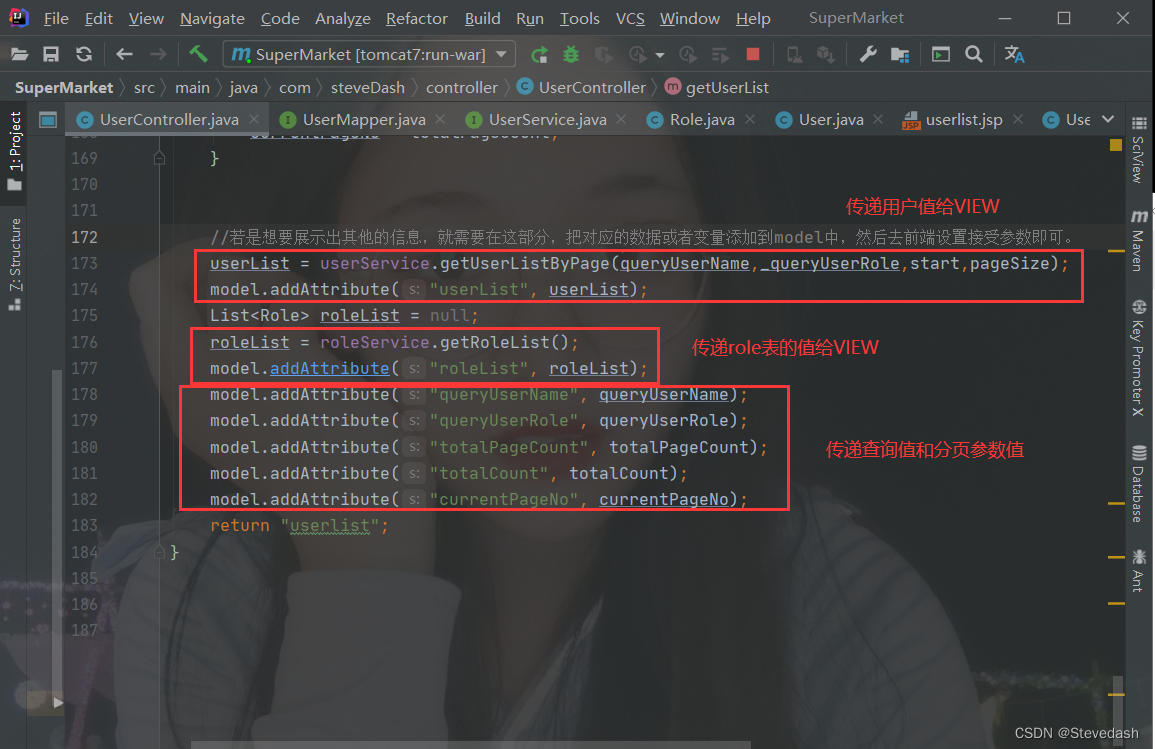
//若是想要展示出其他的信息,就需要在这部分,把对应的数据或者变量添加到model中,然后去前端设置接受参数即可。
userList = userService.getUserListByPage(queryUserName,_queryUserRole,start,pageSize);
model.addAttribute("userList", userList);
List<Role> roleList = null;
roleList = roleService.getRoleList();
model.addAttribute("roleList", roleList);
model.addAttribute("queryUserName", queryUserName);
model.addAttribute("queryUserRole", queryUserRole);
model.addAttribute("totalPageCount", totalPageCount);
model.addAttribute("totalCount", totalCount);
model.addAttribute("currentPageNo", currentPageNo);
return "userlist";
}
}
代码说明:在上面代码中,注意我们把哪些值放到Model里传给了前端
4.view层的实现
往WEB-INF的pages文件夹中创建以下几个页面
①.在WEB-INF的pages中创建userlist.jsp页面:
(若是有修改想要展示的列,那么在这里也得进行对应的参数设置,否则无法获取到model中的参数)
<%--
  Created by IntelliJ IDEA.
  User: Administrator
  Date: 2023/9/18
  Time: 18:52
  To change this template use File | Settings | File Templates.
--%>
<%@ page contentType="text/html;charset=UTF-8" language="java" %>
<%@ taglib prefix="c" uri="http://java.sun.com/jsp/jstl/core" %>
<%@include file="/WEB-INF/pages/common/head.jsp"%>
<div class="right">
    <div class="location">
        <strong>你现在所在的位置是:</strong>
        <span>用户管理页面</span>
    </div>
    <div class="search">
        <form method="post" action="${pageContext.request.contextPath }/userlist">
            <input name="method" value="query" class="input-text" type="hidden">
            <span>用户名:</span>
            <input name="queryname" class="input-text" type="text" value="${queryUserName }">

            <span>用户角色:</span>
            <select name="queryUserRole">
                <c:if test="${roleList != null }">
                    <option value="0">--请选择--</option>
                    <c:forEach var="role" items="${roleList}">
                        <option <c:if test="${role.id == queryUserRole }">selected="selected"</c:if>
                                value="${role.id}">${role.roleName}</option>
                    </c:forEach>
                </c:if>
            </select>

            <input type="hidden" name="pageIndex" value="1"/>
            <input value="查 询" type="submit" id="searchbutton">
            <a href="${pageContext.request.contextPath}/jsp/useradd.jsp" >添加用户</a>
        </form>
    </div>
    <!--用户-->
    <table class="providerTable" cellpadding="0" cellspacing="0">
        <tr class="firstTr">
            <th width="10%">用户编码</th>
            <th width="20%">用户名称</th>
            <th width="10%">性别</th>
            <th width="20%">电话</th>
            <th width="10%">用户角色</th>
            <th width="30%">操作</th>
        </tr>
        <c:forEach var="user" items="${userList }" varStatus="status">
            <tr>
                <td>
                    <span>${user.userCode }</span>
                </td>
                <td>
                    <span>${user.userName }</span>
                </td>
                <td>
                     <span>
                        <c:if test="${user.gender==1}">男</c:if>
                        <c:if test="${user.gender==2}">女</c:if>
                     </span>
                </td>
                <td>
                    <span>${user.phone}</span>
                </td>
                <td>
                    <span>${user.role.roleName}</span>
                </td>
                <td>
                    <span><a class="viewUser" href="javascript:;" userid=${user.id } username=${user.userName }><img src="${pageContext.request.contextPath }/statics/images/read.png" alt="查看" title="查看"/></a></span>
                    <span><a class="modifyUser" href="javascript:;" userid=${user.id } username=${user.userName }><img src="${pageContext.request.contextPath }/statics/images/xiugai.png" alt="修改" title="修改"/></a></span>
                    <span><a class="deleteUser" href="javascript:;" userid=${user.id } username=${user.userName }><img src="${pageContext.request.contextPath }/statics/images/schu.png" alt="删除" title="删除"/></a></span>
                </td>
            </tr>
        </c:forEach>
    </table>
    <input type="hidden" id="totalPageCount" value="${totalPageCount}"/>
    <c:import url="rollpage.jsp">
        <c:param name="totalCount" value="${totalCount}"/>
        <c:param name="currentPageNo" value="${currentPageNo}"/>
        <c:param name="totalPageCount" value="${totalPageCount}"/>
    </c:import>
</div>
</section>

<!--点击删除按钮后弹出的页面-->
<div class="zhezhao"></div>
<div class="remove" id="removeUse">
    <div class="removerChid">
        <h2>提示</h2>
        <div class="removeMain">
            <p>你确定要删除该用户吗?</p>
            <a href="#" id="yes">确定</a>
            <a href="#" id="no">取消</a>
        </div>
    </div>
</div>

<%@include file="/WEB-INF/pages/common/foot.jsp" %>
<script type="text/javascript" src="${pageContext.request.contextPath }/statics/js/userlist.js"></script>
②在WEB-INF的jsp中创建rollpage.jsp页面,用来翻页
rollpage.jsp:
<%--
Created by IntelliJ IDEA.
User: Administrator
Date: 2023/9/18
Time: 18:53
To change this template use File | Settings | File Templates.
--%>
<%@ page contentType="text/html;charset=UTF-8" language="java" %>
<%@ taglib uri="http://java.sun.com/jsp/jstl/core" prefix="c" %>
<!DOCTYPE html PUBLIC "-//W3C//DTD HTML 4.01 Transitional//EN" "http://www.w3.org/TR/html4/loose.dtd">
<html>
<head>
<meta http-equiv="Content-Type" content="text/html; charset=UTF-8">
<title>Insert title here</title>
<script type="text/javascript">
</script>
</head>
<body>
<div class="page-bar">
<ul class="page-num-ul clearfix">
<li>共${param.totalCount }条记录 ${param.currentPageNo }/${param.totalPageCount }页</li>
<c:if test="${param.currentPageNo > 1}">
<a href="javascript:page_nav(document.forms[0],1);">首页</a>
<a href="javascript:page_nav(document.forms[0],${param.currentPageNo-1});">上一页</a>
</c:if>
<c:if test="${param.currentPageNo < param.totalPageCount }">
<a href="javascript:page_nav(document.forms[0],${param.currentPageNo+1 });">下一页</a>
<a href="javascript:page_nav(document.forms[0],${param.totalPageCount });">最后一页</a>
</c:if>
</ul>
<span class="page-go-form"><label>跳转至</label>
<input type="text" name="inputPage" id="inputPage" class="page-key" />页
<button type="button" class="page-btn" onClick='jump_to(document.forms[0],document.getElementById("inputPage").value)'>GO</button>
</span>
</div>
</body>
<script type="text/javascript" src="${pageContext.request.contextPath }/statics/js/rollpage.js"></script>
</html>
③.打开common包中的head.jsp,修改“用户管理”跳转页面的指向,修改为指向userlist(与controller层定义的映射地址一致)
<li><a href=“${pageContext.request.contextPath }/userlist”>用户管理</a></li>
完整代码如下:
<%--
  Created by IntelliJ IDEA.
  User: Administrator
  Date: 2023/9/13
  Time: 23:03
  To change this template use File | Settings | File Templates.
--%>
<%@ page contentType="text/html;charset=UTF-8" language="java" %>
<!DOCTYPE html>
<html>
<head lang="en">
    <meta charset="UTF-8">
    <title>超市订单管理系统</title>
    <link type="text/css" rel="stylesheet" href="${pageContext.request.contextPath }/statics/css/style.css" />
    <link type="text/css" rel="stylesheet" href="${pageContext.request.contextPath }/statics/css/public.css" />
</head>
<!--头部-->
<header class="publicHeader">
    <h1>超市订单管理系统</h1>
    <div class="publicHeaderR">
        <p><span>下午好!</span><span style="color: #fff21b"> ${sessionScope.user.userCode}</span> , 欢迎你!</p>
        <a href="${pageContext.request.contextPath }/logout">退出</a>
    </div>
</header>
<!--时间-->
<section class="publicTime">
    <span id="time">2023年9月13日 23:11  星期三</span>
    <a href="#">温馨提示:为了能正常浏览,请使用高版本浏览器!(Google Or Firefox)</a>
</section>
<!--主体内容-->
<section class="publicMian ">
    <div class="left">
        <h2 class="leftH2"><span class="span1"></span>功能列表 <span></span></h2>
        <nav>
            <ul class="list">
                <li ><a href="${pageContext.request.contextPath }/pages/bill.do?method=query">订单管理</a></li>
                <li><a href="${pageContext.request.contextPath }/pages/provider.do?method=query">供应商管理</a></li>
                <li><a href="${pageContext.request.contextPath }/userlist">用户管理</a></li>
                <li><a href="${pageContext.request.contextPath }/pages/pwdmodify.jsp">密码修改</a></li>
                <li><a href="${pageContext.request.contextPath }/pages/logout.do">退出系统</a></li>
            </ul>
        </nav>
    </div>
    <input type="hidden" id="path" name="path" value="${pageContext.request.contextPath }"/>
    <input type="hidden" id="referer" name="referer" value="<%=request.getHeader("Referer")%>"/>
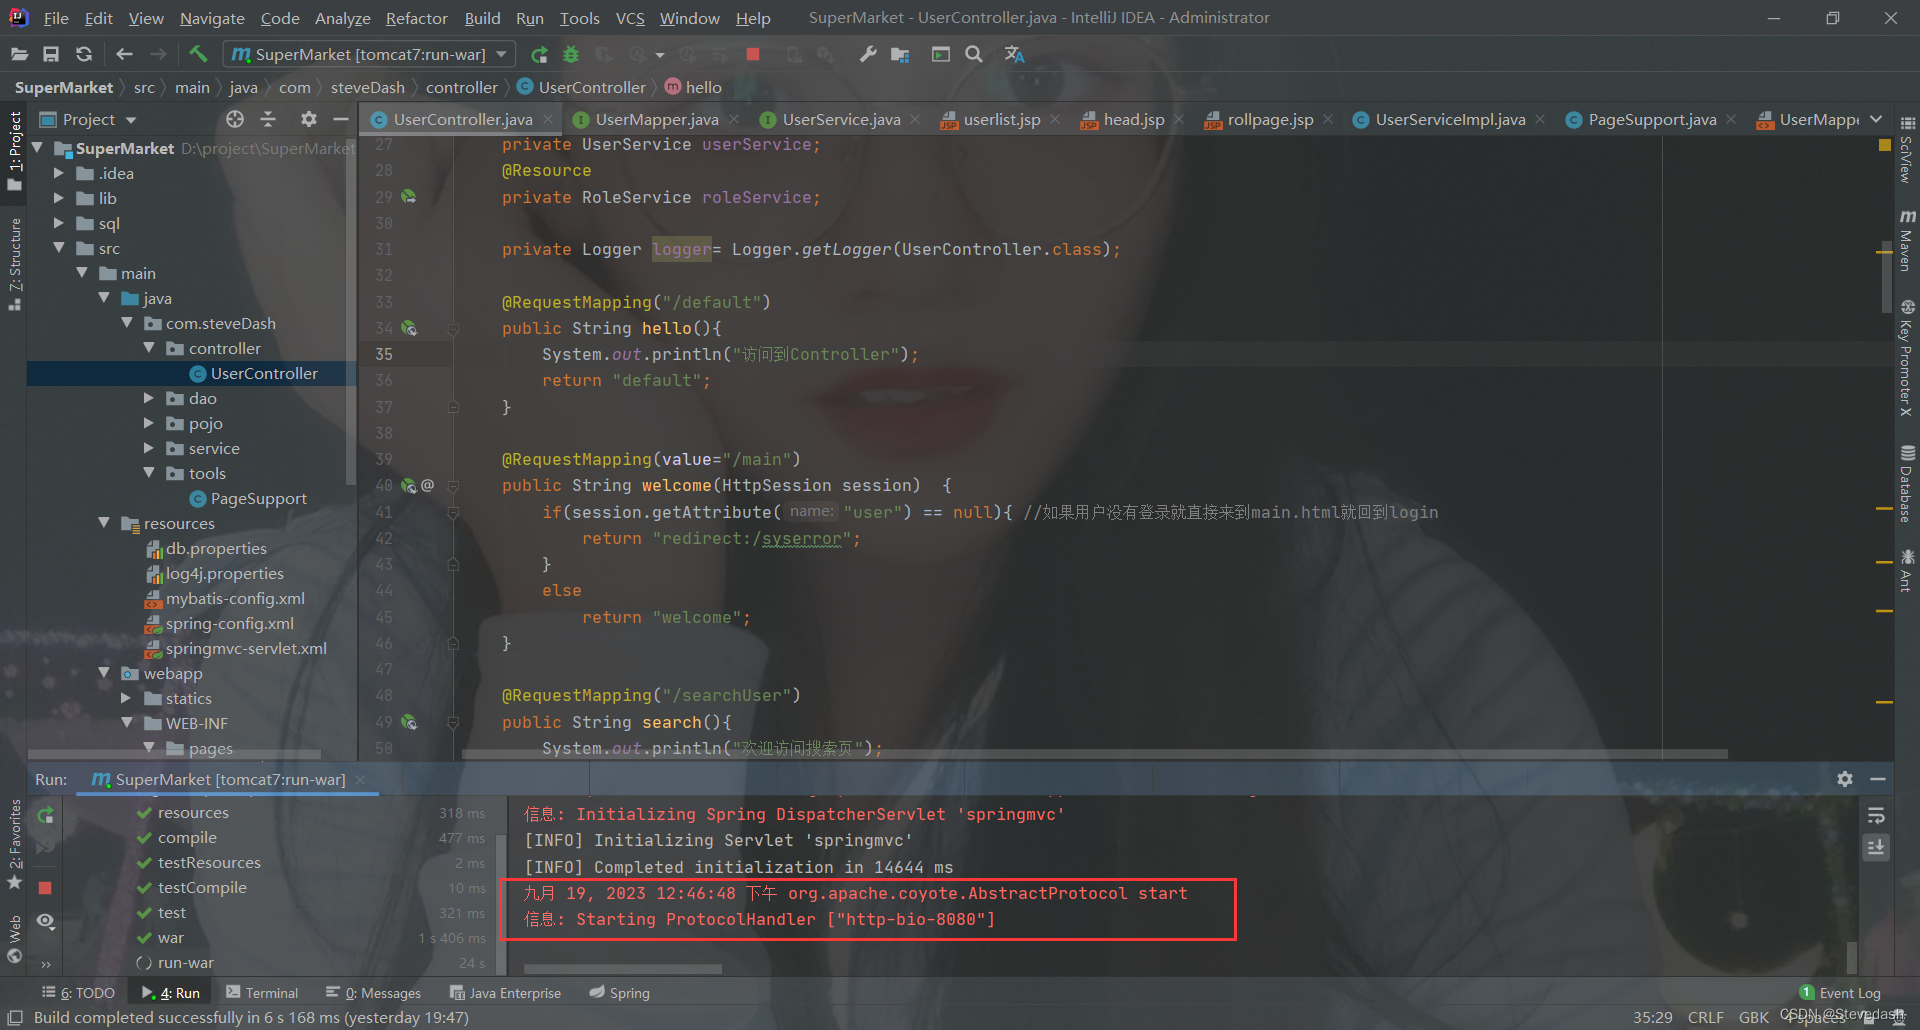
④运行服务,可以部署本地tomcat服务,也可以使用mave插件方式运行tomcat服务(这里我用的是这个)
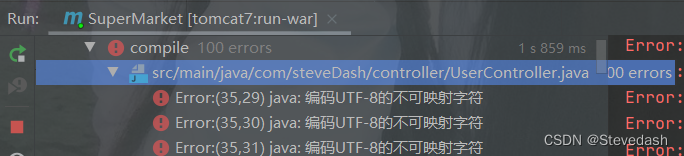
运行服务后,发现报错编码UTF-8的不可映射字符,(若无该bug,可直接去网页车市我们添加的效果)
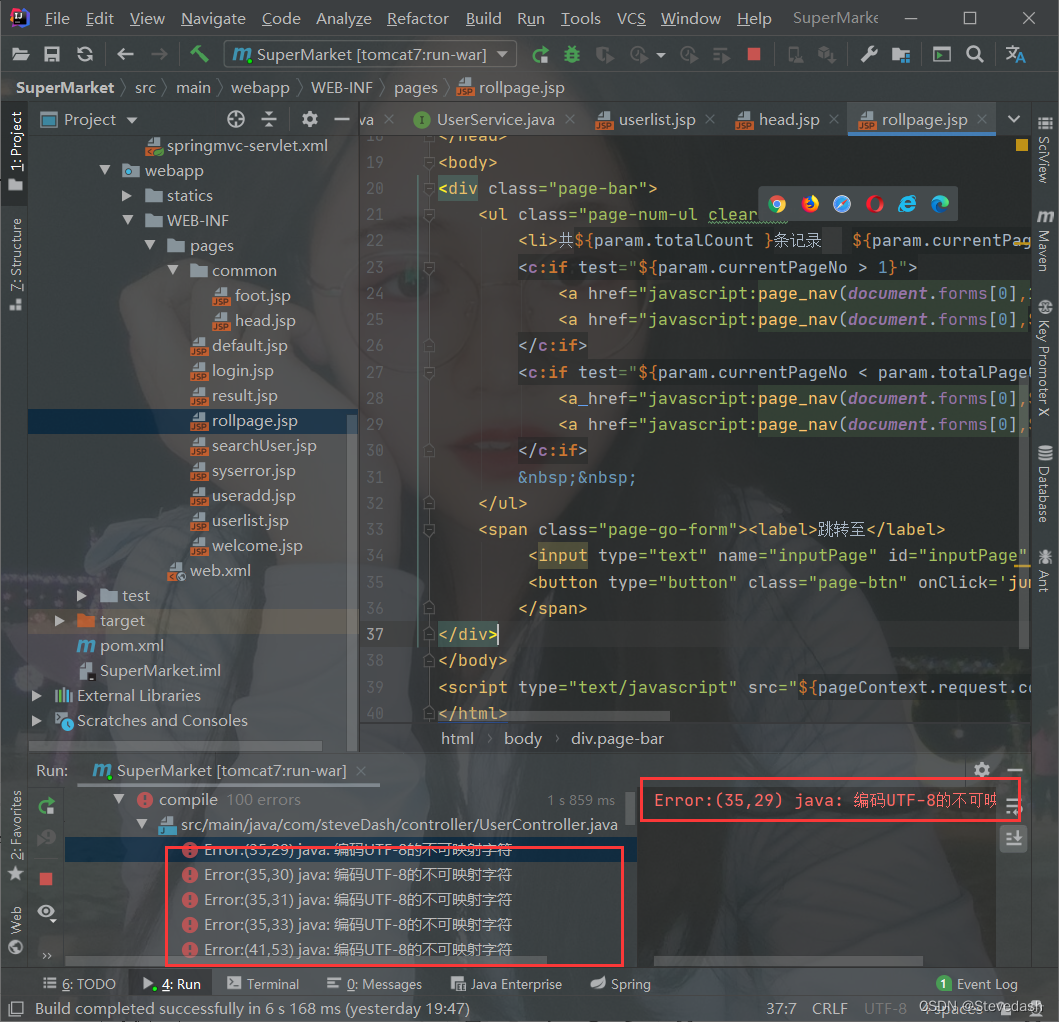
可以看到是我们controller包下的UserController.java出现错误
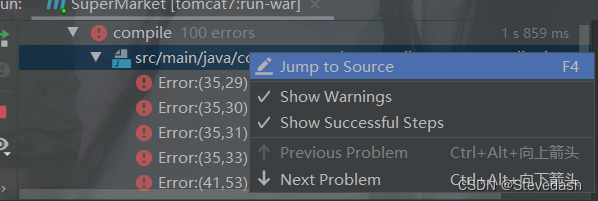
点击jump source,就可以看到报错的位置
发现,报错的原因是中文注释部分。因为我们在前几天,就把项目的文件编码设置了(这是前几天的截图)
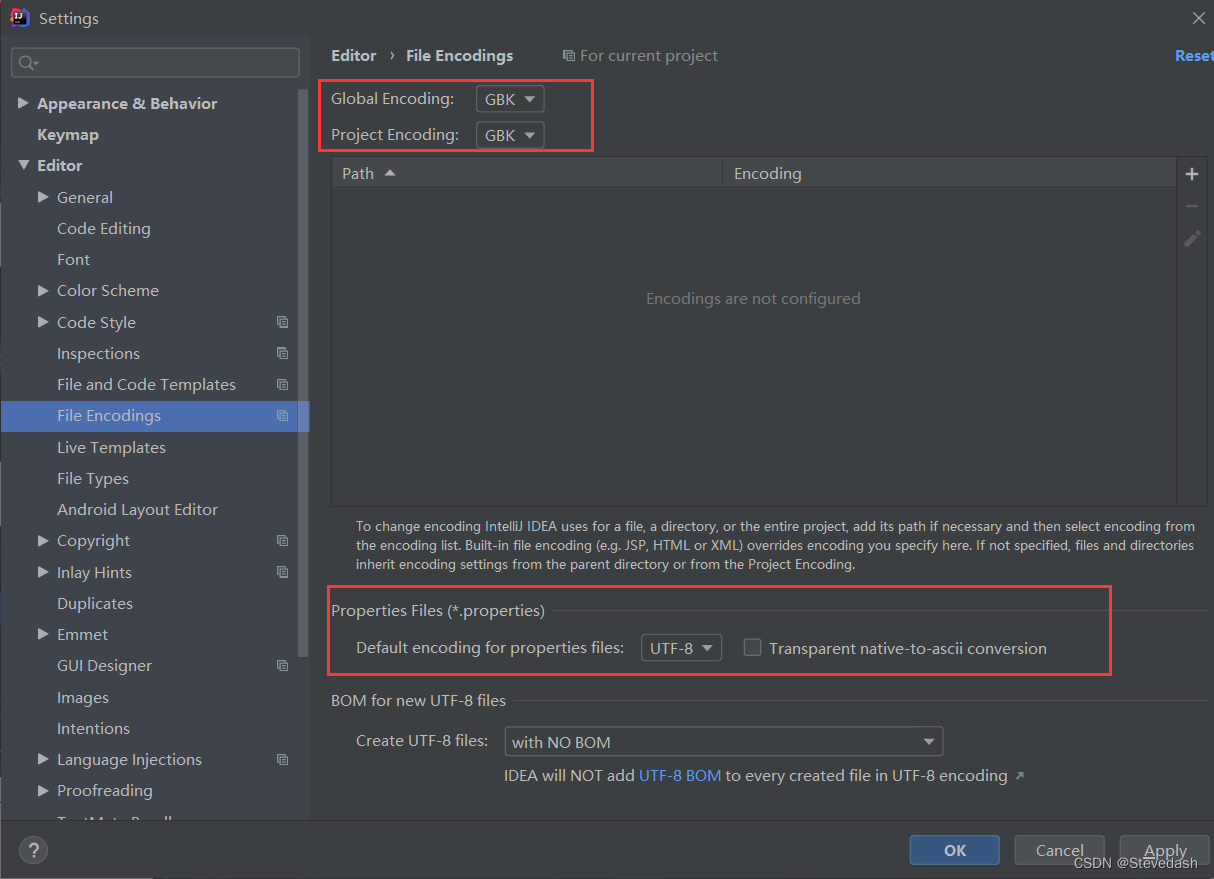
但是呢,现在查看一下设置,发现把java包整个都设置成了gbk编码因此会报错
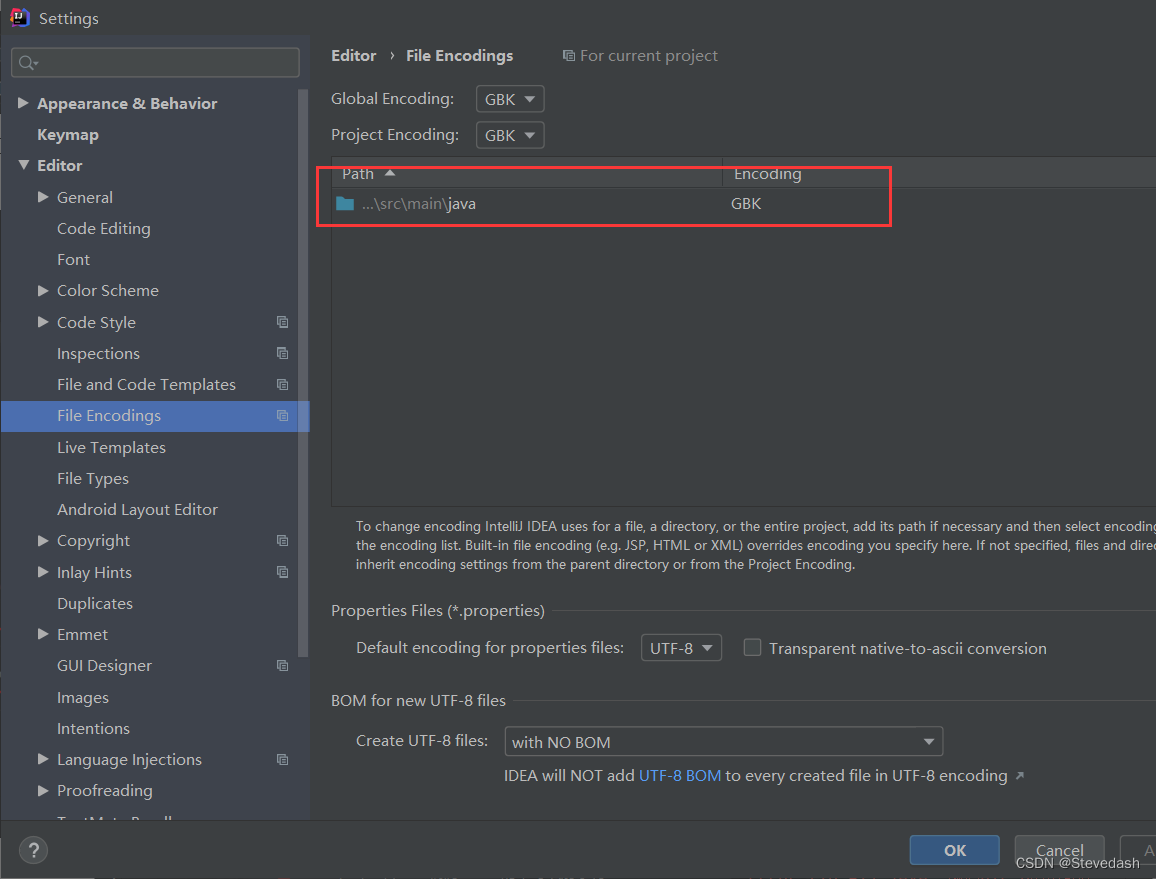
解决办法:更改到controller包,并且点击apply即可

重新运行服务,发现就没有问题了
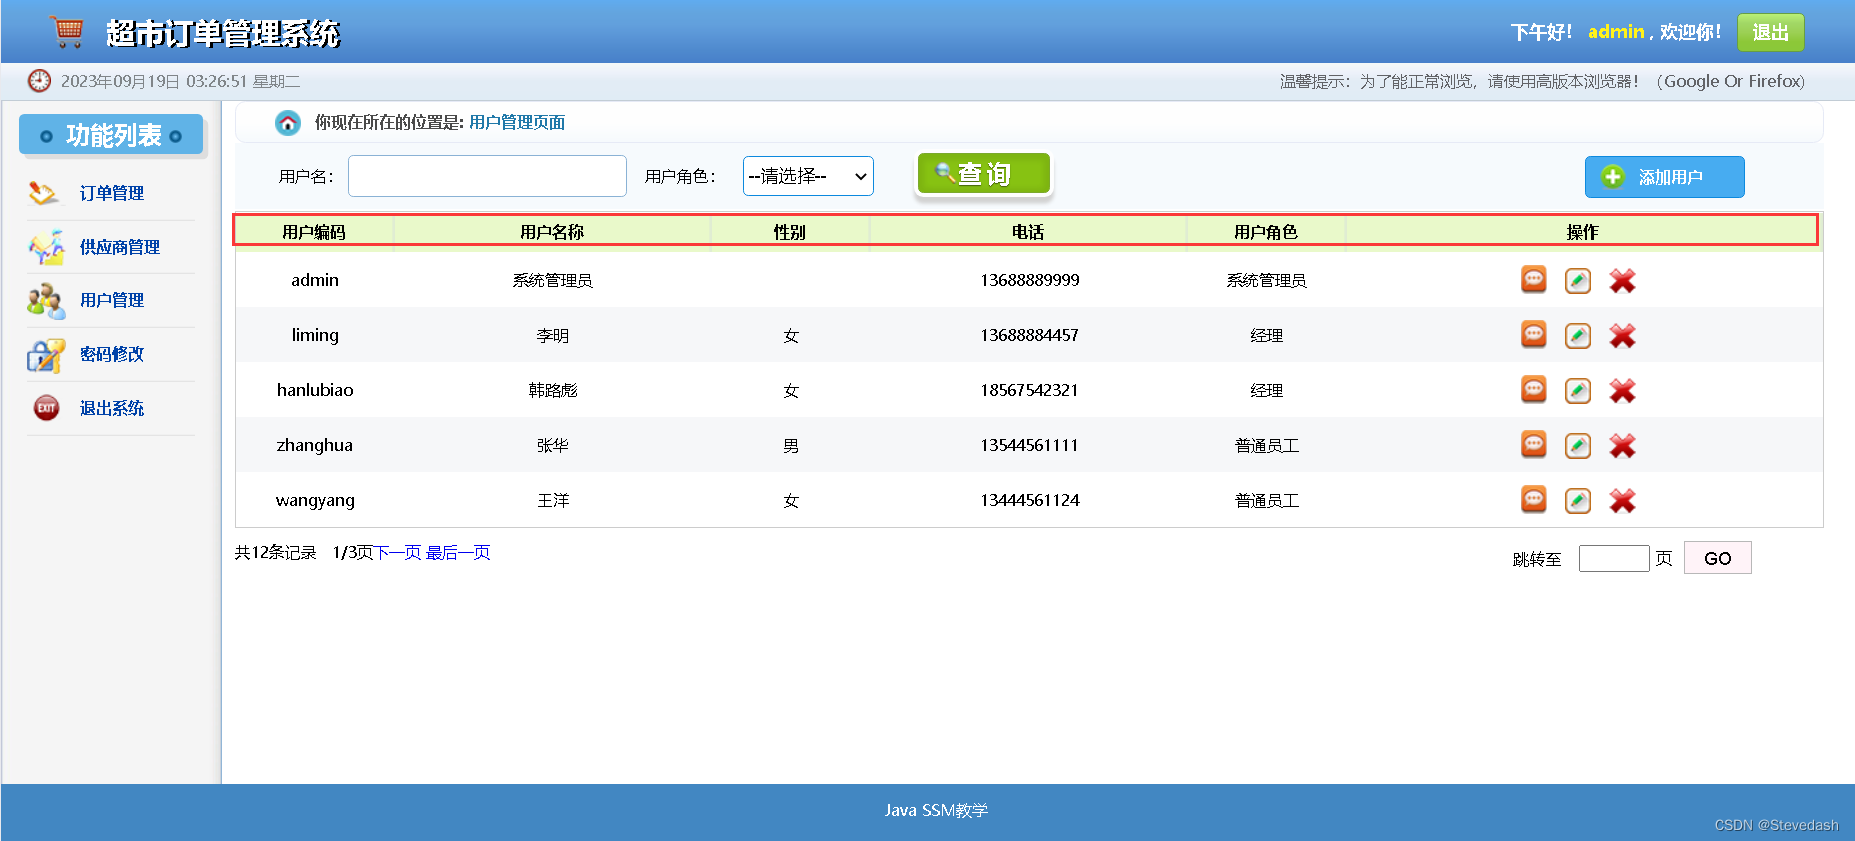
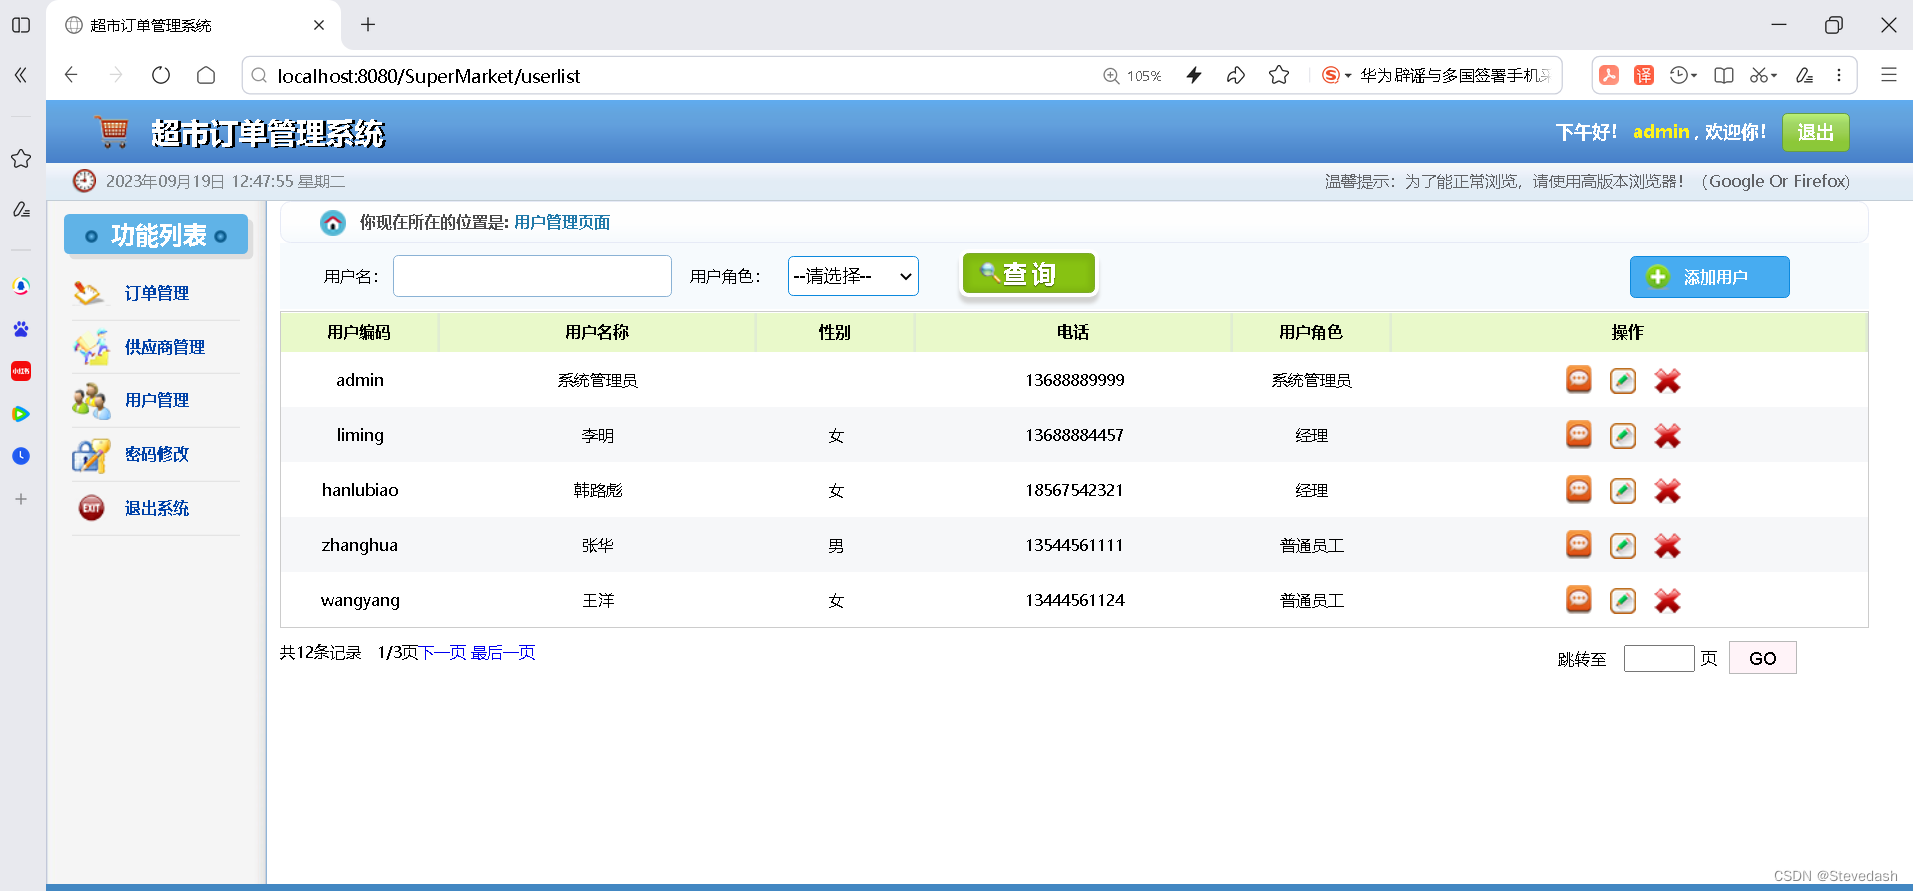
⑤去网页测试查询效果,已经分页效果
1.默认情况下,查询所有用户
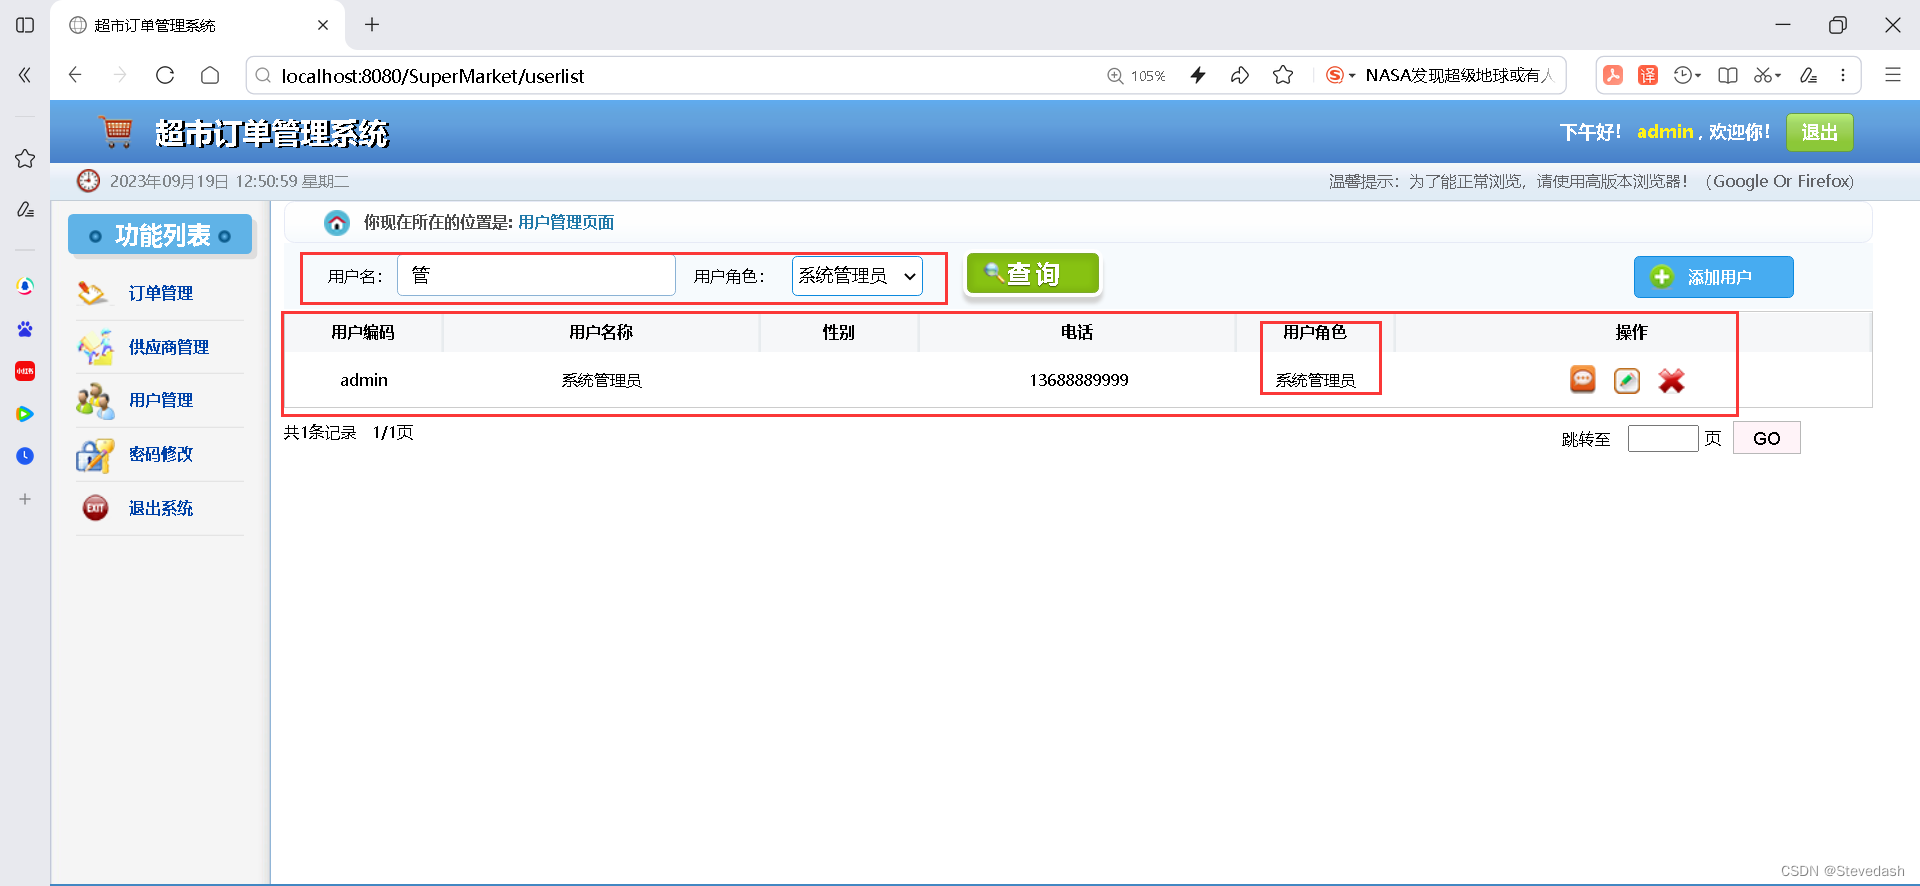
2.指定用户名,采用模糊查询
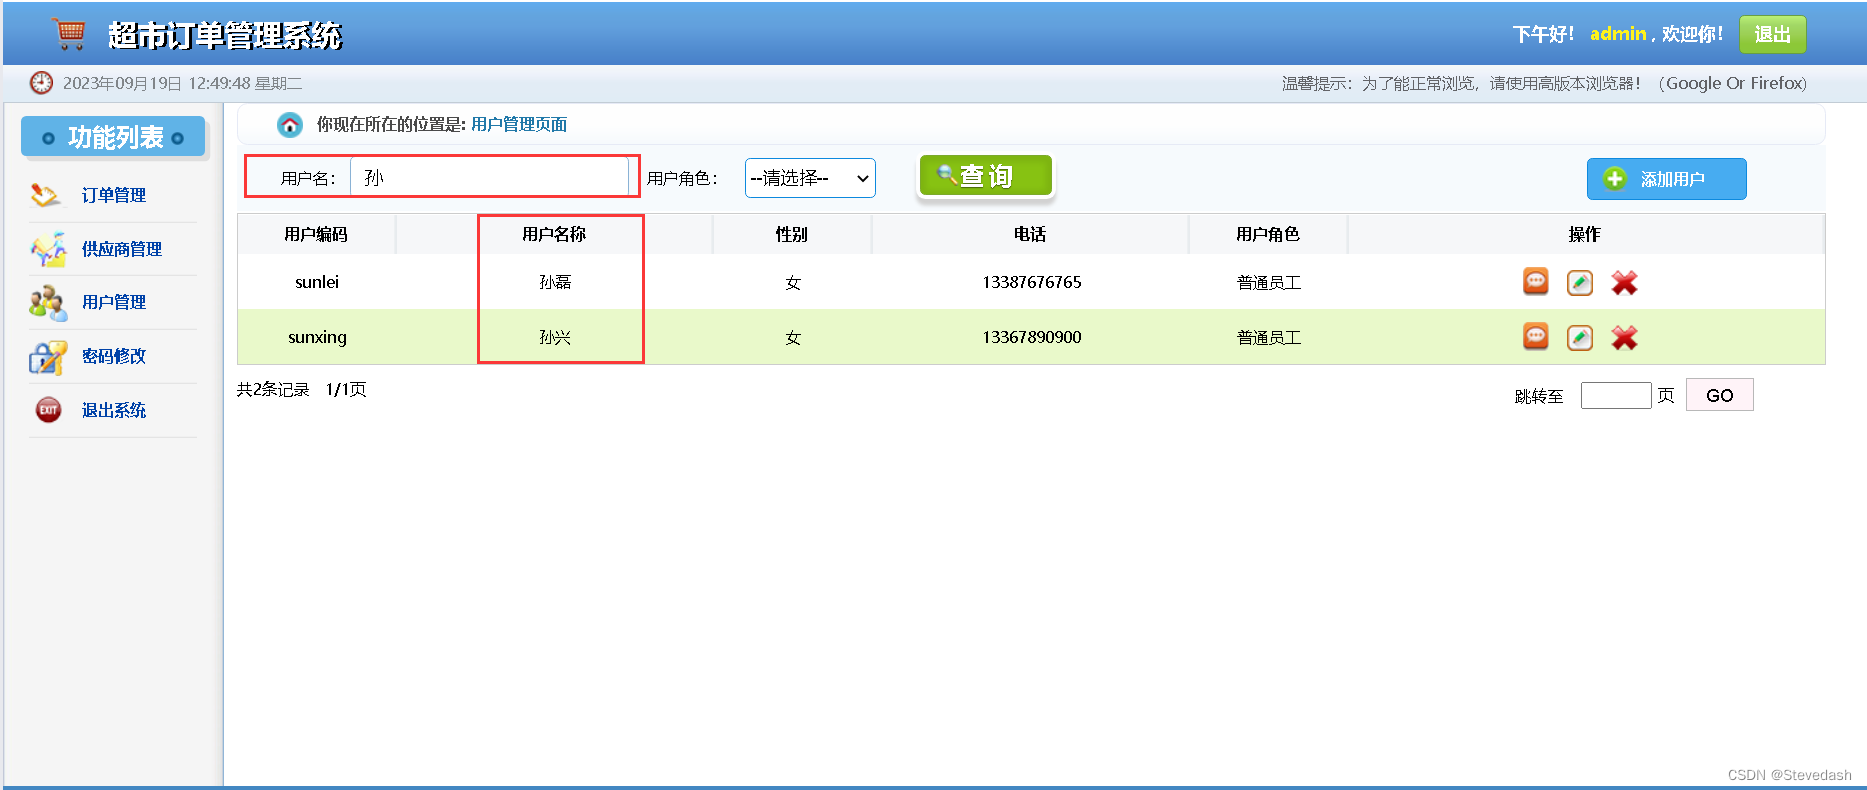
3.精准查询
4.分页效果
代码说明:
(1)在userlist.jsp中使用了c:forEach进行迭代(类似于循环)操作
(2)进行翻页的是由rollpage.jsp实现的:
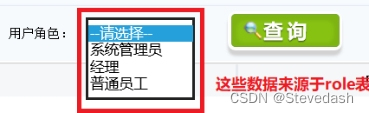
(3)当用户点开"用户角色"右边的下拉菜单时,调用roleList传过来的值显示.
总结
今天是综合项目超市订单管理系统开发的第三天,我们完成对用户信息的显示和查询,动态SQL查询:用户名称(模糊匹配)、用户角色(精确匹配),还使用了分页显示数据列表。把之前学习过的知识,都会应用在这个项目中。涉及到多表关联查询、动态SQL、二级缓存机制、分页显示数据,通过今天的学习,希望各位读者可以对整体的分页显示数据流程有个大致的了解,为框架开发打下坚实基础。
想要跟着学习的可以去我的资源里面找对应的文件下载,我的md文件也会发上去,项目文件会上传可以自己跟着学习一下。(ps:前俩天有事,所以今天补上)
作者:Stevedash
发表于:2023年9月19日 12点57分


 被折叠的 条评论
为什么被折叠?
被折叠的 条评论
为什么被折叠?
 到【灌水乐园】发言


