


是通过去掉标题栏实现的


import tkinter as tk
import ctypes
from PIL import Image, ImageTk # 导入Pillow库
# 定义函数
GetWindowLongPtrW = ctypes.windll.user32.GetWindowLongPtrW # 获取窗口长指针
SetWindowLongPtrW = ctypes.windll.user32.SetWindowLongPtrW # 设置窗口长指针
def get_handle(root) -> int:
root.update_idletasks()# 刷新窗口状态
# 获取窗口的父句柄,与 `ctypes.windll.user32.GetParent` 功能相同
return GetWindowLongPtrW(root.winfo_id(), GWLP_HWNDPARENT)
# 常量定义
GWL_STYLE = -16 # 用于获取窗口样式
GWLP_HWNDPARENT = -8 # 用于获取窗口的父窗口句柄
WS_CAPTION = 0x00C00000 # 窗口标题栏样式
WS_THICKFRAME = 0x00040000 # 窗口可调整边框样式
app = tk.Tk()
icon_path='小红书.ico'
title='自定义标题栏'
app.iconbitmap(icon_path)
app.title(title)
hwnd:int = get_handle(app)# 获取窗口句柄
style:int = GetWindowLongPtrW(hwnd, GWL_STYLE)# 获取窗口的当前样式
# 移除窗口的标题栏和可调整大小的边框样式
# 使用按位与(&)运算并取反(~)来清除 WS_CAPTION 和 WS_THICKFRAME 位
style &= ~(WS_CAPTION | WS_THICKFRAME)
# 将新的样式设置回窗口
SetWindowLongPtrW(hwnd, GWL_STYLE, style)
#=======================================提高程序清晰度=======================================
# 告诉操作系统使用程序自身的dpi适配
ctypes.windll.shcore.SetProcessDpiAwareness(1)
# 获取屏幕的缩放因子
scale_factor = ctypes.windll.shcore.GetScaleFactorForDevice(0)
# 设置程序缩放
app.tk.call('tk', 'scaling', scale_factor / 75)
#=======================================提高程序清晰度=======================================
# 设置窗口大小
app_width = 800 # 宽度
app_height = 500 # 高度
# 获取屏幕宽度和高度
screen_width = app.winfo_screenwidth()
screen_height = app.winfo_screenheight()
# 计算窗口左上角位置
x = (screen_width - app_width) // 2
y = (screen_height - app_height) // 2
# 设置窗口位置
app.geometry(f"{app_width}x{app_height}+{x+200}+{y}") # 中心位置
# 初始标题栏背景图片高度
image_height=100
app_width=1000
# 标题栏背景图片
image_path="标题栏背景.jpg"
# 初始调整图片大小
def resize_image(width, height,image_path):
# 加载图片
background_image666 = Image.open(image_path) # 替换为你的图片路径
"""根据宽高调整图片大小并返回"""
background_image = background_image666.resize((width, height), Image.Resampling.LANCZOS)
return ImageTk.PhotoImage(background_image)
bg_image = resize_image(app_width, image_height,image_path)
background_image666 = Image.open(image_path) # 替换为你的图片路径
# 获取左上角像素的颜色
bg_color = background_image666.getpixel((100, 100))
bg_color_hex = f'#{bg_color[0]:02x}{bg_color[1]:02x}{bg_color[2]:02x}' # 转换为十六进制颜色码
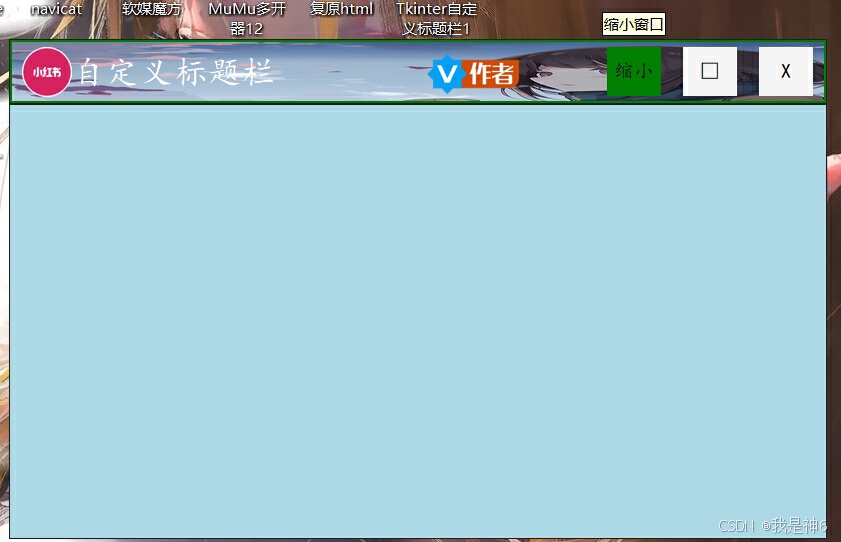
# 创建标题栏
title_bar = tk.Frame(app, bg='green', height=30, bd=2, highlightbackground='#202020',highlightthickness=0.5)
title_bar.pack(expand=0, fill='x')
# 创建画布,覆盖标题栏
canvas = tk.Canvas(title_bar, width=800,highlightthickness=0, bg='green')
canvas.place(x=0, y=0, relwidth=1, relheight=1) # 填充整个标题栏
background_label=canvas.create_image(-80, 0, anchor="nw", image=bg_image) # 在画布的左上角绘制背景图片
# 加载 .ico 图标并显示
def TUBIAO(icon_path,width,height):
icon_image = Image.open(icon_path) # 使用 PIL 打开图标
icon_image = icon_image.resize((width, height)) # 调整图标大小
return ImageTk.PhotoImage(icon_image)
icon=TUBIAO(icon_path,50,50)
icon_item = canvas.create_image(10, 5, anchor="nw", image=icon) # 绘制图标,左上角对齐
# 添加标题文字到画布
title_label=canvas.create_text(60, 30, text=title, fill="white", font=("KaiTi", 20), anchor="w")
zz_icon_path='作者.png'
zz_icon=TUBIAO(zz_icon_path, 130,40)
zz_item = canvas.create_image(405, 12, anchor="nw", image=zz_icon)
# 关于作者函数
def GYZZ(event):
# 创建一个 Toplevel 窗口
title_window = tk.Toplevel(app)
title_window.title("请教问题、合作私信请+V≧◉◡◉≦ Txz-25")
title_window_width=800
title_window_height=550
# 获取屏幕宽度和高度
screen_width = app.winfo_screenwidth()
screen_height = app.winfo_screenheight()
# 计算窗口左上角位置
x = (screen_width - title_window_width) // 2
y = (screen_height - title_window_height) // 2
# 设置窗口位置
title_window.geometry(f"{title_window_width}x{title_window_height}+{x+190}+{y}") # 中心位置
title_window.focus_force() # 强制窗口获取焦点
# 设置窗口图标(大图标支持)
large_icon_path = "创作者中心.png" # 替换为你的大图标文件路径
icon_image = Image.open(large_icon_path)
icon_image = icon_image.resize((80, 80), Image.Resampling.LANCZOS) # 调整为合适尺寸
large_icon = ImageTk.PhotoImage(icon_image)
title_window.tk.call('wm', 'iconphoto', title_window._w, large_icon)
title_window_canvas = tk.Canvas(title_window, width=title_window_width,highlightthickness=0, bg='#f9f7f7')
title_window_canvas.place(x=0, y=0, relwidth=1, relheight=1) # 填充整个标题栏
# 加载二维码图片
mp_image_path = '二维码.jpg' # 替换为你的二维码图片路径
image_width = 340
image_height = 420
mp_image1 = resize_image(image_width, image_height, mp_image_path)
# 绘制二维码图片到 Canvas
title_window_canvas.create_image(140, 30, anchor="nw", image=mp_image1)
# 保存图片引用到 Toplevel 的属性,防止被垃圾回收
title_window.image = mp_image1
# 为图标绑定鼠标点击事件
canvas.tag_bind(zz_item, "<Button-1>", GYZZ)
# 通用的 on_enter 函数,接受按钮、文本和背景色
def on_enter(e, button, enter_text, enter_bg_color):
button.configure(text=enter_text, bg=enter_bg_color)
def on_leave(e, button, leave_text, leave_bg_color):
button.configure(text=leave_text, bg=leave_bg_color)
# 自定义工具提示类 (ToolTip)
class ToolTip:
def __init__(self, widget, text, tip_x, tip_y,enter_text,enter_bg_color,leave_text,leave_bg_color):
self.enter_text=enter_text
self.enter_bg_color=enter_bg_color
self.leave_text=leave_text
self.leave_bg_color=leave_bg_color
self.tip_x = tip_x
self.tip_y = tip_y
self.widget = widget
self.text = text
self.tooltip_window = None
# 绑定鼠标进入和离开事件
# 使用 lambda 将事件绑定到两个回调
self.widget.bind('<Enter>', lambda event: self.show_tooltip(event) or on_enter(event, self.widget, self.enter_text, self.enter_bg_color))
self.widget.bind('<Leave>', lambda event: self.hide_tooltip(event) or on_leave(event, self.widget, self.leave_text, self.leave_bg_color))
def show_tooltip(self, event=None):
if self.tooltip_window is not None:
return
# 使用实例变量 self.tip_x 和 self.tip_y
x = self.widget.winfo_rootx() + self.tip_x
y = self.widget.winfo_rooty() + self.tip_y # 此处是相对于鼠标的位置
# 创建工具提示窗口
self.tooltip_window = tk.Toplevel(self.widget)
self.tooltip_window.wm_overrideredirect(True)
self.tooltip_window.wm_geometry(f'+{x}+{y}') # 设置提示框的位置
label = tk.Label(self.tooltip_window, text=self.text, background='lightyellow', borderwidth=1, relief='solid')
label.pack()
def hide_tooltip(self, event=None):
if self.tooltip_window is not None:
self.tooltip_window.destroy()
self.tooltip_window = None
# 图标 ToolTip 类定义
class ToolTip2:
def __init__(self, canvas, item, text, tip_x, tip_y):
self.canvas = canvas
self.item = item
self.text = text
self.tip_x = tip_x
self.tip_y = tip_y
self.tooltip_window = None
# 绑定鼠标进入和离开事件
self.canvas.tag_bind(self.item, '<Enter>', self.show_tooltip)
self.canvas.tag_bind(self.item, '<Leave>', self.hide_tooltip)
def show_tooltip(self, event=None):
if self.tooltip_window is not None:
return
# 计算提示框位置
x = self.canvas.winfo_rootx() + self.tip_x
y = self.canvas.winfo_rooty() + self.tip_y
# 创建工具提示窗口
self.tooltip_window = tk.Toplevel(self.canvas)
self.tooltip_window.wm_overrideredirect(True)
self.tooltip_window.wm_geometry(f'+{x}+{y}') # 设置提示框的位置
label = tk.Label(self.tooltip_window, text=self.text, background='lightyellow', borderwidth=1, relief='solid')
label.pack()
def hide_tooltip(self, event=None):
if self.tooltip_window is not None:
self.tooltip_window.destroy()
self.tooltip_window = None
# 为图标添加 ToolTip
icon_tooltip = ToolTip2(canvas, icon_item, text="只是软件图标", tip_x=10, tip_y=-40)
# 作者提示
zz_tooltip = ToolTip2(canvas, zz_item, text="关于作者", tip_x=425, tip_y=-40)
# 缩小函数
def minimize_win():
app.wm_iconify()
def restore_window():
fd_button.configure(command=maximize_window)
fd_button.configure(text="□")
app_width=1000
image_height=100
bg_image = resize_image(app_width, image_height,image_path)
canvas.itemconfig(background_label, image=bg_image)
canvas.coords(icon_item, 10, 5)
canvas.coords(title_label, 60, 30)
canvas.coords(zz_item, 405, 12)
canvas.image=bg_image
close_button.configure(width=5,height=2,font='楷体')
fd_button.configure(width=5,height=2,font='楷体')
fd_tooltip.enter_text='放大'
fd_tooltip.text='放大窗口'
sx_button.configure(width=5,height=2,font='楷体')
canvas.itemconfig(title_label, font=('KaiTi', 20))
app.state("normal")
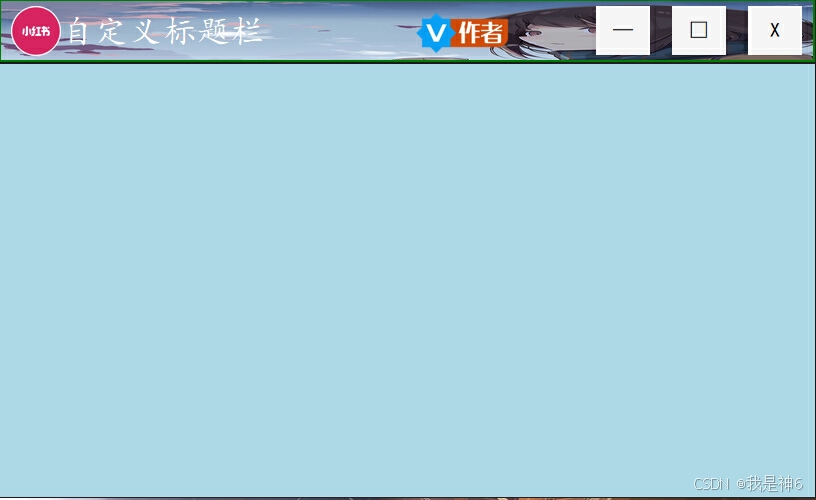
# 放大函数
def maximize_window():
app.state("zoomed")
fd_button.configure(command=restore_window)
fd_button.configure(text="❐")
close_button.configure(font=('KaiTi', 20))
fd_button.configure(font=('KaiTi', 20))
sx_button.configure(font=('KaiTi', 20))
fd_tooltip.enter_text='还原'
fd_tooltip.text='还原窗口'
canvas.itemconfig(title_label, font=('KaiTi', 30))
canvas.coords(icon_item, 10, 20)
canvas.coords(title_label, 60, 45)
canvas.coords(zz_item, 405, 30)
app_width=2000
image_height=200
bg_image = resize_image(app_width, image_height,image_path)
canvas.itemconfig(background_label, image=bg_image)
canvas.image=bg_image
# 关闭按钮
close_button = tk.Button(title_bar, width=5, height=2, text="X", font='楷体', command=app.destroy, bg='#F5F5F5', fg='#000000', highlightthickness=0, bd=0)
close_button.pack(side='right', padx=(11, 11), pady=5) # padx=(11, 11)——表示按钮两侧的填充间距分别为11px。
# 关闭提示(提示位置:tip_x、tip_y)
close_tooltip = ToolTip(close_button, text="关闭窗口", tip_x=5, tip_y=-35,enter_text="关闭", enter_bg_color="red",leave_text='X',leave_bg_color='#F5F5F5')
#放大按钮
fd_button = tk.Button(title_bar, width=5, height=2, text="□",font='楷体', command=maximize_window, bg='#F5F5F5', fg='#000000', highlightthickness=0, bd=0)
fd_button.pack(side='right', padx=(11, 11), pady=5)
#放大提示(提示位置:tip_x、tip_y)
fd_tooltip = ToolTip(fd_button, text="放大窗口", tip_x=-20, tip_y=-35,enter_text="放大", enter_bg_color="yellow",leave_text='□',leave_bg_color='#F5F5F5')
#缩小按钮
sx_button = tk.Button(title_bar, width=5, height=2, text="—", font='楷体',command=minimize_win, bg='#F5F5F5', fg='#000000', highlightthickness=0, bd=0)
sx_button.pack(side='right', padx=(11, 11), pady=5)
#缩小提示(提示位置:tip_x、tip_y)
sx_tooltip = ToolTip(sx_button,text= "缩小窗口", tip_x=-5, tip_y=-35,enter_text="缩小", enter_bg_color="green",leave_text='—',leave_bg_color='#F5F5F5')
# 导入 win32gui 和 win32con 模块用于与 Windows 系统的窗口进行交互
from win32gui import ReleaseCapture, SendMessage, GetParent
from win32con import WM_SYSCOMMAND, SC_MOVE, HTCAPTION
# 将控件放入列表中
widgets_to_bind = [canvas,title_bar]
# 定义一个函数来实现窗口拖动
def windowMove(widgets_to_bind, app):
# 定义一个内部函数 move(),该函数会通过 Windows 消息将窗口移动
def move():
# 释放鼠标捕获,使应用接收后续鼠标事件
ReleaseCapture()
# 向父窗口发送消息,告诉它开始移动窗口
# SC_MOVE 是表示移动窗口的系统命令,HTCAPTION 指定了拖动窗口的区域(通常是标题栏)
SendMessage(GetParent(app.winfo_id()), WM_SYSCOMMAND, SC_MOVE + HTCAPTION, 0)
# 为每个控件绑定鼠标左键点击事件
for widget in widgets_to_bind:
# 将 <B1-Motion> 事件(即按下鼠标左键并移动)绑定到 background_label 上
# 当鼠标按下并移动时,调用 move() 函数
widget.bind("<B1-Motion>", lambda event: move())
# 调用 windowMove 函数,将 控件列表 和 app 作为参数传入
# 这样就实现了通过 控件列表 来拖动 app 窗口
windowMove(widgets_to_bind, app)
# 设置边框(使用highlight参数)
frame = tk.Frame(app, highlightbackground='#202020', highlightthickness=0.5,bg='lightblue')
frame.pack(fill=tk.BOTH, expand=True, padx=0, pady=(0, 0)) # 设定下边距为0,上边距为0
app.mainloop()
 资源蓝奏云:
Tkinter自定义标题栏2.zip - 蓝奏云文件大小:388.3 K|![]() https://wwbh.lanzn.com/iE1j82ggyxhe
https://wwbh.lanzn.com/iE1j82ggyxhe


 被折叠的 条评论
为什么被折叠?
被折叠的 条评论
为什么被折叠?
 到【灌水乐园】发言


