


一、安装channels
在django中使用websocket需要用到python的channels库,但是在django4中需要同时安装daphne。
Python -m pip install -U channels[“daphne”]二、修改settings.py,注册APP
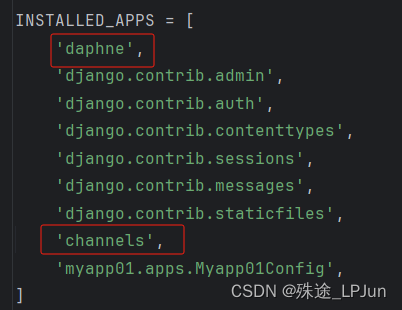
在settings.py中:INSTALLED_APPS添加channels及daphne,注意daphne需要放在最前面。
同时需要手动添加一行代码,进行配置ASGI_APPLICATION
ASGI_APPLICATION = 'mysite.asgi.application'三、启动
至此,基本的ASGI配置已经完成,启动后若显示如下信息则表明ASGI配置成功。

四、创建websocket服务端
在myapp01目录下创建consumers.py并添加内容
from channels.generic.websocket import WebsocketConsumer
from channels.exceptions import StopConsumer


class ChatConsumer(WebsocketConsumer):
    #接收连接请求
    def websocket_connect(self,message):
        print("connected...")
        self.accept()
        self.send('welcome')、

    #接收信息,对应用户的ws.send
    def websocket_receive(self,message):
        if message['text'] == 'ping':
            console.log('ok')

    #关闭连接
    def websocket_disconnect(self,message):
        print("disconnected...")
raise StopConsumer()在mysite目录下创建routings.py并添加内容
from django.urls import re_path
from myapp01 import consumers

websocket_urlpatterns = [
    #前端使用webscoket访问/room/**时创建连接
    re_path(r"room/(?P<group>\w+)/$",consumers.ChatConsumer.as_asgi())
]
五、修改asgi.py
from mysite import routings
application=ProtocolTypeRouter({
    "http": get_asgi_application(),
    "websocket":URLRouter(routings.websocket_urlpatterns)
})
六、js使用websocket
const ws = new Websocket('ws://127.0.0.1:7777/room/1')


#创建连接,对应consumers的websocket_connet函数
ws.onopen = function() {
    console.log('connet')
    console.log('WebSocket connected');
};

#接收信息,服务端的send会调用这条函数
ws.onmessage=function (event){

    console.log(event.data)
};

#关闭连接
ws.onclose = function(event) {
    reconnect()
};


 190
190

 被折叠的 条评论
为什么被折叠?
被折叠的 条评论
为什么被折叠?
 到【灌水乐园】发言


