


springAop
文章目录
1springAop简介
1.什么是AOP?
AOP的全称是Aspect-Oriented Programming,即面向切面编程(也称面向方面编程)。它是面向对象编程(OOP)的一种补充,目前已成为一种比较成熟的编程方式。
2.AOP简介
在传统的业务处理代码中,通常都会进行事务处理、日志记录等操作。虽然使用OOP可以通过组合或者继承的方式来达到代码的重用,但如果要实现某个功能(如日志记录),同样的代码仍然会分散到各个方法中。这样,如果想要关闭某个功能,或者对其进行修改,就必须要修改所有的相关方法。这不但增加了开发人员的工作量,而且提高了代码的出错率。
为了解决这一问题,AOP思想随之产生。AOP采取横向抽取机制,将分散在各个方法中的重复代码提取出来,然后在程序编译或运行时,再将这些提取出来的代码应用到需要执行的地方。这种采用横向抽取机制的方式,采用传统的OOP思想显然是无法办到的,因为OOP只能实现父子关系的纵向的重用。虽然AOP是一种新的编程思想,但却不是OOP的替代品,它只是OOP的延伸和补充。
2.Spring AOP简介
1.类与切面的关系
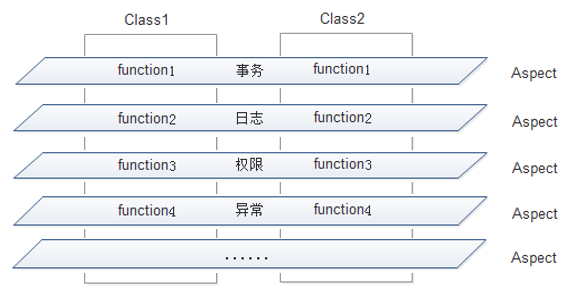
AOP的使用,使开发人员在编写业务逻辑时可以专心于核心业务,而不用过多的关注于其他业务逻辑的实现,这不但提高了开发效率,而且增强了代码的可维护性。
2.AOP术语
Proxy(代理):将通知应用到目标对象之后,被动态创建的对象。
Weaving(织入):将切面代码插入到目标对象上,从而生成代理对象的过程。
Advice(通知/增强处理):AOP框架在特定的切入点执行的增强处理,即在定义好的切入点处所要执行的程序代码。可以将其理解为切面类中的方法。
Target Object(目标对象):指所有被通知的对象,也被称为被增强对象。如果AOP框架采用的是动态的AOP实现,那么该对象就是一个被代理对象。
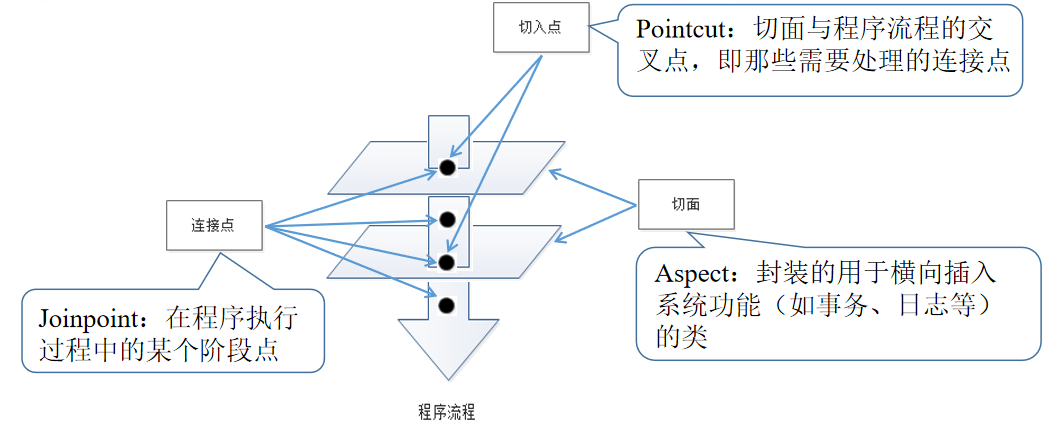
Aspect(切面):封装的用于横向插入系统功能(如事务、日志等)的类
Joinpoint(连接点):在程序执行过程中的某个阶段点
Pointcut(切入点):切面与程序流程的交叉点,即那些需要处理的连接点
3.动态代理的两种基本实现
1.JDK动态代理
JDK动态代理是通过java.lang.reflect.Proxy 类来实现的,我们可以调用Proxy类的newProxyInstance()方法来创建代理对象。对于使用业务接口的类,Spring默认会使用JDK动态代理来实现AOP。
2.CGLIB代理
JDK的动态代理用起来非常简单,但它是有局限性的,使用动态代理的对象必须实现一个或多个接口。
为了实现类的代理可以使用CGLIB代理
CGLIB(Code Generation Library)是一个高性能开源的代码生成包,它采用非常底层的字节码技术,对指定的目标类生成一个子类,并对子类进行增强。
4.基于ProxyFactoryBean代理的实现
1. ProxyFactoryBean
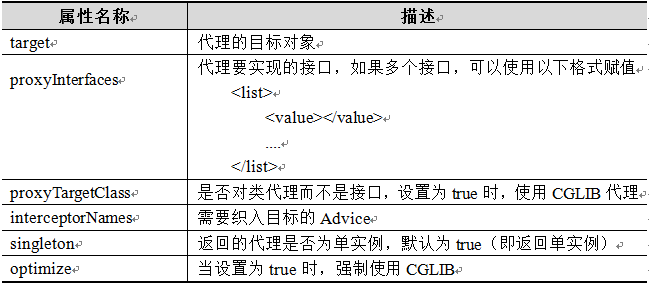
ProxyFactoryBean是FactoryBean接口的实现类,FactoryBean负责实例化一个Bean,而ProxyFactoryBean负责为其他Bean创建代理实例。在Spring中,使用ProxyFactoryBean是创建AOP代理的基本方式。
可以配置的属性
ProxyTargetClass (是否强制使用CGLIB来实现代理)
(true : 强制使用CGLIB来实现代理)
(false : 不强制使用CGLIB来实现代理,首选JDK来实现代理)(默认值)
isOptimize (是否对生成代理策略进行优化)
(true : 进行优化,如果有接口就代理接口(使用JDK动态代理),没有接口代理类(CGLIB代理))
(false : 不进行优化) (默认值)
2.实现
引入依赖
    <properties>
        <!--在当前pom 或者父类pom 中声明属性  -->
        <spirng.version>5.0.16.RELEASE</spirng.version>
    </properties>


    <dependencies>

        <dependency>
            <groupId>org.springframework</groupId>
            <artifactId>spring-context</artifactId>
            <version>${spirng.version}</version>
        </dependency>

        <!-- 导入spring aop -->
        <dependency>
            <groupId>org.springframework</groupId>
            <artifactId>spring-aop</artifactId>
            <version>${spirng.version}</version>
        </dependency>

    </dependencies>
1.创建切面MyAspect
public class MyAspect implements MethodInterceptor {

    public Object invoke(MethodInvocation methodInvocation) throws Throwable {

        // 记录日志
       log( methodInvocation.getMethod().getName());

       Object result = methodInvocation.proceed();

        return result;
    }

    public void log(String log){
        System.out.println("日志调用方法:"+log);
    }
}
2.创建配置文件
<?xml version="1.0" encoding="UTF-8"?>
<beans xmlns="http://www.springframework.org/schema/beans"
       xmlns:xsi="http://www.w3.org/2001/XMLSchema-instance"
       xsi:schemaLocation="http://www.springframework.org/schema/beans http://www.springframework.org/schema/beans/spring-beans.xsd">

    <bean id="studentDao" class="com.zph.dao.impl.StudentDaoImpl"></bean>

    <bean id="myAspect" class="com.zph.proxyfactory.MyAspect">

    </bean>
    <bean id="studentDaoProxy" class="org.springframework.aop.framework.ProxyFactoryBean">

         <!--
         当实现接口时,指定对应得接口  可以选择不写,
         如果代理只有类,不能写否者报错
          <property name="proxyInterfaces" value="com.zph.dao.StudentDaoIm">
            </property>-->
            <!--
                指定目标对象
            -->
            <property name="target" ref="studentDao"></property>

            <!--
                指定切面
             -->
            <property name="interceptorNames" value="myAspect"></property>
            <!--
                true   cglib 代理
                false  jdbc 动态代理
            -->
            <property name="proxyTargetClass" value="false"></property>
    </bean>

</beans>
3.测试
public class ProxyFactoryTest {

    public static void main(String[] args) {

        ApplicationContext applicationContext = new ClassPathXmlApplicationContext("proxyfactory/proxyfactory.xml");

        StudentDaoImpl studentDao = (StudentDaoImpl) applicationContext.getBean("studentDaoProxy");

       Student student = studentDao.findStudentById(10);
        System.out.println("student:"+student);
    }

}
总结:
为什么会有jdk和CGLIB两种选择?
1.jdk 只能代理类实现的接口的类,而没有实现接口类必须使用CGLIB
2.从性能来说:
CGLIB:创建慢,执行块(CGLIB 要生成对应的代理的代码,在创建代理对象)
JDK:创建快,执行慢(反射本身执行就比正常代码的慢)
5.基于AspectJ开发的实现
AspectJ是一个基于Java语言的AOP框架,它提供了强大的AOP功能。Spring 2.0以后,Spring AOP引入了对AspectJ的支持,并允许直接使用AspectJ进行编程,而Spring自身的AOP API也尽量与AspectJ保持一致。新版本的Spring框架,也建议使用AspectJ来开发AOP。
使用AspectJ实现AOP有两种方式:
- 基于XML的声明式AspectJ
- 基于注解的声明式AspectJ
1spring通知的类型
Spring按照通知在目标类方法的连接点位置,可以分为5种类型,具体如下:
- org.springframework.aop.MethodBeforeAdvice(前置通知)
在目标方法执行前实施增强,可以应用于权限管理等功能。 - org.springframework.aop.AfterReturningAdvice(后置通知)
在目标方法执行后实施增强,可以应用于关闭流、上传文件、删除
临时文件等功能。 - org.aopalliance.intercept.MethodInterceptor(环绕通知)
在目标方法执行前后实施增强,可以应用于日志、事务管理等功能。 - org.springframework.aop.ThrowsAdvice(异常抛出通知)
在方法抛出异常后实施增强,可以应用于处理异常记录日志等功能。 - org.springframework.aop.IntroductionInterceptor(引介通知)
在目标类中添加一些新的方法和属性,可以应用于修改老版本程序。
2.基于XML的声明式AspectJ
基于XML的声明式AspectJ是指通过XML文件来定义切面、切入点及通知,所有的切面、切入点和通知都必须定义在aop:config元素内。
-
配置切面
在Spring的配置文件中,配置切面使用的是aop:aspect元素,该元素会将一个已定义好的Spring Bean转换成切面Bean,所以要在配置文件中先定义一个普通的Spring Bean。
               <aop:config>
               <!--配置aop 切面-->
                <aop:aspect ref="myAspect">
                    <!--绑定切点-->
					...
        		</aop:config>
说明:

- 配置切入点
当aop:pointcut元素作为aop:config元素的子元素定义时,表示该切入点是全局切入点,它可被多个切面所共享;当aop:pointcut元素作为aop:aspect元素的子元素时,表示该切入点只对当前切面有效。
<aop:pointcut id="myPointCut" expression="execution(* com.zph.*.*(..))"/>
- 切入点表达式
切入点表达式表达式是表示我们我们当前切面需要拦截那写方法
execution(modifiers-pattern? ret-type-pattern declaring-type-pattern?
                          name-pattern(param-pattern) throws-pattern?)
execution(权限修饰符? 返回值类型 方法类的全路径名?方法名(参数名)异常类型? )
规则:权限修饰符省略,异常类型省略 ,参数名 使用.. 替代 ,  包名,类名,方法名 ,返回值类型可以使用* 替代
备注:?部分表示可以省略不写
-
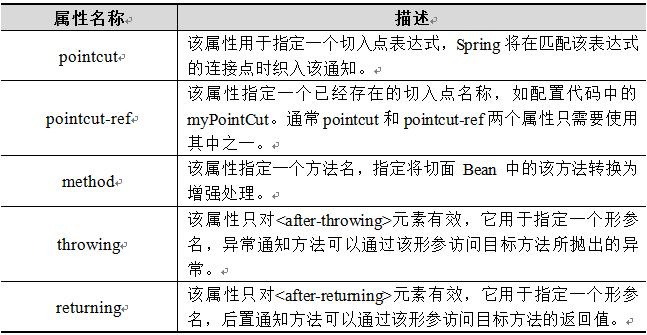
配置通知
使用aop:aspect的子元素可以配置5种常用通知,这5个子元素不支持使用子元素,但在使用时可以指定一些属性,其常用属性及其描述如下:
导入依赖
        <dependency>
            <groupId>org.aspectj</groupId>
            <artifactId>aspectjrt</artifactId>
            <version>1.6.12</version>
        </dependency>
        <dependency>
            <groupId>org.aspectj</groupId>
            <artifactId>aspectjweaver</artifactId>
            <version>1.6.12</version>
        </dependency>
1.创建切面
public class MyAspect {

    /**
     * 前置通知   注意JoinPoint 中 P 大写引入的是org.aspectj.lang.JoinPoint;
     * @param joinPoint
     */
    public void myBefore(JoinPoint joinPoint){

        System.out.println("前置通知");
        System.out.println("目标类:"+joinPoint.getTarget());
        System.out.println("目标方法:"+joinPoint.getSignature().getName());

    }


    /**
     * 后置通知
     * @param joinPoint
     */
    public void myAfterReturning(JoinPoint joinPoint,Object result){
        System.out.println("后置通知");
        System.out.println("目标方法:"+joinPoint.getSignature().getName());
        System.out.println("result:"+result);
    }

    /**
     * 环绕通知
     * @param proceedingJoinPoint
     * @return
     * @throws Throwable
     */
    public Object myAround(ProceedingJoinPoint proceedingJoinPoint) throws Throwable {

        System.out.println("环绕通知:执行方法前");
        Object result = proceedingJoinPoint.proceed();
        System.out.println("result:"+result);
        System.out.println("环绕通知:执行方法后");

        return result;
    }

    /**
     * 异常通知
     * @param joinPoint
     * @param e
     */
    public void myAfterThrowing(JoinPoint joinPoint,Throwable e){

        System.out.println("异常通知出错了:"+e.getMessage());
    }


    public void myAfter(JoinPoint joinPoint){
        System.out.println("最终通知"+ joinPoint.getSignature().getName());
    }

}
2.配置文件
<?xml version="1.0" encoding="UTF-8"?>
<beans xmlns="http://www.springframework.org/schema/beans"
       xmlns:xsi="http://www.w3.org/2001/XMLSchema-instance"
       xmlns:aop="http://www.springframework.org/schema/aop"
       xsi:schemaLocation="http://www.springframework.org/schema/beans
        http://www.springframework.org/schema/beans/spring-beans-4.3.xsd
        http://www.springframework.org/schema/aop
        http://www.springframework.org/schema/aop/spring-aop-4.3.xsd">


        <bean id="studentDao"  class="com.zph.dao.impl.StudentDaoImpl"></bean>

        <bean id="myAspect" class="com.zph.aspect.xml.MyAspect"></bean>

        <!--
            配置aop
        -->
        <aop:config>
                <!--配置aop 切面-->
                <aop:aspect ref="myAspect">
                    <!--绑定切点-->
                    <aop:pointcut id="myPointCut" expression="execution(* com.zph.*.*(..))"/>
                    <!-- 配置各种通知-->
                    <aop:before method="myBefore" pointcut-ref="myPointCut"></aop:before>
                    <aop:around method="myAround" pointcut-ref="myPointCut"></aop:around>
                    <aop:after-returning method="myAfterReturning" pointcut-ref="myPointCut" returning="result"></aop:after-returning>
                    <aop:-throwing method="myAfterThrowing" pointcut-ref="myPointCut" throwing="e"></aop:after-throwing>
                    <aop:after method="myAfter" pointcut-ref="myPointCut"></aop:after>
                </aop:aspect>
        </aop:config>
</beans>
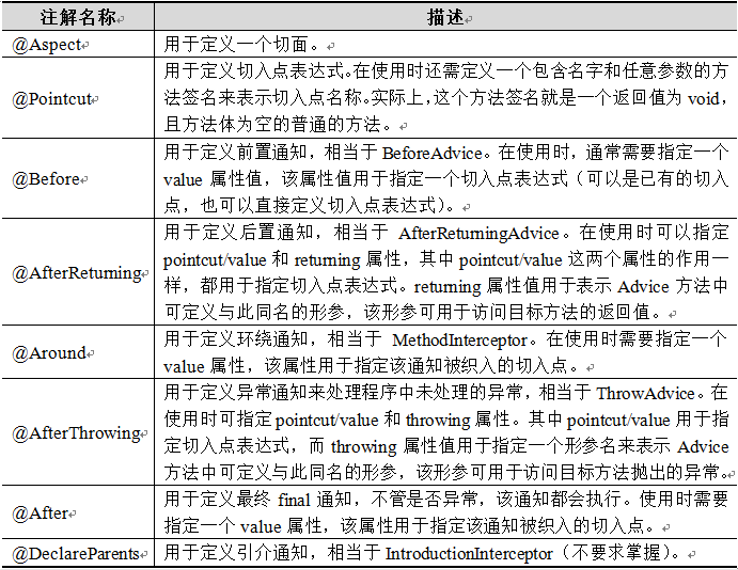
3.基于注解的AspectJ
AspectJ框架为AOP的实现提供了一套注解,用以取代Spring配置文件中为实现AOP功能所配置的臃肿代码。AspectJ的注解及其描述如下所示:
示例
1.声明切面
@Component
@Aspect
public class MyAspect {


    @Pointcut("execution(* com.zph.*.*(..))")
    private void myPointCut(){}

    /**
     * 前置通知   注意JoinPoint 中 P 大写引入的是org.aspectj.lang.JoinPoint;
     * @param joinPoint
     */
    @Before("myPointCut()")
    public void myBefore(JoinPoint joinPoint){

        System.out.println("前置通知");
        System.out.println("目标类:"+joinPoint.getTarget());
        System.out.println("目标方法:"+joinPoint.getSignature().getName());

    }


    /**
     * 后置通知
     * @param joinPoint
     */
    @AfterReturning(value = "myPointCut()",returning = "result")
    public void myAfterReturning(JoinPoint joinPoint,Object result){
        System.out.println("后置通知");
        System.out.println("目标方法:"+joinPoint.getSignature().getName());
        System.out.println("result:"+result);
    }

    /**
     * 环绕通知
     * @param proceedingJoinPoint
     * @return
     * @throws Throwable
     */
    @Around(value = "myPointCut()")
    public Object myAround(ProceedingJoinPoint proceedingJoinPoint) throws Throwable {

        System.out.println("环绕通知:执行方法前");
        Object result = proceedingJoinPoint.proceed();
        System.out.println("result:"+result);
        System.out.println("环绕通知:执行方法后");

        return result;
    }

    /**
     * 异常通知
     * @param joinPoint
     * @param e
     */
    @AfterThrowing(value = "myPointCut()",throwing = "e")
    public void myAfterThrowing(JoinPoint joinPoint,Throwable e){

        System.out.println("异常通知出错了:"+e.getMessage());
    }

    @After("myPointCut()")
    public void myAfter(JoinPoint joinPoint){
        System.out.println("最终通知"+ joinPoint.getSignature().getName());
    }

}
2.设置配置文件开启AOP配置
<?xml version="1.0" encoding="UTF-8"?>
<beans xmlns="http://www.springframework.org/schema/beans"
       xmlns:xsi="http://www.w3.org/2001/XMLSchema-instance"
       xmlns:context="http://www.springframework.org/schema/context"
       xmlns:aop="http://www.springframework.org/schema/aop"
       xsi:schemaLocation="http://www.springframework.org/schema/beans http://www.springframework.org/schema/beans/spring-beans.xsd http://www.springframework.org/schema/context https://www.springframework.org/schema/context/spring-context.xsd http://www.springframework.org/schema/aop https://www.springframework.org/schema/aop/spring-aop.xsd">

    <!-- 开启注解扫描器-->
    <context:component-scan base-package="com.zph"></context:component-scan>
    <!-- 开启aop asjpectj 功能-->
    <aop:aspectj-autoproxy/>
</beans>


 752
752


 被折叠的 条评论
为什么被折叠?
被折叠的 条评论
为什么被折叠?
 到【灌水乐园】发言


