


一.前言
本文是作者阅读Spring源码的记录文章,由于本人技术水平有限,在文章中难免出现错误,如有发现,感谢各位指正。
在学习过程中也看过很多springboot自动装配的文章,但是大多仅停留在注解的解释上,并不能全面的讲述spring在自动装配过程中的工作过程。作者在学习spring源码的过程中看到了相关的代码,就产出了本文章。
二.一切的开始SpringBoot启动类
一个简单的启动类,main方法中把当前启动类传入作为参数。
@SpringBootApplication
public class DesignApplication {
    public static void main(String[] args) throws Exception {
       SpringApplication.run(DesignApplication.class, args);
    }
}
下面就是老生常谈的@SpringBootApplication介绍,如果已经熟悉这部分的内容可以直接跳转第三节内容。
启动类只是一个简单的java类,只不过类上面被@SpringBootApplication注释。
@SpringBootConfiguration
@EnableAutoConfiguration
@ComponentScan
其中第一个注解@SpringBootConfiguration是对@Configuration的封装,作为一个FULL(后面会讲)类型的配置类被spring容器管理、解析、代理。
第三个注解@ComponentScan是大家比较熟悉的注解了,用于组件扫描,扫描的范围是启动类的同路径及子路径。
第二个注解就是比较重要的注解了@EnableAutoConfiguration,先说个题外话,想必大家在使用SpringBoot的过程中遇到过很多以Enable开头的注解,比如@EnableAspectJAutoProxy开启自动代理的注解,(在我看过的注解中)这些注解的解析方式大都类似,大家可以看过作者这篇文章自己去看下自动代理的注解解析实现。
回到咱们的@EnableAutoConfiguration,其主要实现如下:
@AutoConfigurationPackage
@Import({AutoConfigurationImportSelector.class})
其中咱们比较熟悉的就是这个@Import注解,见名知义,导入一个类AutoConfigurationImportSelector.class。其实现如下:
public class AutoConfigurationImportSelector implements DeferredImportSelector, BeanClassLoaderAware, ResourceLoaderAware, BeanFactoryAware, EnvironmentAware, Ordered 它实现了DeferrImportSelector接口,这个接口不用仔细看,只要知道接口名称DeferredImportSelector、内部接口名称group、与其中一个方法selectImports(),在此接口实现如下:
public interface DeferredImportSelector extends ImportSelector {

	/**
	 * Return a specific import group.
	 * <p>The default implementations return {@code null} for no grouping required.
	 * @return the import group class, or {@code null} if none
	 * @since 5.0
	 */
	@Nullable
	default Class<? extends Group> getImportGroup() {
		return null;
	}


	/**
	 * Interface used to group results from different import selectors.
	 * @since 5.0
	 */
	interface Group {

		/**
		 * Process the {@link AnnotationMetadata} of the importing @{@link Configuration}
		 * class using the specified {@link DeferredImportSelector}.
		 */
		void process(AnnotationMetadata metadata, DeferredImportSelector selector);

		/**
		 * Return the {@link Entry entries} of which class(es) should be imported
		 * for this group.
		 */
		Iterable<Entry> selectImports();


		/**
		 * An entry that holds the {@link AnnotationMetadata} of the importing
		 * {@link Configuration} class and the class name to import.
		 */
		class Entry {

			private final AnnotationMetadata metadata;

			private final String importClassName;

			public Entry(AnnotationMetadata metadata, String importClassName) {
				this.metadata = metadata;
				this.importClassName = importClassName;
			}

			/**
			 * Return the {@link AnnotationMetadata} of the importing
			 * {@link Configuration} class.
			 */
			public AnnotationMetadata getMetadata() {
				return this.metadata;
			}

			/**
			 * Return the fully qualified name of the class to import.
			 */
			public String getImportClassName() {
				return this.importClassName;
			}

			@Override
			public boolean equals(@Nullable Object other) {
				if (this == other) {
					return true;
				}
				if (other == null || getClass() != other.getClass()) {
					return false;
				}
				Entry entry = (Entry) other;
				return (this.metadata.equals(entry.metadata) && this.importClassName.equals(entry.importClassName));
			}

			@Override
			public int hashCode() {
				return (this.metadata.hashCode() * 31 + this.importClassName.hashCode());
			}

			@Override
			public String toString() {
				return this.importClassName;
			}
		}
	}

}
在DeferrImportSelector还有一个内部结构group,其中包含了selectImports方法,了解过springboot自动装配的小伙伴应该都了解这个方法的重要性吧~
现在我们对于注解的了解先到此,我们现在大概了解了启动类上@SpringBootApplication的组成,知道了它是由多个注解组成,并且包含了@Import注解,“导入”了一个AutoConfigurationImportSelector.class类,现在它仅仅是一个注解,并没有任何功能,是后续spring在启动流程中解析了该注解,才进行了类的导入与其实现的方法selectImports的调用。
三.启动类的解析过程
大家都知道springBoot与spring的根本是一致的,所以spring在启动过程中refresh()方法,springboot在启动过程中也会执行。
	@Override
	public void refresh() throws BeansException, IllegalStateException {
		synchronized (this.startupShutdownMonitor) {
			StartupStep contextRefresh = this.applicationStartup.start("spring.context.refresh");

			// Prepare this context for refreshing.
			prepareRefresh();

			// Tell the subclass to refresh the internal bean factory.
			ConfigurableListableBeanFactory beanFactory = obtainFreshBeanFactory();

			// Prepare the bean factory for use in this context.
			prepareBeanFactory(beanFactory);

			try {
				// Allows post-processing of the bean factory in context subclasses.
				postProcessBeanFactory(beanFactory);

				StartupStep beanPostProcess = this.applicationStartup.start("spring.context.beans.post-process");
				// Invoke factory processors registered as beans in the context.
				invokeBeanFactoryPostProcessors(beanFactory);

				// Register bean processors that intercept bean creation.
				registerBeanPostProcessors(beanFactory);
				beanPostProcess.end();

				// Initialize message source for this context.
				initMessageSource();

				// Initialize event multicaster for this context.
				initApplicationEventMulticaster();

				// Initialize other special beans in specific context subclasses.
				onRefresh();

				// Check for listener beans and register them.
				registerListeners();

				// Instantiate all remaining (non-lazy-init) singletons.
				finishBeanFactoryInitialization(beanFactory);

				// Last step: publish corresponding event.
				finishRefresh();
			}

			catch (BeansException ex) {
				if (logger.isWarnEnabled()) {
					logger.warn("Exception encountered during context initialization - " +
							"cancelling refresh attempt: " + ex);
				}

				// Destroy already created singletons to avoid dangling resources.
				destroyBeans();

				// Reset 'active' flag.
				cancelRefresh(ex);

				// Propagate exception to caller.
				throw ex;
			}

			finally {
				// Reset common introspection caches in Spring's core, since we
				// might not ever need metadata for singleton beans anymore...
				resetCommonCaches();
				contextRefresh.end();
			}
		}
	}
其中对于咱们启动类解析的步骤就是invokeBeanFactoryPostProcessors(beanFactory)方法,见名知义,调用BeanFactoryPostProcessors(简称BFPP),BFPP也是一个接口,其实现如下:
@FunctionalInterface
public interface BeanFactoryPostProcessor {

	/**
	 * Modify the application context's internal bean factory after its standard
	 * initialization. All bean definitions will have been loaded, but no beans
	 * will have been instantiated yet. This allows for overriding or adding
	 * properties even to eager-initializing beans.
	 * @param beanFactory the bean factory used by the application context
	 * @throws org.springframework.beans.BeansException in case of errors
	 */
	void postProcessBeanFactory(ConfigurableListableBeanFactory beanFactory) throws BeansException;

}
BFPP是一个函数是接口,它有一个子类BeanDefinitionRegistryPostProcessor.class,其实现如下:
public interface BeanDefinitionRegistryPostProcessor extends BeanFactoryPostProcessor {

	/**
	 * Modify the application context's internal bean definition registry after its
	 * standard initialization. All regular bean definitions will have been loaded,
	 * but no beans will have been instantiated yet. This allows for adding further
	 * bean definitions before the next post-processing phase kicks in.
	 * @param registry the bean definition registry used by the application context
	 * @throws org.springframework.beans.BeansException in case of errors
	 */
	void postProcessBeanDefinitionRegistry(BeanDefinitionRegistry registry) throws BeansException;

}
还是那句话,见名知义,Bean定义注册器后期处理器 (直接翻译),还记得咱们refresh的入口的名称是什么吗?invokeBeanFactoryPostProcessors(beanFactory)(invoke 咱们的BFPP),咱们的BFPP里面只有两个方法需要实现的方法,肯定会对其分开调用。
BeanDefinitionRegistryPostProcessor中的方法的参数是BeanDefinitionRegistry.class类型的参数,它可以干什么呢?
BeanDefinitionRegistry中含有方法registerBeanDefinition(String beanName,BeanDefinition beanDefinition)注册BeanDefinition.哦~ 原来它可以注册咱们的Bean。
public interface BeanDefinitionRegistry extends AliasRegistry {

	/**
	 * Register a new bean definition with this registry.
	 * Must support RootBeanDefinition and ChildBeanDefinition.
	 * @param beanName the name of the bean instance to register
	 * @param beanDefinition definition of the bean instance to register
	 * @throws BeanDefinitionStoreException if the BeanDefinition is invalid
	 * or if there is already a BeanDefinition for the specified bean name
	 * (and we are not allowed to override it)
	 * @see RootBeanDefinition
	 * @see ChildBeanDefinition
	 */
	void registerBeanDefinition(String beanName, BeanDefinition beanDefinition)
			throws BeanDefinitionStoreException;
}
还记得咱们的主题嘛?SpringBoot自动装配,自动装配就是把各种类交予咱们的spring管理,那么咱们的BFPP的方法就可以把这些类注册进spring容器。
咱们现在一直讲的都是BFPP的接口与其子接口,现在咱们进入他们的具体实现:ConfigurationClassPostProcessor.class,它实现了BFPP的两个方法。
四.ConfigurationClassPostProcessor 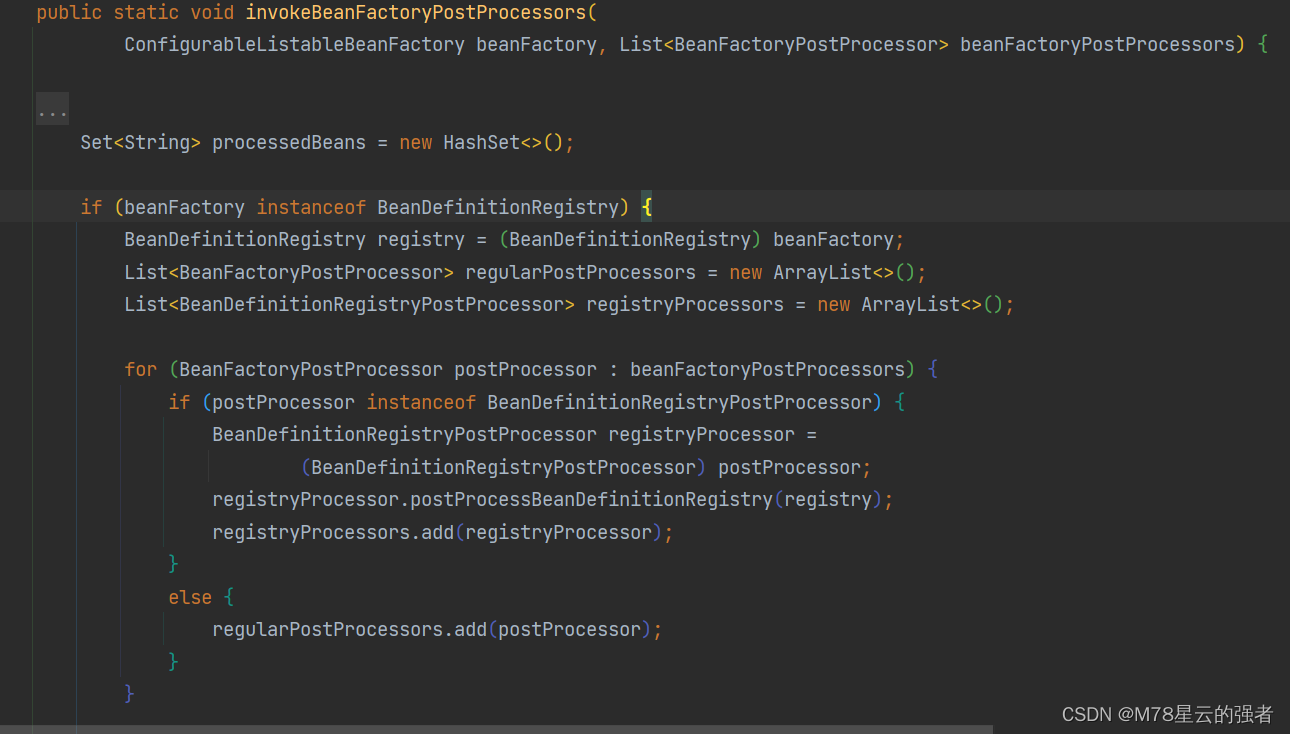
由图中可以看出,在invokeBeanFactoryPostProcessors()的执行过程中,实现对BFPP子类
BeanDefinitionRegistryPostProcessor进行调用,这样就会进入到咱们的具体实现类ConfigurationClassPostProcessor.class中,
	@Override
	public void postProcessBeanDefinitionRegistry(BeanDefinitionRegistry registry) {
		int registryId = System.identityHashCode(registry);
		if (this.registriesPostProcessed.contains(registryId)) {
			throw new IllegalStateException(
					"postProcessBeanDefinitionRegistry already called on this post-processor against " + registry);
		}
		if (this.factoriesPostProcessed.contains(registryId)) {
			throw new IllegalStateException(
					"postProcessBeanFactory already called on this post-processor against " + registry);
		}
		this.registriesPostProcessed.add(registryId);

		processConfigBeanDefinitions(registry);
	}
最后会进入到咱们的processConfigBeanDefinitions(registry)方法中。

在图示方法中,因为咱们的启动类被@Configuration注解注释,所以类型是FULL类型的候选者配置类,有兴趣的可以去看下(这里FULL类型的会被代理,代理之后被@Bean方法注解修饰的类就可以做到类似单例的效果)。
	do {
			StartupStep processConfig = this.applicationStartup.start("spring.context.config-classes.parse");
			parser.parse(candidates);
			parser.validate();

			Set<ConfigurationClass> configClasses = new LinkedHashSet<>(parser.getConfigurationClasses());
			configClasses.removeAll(alreadyParsed);

			// Read the model and create bean definitions based on its content
			if (this.reader == null) {
				this.reader = new ConfigurationClassBeanDefinitionReader(
						registry, this.sourceExtractor, this.resourceLoader, this.environment,
						this.importBeanNameGenerator, parser.getImportRegistry());
			}
			this.reader.loadBeanDefinitions(configClasses);
			alreadyParsed.addAll(configClasses);
			processConfig.tag("classCount", () -> String.valueOf(configClasses.size())).end();

			candidates.clear();
			if (registry.getBeanDefinitionCount() > candidateNames.length) {
				String[] newCandidateNames = registry.getBeanDefinitionNames();
				Set<String> oldCandidateNames = new HashSet<>(Arrays.asList(candidateNames));
				Set<String> alreadyParsedClasses = new HashSet<>();
				for (ConfigurationClass configurationClass : alreadyParsed) {
					alreadyParsedClasses.add(configurationClass.getMetadata().getClassName());
				}
				for (String candidateName : newCandidateNames) {
					if (!oldCandidateNames.contains(candidateName)) {
						BeanDefinition bd = registry.getBeanDefinition(candidateName);
						if (ConfigurationClassUtils.checkConfigurationClassCandidate(bd, this.metadataReaderFactory) &&
								!alreadyParsedClasses.contains(bd.getBeanClassName())) {
							candidates.add(new BeanDefinitionHolder(bd, candidateName));
						}
					}
				}
				candidateNames = newCandidateNames;
			}
		}
		while (!candidates.isEmpty());
在咱们的配置类都被拿到之后,会遍历进行循环解析,parser.parse(candidates)方法进行解析,咱们进入parse方法:

这里咱们先不继续进入parse方法,先看最下面的this.deferredImportSelectorHandler.process(),是不是有点熟悉?咱们SpringBoot注解导入的类就是 DeferredImportSelector的子类,这样咱们就找到了一个连接点了~
那么咱们先思考一下,这里是对DeferredImportSelector的Handler.process()的调用,那么是不是就预示着咱们的@Import注解的解析就在它这个方法的上面parse()中?
现在咱们抱着目的进入parse()方法中,很容易就点进doProcessConfigurationClass()方法中(熟悉spring的都知道以do开头的方法代表着spring要正式开始干活了),可以在该方法中找到如下方法:
// Process any @Import annotations
		processImports(configClass, sourceClass, getImports(sourceClass), filter, true);
processImports()处理Imports,咱们的@Import注解的解析代码就找到了,进入其中:
private void processImports(ConfigurationClass configClass, SourceClass currentSourceClass,
			Collection<SourceClass> importCandidates, Predicate<String> exclusionFilter,
			boolean checkForCircularImports) {

		if (importCandidates.isEmpty()) {
			return;
		}

		if (checkForCircularImports && isChainedImportOnStack(configClass)) {
			this.problemReporter.error(new CircularImportProblem(configClass, this.importStack));
		}
		else {
			this.importStack.push(configClass);
			try {
				for (SourceClass candidate : importCandidates) {
					if (candidate.isAssignable(ImportSelector.class)) {
						// Candidate class is an ImportSelector -> delegate to it to determine imports
						Class<?> candidateClass = candidate.loadClass();
						ImportSelector selector = ParserStrategyUtils.instantiateClass(candidateClass, ImportSelector.class,
								this.environment, this.resourceLoader, this.registry);
						Predicate<String> selectorFilter = selector.getExclusionFilter();
						if (selectorFilter != null) {
							exclusionFilter = exclusionFilter.or(selectorFilter);
						}
						if (selector instanceof DeferredImportSelector) {
							this.deferredImportSelectorHandler.handle(configClass, (DeferredImportSelector) selector);
						}
						else {
							String[] importClassNames = selector.selectImports(currentSourceClass.getMetadata());
							Collection<SourceClass> importSourceClasses = asSourceClasses(importClassNames, exclusionFilter);
							processImports(configClass, currentSourceClass, importSourceClasses, exclusionFilter, false);
						}
					}
					else if (candidate.isAssignable(ImportBeanDefinitionRegistrar.class)) {
						// Candidate class is an ImportBeanDefinitionRegistrar ->
						// delegate to it to register additional bean definitions
						Class<?> candidateClass = candidate.loadClass();
						ImportBeanDefinitionRegistrar registrar =
								ParserStrategyUtils.instantiateClass(candidateClass, ImportBeanDefinitionRegistrar.class,
										this.environment, this.resourceLoader, this.registry);
						configClass.addImportBeanDefinitionRegistrar(registrar, currentSourceClass.getMetadata());
					}
					else {
						// Candidate class not an ImportSelector or ImportBeanDefinitionRegistrar ->
						// process it as an @Configuration class
						this.importStack.registerImport(
								currentSourceClass.getMetadata(), candidate.getMetadata().getClassName());
						processConfigurationClass(candidate.asConfigClass(configClass), exclusionFilter);
					}
				}
			}
			catch (BeanDefinitionStoreException ex) {
				throw ex;
			}
			catch (Throwable ex) {
				throw new BeanDefinitionStoreException(
						"Failed to process import candidates for configuration class [" +
						configClass.getMetadata().getClassName() + "]", ex);
			}
			finally {
				this.importStack.pop();
			}
		}
	}
因为咱们自动装配注解中@Import导入的类是DeferredImportSelector的子类AutoConfigurationImportSelector,所以很容易发现它的解析代码为:
		if (selector instanceof DeferredImportSelector) {
							this.deferredImportSelectorHandler.handle(configClass, (DeferredImportSelector) selector);
						}
它对咱们导入类的处理仅仅是把它加入到了DeferredImportSelectors一个List集合中。
@Nullable
private List<DeferredImportSelectorHolder> deferredImportSelectors = new ArrayList<>();

public void handle(ConfigurationClass configClass, DeferredImportSelector importSelector) {
	        DeferredImportSelectorHolder holder = new DeferredImportSelectorHolder(configClass, importSelector);
	    if (this.deferredImportSelectors == null) {
			 DeferredImportSelectorGroupingHandler handler = new DeferredImportSelectorGroupingHandler();
			 handler.register(holder);
			 handler.processGroupImports();
		}
		else {
			this.deferredImportSelectors.add(holder);
	    }
	}
然后就继续执行来到咱们之前看过的this.deferredImportSelectorHandler.process()方法中: 
	public void process() {
			List<DeferredImportSelectorHolder> deferredImports = this.deferredImportSelectors;
			this.deferredImportSelectors = null;
			try {
				if (deferredImports != null) {
					DeferredImportSelectorGroupingHandler handler = new DeferredImportSelectorGroupingHandler();
					deferredImports.sort(DEFERRED_IMPORT_COMPARATOR);
					deferredImports.forEach(handler::register);
					handler.processGroupImports();
				}
			}
			finally {
				this.deferredImportSelectors = new ArrayList<>();
			}
		}
真正的调用就在handler.processGroupImports()中,咱们进入其中:

进入grouping.getImports()方法:
		public Iterable<Group.Entry> getImports() {
			for (DeferredImportSelectorHolder deferredImport : this.deferredImports) {
				this.group.process(deferredImport.getConfigurationClass().getMetadata(),
						deferredImport.getImportSelector());
			}
			return this.group.selectImports();
		}
DeferredImportSelector 的处理过程并不是直接调用ImportSelector#selectImports方法。而是调用 DeferredImportSelector.Group#process 和 Group#selectImports 方法来完成引入功能。
咱们自动装配导入的类就是DeferrImportSelector的子类,那么在spring启动的过程中,在这里就完成了自动注入。
咱们进入process()方法:
   public void process(AnnotationMetadata annotationMetadata, DeferredImportSelector deferredImportSelector) {
            Assert.state(deferredImportSelector instanceof AutoConfigurationImportSelector, () -> {
                return String.format("Only %s implementations are supported, got %s", AutoConfigurationImportSelector.class.getSimpleName(), deferredImportSelector.getClass().getName());
            });
            AutoConfigurationImportSelector.AutoConfigurationEntry autoConfigurationEntry = ((AutoConfigurationImportSelector)deferredImportSelector).getAutoConfigurationEntry(annotationMetadata);
            this.autoConfigurationEntries.add(autoConfigurationEntry);
            Iterator var4 = autoConfigurationEntry.getConfigurations().iterator();

            while(var4.hasNext()) {
                String importClassName = (String)var4.next();
                this.entries.putIfAbsent(importClassName, annotationMetadata);
            }

        }
其中在第4行把我们的DeferredImportSelector类转成了AutoConfigurationImportSelector,然后调用了 getAutoConfigurationEntry()方法,咱们导入的DeferredImportSelector的 getAutoConfigurationEntry()方法来看一下:
   protected AutoConfigurationImportSelector.AutoConfigurationEntry getAutoConfigurationEntry(AnnotationMetadata annotationMetadata) {
        if (!this.isEnabled(annotationMetadata)) {
            return EMPTY_ENTRY;
        } else {
            AnnotationAttributes attributes = this.getAttributes(annotationMetadata);
            List<String> configurations = this.getCandidateConfigurations(annotationMetadata, attributes);
            configurations = this.removeDuplicates(configurations);
            Set<String> exclusions = this.getExclusions(annotationMetadata, attributes);
            this.checkExcludedClasses(configurations, exclusions);
            configurations.removeAll(exclusions);
            configurations = this.getConfigurationClassFilter().filter(configurations);
            this.fireAutoConfigurationImportEvents(configurations, exclusions);
            return new AutoConfigurationImportSelector.AutoConfigurationEntry(configurations, exclusions);
        }
    }
这里重要的方法就是this.getCandidateConfiturations(annotationMetadata,attributes),进入其中,如下代码:
    protected List<String> getCandidateConfigurations(AnnotationMetadata metadata, AnnotationAttributes attributes) {
        List<String> configurations = new ArrayList(SpringFactoriesLoader.loadFactoryNames(this.getSpringFactoriesLoaderFactoryClass(), this.getBeanClassLoader()));
        ImportCandidates.load(AutoConfiguration.class, this.getBeanClassLoader()).forEach(configurations::add);
        Assert.notEmpty(configurations, "No auto configuration classes found in META-INF/spring.factories nor in META-INF/spring/org.springframework.boot.autoconfigure.AutoConfiguration.imports. If you are using a custom packaging, make sure that file is correct.");
        return configurations;
    }

  protected Class<?> getSpringFactoriesLoaderFactoryClass() {
        return EnableAutoConfiguration.class;
    }
这里 List<String> configurations = new ArrayList(SpringFactoriesLoader.loadFactoryNames(this.getSpringFactoriesLoaderFactoryClass(), this.getBeanClassLoader()))中 this.getSpringFactoriesLoaderFactoryClass()返回的就是我们EnableAutoConfiguration.class类,是不是很熟悉,就是咱们spring.factories中自动装配的key值,然后ImportCandidates.load()方法加载.
从后续的断言中也可以看到,No auto configuration classes found in META-INF/spring.factories.就是咱们自动装配的配置文件.
getAutoConfigurationEntry()在getCandidateConfiturations()之后的方法就是一些过滤等操作,就不再赘述了,不过该方法的最后返回值:
return new AutoConfigurationImportSelector.AutoConfigurationEntry(configurations, exclusions);返回值封装成了一个AutoConfigurationEntry, 其中包含了需要装配的类configurations和需要排除的类exclusions.
还记得咱们这些方法的入口在哪吗?
		public Iterable<Group.Entry> getImports() {
			for (DeferredImportSelectorHolder deferredImport : this.deferredImports) {
            //刚才进入的方法是group.process
				this.group.process(deferredImport.getConfigurationClass().getMetadata(),
						deferredImport.getImportSelector());
			}
            //最后返回group.selectImports()
			return this.group.selectImports();
		}
进入咱们的group.selectImports():
       public Iterable<Entry> selectImports() {
            if (this.autoConfigurationEntries.isEmpty()) {
                return Collections.emptyList();
            } else {
               //获取所有需要排除的类
                Set<String> allExclusions = (Set)this.autoConfigurationEntries.stream().map(AutoConfigurationImportSelector.AutoConfigurationEntry::getExclusions).flatMap(Collection::stream).collect(Collectors.toSet());
              //获取所有需要装配的类
  Set<String> processedConfigurations = (Set)this.autoConfigurationEntries.stream().map(AutoConfigurationImportSelector.AutoConfigurationEntry::getConfigurations).flatMap(Collection::stream).collect(Collectors.toCollection(LinkedHashSet::new));
                //移除需要排除的类
                processedConfigurations.removeAll(allExclusions);
                 //将需要加载的类排序返回
                return (Iterable)this.sortAutoConfigurations(processedConfigurations, this.getAutoConfigurationMetadata()).stream().map((importClassName) -> {
                    return new Entry((AnnotationMetadata)this.entries.get(importClassName), importClassName);
                }).collect(Collectors.toList());
            }
        }
如此,SpringBoot自动装配完成.


 681
681

 被折叠的 条评论
为什么被折叠?
被折叠的 条评论
为什么被折叠?
 到【灌水乐园】发言


