


简介
为什么叫nacos:前四个字母分别为Naming和Configuration的前两个字母,最后的s为Service。
是什么:一个更易于构建云原生应用的动态服务发现、配置管理和服务管理平台Nacos: Dynamic Naming and Configuration Service。
Nacos就是注册中心+配置中心的组合,Nacos等价于eureka+config+bus。
能干啥:替代Eureka做服务注册中心,替代Config做服务配置中心
下载:https://nacos.io/Zh-cn/index.html
各注册中心比较

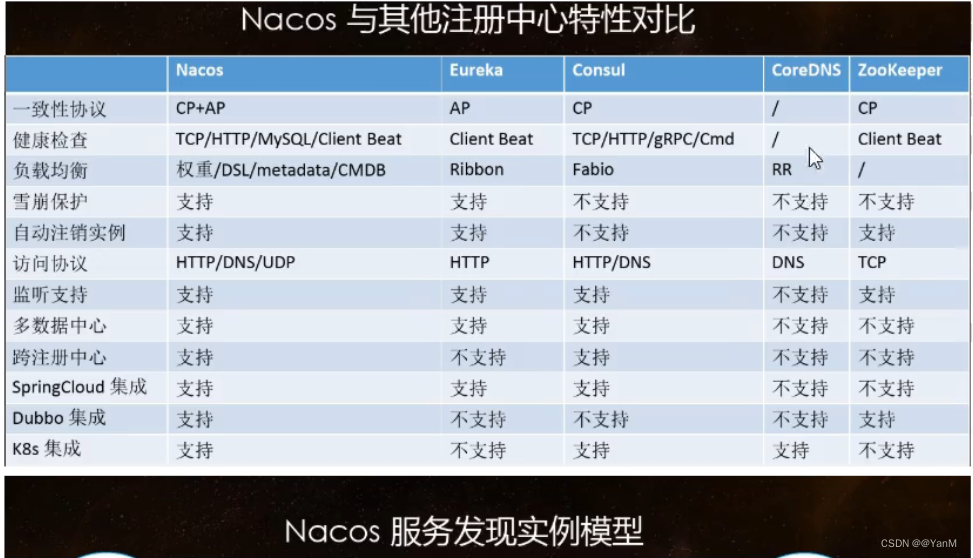
nacos支持CP和AP模式的切换
C是所有节点在同一时间看到的数据是一致的;而A的定义是所有的请求都会收到响应。
何时选择使用何种模式?
一般来说,如果不需要存储服务级别的信息且服务实例是通过nacos-cient注册,并能够保持心跳上报,那么就可以选择AP模式。当前主流的服务如Spring cloud和Dubbo服务,都适用于AP模式,AP模式为了服务的可能性而减弱了一致性,因此AP模式下只支持注册临时实例。
如果需要在服务级别编辑或者存储配置信息,那么CP是必须,K8S服务和DNS服务则适用于CP模式。
CP模式下则支持注册持久化实例,此时则是以Raft协议为集群运行模式,该模式下注册实例之前必须先注册服务,如果服务不存在,则会返回错误。
安装并运行nacos
- 前提:本地java环境和Maven环境以及OK
- 解压安装包,直接运行bin目录下的startup.cmd(nacos以单例模式启动:startup.cmd -m standalone)
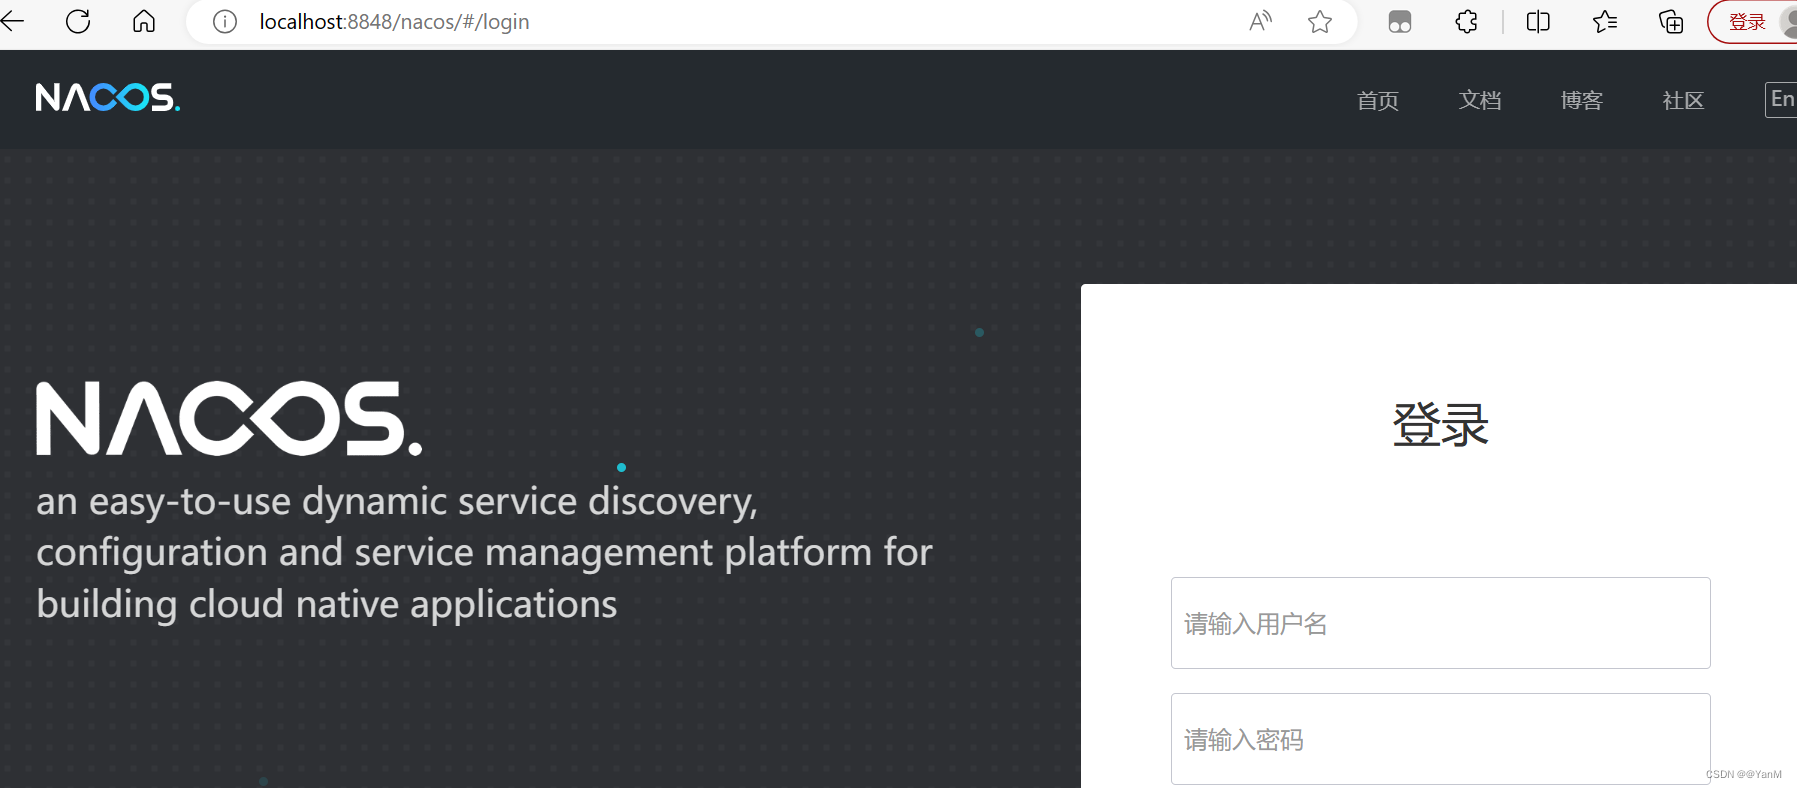
- 命令运行成功后直接访问http://localhost:8848/naco
结果页面(默认账号和密码都是nacos):
nacos作为服务注册中心演示
基于nacos服务提供者
新建module
cloudalibaba-provider-payment9001
pom
父pom
<!--spring cloud alibaba 2.1.0.RELEASE-->
<dependency>
    <groupId>com.alibaba.cloud</groupId>
    <artifactId>spring-cloud-alibaba-dependencies</artifactId>
    <version>2.1.0.RELEASE</version>
    <type>pom</type>
    <scope>import</scope>
</dependency>
子pom
<!--SpringCloud ailibaba nacos -->
<dependency>
    <groupId>com.alibaba.cloud</groupId>
    <artifactId>spring-cloud-starter-alibaba-nacos-discovery</artifactId>
</dependency>
yml
server:
  port: 9001

spring:
  application:
    name: nacos-payment-provider
  cloud:
    nacos:
      discovery:
        server-addr: localhost:8848 #配置Nacos地址

#端口暴漏
management:
  endpoints:
    web:
      exposure:
        include: '*'
主启动
@EnableDiscoveryClient
@SpringBootApplication
public class CloudalibabaProviderPayment9001Application {

    public static void main(String[] args) {
        SpringApplication.run(CloudalibabaProviderPayment9001Application.class, args);
        System.out.println("启动成功");
    }
}
业务类
package com.atguigu.springcloud.alibaba.controller;
import org.springframework.beans.factory.annotation.Value;
import org.springframework.web.bind.annotation.GetMapping;
import org.springframework.web.bind.annotation.PathVariable;
import org.springframework.web.bind.annotation.RestController;

@RestController
public class PaymentController {

    @Value("${server.port}")
    private String serverPort;

    @GetMapping(value = "/payment/nacos/{id}")
    public String getPayment(@PathVariable("id") Integer id) {
        return "nacos registry, serverPort: " + serverPort + "\t id" + id;
    }
}
测试
启动nacos和9001
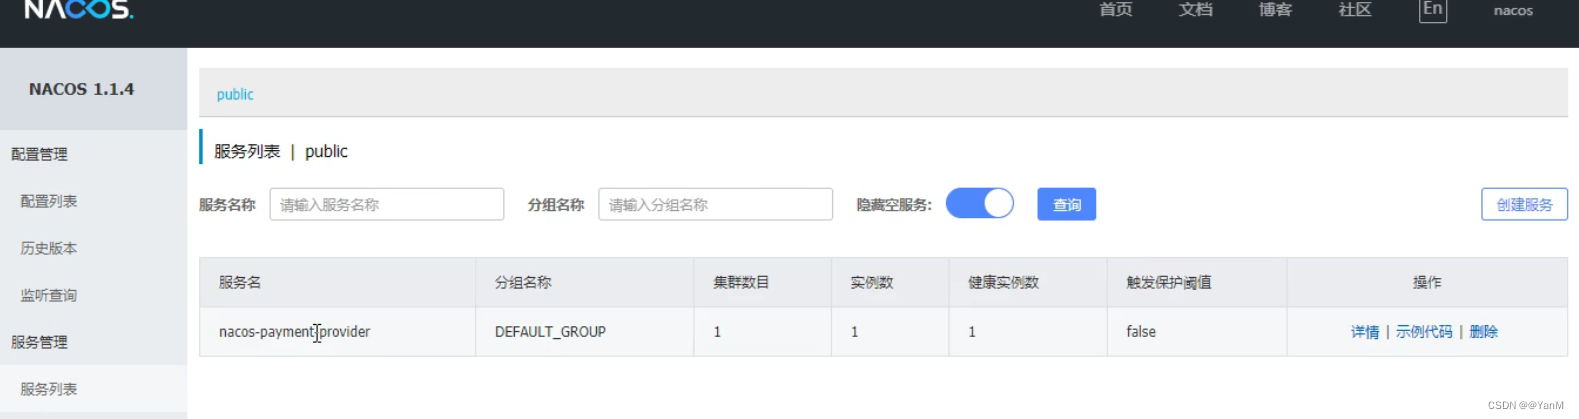 nacos自带了负责均衡,为下一章演示nacos负载均衡,参照9001新建9002
基于nacos服务消费者
新建module
cloudalibaba-consumer-nacos-order83
pom
<!--SpringCloud ailibaba nacos -->
<dependency>
    <groupId>com.alibaba.cloud</groupId>
    <artifactId>spring-cloud-starter-alibaba-nacos-discovery</artifactId>
</dependency>
yml
server:
  port: 83
spring:
  application:
    name: nacos-order-consumer
  cloud:
    nacos:
      discovery:
        server-addr: localhost:8848
service-url:
  nacos-user-service: http://nacos-payment-provider
主启动
@EnableDiscoveryClient
@SpringBootApplication
public class CloudalibabaConsumerNacosOrder83Application {
    public static void main(String[] args) {
        SpringApplication.run(CloudalibabaConsumerNacosOrder83Application.class, args);
        System.out.println("启动成功");
    }
}
nacos自带负责均衡(整合了ribbon),这里要引入负载均衡
package com.atguigu.springcloud.alibaba.config;

import org.springframework.cloud.client.loadbalancer.LoadBalanced;
import org.springframework.context.annotation.Bean;
import org.springframework.context.annotation.Configuration;
import org.springframework.web.client.RestTemplate;
@Configuration
public class ApplicationContextConfig {
    @Bean
    @LoadBalanced
    public RestTemplate getRestTemplate() {
        return new RestTemplate();
    }
}
控制类
package com.atguigu.springcloud.alibaba.controller;
import lombok.extern.slf4j.Slf4j;
import org.springframework.beans.factory.annotation.Value;
import org.springframework.web.bind.annotation.GetMapping;
import org.springframework.web.bind.annotation.PathVariable;
import org.springframework.web.bind.annotation.RequestMapping;
import org.springframework.web.bind.annotation.RestController;
import org.springframework.web.client.RestTemplate;

import javax.annotation.Resource;
@RestController
@Slf4j
@RequestMapping("consumer")
public class OrderNacosController {
    @Resource
    private RestTemplate restTemplate;

    @Value("${service-url.nacos-user-service}")
    private String serverURL;

    @GetMapping(value = "/payment/nacos/{id}")
    public String paymentInfo(@PathVariable("id") Long id) {
        return restTemplate.getForObject(serverURL + "/payment/nacos/" + id, String.class);
    }
}
测试
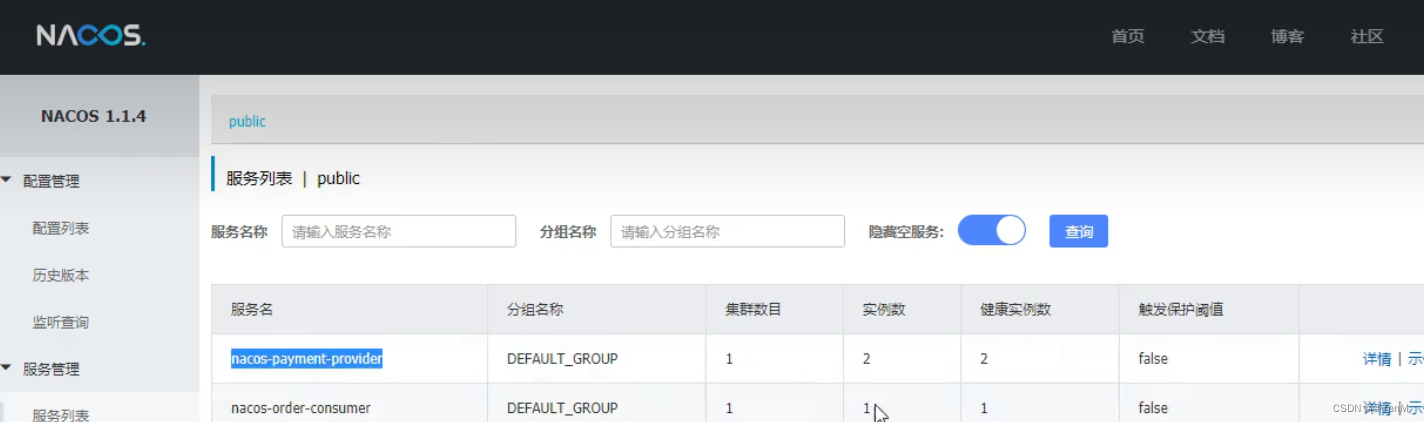
启动8848,9001,9002,83


nacos作为配置注册中心演示
新建module:cloudalibaba-config-nacos-client3377
pom:
<?xml version="1.0" encoding="UTF-8"?>
<project xmlns="http://maven.apache.org/POM/4.0.0"
         xmlns:xsi="http://www.w3.org/2001/XMLSchema-instance"
         xsi:schemaLocation="http://maven.apache.org/POM/4.0.0 http://maven.apache.org/xsd/maven-4.0.0.xsd">
    <parent>
        <artifactId>cloud2020</artifactId>
        <groupId>com.atguigu.springcloud</groupId>
        <version>1.0-SNAPSHOT</version>
    </parent>
    <modelVersion>4.0.0</modelVersion>

    <artifactId>cloudalibaba-config-nacos-client3377</artifactId>

    <dependencies>
        <!--nacos-config 配置中心-自带动态刷新-->
        <dependency>
            <groupId>com.alibaba.cloud</groupId>
            <artifactId>spring-cloud-starter-alibaba-nacos-config</artifactId>
        </dependency>
        <!--nacos-discovery 注册中心-服务发现与注册-->
        <dependency>
            <groupId>com.alibaba.cloud</groupId>
            <artifactId>spring-cloud-starter-alibaba-nacos-discovery</artifactId>
        </dependency>
        <!--web + actuator-->
        <dependency>
            <groupId>org.springframework.boot</groupId>
            <artifactId>spring-boot-starter-web</artifactId>
        </dependency>
        <dependency>
            <groupId>org.springframework.boot</groupId>
            <artifactId>spring-boot-starter-actuator</artifactId>
        </dependency>
        <!--一般基础配置-->
        <!--        <dependency>-->
        <!--            <groupId>org.springframework.boot</groupId>-->
        <!--            <artifactId>spring-boot-devtools</artifactId>-->
        <!--            <scope>runtime</scope>-->
        <!--            <optional>true</optional>-->
        <!--        </dependency>-->
        <dependency>
            <groupId>org.projectlombok</groupId>
            <artifactId>lombok</artifactId>
            <optional>true</optional>
        </dependency>
        <dependency>
            <groupId>org.springframework.boot</groupId>
            <artifactId>spring-boot-starter-test</artifactId>
            <scope>test</scope>
        </dependency>
    </dependencies>
</project>
Nacos同springcloud config一样,在项目初始化时,要保证先从配置中心进行配置拉取拉取配置之后,才能保证项目的正常启动
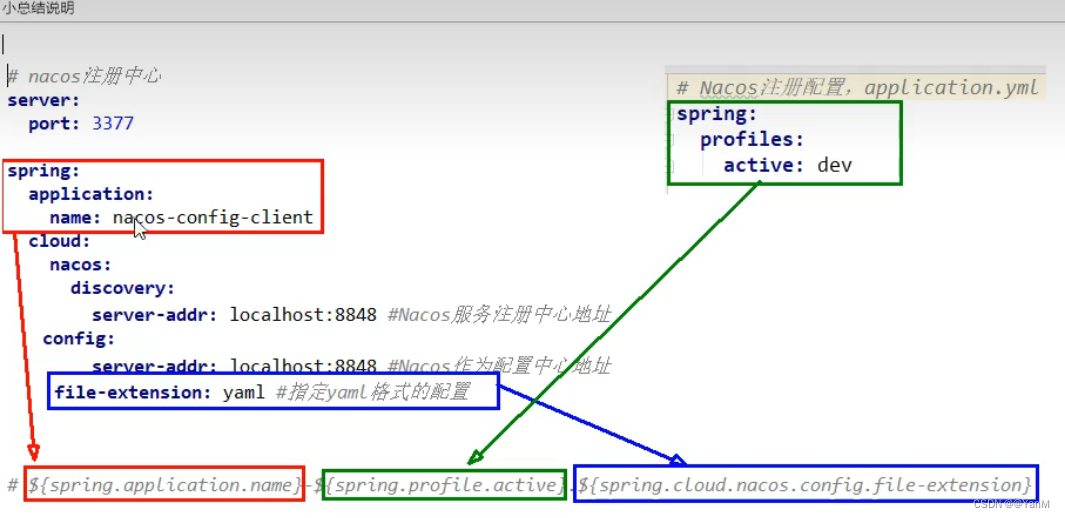
springboot中配置文件的加载是存在优先级顺序的,bootstrap优先级高于application
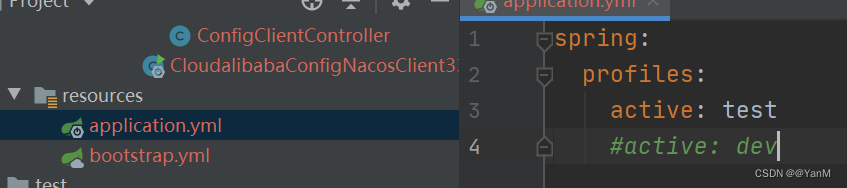
aplicaltion.yml
spring:
profiles:
active: dev
#active: test # 表示测试环境
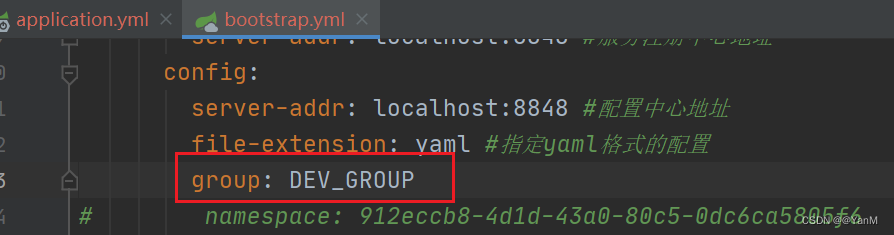
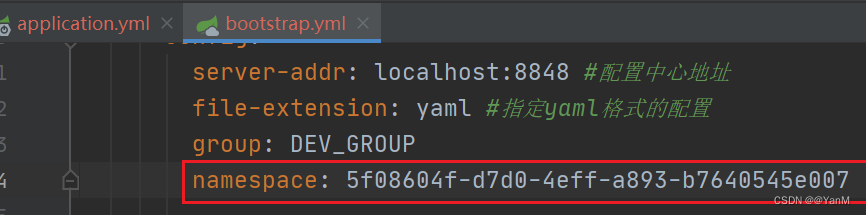
#active: infobootstrap.yml
server:
  port: 3377
spring:
  application:
    name: nacos-config-client
  cloud:
    nacos:
      discovery:
        server-addr: localhost:8848 #服务注册中心地址
      config:
        server-addr: localhost:8848 #配置中心地址
        file-extension: yaml #指定yaml格式的配置
        group: DEV_GROUP
        namespace: 912eccb8-4d1d-43a0-80c5-0dc6ca5805f6

# ${spring.application.name}-${spring.profile.active}.${spring.cloud.nacos.config.file-extension}
# nacos-config-client-dev.yaml

# nacos-config-client-test.yaml   ----> config.info
主启动
package com.atguigu.springcloud.alibaba;


import org.springframework.boot.SpringApplication;
import org.springframework.boot.autoconfigure.SpringBootApplication;
import org.springframework.cloud.client.discovery.EnableDiscoveryClient;

@EnableDiscoveryClient
@SpringBootApplication
public class CloudalibabaConfigNacosClient3377Application {
    public static void main(String[] args) {
        SpringApplication.run(CloudalibabaConfigNacosClient3377Application.class, args);
        System.out.println("启动成功");
    }
}
业务类:
通过Spring Cloud 原生注解@RefreshScope实现配置自动更新:
package com.atguigu.springcloud.alibaba.controller;
import org.springframework.beans.factory.annotation.Value;
import org.springframework.cloud.context.config.annotation.RefreshScope;
import org.springframework.web.bind.annotation.GetMapping;
import org.springframework.web.bind.annotation.RestController;
/**
* @author lixiaolong
* @RefreshScope 支持Nacos的动态刷新功能。
* @date 2021/1/2 16:04
*/
@RestController
@RefreshScope
public class ConfigClientController {
@Value("${config.info}")
private String configInfo;
@GetMapping("/config/info")
public String getConfigInfo() {
return configInfo;
}
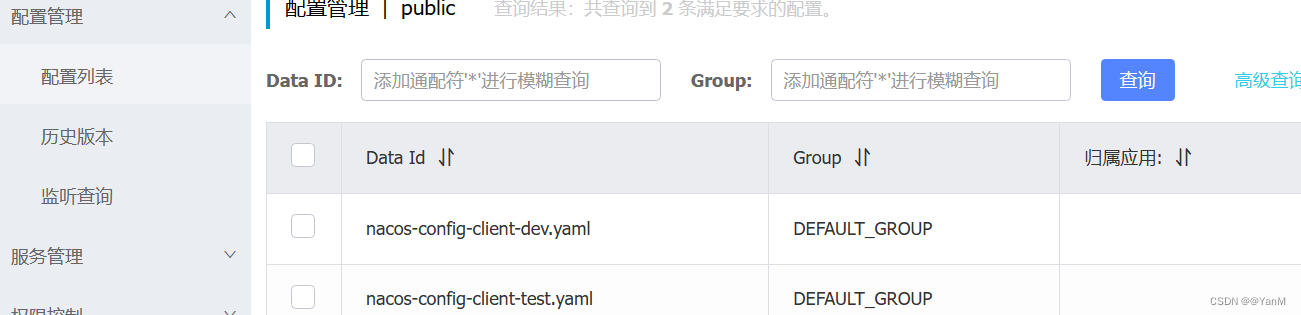
}在nacos配置列表中添加配置信息
DataId的配置规则

 这里DataId等于nacos-config-client-dev.yaml
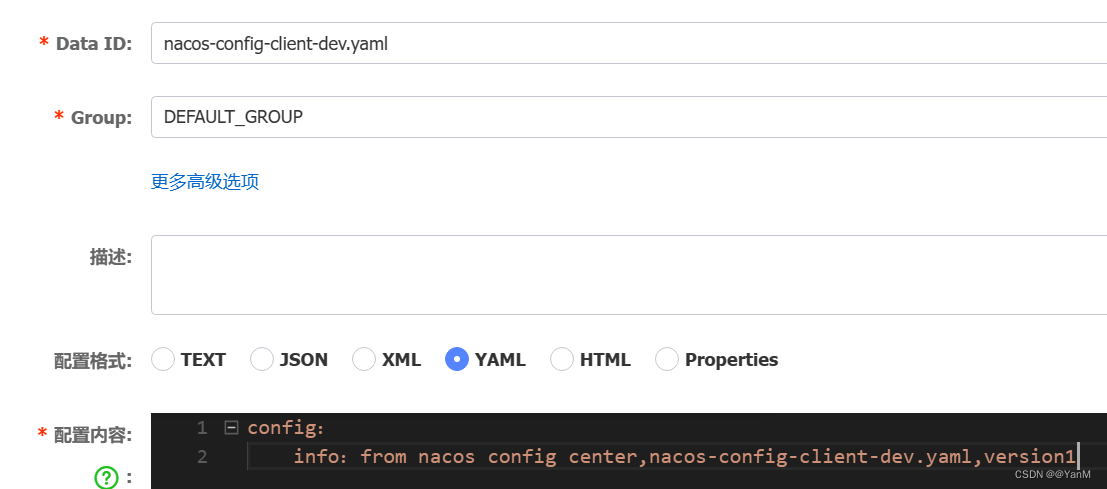
测试
启动3377,访问http://localhost:3377/config/info
自带动态刷新
修改下Nacos中的yaml配置文件,再次调用查看配置的接口,就会发现配置已经刷新
以上是作为配置中心及基础配置
作为配置中心及分类配置
问题1:实际开发中,通常一个系统会准备
dev开发环境
test测试环境
prod生产环境。
如何保证指定环境启动时服务能正确读取到Nacos.上相应环境的配置文件呢?
问题2:
一个大型分布式微服务系统会有很多微服务子项目,
每个微服务项目又都会有相应的开发环境、测试环境、预发环境、正式环境
那怎么对这些微服务配置进行管理呢?
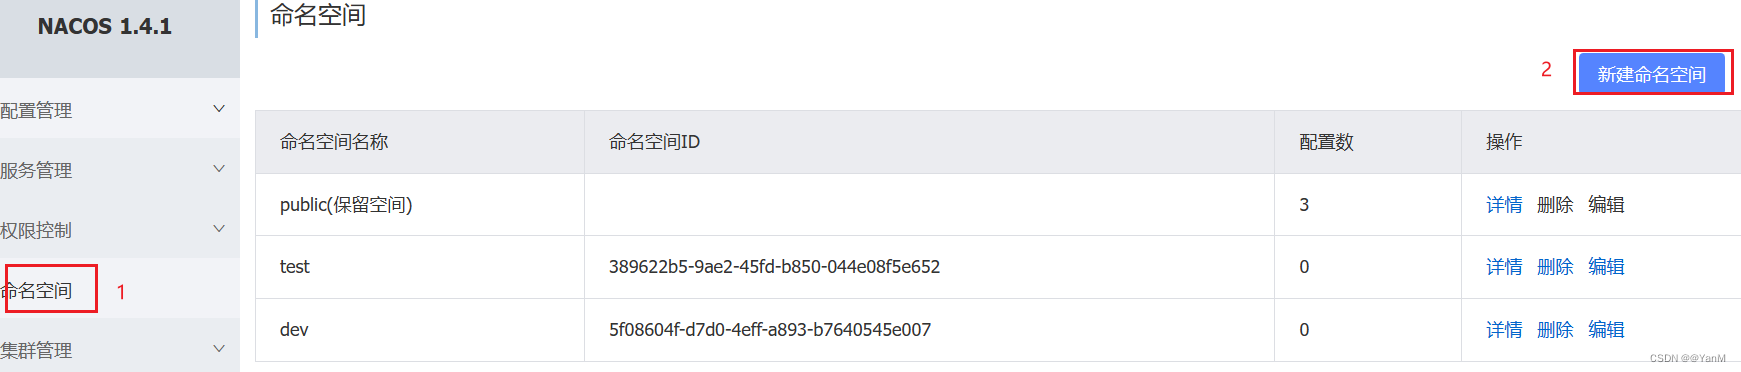
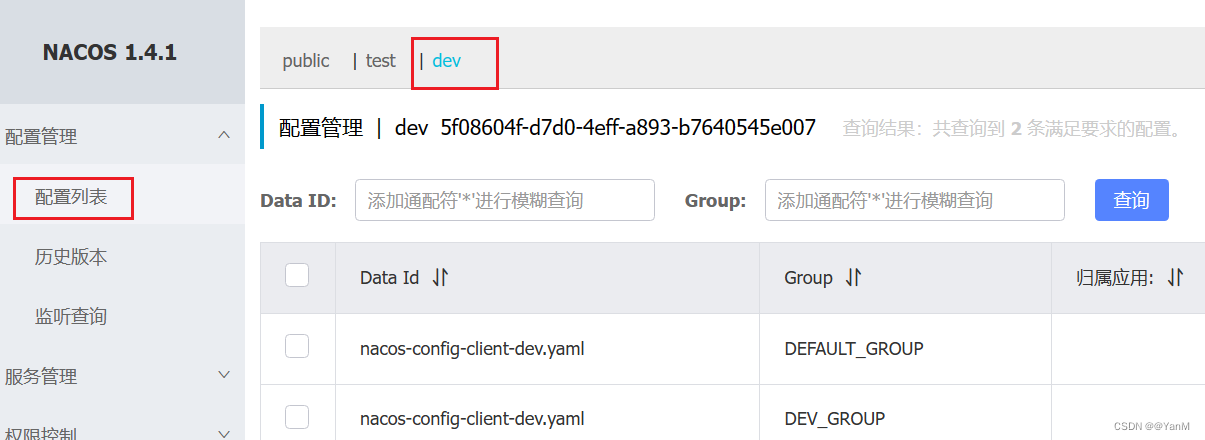
amespace+group+data ID三者的关系
类似Java里面的package名和类名
最外层的namespace是可以于区分部署环境的,Group和DatalD逻辑上区分两个目标对象。
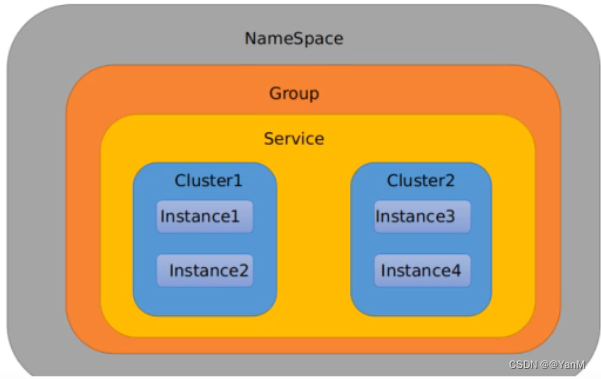
默认情况:
Namespace=public, Group=DEFAULT GROUP,默认Cluster是DEFAULT
Nacos默认的命名空间是public,Namespace主要用来实现隔离。
比方说我们现在有三个环境:开发、测试、产环境,我们就可以创建三个Namespace,不同的Namespace之间是隔离的。
Group默认是DEFAULT_ GROUP, Group可以把不同的微服务划分到同一个分组里面去
Service就是微服务;一个Service可以包含多 个Cluster (集群),Nacos默认Cluster是DEFAULT, Cluster是对指定微服务的一个虚拟划分。
比方说为了容灾,将Service微服务分别部署在了杭州机房和广州机房,
这时就可以给杭州机房的Service微服务起一个集群名称(HZ) ,给广州机房的Service微服务起一个集群名称(GZ) , 还可以尽量让同一个机房的微服务互相调用,以提升性能。
最后是Instance,就是微服务的实例。
三种方案加载配置
Data ID方案
指定spring. profile.active和配置文件的DatalD来使不同环境下读取不同的配置
默认空间+默认分组+新建dev和test两个DatalD
通过spring.profile.active属性就能进行多环境下配置文件的读取量

group方案


namespace方案


 5247
5247


 被折叠的 条评论
为什么被折叠?
被折叠的 条评论
为什么被折叠?
 到【灌水乐园】发言


