


Ant 合并单元格+覆盖样式
项目需求:
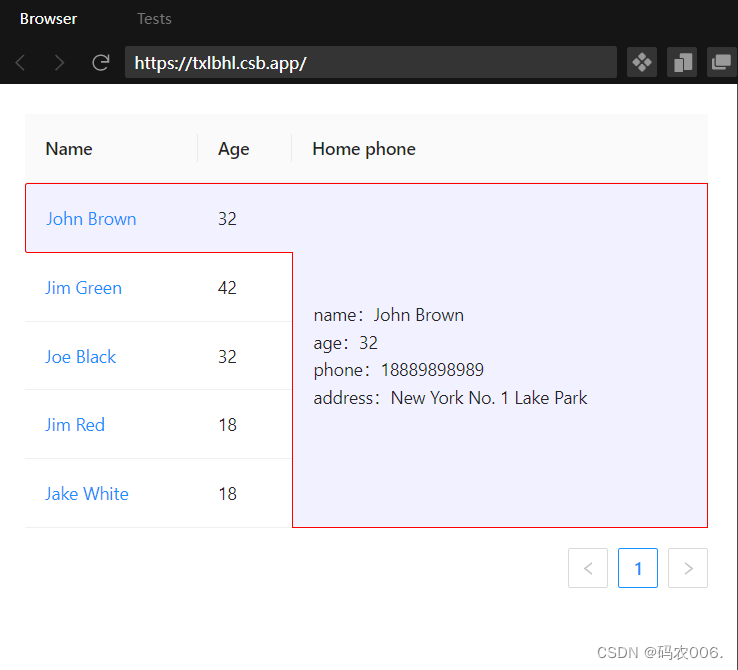
最后一列用来展示详情,表格左侧点击行切换;要求选中行的样式和详情信息用一个边框凸显出来
结果如下:
切换效果展示如下:

实现过程:
在ant合并单元格demo中,找到在线编辑器实现初始版本,实现合并单元格
去除多余的表头和行、列简化项目代码:
const columns = [
 {
    title:'name'
    dataIndex:'name',
    render:(text) => <a>{text}</a>
  },
  {
    title: 'Age',
    dataIndex: 'age',
  },
   {
    title:'合并'
      dataIndex: 'tel',
      onCell:(_,index)=>{
        if(index === 0){
        return {
          rowSpan:5
        };
        }
        return {rowSpan:0}
      }
  },
]
改造了column配置,onCell配置用第一行数据的单元格,平铺占满:效果如下图,
下面是做表格行点击选择,rowClassName属性设置单行class,通过设置这个方法对选中行添加单独的class
onRow方法可以控制表格每行的鼠标交互事件,因此点击选择行的核心代码如下:
import React, {useState} from 'react';
import { Table } from 'antd';
const App = () =>{
const [selectIndex,setSelectIndex] = useState(0);
return(
<Table
columns={columns}
dataSource={data}
pagination={false}
onRow={
(record,index)=>{
return{
//点击行
onClick:event=>{
setSelectIndex(index)
}
}
}
}
rowClassName={(record,index)=>{
if(index === selectIndex) return 'selectedRow';
return '';
}}
/>
)
}
接下来就来到CSS覆盖频道了,实现选中行包围详情背景+边框了:
.ant-table-tbody > :first-child > :last-child {
background: #f1f1ff;
border: 1px solid red;
}
.selectedRow .ant-table-cell {
background-color: #f1f1ff;
background: #f1f1ff;
border: 1px solid red;
border-left: none;
border-right: none;
position: relative;
}
.selectedRow>:first-child {
border-left: 1px solid red;
border-radius: 2px 0 0 2px;
}
.selectedRow .ant-table-cell::after {
content:' ';
position:absolute;
width: 4px;
height: 54px;
background: #f1f1ff;
right: -2px;
top: 0px;
z-index: 999;
}
.ant-table-tbody > :first-child > :last-child::after {
display: none;
}
.selectedRow .ant-table-cell-row-hover {
background-color: #f1f1ff !important;
background: #f1f1ff !important;
}
上面这些CSS都是常规操作,:1- 核心逻辑是给selectedRow下面的每个单元格加边框、加背景; 2 -然后通过每个单元格的after伪类覆盖掉不需要的边框
最后是在右侧单元格上显示选中行的详情了,1- 这一步实现思路是直接把columns改造成函数,传入选中行下标作为参数;2- 最后在右侧单元格的render方法中获取到选中行的数据,然后展示详细信息
const columns = (index)=>[
{
title: 'Name',
dataIndex: 'name',
render: (text) => <a>{text}</a>,
},
{
title: 'Age',
dataIndex: 'age',
},
{
title: 'Home phone',
dataIndex: 'tel',
onCell: (_, index) => {
if (index === 0) {
return {
rowSpan: 5,
};
}
return {rowSpan: 0};
},
render:()=>{
const current = data[index];
return <div>
<div>name:{current.name}</div>
<div>age:{current.age}</div>
<div>phone:{current.phone}</div>
<div>address:{current.address}</div>
</div>;
}
},
];
// 调用时columns传入唯一标识就好了
// <Table columns={columns(selectIndex)} ...
这样改造之后,点击就可以显示具体详情了,实际项目中还是要改回 id 之类的唯一健。
最后附上demo.js文件,全部代码
demo.js
import React, { useState } from "react";
import "antd/dist/antd.css";
import "./index.css";
import { Table } from "antd";
const data = [
{
key: "1",
name: "张三",
age: 32,
tel: "0571-22098909",
phone: 18889898989,
address: "New York No. 1 Lake Park"
},
{
key: "2",
name: "晓余",
tel: "0571-22098333",
phone: 18889898888,
age: 42,
address: "London No. 1 Lake Park"
},
{
key: "3",
name: "布布",
age: 32,
tel: "0575-22098909",
phone: 18900010002,
address: "Sidney No. 1 Lake Park"
},
{
key: "4",
name: "小红",
age: 18,
tel: "0575-22098909",
phone: 18900010002,
address: "London No. 2 Lake Park"
},
{
key: "5",
name: "小张",
age: 18,
tel: "0575-22098909",
phone: 18900010002,
address: "Dublin No. 2 Lake Park"
}
];
const columns = (index) => [
{
title: "姓名",
dataIndex: "name",
render: (text) => <a>{text}</a>
},
{
title: "年龄",
dataIndex: "age"
},
{
title: "详情信息",
dataIndex: "tel",
onCell: (_, index) => {
if (index === 0) {
return {
rowSpan: 5
};
}
return { rowSpan: 0 };
},
render: () => {
const current = data[index];
return (
<div>
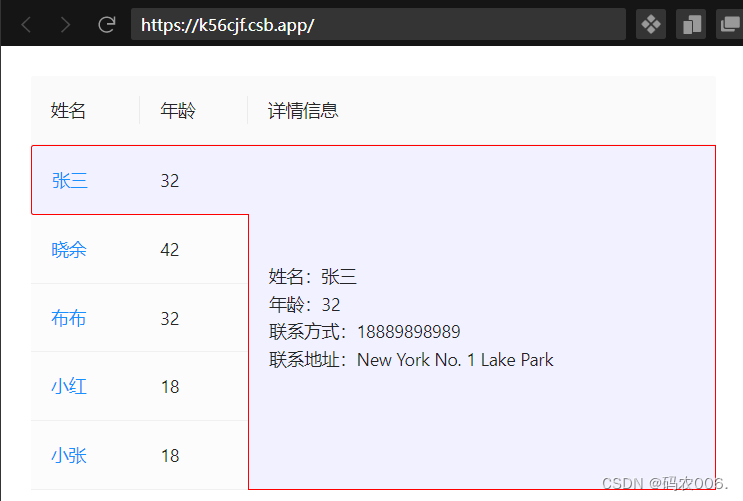
<div>姓名:{current.name}</div>
<div>年龄:{current.age}</div>
<div>联系方式:{current.phone}</div>
<div>联系地址:{current.address}</div>
</div>
);
}
}
];
const App = () => {
const [selectIndex, setSelectIndex] = useState(0);
return (
<Table
columns={columns(selectIndex)}
dataSource={data}
onRow={(record, index) => {
return {
// 点击行
onClick: (event) => {
setSelectIndex(index);
}
};
}}
rowClassName={(record, index) => {
if (index === selectIndex) return "selectedRow";
return "";
}}
/>
);
};
export default App;
index.css
.ant-table-tbody > :first-child > :last-child {
background: #f1f1ff;
border: 1px solid red;
}
.selectedRow .ant-table-cell {
background-color: #f1f1ff;
background: #f1f1ff;
border: 1px solid red;
border-left: none;
border-right: none;
position: relative;
}
.selectedRow > :first-child {
border-left: 1px solid red;
border-radius: 2px 0 0 2px;
}
.selectedRow .ant-table-cell::after {
content: " ";
position: absolute;
width: 4px;
height: 54px;
background: #f1f1ff;
right: -2px;
top: 0px;
z-index: 999;
}
.ant-table-tbody > :first-child > :last-child::after {
display: none;
}
.selectedRow .ant-table-cell-row-hover {
background: #f1f1ff !important;
}
index.html
<!DOCTYPE html>
<html lang="en">
  <head>
    <meta charset="utf-8">
    <meta name="viewport" content="width=device-width, initial-scale=1, shrink-to-fit=no">
    <meta name="theme-color" content="#000000">
  </head>
  <body>
    <div id="container" style="padding: 24px" />
    <script>var mountNode = document.getElementById('container');</script>
  </body>
</html>
index.js
import React from 'react';
import ReactDOM from 'react-dom';
import Demo from './demo';
ReactDOM.render(<Demo />, document.getElementById('container'));
效果图附上:

目录


 3990
3990


 被折叠的 条评论
为什么被折叠?
被折叠的 条评论
为什么被折叠?
 到【灌水乐园】发言


