


本文在预先部署过了RabbitMQ及其管理界面的情境下
一、RabbitMQ的工作模式
先介绍一下RabbitMQ的工作模式,RabbitMQ共五种工作模式:
-
简单模式:就是一个生产者一个消费者,中间通过一个队列直接连接。
-
work工作模式:就是有多个消费者消费队列里的消息,队列里的消息只能被一个消费者消费。这样多部署几个消费者,就可以缓解压力,比如过年的时候抢票,抢票成功后会给你发短信,这个时候就可以把发短信的任务放入队列里,然后有多个发短信的服务来处理队列里的任务。(其他场景:抢红包,抢票等)
-
pub/sub发布订阅模式:上面两种模式生产者的消息只能被一个消费者消费,不符合某些实际场景。需要用到一个Exchange交换机角色来帮助我们把消息发给所有订阅我们的服务商。每个消费者都能消费一整套完整的消息。
-
Routing路由模式:路由模式就是交换机并不是给所有订阅他的队列发送消息了,而是根据路由键来确定应该给哪个队列发送消息,队列和交换机绑定的时候需要通过路由键,而生产者发送消息的时候也需要指定路由键,这样就可以确定给哪个队列发送消息了。
-
Topics主题模式:主题模式就相当于模糊匹配,假如我想给姓张的发送消息,那么我就可以通过主题模式给所有姓张的发送消息。
二、代码示例
1. 简单模式代码示例
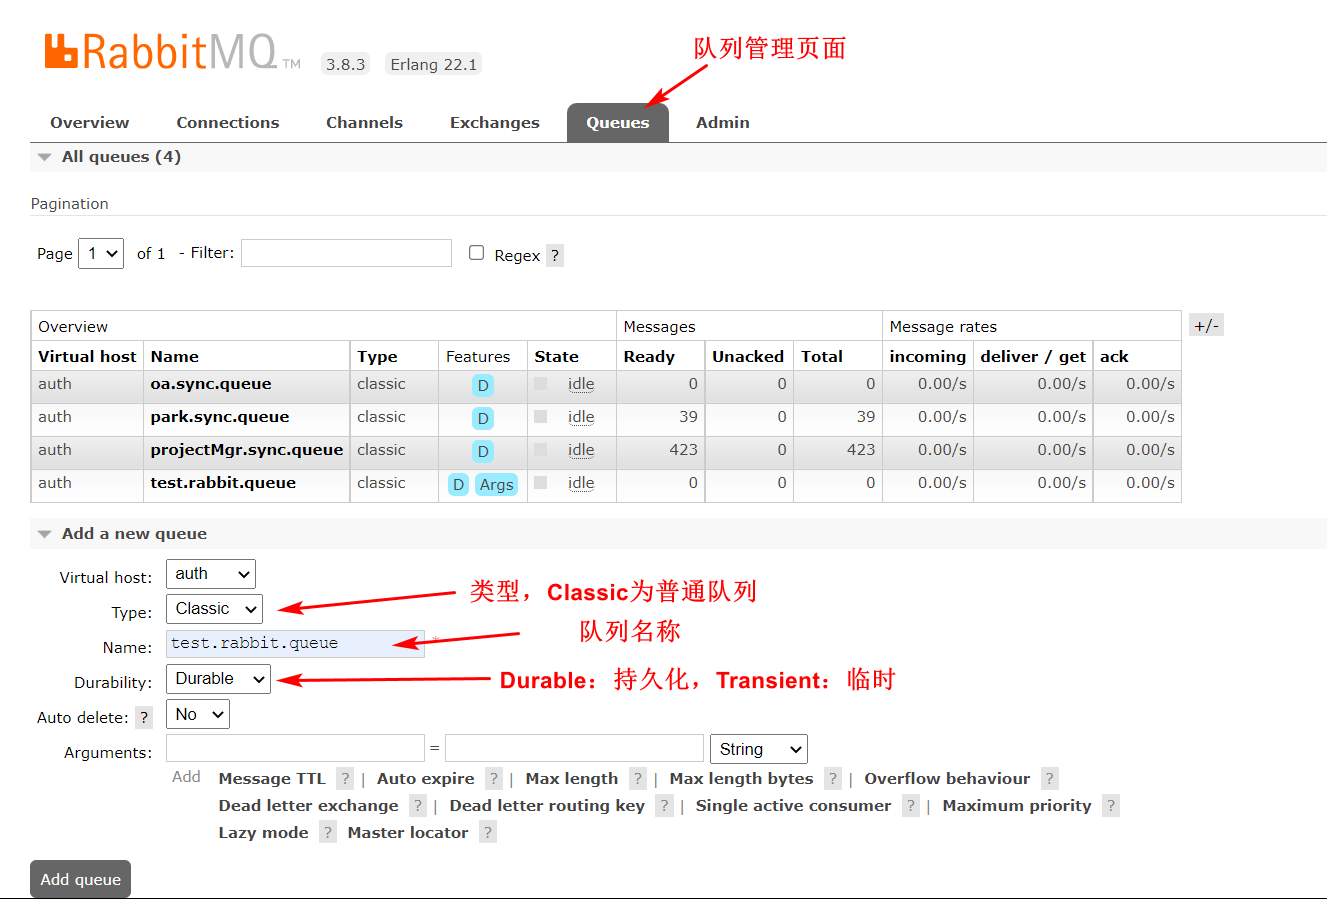
1.1 首先到RabbitMQ的管理界面新建一个队列
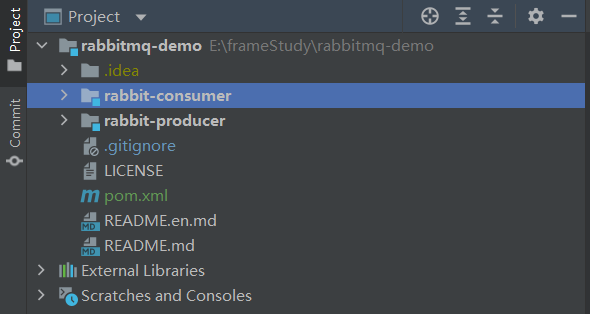
1.2 测试项目的基础结构如下
1.3 父项目的pom.xml文件如下
<?xml version="1.0" encoding="UTF-8"?>
<project xmlns="http://maven.apache.org/POM/4.0.0"
         xmlns:xsi="http://www.w3.org/2001/XMLSchema-instance"
         xsi:schemaLocation="http://maven.apache.org/POM/4.0.0 http://maven.apache.org/xsd/maven-4.0.0.xsd">
    <modelVersion>4.0.0</modelVersion>

    <groupId>com.microsoft</groupId>
    <artifactId>rabbitmq-demo</artifactId>
    <packaging>pom</packaging>
    <version>1.0-SNAPSHOT</version>
    <modules>
        <module>rabbit-producer</module>
        <module>rabbit-consumer</module>
    </modules>

    <parent>
        <groupId>org.springframework.boot</groupId>
        <artifactId>spring-boot-starter-parent</artifactId>
        <version>2.5.3</version>
        <relativePath/> <!-- lookup parent from repository -->
    </parent>

    <properties>
        <maven.compiler.source>11</maven.compiler.source>
        <maven.compiler.target>11</maven.compiler.target>
    </properties>

    <dependencies>
        <dependency>
            <groupId>org.springframework.boot</groupId>
            <artifactId>spring-boot-starter-amqp</artifactId>
        </dependency>
        <!-- https://mvnrepository.com/artifact/org.springframework.boot/spring-boot-starter-test -->
        <dependency>
            <groupId>org.springframework.boot</groupId>
            <artifactId>spring-boot-starter-test</artifactId>
<!--            <scope>test</scope>-->
        </dependency>
        <!-- https://mvnrepository.com/artifact/org.springframework.amqp/spring-rabbit-test -->
        <dependency>
            <groupId>org.springframework.amqp</groupId>
            <artifactId>spring-rabbit-test</artifactId>
<!--            <scope>test</scope>-->
        </dependency>

        <dependency>
            <groupId>junit</groupId>
            <artifactId>junit</artifactId>
        </dependency>
    </dependencies>

    <build>
        <plugins>
            <plugin>
                <groupId>org.springframework.boot</groupId>
                <artifactId>spring-boot-maven-plugin</artifactId>
            </plugin>
        </plugins>
    </build>
</project>
1.4 两个子项目的resource下建立springboot的配置文件:application.yml文件,内容如下:
spring:
  rabbitmq:
    host: (IP)
    port: 5672
    virtual-host:
    username:
    password:
1.5 在两个子项目下建立两个启动类
package com.microsoft;

import org.springframework.boot.SpringApplication;
import org.springframework.boot.autoconfigure.SpringBootApplication;

@SpringBootApplication
public class RabbitProducerApplication {
    public static void main(String[] args) {
        SpringApplication.run(RabbitProducerApplication.class, args);
    }
}
package com.microsoft;

import org.springframework.boot.SpringApplication;
import org.springframework.boot.autoconfigure.SpringBootApplication;

@SpringBootApplication
public class RabbitConsumerApplication {
    public static void main(String[] args) {
        SpringApplication.run(RabbitConsumerApplication.class, args);
    }
}
1.6 监听器
package com.microsoft.consumer;

import org.springframework.amqp.rabbit.annotation.RabbitHandler;
import org.springframework.amqp.rabbit.annotation.RabbitListener;
import org.springframework.stereotype.Component;

@Component
@RabbitListener(queues = "test.rabbit.queue") //指定监听的队列名
public class RabbitConsumerOne {

    @RabbitHandler //消息接收处理
    public void showMsg(String message) { //得到我们producer中发送的Object数据,此处可根据传过来的类型来选择接收,否则抛出异常
        System.out.println("test.rabbit.queue收到的消息内容为:" + message);
    }

}
1.7 生产者
package com.microsoft.producer;

import com.microsoft.RabbitProducerApplication;
import org.junit.Test;
import org.junit.runner.RunWith;
import org.springframework.amqp.rabbit.core.RabbitTemplate;
import org.springframework.boot.test.context.SpringBootTest;
import org.springframework.test.context.junit4.SpringRunner;

import javax.annotation.Resource;

@RunWith(SpringRunner.class)
@SpringBootTest(classes = RabbitProducerApplication.class)
public class RabbitProducerOne {

    @Resource
    private RabbitTemplate rabbitTemplate;

    @Test
    public void sendQueue(){
        System.out.println("开始向队列中发送一条消息!");
        // 参数1:管理中的队列名 参数2:发送的消息
        rabbitTemplate.convertAndSend("test.rabbit.queue","message:这是一条消息!");
        System.out.println("消息发送完毕!");
    }

}
1.8 启动监听器的启动类,启动生产者的测试方法
2022-05-07 10:08:31.800  INFO 6508 --- [           main] com.microsoft.RabbitConsumerApplication  : Started RabbitConsumerApplication in 1.556 seconds (JVM running for 2.828)
test.rabbit.queue收到的消息内容为:message:这是一条消息!
2. 发布订阅模式代码示例
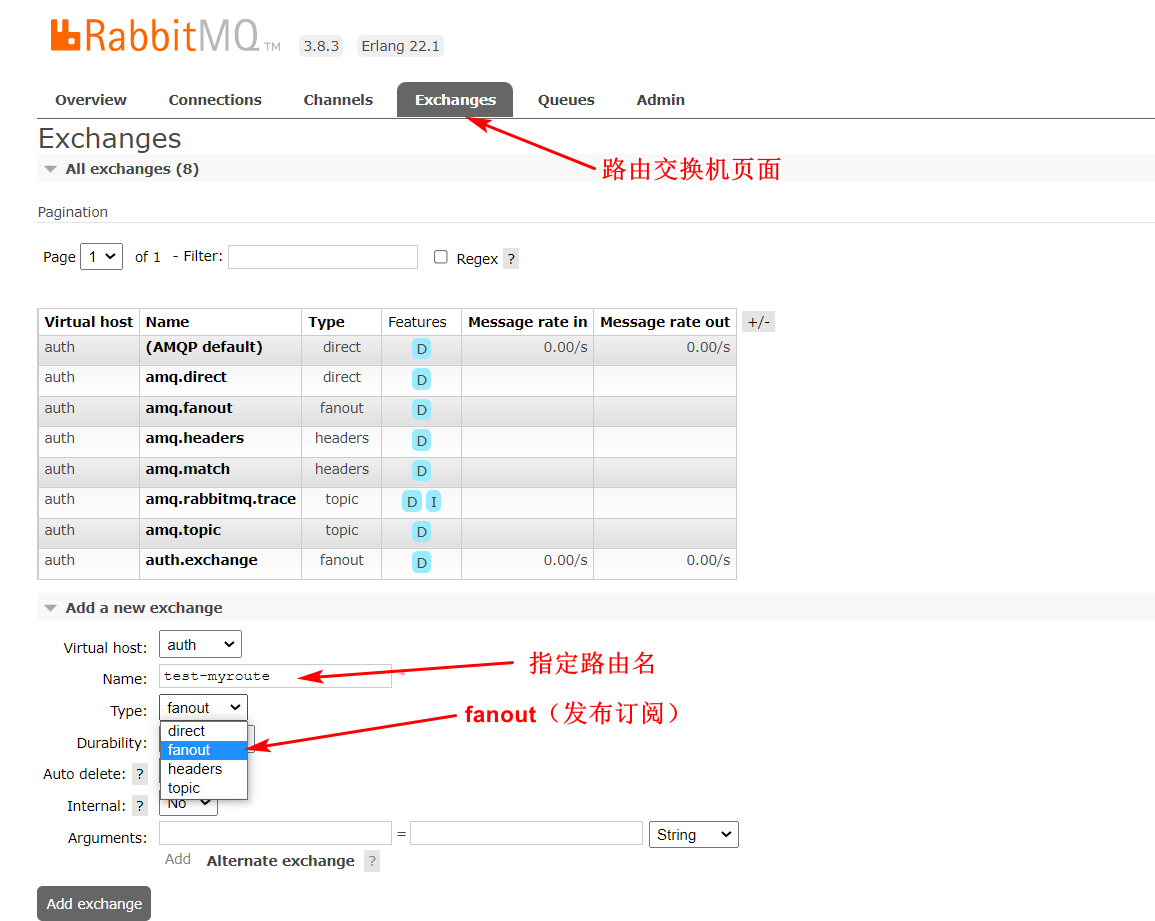
2.1 到RabbitMQ的管理界面新增一个路由交换机(Exchange)
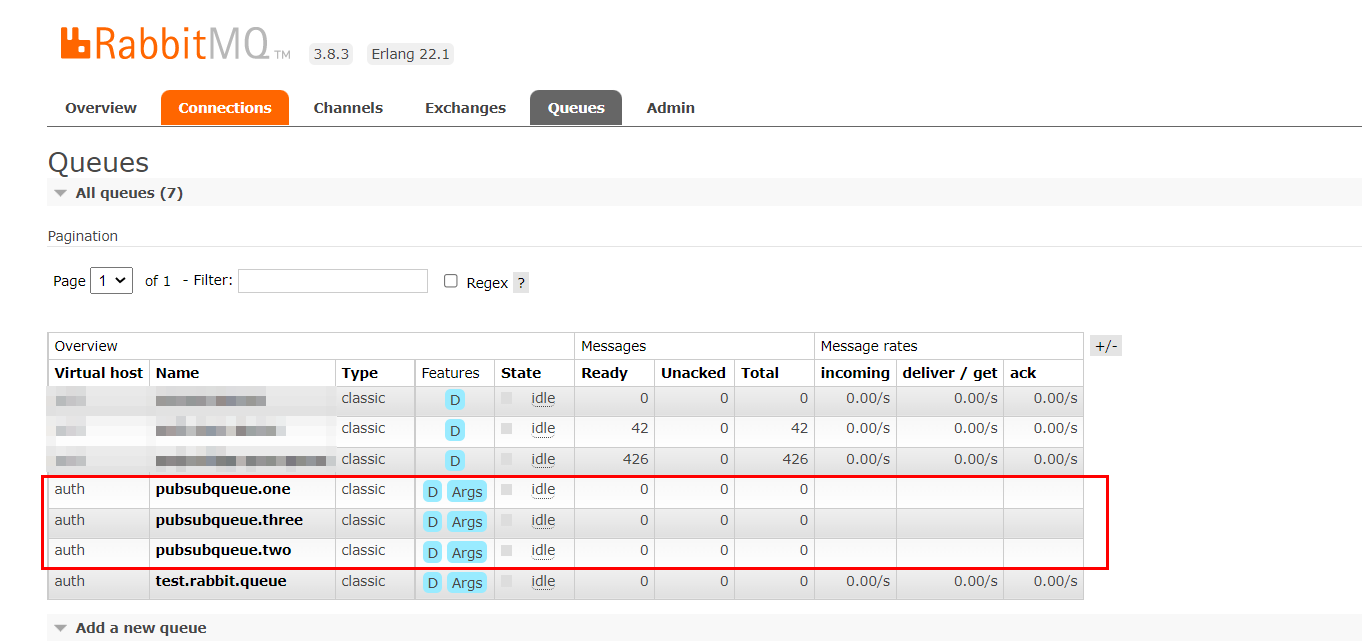
2.2 新建完路由之后,需要再新建几个队列
2.3 把新建的路由和新建的队列绑定
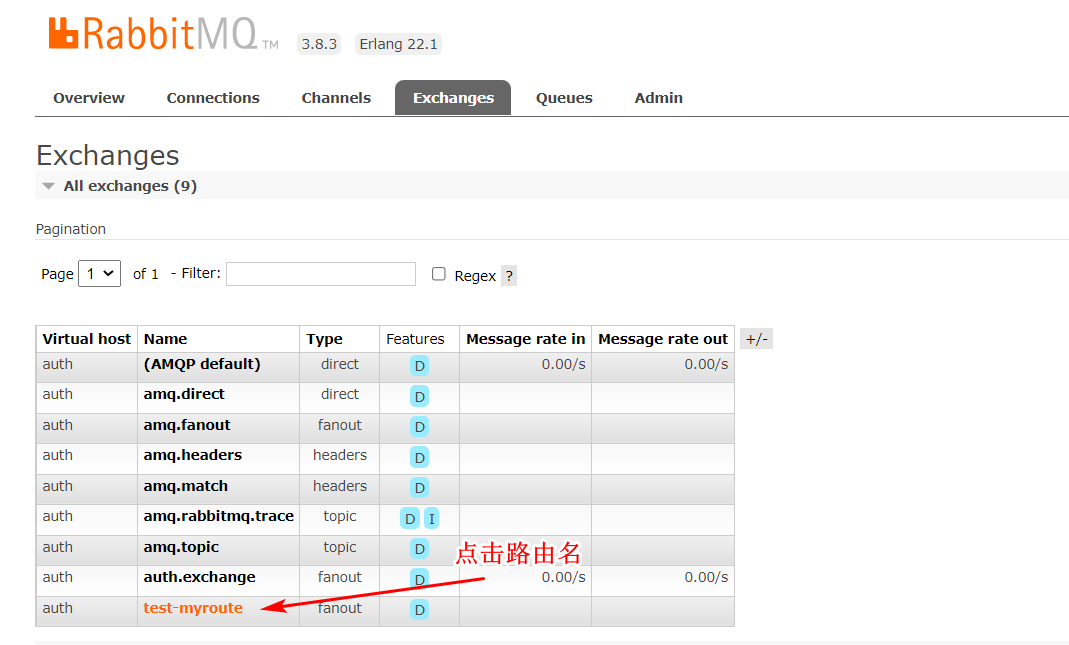
出现如图界面进行绑定
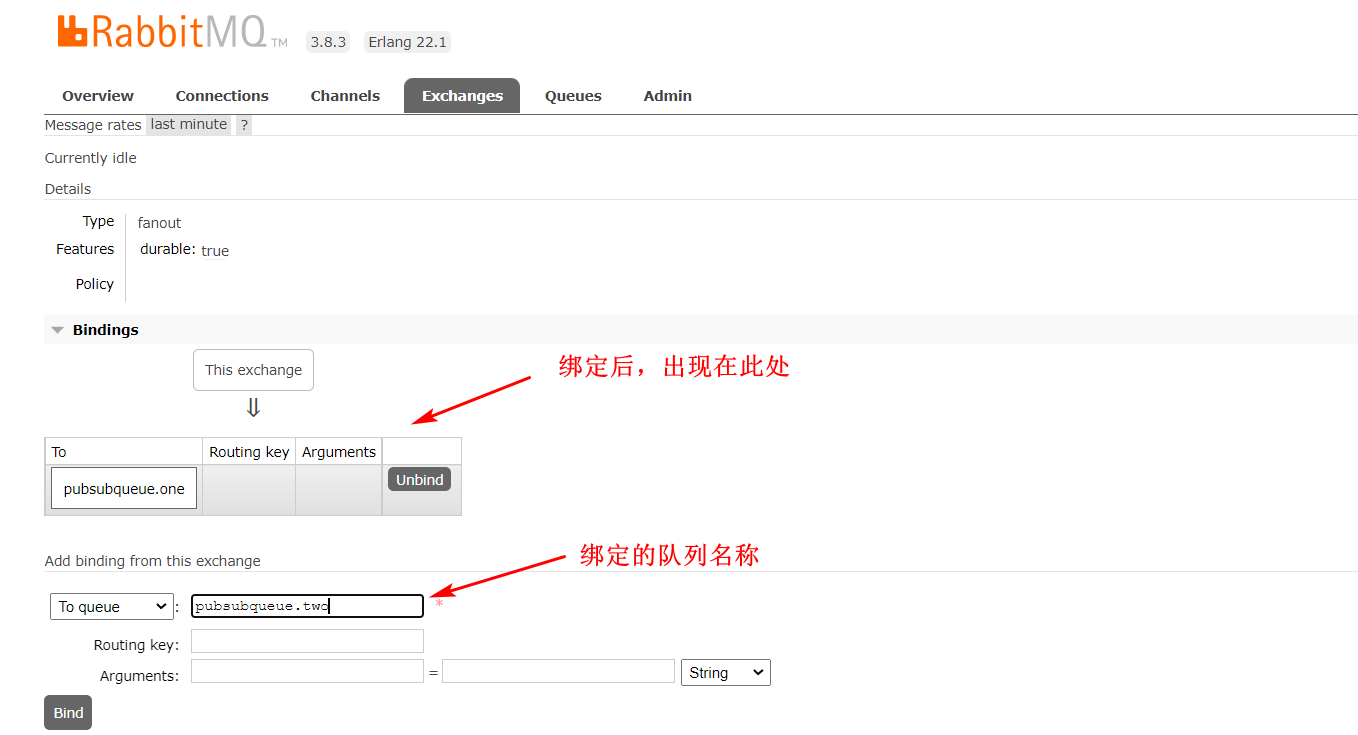
绑定完成,可进行代码测试。
2.4 监听器
package com.microsoft.consumer;

import org.springframework.amqp.rabbit.annotation.RabbitHandler;
import org.springframework.amqp.rabbit.annotation.RabbitListener;
import org.springframework.stereotype.Component;

@Component // 需要注入到Spring容器中
@RabbitListener(queues = "pubsubqueue.one") // 指定监听的队列名
public class SubConsumerOne {

    @RabbitHandler// 消息接收处理
    public void showMsg(String message) { // 得到我们producer中发送的Object数据,此处可根据传过来的类型来选择接收,否则抛出异常
        System.out.println("pubsubqueue.one收到的消息内容为:" + message);
    }

}
package com.microsoft.consumer;

import org.springframework.amqp.rabbit.annotation.RabbitHandler;
import org.springframework.amqp.rabbit.annotation.RabbitListener;
import org.springframework.stereotype.Component;

@Component // 需要注入到Spring容器中
@RabbitListener(queues = "pubsubqueue.two") // 指定监听的队列名
public class SubConsumerTwo {

    @RabbitHandler// 消息接收处理
    public void showMsg(String message) {
        System.out.println("pubsubqueue.two收到的消息内容为:" + message);
    }

}
package com.microsoft.consumer;

import org.springframework.amqp.rabbit.annotation.RabbitHandler;
import org.springframework.amqp.rabbit.annotation.RabbitListener;
import org.springframework.stereotype.Component;

@Component // 需要注入到Spring容器中
@RabbitListener(queues = "pubsubqueue.three") // 指定监听的队列名
public class SubConsumerThree {

    @RabbitHandler// 消息接收处理
    public void showMsg(String message) {
        System.out.println("pubsubqueue.three收到的消息内容为:" + message);
    }

}
2.5 生产者
package com.microsoft.producer;

import com.microsoft.RabbitProducerApplication;
import org.junit.Test;
import org.junit.runner.RunWith;
import org.springframework.amqp.rabbit.core.RabbitTemplate;
import org.springframework.boot.test.context.SpringBootTest;
import org.springframework.test.context.junit4.SpringRunner;

import javax.annotation.Resource;

@RunWith(SpringRunner.class)
@SpringBootTest(classes = RabbitProducerApplication.class)
public class RabbitProducerTwo {

    @Resource
    private RabbitTemplate rabbitTemplate;

    // 广播的形式发送,同一个路由下的所有队列都能接收到消息
    @Test
    public void sendFanout() {
        System.out.println("开始向路由发送消息(路由下的所有Queue都能收到该消息)");
        // 参数1:路由名 参数2:可有可无 参数3:发送的消息内容
        rabbitTemplate.convertAndSend("test-myroute", "", "这是一条所有消费者都能收到的消息!");
        System.out.println("消息发送成功!");
    }

}
2.6 启动监听器的启动类,启动生产者的测试方法
2022-05-07 11:26:07.844  INFO 14428 --- [           main] com.microsoft.RabbitConsumerApplication  : Started RabbitConsumerApplication in 1.058 seconds (JVM running for 1.755)
pubsubqueue.two收到的消息内容为:这是一条所有消费者都能收到的消息!
pubsubqueue.three收到的消息内容为:这是一条所有消费者都能收到的消息!
pubsubqueue.one收到的消息内容为:这是一条所有消费者都能收到的消息!
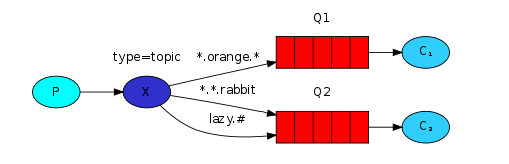
3. 路由模式和主题模式代码示例
路由模式是精确匹配,主题模式是模糊匹配
3.1 新建一个用来发送主题的路由
[外链图片转存失败,源站可能有防盗链机制,建议将图片保存下来直接上传(img-AxfXDVb9-1651907937956)(https://gitee.com/zihanstudy/blog-pic/raw/master/img/image-20220507114107716.png)]
3.2 路由新建完之后,新建3个队列,用来接收发布的topic
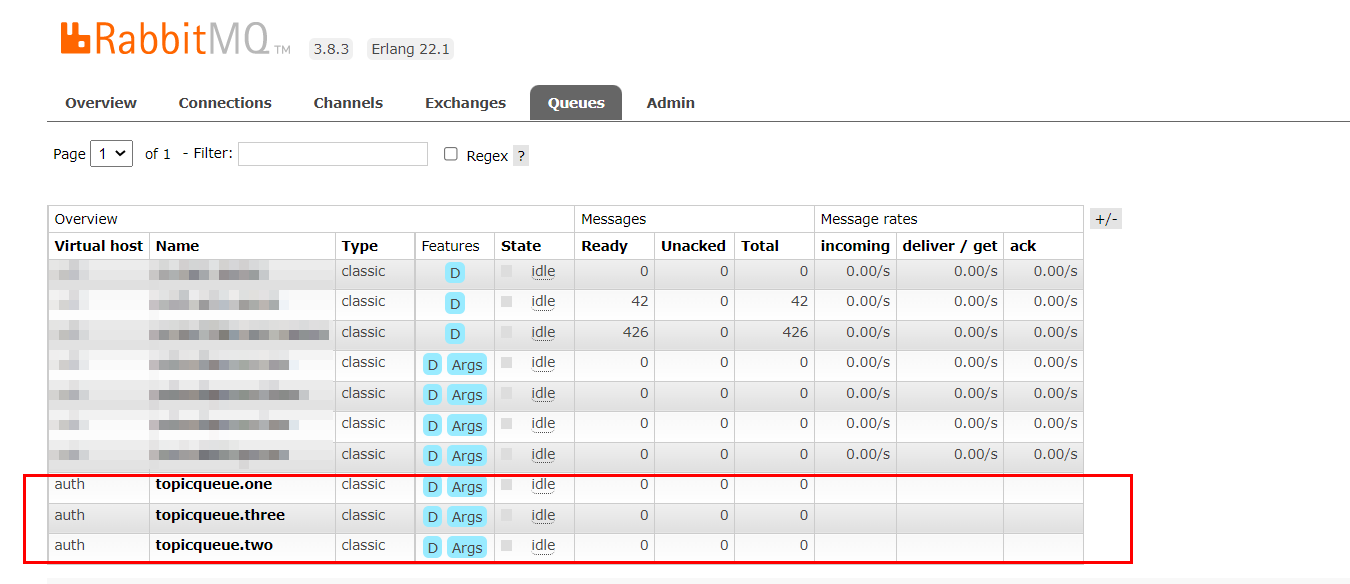
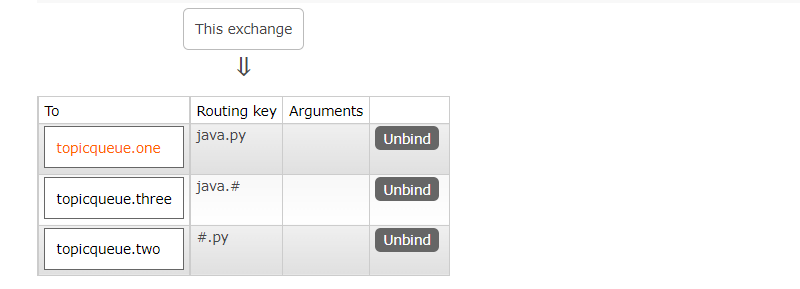
3.3 把新建的队列和路由进行绑定

RabbitMQ主题模式(Topic Exchange)通配符的匹配规则
- 每条消息会被发送到所有符合路由规则的key对应的队列
- 可以使用"*“和”#"两种通配符
- *代表匹配任意一个关键词,#代表匹配一个或多个关键词
- 通配符和普通字符之间需要使用"."隔开
3.4 监听器
@Component
@RabbitListener(queues = "topicqueue.one")
public class TopicConsumerOne {

    @RabbitHandler
    public void showMsg(String message) {
        System.out.println("topicqueue.one收到的消息内容为:" + message);
    }

}
@Component
@RabbitListener(queues = "topicqueue.two")
public class TopicConsumerTwo {

    @RabbitHandler
    public void showMsg(String message) {
        System.out.println("topicqueue.two收到的消息内容为:" + message);
    }

}
@Component
@RabbitListener(queues = "topicqueue.three")
public class TopicConsumerThree {

    @RabbitHandler
    public void showMsg(String message) {
        System.out.println("topicqueue.three收到的消息内容为:" + message);
    }

    /**
     * 可以进行重载,会找到指定参数的queue上
     * @param map
     */
    @RabbitHandler
    public void showMsg(Map map){
        System.out.println("topicqueue.three收到的(map)消息如下:" + map);
    }
    @RabbitHandler
    public void showMsg(List list){
        System.out.println("topicqueue.three收到的(list)消息如下:" + list);
    }
}
3.5 测试1
    @Test
    public void sendTopic1(){
        System.out.println("开始向路由中发送消息!");
        // 参数1:路由器名 参数2:routingKey,类似于发送的规则名
        rabbitTemplate.convertAndSend("test-mytopic","java.py","这是一条java.py消息");
    }
测试结果:
2022-05-07 14:45:24.758  INFO 15548 --- [           main] com.microsoft.RabbitConsumerApplication  : Started RabbitConsumerApplication in 1.107 seconds (JVM running for 2.316)
topicqueue.two收到的消息内容为:这是一条java.py消息
topicqueue.one收到的消息内容为:这是一条java.py消息
topicqueue.three收到的消息内容为:这是一条java.py消息
因为3个队列都符合了规则,所以都能消费到消息
3.6 测试2
    @Test
    public void sendTopic2(){
        System.out.println("开始向路由中发送消息!");
        rabbitTemplate.convertAndSend("test-mytopic","nlp.py","这是一条nlp.py消息");
        rabbitTemplate.convertAndSend("test-mytopic","ocr.py","这是一条ocr.py消息");
    }
测试结果:
topicqueue.two收到的消息内容为:这是一条nlp.py消息
topicqueue.two收到的消息内容为:这是一条ocr.py消息
此处只有topicqueue.two能接收到消息,因为topicqueue.two符合以 .py 结尾
3.7 测试3
    @Test
    public void sendTopic3(){
        // 1.准备发送的数据
        Map map = new HashMap();
        map.put(1,"a");
        map.put(2,"b");
        List list = new ArrayList();
        list.add("qq");
        list.add("ww");
        list.add("SS");
        System.out.println("开始向路由中发送消息!");
        // 2.开始发送消息(发送了2条)
        // 2.1 发送的数据为map类型
        rabbitTemplate.convertAndSend("test-mytopic", "java.cpp", map);
        // 2.2 发送的数据为list类型
        rabbitTemplate.convertAndSend("test-mytopic", "java.cpp", list);
    }
测试结果:
topicqueue.three收到的(map)消息如下:{1=a, 2=b}
topicqueue.three收到的(list)消息如下:[qq, ww, SS]
此处只有topicqueue.three能够收到消息,且被指定参数类型的监听器所消费。


 1009
1009


 被折叠的 条评论
为什么被折叠?
被折叠的 条评论
为什么被折叠?
 到【灌水乐园】发言


