


 本文介绍了如何在SpringBoot应用中使用QQ邮箱的SMTP服务发送带有验证码的模板邮件,包括配置依赖、获取授权码、配置application.yml以及实现EmailService和EmailServiceImpl的方法。
很久之前就想写一个总结的,一直没写,今天刚好又碰见了发送邮箱验证码的需求,刚好记录一波
一.核心依赖如下:
<parent>
	<groupId>org.springframework.boot</groupId>
	<artifactId>spring-boot-starter-parent</artifactId>
	<version>2.2.2.RELEASE</version>
	<relativePath/> <!-- lookup parent from repository -->
</parent>

<!--spring boot web的依赖-->
<dependency>
	<groupId>org.springframework.boot</groupId>
	<artifactId>spring-boot-starter-web</artifactId>
</dependency>

<!-- mail 依赖 -->
<dependency>
	<groupId>org.springframework.boot</groupId>
	<artifactId>spring-boot-starter-mail</artifactId>
</dependency>

<!--thymeleaf模版依赖-->
<dependency>
	<groupId>org.springframework.boot</groupId>
	<artifactId>spring-boot-starter-thymeleaf</artifactId>
</dependency>

<!--freemarker模版依赖-->
<dependency>
	<groupId>org.springframework.boot</groupId>
	<artifactId>spring-boot-starter-freemarker</artifactId>
</dependency>
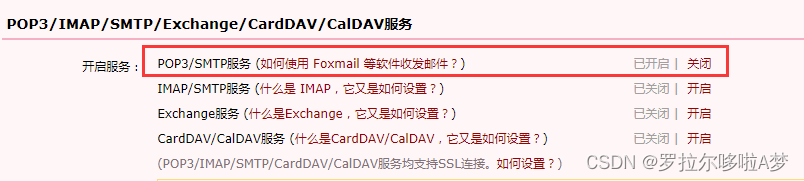
二.获取QQ邮箱授权码(QQ邮箱-设置-账户-POP3/SMTP服务开启,发送短信即可获取,记得保存好)
三、配置application.yml文件
spring:
  mail:
    host: smtp.qq.com
    username: 发件的邮箱
    password: 发件邮箱的授权码
    properties:
      mail:
        smtp:
          auth: true
          port: 587
          starttls:
            enable: true
            required: true
这里不指定properties.mail.smtp.port的话在windons下面可以直接发送,但是到我linux上面就没法了,我猜测不写的话可能就会默认到25号端口,但是我linux又没法连上25号端口,只能 连上587,因此我手动指定。
linux上面测试可以连通邮箱服务的命令:
1.sudo yum install telnet
2.telnet smtp.qq.com 25

像我这样25端口一直卡到超时,那肯定没办法连通了。

不过587就很顺畅得连上了。
大家可以自己测试一下,否则java是抓异常得一直等到超时才会抓到,很浪费时间!!
四、EmailService和EmailServiceImpl
public interface EmailService {

    /**
     * 发送模版邮件
     * @param receiverName
     * @param information 模版参数名(html页面)
     */
    void sendTemplateEmail(String receiverName, String code,String information);
}
package com.exam.serviceimpl.common;


import com.exam.conf.EmailConfig;
import com.exam.service.common.EmailService;
import freemarker.template.Template;
import org.springframework.beans.factory.annotation.Autowired;
import org.springframework.mail.javamail.JavaMailSender;
import org.springframework.mail.javamail.MimeMessageHelper;
import org.springframework.stereotype.Service;
import org.springframework.ui.freemarker.FreeMarkerTemplateUtils;
import org.springframework.web.servlet.view.freemarker.FreeMarkerConfigurer;
import org.thymeleaf.TemplateEngine;

import javax.mail.internet.InternetAddress;
import javax.mail.internet.MimeMessage;
import java.util.HashMap;
import java.util.Map;

@Service
public class EmailServiceImpl implements EmailService {

    @Autowired
    private EmailConfig emailConfig;

    @Autowired
    private JavaMailSender mailSender;

    @Autowired
    private TemplateEngine templateEngine;

    @Autowired
    private FreeMarkerConfigurer markerConfigurer;

    //发送模版邮件
    @Override
    public void sendTemplateEmail(String receiverName,String code, String information) {
        MimeMessage message = mailSender.createMimeMessage();
        try {
            MimeMessageHelper helper = new MimeMessageHelper(message,true);
            helper.setFrom(new InternetAddress(emailConfig.getEmailFrom(),"xxxxxxx","UTF-8"));
            helper.setTo(receiverName);
            helper.setSubject("Online Exam");
            //封装模版使用的数据
            Map<String,Object> map = new HashMap<>();
            map.put("code",code);

//            1.FreeMarker
//            1-1 获取FreeMarker模版
            Template markertemplate = markerConfigurer.getConfiguration().getTemplate(information);
//            1-2 将模版内容转为字符串类型并将参数传入
            String markertTtml = FreeMarkerTemplateUtils.processTemplateIntoString(markertemplate, map);
//            1-3 将字符串作为邮件内容
            helper.setText(markertTtml,true);

//            //2.Thymeleaf
//            //2-1 获取Thymeleaf模版
//            Context context = new Context();
//            context.setVariable("username","瑶");
//            //2-2 将模版内容转为字符串类型并将参数传入
//            String thymeleafHtml = templateEngine.process("thymeleafTemplate", context);
//            helper.setText(thymeleafHtml,true);

        }catch (Exception e){
            e.printStackTrace();
        }

        mailSender.send(message);
    }

}
helper.setFrom(new InternetAddress(emailConfig.getEmailFrom(),"xxxxxx","UTF-8"));指定发件人得时候,可以给发件人改成自己想要的字符串,类似于,将xxx替换成自己想要的字符串

五.EmailConfig
package com.exam.conf;

import lombok.Data;
import org.springframework.beans.factory.annotation.Value;
import org.springframework.stereotype.Component;

@Data
@Component
public class EmailConfig {
    /**
     * 发件人
     */
    @Value("${spring.mail.username}")
    private String emailFrom;
}六、在resources/templates下新建freemarkerTemplate.html和thymeleafTemplate.html用来做文件模版。由于我使用的freemarkerTemplate,因此可能存在一定样式,大家可以自行修改。
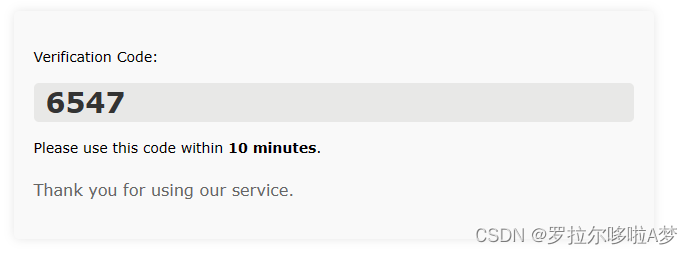
当前freemarkerTemplate渲染出来得样式是这个样子
freemarkerTemplate.html
<!DOCTYPE html>
<html lang="en">
<head>
    <meta charset="UTF-8">
    <title>freemarkerTemplate</title>
    <style>
        body {
            font-family: Arial, sans-serif;
            margin: 0;
            padding: 20px;
            line-height: 1.6;
        }
        .container {
            max-width: 600px;
            margin: 0 auto;
            background-color: #f9f9f9;
            padding: 20px;
            border-radius: 5px;
            box-shadow: 0 0 10px rgba(0, 0, 0, 0.1);
        }
        .verification-code {
            display: block;
            font-size: 28px;
            font-weight: bold;
            color: #333;
            background-color: rgba(166, 165, 160, 0.2);
            padding: 8px 12px;
            border-radius: 5px;
            margin-bottom: 10px;
        }
        .thanks {
            font-size: 16px;
            color: #666;
        }
    </style>
</head>
<body>
<div class="container">
    <p>Verification Code:</p>
    <p><span class="verification-code">${code}</span></p>
    <p>Please use this code within <strong>10 minutes</strong>.</p>
    <p class="thanks">Thank you for using our service.</p>
</div>
</body>
</html>
thymeleafTemplate.html
<!DOCTYPE html>
<html lang="en" xmlns:th="http://www.w3.org/1999/xhtml">
<head>
    <meta charset="UTF-8">
    <title>thymeleafTemplate</title>
</head>
<body>
<span th:text="${username}"></span>,你好,感谢您的使用,这是你的激活邮件,请点击下面的链接进行激活。<br>

</body>
</html>
最后就是使用了,很简单
emailService.sendTemplateEmail(email, code, "freemarkerTemplate.html");注意,"freemarkerTemplate.html"这个就是对应得resources/templates的模板名字
至此,就可以把邮件发送融合入自己需要用的地方了。
参考博客:使用Springboot发送邮件(QQ邮箱)整合笔记_springboot mail qq邮箱发送邮件-CSDN博客


 856
856


 被折叠的 条评论
为什么被折叠?
被折叠的 条评论
为什么被折叠?
 到【灌水乐园】发言


