


NSThread是苹果提供的一种面向对象的轻量级多线程解决方案,一个NSThread对象代表一个线程,使用比较简单,但是需要手动管理线程的生命周期、处理线程同步等问题。
一、创建、启动NSTread线程
- 创建一个
NSThread线程有类方法和实例方法。
类方法创建:
+ (void)detachNewThreadWithBlock:(void (^)(void))block;
+ (void)detachNewThreadSelector:(SEL)selector toTarget:(id)target withObject:(nullable id)argument;
实例方法创建:
- (instancetype)initWithBlock:(void (^)(void))block;
- (nullable instancetype)initWithTarget:(id)target selector:(SEL)sel object:(nullable id)arg;
使用实例方法创建线程返回线程对象,可以根据需要设置相应属性参数。
需要注意:block形式的创建方式 需在iOS10之后使用!
- 创建完毕后记得开启线程!
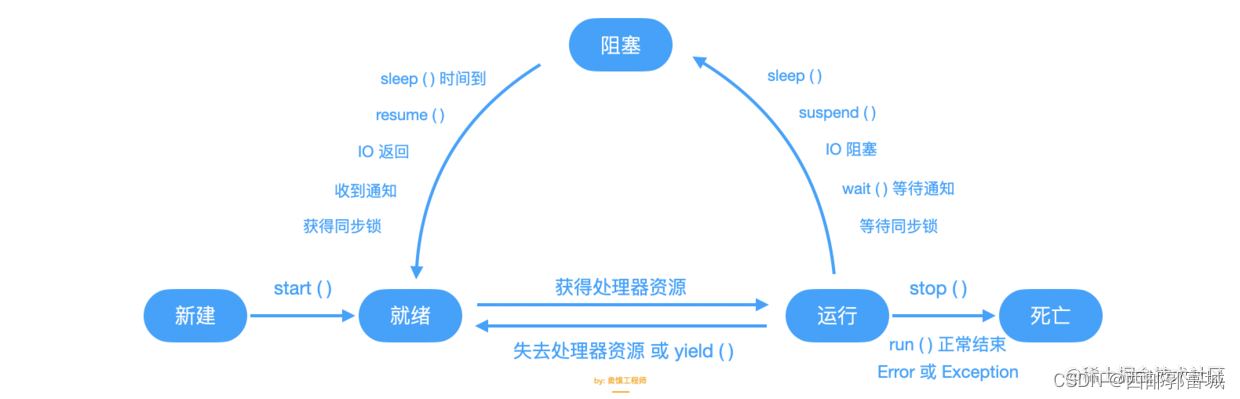
线程创建完毕后对应线程状态的新建态,我们需要调用start方法启动线程(使用类方法创建的线程隐式的启动了线程),否则线程是不会执行的。
但是使用类方法创建或者使用实例方法创建并且调用start方法之后,线程并不会立即执行,只是将线程加入可调度线程池,进入就绪状态,具体何时执行需要等待CPU的调度。
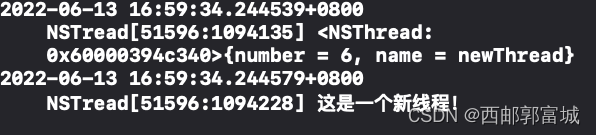
示例:线程的创建和启动:
- (void)viewDidLoad {
    [super viewDidLoad];
    // Do any additional setup after loading the view.

    NSThread *tempThread = [[NSThread alloc] initWithTarget:self selector:@selector(newThread) object:nil];
    [tempThread start];
}

- (void)newThread {
    NSLog(@"这是一个新线程!");
}
示例结果:

二、NSThread线程属性
name属性:设置线程的名字。
- (void)viewDidLoad {
    [super viewDidLoad];
    // Do any additional setup after loading the view.

    NSThread *tempThread = [[NSThread alloc] initWithTarget:self selector:@selector(newThread) object:nil];
    tempThread.name = @"newThread";
    [tempThread start];
    NSLog(@"%@", tempThread);
}

- (void)newThread {
    NSLog(@"这是一个新线程!");
}
输出结果:
qualityOfService属性:设置线程优先级。
该属性是一个枚举值,可供用户选择不同的优先级。
typedef NS_ENUM(NSInteger, NSQualityOfService) {
    NSQualityOfServiceUserInteractive = 0x21,
    NSQualityOfServiceUserInitiated = 0x19,
    NSQualityOfServiceUtility = 0x11,
    NSQualityOfServiceBackground = 0x09,
    NSQualityOfServiceDefault = -1
} API_AVAILABLE(macos(10.10), ios(8.0), watchos(2.0), tvos(9.0));
NSQualityOfServiceUserInteractive优先级最高,从上到下依次降低,NSQualityOfServiceDefault为默认优先级。
示例代码:
- (void)viewDidLoad {
    [super viewDidLoad];
    // Do any additional setup after loading the view.

    NSThread *tempThread = [[NSThread alloc] initWithTarget:self selector:@selector(newThread) object:nil];
    tempThread.name = @"newThread";
    [tempThread start];

    NSThread *threadTwo = [[NSThread alloc] initWithTarget:self selector:@selector(newThread) object:nil];
    threadTwo.name = @"threadTwo";
    threadTwo.qualityOfService = NSQualityOfServiceUserInteractive;
    [threadTwo start];
}

- (void)newThread {
    NSLog(@"%@", [NSThread currentThread]);
}
示例结果:
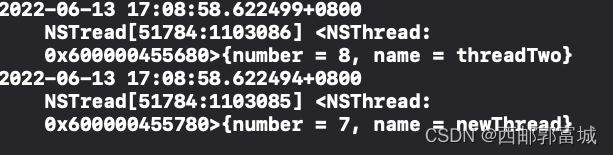
从示例结果我们可以看出,虽然threadTwo是后来创建的,但是因为其优先级高的原因,他还是会先执行。
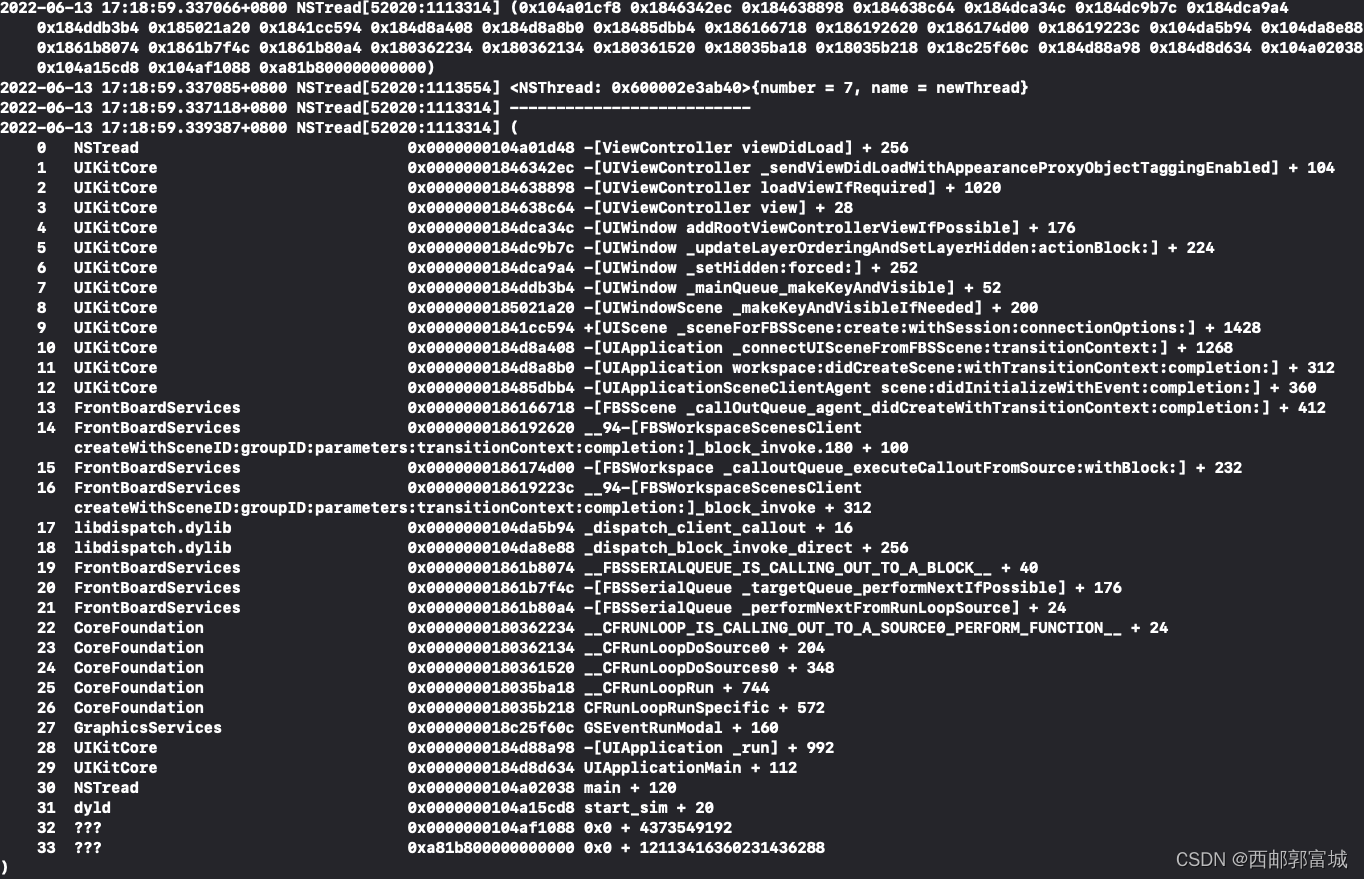
callStackReturnAddresses和callStackSymbols属性:
callStackReturnAddresses属性定义如下:
@property (class, readonly, copy) NSArray<NSNumber *> *callStackReturnAddresses;
线程的调用会有函数的调用,该属性返回的就是该线程中函数调用的虚拟地址数组。
callStackSymbols属性定义如下:
@property (class, readonly, copy) NSArray<NSString *> *callStackSymbols;
该属性以符号的形式返回该线程调用函数。
callStackReturnAddress和callStackSymbols这两个函数可以同NSLog联合使用来跟踪线程的函数调用情况,是编程调试的重要手段。
示例:
- (void)viewDidLoad {
    [super viewDidLoad];
    // Do any additional setup after loading the view.

    NSThread *tempThread = [[NSThread alloc] initWithTarget:self selector:@selector(newThread) object:nil];
    tempThread.name = @"newThread";
    [tempThread start];

    NSLog(@"%@", NSThread.callStackReturnAddresses);
    NSLog(@"--------------------------");
    NSLog(@"%@", NSThread.callStackSymbols);
}

- (void)newThread {
    NSLog(@"%@", [NSThread currentThread]);
}
输出:
threadDictionary属性:
每个线程有自己的堆栈空间,线程内维护了一个键-值的字典,它可以在线程里面的任何地方被访问。你可以使用该字典来保存一些信息,这些信息在整个线程的执行过程中都保持不变。比如,你可以使用它来存储在你的整个线程过程中Run loop里面多次迭代的状态信息。
其定义如下:
@property (readonly, retain) NSMutableDictionary *threadDictionary;
示例:
- (void)viewDidLoad {
    [super viewDidLoad];
    // Do any additional setup after loading the view.

    NSThread *tempThread = [[NSThread alloc] initWithTarget:self selector:@selector(newThread) object:nil];
    tempThread.name = @"newThread";
    [tempThread start];
}

- (void)newThread {
    //获取当前线程的字典
    NSDictionary *tempDictionary = [NSThread currentThread].threadDictionary;
    NSLog(@"%@", tempDictionary);
}
输出:

注意该属性是一个只读属性,我们不能对其进行修改。
- 其他属性:
@property (class, readonly, strong) NSThread *mainThread; // 获取主线程
@property (class, readonly, strong) NSThread *currentThread;// 获取当前线程
@property NSUInteger stackSize; // 线程使用堆栈大小,默认512k
@property (readonly) BOOL isMainThread; // 是否是主线程
@property (class, readonly) BOOL isMainThread ; // 当前线程是否为主线程
@property (readonly, getter=isExecuting) BOOL executing ; // 线程是否正在执行
@property (readonly, getter=isFinished) BOOL finished ;  // 线程是否执行完毕
@property (readonly, getter=isCancelled) BOOL cancelled;  // 线程是否取消
三、NSThread线程阻塞
NSThread提供了2个类方法:
+ (void)sleepUntilDate:(NSDate *)date; // 休眠到指定日期
+ (void)sleepForTimeInterval:(NSTimeInterval)ti; // 休眠执行时常
对于上面设置线程优先级的示例代码,我们稍做些更改,说明线程阻塞的方法:
- (void)viewDidLoad {
    [super viewDidLoad];
    // Do any additional setup after loading the view.

    NSThread *tempThread = [[NSThread alloc] initWithBlock:^{
        NSLog(@"\n 线程:%@ start", [NSThread currentThread]);
    }];
    tempThread.name = @"newThread";
    [tempThread start];
    //加入休眠函数
    [NSThread sleepForTimeInterval:1];


    NSThread *threadTwo = [[NSThread alloc] initWithBlock:^{
        NSLog(@"\n 线程:%@ start", [NSThread currentThread]);
    }];
    threadTwo.name = @"threadTwo";
    threadTwo.qualityOfService = NSQualityOfServiceUserInteractive;
    [threadTwo start];
}
示例结果:

在tempThread与threadTwo之间加入[NSThread sleepForTimeInterval:1];让主线程阻塞1秒,那么tempThread将先于threadTwo执行,即使threadTwo的优先级是高于tempThread。
这是因为,tempThread先start进入就绪状态,此时,主线程休眠,在CPU时间到来之时,可调度线程池中只有tempThread,tempThread被调度执行,此时主线程休眠时间结束,threadTwo进入就绪态,并在下一次CPU时间时被调度执行。
四、NSThread的终止
4.1 取消线程:
- (void)cancel ;
对于已被调度的线程是无法通过cancel取消的。
4.2 退出线程:
+ (void)exit;
强制退出线程,使线程进入死亡态。
五、线程的通信
在开发中,我们有时需要在子线程进行耗时操作,操作结束后切换到主线程进行刷新UI。这就涉及到线程间的通信,NSThread线程提供了对NSObject的拓展函数。
5.1 NSObject方式:
// 在主线程上执行操作 wait表示是否阻塞该方法,等待主线程空闲再运行,modes表示运行模式kCFRunLoopCommonModes
- (void)performSelectorOnMainThread:(SEL)aSelector withObject:(nullable id)arg waitUntilDone:(BOOL)wait modes:(nullable NSArray<NSString *> *)array;
- (void)performSelectorOnMainThread:(SEL)aSelector withObject:(nullable id)arg waitUntilDone:(BOOL)wait;
	// equivalent to the first method with kCFRunLoopCommonModes

// 在指定线程上执行操作
- (void)performSelector:(SEL)aSelector onThread:(NSThread *)thr withObject:(nullable id)arg waitUntilDone:(BOOL)wait modes:(nullable NSArray<NSString *> *)array API_AVAILABLE(macos(10.5), ios(2.0), watchos(2.0), tvos(9.0));
- (void)performSelector:(SEL)aSelector onThread:(NSThread *)thr withObject:(nullable id)arg waitUntilDone:(BOOL)wait API_AVAILABLE(macos(10.5), ios(2.0), watchos(2.0), tvos(9.0));
	// equivalent to the first method with kCFRunLoopCommonModes

// 隐式创建一个线程并执行
- (void)performSelectorInBackground:(SEL)aSelector withObject:(nullable id)arg API_AVAILABLE(macos(10.5), ios(2.0), watchos(2.0), tvos(9.0));

// NSObject函数: 在当前线程上执行操作,调用 NSObject 的 performSelector:相关方法
- (id)performSelector:(SEL)aSelector;
- (id)performSelector:(SEL)aSelector withObject:(id)object;
- (id)performSelector:(SEL)aSelector withObject:(id)object1 withObject:(id)object2;
举个例子,我们来模拟子线程下载图片回到线程刷新 UI 的实现:
// 开辟子线程模拟网络请求
- (void)downloadImage {
   [NSThread detachNewThreadWithBlock:^{
	   // 1. 获取图片 imageUrl
	   NSURL *imageUrl = [NSURL URLWithString:@"https://xxxxx.jpg"];
	   // 2. 从 imageUrl 中读取数据(下载图片) -- 耗时操作
	   NSData *imageData = [NSData dataWithContentsOfURL:imageUrl];
	   // 通过二进制 data 创建 image
	   UIImage *image = [UIImage imageWithData:imageData];

	   // 主线程刷新UI
	   [self performSelectorOnMainThread:@selector(mainThreadRefreshUI) withObject:image waitUntilDone:YES];
    }];
}

// 主线程刷新 UI 调用方法
- (void)mainThreadRefreshUI:(UIImage *)image {
    self.imageView.image = image;
}
5.2 端口通信方式:
端口通信需要使用NSPort,NSPort是一个抽象类,具体使用的时候可以使用其子类NSMachPort。
通过下面方法传递将要在线程间通信的信息数据:
- (BOOL)sendBeforeDate:(NSDate *)limitDate components:(nullable NSMutableArray *)components from:(nullable NSPort *) receivePort reserved:(NSUInteger)headerSpaceReserved;
- (BOOL)sendBeforeDate:(NSDate *)limitDate msgid:(NSUInteger)msgID components:(nullable NSMutableArray *)components from:(nullable NSPort *)receivePort reserved:(NSUInteger)headerSpaceReserved;
实现NSPortDelegate的方法,接受端口传递过来的数据:
- (void)handlePortMessage:(NSPortMessage *)message;
注意:在使用端口的时候,需要注意将端口将入当前Runloop,否则消息无法传递。
[[NSRunLoop currentRunLoop] addPort:self.myPort forMode:NSDefaultRunLoopMode];
基础的创建示例:
#define kMsg1 100
#define kMsg2 101

- (void)viewDidLoad {
    [super viewDidLoad];

    //1. 创建主线程的port
    // 子线程通过此端口发送消息给主线程
    NSPort *myPort = [NSMachPort port];

    //2. 设置port的代理回调对象
    myPort.delegate = self;

    //3. 把port加入runloop,接收port消息
    [[NSRunLoop currentRunLoop] addPort:myPort forMode:NSDefaultRunLoopMode];

    NSLog(@"---myport %@", myPort);
    //4. 启动次线程,并传入主线程的port
    MyWorkerClass *work = [[MyWorkerClass alloc] init];
    [NSThread detachNewThreadSelector:@selector(launchThreadWithPort:)
                             toTarget:work
                           withObject:myPort];
}

- (void)handlePortMessage:(NSMessagePort*)message{

    NSLog(@"接到子线程传递的消息!%@",message);

    //1. 消息id
    NSUInteger msgId = [[message valueForKeyPath:@"msgid"] integerValue];

    //2. 当前主线程的port
    NSPort *localPort = [message valueForKeyPath:@"localPort"];

    //3. 接收到消息的port(来自其他线程)
    NSPort *remotePort = [message valueForKeyPath:@"remotePort"];

    if (msgId == kMsg1) {
        //向子线的port发送消息
        [remotePort sendBeforeDate:[NSDate date]
                             msgid:kMsg2
                        components:nil
                              from:localPort
                          reserved:0];

    } else if (msgId == kMsg2){
        NSLog(@"操作2....\n");
    }
}
这就是大概的使用方法,具体的使用方法可以看看这个:iOS线程通信和进程通信的例子(NSMachPort和NSTask,NSPipe)
六、NSThread通知
NSString * const NSWillBecomeMultiThreadedNotification; //由当前线程派生出第一个其他线程时发送,一般一个线程只发送一次
NSString * const NSDidBecomeSingleThreadedNotification; //这个通知目前没有实际意义,可以忽略
NSString * const NSThreadWillExitNotification; //线程退出之前发送这个通知
七、NSThread 线程安全案例
只要涉及到多线程就有可能存在非线程安全的情况。根本原因就是多条线程同时操作一片临界区,导致临界区资源错乱。
我们来模拟多线程经典的售票案例:两个售票窗口同时售卖50张车票:
#import "ViewController.h"

@interface ViewController ()

@property (nonatomic, strong) NSThread *ticketSaleWindow1; //模拟窗口1售票的线程
@property (nonatomic, strong) NSThread *ticketSaleWindow2; //模拟窗口2售票的线程
@property NSInteger ticketSurplusCount; //剩余火车票

@end

@implementation ViewController

- (void)viewDidLoad {
    [super viewDidLoad];
    // Do any additional setup after loading the view.

    // 1. 设置剩余火车票为 50
    self.ticketSurplusCount = 50;

    // 2. 模拟窗口1售票的线程
    self.ticketSaleWindow1 = [[NSThread alloc]initWithTarget:self selector:@selector(saleTicketNotSafe) object:nil];
    self.ticketSaleWindow1.name = @"售票窗口1";

    // 3. 模拟窗口2售票的线程
    self.ticketSaleWindow2 = [[NSThread alloc]initWithTarget:self selector:@selector(saleTicketNotSafe) object:nil];
    self.ticketSaleWindow2.name = @"售票窗口2";

    // 4. 开始售卖火车票
    [self.ticketSaleWindow1 start];
    [self.ticketSaleWindow2 start];
}

/*
* 售卖火车票(非线程安全)
*/
- (void)saleTicketNotSafe {
    while (1) {
        //如果还有票,继续售卖
        if (self.ticketSurplusCount > 0) {
            self.ticketSurplusCount --;
            NSLog(@"%@", [NSString stringWithFormat:@"剩余票数:%ld 窗口:%@", self.ticketSurplusCount, [NSThread currentThread].name]);
           [NSThread sleepForTimeInterval:0.2];
        } else { //如果已卖完,关闭售票窗口
            NSLog(@"所有火车票均已售完");
            break;
        }
  }
}

@end
截取部分结果如下:
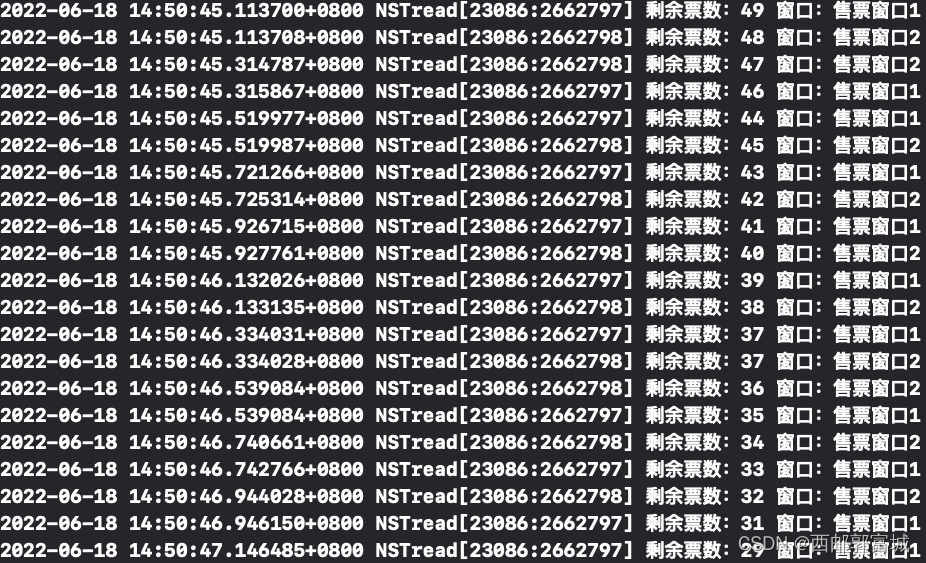
这就是多线程同时操作同一片临界区的结果,得到的票数是错乱的,并且还可能同时访问同一个数据,这是不符合我们的预期的。
线程安全的解决方案,就是线程同步机制。比较常用的是使用【锁】。在一个线程占用临界区的时候,不允许其他线程进入。
iOS 实现线程加锁有很多种方式:@synchronized、 NSLock、NSRecursiveLock、NSCondition、NSConditionLock、pthread_mutex、dispatch_semaphore、OSSpinLock、atomic等等。这里我们使用@synchronized对此案例进行线程安全优化:
#import "ViewController.h"

@interface ViewController ()

@property (nonatomic, strong) NSThread *ticketSaleWindow1; //模拟窗口1售票的线程
@property (nonatomic, strong) NSThread *ticketSaleWindow2; //模拟窗口2售票的线程
@property NSInteger ticketSurplusCount; //剩余火车票

@end

@implementation ViewController

- (void)viewDidLoad {
    [super viewDidLoad];
    // Do any additional setup after loading the view.

    // 1. 设置剩余火车票为 50
    self.ticketSurplusCount = 50;

    // 2. 模拟窗口1售票的线程
    self.ticketSaleWindow1 = [[NSThread alloc]initWithTarget:self selector:@selector(saleTicketNotSafe) object:nil];
    self.ticketSaleWindow1.name = @"售票窗口1";

    // 3. 模拟窗口2售票的线程
    self.ticketSaleWindow2 = [[NSThread alloc]initWithTarget:self selector:@selector(saleTicketNotSafe) object:nil];
    self.ticketSaleWindow2.name = @"售票窗口2";

    // 4. 开始售卖火车票
    [self.ticketSaleWindow1 start];
    [self.ticketSaleWindow2 start];
}

/*
* 售卖火车票(非线程安全)
*/
- (void)saleTicketNotSafe {
    while (1) {
        // 互斥锁
        @synchronized (self) {
               //如果还有票,继续售卖
               if (self.ticketSurplusCount > 0) {
                  self.ticketSurplusCount --;
                  NSLog(@"%@", [NSString stringWithFormat:@"剩余票数:%ld 窗口:%@", self.ticketSurplusCount, [NSThread currentThread].name]);
                 [NSThread sleepForTimeInterval:0.2];
               } else { //如果已卖完,关闭售票窗口
                  NSLog(@"所有火车票均已售完");
                  break;
               }
        }
  }
}

@end
运行后结果是正常的:

八、总结
多线程的方法有很多的好处,自然也就有其坏处,我们在项目中使用多线程时一定要注意线程安全的问题,不要因为一个小差错造成大损失!!!


 2220
2220


 被折叠的 条评论
为什么被折叠?
被折叠的 条评论
为什么被折叠?
 到【灌水乐园】发言


