


开发的时候做导航栏切换。很正常的事情。但有时候为了我们的产品更加的完美会去要求我们前端在做导航栏切换的时候的动画效果。
如下:
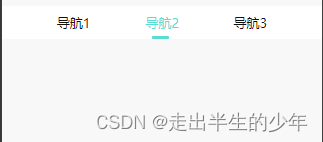
具体效果 大家可以自己复制代码之后看
因为我做的是一个组件并且是用uniapp做的所有大家在自己的uniapp里面创建一个vue文件然后粘贴进去就好了。
如果自己做的是微信小程序原生开发或者是H5 或者做后台管理的
要用 大家复制一下根据自己需求去修改就好了
<template>
	<view class="team-pact">
		<view :style="{color:pitchon==item?'#444':'#999'}" class="segmented-item" :key="index"
			v-for="(item,index) in titleList" :id="'iconBox'+index">
			<view class="cont-box">
				<text @click="itemClick(item,index)" :class="pitchon==item?'subcolor':''">{{item}}</text>
			</view>
		</view>
		<text :style="[{left:left}]" class="subscript"></text>

	</view>
</template>

<script>
	export default {
		data() {
			return {
				pitchon: '',
				left: '',
			}
		},

		// 父组件传递的参数
		// titleList: ['导航1', '导航2','导航3'],
		// pitchon:'导航1'

		// props: ["title", "back"],
		props: {
			pitchon: { //默认选中的内容
				type: String,
				default: '',
			},
			titleList: { //标题列表
				type: Array,
				default: []
			},
			color: { // 标题和返回按钮颜色(默认白色)
				type: String,
				default: '#fff'
			},
			//建议使用background  因为使用backgroundColor,会导致不识别渐变颜色
			background: { // 背景颜色(不传值默认透明)
				type: String,
				default: 'transparent'
			},

		},

		created() {

			let index
			this.titleList.map((item, ind) => {
				if (item == this.pitchon) {
					index = ind
				}
			})


			this.move(index)

		},
		methods: {
			// 左侧返回按钮调用
			itemClick(item, index) {
				console.log(item, index);


				this.move(index)

				this.$emit("itemClick", { item, index })
				// this.left = left * 2
			},


			move(index) {
				let _this = this

				const query = uni.createSelectorQuery().in(this)
				query.select(`#iconBox${index}`).boundingClientRect(data => {
					console.log(data.left)
					console.log(data)

					//  移动距离 = 当前盒子距离屏幕左边距离  +  (当前盒子宽度 - 滑动条宽度 )除2 (注意这里是px)
					_this.left = data.left + (data.width - 20) / 2 + 'px'


					console.log(_this.left);
				}).exec()
			},


		}
	}
</script>
<style lang="less">
	.team-pact {
		position: fixed;
		top: 0;
		width: 100%;
		height: 78rpx;
		display: flex;
		justify-content: space-evenly;
		background-color: #fff;
		position: fixed;
		white-space: nowrap;
		z-index: 9999;
		left: 0;
		color: #444444;

		::-webkit-scrollbar {
			width: 0;
			height: 0;
			color: transparent;
		}

		.iconImg-box {
			display: inline-block;
			margin-left: 10rpx;
			width: 70rpx;

			.iconImg {
				width: 20rpx;
				height: 14rpx;
			}
		}


		.subscript {
			display: block;
			width: 40rpx;
			height: 8rpx;

			background: #5CDBD3;
			border-radius: 7rpx;
			position: absolute;
			bottom: 0rpx;
			transition: all .2s linear;

		}

		.subcolor {
			color: #5CDBD3;
		}

		.segmented-item {
			// width: 50%;


			.cont-box {
				/* margin-top: 20rpx; */
				height: 58rpx;
				margin: auto;
				padding: 20rpx 0 0 0;
				font-size: 32rpx;
				color: #111111;
				display: flex;
				justify-content: space-between;
				flex-direction: column;
			}

		}
	}
</style>


 5077
5077


 被折叠的 条评论
为什么被折叠?
被折叠的 条评论
为什么被折叠?
 到【灌水乐园】发言


