


这是一篇关于android开发四大组件Activity部分的笔记之一,其中包括了解界面之间传递对象 、传递 数据、Activity之间数据回传、requestCode和resultCode 以及实现打电话、发短信、打开系统相机的例子等内容。这里所用到的开发工具是Android4.1。
目录
6.界面之间的基本数据类型数据传递
先写两个界面实现界面之间的跳转
然后在传递数据的界面用putExtra()方法来存放数据的键值对
①整型
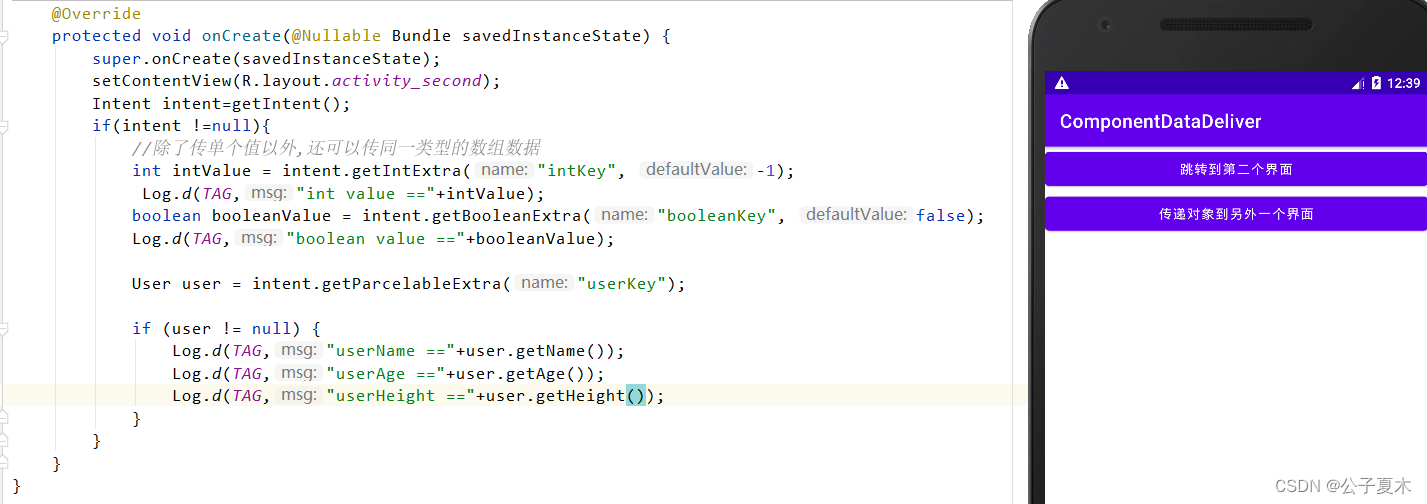
intent.putExtra("intKey",100);在接收数据的界面的用getIntExtra(java.lang.String, int)方法接收。
Intent intent=getIntent();
if(intent !=null){
    int intValue = intent.getIntExtra("intKey", -1);//如果没有使用给定名称存储所需类型的值,则返回该值,这里即为-1。
    Log.d(TAG,"int value =="+intValue);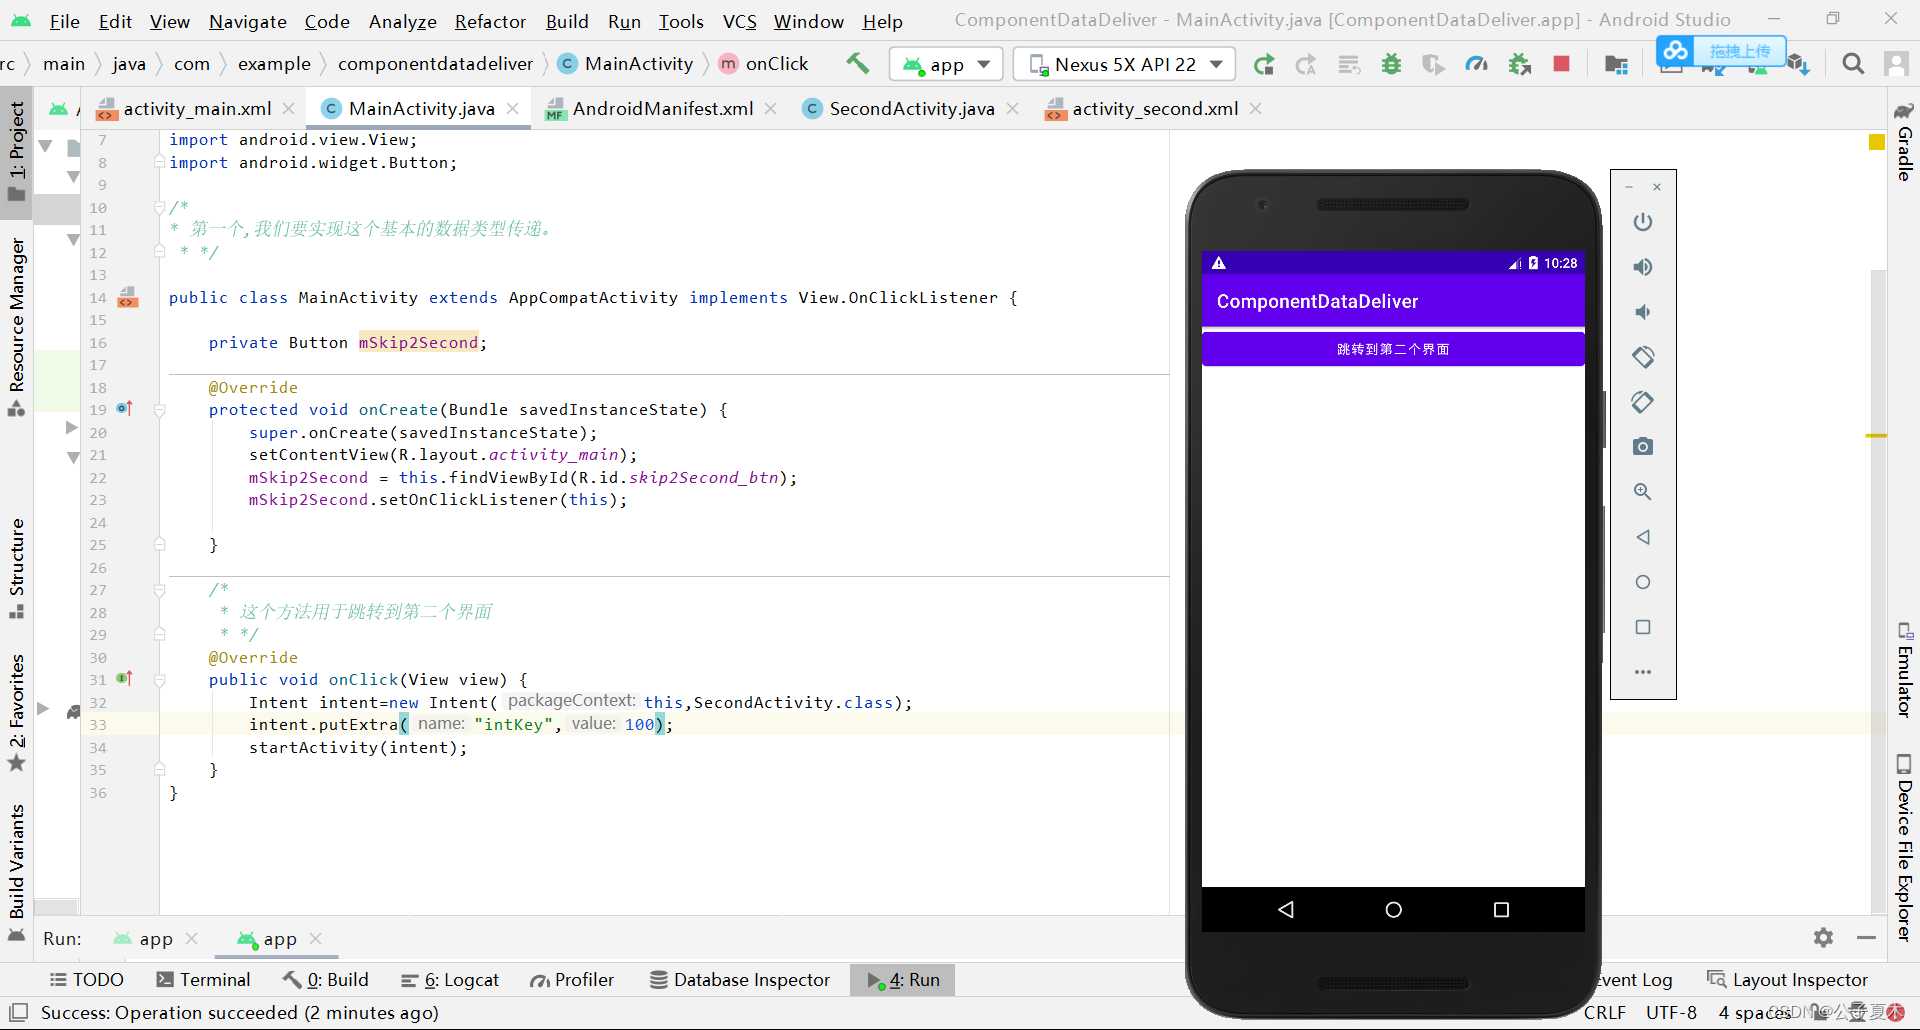

把intent.putExtra("intKey",100);这一句注释掉之后,找不到intKey对应的值就会返回-1。

②布尔型
传递界面:
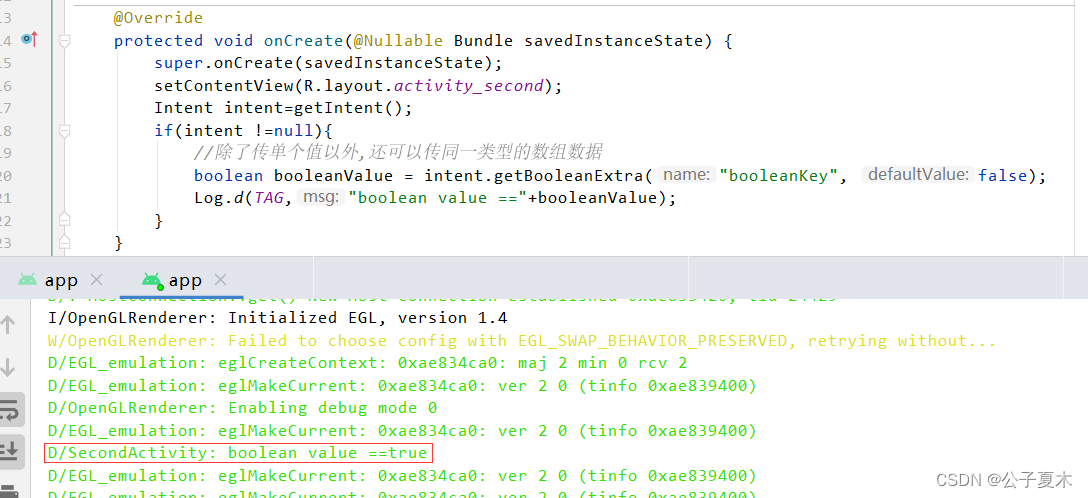
intent.putExtra("booleanKey",true);接收界面:
Intent intent=getIntent();
if(intent !=null){
    //除了传单个值以外,还可以传同一类型的数组数据
    boolean booleanValue = intent.getBooleanExtra("booleanKey", false);
    Log.d(TAG,"boolean value =="+booleanValue);
}
运行结果:
7.界面之间传递对象
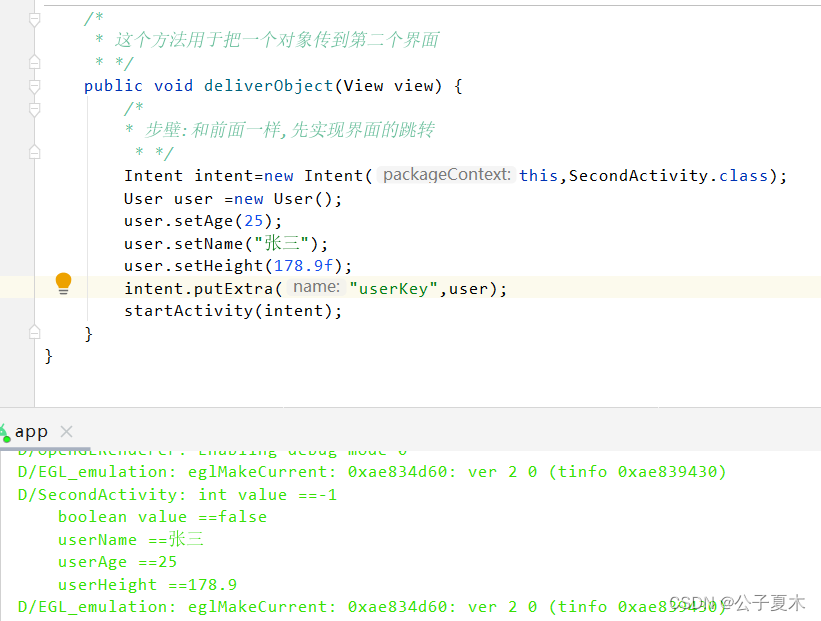
在传递界面设置一个按钮传递对象,和前面一样先实现界面的跳转。
然后创建一个User类并实现get和set方法,并且实现Parcelable接口
Parcelable和Serializable都是Java的一个序列化接口,但是Parcelable的效率比较高,它序列化到内存中去,Serializable序列化到SD卡中去,效率比较低,Parcelable是后来谷歌提供的。
import android.os.Parcel;
import android.os.Parcelable;

public class User implements Parcelable {
    private String name;
    private int age;
    private float height;

    public User(){

    }

    protected User(Parcel in) {
        name = in.readString();
        age = in.readInt();
        height = in.readFloat();
    }

    @Override
    public void writeToParcel(Parcel dest, int flags) {
        dest.writeString(name);
        dest.writeInt(age);
        dest.writeFloat(height);
    }

    @Override
    public int describeContents() {
        return 0;
    }

    public static final Creator<User> CREATOR = new Creator<User>() {
        @Override
        public User createFromParcel(Parcel in) {
            return new User(in);
        }

        @Override
        public User[] newArray(int size) {
            return new User[size];
        }
    };

    public String getName() {
        return name;
    }

    public void setName(String name) {
        this.name = name;
    }

    public int getAge() {
        return age;
    }

    public void setAge(int age) {
        this.age = age;
    }

    public float getHeight() {
        return height;
    }

    public void setHeight(float height) {
        this.height = height;
    }
}
在传递界面创建一个User对象,并设置对象数据,用putExtra()扔进去,并且需要一个Key。
User user =new User();
user.setAge(25);
user.setName("张三");
user.setHeight(178.9f);
intent.putExtra("userKey",user);
在接收界面进行接收。
8.数据传递的例子
isEmpty()这个方法里面有两个判断一个是判空,一个是判断这个字符串的长度.
步骤:
- 创建一个LoginActivity.java类并写一个登录界面activity_login.xml。
- 对注册的账号密码进行判空然后创建一个注册成功的界面activity_result.xml和对应的Activity(RegisterResultActivity.java)。
- 然后进行数据封装。
- 接收数据并提示注册成功。
结束当前界面:
this.finish();运行结果:


源码:
LoginActivity.java
package com.example.componentdatadeliver;

import android.app.Activity;
import android.content.Intent;
import android.os.Bundle;
import android.text.TextUtils;
import android.view.View;
import android.widget.Button;
import android.widget.EditText;
import android.widget.Toast;

import androidx.annotation.Nullable;

public class LoginActivity extends Activity {

    private EditText mUserNameET;
    private EditText mPasswordET;
    private Button mRegisterBtn;

    @Override
    protected void onCreate(@Nullable Bundle savedInstanceState) {
        super.onCreate(savedInstanceState);
        setContentView(R.layout.activity_login);
        initView();
        initListener();
    }

    private void initListener() {
        mRegisterBtn.setOnClickListener(new View.OnClickListener() {
            @Override
            public void onClick(View view) {
                //处理注册
                handlerRegister();
            }
        });
    }

    private void handlerRegister() {
        String userNameText = mUserNameET.getText().toString().trim();
        //这个方法里面有两个判断一个是判空,一个是判断这个字符串的长度.
        if (TextUtils.isEmpty(userNameText)) {
            Toast.makeText(this,"用户名不能为空..",Toast.LENGTH_SHORT).show();;
            return;
        }
        String passwordText = mPasswordET.getText().toString().trim();
        if (TextUtils.isEmpty(passwordText)) {
            Toast.makeText(this,"密码不能为空..",Toast.LENGTH_SHORT).show();;
            return;
        }

        //可以注册了
        Intent intent=new Intent(this,RegisterResultActivity.class);
        intent.putExtra("userNameKey",userNameText);
        intent.putExtra("passwordKey",passwordText);
        startActivity(intent);
        //结束当前界面
        this.finish();
    }

    private void initView() {
        mUserNameET = this.findViewById(R.id.user_name_text);
        mPasswordET = this.findViewById(R.id.password_text);
        mRegisterBtn = this.findViewById(R.id.register_btn);
    }
}
activity_login.xml
<?xml version="1.0" encoding="utf-8"?>
<LinearLayout
    xmlns:android="http://schemas.android.com/apk/res/android"
    android:layout_width="match_parent"
    android:layout_height="match_parent"
    android:orientation="vertical">


    <EditText
        android:id="@+id/user_name_text"
        android:layout_width="match_parent"
        android:hint="请输入账号"
        android:layout_height="wrap_content"/>

    <EditText
        android:id="@+id/password_text"
        android:layout_width="match_parent"
        android:inputType="textPassword"
        android:hint="请输入密码"
        android:layout_height="wrap_content"/>

    <Button
        android:id="@+id/register_btn"
        android:layout_width="match_parent"
        android:text="注册"
        android:layout_height="wrap_content"/>

</LinearLayout>
RegisterResultActivity.java
package com.example.componentdatadeliver;

import android.app.Activity;
import android.content.Intent;
import android.os.Bundle;
import android.view.View;
import android.widget.TextView;

import androidx.annotation.Nullable;

public class RegisterResultActivity extends Activity {
    @Override
    protected void onCreate(@Nullable Bundle savedInstanceState) {
        super.onCreate(savedInstanceState);
        setContentView(R.layout.activity_result);
        TextView result = this.findViewById(R.id.register_result);
        Intent intent = getIntent();
        if (intent != null) {
            String userName = intent.getStringExtra("userNameKey");
            result.setText("恭喜 ["+userName+"] 注册成功!");

        }
    }
}
activity_result.xml
<?xml version="1.0" encoding="utf-8"?>
<LinearLayout
    xmlns:android="http://schemas.android.com/apk/res/android"
    android:layout_width="match_parent"
    android:layout_height="match_parent">

    <TextView
        android:id="@+id/register_result"
        android:layout_width="match_parent"
        android:gravity="center"
        android:textSize="20sp"
        android:layout_height="match_parent"/>
</LinearLayout>
9.实现拨打电话功能
增加一个按钮用来拨打电话,设置点击事件,获取intent,用隐式意图来跳转电话。
第一种写法:
public void call(View view) {
    Intent intent =new Intent();

    //<action android:name="android.intent.action.CALL"/>
    //<category android: name="android.intent.category.DEFAULT"/>
    //第一种写法
    intent.setAction("android.intent.action.CALL");
   //第二种写法
   //intent.setAction(intent.ACTION_CALL);
    intent.addCategory("android.intent.category.DEFAULT");
    Uri uri=Uri.parse("tel:10086");
    intent.setData(uri);
    startActivity(intent);
}
第二种写法:
public void call(View view) {
        Intent intent =new Intent(Intent.ACTION_CALL,Uri.parse("tel:10086"));
       startActivity(intent);
    }
运行结果:

10.模拟发短信的例子
在activity_login.xml中添加一个按钮用来发送短信,在MainActivity.java创建sendMsg(View view)方法。
创建一个SendMsgActivity.java并写一个发短信界面
<?xml version="1.0" encoding="utf-8"?>
<LinearLayout
    xmlns:android="http://schemas.android.com/apk/res/android"
    android:layout_width="match_parent"
    android:layout_height="match_parent"
    android:orientation="vertical">

    <EditText
        android:id="@+id/receiver_phone_number_et"
        android:layout_width="match_parent"
        android:hint="接受者"
        android:maxLines="1"
        android:layout_height="wrap_content"/>
    <EditText
        android:id="@+id/msg_content_et"
        android:layout_width="match_parent"
        android:hint="键入信息"
        android:layout_height="wrap_content"/>
    <Button
        android:id="@+id/sent_msg_btn"
        android:layout_width="match_parent"
        android:text="发送"
        android:layout_height="wrap_content"/>
</LinearLayout>
在AndroidManifest.xml中注册一下这个SendMsgActivity,用隐式意图实现跳转。
<activity android:name=".SendMsgActivity">
    <intent-filter>
        <action android:name="com.example.componentdatadeliver.SEND.MSG" />

        <category android:name="android.intent.category.DEFAULT" />
        <data android:scheme="msg"/>
    </intent-filter>
</activity>
在sendMsg(View view)方法中用隐式意图来跳转,然后设置数据如果不设置数据的话会崩溃掉。
public void sendMsg(View view) {
Intent intent=new Intent();
intent.setAction("com.example.componentdatadeliver.SEND.MSG");
intent.addCategory(intent.CATEGORY_DEFAULT);
intent.putExtra("targeNumKey","10086");
intent.setData(Uri.parse("msg:帮我查询一下电话费"));
startActivity(intent);
}
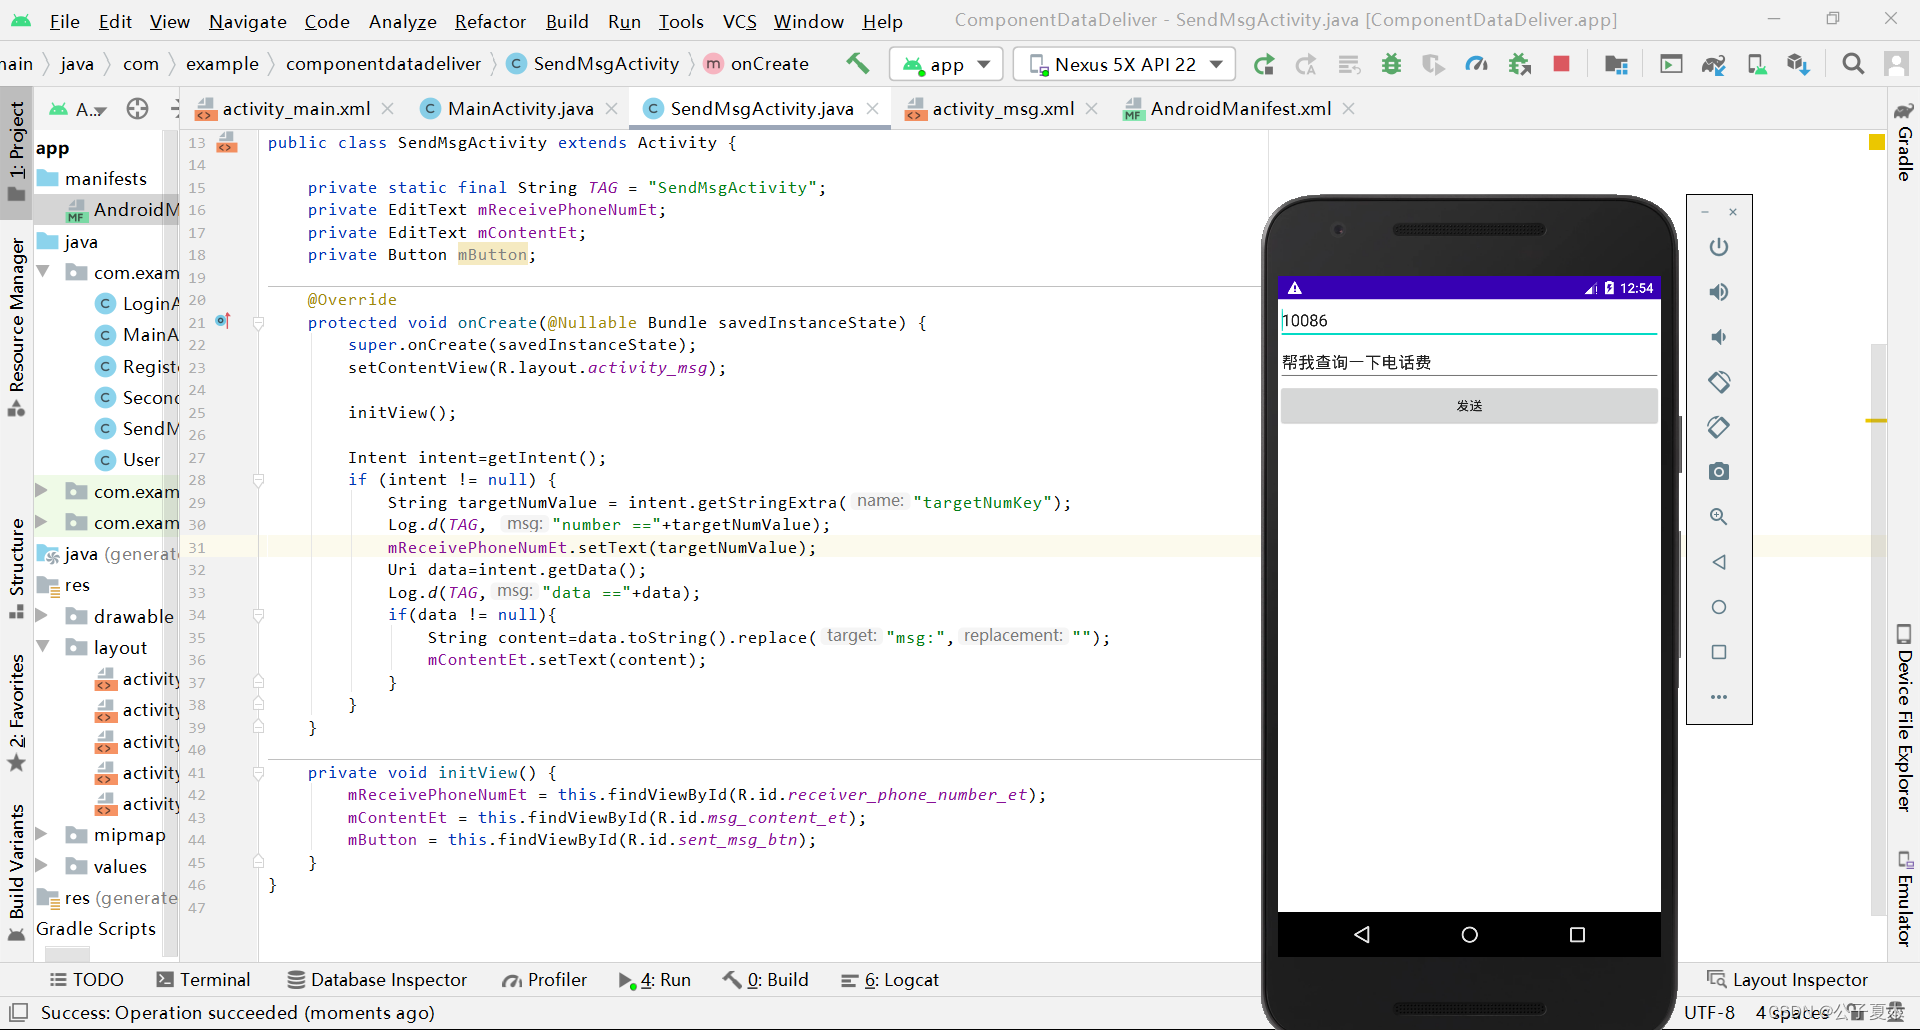
}在SendMsgActivity.java中接收信息并显示。
package com.example.componentdatadeliver;

import android.app.Activity;
import android.content.Intent;
import android.net.Uri;
import android.os.Bundle;
import android.util.Log;
import android.widget.Button;
import android.widget.EditText;

import androidx.annotation.Nullable;

public class SendMsgActivity extends Activity {

    private static final String TAG = "SendMsgActivity";
    private EditText mReceivePhoneNumEt;
    private EditText mContentEt;
    private Button mButton;

    @Override
    protected void onCreate(@Nullable Bundle savedInstanceState) {
        super.onCreate(savedInstanceState);
        setContentView(R.layout.activity_msg);

        initView();

        Intent intent=getIntent();
        if (intent != null) {
            String targetNumValue = intent.getStringExtra("targetNumKey");
            Log.d(TAG, "number =="+targetNumValue);
            mReceivePhoneNumEt.setText(targetNumValue);
            Uri data=intent.getData();
            Log.d(TAG,"data =="+data);
            if(data != null){
                String content=data.toString().replace("msg:","");
                mContentEt.setText(content);
            }
        }
    }

    private void initView() {
        mReceivePhoneNumEt = this.findViewById(R.id.receiver_phone_number_et);
        mContentEt = this.findViewById(R.id.msg_content_et);
        mButton = this.findViewById(R.id.sent_msg_btn);
    }
}
运行结果:

假如有别的应用要调用这个界面要在AndroidManifest.xml中加上 android:exported="true"这一句。
<activity android:name=".SendMsgActivity"
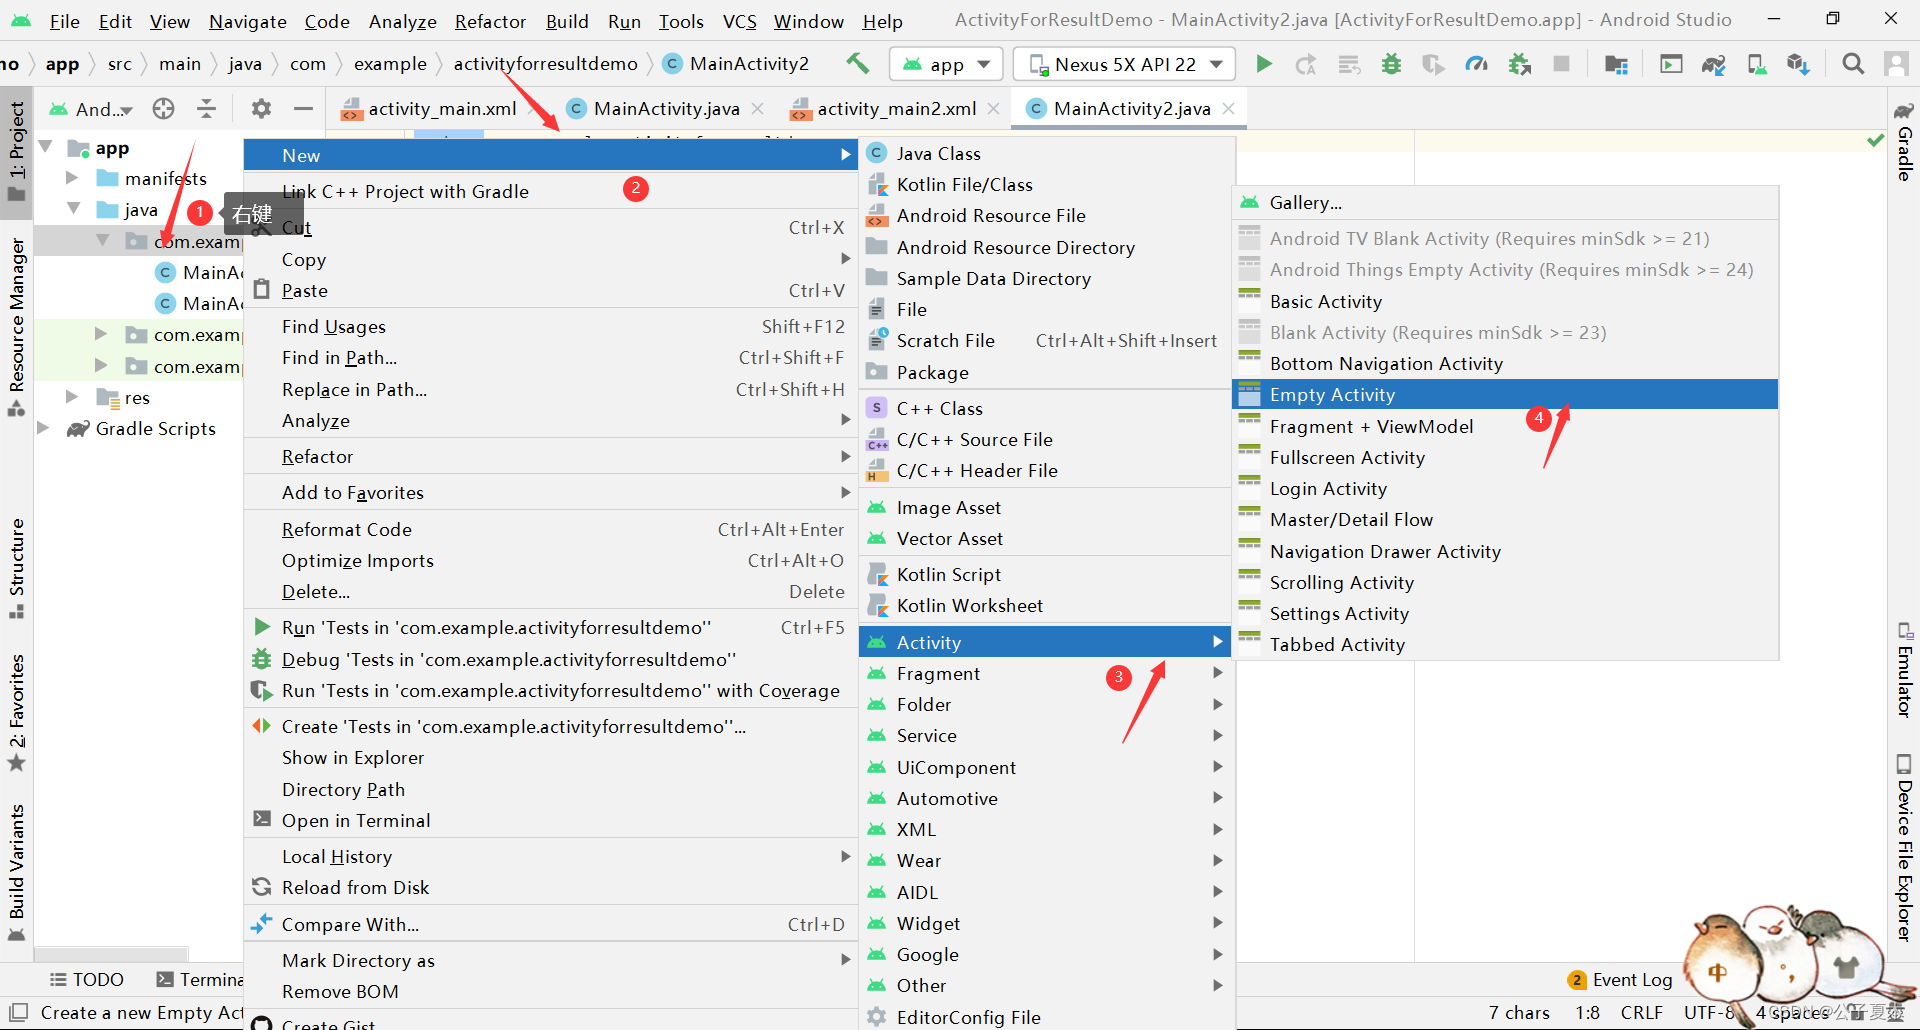
android:exported="true">11.Activity之间数据回传
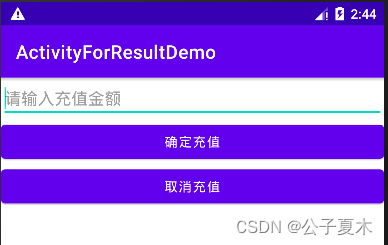
创建一个新的Activity
在activity_main.xml中设置按钮和TextView

在MainActivity.java初始化View设置点击事件,通过显式意图来进行跳转。

在activity_pay.xml中写一个TextView

运行成功

修改activity_pay.xml如下

在PayActivity.java中初始化View。
在MainActivity.java中使用startActivityForResult代替原来的startActivity,然后复写一个方法,返回结果会在这个方法里回调。
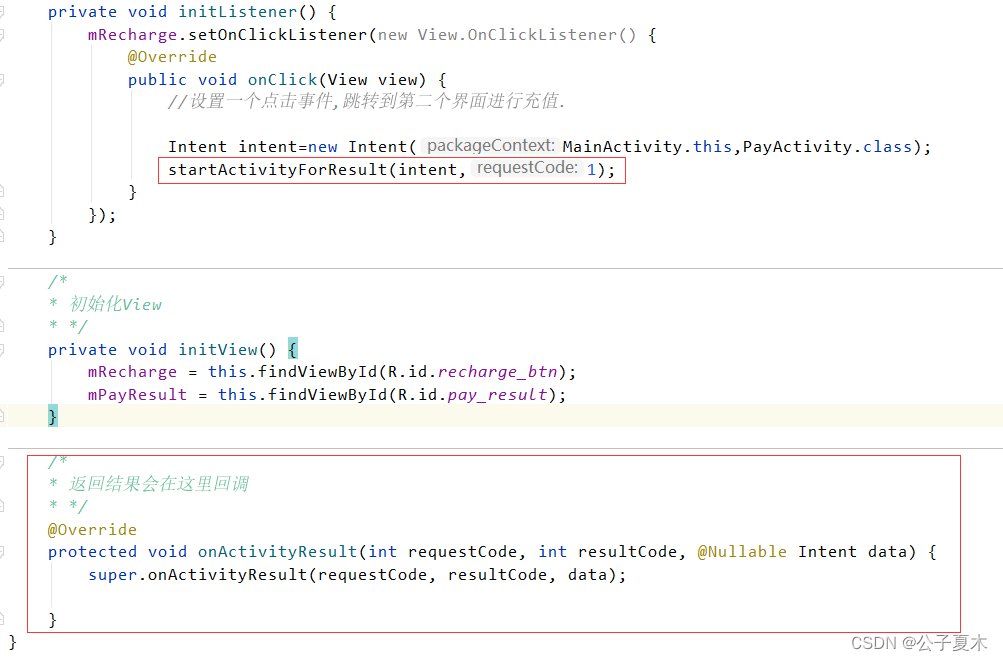
把startActivityForResult中的"1"抽成一个常量。
private static final int PAY_REQUEST_CODE = 1;在PayActivity.java中设置监听事件获取充值金额并判空。
进行网络访问,进行充值。(这里不做实现)
返回结果,setResult方法有两个重载的方法,一个是只有resultCode的,另外一个还有Intent。
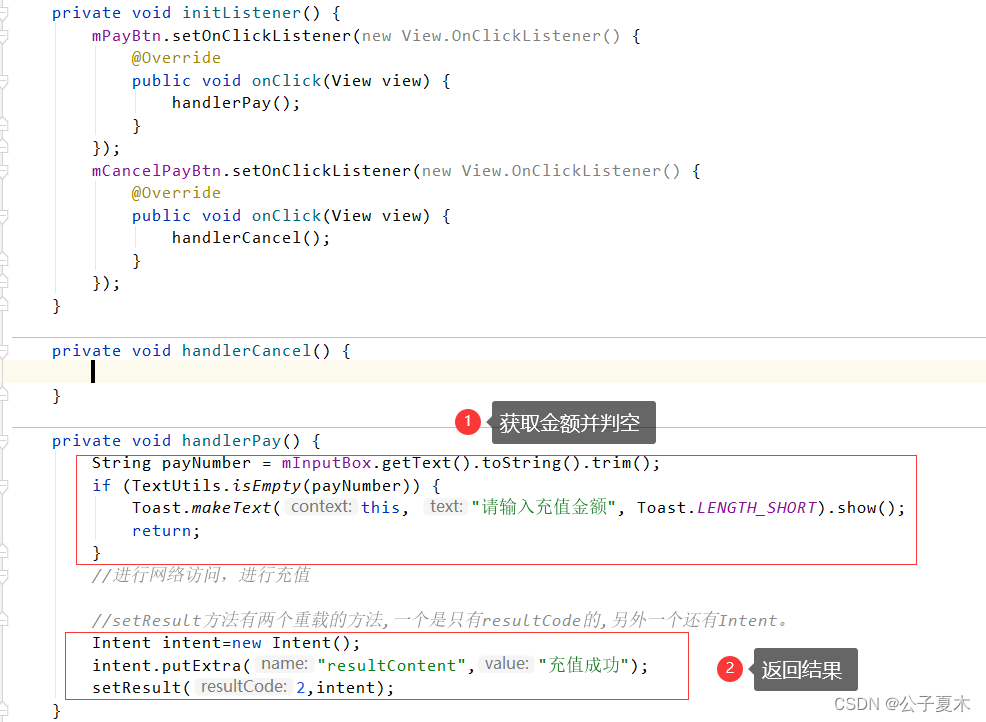
如果点击取消充值则返回结果充值失败。

在MainActivity.java的onActivityResult方法中对返回的结果进行判断。

运行结果:


12.requestCode和resultCode解释
请求码:requestCode
startActivityForResult发送一个请求码到请求页面,请求页面通过setResult返回结果的时候也会返回一个请求码,只需要判断请求码就可以知道这个界面是不是我们请求的界面。
请求码的作用:用于区分哪一个startActivityForResult请求的
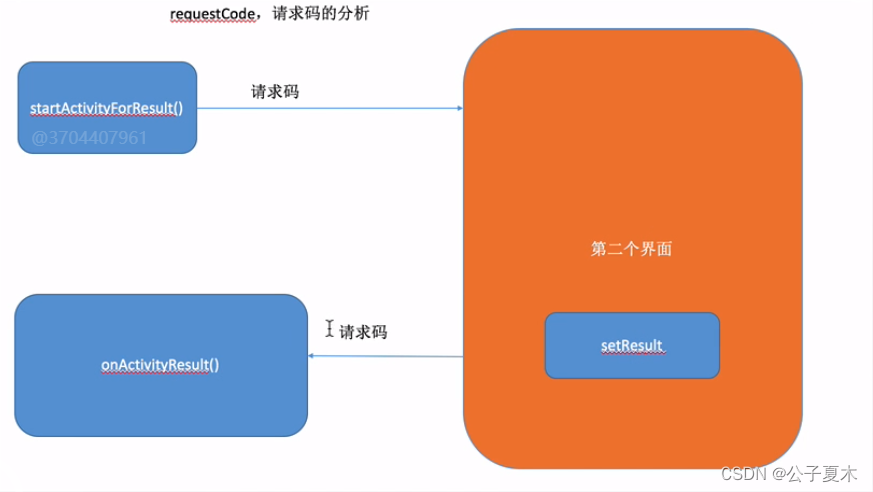
结果码:resultCode
结果码的作用:用于区分结果,一般来说,一个数字表示一种结果。

13.第三方应用打开系统相机数据回传
UI部分

效果:

如何把按钮改成圆形?
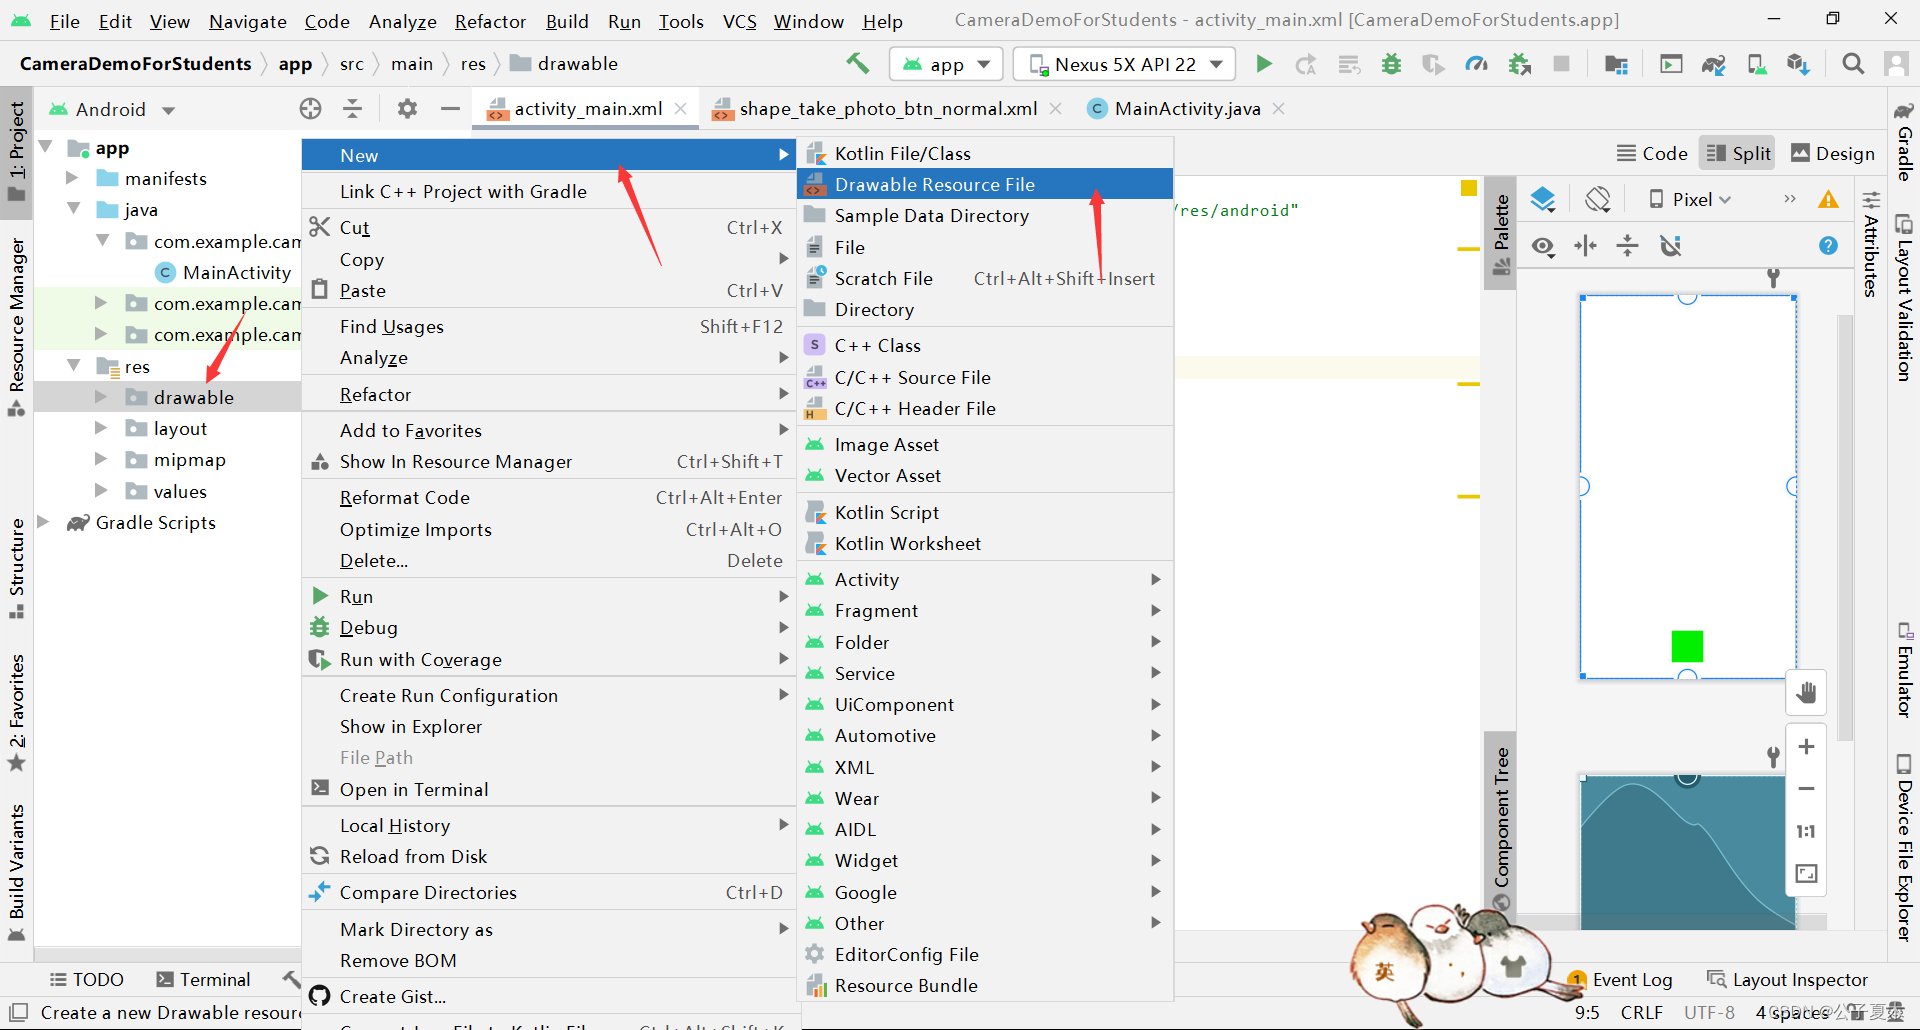
新建一个drawable源文件shape_take_photo_btn_normal.xm

设置形状和颜色

再复制一份,做一个drawable源文件shape_take_photo_btn_press.xml,修改一下颜色。
再创建一个drawable源文件selector_taker_photo_btn.xml

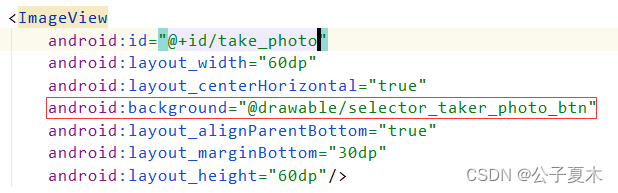
再回到主界面把background改为"@drawable/selector_taker_photo_btn"并加上id
UI部分就完成了。
代码实现
初始化View,设置监听事件,通过显式意图来进行跳转并复写onActivityResult方法。
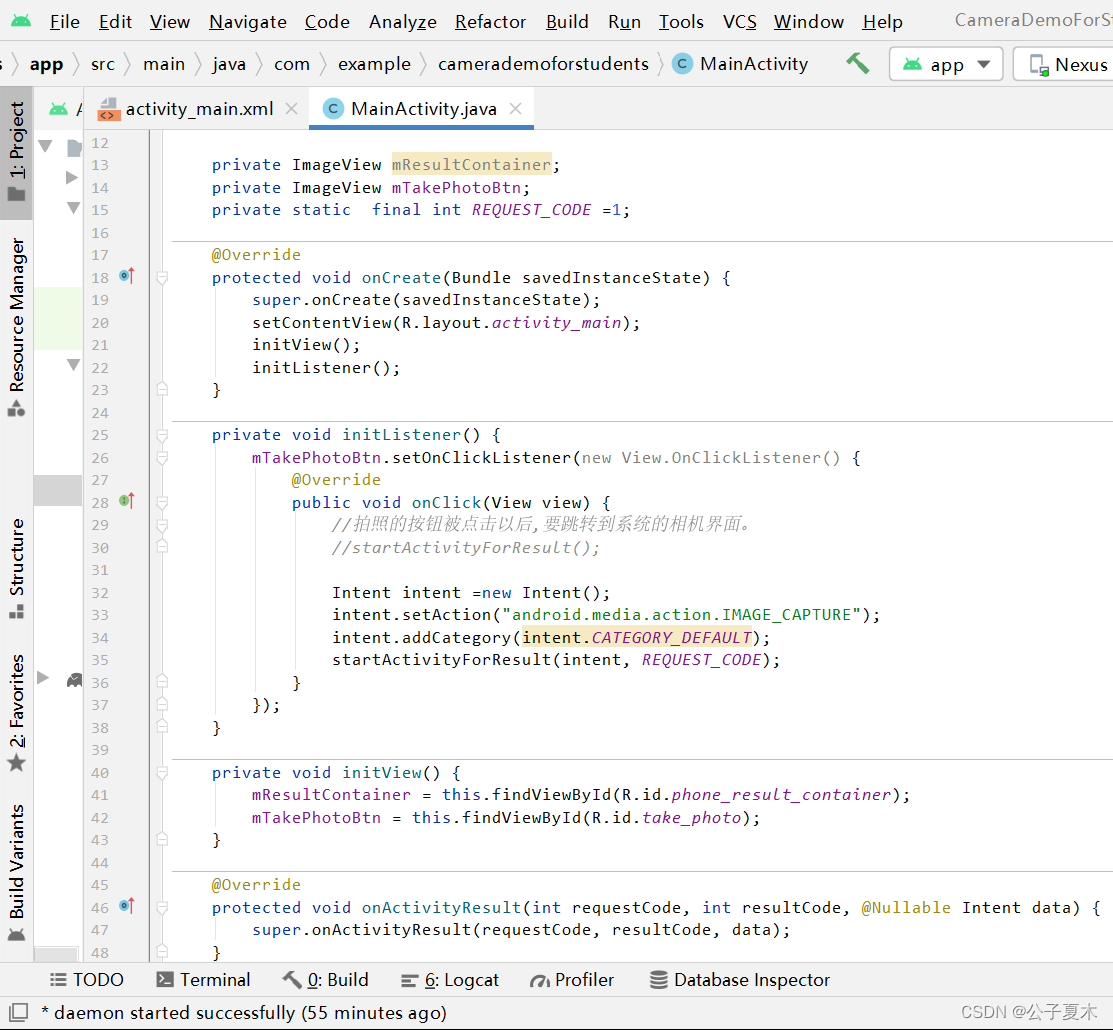
在MainActivity.java的onActivityResult方法中对返回的结果进行判断。
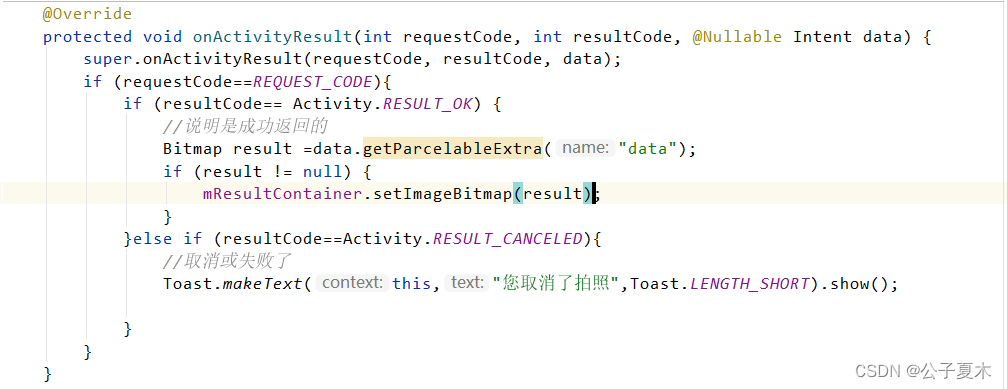
运行结果:


可以看到图片是没有铺满的,在activity_main.xml中添加android:scaleType="fitXY"即可。

运行结果:


 2万+
2万+


 被折叠的 条评论
为什么被折叠?
被折叠的 条评论
为什么被折叠?
 到【灌水乐园】发言


