


        android:value="2" />

</application>
Flutter生成的文件建议是大部分内容可以保留不动,但是可以根据需要进行修改。
具体可能要修改的内容如下:
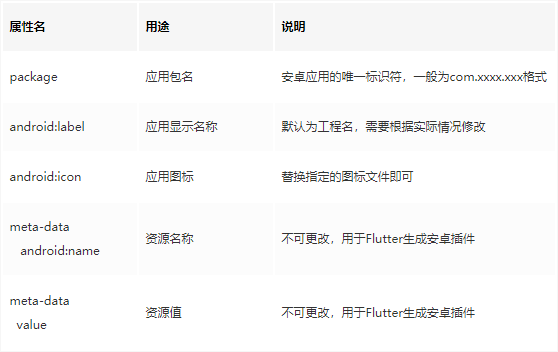
#### []( )替换应用图标
安卓提供了如下尺寸的图标配置文件,在Flutter项目下的android/app/src/main/res对应尺寸目录下可以应用图标文件。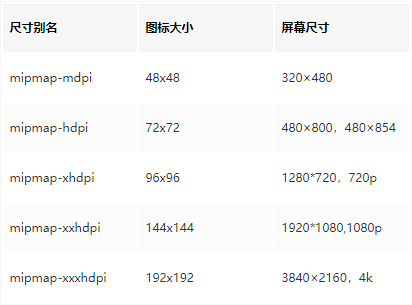
#### []( )替换启动页
应用启动页图片在Flutter项目下的android/app/src/main/drawable下的launch\_background.xml配置文件中,默认是一个白色底,xml问卷如下所示:
<item android:drawable="@android:color/white" />


<!-- You can insert your own image assets here -->

<!-- <item>

    <bitmap

        android:gravity="center"

        android:src="@mipmap/launch_image" />

</item> -->
注释掉的部分可以用来设置启动页图片,需要注意部分机型的尺寸未必和启动页图片一致,因此可以设置启动页的背景色与启动页图片边缘一致。
<!-- 背景色 -->

<item android:drawable="@android:color/white" />


<!-- 启动页图片,也可以添加其他元素 -->

<item>

    <bitmap

        android:gravity="center"

        android:src="@mipmap/launch_image" />

</item>
#### []( )设置访问权限


在android/app/src下的AndroidManifest.xml(注意不是src/profile文件夹下的AndroidManifest.xml文件)文件中设置应用权限,如访问网络,相册,摄像头等。开发环境是在android/src/debug的AndroidManifest.xml中设置。下面是一个示例的文件:
<manifest xmlns:android=“http://schemas.android.com/apk/res/android”
package="com.example.animation_demo">


<uses-permission android:name="android.permission.INTERNET"/>

<uses-permission android:name="android.permission.ACCESS_WIFI_STATE"/>

<uses-permission android:name="android.permission.ACCESS_NETWORK_STATE"/>


<application

    android:name="io.flutter.app.FlutterApplication"

    android:label="动画演示"

    android:icon="@mipmap/ic_launcher">

    <activity

        android:name=".MainActivity"

        android:launchMode="singleTop"

        android:theme="@style/LaunchTheme"

        android:configChanges="orientation|keyboardHidden|keyboard|screenSize|smallestScreenSize|locale|layoutDirection|fontScale|screenLayout|density|uiMode"

        android:hardwareAccelerated="true"

        android:windowSoftInputMode="adjustResize">

        <intent-filter>

            <action android:name="android.intent.action.MAIN"/>

            <category android:name="android.intent.category.LAUNCHER"/>

        </intent-filter>

    </activity>

    <!-- Don't delete the meta-data below.

         This is used by the Flutter tool to generate GeneratedPluginRegistrant.java -->

    <meta-data

        android:name="flutterEmbedding"

        android:value="2" />

</application>
#### []( )配置版本发布参数


在android/app/build.gradle文件检查配置是否正确:


1.applicaitonId:应用唯一AppId,如com.lios.helloworld

2.versionCode:应用程序版本号

3.versionName:版本号字符串

4.minSdkVersion:指定最低的API级别

5.targetSdkVersion:指定应用程序设计运行的API级别

如下所示:
android {
compileSdkVersion 28


sourceSets {

    main.java.srcDirs += 'src/main/kotlin'

}


lintOptions {

    disable 'InvalidPackage'

}


defaultConfig {

    // TODO: Specify your own unique Application ID (https://developer.android.com/studio/build/application-id.html).

    applicationId "com.example.animation_demo"

    minSdkVersion 16

    targetSdkVersion 28

    versionCode flutterVersionCode.toInteger()

    versionName flutterVersionName

    testInstrumentationRunner "androidx.test.runner.AndroidJUnitRunner"

}


buildTypes {

    release {

        // TODO: Add your own signing config for the release build.

        // Signing with the debug keys for now, so `flutter run --release` works.

        signingConfig signingConfigs.debug

    }

}
}
这里面可以看到versionCode和versionName是从flutterVersionCode和flutterVersionName中引入的,其中这两个变量在build.gradle上面有定义。先从local.properties中读取,若没有再在该文件中定义,因此可以在localProperties中设置或在build.gradle中设置(优先取local.properties中的值)。
def flutterVersionCode = localProperties.getProperty(‘flutter.versionCode’)
if (flutterVersionCode == null) {
flutterVersionCode = '1'
}
def flutterVersionName = localProperties.getProperty(‘flutter.versionName’)
if (flutterVersionName == null) {
flutterVersionName = '1.0'
}
#### []( )生成应用签名


创建keystore,如果之前创建过了,在key.properties中引入即可。
#其中/key.jks是将keystore文件key.jks存储在/目录下
keytool -genkey -v -keystore ~/key.jks -keyalg RSA -keysize 2048 -validity 10000 -alias key
按提示输入密码和组织信息即可。
输入密钥库口令:
再次输入新口令:


 1454
1454


 被折叠的 条评论
为什么被折叠?
被折叠的 条评论
为什么被折叠?
 到【灌水乐园】发言


