


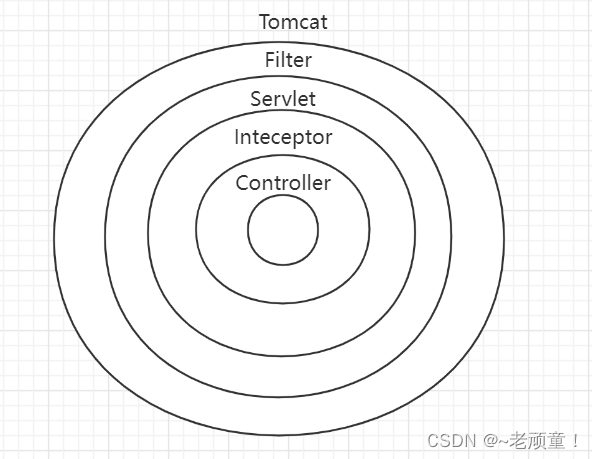
SpringMVC
第一章:SpringMVC概述
SpringMVC是基于MVC的一个Web框架。
SpringMVC有一个前端控制器(DispatcherServlet),用来接收外部的请求,并且解析参数传给了服务层。
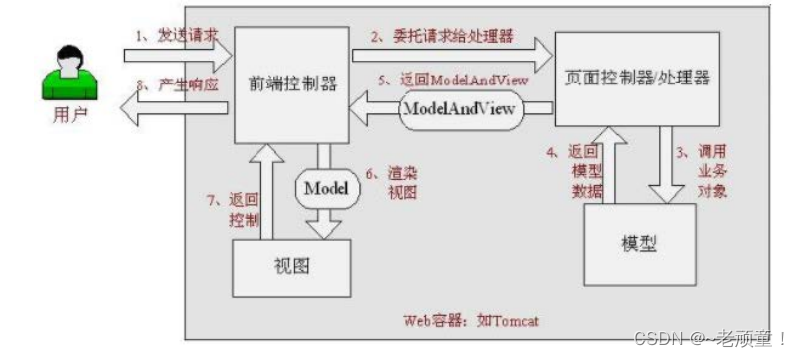
SpringMVC执行原理
SpringMVC中的一些组件:括DispatcherServlet(前端控制器)、HandlerMapping(处理器映射器)Handler(处理器)、HandlAdapter(处理器适配器)ViewResolver(视图解析器)等。
DispatcherServlet(前端控制器):
前端控制器负责拦截客户端请求并分发给其他组件,它是整个流程控制的核心,负责调度其他组件的执行,降低各组件之间的耦合,提高了整体效率。前端控制器由框架提供,在程序运行过程中自动实现功能。
HandlerMapping(处理器映射器):
处理器映射器负责根据客户端请求的URL寻求处理器,SpringMVC中提供了配置文件、注解等映射方式,这些映射方式将由相应的处理器映射器负责处理。处理器映射器有框架提供,在程序运行过程中自动实现功能。
Handler(处理器)
处理器负责对客户端的请求进行处理,由于处理请求设计到具体的业务逻辑,因此,开发者需要在处理器中编写处理业务逻辑的代码。
HandlerAdapter(处理器适配器)
处理器适配器负责根据特定的规则对处理器进行执行,他可以执行多种类型的处理器,是设计模式中适配器模式的具体应用。处理器映射器有框架提供,在程序运行过程中自动实现功能。
ViewResolver(视图解析器)
视图解析器负责视图解析,它可以将处理结果生成View(视图)并展示给用户。视图解析器由框架提供,在程序运行过程中自动实现功能,但是View需要由开发者根据具体需求编写。
执行原理:
当发起请求时被前端控制器拦截到请求,根据请求参数生成代理请求,找到请求找到对应的具体控制器,控制器处理请求,创建数据模型,访问数据库,将模型响应给前端控制器,控制器使用模型与视图渲染视图结果,将结果返回给前端控制器,再将结果返回给请求者。
SpringMVC执行流程
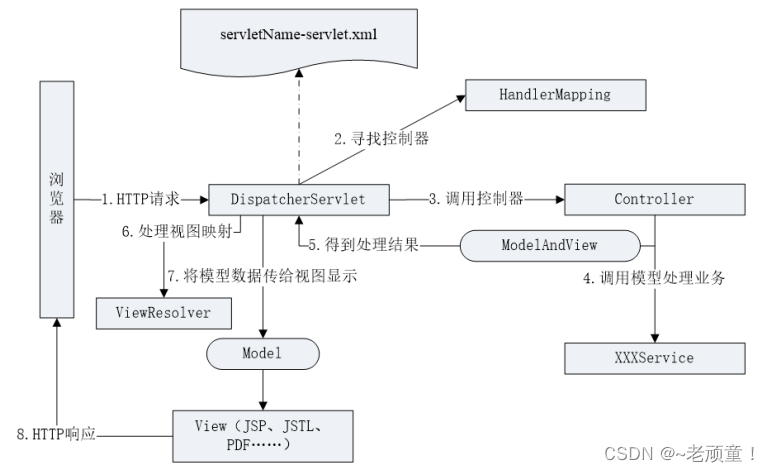
- 用户发送请求到DispatcherServlet。
- DispatcherServlet收到请求调用HandlerMapping处理器映射器。
- HandlerMapping处理器映射器找到具体的处理器(可以根据xml配置、注解进行查找),生成处理器对象及处理器拦截器(如果有则生成)一并返回给DispatcherServlet。
- DispatcherServlet 调用 HandlerAdapter处理器适配器。
- HandlerAdapter处理器适配器经过适配调用具体的处理器(Controller)。
- Controller执行完成返回ModelAndView。
- HandlerAdapter处理器适配器将controller执行结果ModelAndView返回给DispatcherServlet。
- DispatcherServlet将ModelAndView传给ViewReslover视图解析器。
- ViewReslover视图解析器解析后返回具体View。
- DispatcherServlet根据View进行渲染视图(即将模型数据填充至视图中)。
- DispatcherServlet响应用户。
第二章:基本的请求和响应
搭建环境:
搭建一个 SpringMVC工程。若有不会创建的,请看这篇文章,详细讲解了搭建一个SpringMVC工程。
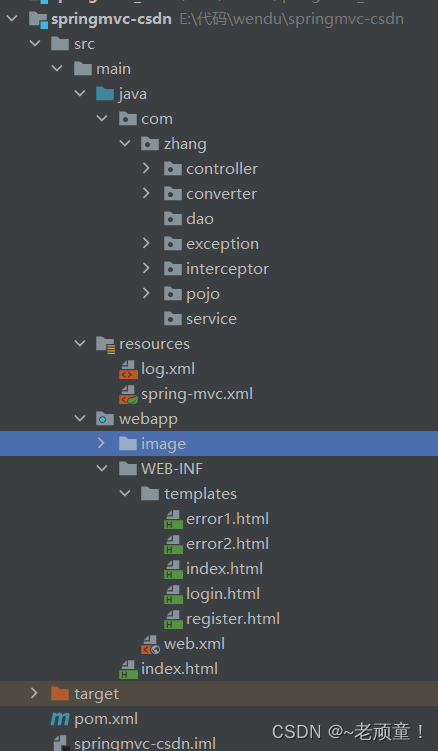
搭建完成后,然后按照下图创建目录。其中templates存放的是html页面。
在pom.xml文件中添加依赖
<dependency>
  <!-- Spring-webmvc 依赖 -->
  <groupId>org.springframework</groupId>
  <artifactId>spring-webmvc</artifactId>
  <version>5.3.21</version>
</dependency>
<!-- 小辣椒 -->
<dependency>
  <groupId>org.projectlombok</groupId>
  <artifactId>lombok</artifactId>
  <version>1.18.24</version>
</dependency>
<!-- thymeleaf的依赖 -->
<dependency>
    <groupId>org.thymeleaf</groupId>
    <artifactId>thymeleaf-spring5</artifactId>
    <version>3.0.15.RELEASE</version>
</dependency>
<!-- servlet的依赖 -->
<dependency>
  <groupId>javax.servlet</groupId>
  <artifactId>javax.servlet-api</artifactId>
  <version>4.0.1</version>
</dependency>
在springmvc.xml文件中配置扫描的基包和视图解析器
<beans xmlns="http://www.springframework.org/schema/beans"
       xmlns:xsi="http://www.w3.org/2001/XMLSchema-instance"
       xmlns:context="http://www.springframework.org/schema/context"
       xsi:schemaLocation="http://www.springframework.org/schema/beans
       http://www.springframework.org/schema/beans/spring-beans-4.2.xsd http://www.springframework.org/schema/context https://www.springframework.org/schema/context/spring-context.xsd">
    <!-- 配置扫描的基包 -->
    <context:component-scan base-package="com.zhang"/>
     <!-- Thymeleaf视图解析器 -->
    <bean id="viewResolver" class="org.thymeleaf.spring5.view.ThymeleafViewResolver">
        <property name="order" value="1"/>
        <property name="characterEncoding" value="UTF-8"/>
        <property name="templateEngine">
            <bean class="org.thymeleaf.spring5.SpringTemplateEngine">
                <property name="templateResolver">
                    <bean class="org.thymeleaf.spring5.templateresolver.SpringResourceTemplateResolver">
                        <!-- 视图前缀 -->
                        <property name="prefix" value="/WEB-INF/templates/"/>
                        <!-- 视图后缀 -->
                        <property name="suffix" value=".html"/>
                        <property name="templateMode" value="HTML5"/>
                        <property name="characterEncoding" value="UTF-8" />
                    </bean>
                </property>
            </bean>
        </property>
    </bean>
</beans>
在web.xml文件中配置视图解析器与解决乱码的过滤器
<filter>
	<filter-name>characterEncodingFilter</filter-name>
	<filter-class>org.springframework.web.filter.CharacterEncodingFilter</filter-class>
	<!-- encoding参数指定要使用的字符集名称 -->
	<init-param>
	  <param-name>encoding</param-name>
	  <param-value>UTF-8</param-value>
	</init-param>
	<!-- 请求强制编码 -->
	<init-param>
	  <param-name>forceRequestEncoding</param-name>
	  <param-value>true</param-value>
	</init-param>
	<!-- 响应强制编码 -->
	<init-param>
	  <param-name>forceResponseEncoding</param-name>
	  <param-value>true</param-value>
	</init-param>
</filter>

<filter-mapping>
  <filter-name>characterEncodingFilter</filter-name>
  <url-pattern>/*</url-pattern>
</filter-mapping>

<!-- 配置SpringMVC中负责处理请求的核心Servlet,也称前端控制器 -->
<servlet>
    <!-- 这个名字自定义,但必须要与servlet-mapping的servlet-name相匹配 -->
    <servlet-name>dispatcherServlet</servlet-name>
    <!-- DispatcherServlet的全类名 -->
    <servlet-class>org.springframework.web.servlet.DispatcherServlet</servlet-class>
    <!-- 通过初始化参数指定SpringMVC配置文件位置 -->
    <init-param>
        <param-name>contextConfigLocation</param-name>
        <!-- 使用classpath:说明这个路径从类路径的根目录开始才查找 -->
        <param-value>classpath:spring-mvc.xml</param-value>
    </init-param>
    <!-- 将dispatcherServlet设置为随web应用一起启动 -->
    <load-on-startup>1</load-on-startup>
</servlet>
<servlet-mapping>
    <servlet-name>dispatcherServlet</servlet-name>
    <!-- 表示哪些请求交给Spring Web MVC处理,类似/hello,就会访问成功,这里有两种配置方式-->
    <!-- 方式一:配置"/",表示匹配整个Web应用范围内所有请求。注意:这里不能写成/*。这是硬性规定的-->
    <!-- 方式二:配置"*.扩展名",表示匹配整个Web应用范围内部分请求-->
    <url-pattern>/</url-pattern>
</servlet-mapping>
2.1 @RequestMapping注解
解释:@RequestMapping注解的作用是将请求的URL地址和处理请求的方式关联起来,建立映射关系。
而SpringMVC接收到指定的请求,就会来找映射关系中对应的方法来处理这个请求。如果没有指定请求方式,那么@RequestMapping支持接收HTTP的所有请求。
注意:相同的请求方式,映射地址是唯一的。如果有多个,会报错。
两种匹配方式
- 精确匹配
在HTML中的写法
<a th:href="@{/admin/login}">跳转到登录页面</a>
@RequestMapping注解的写法
@RequestMapping("/admin/login")
- 模糊匹配
在HTML中的写法
<a th:href="@{/admin/login}">跳转到登录页面</a>
<a th:href="@{/admin/register}">跳转到注册页面</a>
@RequestMapping注解的写法
@RequestMapping("/admin/*")
注解的标记位置
- 在方法上标记
就用上面的例子,跳转到登录和注册页面。
@Controller
public class LoginController {
	// 跳转到登录页面
    @RequestMapping("/admin/login")
    public String toLogin(){
        return "login";
    }
	// 跳转到注册页面
    @RequestMapping("/admin/register")
    public String toRegister(){
        return "register";
    }
}
- 在类上标记
一般情况下,都会将方法上@RequestMapping注解中重复的地址抽取出来放在类上。 因此,正常情况下如果要在类上标记的话,那么方法上也会标记。在第3点会讲。
- 在类和方法上都标记
这里还是用登录注册的例子吧
@Controller
@RequestMapping("/admin")
public class LoginController {
	// 跳转到登录页面
    @RequestMapping("/login") // 在类上写了admin,因此这里可以省略
    public String toLogin(){
        return "login";
    }
	// 跳转到注册页面
    @RequestMapping("/register") // 如上解释
    public String toRegister(){
        return "register";
    }
}
在注解上附带请求方式
请求方式有八种:GET, HEAD, POST, PUT, PATCH, DELETE, OPTIONS, TRACE。
如果加了请求方式,就不仅需要请求与地址相匹配,而且还需要请求与请求方式相匹配。
这里使用处理登录请求的例子。
在HTML中的写法
<form th:action="@{/admin/doLogin}" method="post">
</form>
控制层中处理POST请求
@Controller
@RequestMapping("/admin")
public class LoginController {
    @RequestMapping(value = "/doLogin", method = RequestMethod.POST)
    public String login(){
    	// 调用业务层的方法.....
        return "index";  // 跳转index.html
    }
}
在注解上附带参数映射
此注解意思是必须要有参数名为name且值必须为zhangsan,才能匹配成功。
@RequestMapping(value = "add",params = {"name=zhangsan"})
此注解意思是必须要有参数名为name且值没有限制。
@RequestMapping(value = "add",params = {"name"})
此注解意思是必须要有参数名不能为name,而值没有限制。
@RequestMapping(value = "add",params = {"!name"})
此注解意思是必须要有参数名为name且值不能为zhangsan。
@RequestMapping(value = "add",params = {"name=!zhangsan"})
在注解上附带请求头映射
这个了解一下,因为现在不知道该怎么测试。
@RequestMapping(value="upload",headers = {"Content-Type=application/x-www-formurlencoded"})
在注解上有多个URL映射
@RequestMapping({"/index","/home"})
简化@RequestMapping注解的写法
| 原写法 | 简化写法 |
|---|---|
| @RequestMapping(value = “/admin/login”,method = RequestMethod.GET) | @GetMapping(“/admin/login”) |
| @RequestMapping(value = “/admin/register”,method = RequestMethod.POST) | @PostMapping(“/admin/register”) |
| @RequestMapping(value = “/admin/update”,method = RequestMethod.UPDATE) | @UpdateMapping(“/admin/update”) |
| @RequestMapping(value = “/admin/delete”,method = RequestMethod.DELETE) | @DeleteMapping(“/admin/delete”) |
| @RequestMapping(value = “/admin/put”,method = RequestMethod.PUT) | @PutMapping(“/admin/put”) |
| @RequestMapping(value = “/admin/patch”,method = RequestMethod.PATCH) | @PatchMapping(“/admin/patch”) |
2.2 获取请求参数
一名一值
在HTML中的写法
<a th:href="@{/test(view='add')}">一个名字存一个值</a>
使用@RequestParam注解接收参数
SpringMVC会将获取到的请求参数从形参位置给我们传进来。
当请求参数名和形参名一致,可以省略@RequestParam注解。
但是,省略后代码可读性下降,并且在将来的SpringCloud中不能省略。
控制层中接收请求
@RequestMapping("/test")
public String test(@RequestParam("view") String view){
    System.out.println(view);
    return "index";
}
@RequestParam的required属性设为false,代表整个请求参数可有可无,默认为true。如果没有传请求参数,那么会报400错误。
@RequestParam的defaultValue 属性,代表的是给请求参数设置默认值。
举例:
@RequestMapping("/test")
public String test(@RequestParam(value = "view",defaultValue = "css") String view){
     System.out.println(view);
     return "index";
 }
分析:如果此时没有传递参数,那么默认值就是css,此时就可以省略required属性。如果传递过来参数,就是传递的值。
一名多值
在HTML中的写法
<form th:action="@{/game}" method="post">
      请选择你最喜欢的游戏:
      <input type="checkbox" name="game" value="wz"/>王者荣耀
      <input type="checkbox" name="game" value="cj"/>绝地求生
      <input type="checkbox" name="game" value="fc"/>QQ飞车<br/>
      <input type="submit" value="保存"/>
</form>
在控制层中接收请求
@RequestMapping("/game")
public void game(@RequestParam("game") List<String> list){
      for (String game : list) {
          System.out.println(game);
      }
 }
注意:只要参数名与表单中input的name属性保持一致,就可以省略@RequestParam注解。
并且SpringMVC中支持使用一个能够存储多个数据的容器就能接收一个名字对应多个值(其中的参数必须保持一致)的请求参数。
通过表单传递值
在HTML中的写法
<form th:action="@{/doRegister}" method="post">
	  姓名:<input type="text" name="name"/><br/>
      年龄:<input type="text" name="age"/><br/>
      密码:<input type="password" name="password"/><br/>
      <input type="submit" value="保存"/>
</form>
实体类:
@Data
public class User{
    private Integer id;
    private String name;
    private int age;
    private String password;
}
在控制层中接收请求
@RequestMapping("/doRegister")
public String doRegister(User user){
    System.out.println(user.toString());
    return "login";
}
注意:SpringMVC 会自动调用实体类中的 setXxx() 注入请求参数。
如果在控制层获取的值乱码了,则需要在web.xml中配置filter,解决乱码问题。
表单对应的实体类包含级联属性
<form th:action="@{/listUser}" method="post">
      姓名:<input type="text" name="name"/><br/>
      年龄:<input type="text" name="age"/><br/>
      密码:<input type="password" name="password"/><br/>
      喜欢的第一个游戏:<input type="text" name="gameList[0].name"/><br/>
      喜欢的第二个游戏<input type="text" name="gameList[1].name"/><br/>
      <input type="submit" value="保存"/>
 </form>
实体类:
// User类
@Data
public class User{
    private Integer id;
    private String name;
    private int age;
    private String password;
    private List<Game> gameList;
}

// Grame类
@Data
public class Game {
    private Integer id;
    private String name;
}
在控制层中接收请求
 @RequestMapping("/listUser")
 public String listUser(User user){
      System.out.println(user.toString());
      return "index";
  }
注意: SpringMVC自己会注入级联属性,只要有属性名和对应的getXxx()、setXxx()匹配即可。
2.3 @RequestHeader注解
作用:获取请求消息头中的具体数据。
在控制层中接收请求
@RequestMapping("/header")
public String getHeader(@RequestHeader(name = "Accept",defaultValue = "defaultValue") String accept){
    System.out.println(accept);
    return "index";
}
注意:
name或value属性:指定请求消息头名称
defaultValue属性:设置默认值
2.4 @CookieValue注解
作用:获取当前请求中的Cookie数据。
在控制层中接收请求
@RequestMapping("/cookie")
public String getCookie(@CookieValue(value = "JSESSIONID", defaultValue = "defaultValue") String cookieValue) {
     System.out.println(cookieValue);
     return "index";
 }
注意:
name或value属性:指定请求消息头名称
defaultValue属性:设置默认值
2.5 @ModelAttribute注解
作用在方法的参数上
在控制层中接收请求
@RequestMapping("/listUser")
public String listUser(@ModelAttribute User user){
    System.out.println(user.toString());
    return "index";
}
将客户端传递过来的参数按名称注入到对象中,并且会将这个对象自动存入到请求域对象中。
作用在控制层的方法上
在控制层中接收请求
@ModelAttribute
public User getUser(){
    User user = new User();
    user.setAge(15);
    user.setName("张三");
    return user;
}

@RequestMapping("/listUser")
public String listUser(User user){
    System.out.println(user.toString());
    return "index";
}
如果将@ModelAttribute作用在方法上,那么每一个此方法会在每一个@RequestMapping标注的方法前执行,如果有返回值,则会自动的将返回值放入请求域中。
2.5 其他注解
@ResponseBody和 @RequestParam注解
在控制层接收请求
@RequestMapping("/test4")
@ResponseBody
public String test4(@RequestParam("name")String name,String password){
    System.out.println(name + "   " + password);
    return "hello  " + name + "  " + password;
}
@RequestParam 注解:接收请求参数
@ResponseBody注解:将当前的方法的返回值作为响应体,不在去找视图了。
方法的返回值有两种情况:一种是直接将返回值作为响应体数据;另一种是将返回值转化为JSON格式,然后在作为响应体,例如实体类。
@RequestBody注解
使用场景:请求体整个是一个JSON格式的数据。
先导入SpringMVC的注解驱动
<mvc:annotation-driven/>
导入Jackson依赖
<dependency>
  <groupId>com.fasterxml.jackson.core</groupId>
  <artifactId>jackson-databind</artifactId>
  <version>2.13.0</version>
</dependency>
在控制层中接收请求
@RequestMapping("/test5")
@ResponseBody
public User test5(@RequestBody User user){
	// 使用@RequestBody注解需要将请求头JSON数据解析出来,需要使用serXxx()方法注入到对应的实体类中。
    System.out.println(user.toString());
    return user;
}
- 如果使用@RequestBody注解,则必须要有SpringMVC的注解驱动,还有一点需要 Jackson jar包,因为SpringMVC解析JSON数据时需要使用Jackson的支持。
- SpringMVC 解析 JSON 数据包括两个方向:①:从 JSON 字符串到 Java 实体类。②:从 Java 实体类到 JSON 字符串。
- @RequestBody注解不适合Get请求。
- 如果传过来的数据都是实体类的属性,就用实体类封装起来,此时有没有@RequestBody注解都可以。
- 如果使用@ResponseBody注解标记的方法返回一个实体类数据时,此时SpringMVC需要通过 Jackson 来将实体类转换为 JSON 格式的数据。
@RestController注解
@RestController注解相当于是@ResponseBody 注解与 @Controller 注解的合并。因此如果在类上用了@RestController注解,相当于是给类中的每一个方法都加了 @ResponseBody 注解。
2.5 页面的请求跳转
在spring-mvc.xml中添加两个配置
<!-- SpringMVC的注解驱动 -->
<mvc:annotation-driven/>
<!-- 加入这个配置,SpringMVC 就会在遇到没有 @RequestMapping 的请求时放它过去 -->
<!-- 所谓放它过去就是让这个请求去找它原本要访问的资源 -->
<mvc:default-servlet-handler/>
这两个配置会在静态资源访问那里讲解。
重定向
@RequestMapping("/redirect")
public String redirect(){
    return "redirect:/index.html";
}
此地址会重定向到webapp目录下的index.html。
因为我们配置视图解析器时,此页面不在指定的视图之内,因此我们需要写出完整的前后缀。
注意:SpringMVC框架负责在前面主动加上 contextPath,因此我们就不需要加额外的项目路径了。
转发
@RequestMapping("/forward")
public String forward(){
    return "forward:/index.html";
}
注意点如上所示。
第三章:RESTFul风格
RESTFul的URL地址风格:
从前到后每个单词使用 / 分开,不使用问号键值对的方式携带请求参数,而是将其参数作为URL的一部分。
例:
传统的 URL 地址: /add/user?name=zhansgan。
RESTFul风格: /user/zhangsan
RESTFul规范的具体要求:
| 操作 | 请求方式 | 传统风格 | REST风格 |
|---|---|---|---|
| 查询 | GET | /getUser | /user/1 |
| 保存 | POST | /saveUser | /user |
| 删除 | DELETE | /deleteUser | /user/1 |
| 修改 | PUT | /updateUser | /user |
个人认为:使用RESTFul风格是比较简洁、统一,但是在传统的项目中,如果遵循RESTFul风格反而会比较更加繁琐。
使用@PathVariable注解
- 请求中传一个值的情况
在控制层接收请求
// 映射地址:/emp/{empId}是把变量部分用大括号标记出来,写入变量名。
// 实际地址:/emp/1
@RequestMapping("/oneValue/{value}")
public String testOneValue(@PathVariable("value") String value){
    System.out.println(value);
    return "index";
}
- 请求中传多个值的情况
在控制层接收请求
@RequestMapping("/moreValue/{value1}/{value2}")
public String testMoreValue(@PathVariable("value1") String value1,@PathVariable("value2") String value2){
    System.out.println(value1 + "   " + value2);
    return "index";
}
第四章:其他的基本功能
4.1 静态资源的访问
静态资源的概念:资源本身就可以直接在浏览器上访问,不需要通过服务器端处理。例如:纯html文件,图片等。
SpringMVC环境下静态资源的问题
情况一:斜杠情况
因为dispatchServlet的 url-pattern 标签配置的是 " / "。意思是整个Web应用范围内所有请求都由 SpringMVC 来处理。对SpringMVC来说,必须要有对应的 @RequestMapping 才能找到处理请求的方法,如果没有对应的@RequestMapping ,就会返回404。
解决办法
在SpringMVC配置文件中增加配置:
<!-- 加入这个配置,SpringMVC 就会在遇到没有 @RequestMapping 的请求时放它过去 -->
<!-- 所谓放它过去就是让这个请求去找它原本要访问的资源 -->
<mvc:default-servlet-handler/>
此时访问不了其他的正常请求。应该在加一个 SpringMVC的注解驱动。
<!-- 开启 SpringMVC 的注解驱动功能。这个配置也被称为 SpringMVC 的标配。 -->
<!-- 标配:因为 SpringMVC 环境下非常多的功能都要求必须打开注解驱动才能正常工作。 -->
<mvc:annotation-driven/>
情况二:扩展名情况
<!-- 配置SpringMVC中负责处理请求的核心Servlet,也称前端控制器 -->
<servlet>
   <!-- 这个名字自定义,但必须要与servlet-mapping的servlet-name相匹配 -->
   <servlet-name>dispatcherServlet</servlet-name>
   <!-- DispatcherServlet的全类名 -->
   <servlet-class>org.springframework.web.servlet.DispatcherServlet</servlet-class>
   <!-- 通过初始化参数指定SpringMVC配置文件位置 -->
   <init-param>
     <param-name>contextConfigLocation</param-name>
     <!-- 使用classpath:说明这个路径从类路径的根目录开始才查找 -->
     <param-value>classpath:spring-mvc.xml</param-value>
   </init-param>
   <!-- 将dispatcherServlet设置为随web应用一起启动 -->
   <load-on-startup>1</load-on-startup>
 </servlet>
 <servlet-mapping>
   <servlet-name>dispatcherServlet</servlet-name>
   <!-- <url-pattern>/</url-pattern> -->
   <!-- 请求的扩展名必须是 html,SpringMVC 才会处理这个请求 -->
   <url-pattern>*.html</url-pattern>
 </servlet-mapping>
结果:对于一些非html格式的静态资源可以访问了,因为此时的静态资源不会受到SpringMVC的影响。而对正常的请求,不仅需要在 @RequestMapping 注解指定的 URL 地址上写 html 的扩展名,而且还需要在跳转请求前的地址后面加 html 扩展名。
4.2 数据绑定和值传递
数据绑定的概念:将请求参数注入到实体类对象中。
使用 Model 类型的形参
在控制层中接收请求
@RequestMapping("/testModel")
public String testModel(Model model){
    model.addAttribute("test","测试Model数据回显1");
    model.addAttribute("test1","测试Model数据回显2");
    return "index";	// 此index.heml页面是templates文件中的
}
在index.html中查看数据
<span th:text="${test}">1</span>
<span th:text="${test1}">2</span>
结果:数据显示成功。
注意:在形参位置声明Model类型变量,用于存储模型数据,同时SpringMVC也会帮我们把模型数据存入请求域(request对象)中。
如果使用重定向或转发,跳转的页面就会取不到值。如果使用重定向,Model的模式数据会作为请求参数(Get请求)。
使用 ModelMap 类型的形参
在控制层中接收请求
@RequestMapping("/testModelMap")
public String testModelMap(ModelMap modelMap){
    User user = new User();
    user.setName("张三");
    user.setAge(15);
    modelMap.addAttribute("user",user);
    return "index";
}
在index.html中查看数据
<span th:text="${user.name}">3</span>
<span th:text="${user.age}">4</span>
结果:数据显示成功。
注意:在形参位置声明ModelMap类型变量,用于存储模型数据,同时SpringMVC也会帮我们把模型数据存入请求域中。
如果使用重定向或转发,跳转的页面就会取不到值。如果使用重定向,ModelMap的模式数据会作为请求参数(Get请求)。
使用 Map 类型的形参
在控制层中接收请求
@RequestMapping("/testMap")
public String testMap(Map<String,Object> map){
     map.put("test","测试Map的数据回显1");
     map.put("test1","测试Map的数据回显2");
     return "index";// 此index.heml页面是templates文件中的
}
在index.html中查看数据
<span th:text="${test}">1</span>
<span th:text="${test1}">2</span>
结果:数据显示成功。
注意:在形参位置声明Map类型变量,用于存储模型数据,同时SpringMVC也会帮我们把模型数据存入请求域中。
如果使用重定向或转发,跳转的页面就会取不到值。如果使用重定向,Model的模式数据会作为请求参数(Get请求)。
使用 ModelAndView 类型的形参
在控制层中接收请求
@RequestMapping("/testModelAndView")
public ModelAndView testModelAndView(){
    ModelAndView modelAndView = new ModelAndView();
    modelAndView.addObject("test","测试ModelAndView的数据回显1");
    modelAndView.addObject("test1","测试ModelAndView的数据回显2");
    modelAndView.setViewName("index");
    return modelAndView;
}
在index.html中查看数据
<span th:text="${test}">1</span>
<span th:text="${test1}">2</span>
结果:根据设置的视图来看结果是否成功。
注意:在方法中ModelAndView类型变量,用于存储模型数据和设置视图名称,同时SpringMVC也会帮我们把模型数据存入请求域中,也会将设置的视图名作为路径跳转。
这里视图名称可以设三种
- 正常跳转:数据回显成功。
- 重定向:数据回显失败,此时将ModelAndView中的模型数据作为了请求参数(get请求)。
- 转发:数据回显失败。
使用RedirectAttributes 类型的形参
在控制层中接收请求(/testRedirectAttributes)
@RequestMapping("/testRedirectAttributes")
public String test(RedirectAttributes attributes){
    attributes.addFlashAttribute("test","测试RedirectAttributes数据回显1");
    attributes.addFlashAttribute("test1","测试RedirectAttributes数据回显2");
    //attributes.addAttribute("test","测试RedirectAttributes数据回显1");
    //attributes.addAttribute("test1","测试RedirectAttributes数据回显2");
    return "redirect:/tests";
}

@RequestMapping("/tests")
public String test2(@ModelAttribute("test") String param1,@ModelAttribute("test1") String param2){
	// 这里也可以将HttpServletRequest作为参数,然后getAttribute方法取值
    System.out.println(param1 + "    " + param2);
    return "index";
}
在index.html中查看数据
<span th:text="${test}">1</span>
<span th:text="${test1}">2</span>
结果:数据回显成功。
addFlashAttribute::跳转页面时不会将键值对作为url的参数显示传递。
addAttribute:跳转页面时将键值对作为url的参数显示传递。
@ModelAttribute注解:获取参数值。
使用@SessionAttributes注解
在控制层中接收任一请求
@RequestMapping("/testMap")
@SessionAttributes({"test","test1"})
public String testMap(Map<String,Object> map){
     map.put("test","测试Map的数据回显1");
     map.put("test1","测试Map的数据回显2");
     return "index";// 此index.heml页面是templates文件中的
}
@SessionAttributes注解:
SpringMVC帮我们把模型数据存入请求域的同时,如果上面的@SessionAttributes的key值与map的key相同时,也会将此值同步到session中。
使用原生 request 对象、元素response对象、会话域
在控制层中接收任一请求
@RequestMapping("/getServlet")
public String getServletAPI(HttpServletRequest request, HttpServletResponse response,HttpSession session){
     System.out.println(request.toString());
     System.out.println(response.toString());
     System.out.println(session.toString());
     return "index";
 }
如果需要使用原生的 request、response、session对象,就可以直接在形参位置声明即可。这可是非常的方便。
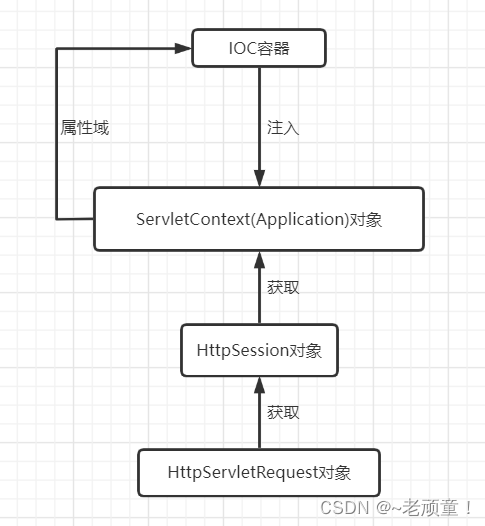
使用应用域
可以通过HttpSession获取ServletContext,也可以通过IOC容器注入ServletContext对象。
在控制层中接收任一请求
// 通过HttpSession获取ServletContext(应用域)
@RequestMapping("getApplication1")
public String getApplication1(HttpSession session){
     ServletContext context = session.getServletContext();
     System.out.println(context);
     return "index";
}

// 通过IOC容器注入ServletContext(应用域)
@Autowired
private ServletContext context;

@RequestMapping("getApplication1")
public String getApplication1(HttpSession session){
     System.out.println(context);
     return "index";
}
用图描述IOC容器与原生对象的关系
注意:这里的一个Application对象可以有多个HttpSession对象。
4.3 mvc:view-controller
使用场景:在控制层的任意一个方法中,如果只是通过 @RequestMapping 映射,将请求转发到目标视图,没有任何其他的操作。此时就可以在spring-mvc.xml配置文件中配置此请求,省略了控制层中的方法。
配置:
<mvc:view-controller path="/hello" view-name="index"/>
如果还没有配置 <mvc:annotation-driven />,此时就会发现其他的@RequestMapping 请求都访问不了。因此将此配置(SpringMVC的注解驱动)加上。
<mvc:annotation-driven />
- path=“/hello”:代表的是要访问的路径 ---- 相当于@RequestMapping(“/hello”)。
- view-name=“index”:代表的是跳转的视图 ---- 相当于 return “index”。
- 注意:针对于hello的请求,他都会直接交给dispatcherServlet进行处理。
- 如果对于相同的请求,@RequestMapping和mvc:view-controller两种方法都存在,那么优先使用@RequestMapping,此时配置的mvc:view-controller不起任何作用了。
4.4 拦截器
过滤器和拦截器的区别
相同点:
- 过滤:拦截器或过滤器存在的意义就是对请求进行统一处理。
- 拦截:必须先把请求拦住,在进行后续操作。
- 放行:对请求执行了必要操作后,放请求过去,去访问他原本想要访问的资源。
不同点:
3. 过滤器存在于Servlet容器中;拦截器存在于SpringMVC的基础上。
4. 过滤器能够拦截整个Web应用;拦截器能够拦截整个SpringMVC负责的请求。
5. 过滤器可以对所有请求起作用;拦截器只能对action请求起作用。
6. 过滤器不能使用Spring的任何资源;拦截器可以使用Spring的任何资源,可以通过IOC注入即可。
7. 过滤器只能在容器初始化的时候调用一次;拦截器可以被每个action请求调用。
推荐使用拦截器,只要过滤器能实现的,拦截器都能够实现。
HandlerInterceptor拦截器的使用步骤
创建拦截器类
public class MyInterceptor implements HandlerInterceptor {

    // 处理请求(控制器)前进入的方法
    @Override
    public boolean preHandle(HttpServletRequest request, HttpServletResponse response, Object handler) throws Exception {
        System.out.println("==========preHandle=========");
        return true;    // 返回值为true:放行; false:不放行
    }

    // 处理请求(控制器)后,视图渲染前
    @Override
    public void postHandle(HttpServletRequest request, HttpServletResponse response, Object handler, ModelAndView modelAndView) throws Exception {
        System.out.println("==========postHandle=========");
    }

    // 视图跳转完成后
    @Override
    public void afterCompletion(HttpServletRequest request, HttpServletResponse response, Object handler, Exception ex) throws Exception {
        System.out.println("==========afterHandle=========");
    }
}
preHandle()方法:在进入控制器(处理请求)之前执行。如果返回值为true,即可进行下一个拦截器或控制器;如果返回值为false,即直接拦截到此,不再进入下一个拦截器或控制器了。
.postHandle()方法:进入控制器(处理请求时)之后,视图渲染前执行该方法。
afterCompletion()方法:视图渲染完后执行。
单个拦截器的执行顺序:preHandle(返回值为true) ---- 控制器(Controller) ---- postHandle ---- 显示视图html(视图渲染) ---- afterCompletion
在spring-mvc.xml文件中配置拦截器
<!--拦截器配置-->
<mvc:interceptors>
	<mvc:interceptor>
		<!--拦截所有请求-->
		<mvc:mapping path="/**"/>
		<!-- 使用 mvc:exclude-mapping 标签配置不拦截的请求 -->
        <mvc:exclude-mapping path="/test"/>
		<!--自定义拦截器-->
		<bean class="com.wdzl.interceptor.MyIntegerceptor"/>
	</mvc:interceptor>
</mvc:interceptors>
这里拦截请求可以自定义,例如拦截某一个精确的请求或是拦截某一类请求(某一前缀相同的请求)。
WebRequestInterceptor拦截器的使用步骤
创建拦截器类
public class ContentInterceptor implements WebRequestInterceptor {
    // 处理请求(控制器)前进入的方法
    @Override
    public void preHandle(WebRequest request) throws Exception {
        System.out.println("==========preHandle=========");
    }
    // 处理请求(控制器)后,视图渲染前
    @Override
    public void postHandle(WebRequest request, ModelMap model) throws Exception {
        System.out.println("==========postHandle=========");
    }
    // 视图跳转完成后
    @Override
    public void afterCompletion(WebRequest request, Exception ex) throws Exception {
        System.out.println("==========afterHandle=========");
    }
}
此拦截器不依赖于Servlet API,解耦Servlet的实现方式。
preHandle() 方法没有返回值,不能阻止后续资源的访问。
此拦截器的内容可以对一些字符进行处理。例如将一些不文明的字替换为**。
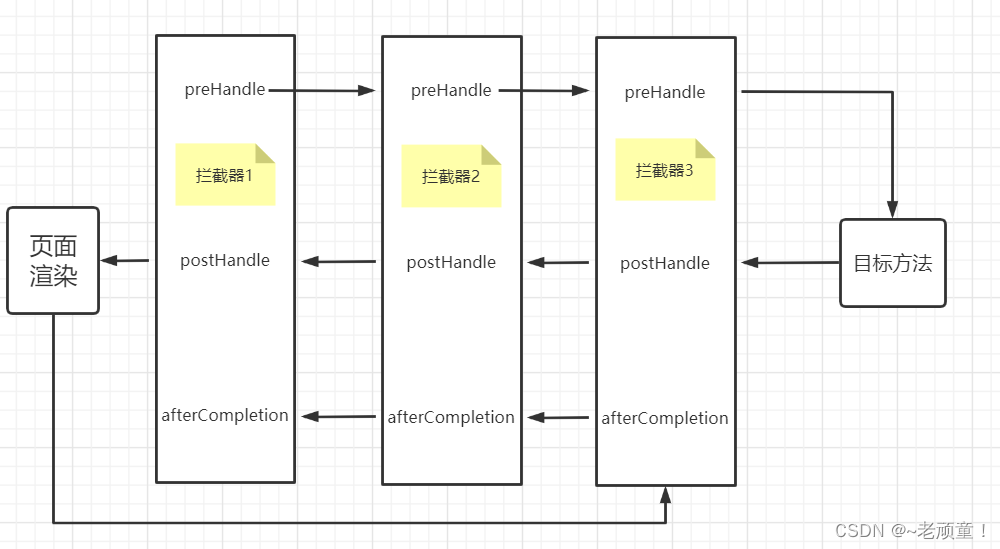
拦截器的执行顺序
单个拦截器的顺序:preHandle(返回值为true) ---- 控制器(Controller) ---- postHandle ---- 显示视图html(视图渲染) ---- afterCompletion
多个拦截器的顺序:如下图所示
preHandle(和配置顺序相同) – 目标方法 – postHandle(和配置顺序相反) – 页面渲染 – afterCompletion(和配置顺序相反)
4.5 类型转换
Spring MVC 框架的 Converter<S,T> 是一个可以将一种数据类型转换成另一种数据类型的接口,这里
S 表示源类型,T 表示目标类型。这里类型转换主要发生在数据绑定(将请求参数注入到实体类中)的过程中。
使用Converter<S,T> 接口
作用: 只能单向转换,指定泛型,从S类型转向T类型。
创建自定义类型转化器类
public class DateConvert implements Converter<String, Date> {
    @Override
    public Date convert(String source) {
        System.out.println("类型转换了" + source);
        Date date = null;
        try {
            SimpleDateFormat simpleDateFormat=new  SimpleDateFormat("yyyy-MM-dd");
            date = simpleDateFormat.parse(source);
        } catch (Exception e) {
            e.printStackTrace();
            System.out.println("时间转换异常");
        }
        return date;
    }
}
在spring-mvc.xml文件中配置
<!-- 向mvc:annotation-driven 中注册 -->
<!-- 这里使用了哪种bean,就将conversion-service换成使用的bean的id -->
<mvc:annotation-driven conversion-service="formattingConversionService"/>

<!-- 第一种写法 -->
<!-- 自定义类型转换器 -->
<!-- 指定自定义的转化器类 -->
<bean id="dateConvert" class="com.zhang.converter.DateConvert"></bean>
<bean id="conversionServiceFactoryBean" class="org.springframework.context.support.ConversionServiceFactoryBean">
	<!-- 在 converters 属性中指定自定义类型转换器 -->
    <property name="converters">
        <set>
            <ref bean="dateConvert"></ref>
        </set>
    </property>
</bean>

<!-- 第二种写法 -->
<!-- 自定义类型转换器 -->
<bean id="formattingConversionService" class="org.springframework.format.support.FormattingConversionServiceFactoryBean">
	<!-- 在 converters 属性中指定自定义类型转换器 -->
    <property name="converters">
        <set>
       	 	<!-- 指定自定义的转化器类 -->
            <bean class="com.zhang.converter.DateConvert"></bean>
        </set>
    </property>
</bean>
实体类
@Data
public class User{
    private Integer id;
    private String name;
    private int age;
    private String password;
    private String email;
    @DateTimeFormat(pattern="yyyy-MM-dd")
    private Date birthday;
    private List<Game> gameList;
}
注册了自定义转换器后,@DateTimeFormat(pattern=“yyyy-MM-dd”) 失效
实现Formatter接口
自定义类实现Formatter接口。
注意这个是可以双向转换的。
创建自定义类型转化器类
public class DateFormater implements Formatter<Date> {
    // String --> Date 用于接收请求参数,封装到实体类中
    @Override
    public Date parse(String text, Locale locale) throws ParseException {
        System.out.println("String -> Date" + text);
        Date date = null;
        try {
            SimpleDateFormat simpleDateFormat=new  SimpleDateFormat("yyyy-MM-dd");
            date = simpleDateFormat.parse(text);
        } catch (Exception e) {
            e.printStackTrace();
            System.out.println("时间转换异常");
        }

        return date;
    }
    // Date --> String 用于页面的显示。显示时,必须使用spring标签绑定显示才可以
    @Override
    public String print(Date object, Locale locale) {
        System.out.println("Date -> String" + object);
        SimpleDateFormat simpleDateFormat=new  SimpleDateFormat("yyyy-MM-dd");
        return simpleDateFormat.format(object);
    }
}
在spring-mvc.xml文件中配置
<!-- 向mvc:annotation-driven 中注册 -->
<mvc:annotation-driven conversion-service="formattingConversionService"/>

<bean id="formattingConversionService" class="org.springframework.format.support.FormattingConversionServiceFactoryBean">
   <property name="formatters">
        <set>
        	<!-- 指定自定义的转化器类 -->
            <bean class="com.zhang.converter.DateFormater"></bean>
        </set>
    </property>
</bean>
注意:如果需要使用parse方法转换时,则需要使用spring 标签库,来
显示数据。
如果Convertor 和 Formatter 同时注入,则只有Formatter执行
4.6 数据效验
这里使用 JSR 303 作为数据效验的框架。使用的时候可以去网上搜,这里只是简单的搭建一下框架。
具体操作:使用之前Tomcat的版本最低为8
加入依赖
<!-- https://mvnrepository.com/artifact/org.hibernate.validator/hibernate-validator -->
<dependency>
  <groupId>org.hibernate.validator</groupId>
  <artifactId>hibernate-validator</artifactId>
  <version>7.0.1.Final</version>
</dependency>
<!-- https://mvnrepository.com/artifact/org.hibernate.validator/hibernate-validator-annotation-processor -->
<dependency>
  <groupId>org.hibernate.validator</groupId>
  <artifactId>hibernate-validator-annotation-processor</artifactId>
  <version>7.0.1.Final</version>
</dependency>
配置SpringMVC的注解驱动
<mvc:annotation-driven/>
在实体类中附加效验规则
这里注意一下导入的包,不要导错,否则JSR 303 不生效。
import lombok.Data;

import javax.validation.constraints.Email;
import javax.validation.constraints.Size;
import java.util.List;
@Data
public class User{
    private Integer id;
    private String name;
    private int age;
    @Size(min = 6,max = 15)
    private String password;
    @Email
    private String email;
    private List<Game> gameList;
}
在控制层接收请求
@RequestMapping("/doRegister")
public String doRegister(@Valid User user, BindingResult bindingResult, Model model){
    if(bindingResult.hasErrors()){
        model.addAttribute("user",user);
        return "register";  // 跳转注册页面
    }
    return "index";     // 跳转登录页面
}
在HTML页面显示错误信息
<p th:errors="${user.email}">这里显示邮箱提示消息</p>
注意:实体类参数和BindingResult 之间不能有任何的其他参数,否则会报错。
@Valid注解:让SpringMVC将请求参数绑定到该形参对象后,就会调用效验框架对实体类上声明的效验规则进行效验。
BindingResult对象:将效验结果保存到这个对象里面。
4.7 异常映射
基于XML的异常映射
<bean id="exceptionResolver" class="org.springframework.web.servlet.handler.SimpleMappingExceptionResolver">
    <!-- 配置异常映射关系 -->
    <property name="exceptionMappings">
        <props>
            <!-- 异常类型和跳转处理页面映射 -->
            <!-- key属性: 指定异常类型 -->
            <!-- 文本标签体: 和异常类型对应的逻辑视图 -->
            <prop key="java.lang.ClassNotFoundException">error1</prop><!--跳转到error1页面,这里还需要经过DispatcherServlet前端控制器-->
            <prop key="java.lang.Exception">error2</prop>
        </props>
    </property>
    <!-- 使用exceptionAttribute属性配置将异常对象存入请求域时使用的属性名,属性名默认是exception -->
    <property name="exceptionAttribute" value="exception"/>
</bean>
- SpringMVC会根据异常的映射信息,当捕获到异常对象后,会将异常信息存入到请求域(request对象)中,然后根据异常的信息转发到对应的视图页面。
- 如果SpringMVC匹配到多个异常类型,那么SpringMVC会使用最接近的异常映射关系。
基于注解的异常映射
配置异常处理器类
// 异常处理器上需要加 @ControllerAdvice 注解标记
@ControllerAdvice
public class MyDiyException {
	// @ExceptionHandler注解:标记异常处理方法
	// value属性:指定匹配的异常类型
	// 异常类型的形参:SpringMVC 捕获到的异常对象
	@ExceptionHandler(value = Exception.class)
	public String exception(Exception e, Model model){
	    model.addAttribute("exception",e.getMessage());
	    return "error2"; // 页面跳转
	}
	@ExceptionHandler(value = ClassNotFoundException.class)
	public String classNotFound(Exception e, Model model){
	    model.addAttribute("exception",e.getMessage());
	    return "error1"; // 页面跳转
	}
}
将配置的异常处理器加入IOC容器
<context:component-scan base-package="com.zhang"/>
注意:基于注解配置的异常映射器,是不会把异常对象放入请求域中,如果需要页面显示错误信息,需要将返回值放入Model、ModelMap、Map、ModelAndView的其中一个,进行错误信息的绑定。
若项目中不仅配置了xml的异常映射,还配置了注解的异常映射,优先使用xml的异常映射。
自定义异常处理解析器
自定义一个异常处理解析器类
public class MyException implements HandlerExceptionResolver {
    @Override
    public ModelAndView resolveException(HttpServletRequest request, HttpServletResponse response, Object handler, Exception ex) {
        System.out.println("自定义异常解析器");
        ModelAndView modelAndView = null;
        if(ex instanceof RuntimeException){
            modelAndView = new ModelAndView();
            modelAndView.setViewName("error2");	// 设置视图
            modelAndView.addObject("exception",ex);  // 设置异常信息
        }
        return modelAndView;
    }
}
在spring-mvc.xml配置中配置bean即可。
<bean id="exception" class="com.zhang.exception.MyException"/>
4.8 文件上传
添加依赖
<dependency>
	<groupId>commons-fileupload</groupId>
	<artifactId>commons-fileupload</artifactId>
	<version>1.3.3</version>
</dependency>
在spring-mvc.xml文件中配置文件解析器
<!--文件上传解析器 注意id 值固定-->
<bean id="multipartResolver" class="org.springframework.web.multipart.commons.CommonsMultipartResolver">
		<!-- 文件上传的最大限制 -->
        <property name="maxUploadSize" value="88888888"></property>
        <!-- 由于上传文件的表单请求体编码方式是 multipart/form-data 格式,所以要在解析器中指定字符集 -->
        <property name="defaultEncoding" value="UTF-8"/>
</bean>
编写html页面
<form th:action="@{/upload}" method="post" enctype="multipart/form-data">
     <input type="file" name="pic">
     <input type="submit" value="上传图片">
</form>
注意点:
- 请求方式必须为POST请求。
- 请求体的编码格式要设置为multipart/form-data(通过form表单的enctype属性)。
- input标签中的type要为file属性。
在控制层中接收请求
@RequestMapping(value = "/upload",method = RequestMethod.POST)
public String upload(@RequestParam("pic") MultipartFile pic) throws IOException {
    System.out.println("上传的文件:" + pic);
    System.out.println("上传文件的表单元素名称:" + pic.getName());
    System.out.println("文件名:" + pic.getOriginalFilename());
    System.out.println("文件大小: " + pic.getSize());

    // 1. 本地磁盘的路径
    String realPath = "e:/aaa";
    //2.判断该目录是否存在
    File file = new File(realPath);
    if(!file.exists()){
        file.mkdirs();
    }
    // 3. 生成保存文件的文件名 --->   防止文件名重复
    String saveFilePath = UUID.randomUUID().toString().replace("-","") + pic.getOriginalFilename();
    File saveFile = new File(saveFilePath);
    // 4. 文件转存
    pic.transferTo(saveFile);   // 将文件转移到目标目录下。
    return "index";
}
如果上传文件夹input标签的name属性与参数名一致,那么就可以省略@RequestParam标签。
这种方式是将文件上传到本地硬盘中。还有一种实现方式: 将文件上传到阿里云OSS对象存储服务的教程。大家感兴趣的话可以看一下。
4.9 文件下载
第一种使用Spring的实现方式
@RequestMapping("/down1")
public ResponseEntity<byte[]> down1(String filename){
    // 本地磁盘路径
    String realPath = "e:/aaa";
    File downFile = new File(realPath, filename);
    try {
        FileInputStream inputStream = new FileInputStream(downFile);

        // 根据输入流可用字节数来实例化数组
        byte[] bytes = new byte[inputStream.available()];
        // 从流中读取字节放入字节数组中
        inputStream.read(bytes);

        // 转码
        filename = URLEncoder.encode(filename,"utf-8");
        // 封装响应消息头
        HttpHeaders httpHeaders = new HttpHeaders();    // 是MultiValueMap的子类
        httpHeaders.add("Content-Disposition", "attchement;filename=" + filename);
        HttpStatus status = HttpStatus.OK;

        // 实例化响应实体对象
        ResponseEntity<byte[]> responseEntity = new ResponseEntity<>(bytes,httpHeaders,status);
        inputStream.close();
        return responseEntity;
    } catch (Exception e){
        e.printStackTrace();
    }
    return null;
}
第二种使用原生的实现方式
@RequestMapping("/down2")
public void down2(String filename, HttpServletResponse response){
    // 本地磁盘路径
    String realPath = "e:/aaa";
    File downFile = new File(realPath, filename);
    try {
        FileInputStream inputStream = new FileInputStream(downFile);
        // 转码
        filename = URLEncoder.encode(filename,"utf-8");
        response.setCharacterEncoding("utf-8");
        response.setContentType("application/octet-stream");
        response.setHeader("Content-Disposition", "attchement;filename=" + filename);

        // 输出流
        ServletOutputStream outputStream = response.getOutputStream();
        byte[] bytes = new byte[1024];
        int len = 0;
        // 读取文件
        while ((len = inputStream.read(bytes)) != -1){
            outputStream.write(bytes,0,len);
        }
        outputStream.close();
        outputStream.close();
    } catch (Exception e){
        e.printStackTrace();
    }
}


 1178
1178


 被折叠的 条评论
为什么被折叠?
被折叠的 条评论
为什么被折叠?
 到【灌水乐园】发言


