


一、微服务版本依赖
| Spring Cloud Version | Spring Cloud Alibaba Version | Spring Boot Version |
|---|---|---|
| Hoxton.SR8 | 2.2.3.RELEASE | 2.3.2.RELEASE |
| Greenwich.SR6 | 2.1.3.RELEASE | 2.1.13.RELEASE |
| Hoxton.SR8 | 2.2.2.RELEASE | 2.3.2.RELEASE |
| Hoxton.SR3 | 2.2.1.RELEASE | 2.2.5.RELEASE |
| Hoxton.RELEASE | 2.2.0.RELEASE | 2.2.X.RELEASE |
| Greenwich | 2.1.2.RELEASE | 2.1.X.RELEASE |
| Finchley | 2.0.3.RELEASE | 2.0.X.RELEASE |
<dependency>
    <groupId>com.alibaba.cloud</groupId>
    <artifactId>spring-cloud-alibaba-dependencies</artifactId>
    <version>2.2.1.RELEASE</version>
    <type>pom</type>
    <scope>import</scope>
</dependency>
二、注册中心
// 服务发现
<dependency>
    <groupId>com.alibaba.cloud</groupId>
    <artifactId>spring-cloud-starter-alibaba-nacos-discovery</artifactId>
</dependency>
@EnableDiscoveryClient
@SpringBootApplication
public class SystemApplication {
    public static void main(String[] args) {
        SpringApplication.run(SystemApplication.class, args);
    }
}
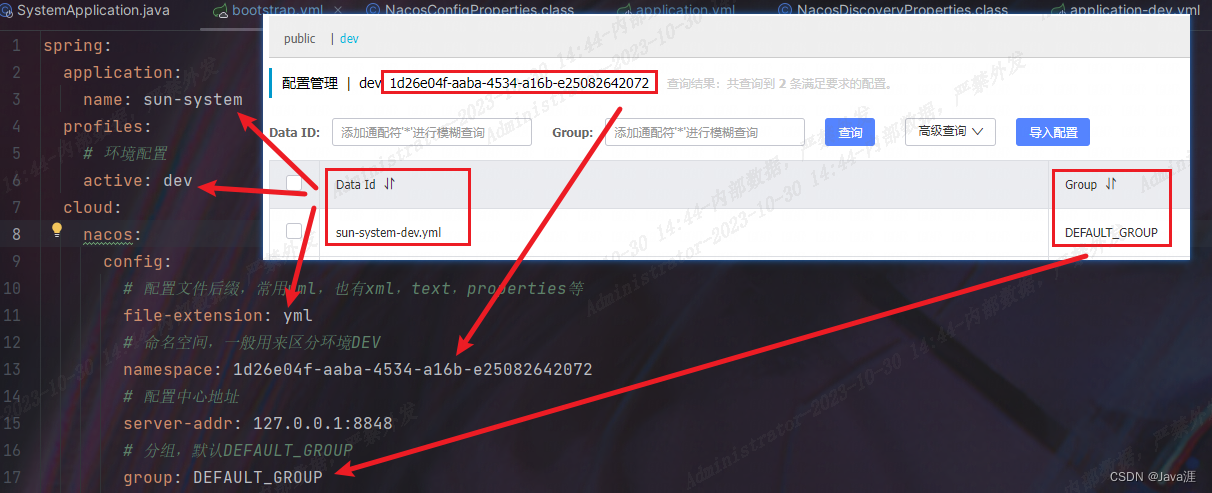
spring:
  application:
    name: sun-system
  profiles:
    # 环境配置
    active: dev
  cloud:
    nacos:
      discovery:
        # 服务发现地址
        server-addr: 127.0.0.1:8848
        # 命名空间,一般用来区分环境DEV,不同环境之间不可相互调用
        namespace: 1d26e04f-aaba-4534-a16b-e25082642072
        # 分组,默认DEFAULT_GROUP,不同分组之间不可调用
        group: LOCAL_GROUP

三、配置中心
// 配置中心
<dependency>
	<groupId>com.alibaba.cloud</groupId>
	<artifactId>spring-cloud-starter-alibaba-nacos-config</artifactId>
</dependency>
spring:
  application:
    name: sun-system
  profiles:
    # 环境配置
    active: dev
  cloud:
    nacos:
      config:
        # 配置文件后缀,常用yml
        file-extension: yml
        # 命名空间,一般用来区分环境DEV
        namespace: 1d26e04f-aaba-4534-a16b-e25082642072
        # 配置中心地址
        server-addr: 127.0.0.1:8848
        # 分组,默认DEFAULT_GROUP
        group: DEFAULT_GROUP
之所以需要配置 spring.application.name ,是因为它是构成 Nacos 配置管理 dataId字段的一部分。
在 Nacos Spring Cloud 中,dataId 的完整格式如下:
${prefix}-${spring.profiles.active}.${file-extension}
prefix默认为spring.application.name的值,也可以通过配置项spring.cloud.nacos.config.prefix来配置。spring.profiles.active即为当前环境对应的 profile。- 注意:当
spring.profiles.active为空时,对应的连接符-也将不存在,dataId 的拼接格式变成${prefix}.${file-extension}
- 注意:当
file-exetension为配置内容的数据格式,可以通过配置项spring.cloud.nacos.config.file-extension来配置。目前只支持properties和yaml类型。
-
配置自动更新
@RefreshScope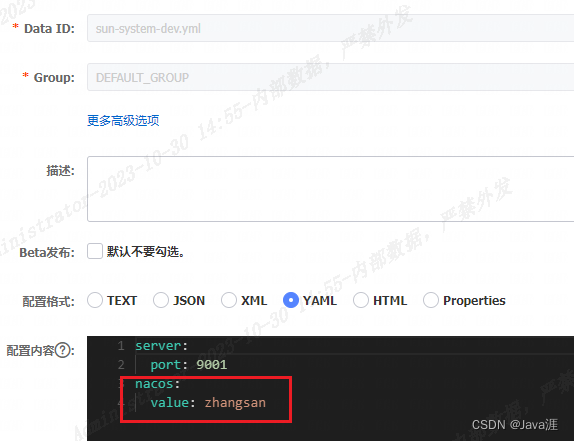
@Value("${nacos.value}")
private String nacosValue;

@GetMapping("/value")
public ResponseResult getValue() {
    return ResponseResult.ok(nacosValue);
}
这样是可以正常获取到
zhangsan数据的,但是这时候从nacos配置中心修改成lisi,服务里是不会更新的,获取数据还是zhangsan@RestController @RefreshScope public class HealthController { @Value("${nacos.value}") private String nacosValue; @GetMapping("/value") public ResponseResult getValue() { return ResponseResult.ok(nacosValue); } }在需要自动更新的类加上
@RefreshScope注解,就可以自动更新配置了 -
共享配置和扩展配置
spring: application: name: sun-system profiles: # 环境配置 active: dev cloud: nacos: config: # 配置文件后缀,常用yml,也有properties file-extension: yml # 命名空间,一般用来区分环境DEV namespace: 1d26e04f-aaba-4534-a16b-e25082642072 # 配置中心地址 server-addr: 101.43.51.245:8848 # 分组,默认DEFAULT_GROUP group: DEFAULT_GROUP shared-configs[0]: data-id: common-dev.yml group: DEFAULT_GROUP refresh: trueshared-configs是一个数组,后面的数据越大说明优先级越高,shared-configs[1] > shared-configs[0]data-id指定公共配置,需要带上后缀group默认分组为DEFAULT_GROUPrefresh是否刷新默认为false,这里指定为true
要在各应⽤之间共享⼀个配置,请使⽤上⾯的 shared-configs,因此按该理念,
shared-configs指定的配置,本来应该是不指定group的,也就是应当归⼊DEFAULT_GROUP这个公共分组-
拓展配置的用法同
shared-configs,优先级高于shared-configs,也就是相同的属性会对其覆盖 -
如果要在特定范围内(⽐如某个应⽤上)覆盖某个共享dataId上的特定属性,请使⽤ extension-config
-
⽐如其他应⽤的数据库url,都是⼀个固定的url,使⽤
shared-configs.dataId = mysql的共享配置,但其中有⼀个应⽤ddd-demo是特例,需要为该应⽤配置扩展属性来覆盖
extension-configs[0]: data-id: common-dev.yml group: DEFAULT_GROUP refresh: true -
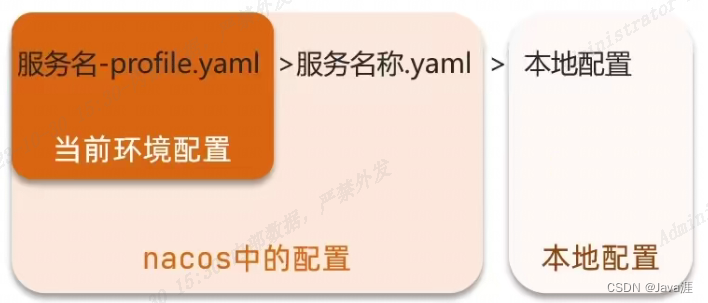
配置优先级
优先级
user-service-dev.yml(nacos上的当前环境配置) > user-service.yml(nacos上的)> application.yml(本地的)
实现本地配置优先
spring:
  cloud:
    config:
	  # 如果本地配置优先级高,那么 override-none 设置为 true,包括系统环境变量、本地配置文件等配置
      override-none: true
      # 如果想要远程配置优先级高,那么 allow-override 设置为 false,如果想要本地配置优先级高那么 allow-override 设置为 true
      allow-override: true
      # 只有系统环境变量或者系统属性才能覆盖远程配置文件的配置,本地配置文件中配置优先级低于远程配置;注意本地配置文件不是系统属性
      override-system-properties: false
注意:一定要配置到远程配置(nacos)上,否则不生效


 5880
5880


 被折叠的 条评论
为什么被折叠?
被折叠的 条评论
为什么被折叠?
 到【灌水乐园】发言


