


一、引导页
实现效果:

我们先书写一个条目
<?xml version="1.0" encoding="utf-8"?>
<RelativeLayout xmlns:android="http://schemas.android.com/apk/res/android"
    android:layout_width="match_parent"
    android:layout_height="match_parent">

    <!-- 这是引导图片的图像视图 -->
    <ImageView
        android:id="@+id/iv_launch"
        android:layout_width="match_parent"
        android:layout_height="match_parent"
        android:scaleType="fitXY" />

    <!-- 这里容纳引导页底部的一排圆点 -->
    <RadioGroup
        android:id="@+id/rg_indicate"
        android:layout_width="wrap_content"
        android:layout_height="wrap_content"
        android:layout_alignParentBottom="true"
        android:layout_centerHorizontal="true"
        android:orientation="horizontal"
        android:paddingBottom="20dp" />

    <!-- 这是最后一页的入口按钮 -->
    <Button
        android:id="@+id/btn_start"
        android:layout_width="wrap_content"
        android:layout_height="wrap_content"
        android:layout_centerInParent="true"
        android:text="立即开始使用"
        android:textColor="#ff3300"
        android:textSize="22sp"
        android:visibility="gone" />
</RelativeLayout>
现在我们就定义了一个条目,他由背景图片,底部原点,和按钮组成,我们用Adapter放入活动页面中,其中我们使用ViewPager,当我们滑动至下一页中,就高亮底部按钮,当遍历至最后一页中再显示按钮,否则就隐藏
<?xml version="1.0" encoding="utf-8"?>
<LinearLayout xmlns:android="http://schemas.android.com/apk/res/android"
    xmlns:app="http://schemas.android.com/apk/res-auto"
    xmlns:tools="http://schemas.android.com/tools"
    android:layout_width="match_parent"
    android:layout_height="match_parent"
    tools:context=".LaunchSimpleActivity">

    <androidx.viewpager.widget.ViewPager
        android:id="@+id/vp_launch"
        android:layout_width="match_parent"
        android:layout_height="match_parent"/>


</LinearLayout>
在适配器中书写逻辑
package com.example.androidapp.adapter;

import android.content.Context;
import android.content.Intent;
import android.view.LayoutInflater;
import android.view.View;
import android.view.ViewGroup;
import android.widget.Button;
import android.widget.ImageView;
import android.widget.RadioButton;
import android.widget.RadioGroup;

import androidx.annotation.NonNull;
import androidx.viewpager.widget.PagerAdapter;

import com.example.androidapp.LoginActivity;
import com.example.androidapp.R;

import java.util.ArrayList;
import java.util.List;

public class LaunchSimpleAdapter extends PagerAdapter {
    private List<View> mViewList = new ArrayList<>();

    public LaunchSimpleAdapter(Context context, int[] imageArray) {
        for (int i = 0; i < imageArray.length; i++) {
            View view = LayoutInflater.from(context).inflate(R.layout.item_launch, null);
            ImageView iv_launch = view.findViewById(R.id.iv_launch);
            RadioGroup rg_indicate = view.findViewById(R.id.rg_indicate);
            Button btn_start = view.findViewById(R.id.btn_start);
            iv_launch.setImageResource(imageArray[i]);

            // 每个页面都分配一组对应的单选按钮
            for (int j = 0; j < imageArray.length; j++) {
                RadioButton radio = new RadioButton(context);
                radio.setLayoutParams(new ViewGroup.LayoutParams(
                        ViewGroup.LayoutParams.WRAP_CONTENT,
                        ViewGroup.LayoutParams.WRAP_CONTENT
                ));
                radio.setPadding(10,10,10,10);
                rg_indicate.addView(radio);
            }

            // 当前位置的单选按钮要高亮显示,比如第二个引导页就高亮第二个单选按钮
            ((RadioButton)rg_indicate.getChildAt(i)).setChecked(true);

            // 如果是最后一个引导页,则显示入口按钮,以便用户点击按钮进入主页
            if (i == imageArray.length - 1){
                btn_start.setVisibility(View.VISIBLE);
                btn_start.setOnClickListener(v -> {
                    Intent intent = new Intent(context, LoginActivity.class);
                    context.startActivity(intent);

                });
            }

            mViewList.add(view);
        }
    }

    @Override
    public int getCount() {
        return mViewList.size();
    }

    @Override
    public boolean isViewFromObject(@NonNull View view, @NonNull Object object) {
        //在这里,view是我们添加的,object是下方生命周期函数返回的
        return view == object;
    }


    //实例化指定位置的页面,并将其添加到容器中
    @NonNull
    @Override
    public Object instantiateItem(@NonNull ViewGroup container, int position) {
        //根据position拿到item
        View item = mViewList.get(position);
        container.addView(item);
        //返回一个跟这个view可以关联起来的对象,这里直接将自己返回就可以了,可以将view和object关联起来
        return item;
    }

    //从容器中销毁指定位置的页面
    @Override
    public void destroyItem(@NonNull ViewGroup container, int position, @NonNull Object object) {
        container.removeView(mViewList.get(position));
    }
}
将适配器携带图片数据传入引导页主活动
package com.example.androidapp;

import androidx.appcompat.app.AppCompatActivity;
import androidx.viewpager.widget.ViewPager;

import android.os.Bundle;


import com.example.androidapp.adapter.LaunchSimpleAdapter;

public class LaunchSimpleActivity extends AppCompatActivity {

    // 声明引导页面的图片数组
    private int[] launchImageArray = {R.drawable.guide_bg1,
            R.drawable.guide_bg2, R.drawable.guide_bg3, R.drawable.guide_bg4};

    @Override
    protected void onCreate(Bundle savedInstanceState) {
        super.onCreate(savedInstanceState);
        setContentView(R.layout.activity_launch_simple);

        ViewPager vp_launch = findViewById(R.id.vp_launch);
        LaunchSimpleAdapter adapter = new LaunchSimpleAdapter(this,launchImageArray);
        vp_launch.setAdapter(adapter);


    }
}
二、登录页面
我们先定义一个登录页布局和注册页布局
<?xml version="1.0" encoding="utf-8"?>
<TableLayout xmlns:android="http://schemas.android.com/apk/res/android"
    android:gravity="center"
    android:layout_width="match_parent"
    android:layout_height="match_parent"
    android:background="@drawable/background">


    <TableRow
        android:gravity="center"
        android:layout_marginHorizontal="30dp">

        <TextView
            android:text="用户名:"
            android:textSize="20sp"
            android:textColor="@color/white"/>
        <EditText
            android:id="@+id/et_log_admin"
            android:hint="请输入用户名"
            android:background="@drawable/editext_selector"
            android:textColorHint="@color/gary"
            android:textColor="@color/white"
            android:layout_weight="1"/>
    </TableRow>
    <TableRow
        android:gravity="center"
        android:layout_marginTop="20dp"
        android:layout_marginHorizontal="30dp">
        <TextView
            android:text="密码:"
            android:textColor="@color/white"
            android:textSize="20sp"
            android:gravity="end"/>
        <EditText
            android:id="@+id/et_log_pass"
            android:hint="请输入登录密码"
            android:background="@drawable/editext_selector"
            android:textColorHint="@color/gary"
            android:layout_weight="1"/>
    </TableRow>
    <LinearLayout
        android:layout_marginTop="30dp"
        android:orientation="horizontal"
        android:gravity="center">
        <Button
            android:id="@+id/bt_login"
            android:text="登录"
            android:layout_marginEnd="50dp"
            android:layout_width="100dp"
            android:layout_height="50dp"/>
        <Button
            android:id="@+id/bt_register"
            android:text="注册"
            android:layout_width="100dp"
            android:layout_height="50dp"/>
    </LinearLayout>
</TableLayout>
<?xml version="1.0" encoding="utf-8"?>
<LinearLayout xmlns:android="http://schemas.android.com/apk/res/android"
android:orientation="vertical"
android:layout_width="match_parent"
android:layout_height="match_parent">
<TextView
android:text="用户注册"
android:textSize="30sp"
android:textColor="@color/black"
android:textStyle="bold"
android:lines="2"
android:gravity="center"
android:layout_width="match_parent"
android:layout_height="wrap_content"/>
<RelativeLayout
android:layout_width="match_parent"
android:layout_height="wrap_content">
<TableLayout
android:layout_width="match_parent"
android:layout_height="wrap_content">
<TableRow android:layout_marginTop="10dp">
<TextView
android:text="用户名:"
android:textSize="20sp"
android:textColor="@color/black"
android:drawableStart="@drawable/baseline_perm_identity_black_24dp"
android:layout_weight="0.1"/>
<EditText
android:id="@+id/et_reg_admin"
android:inputType="textPersonName"
android:layout_weight="0.9"/>
</TableRow>
<TableRow android:layout_marginTop="10dp">
<TextView
android:text="密码:"
android:textSize="20sp"
android:textColor="@color/black"
android:drawableStart="@drawable/baseline_lock_black_24dp"
android:layout_weight="0.1"/>
<EditText
android:id="@+id/et_reg_pass"
android:layout_weight="0.9"/>
</TableRow>
<TableRow android:layout_marginTop="10dp">
<TextView
android:text="确认密码:"
android:textSize="20sp"
android:textColor="@color/black"
android:drawableStart="@drawable/baseline_vpn_key_black_24dp"
android:layout_weight="0.1"/>
<EditText
android:id="@+id/et_reg_checkpass"
android:layout_weight="0.9"/>
</TableRow>
<TableRow android:layout_marginTop="10dp">
<TextView
android:text="年龄:"
android:textSize="20sp"
android:textColor="@color/black"
android:drawableStart="@drawable/baseline_date_range_black_24dp"
android:layout_weight="0.1"/>
<EditText
android:id="@+id/et_reg_age"
android:inputType="number"
android:layout_weight="0.9"/>
</TableRow>
<TableRow android:layout_marginTop="10dp">
<TextView
android:text="电话:"
android:textSize="20sp"
android:textColor="@color/black"
android:drawableStart="@drawable/baseline_phone_black_24dp"
android:layout_weight="0.1"/>
<EditText
android:id="@+id/et_reg_tel"
android:inputType="phone"
android:layout_weight="0.9"/>
</TableRow>
<TableRow android:layout_marginTop="10dp">
<TextView
android:text="家庭地址:"
android:textSize="20sp"
android:textColor="@color/black"
android:drawableStart="@drawable/baseline_home_black_24dp"
android:layout_weight="0.1"/>
<EditText
android:id="@+id/et_reg_address"
android:layout_weight="0.9"/>
</TableRow>
<TableRow
android:layout_marginTop="10dp"
android:gravity="center">
<TextView
android:text="性别:"
android:textSize="20sp"
android:textColor="@color/black"
android:drawableStart="@drawable/baseline_face_blue_900_24dp"
android:layout_weight="0.1"/>
<RadioGroup
android:orientation="horizontal"
android:layout_weight="0.9">
<RadioButton
android:id="@+id/rb_boy"
android:text="男"
android:textSize="20sp"
android:layout_marginEnd="20dp"
android:layout_width="wrap_content"
android:layout_height="wrap_content"/>
<RadioButton
android:id="@+id/rb_girl"
android:text="女"
android:textSize="20sp"
android:layout_width="wrap_content"
android:layout_height="wrap_content"/>
</RadioGroup>
</TableRow>
</TableLayout>
<View
android:id="@+id/view"
android:layout_width="0dp"
android:layout_height="match_parent"
android:layout_centerHorizontal="true"/>
<Button
android:id="@+id/bt_register"
android:text="确定"
android:layout_marginTop="450dp"
android:layout_marginEnd="40dp"
android:layout_toStartOf="@id/view"
android:layout_width="100dp"
android:layout_height="50dp"/>
<Button
android:id="@+id/bt_cancel"
android:text="取消"
android:layout_marginTop="450dp"
android:layout_marginStart="40dp"
android:layout_toEndOf="@id/view"
android:layout_width="100dp"
android:layout_height="50dp"/>
</RelativeLayout>
</LinearLayout>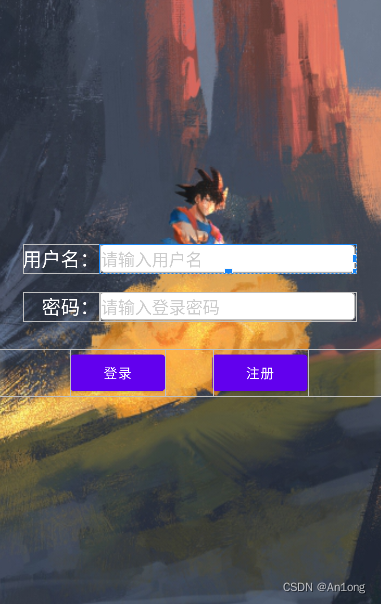 登录页
登录页  注册页
注册页
我们先来看注册过程,大致的内容就是
我们点击确定按钮时就触发事件,创建一个字符串数组用于存放以上信息,当每条信息不为空时,插入到client表中,首先我们需要user类
package com.example.androidapp.entity;

import java.io.Serializable;

//User类,含有用户名和密码。在bundle数据包中要放入自定义数据类型,需要实现序列化接口
public class User implements Serializable {
    private String login;
    private String pass;

    public User(){

    }

    public User(String login, String pass) {
        this.login = login;
        this.pass = pass;
    }

    public String getLogin() {
        return login;
    }

    public void setLogin(String login) {
        this.login = login;
    }

    public String getPass() {
        return pass;
    }

    public void setPass(String pass) {
        this.pass = pass;
    }
}
当我们注册完之后,信息就存在bundle数据包中,数据包再存入intent意图中,在登陆界面中就根据数据包中的键值对来获取信息直接添加到输入栏中
package com.example.androidapp;

import android.app.Activity;
import android.content.Intent;
import android.database.Cursor;
import android.database.sqlite.SQLiteDatabase;
import android.os.Bundle;
import android.util.Log;
import android.view.View;
import android.widget.EditText;
import android.widget.RadioButton;

import androidx.appcompat.app.AppCompatActivity;

import com.example.androidapp.entity.User;
import com.example.androidapp.database.ApplicationSqLite;

public class RegisterActivity extends AppCompatActivity {
    private SQLiteDatabase sqLiteDB;//数据库对象(包含操作数据库的方法)
    private Cursor cursor;//结果集对象(用作接收查询结果)

    @Override
    protected void onCreate(Bundle savedInstanceState) {
        super.onCreate(savedInstanceState);
        setContentView(R.layout.activity_register);

        //获取数据库对象
        sqLiteDB = ApplicationSqLite.getDB();

        this.findViewById(R.id.bt_register).setOnClickListener(new View.OnClickListener() {
            @Override
            public void onClick(View v) {
                String[] args = new String[6];
                //用户名
                EditText et_reg_admin = RegisterActivity.this.findViewById(R.id.et_reg_admin);
                args[0] = et_reg_admin.getText().toString();
                //密码
                EditText et_reg_pass = RegisterActivity.this.findViewById(R.id.et_reg_pass);
                args[1] = et_reg_pass.getText().toString();
                EditText et_reg_checkpass = RegisterActivity.this.findViewById(R.id.et_reg_checkpass);
                String checkpass = et_reg_checkpass.getText().toString();
                //年龄
                EditText et_reg_age = RegisterActivity.this.findViewById(R.id.et_reg_age);
                args[2] = et_reg_age.getText().toString();
                //性别
                RadioButton rb_boy = RegisterActivity.this.findViewById(R.id.rb_boy);
                RadioButton rb_girl = RegisterActivity.this.findViewById(R.id.rb_girl);
                Boolean noCheckSex = true;
                if (rb_boy.isChecked() || rb_girl.isChecked()) {
                    noCheckSex = false;
                    if (rb_boy.isChecked()) {
                        args[3] = "男";
                    } else {
                        args[3] = "女";
                    }
                }
                //电话
                EditText et_reg_tel = RegisterActivity.this.findViewById(R.id.et_reg_tel);
                args[4] = et_reg_tel.getText().toString();
                //地址
                EditText et_reg_address = RegisterActivity.this.findViewById(R.id.et_reg_address);
                args[5] = et_reg_address.getText().toString();

                if(args[0].isEmpty()||args[1].isEmpty()||args[2].isEmpty()||noCheckSex||
                        args[3].isEmpty()||args[4].isEmpty()||args[5].isEmpty()){
                    Log.e("MSG","信息填写不完整!");
                }
                else{
                    String qclient = "select * from client where admin=?";
                    cursor = sqLiteDB.rawQuery(qclient,new String[]{args[0]});
                    if(cursor.getCount()!=0){
                        Log.e("MSG", "用户名已存在!");
                        et_reg_admin.setText("");
                    }
                    else{
                        if(!args[1].equals(checkpass)){
                            Log.e("MSG","密码不一致!");
                            et_reg_checkpass.setText("");
                        }
                        else{
                            //把注册信息插入到client表中
                            String iclient = "insert into client values(null,?,?,?,?,?,?)";
                            sqLiteDB.execSQL(iclient,args);
                            //封装数据,将注册的用户名和密码传给登录界面
                            User user = new User(args[0], args[1]);
                            Bundle bundle = new Bundle();
                            bundle.putSerializable("user", user);
                            Intent intent = getIntent();
                            intent.putExtra("user", user);
                            setResult(Activity.RESULT_OK, intent);
                            finish();
                        }
                    }
                }
            }
        });

        //取消按钮
        this.findViewById(R.id.bt_cancel).setOnClickListener(new View.OnClickListener() {
            @Override
            public void onClick(View view) {
                setResult(Activity.RESULT_CANCELED);
                finish();
            }
        });
    }
}
之后还当我们点击登录按钮就根据数据库中的信息判断是否存在,存在就跳转主活动界面
package com.example.androidapp;

import android.app.Activity;
import android.content.Intent;
import android.database.Cursor;
import android.database.sqlite.SQLiteDatabase;
import android.os.Bundle;
import android.util.Log;
import android.view.View;
import android.widget.EditText;

import androidx.activity.result.ActivityResult;
import androidx.activity.result.ActivityResultCallback;
import androidx.activity.result.ActivityResultLauncher;
import androidx.activity.result.contract.ActivityResultContracts;
import androidx.appcompat.app.AppCompatActivity;

import com.example.androidapp.entity.User;
import com.example.androidapp.database.ApplicationSqLite;

public class LoginActivity extends AppCompatActivity {
    private SQLiteDatabase sqLiteDB;//数据库对象(包含操作数据库的方法)
    private Cursor cursor;//结果集对象(用作接收查询结果)

    @Override
    protected void onCreate(Bundle savedInstanceState) {
        super.onCreate(savedInstanceState);
        setContentView(R.layout.activity_login);

        //获取数据库对象
        sqLiteDB = ApplicationSqLite.getDB();

        //登录按钮
        this.findViewById(R.id.bt_login).setOnClickListener(new View.OnClickListener() {
            @Override
            public void onClick(View v) {
                //获取输入的用户名、密码
                EditText et_admin = LoginActivity.this.findViewById(R.id.et_log_admin);
                EditText et_password = LoginActivity.this.findViewById(R.id.et_log_pass);
                //转换为字符串
                String admin = et_admin.getText().toString();
                String password = et_password.getText().toString();
                if(admin.isEmpty()||password.isEmpty()){
                    Log.e("MSG","用户名或密码为空!");
                }
                else{
                    String qclient = "select * from client where admin=? and pass=?";
                    cursor = sqLiteDB.rawQuery(qclient,new String[]{admin,password});
                    //若用户名和密码在数据库中存在,
                    if(cursor.getCount()!=0){
                        //则跳转到主活动界面
                        Intent intent = new Intent(LoginActivity.this,MainActivity.class);
                        startActivity(intent);
                        //结束活动
                        finish();
                    }
                    else{
                        Log.e("MSG","用户名或密码错误!");
                    }
                }
            }
        });

        //数据传输
        ActivityResultLauncher<Intent> launcher = this.registerForActivityResult(
                new ActivityResultContracts.StartActivityForResult(), new ActivityResultCallback<ActivityResult>() {
                    @Override
                    public void onActivityResult(ActivityResult result) {
                        //若返回数据为有效数据,
                        if (result.getResultCode() == Activity.RESULT_OK) {
                            //则获取数据
                            Intent intent = result.getData();
                            //取出Intent中所携带的数据包,即bundle
                            Bundle bundle = intent.getBundleExtra("user");
                            //bundle使用key-value来存储数据
                            User user = (User)bundle.getSerializable("user");
                            //设置数据,即设置登陆界面输入框里的用户名和密码
                            EditText et_admin = LoginActivity.this.findViewById(R.id.et_log_admin);
                            EditText et_password = LoginActivity.this.findViewById(R.id.et_log_pass);
                            et_admin.setText(user.getLogin());
                            et_password.setText(user.getPass());
                        }
                    }
                });

        //注册按钮
        this.findViewById(R.id.bt_register).setOnClickListener(new View.OnClickListener() {
            @Override
            public void onClick(View v) {
                //携带数据,Activity之间数据交换使用Intent来完成
                Intent intent = new Intent(LoginActivity.this,RegisterActivity.class);
                launcher.launch(intent);
            }
        });
    }
}


 1万+
1万+


 被折叠的 条评论
为什么被折叠?
被折叠的 条评论
为什么被折叠?
 到【灌水乐园】发言


