


Mybatis
maven依赖:
<!-- https://mvnrepository.com/artifact/org.mybatis/mybatis -->
<dependency>
    <groupId>org.mybatis</groupId>
    <artifactId>mybatis</artifactId>
    <version>3.5.2</version>
</dependency>
实现工具类
package com.hu.utils;

import org.apache.ibatis.io.Resources;
import org.apache.ibatis.session.SqlSession;
import org.apache.ibatis.session.SqlSessionFactory;
import org.apache.ibatis.session.SqlSessionFactoryBuilder;

import java.io.IOException;
import java.io.InputStream;

//SqlSessionFactory --->sqlSession
public class MybatisUtils {
    private  static SqlSessionFactory sqlSessionFactory;
    static {
        try {
            //使用mybatis的第一步
            String resource = "mybatis-config.xml";
            InputStream inputStream =Resources.getResourceAsStream(resource);;
            sqlSessionFactory = new SqlSessionFactoryBuilder().build(inputStream);
        } catch (IOException e) {
            e.printStackTrace();
        }
    }
    //既然有了 SqlSessionFactory,顾名思义,我们可以从中获得 SqlSession 的实例。
    // SqlSession 提供了在数据库执行 SQL 命令所需的所有方法。你可以通过 SqlSession 实例来直接执行已映射的 SQL 语句。
    public static SqlSession getSqlSession(){
        return sqlSessionFactory.openSession();
    }
}
配置文件
<?xml version="1.0" encoding="UTF-8" ?>
<!DOCTYPE configuration
        PUBLIC "-//mybatis.org//DTD Config 3.0//EN"
        "http://mybatis.org/dtd/mybatis-3-config.dtd">
<!--mybatis-config文件配置-->
<configuration>
<!--引入外部配置文件-->
    <properties resource="db.properties"/>
<settings>
<!--标准的日志工厂实现-->
<!--    <setting name="logImpl" value="STDOUT_LOGGING"/>-->
    <setting name="logImpl" value="LOG4J"/>
</settings>


<!--实体类别名-->
    <typeAliases>
        <typeAlias type="com.hu.pojo.User" alias="user"/>
    </typeAliases>

    <environments default="development">
        <environment id="development">
            <transactionManager type="JDBC"/>
            <dataSource type="POOLED">
                <property name="driver" value="${driver}"/>
                <property name="url" value="${url}"/>
                <property name="username" value="${username}"/>
                <property name="password" value="${password}"/>
            </dataSource>
        </environment>
    </environments>
<!--每一个Mapper.xml都需要在Mybatis核心配置文件中注册!!!!!!-->
        <mappers>
    <!--        <mapper resource="com/hu/dao/UserMapper.xml"/>-->
            <mapper class="com.hu.dao.UserMapper"/>
        </mappers>
</configuration>
LOG4J
maven:
<!--LOG4J的包-->
<dependency>
    <groupId>log4j</groupId>
    <artifactId>log4j</artifactId>
    <version>1.2.17</version>
</dependency>
log4j.properties
#将等级为DEBUG的日志信息输出到console和file这两个目的地,console和file的定义在下面的代码
log4j.rootLogger=DEBUG,console,file

#控制台输出的相关设置
log4j.appender.console = org.apache.log4j.ConsoleAppender
log4j.appender.console.Target = System.out
log4j.appender.console.Threshold=DEBUG
log4j.appender.console.layout = org.apache.log4j.PatternLayout
log4j.appender.console.layout.ConversionPattern={%c}-%m%n

#文件输出的相关设置
log4j.appender.file = org.apache.log4j.RollingFileAppender
log4j.appender.file.File=./log/kuang.log
log4j.appender.file.MaxFileSize=10mb
log4j.appender.file.Threshold=DEBUG
log4j.appender.file.layout=org.apache.log4j.PatternLayout
log4j.appender.file.layout.ConversionPattern={%p}{%d{yy-MM-dd}}{%c}%m%n

#日志输出级别
log4j.logger.org.mybatis=DEBUG
log4j.logger.java.sql=DEBUG
log4j.logger.java.sql.Statement=DEBUG
log4j.logger.java.sql.ResultSet=DEBUG
log4j.logger.java.sql.PreparedStatement=DEBUG
Spring IOC容器配置(Bean)
<?xml version="1.0" encoding="UTF-8"?>
<beans xmlns="http://www.springframework.org/schema/beans"
       xmlns:xsi="http://www.w3.org/2001/XMLSchema-instance"
       xsi:schemaLocation="http://www.springframework.org/schema/beans
        http://www.springframework.org/schema/beans/spring-beans.xsd">
<!--使用Spring来创建对象,在Spring这些都称为Bean
    类型 变量名 = new 类型()
    Hello hello = new Hello();

    id = 变量名
    class = 要new的对象
    property 相当于给对象中的一个属性赋值
    bean = 对象  new Hello();

-->
    <bean id="hello" class="com.hu.pojo.Hello">
        <property name="str" value="Spring"/>
     </bean>
</beans>
- (1)
id属性是标识单个 bean 定义的字符串。 - (2)
class属性定义 bean 的类型并使用完全限定的类名。
id属性的值是指协作对象。在此示例中未显示用于引用协作对象的 XML。有关更多信息,请参见Dependencies。
Spring注解开发配置
<?xml version="1.0" encoding="UTF-8"?>
<beans xmlns="http://www.springframework.org/schema/beans"
    xmlns:xsi="http://www.w3.org/2001/XMLSchema-instance"
    xmlns:context="http://www.springframework.org/schema/context"
    xsi:schemaLocation="http://www.springframework.org/schema/beans
        http://www.springframework.org/schema/beans/spring-beans.xsd
        http://www.springframework.org/schema/context
        http://www.springframework.org/schema/context/spring-context.xsd">

    <context:annotation-config/>

</beans>
常用依赖
<!-- https://mvnrepository.com/artifact/org.springframework/spring-webmvc -->
Spring
<dependency>
            <groupId>org.springframework</groupId>
            <artifactId>spring-webmvc</artifactId>
            <version>5.2.0.RELEASE</version>
        </dependency>
测试类
        <dependency>
            <groupId>junit</groupId>
            <artifactId>junit</artifactId>
            <version>4.12</version>
            <scope>test</scope>
         </dependency>
文件未生成解决代码(静态资源导入问题)
<!--  在build中配置resources,来防止我们资源导出失败的问题-->
    <build>
        <resources>
            <resource>
                <directory>src/main/resources</directory>
                <includes>
                    <include>**/*.properties</include>
                    <include>**/*.xml</include>
                </includes>
                <filtering>true</filtering>
            </resource>
            <resource>
                <directory>src/main/java</directory>
                <includes>
                    <include>**/*.properties</include>
                    <include>**/*.xml</include>
                </includes>
                <filtering>true</filtering>
            </resource>
        </resources>
    </build>
Spring事务配置
<?xml version="1.0" encoding="UTF-8"?>
<beans xmlns="http://www.springframework.org/schema/beans"
xmlns:xsi="http://www.w3.org/2001/XMLSchema-instance"
xmlns:tx="http://www.springframework.org/schema/tx"
xmlns:aop="http://www.springframework.org/schema/aop"
xsi:schemaLocation="http://www.springframework.org/schema/beans
http://www.springframework.org/schema/beans/spring-beans.xsd
http://www.springframework.org/schema/tx
http://www.springframework.org/schema/tx/spring-tx.xsd
http://www.springframework.org/schema/aop
http://www.springframework.org/schema/aop/spring-aop.xsd">
<!--DataSource:使用Spring的数据源替换Mybatis的配置:c3p0 dbcp druid
这里我们使用Spring提供的JDBC:org.springframework.jdbc.datasource
-->
<bean id="dataSource" class="org.springframework.jdbc.datasource.DriverManagerDataSource">
<property name="driverClassName" value="com.mysql.jdbc.Driver"/>
<property name="url" value="jdbc:mysql://localhost:3306/mybatis?useSSL=true&userUnicode=true&characterEncoding=UTF-8"/>
<property name="username" value="root"/>
<property name="password" value="123456"/>
</bean>
<!--sqlSessionFactory-->
<bean id="sqlSessionFactory" class="org.mybatis.spring.SqlSessionFactoryBean">
<property name="dataSource" ref="dataSource" />
<!--绑定Mybatis配置文件-->
<property name="configLocation" value="classpath:mybatis.xml"/>
<property name="mapperLocations" value="classpath:com/hu/mapper/UserMapper.xml"/>
</bean>
<!--SqlSessionTemplate:就是我们使用的sqlSession-->
<bean id="sqlSession" class="org.mybatis.spring.SqlSessionTemplate">
<!--没有Set方法 只能通过构造器注入-->
<constructor-arg index="0" ref="sqlSessionFactory"/>
</bean>
<!--开启事务配置-->
<bean id="transactionManager" class="org.springframework.jdbc.datasource.DataSourceTransactionManager">
<constructor-arg ref="dataSource" />
</bean>
<!--结合AOP经行事务的织入-->
<!--配置事务通知:spring已经做好了-->
<tx:advice id="txAdvice" transaction-manager="transactionManager">
<!--给那些方法配置事务-->
<tx:attributes>
<tx:method name="*" propagation="REQUIRED"/>
</tx:attributes>
</tx:advice>
<aop:config>
<aop:pointcut id="txPointCut" expression="execution(* com.hu.mapper.*.*(..))"/>
<aop:advisor advice-ref="txAdvice" pointcut-ref="txPointCut"/>
</aop:config>
</beans>
SpringMVC配置文件
<?xml version="1.0" encoding="UTF-8"?>
<beans xmlns="http://www.springframework.org/schema/beans"
       xmlns:xsi="http://www.w3.org/2001/XMLSchema-instance"
       xmlns:context="http://www.springframework.org/schema/context"
       xmlns:mvc="http://www.springframework.org/schema/mvc"
       xsi:schemaLocation="http://www.springframework.org/schema/beans
       http://www.springframework.org/schema/beans/spring-beans.xsd
       http://www.springframework.org/schema/context
       https://www.springframework.org/schema/context/spring-context.xsd
       http://www.springframework.org/schema/mvc
       https://www.springframework.org/schema/mvc/spring-mvc.xsd">

    <!-- 自动扫描包,让指定包下的注解生效,由IOC容器统一管理 -->
    <context:component-scan base-package="com.hu.controller"/>
    <!-- 让Spring MVC不处理静态资源 -->
    <mvc:default-servlet-handler />
    <!--
    支持mvc注解驱动
        在spring中一般采用@RequestMapping注解来完成映射关系
        要想使@RequestMapping注解生效
        必须向上下文中注册DefaultAnnotationHandlerMapping
        和一个AnnotationMethodHandlerAdapter实例
        这两个实例分别在类级别和方法级别处理。
        而annotation-driven配置帮助我们自动完成上述两个实例的注入。
     -->
    <mvc:annotation-driven />
    <!-- 视图解析器 -->
    <bean class="org.springframework.web.servlet.view.InternalResourceViewResolver"
          id="internalResourceViewResolver">
        <!-- 前缀 -->
        <property name="prefix" value="/WEB-INF/jsp/" />
        <!-- 后缀 -->
        <property name="suffix" value=".jsp" />
    </bean>

</beans>
项目乱码问题解决
修改了xml文件需要重启服务器!
<filter>
   <filter-name>encoding</filter-name>
   <filter-class>org.springframework.web.filter.CharacterEncodingFilter</filter-class>
   <init-param>
       <param-name>encoding</param-name>
       <param-value>utf-8</param-value>
   </init-param>
</filter>

<filter-mapping>
   <filter-name>encoding</filter-name>
   <url-pattern>/*</url-pattern>
</filter-mapping>

1234567891011121314
注意:这里写/*,写/的话过滤不了jsp页面,不能解决乱码
但是我们发现 , 有些极端情况下.这个过滤器对get的支持不好 .
处理方法 :
-
修改tomcat配置文件 :设置编码!
<Connector URIEncoding="utf-8" port="8080" protocol="HTTP/1.1" connectionTimeout="20000" redirectPort="8443" /> 1234 -
自定义过滤器(万能解决)
package com.kuang.filter;

import javax.servlet.*;
import javax.servlet.http.HttpServletRequest;
import javax.servlet.http.HttpServletRequestWrapper;
import javax.servlet.http.HttpServletResponse;
import java.io.IOException;
import java.io.UnsupportedEncodingException;
import java.util.Map;

/**
* 解决get和post请求 全部乱码的过滤器
*/
public class GenericEncodingFilter implements Filter {

   @Override
   public void destroy() {
  }

   @Override
   public void doFilter(ServletRequest request, ServletResponse response, FilterChain chain) throws IOException, ServletException {
       //处理response的字符编码
       HttpServletResponse myResponse=(HttpServletResponse) response;
       myResponse.setContentType("text/html;charset=UTF-8");

       // 转型为与协议相关对象
       HttpServletRequest httpServletRequest = (HttpServletRequest) request;
       // 对request包装增强
       HttpServletRequest myrequest = new MyRequest(httpServletRequest);
       chain.doFilter(myrequest, response);
  }

   @Override
   public void init(FilterConfig filterConfig) throws ServletException {
  }

}

//自定义request对象,HttpServletRequest的包装类
class MyRequest extends HttpServletRequestWrapper {

   private HttpServletRequest request;
   //是否编码的标记
   private boolean hasEncode;
   //定义一个可以传入HttpServletRequest对象的构造函数,以便对其进行装饰
   public MyRequest(HttpServletRequest request) {
       super(request);// super必须写
       this.request = request;
  }

   // 对需要增强方法 进行覆盖
   @Override
   public Map getParameterMap() {
       // 先获得请求方式
       String method = request.getMethod();
       if (method.equalsIgnoreCase("post")) {
           // post请求
           try {
               // 处理post乱码
               request.setCharacterEncoding("utf-8");
               return request.getParameterMap();
          } catch (UnsupportedEncodingException e) {
               e.printStackTrace();
          }
      } else if (method.equalsIgnoreCase("get")) {
           // get请求
           Map<String, String[]> parameterMap = request.getParameterMap();
           if (!hasEncode) { // 确保get手动编码逻辑只运行一次
               for (String parameterName : parameterMap.keySet()) {
                   String[] values = parameterMap.get(parameterName);
                   if (values != null) {
                       for (int i = 0; i < values.length; i++) {
                           try {
                               // 处理get乱码
                               values[i] = new String(values[i]
                                      .getBytes("ISO-8859-1"), "utf-8");
                          } catch (UnsupportedEncodingException e) {
                               e.printStackTrace();
                          }
                      }
                  }
              }
               hasEncode = true;
          }
           return parameterMap;
      }
       return super.getParameterMap();
  }

   //取一个值
   @Override
   public String getParameter(String name) {
       Map<String, String[]> parameterMap = getParameterMap();
       String[] values = parameterMap.get(name);
       if (values == null) {
           return null;
      }
       return values[0]; // 取回参数的第一个值
  }

   //取所有值
   @Override
   public String[] getParameterValues(String name) {
       Map<String, String[]> parameterMap = getParameterMap();
       String[] values = parameterMap.get(name);
       return values;
  }
}

123456789101112131415161718192021222324252627282930313233343536373839404142434445464748495051525354555657585960616263646566676869707172737475767778798081828384858687888990919293949596979899100101102103104105106107108109
一般情况下,SpringMVC默认的乱码处理就已经能够很好的解决了!
然后在web.xml中配置这个过滤器即可!
乱码问题,需要平时多注意,在尽可能能设置编码的地方,都设置为统一编码 UTF-8!
使用Json乱码问题解决
<mvc:annotation-driven>
   <mvc:message-converters register-defaults="true">
       <bean class="org.springframework.http.converter.StringHttpMessageConverter">
           <constructor-arg value="UTF-8"/>
       </bean>
       <bean class="org.springframework.http.converter.json.MappingJackson2HttpMessageConverter">
           <property name="objectMapper">
               <bean class="org.springframework.http.converter.json.Jackson2ObjectMapperFactoryBean">
                   <property name="failOnEmptyBeans" value="false"/>
               </bean>
           </property>
       </bean>
   </mvc:message-converters>
</mvc:annotation-driven>
控制台乱码
1.idea设置File Encodings
File -> Settings -> File Encodings下设置编码格式为UTF-8,此种最常见,一般刚装idea或者刚导入项目的时候会遇到此处编码格式未修改的情况。

File -> Settings -> File Encodings
2.修改idea.exe.vmoption
打开idea安装路径bin目录,找到idea.exe.vmoptions与idea64.exe.vmoptions两个文件
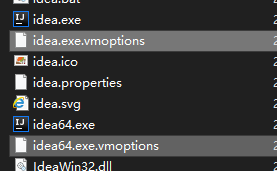
image.png
在两个文件的末尾添加一行-Dfile.encoding=UTF-8
[外链图片转存失败,源站可能有防盗链机制,建议将图片保存下来直接上传(img-RVpSd2xo-1628574309940)(https:upload-images.jianshu.io/upload_images/23562935-3b3b58b1f556b69c.png?imageMogr2/auto-orient/strip|imageView2/2/w/426/format/webp)]
image.png
保存后需重启idea。
注意:自作主张去idea的help->Edit Custom VM Options里修改是无效的
3.去项目启动配置中查看是否设置了容器的编码格式
Run->Edit Configration
无论你是直接运行main方法,还是SpringBoot项目的启动方法,还是tomcat,都有一个配置为
VM options,将此配置主动配置为-Dfile.encoding=utf-8,配好重启项目即可。
[外链图片转存失败,源站可能有防盗链机制,建议将图片保存下来直接上传(img-AgM0KPWO-1628574309941)(https:upload-images.jianshu.io/upload_images/23562935-a61a0207d7ee61b4.png?imageMogr2/auto-orient/strip|imageView2/2/w/805/format/webp)]
tomcat

SpringBoot

2.修改idea.exe.vmoption
打开idea安装路径bin目录,找到idea.exe.vmoptions与idea64.exe.vmoptions两个文件
[外链图片转存中…(img-32dWK2FQ-1628574309939)]
image.png
在两个文件的末尾添加一行-Dfile.encoding=UTF-8
[外链图片转存中…(img-RVpSd2xo-1628574309940)]
image.png
保存后需重启idea。
注意:自作主张去idea的help->Edit Custom VM Options里修改是无效的
3.去项目启动配置中查看是否设置了容器的编码格式
Run->Edit Configration
无论你是直接运行main方法,还是SpringBoot项目的启动方法,还是tomcat,都有一个配置为
VM options,将此配置主动配置为-Dfile.encoding=utf-8,配好重启项目即可。
[外链图片转存中…(img-AgM0KPWO-1628574309941)]
tomcat
[外链图片转存中…(img-dXbWEEie-1628574309942)]
SpringBoot
[外链图片转存中…(img-51dgRLOY-1628574309943)]


 被折叠的 条评论
为什么被折叠?
被折叠的 条评论
为什么被折叠?
 到【灌水乐园】发言


